First Steps. My journey back into model making
I have recently started making model aircraft again for the first time since my childhood.
I thought some people might be interested to read kit reviews and builds from a nearly total newbies point of view, with all the challenges and problems that seem so insoluble when you are starting out, so I do hope you enjoy.
If anyone has any tips, pointers or solutions to any of the problems I encounter on my journey then please feel free to leave them in the comments. I am sure they will prove valuable to both myself and any other “noobs” who read this!
First steps…
In December last year my wife and I saw some Airfix 1/72nd scale starter kits for sale at our local Aldi. There was not a massive choice with only the ME109 E4, The Tomahawk BII, Focke Wulf 190 A8 and Red Arrows Hawk.
We bought the Me109, Fw 190 and Tomahawk as potential presents for Christmas with my two sons receiving one each and myself bagging the third.
I sat down with my sons to help them make their two kits, the FW190 and Tomahawk and was reminded how much I enjoyed making similar kits when I was a youngster myself. I tried to remember all the mistakes I made as a kid and teach the boys how to do things properly by painting as much as possible before removing parts from sprue, dry fitting and sanding parts etc.
I will confess to putting the finishing touches to the models for the boys and adding the decals.
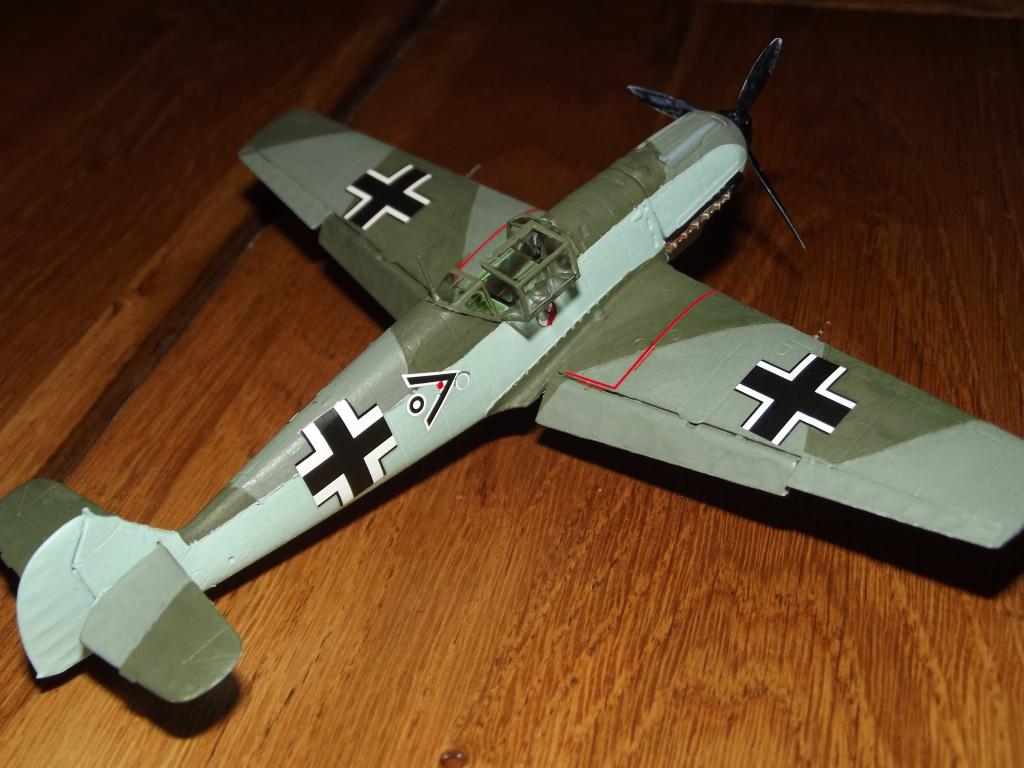
They came out quite well, although I must confess that both myself and the boys were a little heavy handed with the paint… Thus I was fired up with enthusiasm for the ME109.
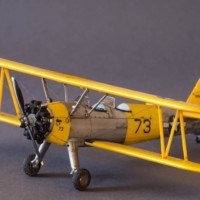
This kit became a little bit of a challenge for me. I wanted to make the model to a better standard than the ones I used to make as a child. I have more tools, better hand co-ordination and a lot more patience than back then so hopefully this would not prove too difficult.
I followed the instructions for the first stage, using super glue to assemble the cockpit without any issues. I used a metallic light green paint pen to colour the bulkheads and sides of the cockpit, painting the seat black. I added the decals provided to the bulkhead to represent the control panel and coloured the fine markings on the inside of the fuselage to represent wiring etc.
Sadly at this point the first disaster of the build struck. Whilst endeavouring to remove the joystick from the sprue it snapped in half and when I tried to glue the two halves together things got kind of messy. I replaced the joystick with a small section of copper cable core. This was cut to fit and I decided its natural copper colour made it a quite handsome replacement although it does lack some slight details.
I used Polystyrene cement to fit the cockpit to one side of the fuselage section then painted the components of the propeller and its boss, using metallic light green to paint the central hub of the propeller section and the inside of the boss. The outside was painted matt black as were the propeller blades.
I have fond that one of the best ways to apply both superglue and poly cement is using the plastic stem of a cotton bud, cut diagonally. The hollow centre acts as a reservoir for the glue. In areas where I need to apply delicate amounts I cut the centre of the diagonal to allow it to act like a pen nib.
Using the plastic stem I applied a coating of poly cement to the edges of both sides of the fuselage and the exposed edge of the cockpit. I have found that giving both edges a thin coat of adhesive gives better results than giving one edge a thick coat of glue. I then placed the propeller assembly in place and joined both sides together.
Using my fingers I applied even pressure along the length of the fuselage to ensure that the cement bonded along all coated edges. There are various clamps and clips you can buy that are designed to hold models together whilst poly cement dries but alas I don't own any yet. Once the glue was dry I gently sanded with 1500grit sandpaper along the seams to remove any excess glue.
Whilst the fuselage was drying I started painting the wings. I did this before joining the top sections to the bottom section but this can be done as easily once they are connected. Sadly I do not yet own an airbrush so am still using paints and brushes. When painting anything I find it best to start with the colour that covers the largest area as the base coat and anything else added on top so gave the wings a base coat of grey and the undersides their first coat of Sky Blue.
As with the kits the boys built I used the paints supplied. In my eagerness to get started I forgot all about thinning acrylic paints which resulted in rather thicker coats of paint than I would have preferred. A beginner's mistake and one that I have learnt from. I will cover paints and thinning them in another post.
On the fuselage I started with the paint that covered the largest area fuselage first, in this case Sky Blue. I then hit my first problem. How to get a straight line on the fuselage between the light blue undersurfaces and sides and the green and grey splinter camouflage on the top of the fuselage?
Masking tape seemed to be the best solution but domestic masking tape was too strong and when I tried to remove it the paintwork it was protecting came away too. I also tried specialist modelling masking tape and decorators low tack tape with much the same results.
I tried various different methods of masking straight lines on the sides of 1/72nd models and have found that cigarette papers can give very good results with the sticky part of post it notes also giving very good straight line masking. The post it notes will need cutting with a craft knife and a metal straight edge for this, and cigarette papers need to be soaked off with warm water to avoid damaging the paintwork underneath.
On this kit I used cigarette papers to mask any straight lines required on the fuselage and the wings. Where the camouflage curved down over the nose of the airframe I carefully cut a curve into the adhesive part of the cigarette paper with a craft knife.
To ensure both sides were matched I cut both papers at the same time with them lined up one above the other.
Once I had applied the masking paper the first thing I needed to do was apply a thin coat of the colour being protected, making sure that this covered the masked edge. This helps seal the masked area off and ensures that if there is any seepage under the masking paper/tape it matches the protected finish.
Once this was dry I applied a base coat of the grey paint supplied with the kit, above the masking tape, ensuring that there was equal coverage across the edges of the masking paper.
The second disaster struck when I was removing the two 20mm wing mounted cannon barrels from the sprue. Sadly one of them snapped as I separated it from the moulding tag, the freed half pinging across the kitchen and skittering forever out of sight with a sad little rattling noise.
Undeterred I reached for the same coil of wire that had supplied the replacement joystick and having measured against the remaining undamaged cannon barrel, cut two short lengths off to replace both barrels. I now know that replacement cast metal gun barrels etc are available on Ebay but to he honest I don't think I could have waited for them to arrive. This was, after all, the first kit of my own…
I masked the upper surface of the wings and again blocked off the edges of the cigarette papers with the base colour grey. I also masked off and blocked the top section of the fuselage to allow me to get all the dark green painting out of the way in one hit, leaving the original masking paper along the demarcation line in place. Once the blocking was dry I filled the areas on both wings and fuselage with dark green.
Once the paint was dry I placed the wings and fuselage into a bowl of warm water for about 30 minutes to allow the adhesive on the cigarette papers to loosen, then using a #0 paintbrush, gently removed the papers exposing clean lines on the wings and fuselage. There was one tiny bit of seepage which I touched in with an ultra fine paintbrush.
I then attached the tops of the wings to the bottom section and inserted the copper replacement cannon barrels. I used poly cement to attach these pieces. The flaps were also added at this stage. As this model was always intended as a display model I set the flaps to the extended position. I used a small amount of superglue on the end of the tabs to fix them in place.
I also coloured the engine compartment in at this stage. I did not try to reproduce the appearance of the correct engine, merely to hint at “engineness”, it is after all going to be covered by a cowling and thus invisible.
I painted and added the tailplanes, struts, cowling and undercarriage then joined the wings and fuselage together. I decided to leave any fragile external pieces until the very end to avoid unfortunate accidents such as breaking off the antenna or snapping the tailwheel etc.
Smaller parts such as the undercarriage legs and the tail struts were fixed using superglue. The wings and fuselage etc were bonded with poly cement and any gaps requiring filler were treated with PVA glue, the really thick stuff.
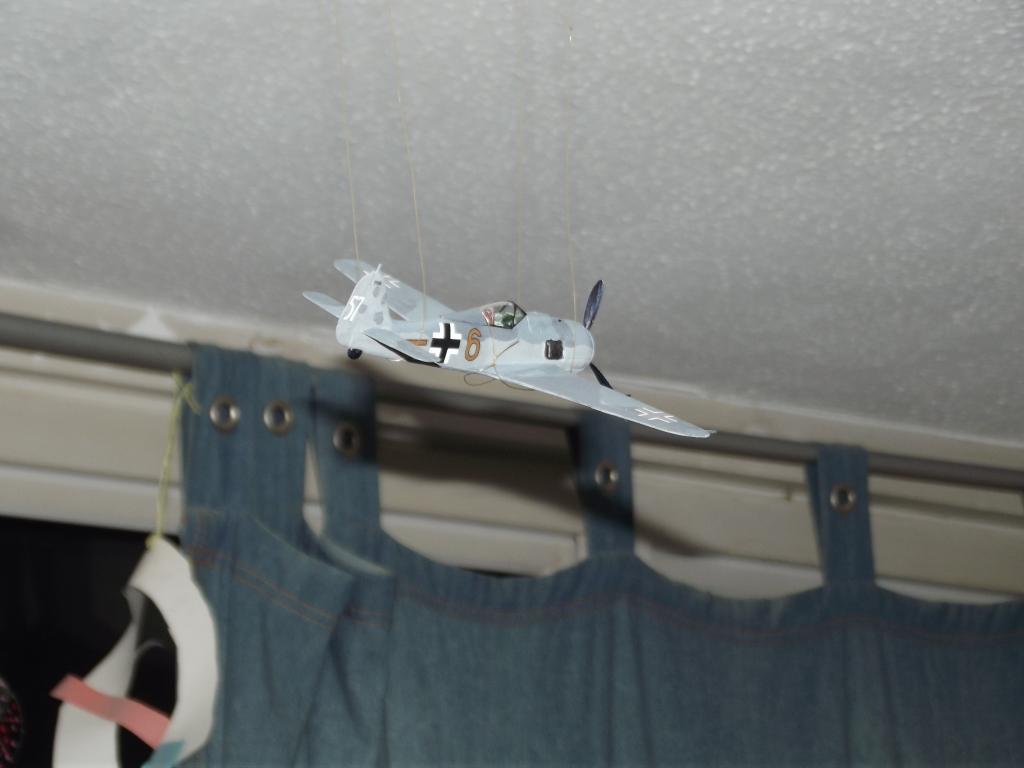
The next step was the one I used to dread as a child and was not particularly looking forward to attempting. Painting the canopy!
The canopy supplied comes in three parts allowing you to have the cockpit open or closed. The canopy is well formed with well defined lines marking the framework.
Sadly at this point yet another minor calamity struck. Whilst removing the front section of the canopy a perfectly circular section of the centre part of the windshield broke off. The shape is so perfect it may well have been a moulding fault. I considered trying to repair it in some way but eventually realised I would only make matters worse so decided to carry on and paint the framework.
I am aware that companies such as Eduard produce very good canopy masks but I was not aware of such things when building this kit and to be honest my model making budget is not large! I used my crocodile clip/magnifying glass gadget thingy to help when painting the canopy framework and it came out ok. I used a fine brush to apply the acrylic and once dry, the back of a Stanley knife to remove any overapplication from the areas to remain transparent. This sort of worked but did leave some scratches so I will have to work out a better way to get overspill off. As this is the first kit I have built in 30 years I was quite happy with it. From a distance it looks fine. I glued the canopy in place with small dabs of polystyrene cement and filled any gaps with PVA.
Once the canopy was in place it was time to apply the decals and then all the smaller more fragile details such as the aileron balances and radio aerial mast etc.
The decals were a delight to apply. I soaked each decal in warm water to remove them from the backing sheet. After 3 or 4 minutes I would use a paintbrush placed on the decal in the water to see if they were ready. The same paintbrush was used to accurately position the decals once they had left the backing paper.
The tailwheel, aileron balances, pitot tube etc were all painted prior to being affixed with superglue. Once that had dried I gave a final touch up of paint to any areas needing it and left it to dry.
Overall I am very happy with the way this model came out. It is the first model I have made in 30 years and it took me a little while to recall some of the tricks of the trade and the value of a good pair of tweezers.
I did not get the splinter cam quite perfect on this model but I am happy with the effect. Still I have learned lots of lessons for next time!
I have been pleasantly surprised by the improvements time has brought to this Airfix kit. When I was younger the Matchbox BF109E was always the better bet as the Airfix kit back then was had shocking build quality and did not always fit together very well.
Some of the fine parts seemed a little too fine and the manner in which some of them are attached to the sprue does defy logic but that aside a good fun budget kit with some great features such as the three part canopy and overall build quality.
Welcome Back!
Hello Nick welcome to iModeler.com, you have made a nice job for your first build in 30 years so well done,if you use this site regularly you will pick up a lot of useful information.
My first tips would be to buy a good quality pair of small scissors like dressmakers use to remove your parts don't snap anything of the sprue,next I would steer well clear of those ancient Airfix mouldings and when your looking at kits to buy think about the colour scheme and pick an easy one, something with one or two colours if possible ,oh and think about moving up to 1/48 scale as it is easier to see what your doing and in my humble oppinion is a much better scale, a very nice kit is the Revell "spirit of st louis" in 1/48 you will find one on E-Bay for not too much money.
Cheers N.
Nice build Nick. As Neil said we are a friendly bunch here.
A tip for cleaning up over-painting on canopies is to use a sharpened cocktail stick, it does not leave scratches.
Well done sir.
Actually, I find that sharpening a piece of clear sprue (from whence the canopy came from) to a chisel point is the best way to remove both acylic and enamel paint from clear parts. But hey, whatever works for you...
I never thought of that ,cheers S ,I always have trouble cleaning up clear parts ,I have used a cocktail stick cut like a chisel and then hardened with superglue but I will give this a go.
N.
Welcome back to modeling & this forum. As Simon said a cocktail stick, or as we say on this side of the pond: toothpick, is good for cleaning up canopies. The reason this works is because acrylic paints don't etch the plastic as do enamels & lacquers. I would suggest you clean your parts in soapy water before removing them from the trees & possible using a spray can primer before final colors. Another trick is to take your tape & stick it to the palm of your hand a few times before the model. Hope this helps.
All that said your efforts paid off with a pretty nice model.
Nick, nice job on the 109 and a very good article on your adventures returning to the hobby. Welcome back and welcome to iModeler.
Modeling (and its' associated "techniques") have taken tremendous strides since last you dabbled in the 'hobby'. The best advice I can give you in regard to "catching up", would be to ask specific questions as they arise throughout your assembly process. It appears it won't take you long to climb that ladder. Welcome to the forum and we hope to hear more from you in the weeks to come.
Build what you want, the way you want and above all HAVE FUN!
This group is not a bunch of New York Times "art critics", so feel free to ask a few questions concerning your model builds. I'm sure someone will offer an answer or suggestion. Welcome.
Welcome back to the most wonderful hobby I know of and welcome to the fold of the best scale modeling website. May I suggest you re- introduce yourself with 1/72 or 1/48 Monogram kits (quite a few have been re-boxed by Revell). These kits are readily available, inexpensive, easy to assemble, and have a good level of detail to them. Of course, before you go out a buy a bunch of kits, you should first acquire some basic modelling tools such as a sprue nipper (or small scissors as Neil suggested), an X acto knife with some No.11 blades, regular razor blades, hobby tape (Tamiya is the best kind), toothpicks (a must), some sanding sticks or emery boards, liquid glue (Testors in the black bottle), and some CA cement (I prefer Slow-Zap). I also suggest you frequent and join the various scale modeling websites, especially the ones with "In Progress" groups (you can learn a lot there). There are also many scale modeling videos on you tube. Above all, ask questions. As scale modeling is a solitary and often misunderstood hobby, most scale modelers love to help/share with someone of their own ilk. Happy plastic bashing.
Welcome back to modelling, and to Imodeler. I'm sure you'll find this website helpful, easy to use, and, above all, fun, just like your hobby should be!
Nick,
Your on the right track. Working with and encouraging your sons is the most valuable point. Not only are you coming back into modeling you may very well be bringing your sons along also. This hobby needs youth to keep it going. I go along with others to encourage you to move up to 1/48 and also to consider some of the early Monogram releases.
Just follow a few simple rules when you're building and everything will be honkey dorey! 1) Didn't like something or things on you last model? Pick one problem or something you didn't like about your last effort and try something different. 2) If anything goes terribly wrong, just tell your self "It's just a model." You can (usually) get another one and try again! 3) There is no "right" way to do anything. What works really well for someone might not be the easiest way for you, which brings me to...4) Don't be afraid to experiment! There's nothing you can do that will reverse the rotation of the Earth or otherwise end civilization as we know it! Refer to rule #2! (You might not want to experiment on any particularly rare model you might have!) 5) HAVE FUN! Model building, although sometimes frustrating should be something that you should enjoy doing, not something you have to dread coming home from work to! ("I have to work on that @$#%&* thing again!?") There are some kits that try peoples sanity. Just take those a bit at a time and work on something easier in between!
Welcome to the site and thank you for sharing modeling with your children. If we don't, the hobby just may disappear!