Wood effect – my way
Every now and then I come up with a modelling idea that includes some kind of simulated wood. What do I do? Bring out my oils, of course.
I like a bit of contrast like metal/wood or fabric/wood on my models. It doesn´t have to be much but it gives an understanding of how the machine was constructed and adds an organic touch to a mechanical thing.
Wood can be found in many places when it comes to machines. First generation airplanes, a number of vehicles and many ships usually have some amount of wood. A number of airplanes during WW 2 were partially or totally made of wood, like the Mosquito, as metals were wanted for more strategic use like engines or tanks.
Wood also gives that little visual extra to a model, just like rust, chipped paint or rain marks. It’s a visual thing but your hands knows what it’s like to touch and your ears knows what it sounds like if you tap it.
Wood can be solid, like a beam or a board, or sliced into a thin veneer, like plywood. So depending on actual use, your model should be showing what kind of wood it is and how it was cut. A mahogany red or oak yellow coloured Mosquito? Not likely, as it was largely made up of balsa wood covered in sheets of birch plywood. So check your references.
Now, let´s get on with the wood simulation. You will need this:
• Masking tape
• 2-3 brushes: a fine pointed, a medium size (an old worn one will be perfect) and perhaps a flat medium size for lager areas
• White spirit
• A rag
• Primer (like Tamiya Fine Surface Primer White)
• Base coat (like Vallejo Model Air Sand Yellow #28)
• Clear coat (like floor polish)
• Raw Umber & Burnt Sienna oil paints
• Something to stick your model on to as you do not want to touch it while working!
-
Make sure area to be treated is absolutely smooth. Any imperfection will show later on.
-
Primer, preferably white or light grey. Check primer for dust and sand off, primer must be blemish free. I use Tamiya´s Fine surface primer.
-
Airbrush a base coat. This is the coat that acts as a foundation to the wood tone you want to replicate. Use anything from a pale sand to a rich honey yellow brown depending on what kind of wood you want to simulate. I like to use Vallejo Model Air Sand & Sand Yellow. If you have a primer with a good colour you may use it as a base coat.
-
If you want, you may polish the base coat. This will make the oil paint to unstick slightly and enable you to control the paint a bit more. Some may want to gloss coat the surface for same effect. Try both ways to see if either method gives you any better result.
-
If you have well defined panel lines you may want to put some tape around the area to keep it nice and tidy. Use low tack tape like Tamiya´s yellow or similar tape. For narrow spaces or tightly curved fuselages it´s best to use a very narrow tape.
-
Bring out the oils! I use artist oils with a very fine pigment. Most of the time I use Burnt Sienna and Raw Umber. Find a mix of these two colours that suits your intentions and what kind of wood you aim to replicate. More of Sienna if you want to do a rich red mahogany. More of Umber if you want to have a less noble wood. Or use them singly but then you´ll get a somewhat bland result. If making a number of panels or pieces you may want to vary the mixture a bit to get different shades and keep the interest up for the observer of the model. Make sure you got enough paint for the whole area to be covered. You do not want to mix up a new batch halfway as the tone then will change over the area.
-
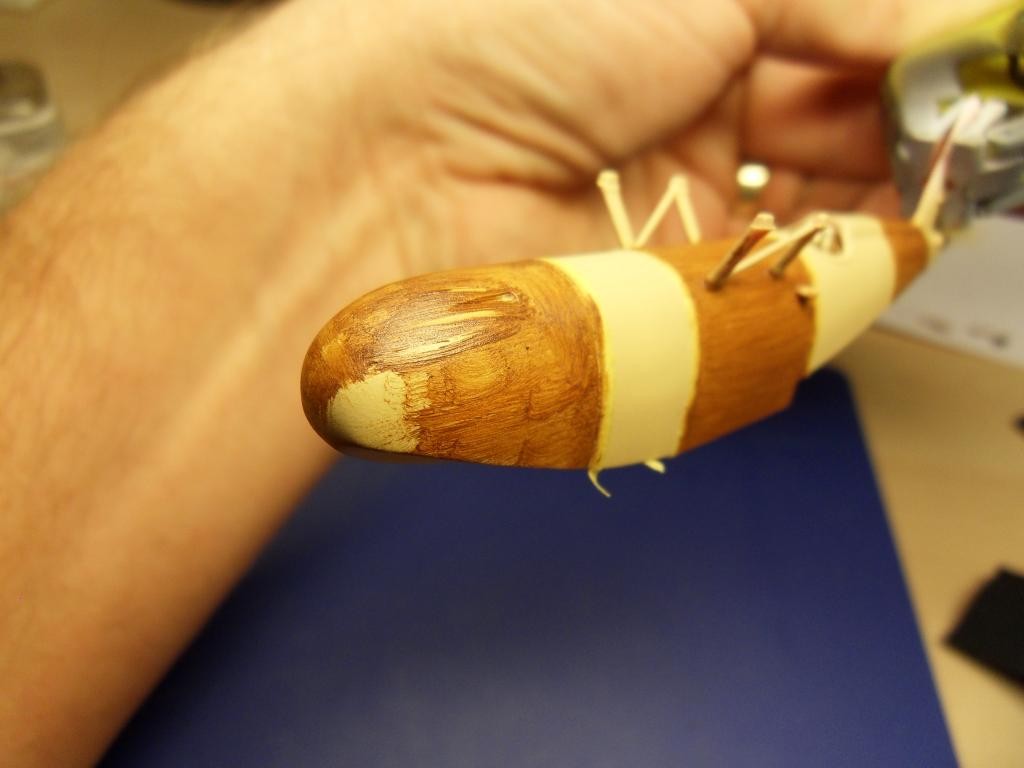
Now take a fine brush, like No. 4/0, start framing the area to be treated by brushing the paint along the tape or panel lines. The paint should get right along the tape, into panel lines and around details. If there are details sticking up from the fuselage (or whatever you are painting) make sure there is paint right up to them. If details are to be in other colour you can swipe off oil paint with a brush dipped in White spirit or simply paint over the oils.
-
Now add more of your oil paint to the rest of the panel section, use a medium sized flat brush. Paint should be a bit moist but not wet. Panel should now be completely covered in a very light coat of paint.
-
Now take a medium sized brush, round or flat depending on size of area you will work. Brush gently in the direction you want the grain to go. Make sure you don’t brush all the way to the tape, you will then build up too much paint against the edge. Now brush the other way. In the beginning you may need to wipe off excess paint from the brush after each stroke. Keep doing this till you have a very fine coat of paint that has a streaky grain pattern to it. Add more interest by make slightly wavy patterns. Again, check your references to get the right character to the kind of wood you want to replicate. Mahogany usually has a much finer and denser pattern than pine. The lighter the wood, the more oil paint you want to brush away. If so, use a stiffer brush to let more of the base colour to show.
-
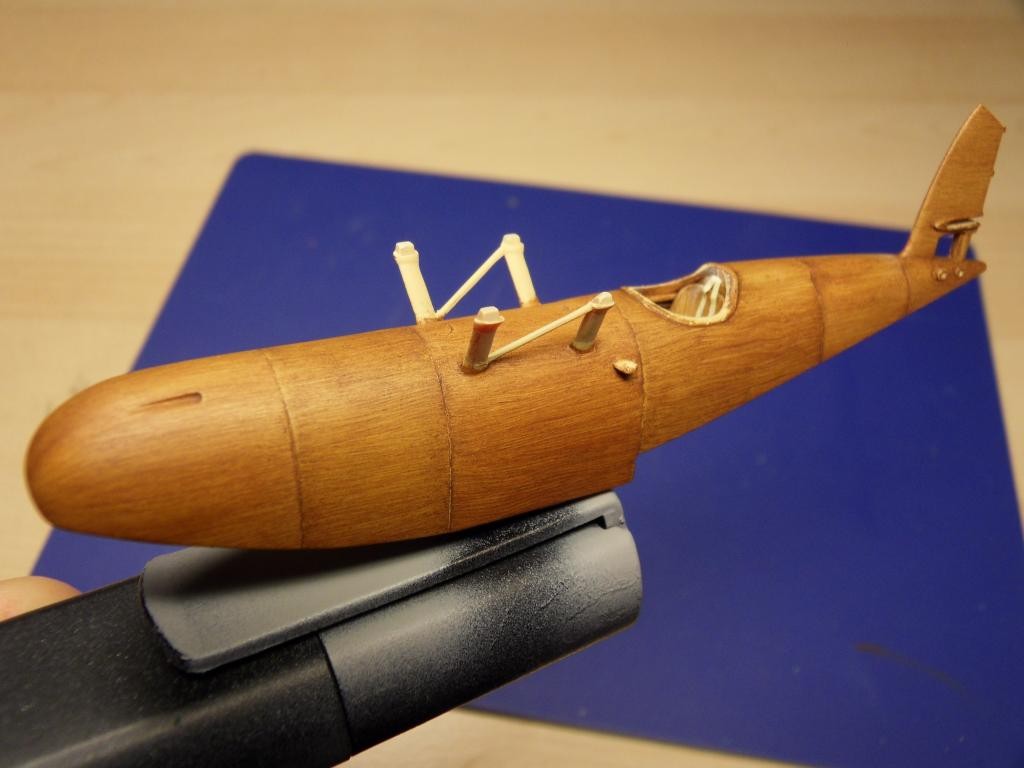
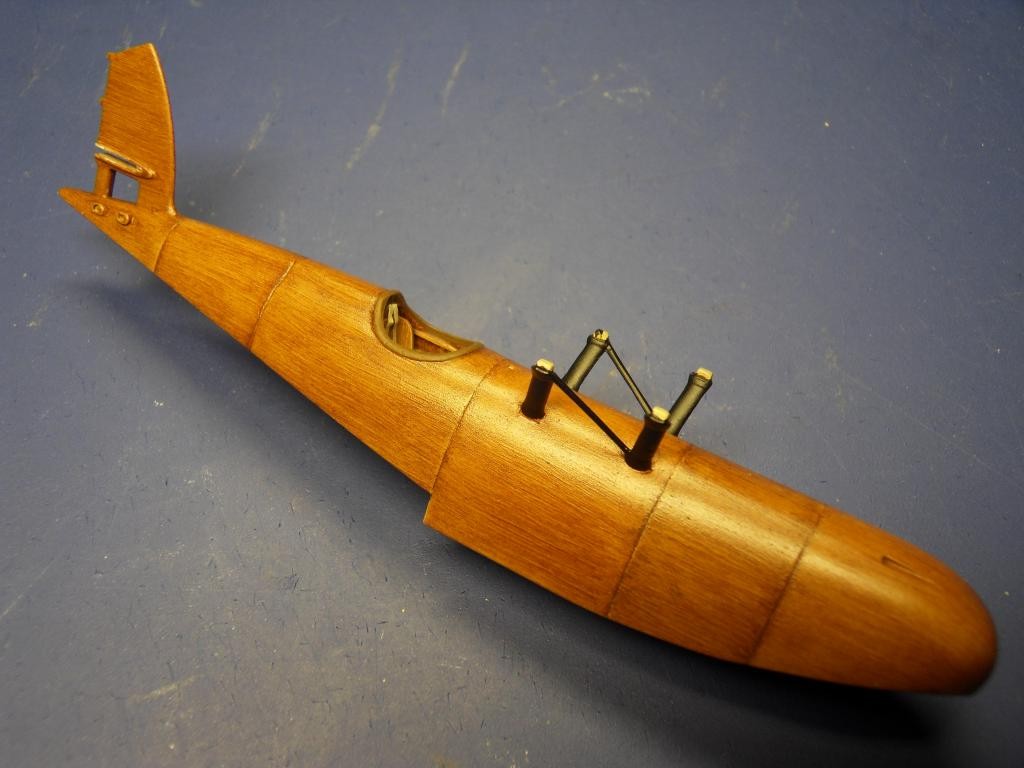
Let the paint dry a few days, preferably under cover to protect from dust and fingers. No touch now! Spray a protective coat of clear varnish to seal the surface when dry. After a number of thin coats the wood effect will really show. From a normal viewing distance it should be difficult to tell if it is wood or paint. When sealed you may add a wash into panel lines or so to increase the joint effect.
You are done!
A few other tricks:
Pre shade the panel lines on the base coat, or even on the primer before you airbrush the base coat. This would be a way to enhance the panel lines without actually filling in the joints with a wash, as this might be too strong an effect.
For a multi layered wooden propeller you may paint the base coat in stripes in different tones (like a light sand colour and a medium brown) and just add a single coat of oil paint to get the wood grain effect.
Some use a small sponge rather than a brush. On small areas this method might be a bit tricky.
To add depth, warmth and colour you may airbrush a transparent yellow colour over the simulated wood.
If you want to replicate branch marks, make a small dot in the paint with a fine point brush and then make the grain pattern curve around it. Look at photos and try yourself till you find something that works for you.
Remember to replicate the circular pattern on the end surfaces if you make boards. Just make a C with the brush and you´ve got it!
To vary the colour on a panel you can dot Sienna and Umbra and blend as you move the brush over the surface.
Good luck!


Very usefil guide indeed, Stellan. Thanks for sharing.
wonderful and your result looks fantastic
A tried and true method that allows leeway for applying individual touches to the grain. When I use oils I begin with the broad grain as well, but then add streaks of Venetian Red, Naples Yellow, and then a little Lamp Black adjacent to some of the grain colour to emphasise the variations.
Excellent tutorial...and a very convincing result. Thank you.
Really nice and thanks for this. One can achieve the wood effect without using oils. Preshade the panels, then apply the base "wood color" in Tamiya acrylic, then give it a coat of Metalizer sealer. Then apply a thinned Tamiya brown color, and apply as you suggested to get the "grain effect." When done, apply sealer over all of it. You won't have to wait for the oil paints to dry.
Nice work !
Like
Thanks for the very positive response, guys. As Rob mentions there are other colours to add if one want to increase the "interest factor" and also depending on what wood one is trying to replicate. Tom mentions a similar and maybe quicker way of doing this, but as the headline suggests, this is just my way. If spending so much time on a model, I don´t mind waiting a couple of days before the oils are dry. There are always other things to do while waiting. I´ll post some photos on my little plane in a few days when all small bits are added.
I too like the organic process of 'watching paint dry'.
Thanks, Stellan! Really nice wood effect!
Thank You Stellan for this article! Very good summary of this method - I use it after trying several methods and like it very much. "Tried and true" well said 🙂
🙂 ... Greetings ... 🙂 :
Thank you for the insight and tutorial, the finish is very well done and convincing .
Thanks again for feedback. For some it might be an old technique, but as said, it´s a tried and true one. By addressing old stuff in new words we might teach it to those who haven´t tried it before.
Nice info Stellan, looking forward to seeing the finished model.
Wonderful post - great tutorial! Also appreciate those who posted enhancements and alternatives all in the same thread here, so as to make this a great reference post.
Wonderful tutorial - and the additional comments, enhancements and alternatives make this a great reference post.
My pleasure. Tom. Model is taking small but decisive steps right now...
Excellent bit of advice, and wonderful tutorial.
Many thanks, Bryan. Hope it comes to good use for you.
Excellent tutorial, and thanks to all the additional comments for suggestions, modifications and alternatives. Makes this a great reference article!
Excellent tutorial, and all of the additional comments adding modifications and alternatives make this a great reference post. Thanks everyone!
Great tutorial, and all the additional comments and suggestions have made this an excellent reference post!
Love the wood effect, thanks for the tip!
Great effect thanks for sharing!
Great effect thanks!
That looks great!
Looks great!
For all of you who think Rob and I have nothing better to do than create multiple comments, we were "kicked into the spam folder" after the last site update, and all these comments were tests that Martin was asking us to post!
Yes, agree, all the above comments have been released in bulk today - a bit of extra comment love to the author 🙂
Ehhh...thanks guys, it´s too much, I´m all overwhelmed. Paying the editor for some extra comments seem to work 😉
What type of plane is it? Single, twin? It looks as though there are guns in the hull. It looks like you also shot in a yellow/low light.
it brings out a "wood glow" to your technique! Looking forward to the end result!
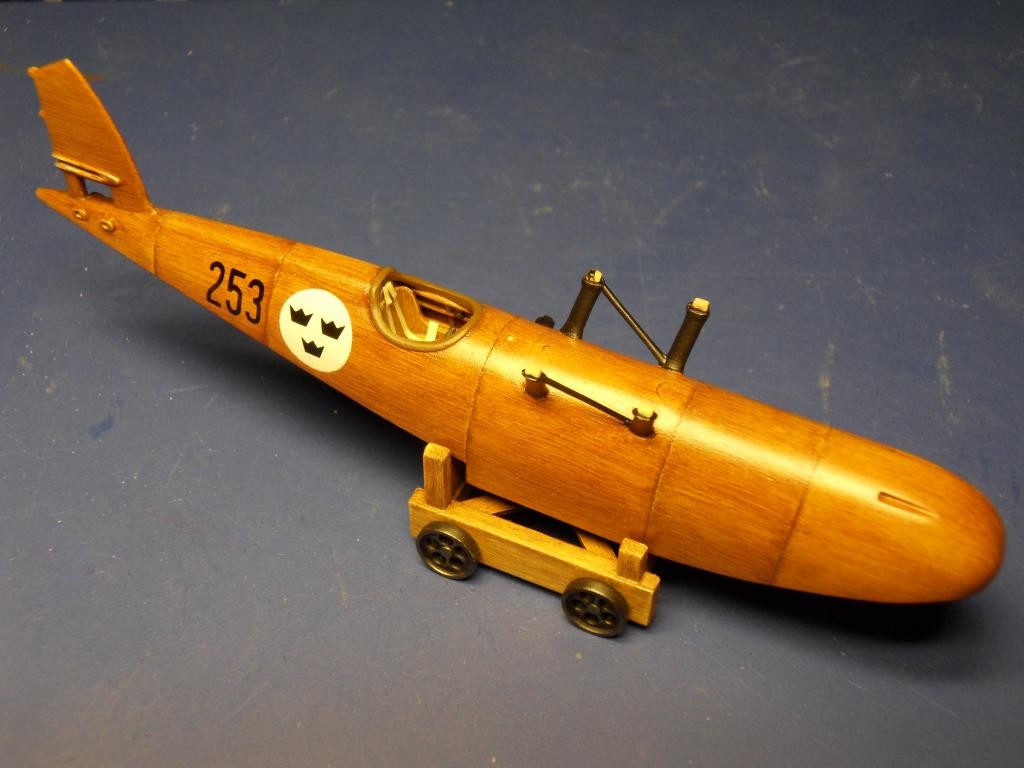
Thanks, Josh. Hehe, its Finemold´s Savoia S.21 in 1/72, a single engined flying boat. Not the easiest one to spot if you don´t know your japanese animated film. I have painted it as a Swedish one. Photos will be posted in a few days, just have to wait for some paint to dry etc. Final assembly is going on.
What a comprehensive, helpful and knowledgeable post. Thank you for compiling and publishing it! I will be happy to give this a try!
Thanks, Roland. Hope you get some inspiration and help from this article. Give it a try and find your own way to get the effect you are looking for.