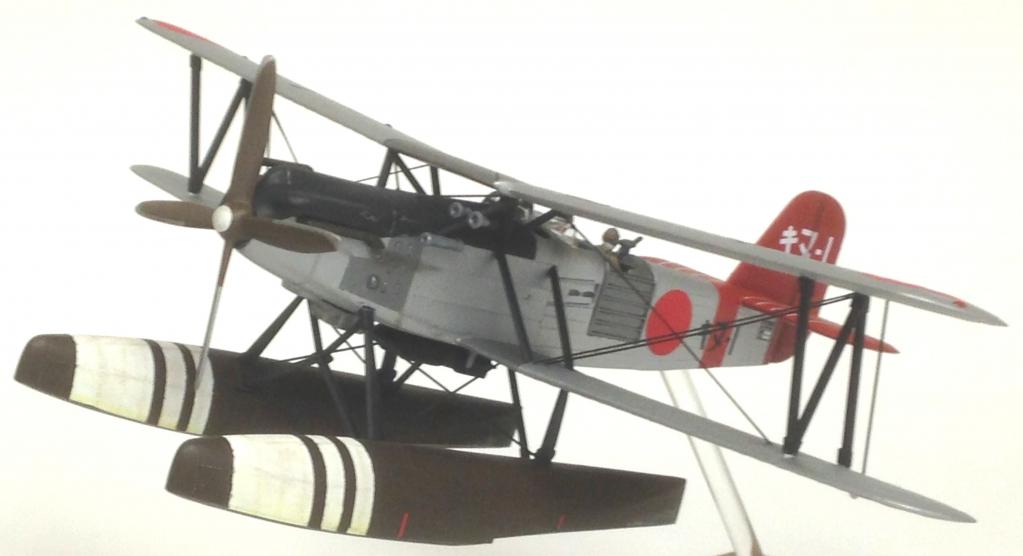
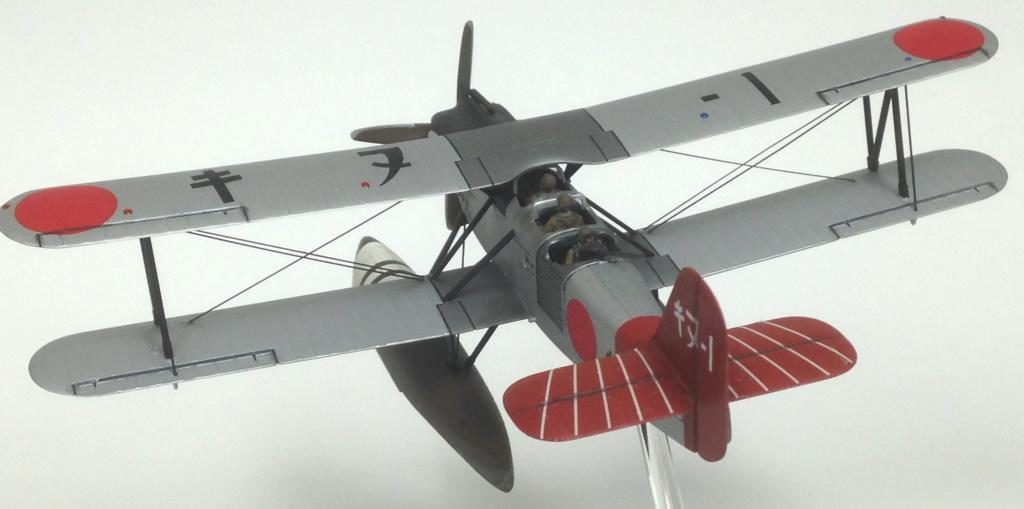
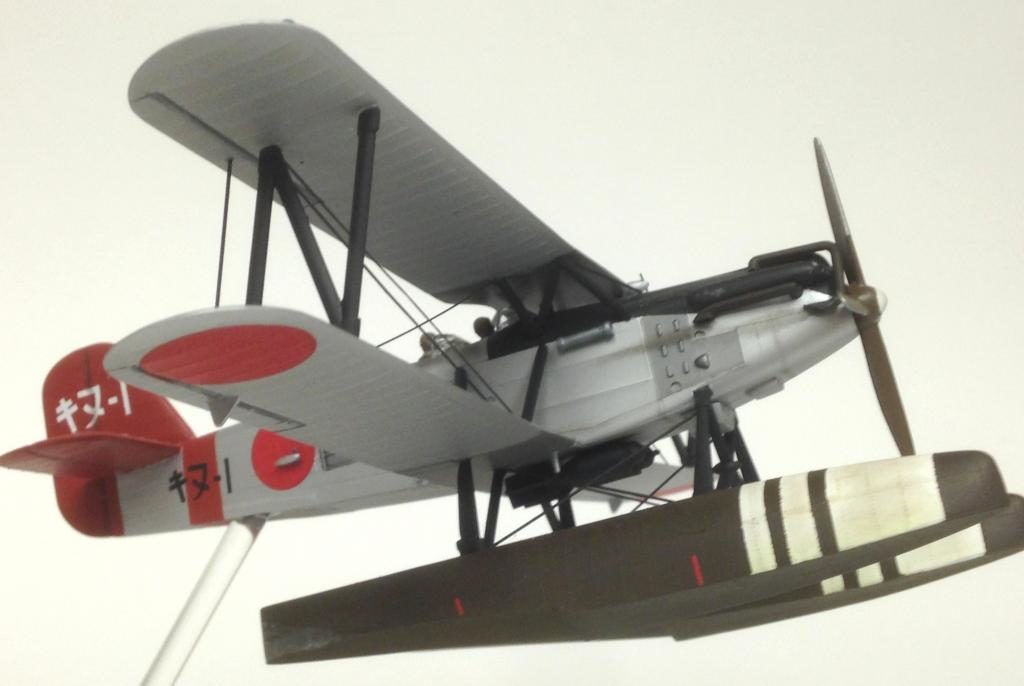
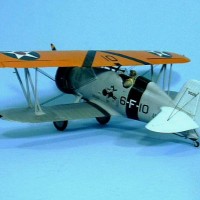
Hasegawa 1/72 E7K1 Type 94 Alf
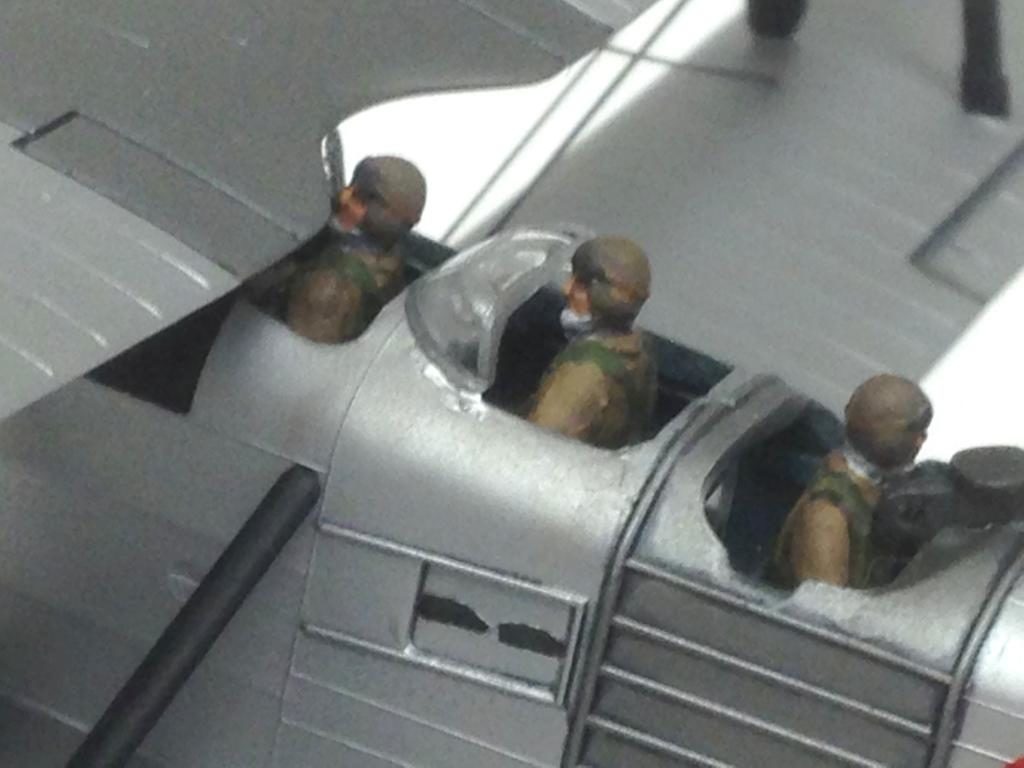
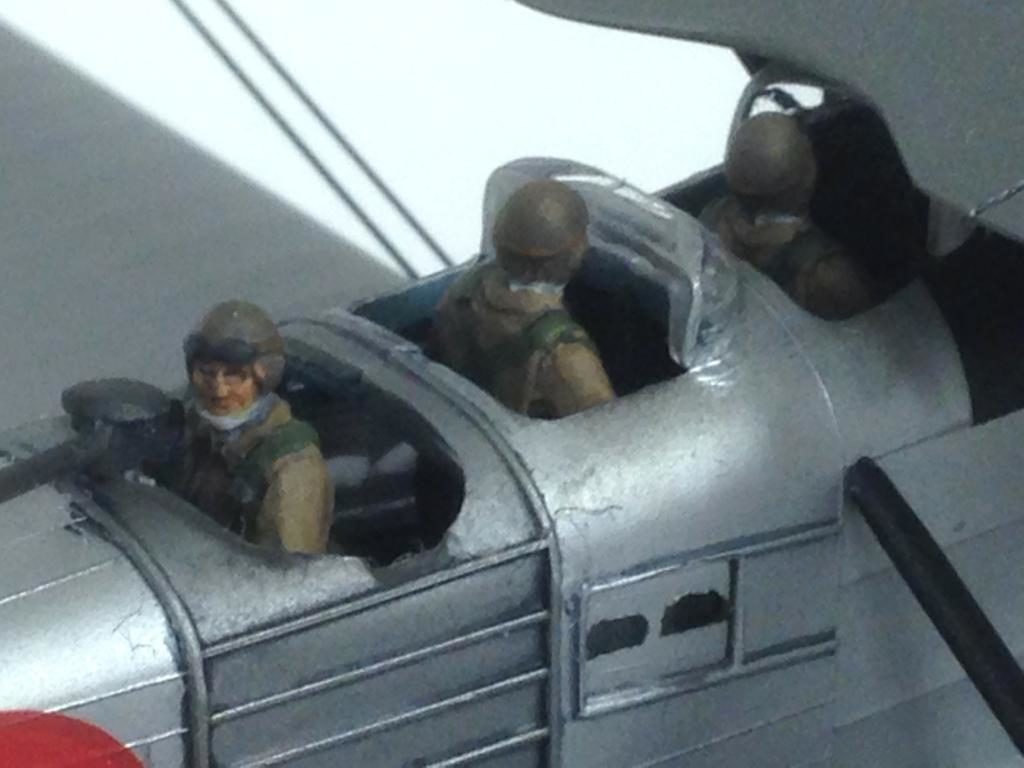
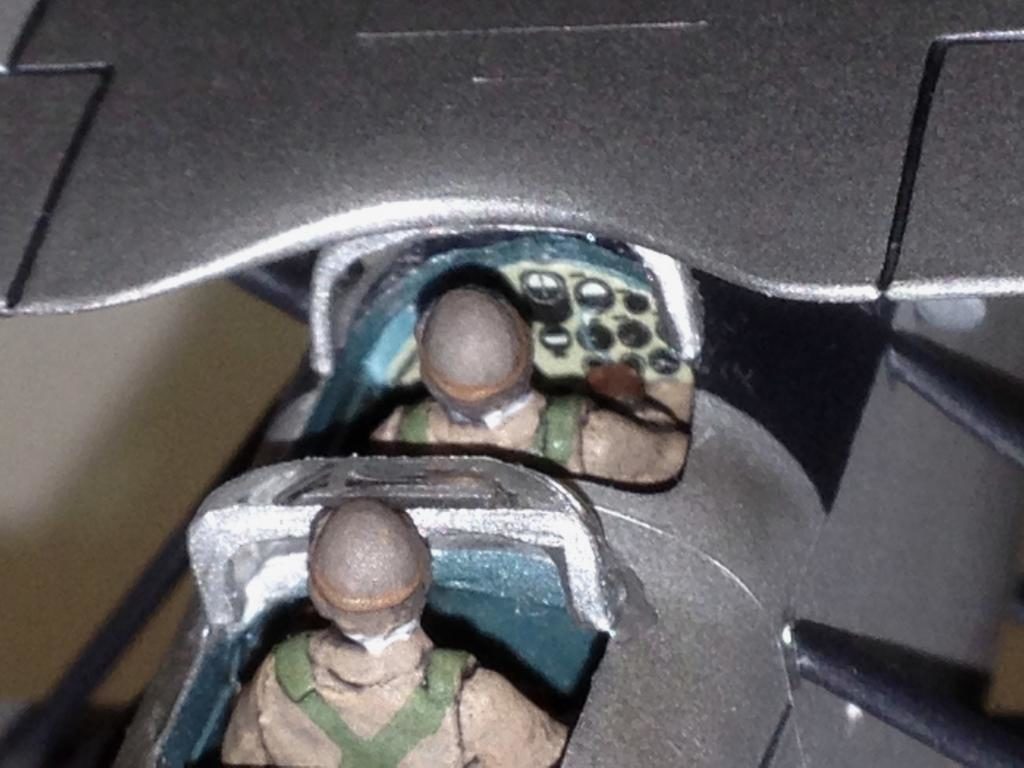
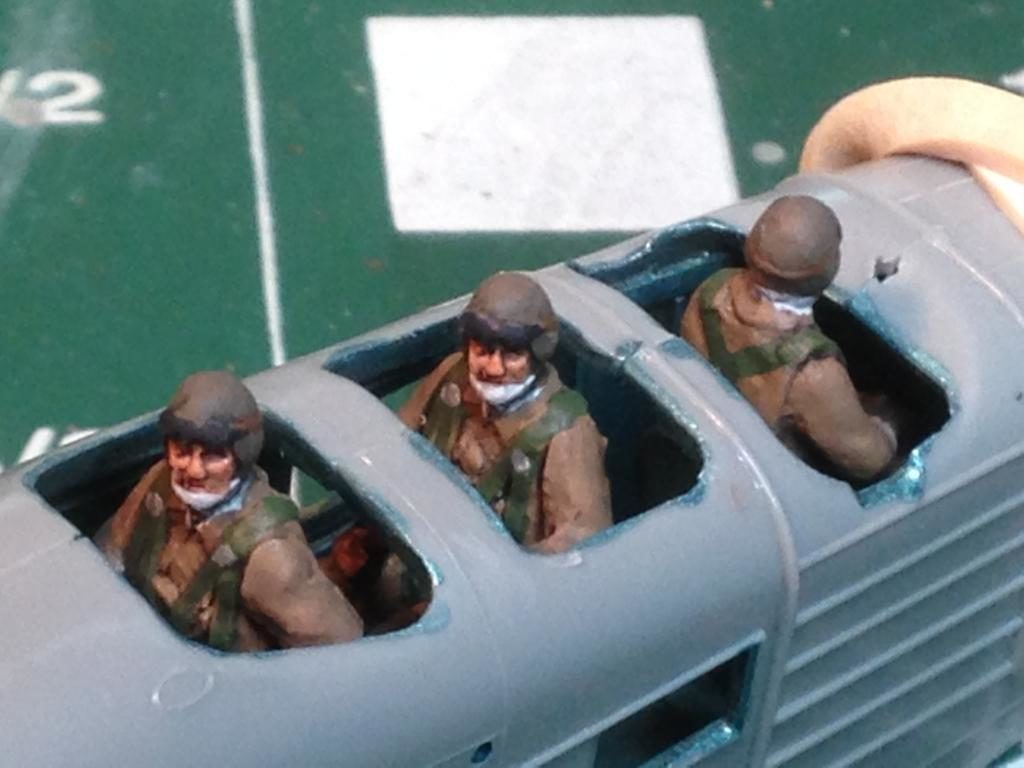
This was a fairly straight forward build. It did require thinking through the final assembly and rigging sequence to make sure I could handle the model carefully while getting all the fiddly bits and rigging installed. Because I used after market pilots, which were a bit larger than the kit pilots, I also had to install them prior to closing up the fuselage (a few challenges with that later...).
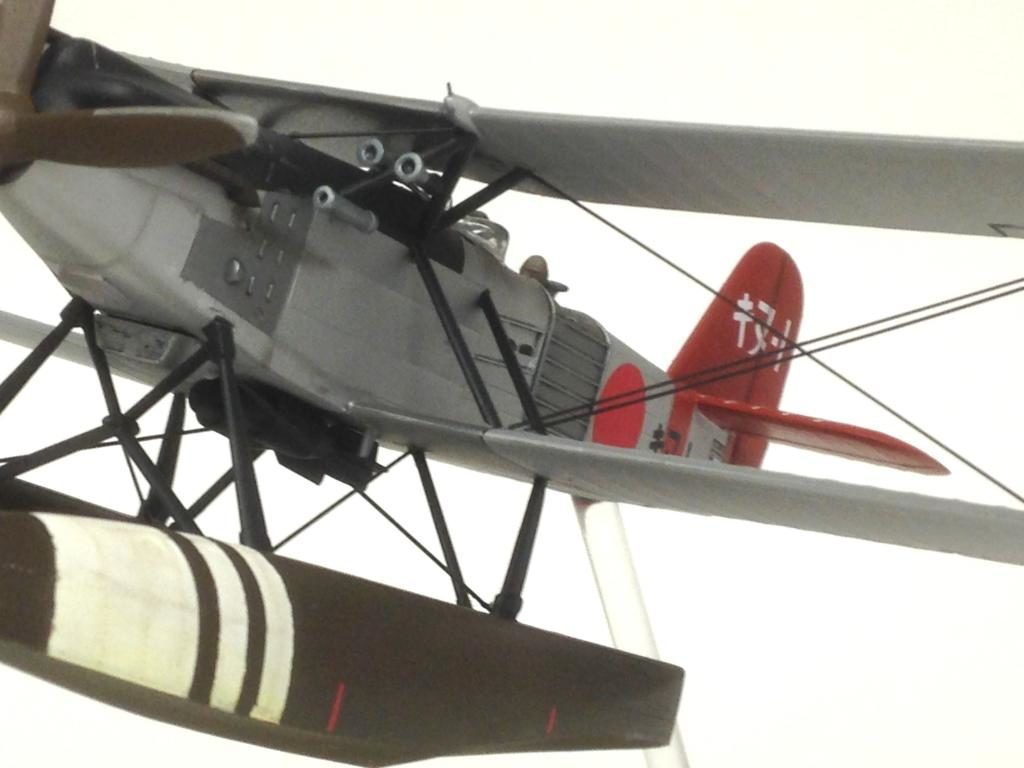
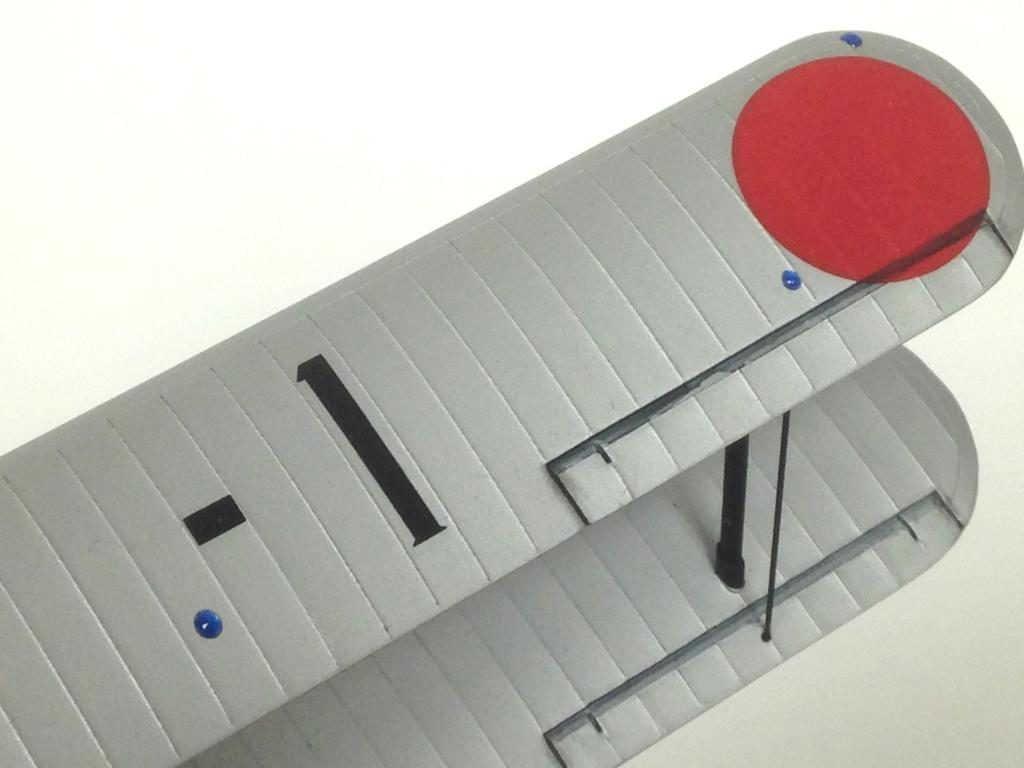
I did put some ribbing into the interior, thinking it might be visible with the clear "window" that was provided by the kit and the open cockpits. However, once I checked reference photos, I realized that the large square window Hasewaga provided was actually supposed to be two small odd-shaped windows per side, and once I masked off and provided for a more realistic appearance, you can't see any of the ribbing work, through the windows or down into the cockpit (well - maybe with a flashlight and a magnifying glass). Oh well.
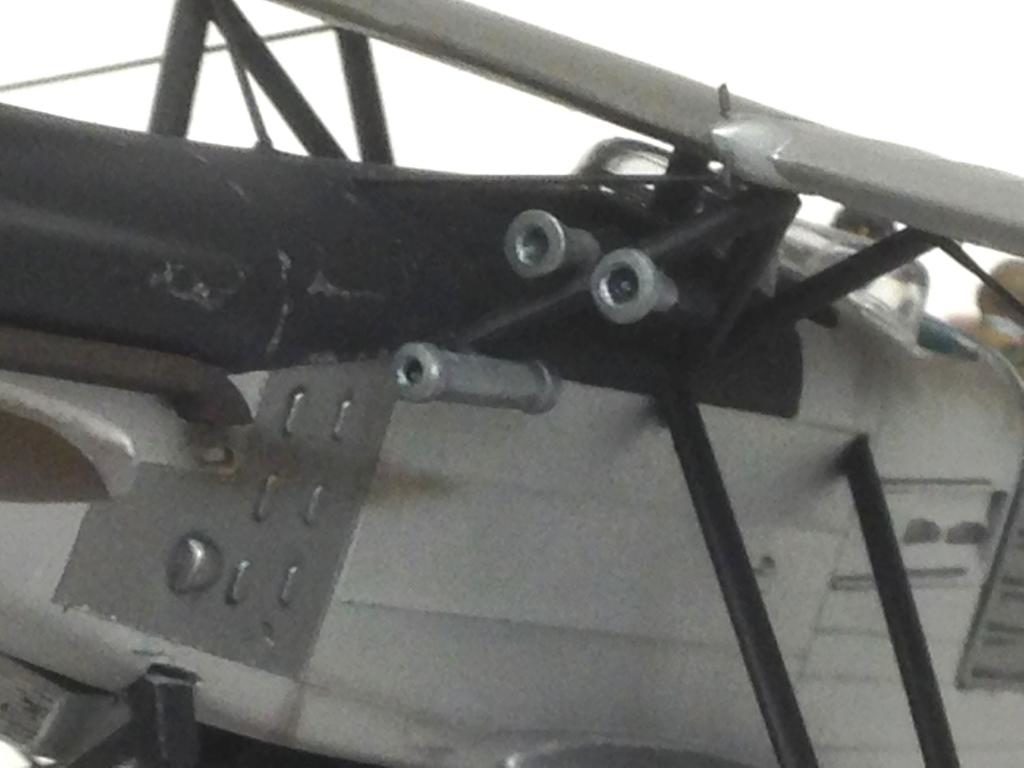
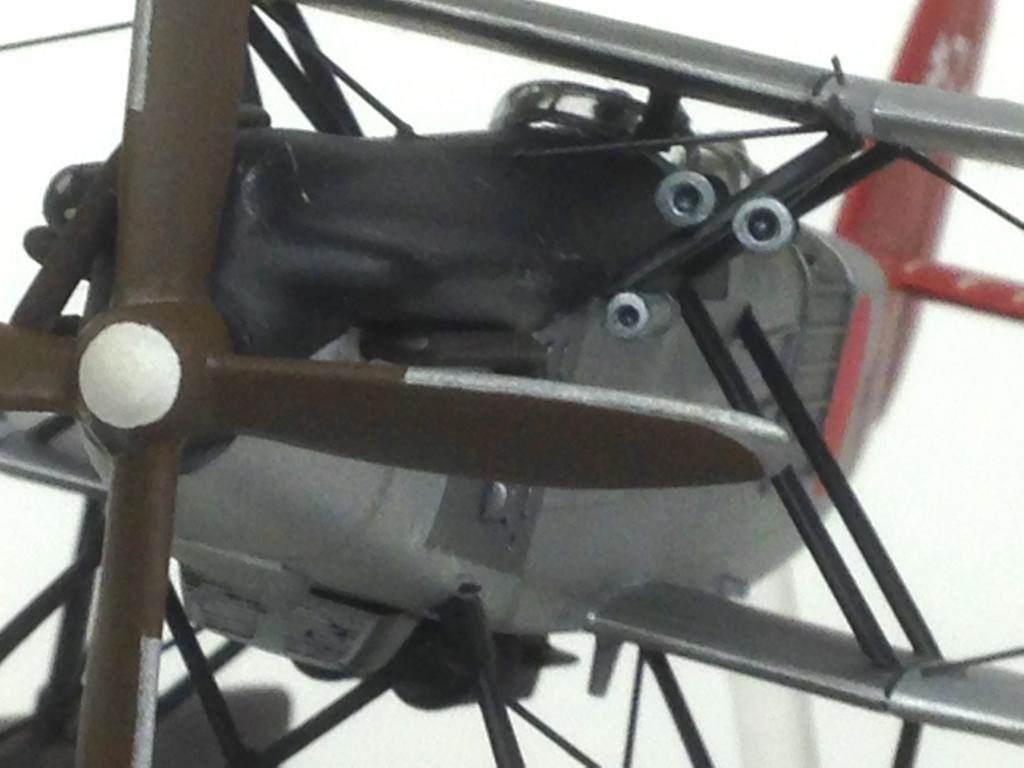
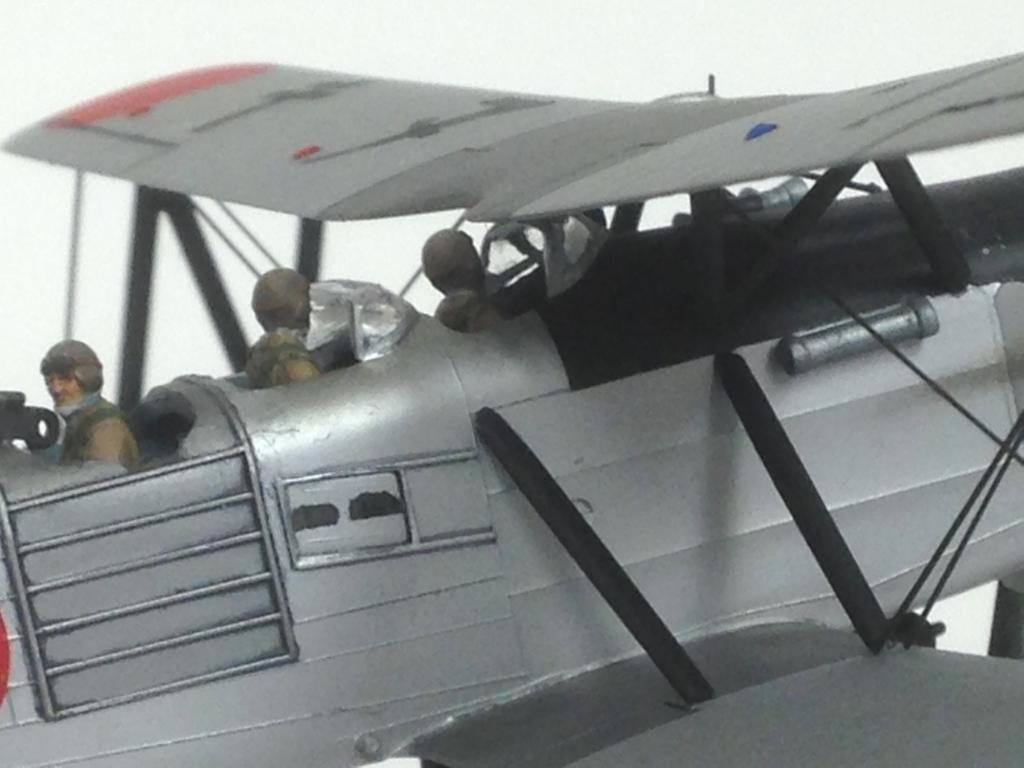
Other than that, the only scratch building done was to add the various instruments hanging from the interior wing struts and fuselage - not sure what exactly they all are, but they look like horns/tubes. I also added some tiny pieces of stretched sprue to the small fan on front port side of the upper wing for fan blades.
I should have used the fuselage braces when attaching the bottom wing to help line things up, as I got it slightly off-center, and had to improvise a bit when attaching those braces later. I also had a bit of an issue with the fuselage/wing struts. I glued the outside wing struts first to the bottom wing, using the upper wing to line them up while they dried. Then when attaching the interior fuselage/wing struts, there wasn't really the clearance for them to fit properly into their locating pins in the upper wing. So, I filed off the locating pins where they attach to the upper wing, glued them into the fuselage and used the upper wing to position them while they dried, then used some super glue on them when I finally attached the upper wing. Here is also where I ran into an issue with pilot size. These PJ productions aftermarket pilots are apparently a bit larger than 1/72, or at least Hasegawa's interpretation of the scale. The head of the pilot stuck up too far and wouldn't allow the wing to seat. Luckily, the front seat pilot was the one crew member I could extract with the fuselage closed up, so I yanked him, filed his butt down significantly, and also canted him in the seat just a bit. Now the wing could attach! You'll notice by looking at the windscreen and middle crew member that he sits higher than the windscreen! In hindsight, I should have done some test fitting, and filed down all of the crew members to make the perspective look more correct.
Rigging on the wings was done with stretched sprue. Cross bracing on the floats was done with .095 wire. I did replace the aileron stretchers with the wire also, as the kit parts didn't quite extend properly between the span. I tried to add line stretchers between the two parallel rigging lines on the wings, but I just couldn't manipulate those teeny tiny pieces with tweezers well enough to pull it off. In hindsight, I could have attached those to the two parallel runs before I attached to the wing, creating a sort of ladder, and then attached to the aircraft. That MIGHT have worked...
As I mentioned in the group build thread, decals were an issue. The original kit decals, even once coated with decal film/fixer, performed miserably. They curled, wouldn't lie down - what a mess! I did use the tail band, and after much solvent and makeup sponge pressure, got it to conform. Luckily I was also able to use the white stripe decals for the stabilizers. The stripes in the replacement set of decals I purchased had individual stripes, and I thought that would be a nightmare getting them perfectly aligned.
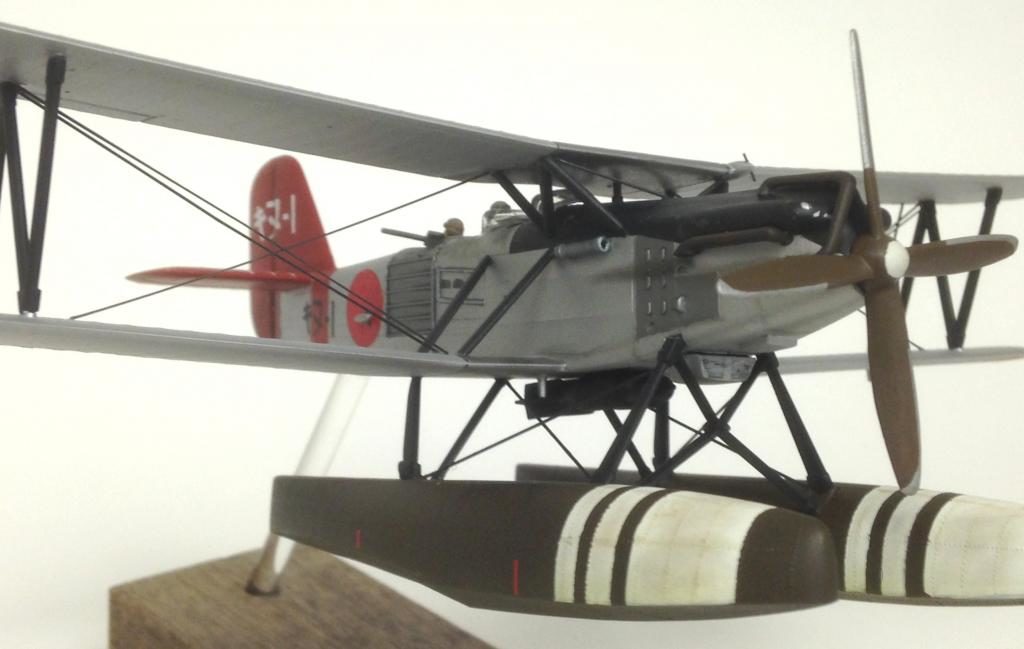
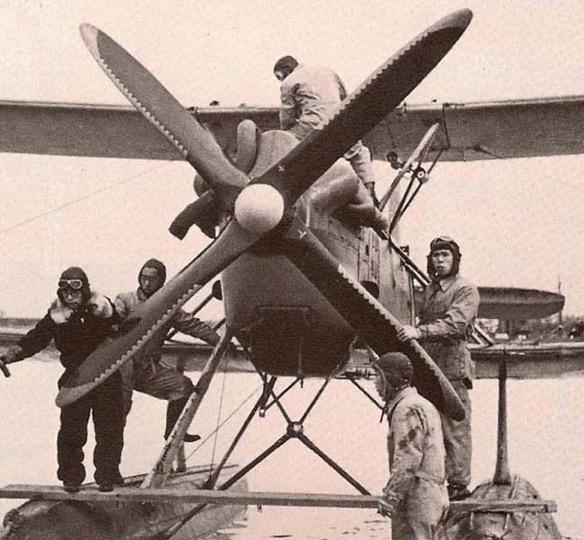
Even the replacement set had issues. First, if you look carefully, the red of the hinomarus is lighter than the red tail band. I had mixed the paint for the tail section to match the Hasegawa decals and had already painted that before applying decals, so at least the tail color matches the tail band, but is darker than the hinomarus. Lastly, one of the large black markings on the upper wing folded all over itself when I attempted to apply it (they were all very delicate). I ended up having to cut a mask out of frisket paper and hand painting it on. I tried to use the kit decals for the leading edges of the prop blades. I presume they depict a metal edge attached to wooden props (see last reference photo). However, no luck - they would not lay down. So I used a french curve to cut masks for the front and back of the props and painted that on, although I lost the serrated look to the edge.
Last touch was to use some epoxy to add the red/blue lights on the upper wing, and paint with Tamiya Clear Red and Blue.
For weathering, I did a slight panel wash in some of the wing areas and the darker part of the fuselage ribbing under the gunner, and the grill work beneath the aircraft. I used some pastel chalks for accentuate some of the other panel lines and tail section hinge lines, for footprint smudges on the wings and fuselage around the cockpit areas and on the floats, and for the exhaust pipes and exhaust stains. I also dirtied up the white areas of the floats with various colors of the pastel chalks. I used some oil dot filtering beneath the floats to portray typical water/slime discoloration, and I used a Flory snow wash to depict the salt spray residue on the rear of the floats. I uses silver paint for paint chipping on the black cowling/glare panel section.
For paint, I used MM Metalizer in spray cans for the two tones, then used Vallejo acrylics for hand-painting the rest. I mixed all of the colors - faded black, the brown for the floats and the red for the tail section. Also used rattle can white for the white bands on the floats.
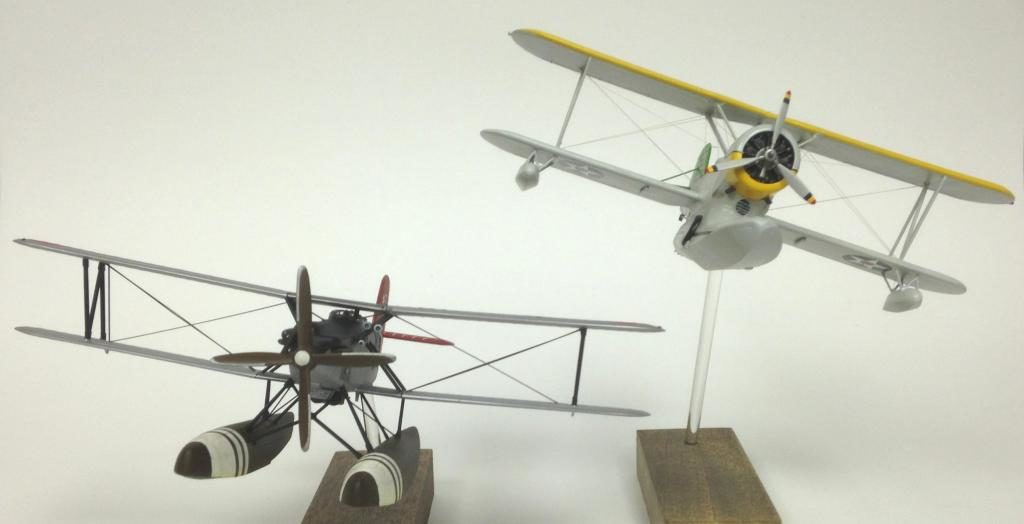
The Alf is a larger aircraft than I imagined it was, so I added a picture along with a Grumman Duck so you could at least get a sense of the wing span difference (and the Duck is a big bird as well!).
All in all, I'm really happy with the finished product - very colorful in the display case. The Hiro-engined early Alf provides a unique look with the cowling shape and unusual exhaust structure - much different from the radial-engined E7K2 that entered service in '38 (the Hiro-engined Alf was underpowered).


Very nice job indeed, Greg...I was wonderin' if you were gonna incorporate one of those signature display stands. 🙂
Good to see you got her done, Greg! Beautiful job!
Excellent build sir ! Looks great. On my Ryan I had to cut the pilots lower half to get them in the cockpit.
My lands! Tremendous work on a daunting project! You're a better man than I, Gunga Din.
An excellent subject, Greg.
Very nice.
Amazingly, three of these were used as kamikazes at Okinawa. they were quite successful, since they had a low radar signature. They actually landed near the ships they were attacking, then launched themselves off directly at them. One of the DDs was sunk.
Impressive modeling Greg. Some really strong work and a candidate for model of month in my book.
Two thumbs up.
Looks great ! I did one of these a while back.The kit was O L D. It had different markings than yours. The only reference photo I found at the time was an old B & W with the radial engine version. The parchment didn't show any extra detail either.
It looks Great!
Greg, this is really nice. I really like the paint scheme. Well done !
Sweet! Nice job, Greg!
Well done Greg, nice detail, interesting model.
Excellent finish on this unusual subject.
Thanks for the explanation.
Nice job, Greg! Great subject.
Good work Greg.
Greg, this is one of the few I've ever seen built. There sure isn't a lot of information available on it. I'm happy they did one, otherwise it would have been a vacuform for sure.
Fine work, nice catch on the side windows.
Great skills and excellent workmanship on this model, Greg, good job.
great work