Who needs decals? Painting on a design freehand
So this isn't a finished piece yet, but I wanted to share my approach to painting on designs. Hopefully it's still okay to post here (if not, feel free to remove and I can repost in another part of the site).
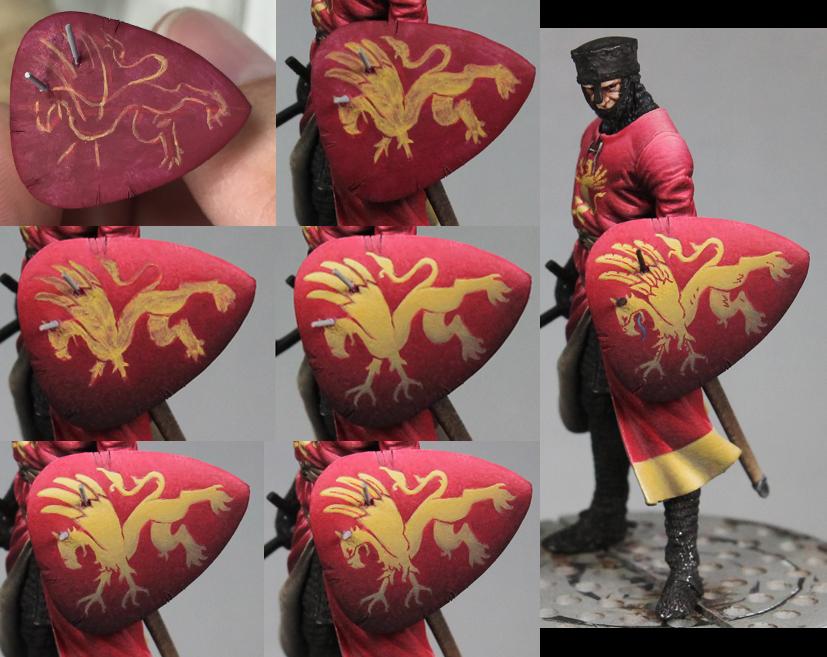
This figures is a 1/35 scale Knight from Pegaso Models. I wanted to add some heraldry to him and, after checking some period references, decided on a griffin. Now, depending on the scale and the size of the region I'm painting, I will either add more detail or simplify the design. Practice certainly helps me take on more complex images, but we all have our limits on what we can do. Best to start simple and work up.
Before doing any painting, I printed out a reference image to work off of. I began the painting by base coating the shield and sketching in the design. I don't worry about all the details, I just want to get the major shapes down. Then, I go back in and fill in the design. Here I start to add a bit more detail, but it's still just a rough base coat. After that, I did the shading and highlighting on the red background (which does slightly overlap the edges of the design). Then, I go over the base coat of the design to give it complete coverage, add some shading, and fix some details (like the hands and feet). After that, it's just a series of steps using both the yellow of the design and the red of the background to refine the shape and add detail. Initially I added some fine level detail on the outline of the figure (neck, chest, leg, and tail). Then I went in with the red to detail some more lines in the wings, face, and arms. In the final image you can see I've done even more detail with the red and added a tongue. During these last steps, the process was back and forth. Add a few red lines and then switch back to the yellow to adjust and reshape. Then back to red to clean up the borders of the yellow and add a new line here or there. And so on until I was happy with how it looked.
As with anything in this hobby, practice is key. I've done many designs, starting out simple and gradually taking on more complex and involved images. And there are people like Bohun or Karol Rudyk who are capable of freehand that puts my work to shame. But, it's a process and next time I'll try something even more complicated. I know most of the people on this site work with vehicles and there decals really make the most sense. But perhaps there's an instance where you want something to look painted on (maybe like the 'Fury' on the barrel of the tank from that movie). If so, hopefully this gives you some useful information for how you could approach that task.
A fine rhetorical question, David. But then again, some of us aren't lesser gods when it comes to painting such things. 🙂
Still, and excellent tutorial post! Lovely work!
Ha, thanks! Yeah, for vehicles I'd say 99% of the time decals are the way to go. Maybe in a few instances you would want to paint on something, like if you wanted it to look like the vehicles operators had painted it on.
Thanks for posting this, David. Can I ask what brushes you use? And paints/mixture ratios? Your work is inspiring (although also a bit intimidating) and I really appreciate you letting us into your thought processes with this dark art.
Thanks! I used Winsor Newton Series 7 brushes (Kolinsky Sable). Most of this was done with size 00 and size 000. I've also worked with Scharff Brushes (their Series 3000 are their Kolinsky Sable ones).
For paint mixtures, are you referring to paint to water? I thin down the paints somewhat, though for the design work I prefer the paint to be a bit more opaque so I don't have to apply too many layers. In image 2 and 3 you can see one layer of the yellow over the red and how much of the underlying color shows through. I'd say it's around 2 coats for complete coverage when working on the design, maybe slightly more.
Beautifully done! Thanks for the lesson.
An amazing talent you have there, sir...don't think I could do that. 🙁
Amazing talent, you sir must have an impressive steady hand coupled with an artistic vein above average.
You have a great talent!
An artist's talent!
Painting the same design on the knight himself would be a tough go cuz of the folds in the surcoat, as if the shield was easy at this scale! Good work, good photos, thank you.