Review: 1/48 scale ICM 48232 Junkers Ju-88 A-5 kit review – Part 2 of 2
This is the follow up to the first article I posted on the newer ICM release of the Junkers Ju-88 A-5.
The first part of this kit review is covered here.
I had to break this review up into two separate parts, due to the high number of photos I took. There are 80 photos in all...
To begin with, these are the books I used for references during this review.
Warplanes of the Luftwaffe, edited by David Donald,

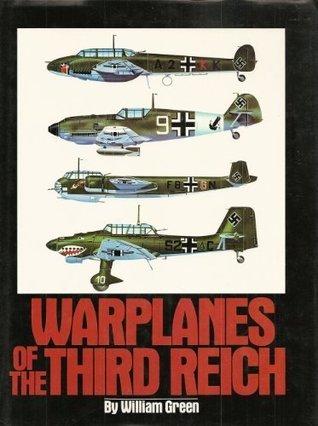
Warplanes of the Third Reich, by William Green,
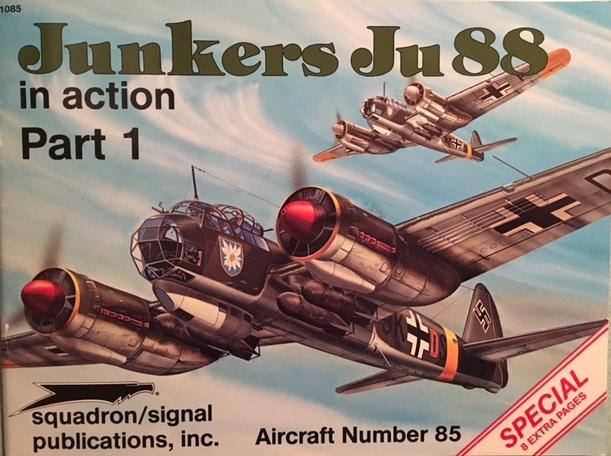
and the Squadron Signal "Junkers Ju-88 In Action" book by Brian Filley.
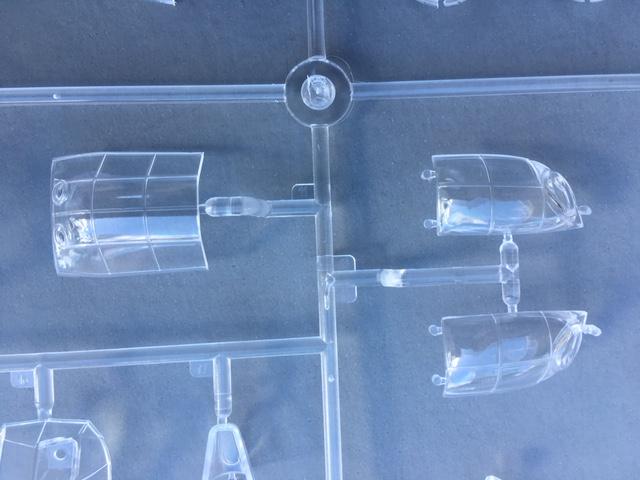
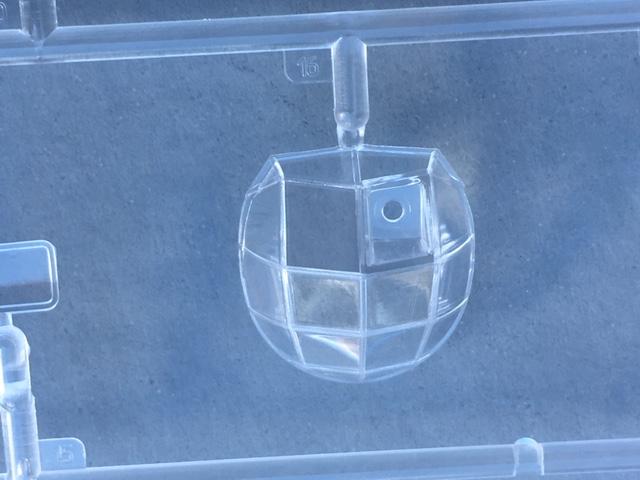
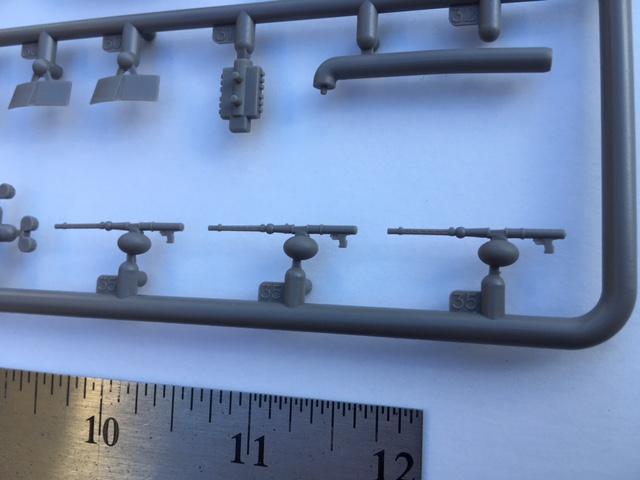
Lets start this out by looking at the clear parts.
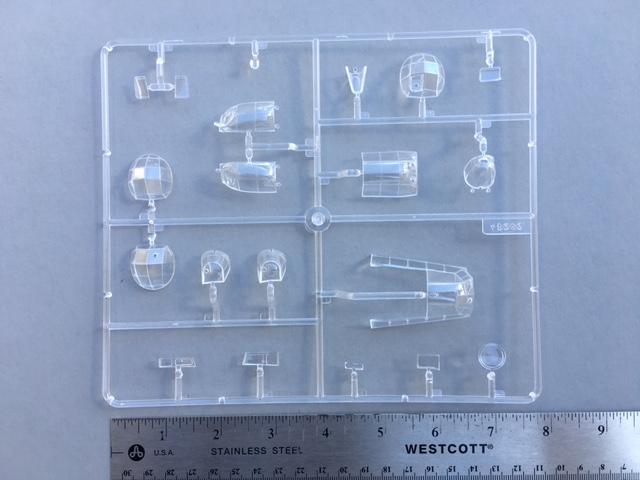
They are nicely molded, thin and crisp. They also look to be very transparent. As in the first article, I have included a 12 inch ruler to use as a guide to indicate the size of the parts.
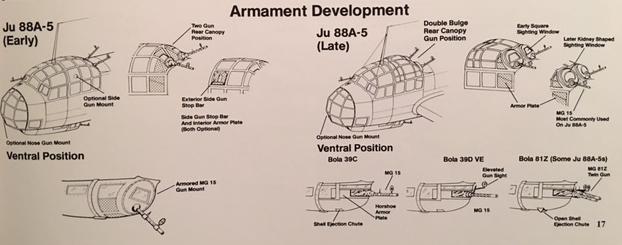
This next photo can explain some of the differences far better than I can by writing a description. This picture came from the "In Action" book, which is an excellent resource on the early variants.
As mentioned in the first article, the Ju-88 was a work in progress during the early variants. Because of this, and field modifications, along with factory rebuilds, The Ju-88 A5 could have had a number of possibilities present on the "plexi" glass components.
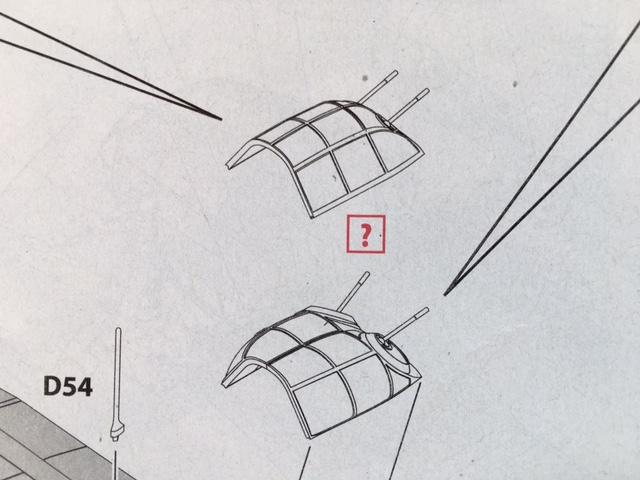
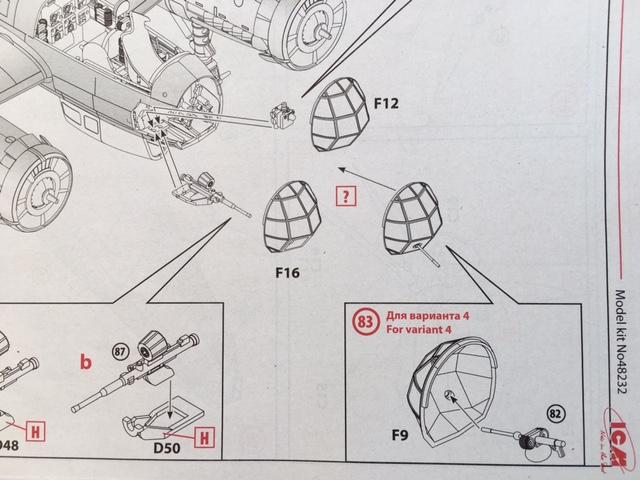
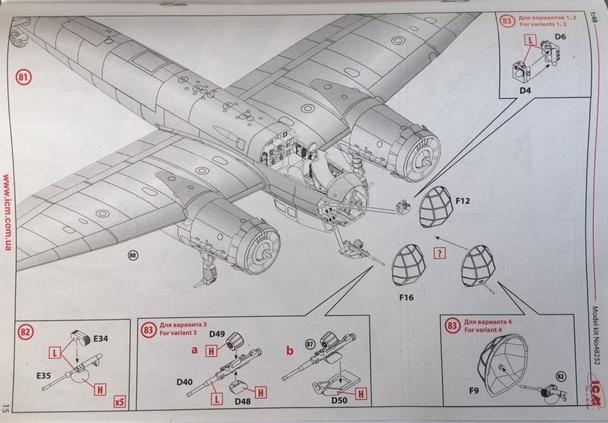
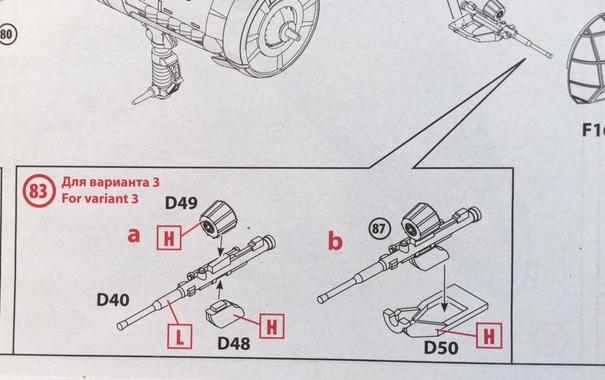
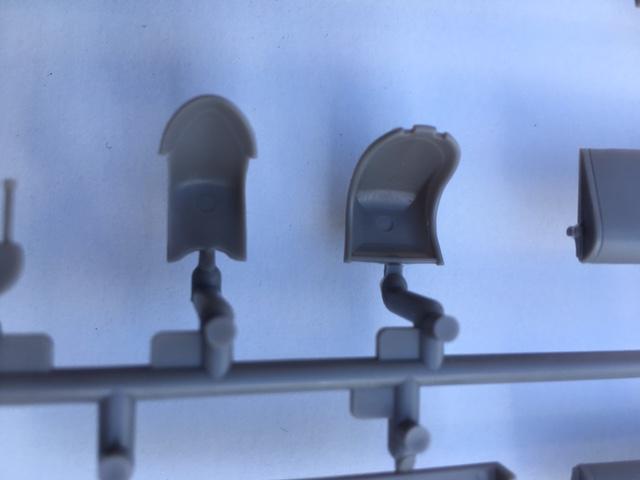
Here are two options for the rear gunner. This is a close up photo of the kit instructions.
followed by the associated kit parts.
The glass nose "Bug Eye" as it is often referred to, is a single part. However three different versions are included as options.
This picture below, shows the different types of nose and the various MG's (and cannon) that are (or are not) used, depicting the part used. Here again it would pay to check your references...
and the associated kit parts.
This next photo is a full page from the kit instructions. It shows the various MG's that were mounted in the cockpit.
There is also an option for a cannon, which was occasionally fitted in the 88.
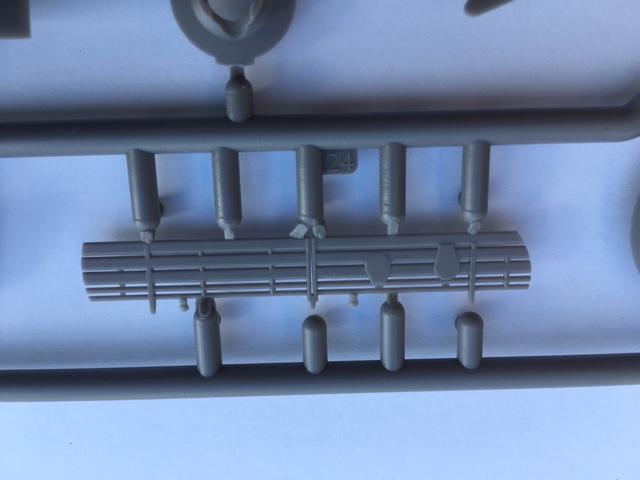
The kit parts for these MG's and cannons are represented very well. This is a close up of the MG's.
The "snail drum" magazines look great too.

There are many of the magazines provided, since they were often stored throughout the cockpit in various locations.
Some were located here, next to the radio set, where they could be easily accessed by the crew.
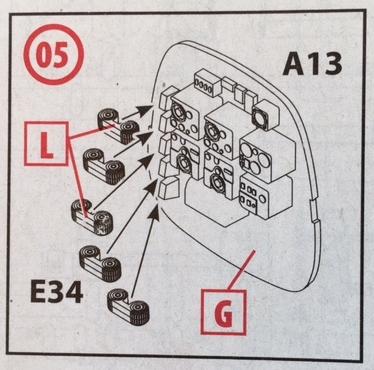
Here's a close up of the radio ...

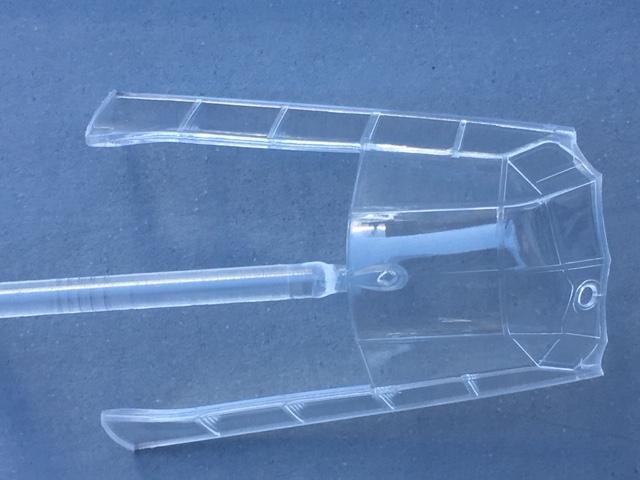
The instructions have you install the pilot's windscreen after the nose glass is installed.
The parts is molded well. However it looks like the part may have sprung open in my sample. These kit parts look really nice. The only thing that bothers me is having to glue along a panel line where a slight slip during gluing the parts together, could be a disaster. I would have rather seen these parts molded as a complete unit and included as an additional part, just in case.
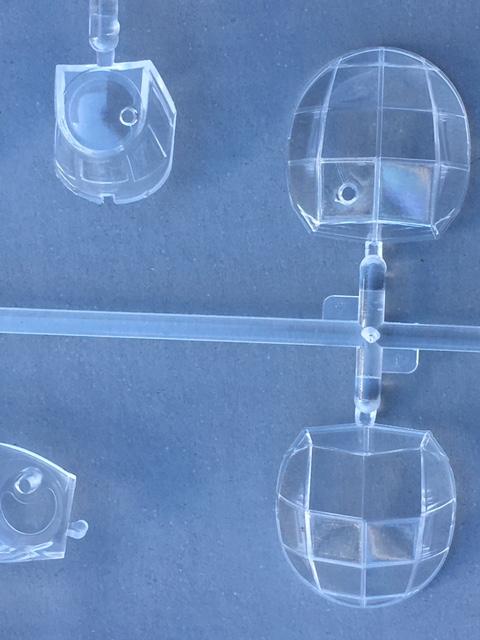
There is another similar glue line on the rear gunners position, if you decide to use the later armored glass for your build. The earlier glass that does not have the small circular windows is molded as a single part, where the later armored glass that has the round circular windows is molded in two halves.
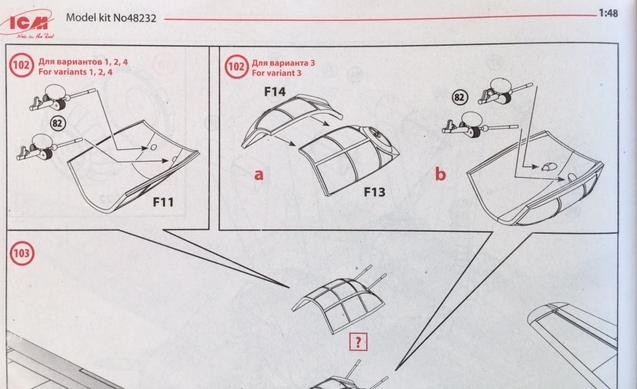
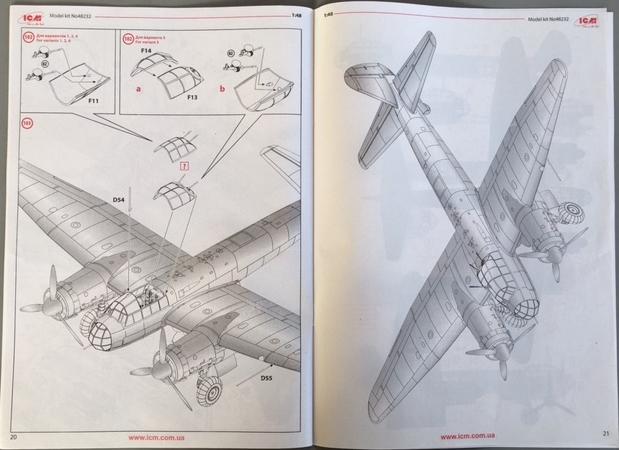
This rear gunner's canopy assembly sequence can be seen better by looking at the kit instructions as shown here. This is actually the last construction step listed on the instructions.
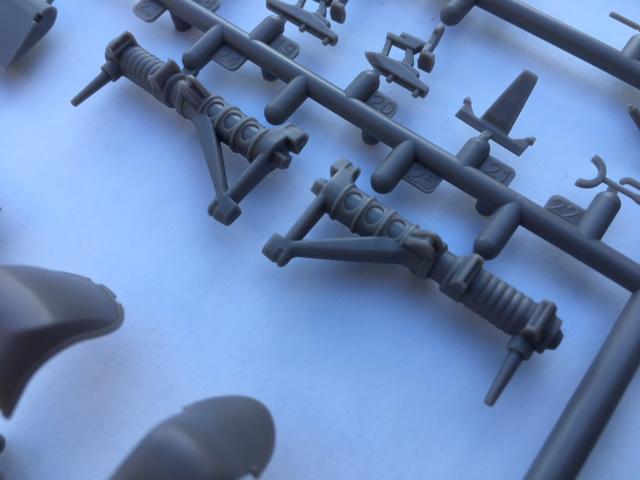
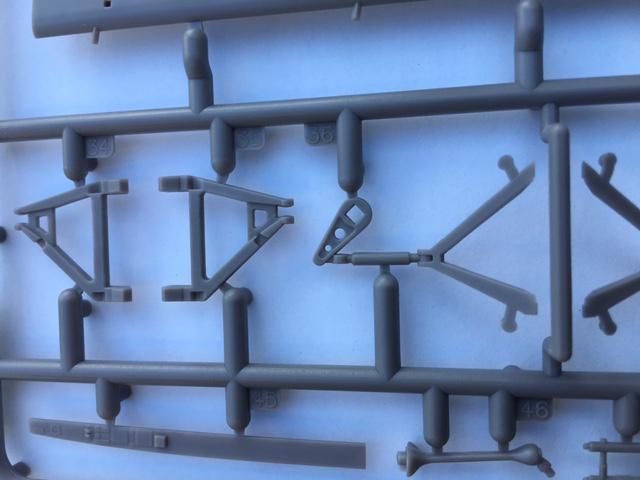
The main landing gear are vey nicely molded. The main gear legs look to be very sturdy.
The details look crisp and no flash is present anywhere and any of the parts in this model.
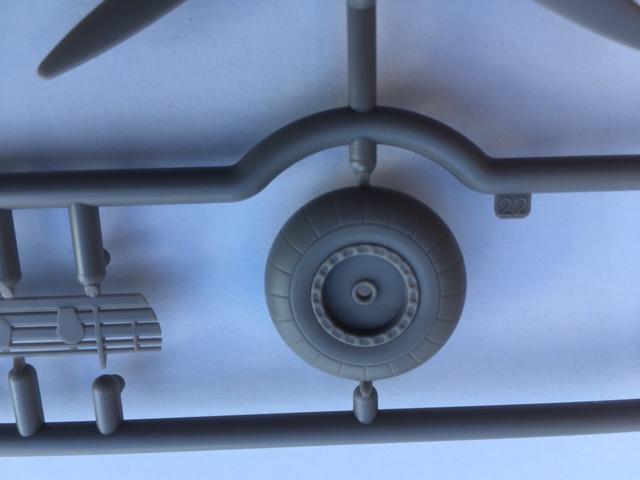
The main wheels are also very nice... They are two parts, molded as halves.
The tail wheel has some nice details molded into it.

There are several other small landing gear parts, as seen in this picture below.
The instructions have you install the main gear before installing the engine nacelles.

Here's a close up of the nacelles. Notice the engine access panel locations, and how they can be posed in the open position if desired. This will allow you to display the Jumo engines easily without modifications. Here you can also see the large square locating pins that will ensure a robust positive attachment point under the wings.

The larger bombs were carried under the wing on the Ju-88, since to my knowledge, there wasn't enough room for large ordnance in the internal bomb bay on the A-5.
Here is a close up of one of the bombs.
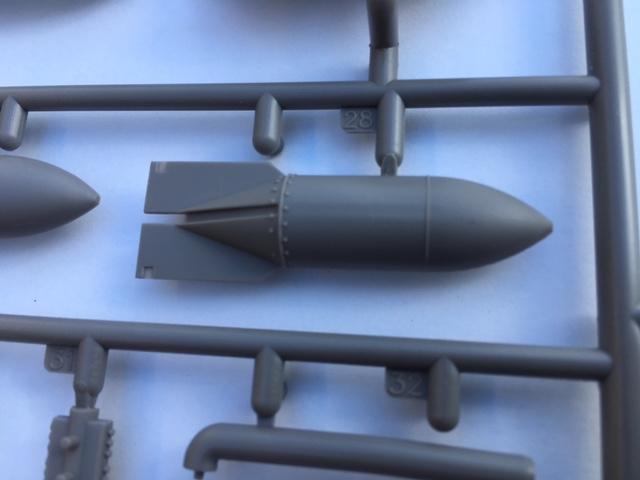
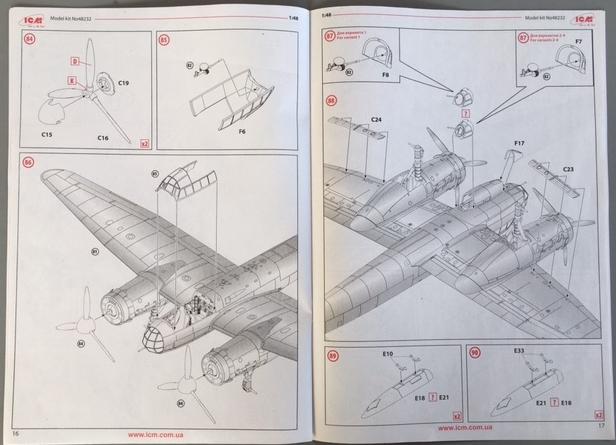
along with the associated page covering this from the instructions.
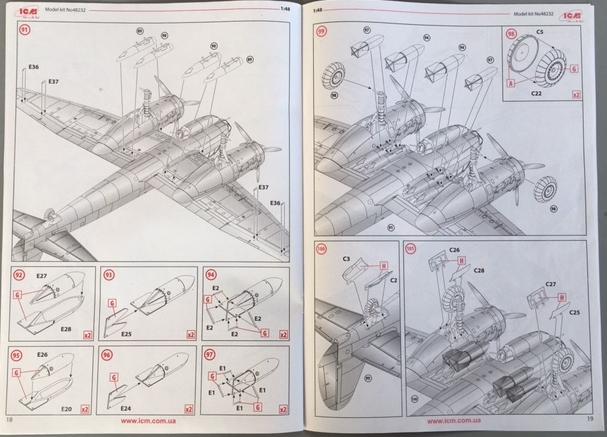
This page also covers installing the landing gear doors, which have some very nice details molded into them as well.
This is how the inside of the main gear doors look.
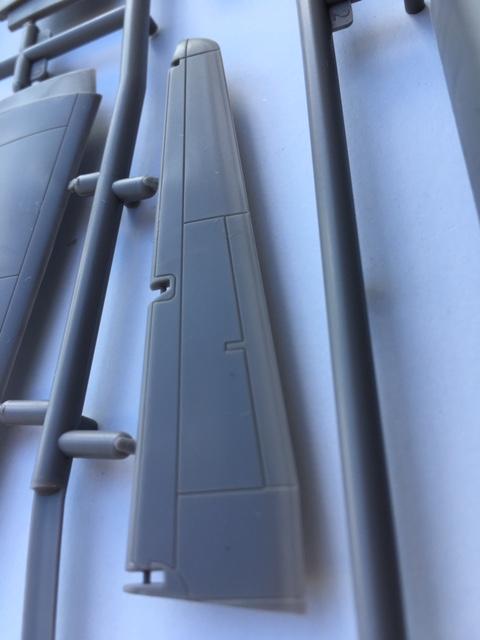
The flaps look like they can be posed. There are some nice surface details molded in to them. Here in this photo, you can also see one of the metal covered ailerons. This was a change form the earlier A-1, which had a shorter wing, and fabric covered ailerons.
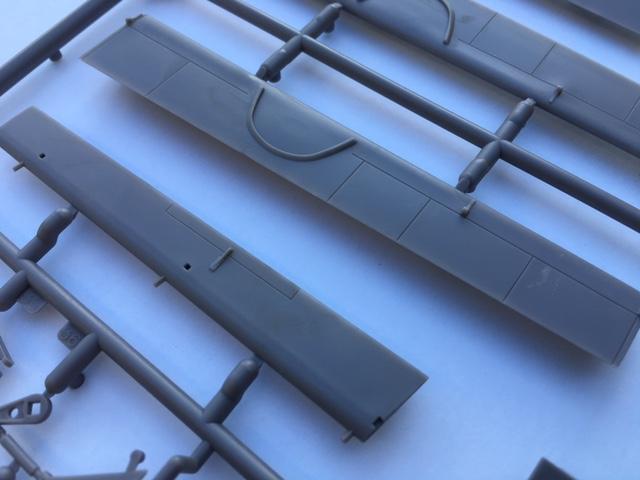
In the first installment, I mentioned the dive brakes. Here's a close up of one of them.
The very first part of the building starts with the cockpit.

Various bits are glued to the sidewalls of the fuselage. There are several small round marks present on the inside of the fuselage halves. They appear to be raised, and may not even be visible once everything else has been installed. These raised marks could quite possibly be a locating pin for another part. I will now know for sure until I start construction.
Please take a look at this picture and decide for yourself.

Now that we are talking about the cockpit, this is another source of online debate . Some have stated the gunner's seat should be mounted on a raised platform. Others have said the floor needs to be slightly trimmed and modified, and that it is hardly visible once the model is finished.
Personally I didn't know what the deal was. That was until my friend Pedro L. Rocha asked me to post a photo of the cockpit floor, so he could compare it to a Dragon kit he built and had used a Verlinden resin replacement part.
That's when the light bulb went off... Hey I have several Pro Modeler A4 kits in my stash...
So I pulled one down and inside there was also a replacement resin cockpit by CMK inside the box ! I had completely forgotten about purchasing that, so it was a nice find.
I photographed the parts like he requested, and the problem areas are visible.
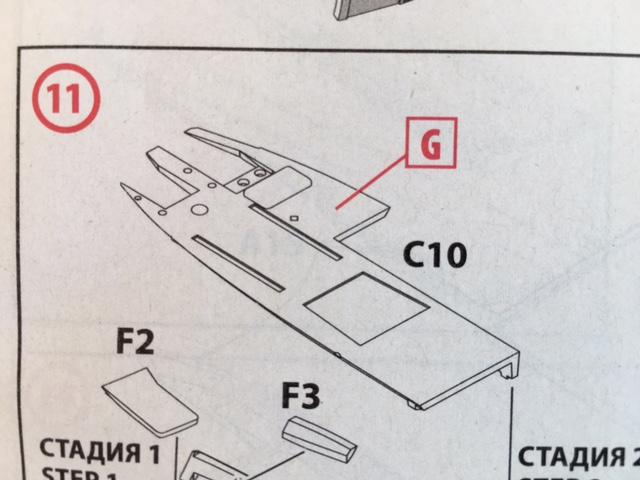
The cockpit floor (part # C10) is shown in this instruction booklet photo. This is most likely the part causing the online stir...
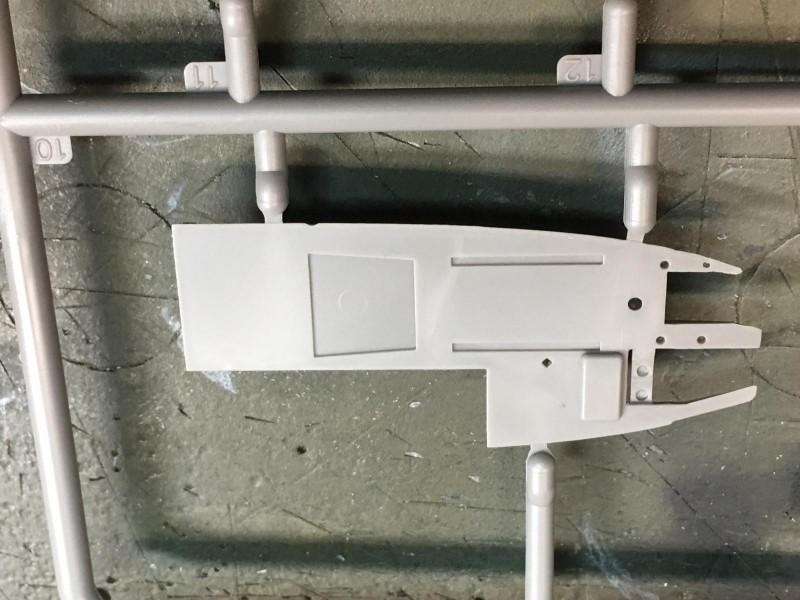
Here is the kit supplied cockpit floor. It is pretty much flat, with a minor change in height where the radio operator seat will be installed.
Below is a photo that shows the Revell / Pro Modeler Ju-88 A4 cockpit floor, molded in light gray and still connected to the parts tree. I am pointing at the elevated radio operator's seat location, with a red tipped wooden tooth pick. Look at the height difference.
Then sitting just behind it, is a yellowish colored resin cockpit floor made by CMK. This is supposed to be an "Improved" replacement part for the RM / PM kit. This part is still attached to the resin pouring block. The details showing the variations with the floor elevations are highly visible.

Please keep in mind that these parts are what another kit manufacturer has molded, and the assembly process is a little different from what ICM uses. These parts are also for an A-4 version, which Pedro advised is the same and an earlier A-5 variant.
The gold standard would be to locate an actual photo of a real Ju-88 cockpit floor ... The search is on.
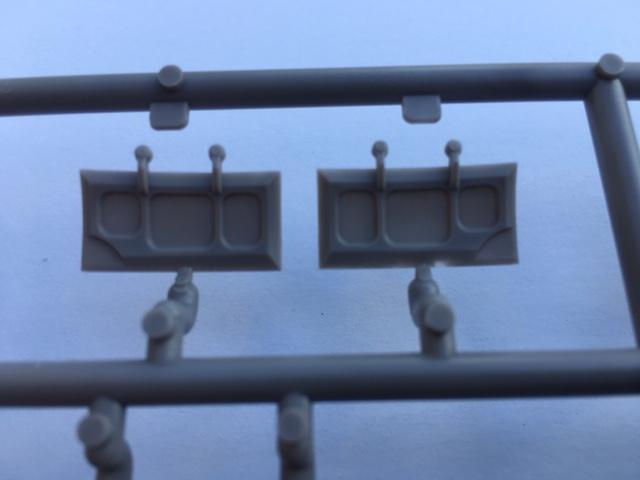
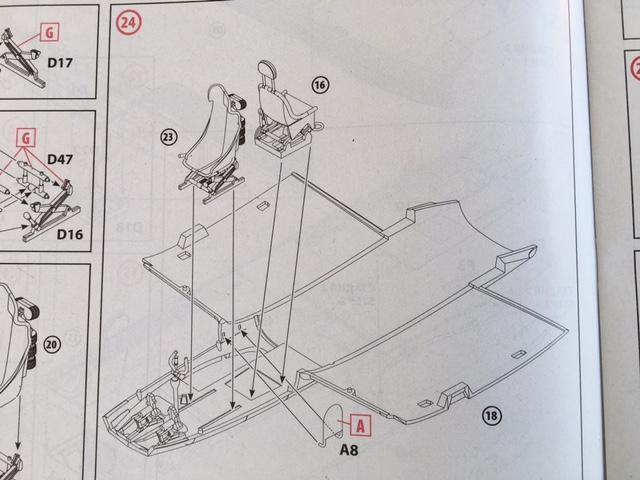
Meanwhile, the seats are constructed from several parts. Here is the assembly sequence:

The seats themselves have a single small ejector pin mark located in the center of the seat bottom. It looks to be very shallow, but it is there.
This next picture shows how the pilots controls are installed...

followed by the seats...
The instrument panel is well presented. It has raised details, and should look nice once the decals are applied for the instruments. Located in the top of the photo is the pilots "armored" seat. This is something that was added later in production. The early A-5's didn't have an armored seat like this. But they could have been added at a later time, such as a field modification, or a factory rebuild.

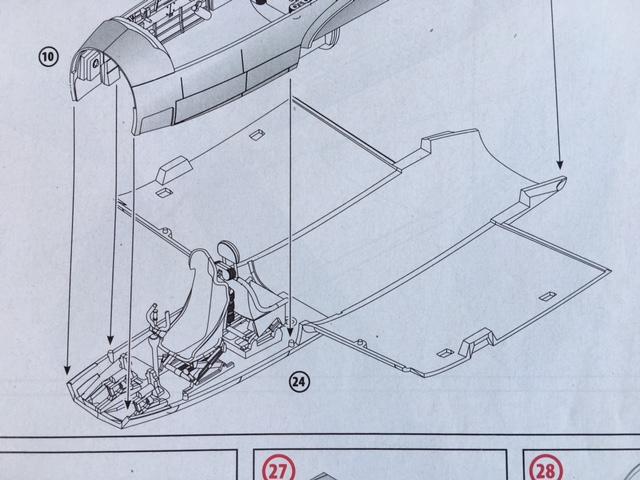
The cockpit assembly is built on the lower wing center section. Once everything is in place, this lower wing part is then attached to the fuselage. This is some clever engineering. This will ensure the proper dihedral, and should eliminate any possible gaps along the engine nacelles and fuselage sides. The outer wing seam will be hidden under the engine nacelle. This seam I'm talking about is located where the lower outer wing panel is joined on.
I mentioned earlier that the flaps were position able. All of the control surfaces are. This is a nice touch. This next photo shows the assembly of the tail feathers...
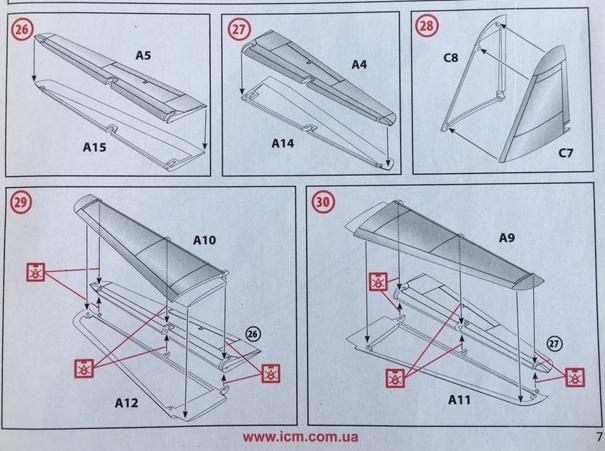
Here's a close up of a control surface. I'm pretty sure it's one of the elevators. Notice how the panel lines are.
Speaking of panel lines, check these out... They are nicely rendered. This next one is the underside of the wing.
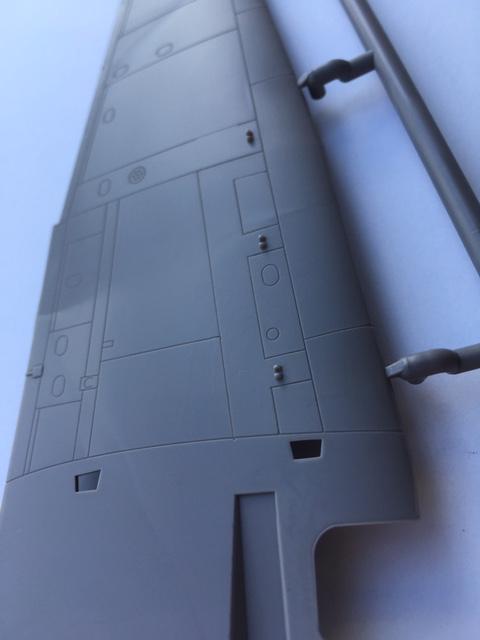
Followed by the top side of the wing...

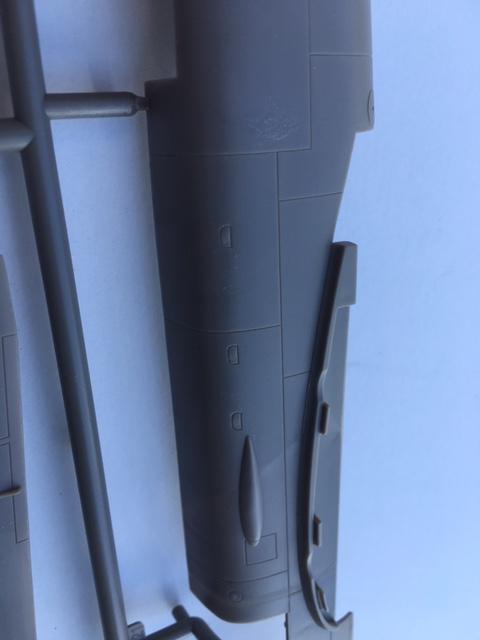
And the side of the fuselage where the upper wing panel is joined. Notice the reinforcement strips along the wing seam. This should help to ensure a good strong glue joint.
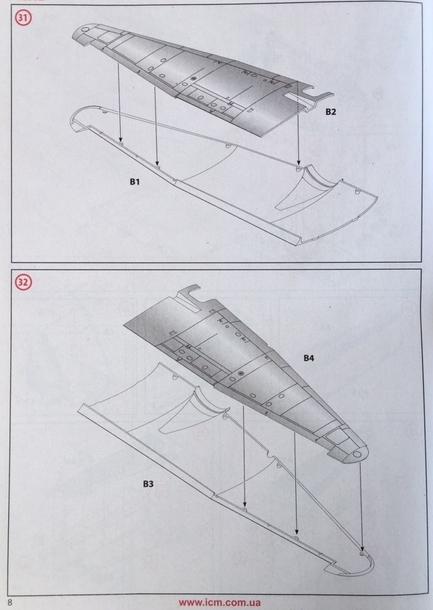
These last two pictures show how the wing panels and control surfaces are built and installed on the plane.

Well, there you have it. I presented it all, sort of like one of my favorite Clint Eastwood movies, "The Good, The Bad, and the Ugly".
But in this kit, there is hardly anything that can be called "Bad" or "Ugly".
You can look at the photos I have provided, along with the reference materials, and make an educated decision for yourself. I reported an honest unbiased review of this kit, as I always try to do.
I am not affiliated with any model company, and all of the kits from my reviews have been purchased with my money... (except one, the BP Defiant which I won as the random award here on Imodeler).
Is it the "perfect kit" ? Nope... But I'll answer this question with another one...
Will there ever be a "perfect kit" ? I hardly doubt it. You can't please all of the people all of the time.
ICM has come along in leaps and bounds, and will be giving some Asian model companies a run for their money... This is a nice kit. I wouldn't hesitate to buy another one... or two.
They have given us something that we should be thankful for... Another WW2 German twin engine bomber in 1/48 scale ! We do indeed live in the Golden Age of modelling.
In closing, I wish to thank my friends who assisted me with this review. Without their help, this article wouldn't exist. Seriously, thanks guys !
They are Robert Paschall, a fellow Imodeler member and friend, who provided the missing center pages of the instructions.
Tom Fox, the customer service manager from Squadron Mail Order, who tirelessly searched for the missing pages, and came through with a second set for me...
and Pedro L. Rocha, another fellow Imodeler member, Ju-88 connoisseur, (and new friend of mine), for asking the questions he did after I posted this article in it's original form.
This kit is "Highly Recommended" by me...even with the few things I pointed out during the two reviews. I'm sure that someone with a little effort, could fix these small errors easily.
Thanks for reading this.
and as usual, "Comments are Encouraged".
Good night.
REFERENCES:
- “Warplanes of the Luftwaffe”, Edited by David Donald.
- “Warplanes of the Third Reich”, by William Green.
- Squadron Signal “JU-88 In Action Part 1” Series by Brian Filley.


Love it, my friend...nice job on the presentation.
Thanks buddy... I appreciate the compliments.
Another excellent review Louis. The details and honest remarks are very welcoming. Not to critical, you don't beat up ICM for any discrepancies or mistakes, just your honest point of view. I wish more were like that. Make the point of it's qualities and any shortcomings. Your neutral views are right on. And the fact that you also refer to reference material on the subject is also a plus. Looking forward to picking one of these up. I have the Pro-modeller boxing and DML's night fighter. Now I hope ICM will continue the Junker line and produce a Ju-188E Racher, as the DML one is hard to get and quite expensive
Thanks Chuck.
I'm sorry for the late reply. I just noticed that you have commented on the review.
I try to keep my reviews as neutral and unbiased.
I'm sure that I get caught up with excitement occasionally when it's a brand new kit or something that is close to my heart.
These new ICM kits have been very well done. Like you I hope that they will continue with the Ju-88, the He-111, and the Do-17 series in 1/48 scale.
How cool would that be ?
We indeed live in the golden age of modeling.
Thanks again buddy. I'm glad you enjoyed the article.
I'll try to keep using reference material for my future articles. I plan on doing quite a few more subjects.
I also encourage our fellow Imodeler members to comment about the reviews. Sometimes I learn a lot from this, and it makes the reviews even more honest.
A prime example is the cockpit floor on this kit.
Louis, can you post a picture of the cockpit floor base?
I can compare it with a photo of Dragon built with a resin replacement from Verlinden. I believe it will should be noticeable the difference between them and the reason behind the remarks seen on other review sites about that part. Again, let me state that I think it’s nothing big, it’s correctable, and something most people would be oblivious to.
Here you go my friend. I took pictures of the kit part first. Top and bottom side of it.
Then I took a picture of the Pro Modeler A-4 kit with a CMK resin cockpit floor designed as a replacement part.
I think I may have stumbled upon what all the talk is about.
To me it looks another small section of sheet plastic needs to be added to the floor to cover the entire rear cockpit section. The radio operator's seat needs to be raised as well.
Please keep in mind the last picture is for the R/M (and possibly the Dragon / DML kits) and that they assemble a little different that the ICM kit does.
I hope this helps...
That’s exactly what the good people of ICM missed. I know that AIMS sells a replacement cockpit for the A-5 and A-4 since that part is the same on both versions
Thanks for asking the question!
It made me dig a little deeper, and I accidentally stumbled upon the answer. I will correct mine with some plastic sheet when I start building it. It's good to know the A5 and the A4 shared the same part in the cockpit.
Thanks my friend.
When I get the time, I will edit the kit review to show this defect. It should be done by later this evening.
Hello Pedro ! I just wanted to let you know that I finished editing the review, to show the cockpit floor more in depth.
Thanks again for prompting me to dig a little deeper into this.
Take care.
Nice review Louis, have the Pro-Modeler JU-88C-6 in the stash, may have to break it out now. BTY, the USAF Museum has a D-3 on display so if you want some pics let me know and I'll sent them along. Their web site also has some nice B&W pics of the cockpit interior. Have fun buddy.
Thanks Tom !
I say go for it and build the 88. From what I have read, it is a nice looking plane once completed, just a little fiddly to construct. But it's one that can be done if you take the time to test fit before gluing, and I'm sure you would have no problems with it.
If you don't mind, I would sincerely appreciate some pictures of the museum's D-3 !
Do you still have me email address ? I know the ones you sent me of the PBY were spot on and really helped a lot when I was assembling the landing gear. Thanks again for that ...
I will look for the cockpit photos online. Thanks for the tip.
These last three ICM kit reviews really have me itching to get busy... The Heinkel 111 is a gem. The other two are very good too.
WoW! (Part 2) Great review, Louis! Very comprehensive, my friend. All these cool models and I'd soooo like to do them all, but I still have so many to do already ... and I haven't yet finished my KassPass Crusader OR my Year of the Cat F6F! Time's a-wastin'!
Well don’t just sit there “Neutral Steering” ! Go build something !
I’m just teasing you Jeff…… I figured that since you were a fellow Tread Head / AKA Tanker (like me), you might like that reply……….. If not, I’m sorry.
Thanks for the compliments my friend……….. and I meant that comment. Not joking around with you this time ……………..
There will be time to finish the ‘Cat F6F, since the end date isn’t being enforced. So no worries my friend. I’d like to see both when your finished with them.
Take care buddy. It’s good to hear from you.
Hey Louis, very nice work. I like the fact that you kept it neutral and fun. I honestly don't think that the floor issue is very difficult to overcome, with a number of different ways to tackle it.
I also think most people are just happy a new tool Ju88!
Thanks Robert! Like I mentioned before, this review would not have been possible without your help. I sincerely appreciate what you did for me.
I wanted to present this review based on the facts I found inside the box, and back it up with research on the real plane. I tried not to add negativity to the article, and encouraged others to comment on what they know about the plane (or the kit). I was hoping that the reader could make up their own mind about the kit after reading the article.
I agree with you on the floor. I think it will be an easy fix, and I hope to find out soon !
Personally, I really like this kit. It looks great in person, and I am very pleased that we have a new tool Ju-88 now. In fact I'm looking to purchase the new 1/48 scale ICM Ju-88 A-14 soon. It's the "Tropicalized" version of an A-4 from what I have read. This one could be fun too... and it would be a perfect build for the Kasserine Pass GB to boot.
Take care my friend.
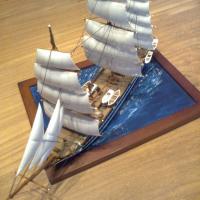
Hi Louis, thanks again for this review, I've really enjoyed reading it and the comments it has encouraged. I was so taken by your HE 111 review that I tried to buy it but couldn't find one, so I bought this kit instead and have been building it over the last couple of weeks. I hope you don't mind if I go through the instructions and point out any areas that may be of interest to you or anyone else building this great kit. Page 3 steps 1 to 7 presented no problems, I think you'll find those little bumps are fixings. in step 9 on the next page I'd definitely recommend fixing the decal if you using it now, access is a bit fiddly later on. Then onto the famous floor, with Pedro's help you've already described how to fix it. I'm following Tom Cleaver's advice and leaving it as it is. By the way, I'd recommend reading his build review and history of this kit, easily found in the excellent A - Z feature on this web site. The seat assemblies on this page and the next are very intricate and need careful study of the instructions to make sure you get everything the right way round. Before assembling the seats you are instructed to join the fuselage halves, I'd suggest you don't cement the fuselage bottom seams until step 25 when you also join the centre lower wing assembly, it should be much easier to line everything up. The ICM plastic is quite thin and flexible and it would be easy to get things out of line. No more to say until page 11, the main undercarriage assembly. This is very sturdy, but I think you have to cement them onto the lower wings before attaching the engine nacelles, I can't see how you can do this after attaching them. I think Tom mentions this in his review. Next the engines, they are bit fiddly but make up very well. However, I had some trouble in the next step, actually fixing them in the nacelles. I don't know why but I couldn't get things to line up very easily, which, in turn, gave me difficulties in getting the nacelles to fit neatly on the wings. They are still not fixed and I'm playing with them! I note Tom also a little difficulty with the seams on these. Onto sprue F, the transparencies. ICM do give some options here. Part F6, the main canopy part, has also sprung apart on my kit and will require careful fixing before I reach the painting stage, this part, in particular, is quite fragile and needs careful handling so as not to damage it. As you say, and to repeat Tom's warning, don't fit the dive brakes, step 88, yet, fix them after the decaling. Steps 92 to 97, the bomb assemblies are fine, except in my kit the body halves had quite a gap on their noses which will need filling. I've attached a couple of snaps of how the kit looks so far. Most of the bits and pieces are not finally fixed yet, I've just put them together to get an idea of how it's looking. I've masked the canopies with Tamiya masking tape, but, before fixing them I need to add some safety harnesses. I'd appreciate it if you have any pictures showing how they fitted, I'm planning to use strips of Tamiya masking tape suitably painted and drape them over those holes in the seats! Hope you find this interesting, and thanks again for your time and effort in writing the review.
4 attached images. Click to enlarge.
George, I just noticed this reply !
WOW ! You have been busy my friend... This is an excellent addition to the review article. I would love to see more of it. Hopefully you can get your hands on the new He-111, as it really is a sweet kit. You will love it...
If you have the extra time, and don't mind, could you please start a build log on this beauty ?
It really looks fantastic !
I also appreciate the building tips you mentioned. I will definitely refer to this when I start construction on mine.
Thanks again, and I am sorry for the late reply.
Take care my friend.