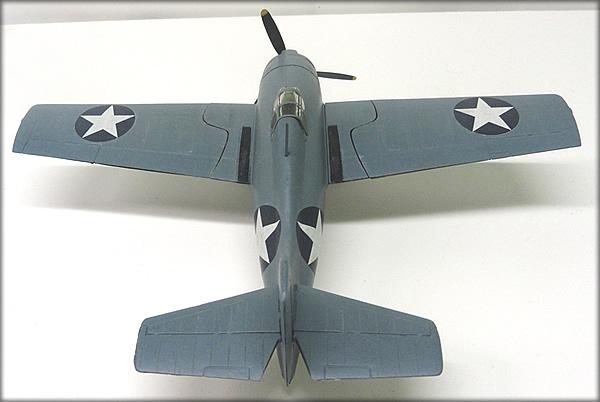
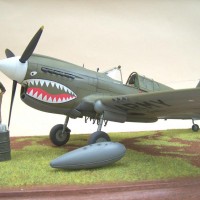
1/48 Scale Monogram Grumman F4F-4 Wildcat
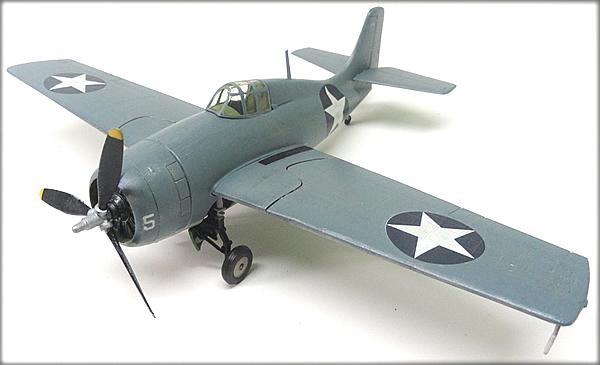
The Monogram Wildcat is a Wildcat, but I am not sure which one it is. Is it a Wildcat F4F, or a Wildcat FM 1? The FM 1 was made by GM, and the F4F by Grumman. The tail looks tall, like the FM series, and there are only 4 machine guns in the wings (two per wing), but the nose and cowling are F4F (which had 3 guns per wing, 6 guns' total), so I built the model as an F4F, mainly because I wanted to build an early war F4F-4. After the grand decision was made, it was off to the stash to find a Wildcat.
In the Beginning
Opening the box, I discovered that this kit is a 1976 issue that has a fair amount of parts, all shot in a very dark blue. There was a moderate amount of flash, but mainly on the larger wing parts, which were easily removed without too much effort. There were casting seam marks on the wheel struts, but overall, there is not a lot of molding cleanup. This kit was also one of those with working parts, mainly that the wings could fold. After some cleanup and a bath, the adventure began.
Construction
As usual, aircraft construction begins with the cockpit. But because there is really no cockpit at all (there is molded in side walls with a rear bulkhead, a rudimentary instrument panel, and a pilot figure which has the seat attached to him), there is not really too much to do. I painted the interior cockpit area and all interior areas that would be seen on the assembled aircraft US Interior Green. I also cut out the two underside windows which I plan to replace by using Microscale Krystal Kleer.
While the interior paint was drying, I attempted to put the wing assemblies together. The kit was one of those models with play value, mainly for kids. The wings could fold, the prop could turn, and you could flare the ends of the wheel struts so the wheels could roll. As it turned out, the hardest part of the build were the wings. I originally had planned to keep the wing folding action intact, but to make this work you have a somewhat complicated building sequence to do first.
The wings have three main pieces, two outer wing panels (one for each side in two pieces), and one main center panel (also with two pieces). You are supposed to first assemble the main center piece around the left and right rods, then you insert the center piece through the assembled fuselage. After this, you sandwich the outer wing panels around each of the plastic rods that has wing tabs on the ends. The center piece was not a problem, but the outer wing panels were not as easy. The outer pieces kept coming apart, or if the glue did hold together, the wing looked like an arm that was broken in mid-bone. After four failed attempts to get the wing folding mechanism installed, I gave up and just glued them to the main center piece that would be installed in the fuselage. The final wing assembly actually worked out better than I thought, because the wing folding mechanisms were not realistic at all. The wing folding line is intact, so it still looks like the wing can fold.
While the wing assemblies were drying, I assembled the main fuselage. This included installing the engine “block” (this is just the front face piece of the engine block, there is no full engine assembly), and the stabilizers. The engine block was painted metallic gray, and weathered up by dry brushing aluminum on the cooling vanes. I did not attach the engine block or the forward engine cowl at this point because the real aircraft had an obvious line where the cowl would fit onto the aircraft, so this would make painting and final assembly of this area much easier. After all the seams were filled and sanded, I installed the wing assembly and the main landing gear (pre painted black, since the landing gear was painted black and not interior green). After all was judged to be in order, it was off to the paint shop.
Painting
Painting this aircraft was relatively easy. I laid down the underside first with Pollyscale USN Light Gray for the lower parts of the aircraft, and Pollyscale Intermediate Blue for the uppers. As usual, I employed the qtip method of painting that I have developed, and it worked out really good for the demarcation line. All the tires were painted Pollyscale RLM 66 and, after drying, were glued on the landing gear. The wing guns were painted Tamiya gunmetal. After a little touch up here and there, I sprayed on a coat of gloss from the can for the decal stage.
Decaling and Weathering
I went with the kit decals for this classic, and they worked out very good. I wanted to do an early F4F-4 that had been stationed at Guadalcanal and decals that came with this kit fit the bill. There were very few makings on this kit. Aside from the six position national star markings, there was only a single numeral (the number 5) on the engine cowl, and the rudder. There was also a very small Navy bureau number on the tail, and that was it.
After all the decals had been put on, I used Microsol on the larger decals and Microset on the smaller ones. After these had dried, I sprayed another layer of gloss. After letting the gloss dry for a day, I laid down a layer of flat clear to dull everything down.
After waiting a few days for the dull to dry, the weathering began. As I stated above, I decaled this bird as a USMC aircraft during the early days of the Guadalcanal campaign. The first step for me is paint chipping the leading edges, as well as any maintenance and gun access ports with Tamiya Flat Aluminum. I then dirtied up the upper and lower wings and fuselage with dry brushing Pollyscale RLM 66, which looks a lot like the old Grimy Black shade of black which Pollyscale discontinued years ago (too bad too, I loved that color for weathering). I also used the RLM 66 for exhaust staining, toning down the decals, and showing gun muzzle blast and streaking stains. I also did an overall dirty wash over the whole kit. I then did a light dry brush of Pollyscale Mud on the lower fuselage where the tires would have kicked up mud and dirt.
Final Assembly
After the final painting, decaling, and weathering was done, a last swipe of flat was done to seal everything in. The one piece canopy was then glued on with Krystal Kleer (the evil canopy lines on this one was very quick and easy to paint) and the landing strut oleos were painted bright silver. After all was allowed to dry for a few days, the Wildcat took its place on the shelf.
Conclusions
This bird was a fun and fairly quick build (except for the wing fold bit). Like the Zero and Hurricane before it, the kit is a simple build, with not a lot of interior detail. In fact, as stated above in my opening paragraph, you are really not sure what version this aircraft even is supposed to be. But, when all is said and done, the aircraft looks good and I now have an aircraft that fills an empty spot for the early war years.
Until next time...


Good-lookin' build...I like it.
Nicely done! I had a 60s Blue Box edition, still in the shrinkwrap in my hands at Skyway Models in Seattle the other day. Ended up with a P-39 instead.
I remember getting one in 1961 or so. Yeah the wings folded, which I thought was great. Bert Kinseys D & S book on the Wildcat says it's closest to an FM-1 (Eastern Aircraft) version, though it is a conglomerate of several versions. It's a Wildcat, no doubt about it! Good old Monogram!
Nice work on a old classic!
Another nice, clean build. Well done.
You obviously enjoy building these old classics, and I think you've got the most out of this one.