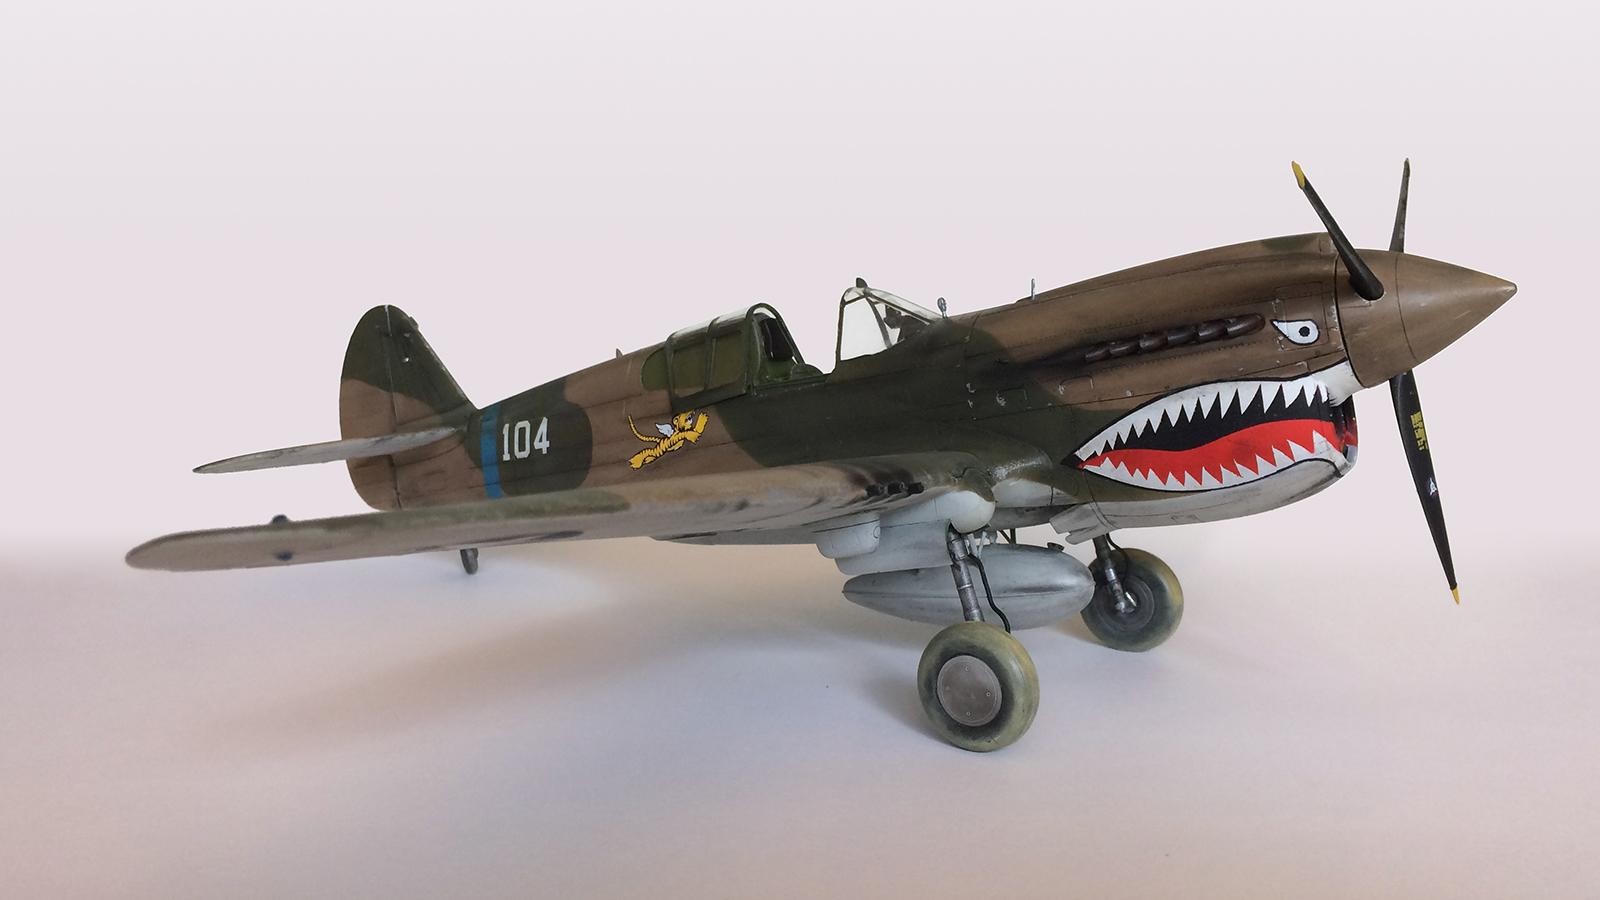
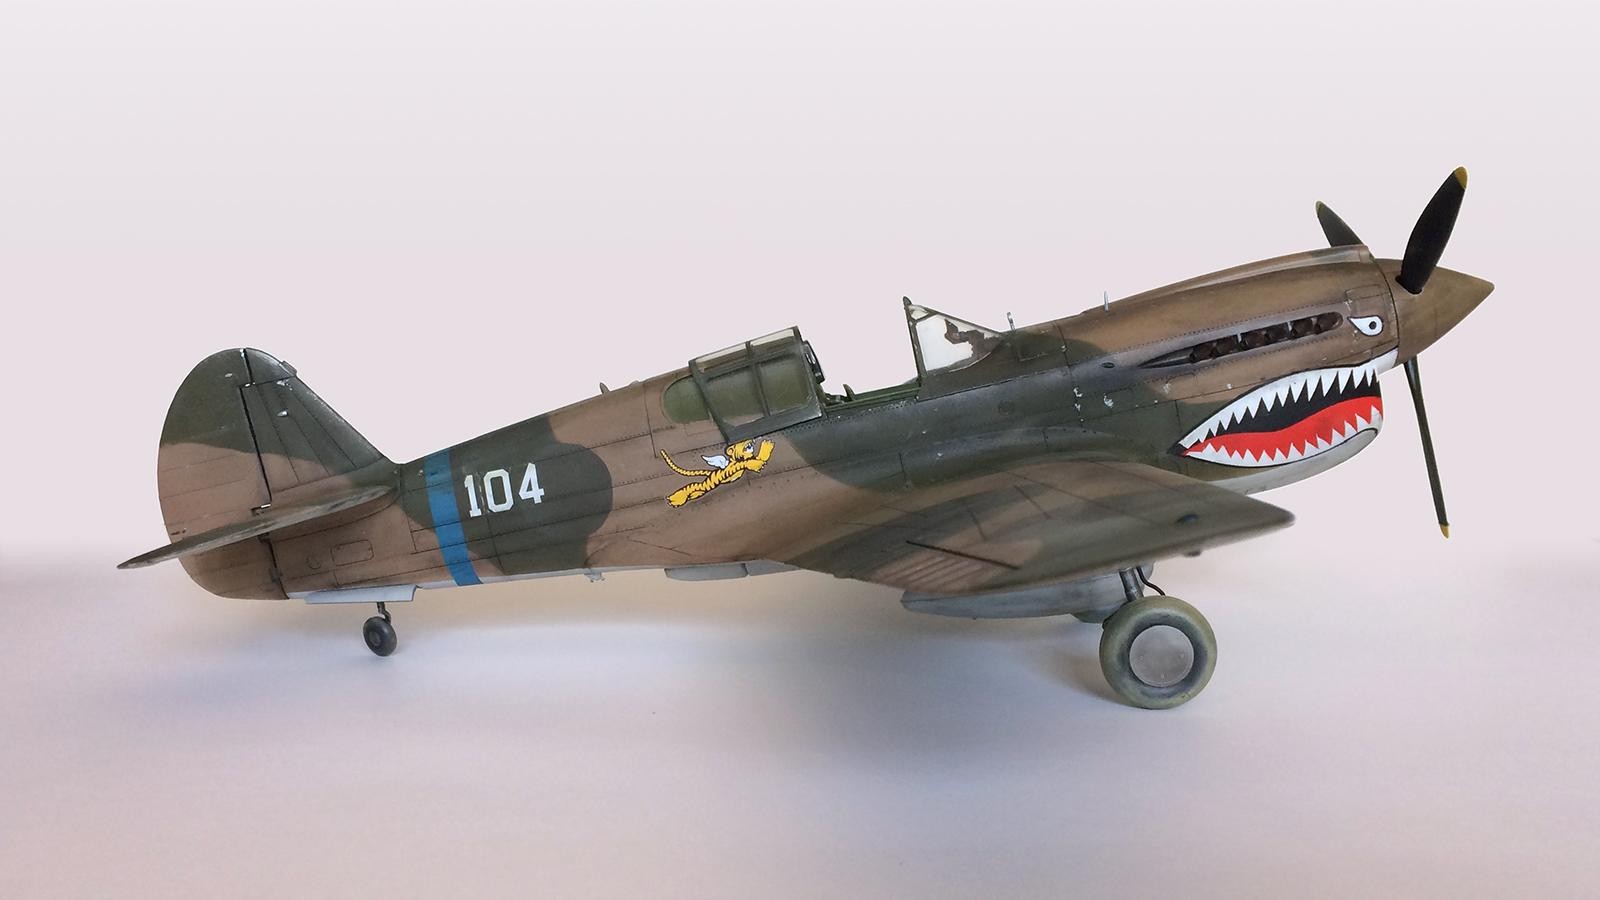
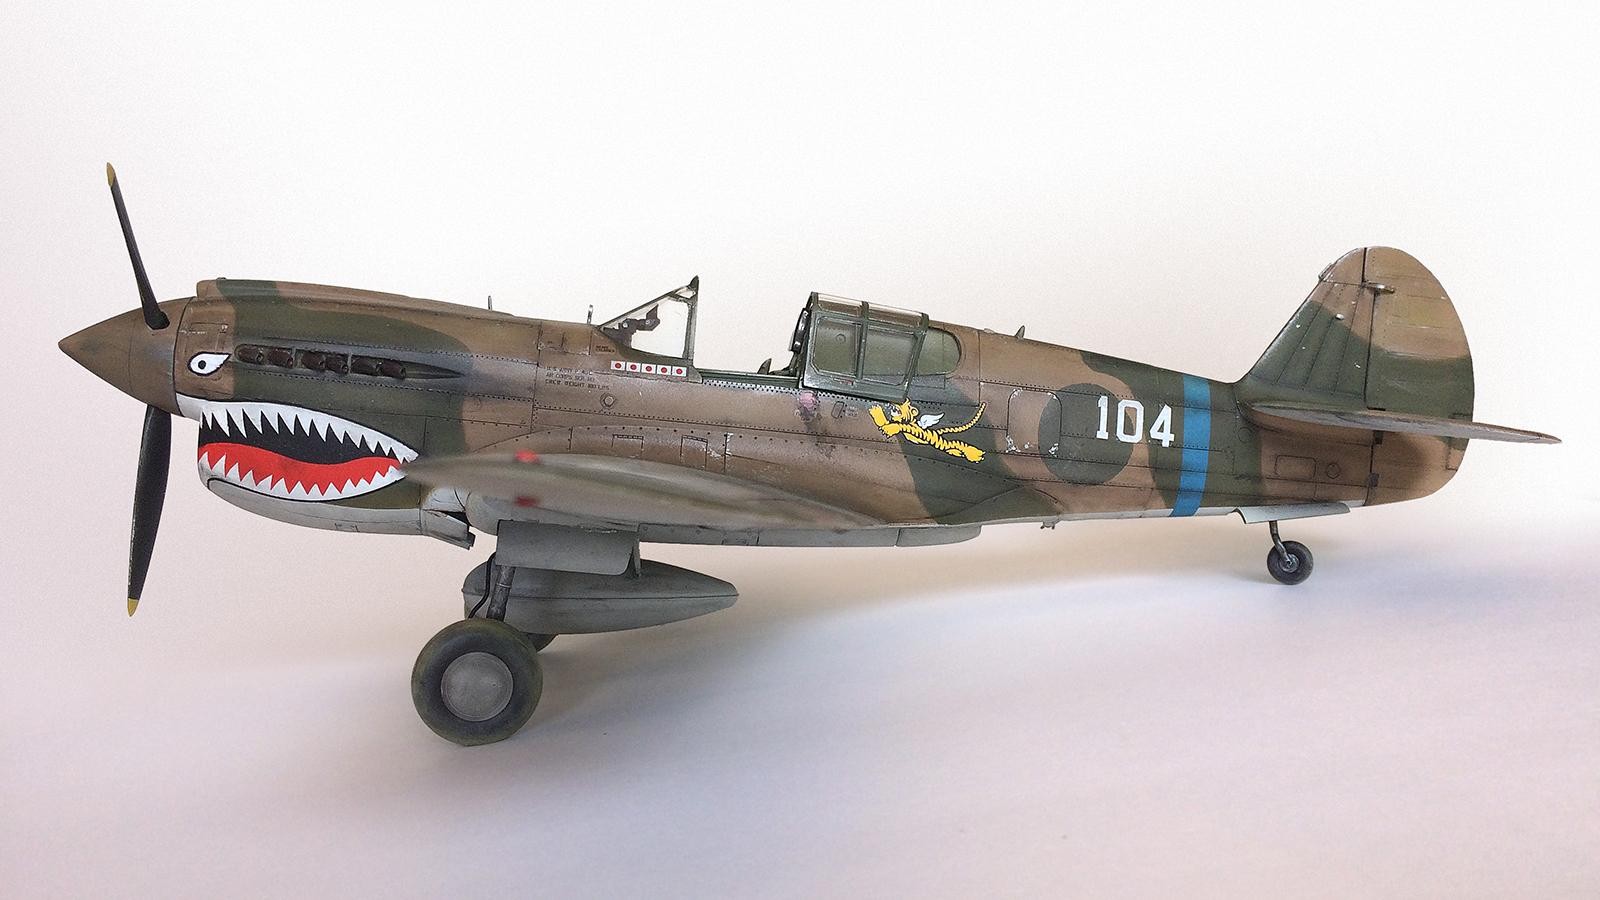
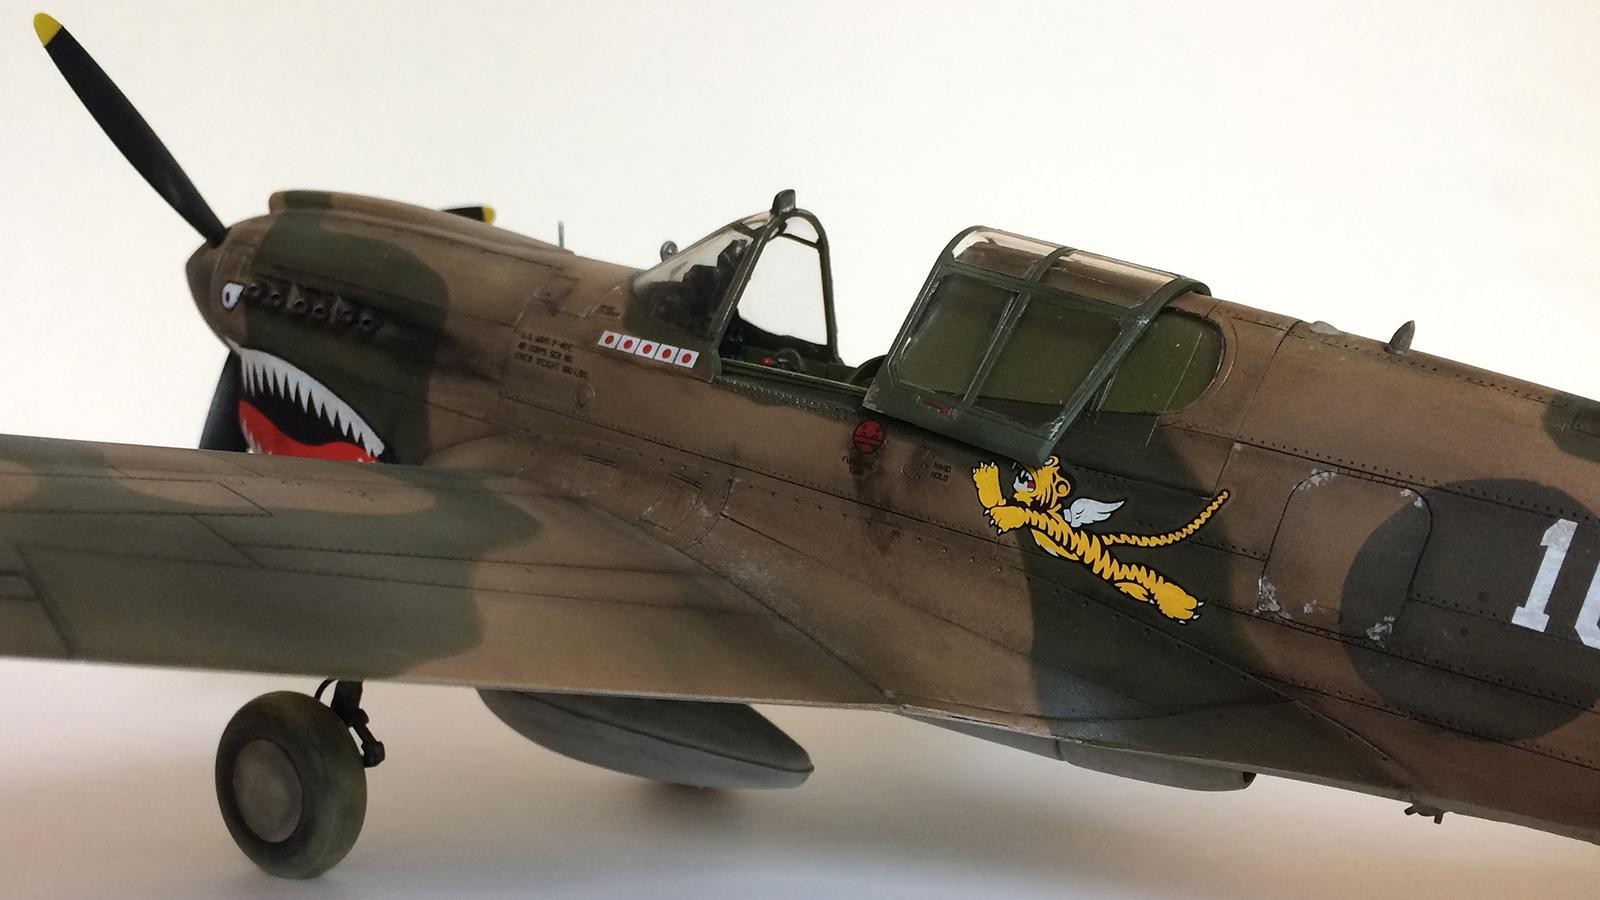
1:32 Hasegawa P-40E “Tiger 104” – Nose Art Group Build
First I want to thank Jaime Carreon for starting this group build. From the beginning I knew I wanted to be part of it, but didn't know what I should build. Than it became clear it had to be a Flying Tiger P-40 due to their defining Tiger Shark mouths. Then the struggle was which one? At this point I didn't even know that different variants of the P-40 existed, which is what's so cool about building models. One can approach every build as a history project. In the end I chose AVG Ace Col. Ed Rector's Warhawk. This leads me to the other cool thing about the iModeler community. I posted a few WIP images during this build and want to thank both Tom Cleaver and Paul Teixera for their advice on P-40s and this specific bird. I hope I did it justice.
Tom is a font of knowledge on WWII war birds and was very generous with his insights. Paul is just an awesome builder and sent me some great reference pics of his P-40B. If you care to view the WIP thread, click here: http://imodeler.com/groups/nose-art-group-build-1917053956/forum/topic/p-40-tiger-104-132-hasegawa/
Background on Tiger 104's pilot Colonel Edward F. Rector
On December 10, 1941 Rector was part of a three plane photo reconnaissance mission from Rangoon to Bangkok. On December 20 when the Flying Tigers engaged in combat for the first time during a raid by Hanoi-based Japanese aircraft on the Chinese city of Kunming, Rector provided the American Volunteer Group with its first aerial victory and would later record the last in a long list of 23rd Fighter Group air-to-air kills. In May 1942, he played a critical role in locating and attacking Japanese military columns attempting a push into China at the Salween River Gorge. This allowed the Chinese time to blow up a key bridge across the river, and the Japanese subsequently retreated into Burma. Rector was credited with having destroyed 10.5 Japanese aircraft in aerial combat during the war. More from Wikipedia: https://en.wikipedia.org/wiki/Edward_F._Rector
My Take on the Build
Well as excited as I was to build this bird, I hit a few frustrating points and it seemed to fight me all the way. I'm not sure why, maybe I was distracted. At any rate I got it together after what seemed like months, on yeah, it was months. Funny how life can get in the way of hobbies. Through all it though I continued to marvel at what quintessential fighter the P-40 was. Not too big, not too small, aggressive looking and that fierce shark mouth coming to blow you out of the sky.
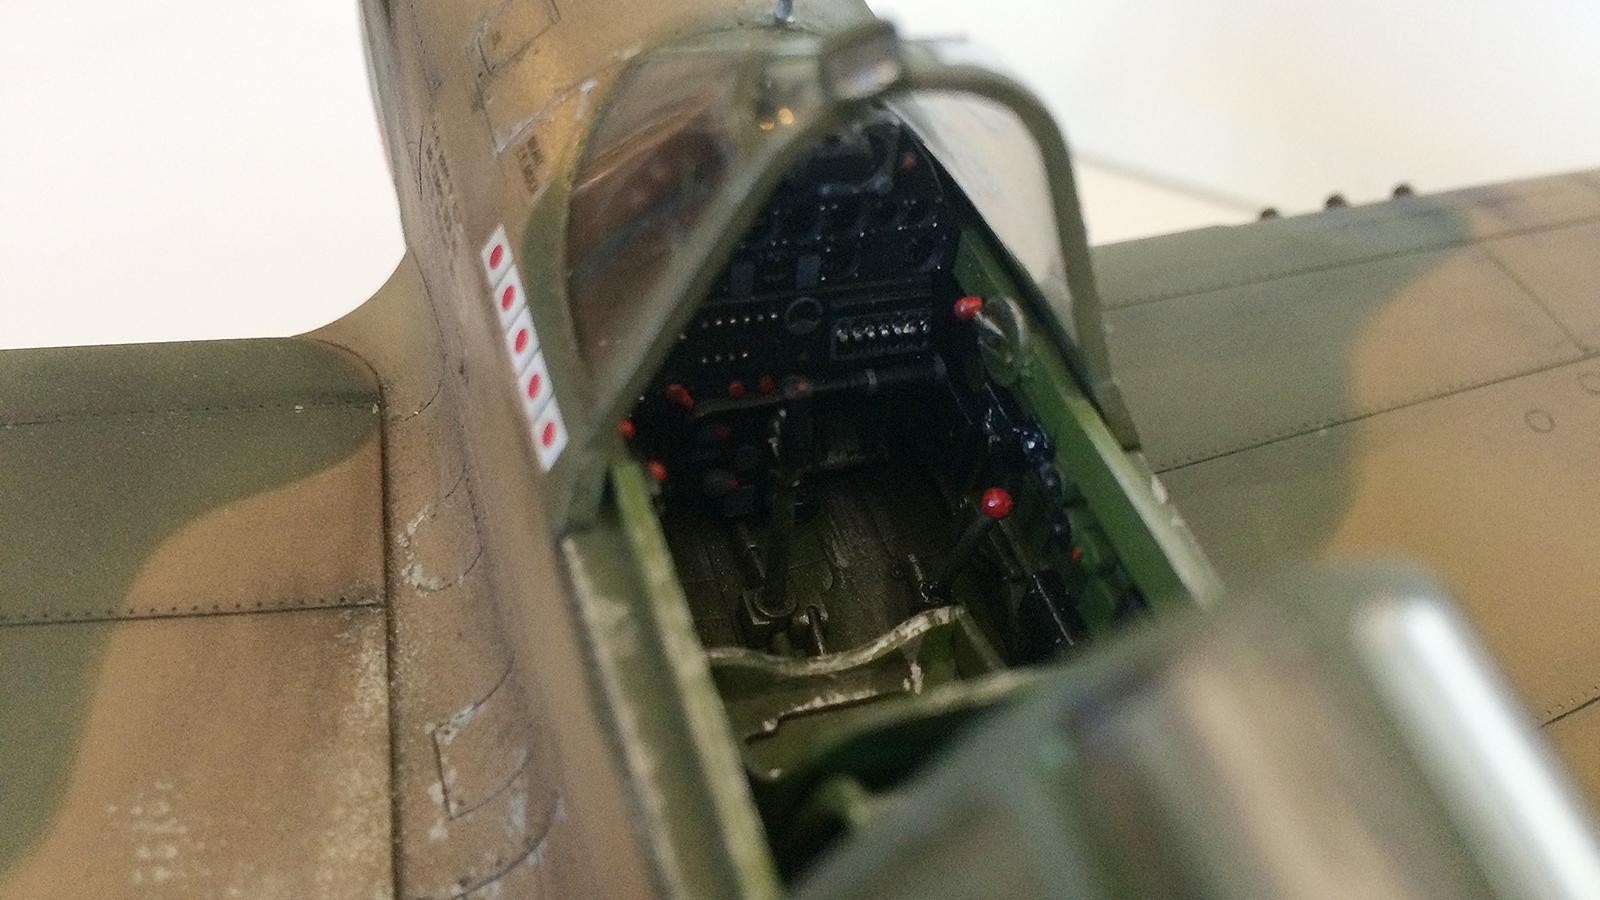
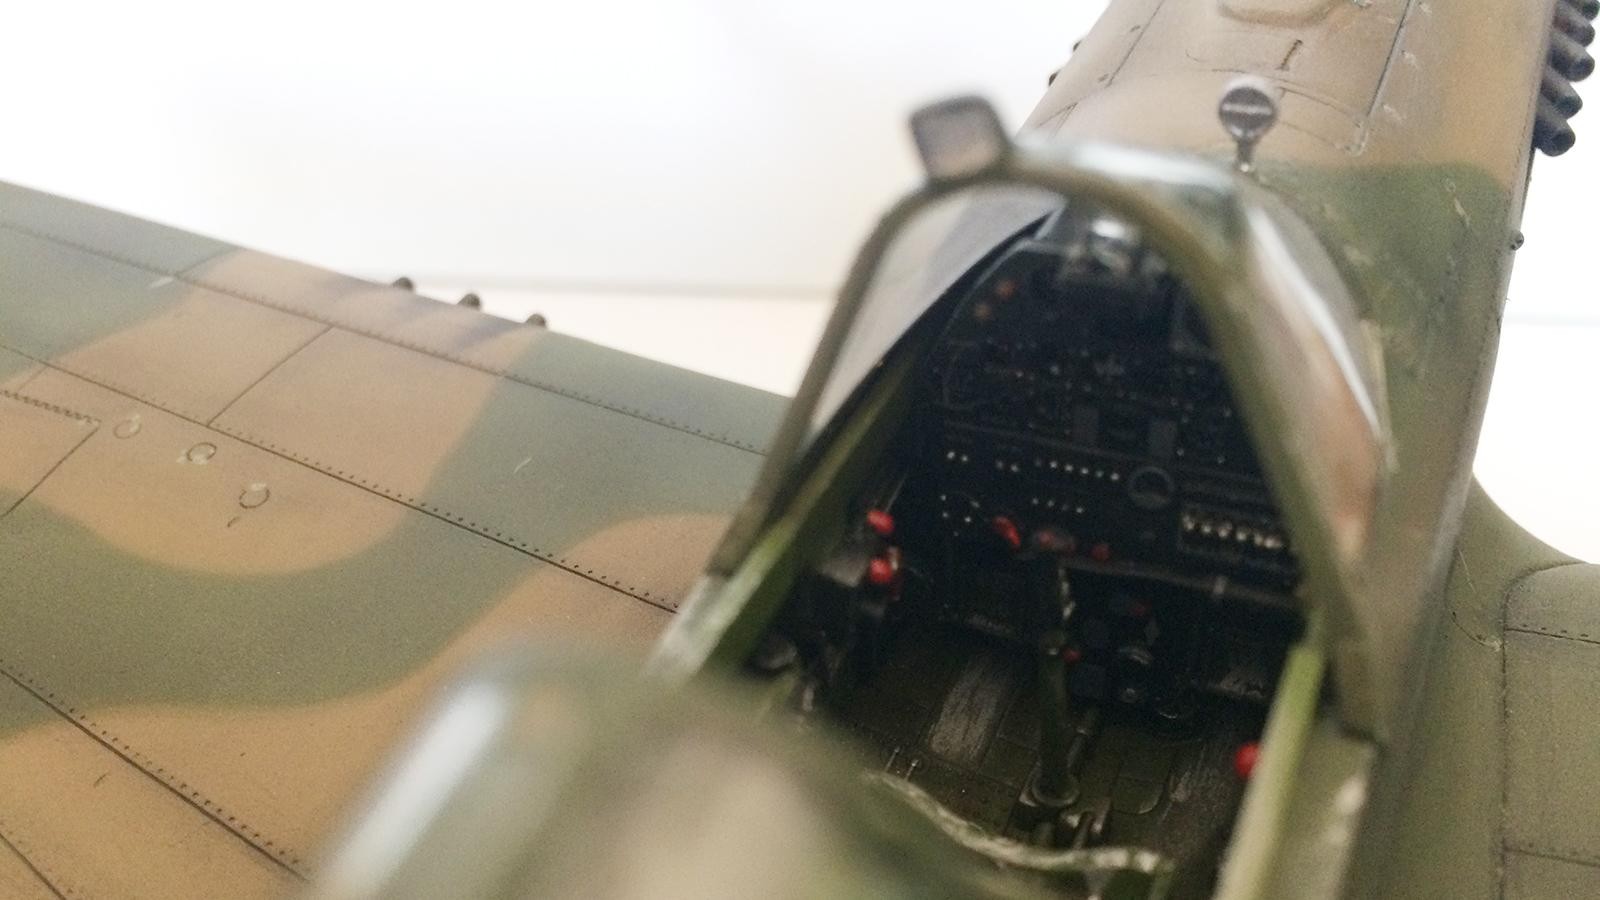
The finishing
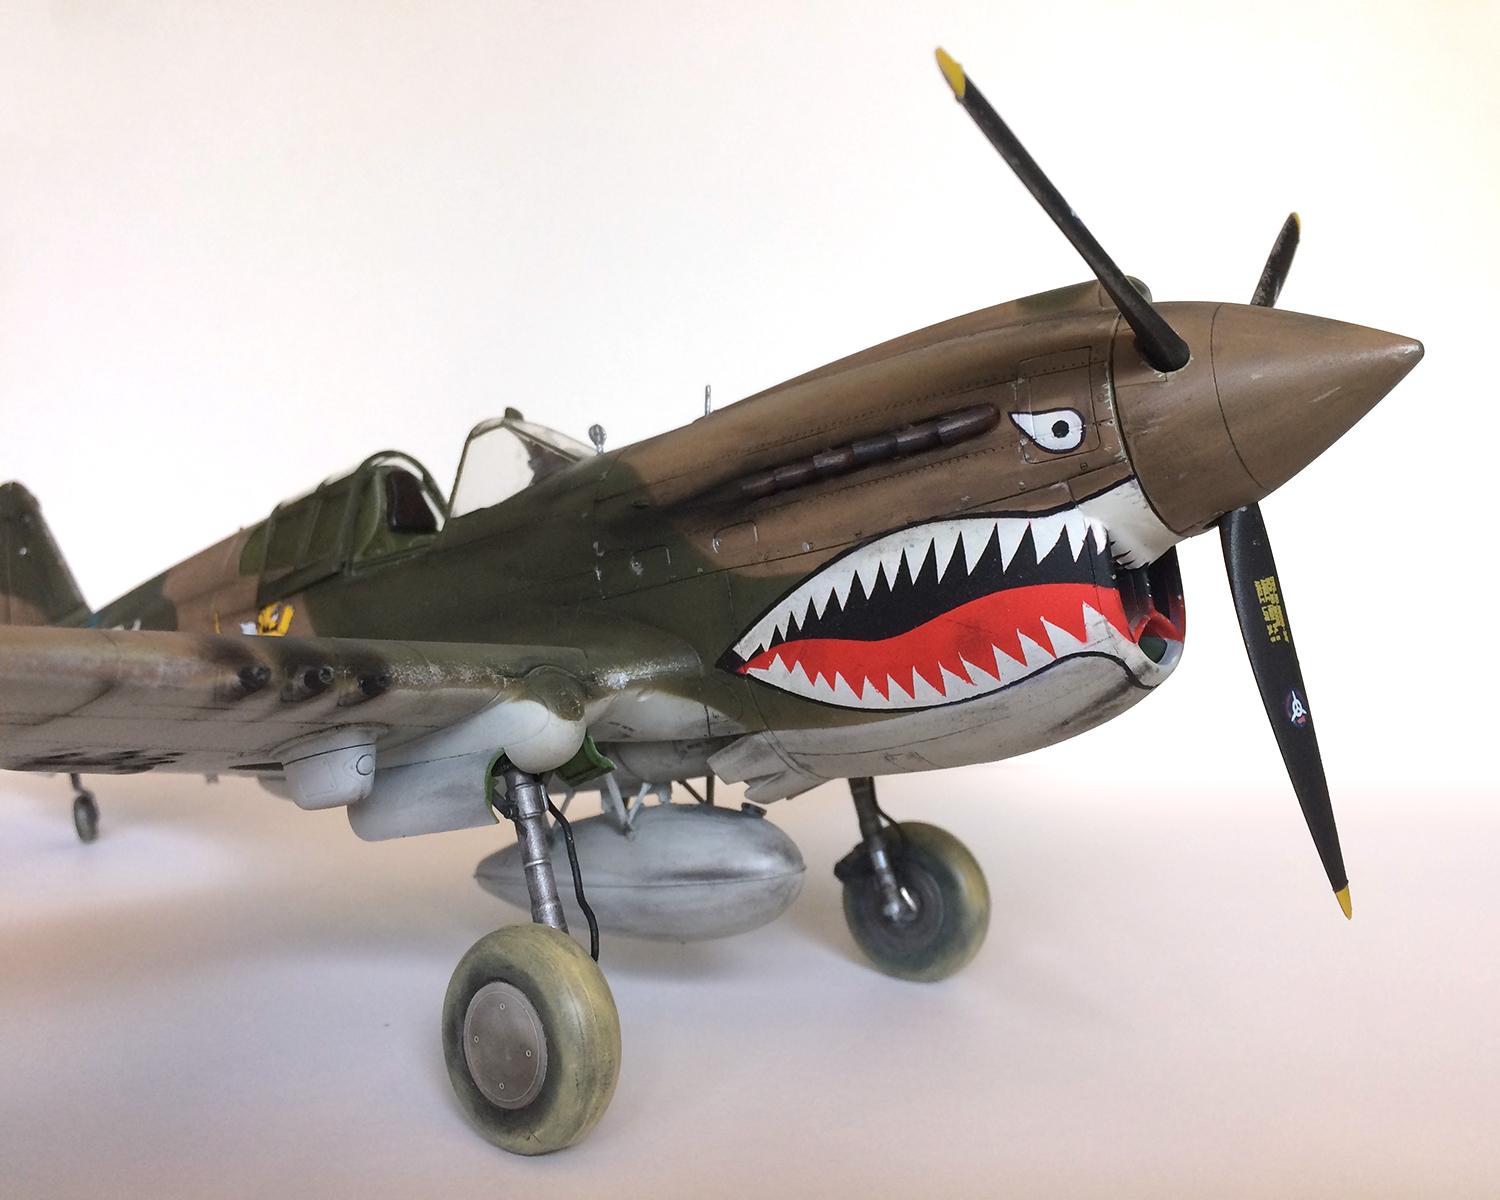
Speaking of the toothy grin. I decided at the beginning that I was going to paint the mouth rather than trust myself to not mess up placing the decals around the engine cowl. And, for all the layers of Frisket I used to paint that rascal on, I'm glad I did, because Haswgawa decals suck! Or at least I suck at applying them—more on that later.
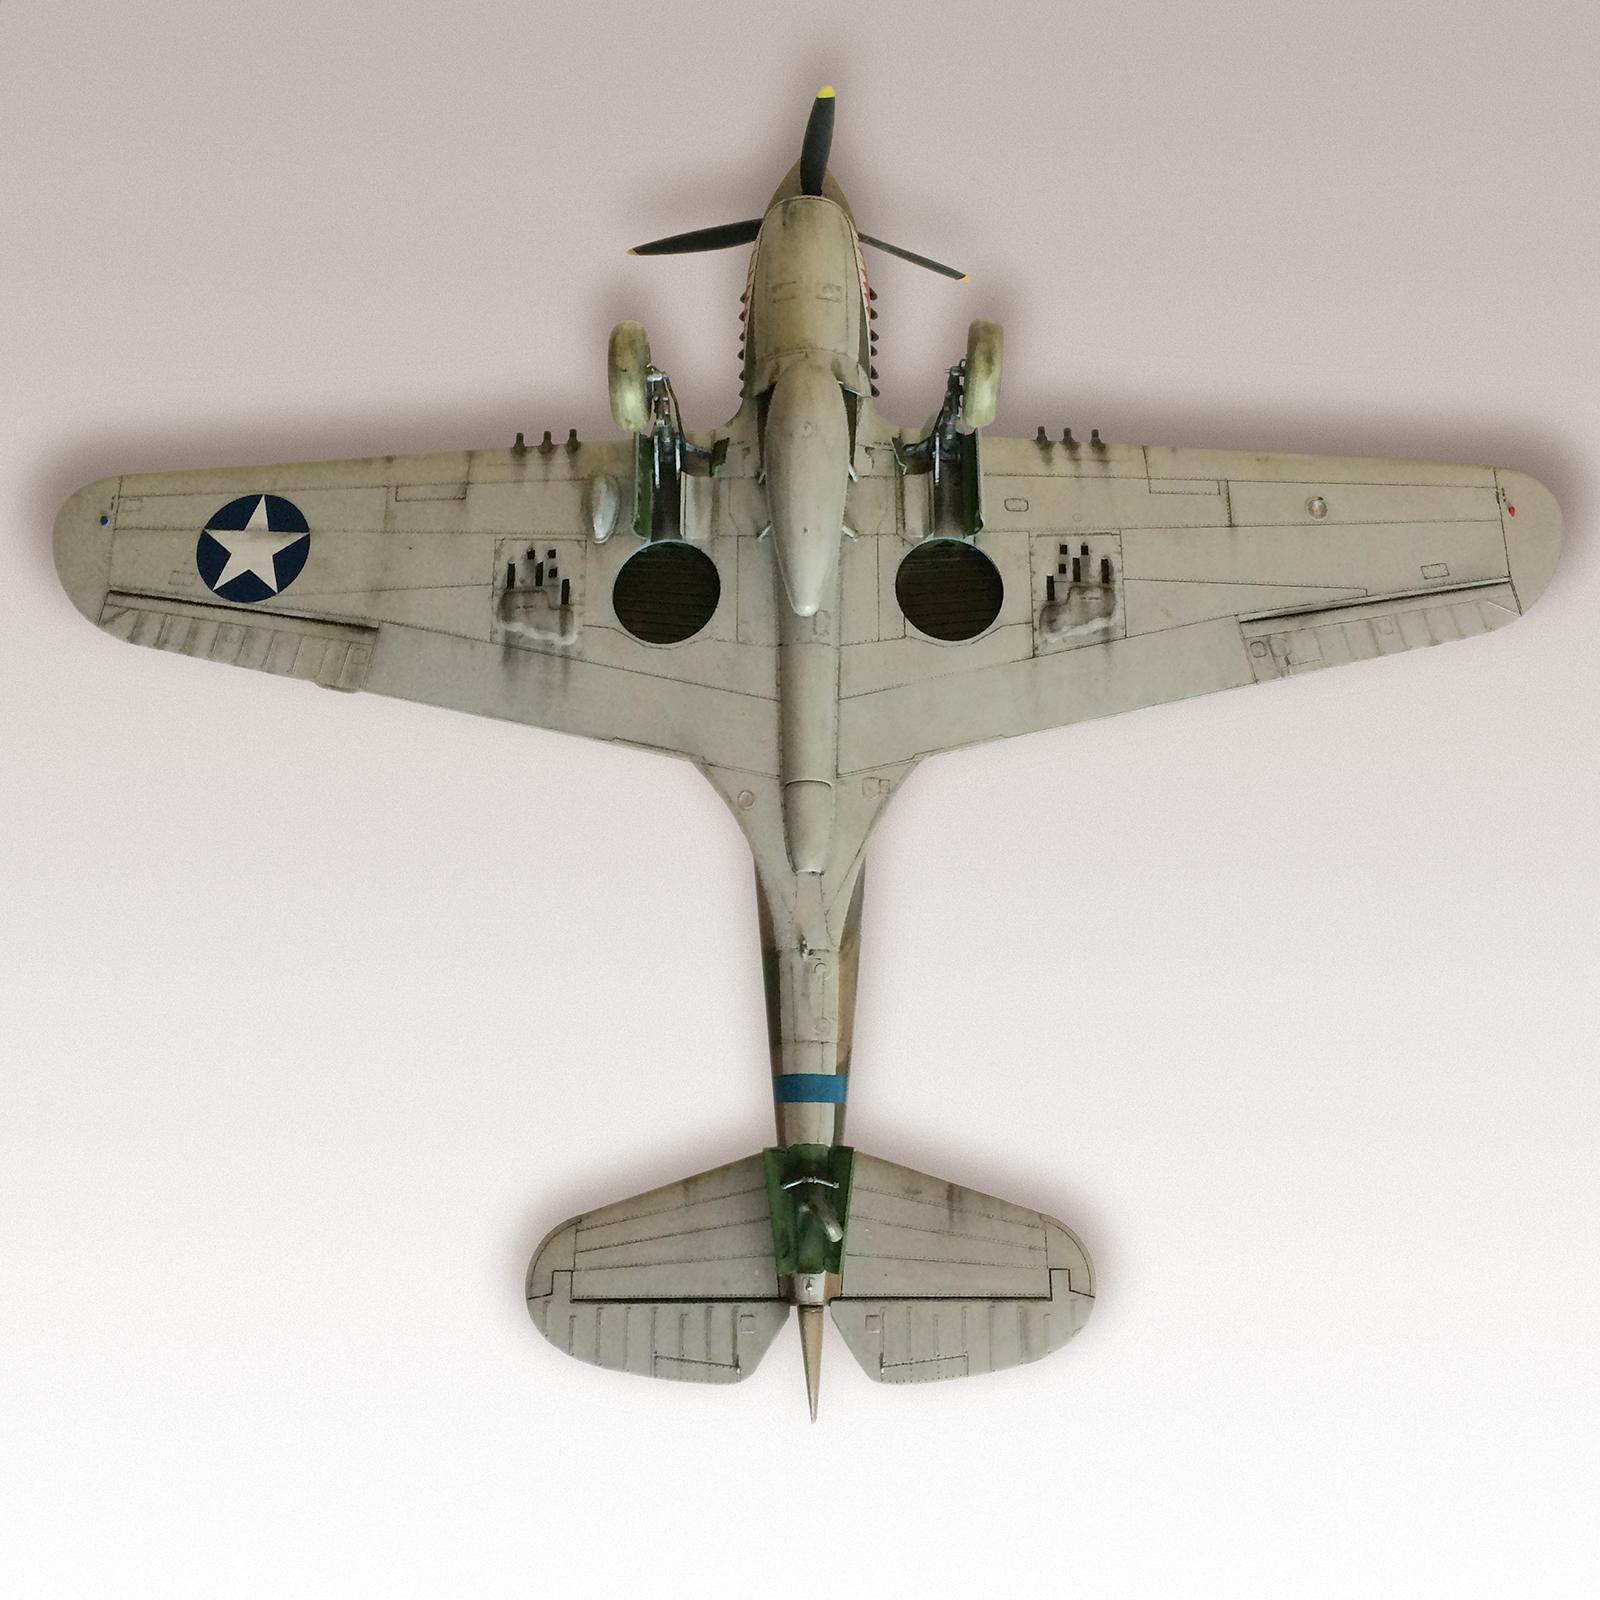
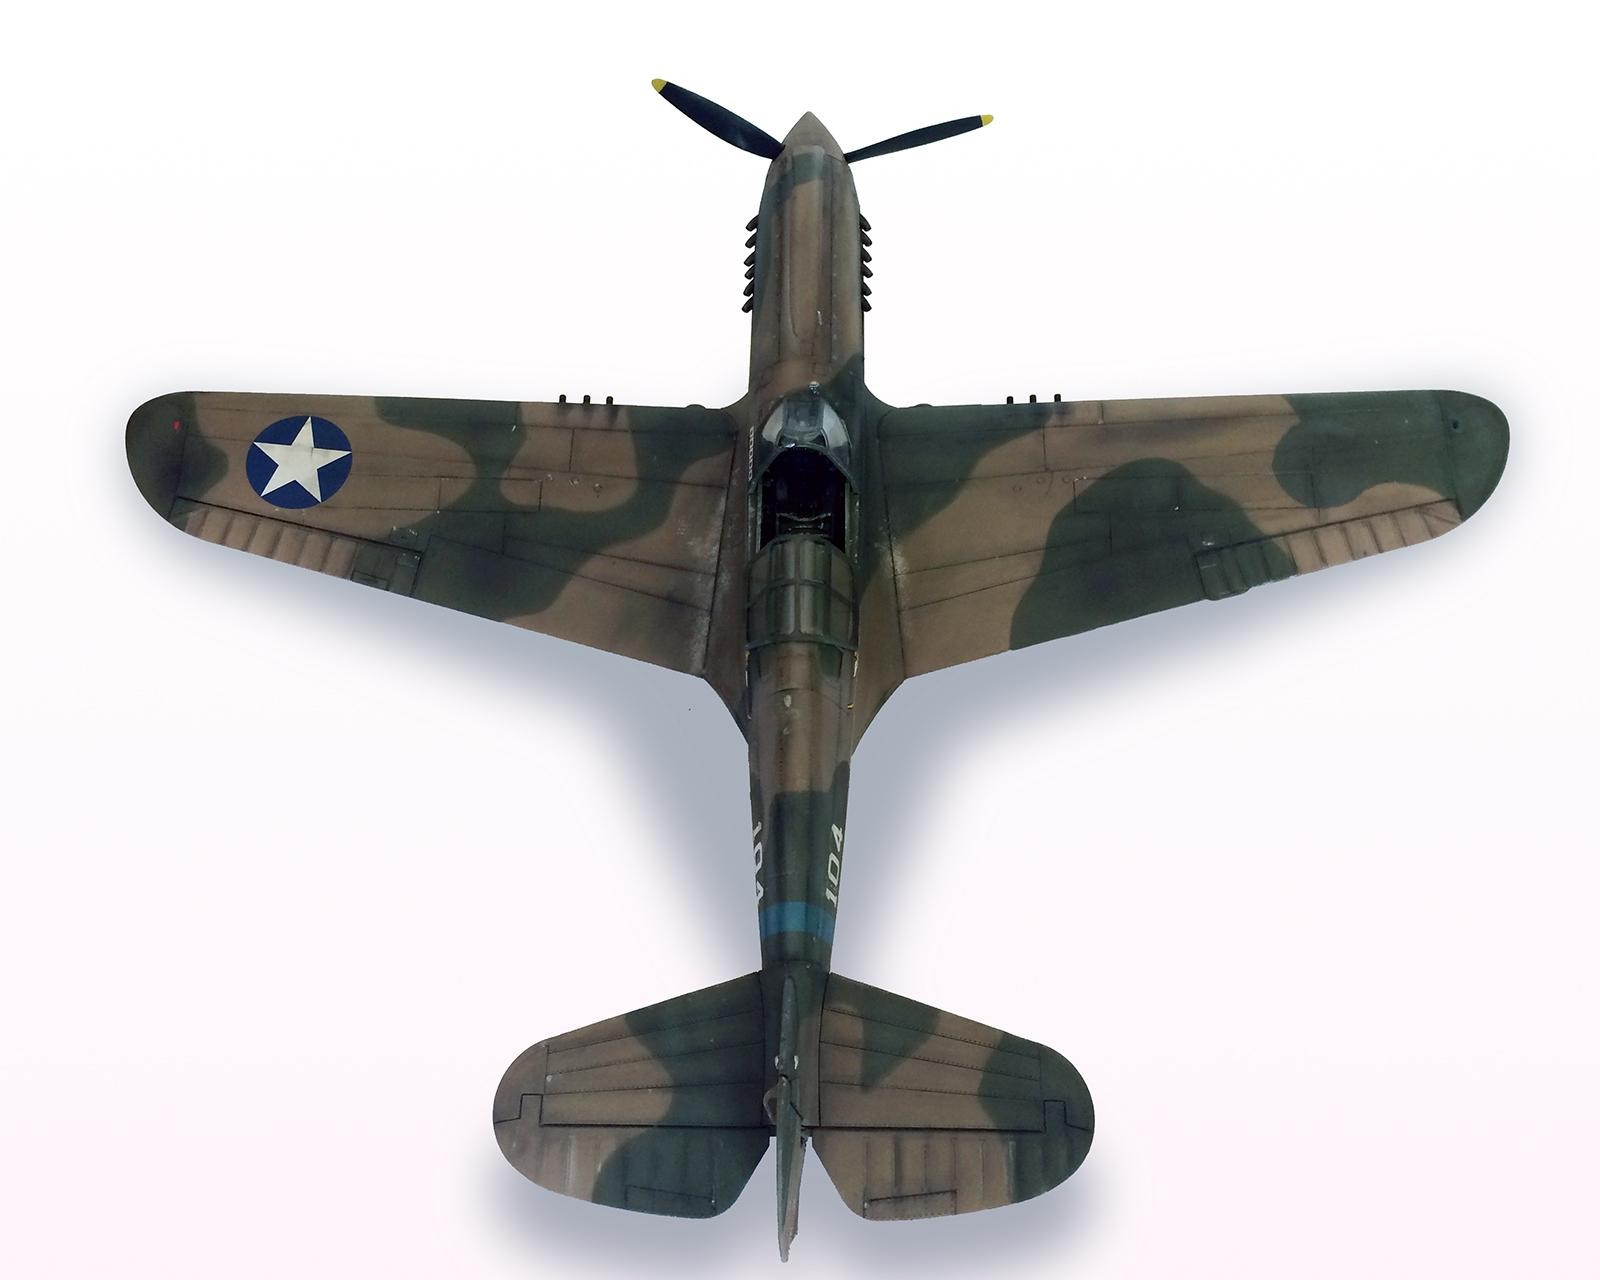
Since I've had bad luck with airbrush primers, I shot this whole thing with Mr. Finishing Surfacer 1500 from a rattle can. It's not only hard, it fills a bit of the imperfections too. Final paint was all Vallejo from their US Pacific/Burma color line. I figure they must know what the right color is so why not use it. Thanks to Tom Cleaver (mentioned above) for clueing me in on the in-theatre, over-painted US insignias. I made them a different color green, maybe not as pronounced as they could have been, but at least I tried.
This is about the point I found out how much I hated the factory decals. I tore the first Tiger eye I attempted to adhere. Well, after waiting a few days to see if anyone had some spares they would part with, I painted those on too. I outlined everything with fine Sharpie. God knows there is no way I have the talent to paint the black pinstripe around those features. To date I have not added the antenna wires, which is something I'd like to try on this build, so for now it is done. And yes, for those of you who are really observant, I forgot to add the wing Pitot head prior to taking the photos. It has since been added.
With that—I give you my take on Col. Rector's P-40 Tiger 104. That's all folks. I look forward to your comments. Keep building!


Matt, this is an excellent looking P-40, your paint work looks really good and I really admire the shark teeth, (gutsy move painting that on).
I was wondering about your camo work, did you mask / tape that ? I ask because I've been a Testors Model Master enamel using forever, but now that they are starting to discontinue their FS colors, I 'm looking to go to something else and Vellejo air was on my list. The finish looks great, but my questions was due to my past experience's using Acrylic paint were the paint lifts off when I using tape on it.
Terry, do you wash your models before building and then prime? All the plastic is covered in a micro layer of release agent that should be washed off with mild soapy water and rinsed. When dry and as the build progresses the model/model parts should be primed before painting. It’s important to create a key for the paint to adhere to, which is accomplished with the wash and the prime. Also, on decalled areas you can always brush/spray a clear acrylic over the area as an additional protective layer.
Apologies if you’re already familiar with the process.
Terry,
The Vellejo model air can be finicky, but I would agree with everything Rob said above. The biggest thing I found was the using the right primer. Vellejo primer has low adhesion, so I switch to the Mr. Finish line. Much better base. Once I did that I have very little issues with the paint coming off with tape or sticky tac. The exception being clear parts, they need to be roughed up for any paint to stick well to them in my experience.
I also only use low-tac tape. Usually the Tamiya tape, but I will use blue painters tape to cover large areas. Best thing to do is find an old kit and do some test. Hope this helps.
There is a type of tape used commercially by decorators for fine-lining, called Frog Tape (low tack). Also re primer, Tamiya Fine is very good.
Good job, Matt.
The teeth and the replacement eyes are fantastically well done Matt. I'm really impressed by the use of the sharpie too - not easy in itself! They are the cherry on top of a cracking build!
Excellent model Matt! What type of pen do you use to paint those black areas? I have several acrylic pens bought in artistic stores that worked well, not only in getting thin black lines but also stains & exhaust fumes
I used a fine tip Sharpie because they are permanent. I also use artist markers for the panel lines, but those can be manipulated with water and I wanted the black to stick.
Matt, the brand Sharpie is new to me, so please excuse if I didn’t catch it in your text earlier. Indeed my Faber Castell pen are a sort of water based ink but once dry the line stands the finger touch. Will try one of these Sharpies when the occasion comes. Thanks!
Excellent job Matt, especially that shark mouth paint job. Really looks good and like you I've also have issues with Hasegawa decals. Usually go the after market route.
One of the better examples of this scheme I've ever seen. Outstanding work, Matt.
Hi Matt: Fantastic job..really. All around nice finish and realistic appearance! Your weathering is spot on and perfect. I actually like the "E" model better then the "B" b/c more aggressive looking chin intake. Nose-Art is impressive, especially since you painted it! I chicken out on that, cheated and used decals. They were after-market and much better then the Trumpeter so I gave the decals a chance. Cockpit really fits the look and well finished. Camo came out so well. I really really wanted to thank you for citing my name! Never had that happen before. Nice to be appreciated. Thanx so much. Would be cool to put our builds side by side in a flight-line sort of diorama. Great Job.
Hey Buddy, we're all in this together. I appreciate ya. A dio would be super cool. I'm toying with building "Tex" Hill's P-40 to partner up with Rector's.
Matt, this P-40 is outstanding! I love it. Unlike Paul, I tend to prefer the B model, but that wee fact has nothing to do with the admiration I have for YOUR P-40! Well done on the painting (and the steady-handed Sharpie work) as well as the weathering.
Ona a side note, I had the honor of meeting Col. (Ret.) Rector in the late 1970s. He was the keynote speaker at a function here in Indy and my Mom heard about him and bought tickets to the affair. It was VERY interesting! Sadly, he passed away in 2000 or 2001.
Bravo!
Very nice work Matt.
Nice weathering balance. Not too much or too little. Just enough to make it appear as it's seen more than a few sorties.
Looks great.
Really nice work on this and a very realistic result. Glad to have been of help (it's what I do). Masking the sharkmouth is amazing - truly excellent result.
Beauty, Matt, and a great addition to the group. I think you just set the bar up a couple of notches! Shark teeth are bang on...
Tex Hill and my youngest son share the same first name, something they had a great discussion about when we met him a few years back at an airshow. We were fortunate enough to get a P-40 print autographed by him during that meeting, and it now hangs in my model room.
That is so cool. Not that many of the greatest generation left. The best we can do is preserve their legacy in the craft we all share.
Sharp looking P-40! The hand painted shark mouth makes even more authentic.
A real beauty Matt - as others have said, the paint and weathering look spot-on, and you did a fantastic job on the mouth & eyes.
AWESOME.
Hi
Trying to get a 1/32 scale model but it seems no one sells them does any one have a or knw a place that still sells the model?
Cheers
Wombat
Wombat,
Here you go https://www.scalehobbyist.com/catagories/Model_Aircraft/browse.php?s=0&t=0&u=0&micr=294&pg=1&ppp=48&sb=stocknumber&so=a&era=6&ct=1&sc=32