1/72 Hasegawa SBD-3 Dauntless

Started by Greg Kittinger · 22 · 6 years ago · 1/72, Dauntless, Midway, SBD
  • Profile Photo
    Greg Kittinger said 7 years ago:

    I decided to start another thread, since I couldn't find a proper B-26 subject at the beginning, and pulled this out of the stash since the decal set I bought also included one.

    I got the cockpit started (no pics yet), and originally thought I'd build with canopy closed since it would be quite a bit of work to sand down the sections to fit in an open configuration, and this kit has pre-painted canopy frames! I changed my tune when I hastily decided to open all the dive brakes (see below description), and decided to build just before pushing over to drop bombs. I'm still going to keep the forward section of the canopy closed, but think I can trim edges to make the rear sections fit open, and won't have too much re-work on canopy frames to have to do. This does mean I may do some extra work in the cockpit since at least the rear section will be open...

    Now - about those dive brakes. Both upper and lower dive brakes (wing sections) are molded into the upper half of the wing, and originally I thought I'd just drill out the holes so it would look more realistic. I did on one of the wings, and I suddenly started thinking - what if I sand this fat baby down, cut out the upper brake and create the lower flap out of styrene?

    Before I could think clearly, the files and sanding sticks came out, and I took the brake down to just about the thickness of the upper wing half, and then cut out with a knife. Before I sanded it down, I used the shape as a pattern for the lower flap, as the shape is just a tad different.


    Next was to cut out the lower flaps from styrene, and finish the drilling process. I ended drilling out 378 holes (318 for the 5 units of brakes/flaps, and an extra 60 for a flap I broke while sanding - more below).

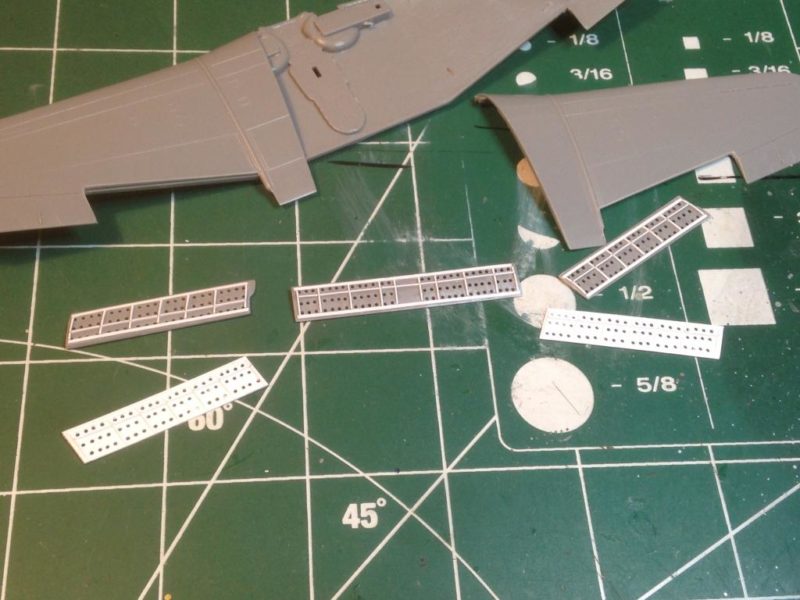
    Cleaning up the drilling took some effort, especially for the softer styrene plastic. First I got the drill bit through each hole, and then backed out without reaming, because I broke one bit early in the process and only had one other of the same diameter. Once I had drilled all holes, I ran the bit back into the hole up against the end point and then reamed out the hole of excess. I did this from both sides, then used a knife to scrape across the flap/brake to get the hanging chads off. Next was to take my smallest round file and lightly ream the lip of each hole to further release remaining excess plastic. Then I sanded (lightly, after breaking one of my completely drilled flaps by sanding too vigorously!). After sanding and brushing off all loose stuff, I inserted the brush tip of Tamiya glue into each hole to further clean up the small remaining excess.

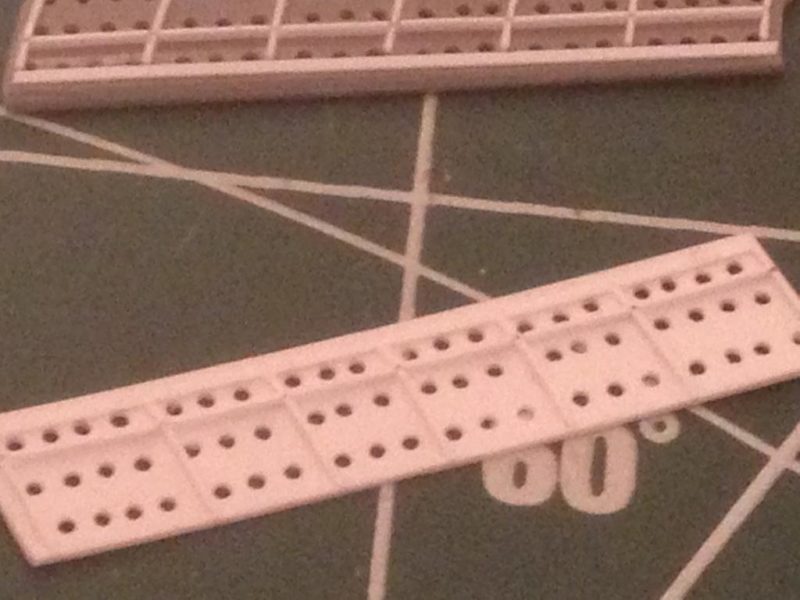
    It was very hard to get the holes perfectly aligned, but it looks more realistic than little indentions in the flaps/brakes! The sections are also thicker than scale, but I decided to keep it this way, as the thinner styrene I experimented with didn't drill well and didn't hold it's shape very nicely.

    Now comes the fun part! Before all this, I really hadn't done research on just what the undersides of the flaps/ brakes and the actuators looked like. Yikes! (a few pics of my research..)


    So, out came the styrene strip in .01 x .02 dimension, and away we go. I laid down the runners at the front and trailing edge of each brake (the wing flaps didn't really have the training edge runner). Then cut 38 ribs and glued edgewise, and then sanded to shape. Next I had to create the center runner for each piece, but did so by cutting individual "spacers" to run between each rib (33 spacers total, also glued edgewise).


    Yet to come: I need to even up the upper and lower wing sections where the flaps/brakes mount, blank it off and drill it out, and add the actuators. I also need to create the detail under the center section flap/brake up against the fuselage and inner wings.

  • Profile Photo
    Louis Gardner said 7 years ago:

    Wow Greg ! You sure have packed a lot of details in those flaps ! Looks really nice too.

    I have just finished installing the flaps and dive brakes on my 1/48 scale AM Dauntless. It was hard enough for me at that larger scale. (My eyes are not what they used to be) 🙂

    Thanks for starting the thread. I'm looking forward to seeing your progress.

  • Profile Photo
    Bernard E. Hackett, Jr. said 7 years ago:

    Greg, thanks for the closeup photos of the dive brakes and actuators.
    Great work replicating the interior details on the model.

  • Profile Photo
    Greg Kittinger said 7 years ago:

    Ok - since I decided to cut open the canopy and at least next the back sections, I knew you would be able to see more detail in the cockpit, and Hasegawa provides none. I had already painted a base coat of interior green thinking I was originally going to mount the canopy closed as provided. Here's the result:

    Added the linked red-handled levers (not sure what they are - didn't research them - dive brakes?), and some details to the bulkhead.

    Heres a couple of pics of the floor/seat section installed on the starboard fuse half, showing the added detail there


    Here's the port details - used sprue, styrene rod and wire for the cabling and bits of styrene for all the boxes and such.

    You'll notice I didn't add the ribbing under the center bulkhead, as it won't be seen past the gunner and all the filler in there, nor did I add much ribbing or detail in the front section, as with the canopy closed up front, you won't see much. I did add some upper side wall details (throttle levers, etc.) but that's about all.

  • Profile Photo
    Louis Gardner said 7 years ago:

    The details are simply amazing Greg. Especially when you consider the scale of your plane is a 1/72 kit. Your dive brakes and flaps really pop now that you have scratch built these extra parts. I'm definitely looking forward to seeing updates with this one!

  • Profile Photo
    Greg Kittinger said 7 years ago:

    So here is some work on the wing where the airbrakes/flaps will be affixed - building up the actuators...

    First step was to blank off the wing - once the original brake was cut out, the top and bottom sections of the wing do not meet and there is a gap. I sanded down the top and bottom sections evenly then glued a piece of thin styrene to it, and once dry, drilled with holes per reference photos.

    Next, I cut sections of styrene strip and glued them down to the styrene blanking strip. The actual brackets that hold the actuator control rods are a bit different shape and hollow in the middle, but that just isn't gonna happen at 1/72 with styrene!
    Once those were dry, I cut sections of styrene rod and inserted between the brackets to depict the continuous control rods running down the wing - there are two, one almost up against the wing and another just above it and seemingly a little higher up from the ground.
    You can see just to the right I've begun adding detail to the center section above the central air brake, and will flesh this out once the fuselage has been mated to the wings.

  • Profile Photo
    Paul Wilsford said 7 years ago:

    That is some tedious work for a 72 scale kit, Greg. You seem to have it well in hand.

  • Profile Photo
    Louis Gardner said 7 years ago:

    Wow buddy... You are scratch building something in 1/72 scale, that I would be very hesitant to try in 1/48 (or even 1/32nd scale). Outstanding work ! Looks great. Hope you had a wonderful Easter.

    Thanks for the updates my friend...

  • Profile Photo
    Greg Kittinger said 6 years, 12 months ago:

    Got the wings attached, and then finished detailing the underside of the center brake along with the actuator control rods (or whatever they would be called). You can see I also had to replace the gear doors, as the kit parts, as usual, were molded to be displayed in the down position and didn't fit properly closed.

    I've also got the engine finished and attached, and am now working on some seam clean-up. Getting closer to paint... (already finished the red undersides of the brakes/flaps).

  • Profile Photo
    Tom Bebout said 6 years, 12 months ago:

    That's some really nice Greg, looking forward to the end result

  • Profile Photo
    Louis Gardner said 6 years, 12 months ago:

    This looks like you took an Accurate Miniatures kit and shrank it down a few sizes or someone has some REALLY big chickens ! 😉 🙂 🙂

    Amazing details here my friend. Looks great !

    I seriously would not have known this is a 1/72 scale kit if you didn't tell us this earlier in the title for this build thread...

  • Profile Photo
    Greg Kittinger said 6 years, 11 months ago:


    Finally got all the brakes/flaps on and the actuators added. Close enough for 72 scale (and me)! Now I can finish paint and move on to decaling, weathering, and all the finish work.

    I did get the canopy cut apart - it survived! Now I just need to do a bit of work to sand them down so they'll nest, repaint the framing (it was a pre-painted canopy but the wrong color), and get it ready for final step. Seating the canopy is generally the last step for me, besides any aerial rigging.

  • Profile Photo
    David Mills said 6 years, 11 months ago:

    Lovely work Greg !

  • Profile Photo
    Jeff Bailey said 6 years, 11 months ago:

    Greg, you've done a fantastic job & I can't so I hate you! (Just KIDDING!)

    Seriously, your work is inspirational and I mean that! You really have done your homework and your patience & steady hand work is outstanding. You must have much younger eyes and hand & eye co-ordination than most folks do. As Louis said, it would be hard to do as well as you've done in 1/32 scale, let alone in 1/72!

    Great job and like the others have said, I really look forward to the finished product.

  • Profile Photo
    Louis Gardner said 6 years, 11 months ago:

    Fantastic job with the flaps and dive brakes Greg. Your attention to detail is amazing. I would really think twice before I attempted such a scratch building feat, much less in 1/72 scale. My fat sausages for fingers and poor up close eyesight would do me in. 🙂

    It should not be too long and you're wrapping it up. Looks fantastic my friend.