Dragon Tiger I ”Tunisian Initial” in 1:35 (#6608) S.Pz.Abt. 501 Tunisia 1943

Started by Michel Verschuere · 69 · 4 years ago · Alignment, Dragon, Initial, Kasserine, Panzer V, Pzkpfw 5, Tiger I, Tunisia
  • Profile Photo
    Michel Verschuere said 6 years, 3 months ago:

    This is the second part of my entry to David’s “Kasserine” Group Build. I intend to model the a Tiger I initial in Tunisian setting into a diorama. This part describes the progress on the Tiger I initial, for the Opel Blitz fuel and ammo transporter, see my article:

    Italeri Kfz. 305 Opel Blitz in 1:35 (#216) Afrika Korps
    Some history: The tiger I is probably the most epic tank of WWII. Its design was a response to the KV series tanks the Germans met in Russia, in the early stages of operation Barbarossa. The designer, Dr. Edwin Alders was Chief Development at the Henschel Werke in Kassel, Germany. The first vehicles became available in late 1942 and some of them found their way to Tunisia in the late stages of the North African campaign. Some were in action at Kasserine, hence my choice for a GB entry. The Tiger I opened a new doctrine of "armored pincers" to breach enemy lines of defense. Armored effectively 110 mm in front and 80 mm on the sides, this 57t beast could take most of what the Russians and Allies could throw at it. Furthermore, its Kwk 36 - 88mm - L56 gun, a direct derivative of the infamous AA gun Flak 36, had formidable armor piercing potential and flat trajectory. A single Tiger could knock out enemy armor at ranges of 2000m, many times more than the effective range of its adversaries. However few Tigers there were, for some time during the war, the Tiger had the monopoly on tank warfare and its very appearance on the battlefield already made most adversaries become quite nervous to say the least... The kit: This kit was released by Dragon in 2015 and is of the accustomed level of detail for this manufacturer. The gun is plastic but molded in one piece, there is photo-etch and a box full of plastic. The track is DS, so no individual track links (I prefer the latter but it's ok for once). Nevertheless, the build involves more than 450 parts at high level of engineering detail. A true challenge this Tiger most certainly compared with its Opel Blitz brother in arms for this build... The build of this vehicle will largely be out of the box (OOB). The build: I started with the lower part and suspension. The torsion bars are featured with the kit and since I intend to leave at least some of the hatches open, I decided to install them although they are not workable (sigh...). These and the suspension arms require quite some cleanup, but there are no ejection marks to fill, so that's a start. 
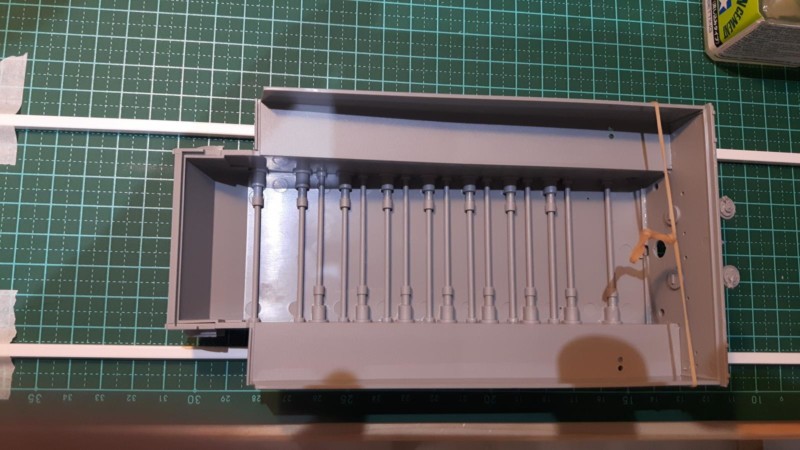
I assembled the suspension and am now aligning the arms flat as you can see below. I used two styrene bars equally spaced and fixed to the workbench to "carry" the underside of the tank so that the arms can evenly set overnight. As a last, I could not resist placing the Tiger's older brother next to it. Gives you an idea how big this thing was, even without figures... More later, stay tuned! Happy modeling! Michel.
  • Profile Photo
    Louis Gardner said 6 years, 3 months ago:

    Excellent ! Looks like your New Year is off to a great start.

    I'm very pleased to see this one started... It looks gigantic parked next to the older but smaller Blitz brother. Just wait until you get the turret installed and the tracks on it. Then you will be amazed at just how big the Tiger really is.

    Thanks for posting, and I will definitely be watching for updates... If you don't mind, can you post any of the problems that you may have ran into along the way ? I have this exact kit in the stash and plan on building it hopefully later this year.

    Take care my friend...

  • Profile Photo
    Michel Verschuere said 6 years, 3 months ago:

    Sure Louis, I'll report my findings. Cheers from Belgium, Michel.

  • Profile Photo
    David A. Thomas said 6 years, 3 months ago:

    Michel, "epic" is right! Again, you strike at the very core of the Kasserine Pass GB ethos with these selections. The image of the box and your hobby bench, tools poised, followed but the initial stages provides an understated but powerful sense of what it is to embark upon an important build.

    Many thanks for your important contribution!

  • Profile Photo
    Jeff Bailey said 6 years, 3 months ago:

    You're off to a great beginning, Michel ! I look forward to more and I can't wait to see the Blitz & the finished Tiger together.

  • Profile Photo
    Tom Bebout said 6 years, 3 months ago:

    Great start Michel, that's great way to insure the suspension arms are aligned and straight. Looking forward to viewing your progress.

  • Profile Photo
    Bernard E. Hackett, Jr. said 6 years, 3 months ago:

    Michel, your aligning jig is something I'd never have thought of. But then I'm not a tanker. I always wondered what version of the Tiger they used in Tunisia, as opposed to what came later in Europe. Now, I'll get to see. .

  • Profile Photo
    david leigh-smith said 6 years, 3 months ago:

    I love your jig, Michel. I'm planning a Tiger/Sherman diorama ((Kelly's Heroes) later in the year and I'm going to steal that idea.

  • Profile Photo
    Michel Verschuere said 6 years, 3 months ago:

    Hello dear friends,

    I'm back modeling after busy times at work and a flu attack... I counter attacked the virus with my 88 and so after only a few days in bed, I could build again today 🙂

    This kit really is Dragon pur sang: A box full of styrene with sometimes twice the same frame letter, a joy for the spares box but sometimes a jigsaw puzzle! There are very small pieces, PE I already used mainly on the rear of the vehicle where the level of detail is very high.

    @Louis, I came across no major issues yet, only pay attention at the Erratum slip in the kit: in step 4 the original plan swaps the part numbers for left and right and pay attention when installing the fenders in step 5! Keep the erratum near at all times, or the part alignment and the instructions will drive you mad!

    I now finished the back of the hull and will start with the top plate of the tank next. I skipped some of the installation steps to allow for accurate painting of the oil cooling system which is well detailed in this kit but later covered in part.

    I plan to continue further today so if we're lucky we'll see a tiger closed by tonight!

    Stay tuned, Michel.

  • Profile Photo
    David A. Thomas said 6 years, 3 months ago:

    Sorry to hear you were down, Michel. That flu strain is wreaking havoc on this side of the pond. Glad you've rebounded and I'm sure the flu bug is cursing your 88 every bit as much as the GI's did! Great work on the Tiger, and keep going!

  • Profile Photo
    Michel Verschuere said 6 years, 2 months ago:

    This is about how far I will push it for today: A dry fit of lower hull, upper hull plate and the tower sides for The Beast.

    I added detail to the top cover of the vehicle and decided to leave the radio operator/ machine gunner hatch open while the drivers hatch will remain closed.

    I have a number of good pictures of the interior of Tiger 131 which is in the Bovington Tank Museum in the UK. This was the first Tiger I early captured by the Allies in Tunisia.
    It was part of the same unit as the vehicle in this build. The radio operators' seat is ok to scratch build a bit so I will try and do better than what's in the kit here. The radio installation is on the left and the machine gun ball mount center in case it proves visible from the outside. The hatch is aligned to the right looking from the inside upward as in this picture. I have a nice Eduard set for the Fu 5 radio I can use. The rest will be plastic card.

    I assembled the main barrel components but I'm not very pleased since it still shows a nasty seam and the recoil cover does not center precisely. The muzzle brake is assembled in 4 pieces but the fit is sub optimal. I added some putty to set overnight. I will try and sand it tomorrow and see whether that does the job. In case required, I'll order a turned barrel.

    Cheerio, Michel.

  • Profile Photo
    Michel Verschuere said 6 years, 2 months ago:

    Worked the interior a few hours today, based on some excellent reference pictures. Especially the book by Spielberger on the Tiger and its derivatives was a charm. I found sufficient items in the spare box to do the job and used styrene rods and sheet for the remainder.


    Other pictures I found on the web.


    Hope you like it!


    All the rest of the interior is invisible from the outside so this will do!
    Cheers, Michel.

  • Profile Photo
    Michel Verschuere said 6 years, 2 months ago:

    Worked on the turret this time, I was able to use the plastic barrel featured with the kit after careful sanding. The result is good enough to stand my acceptance requirements.

    The bracket nuts fixing the turret to the hull are very tiny, about 1 mm in diameter. Check out the one nut North of Scotland on this 2 EURO coin:

    I posed the Opel Blitz next to the tank, it looks huge and will be a further 15 mm higher so after the wheels are added! Some of the shots already look scary looking down the 88mm barrel...

    Bye for now, comments and suggestions welcome.

  • Profile Photo
    Louis Gardner said 6 years, 2 months ago:

    What a beast ! Looking good my friend... I really like the original era detail photos you have posted, and the scratch building you have done. I'm glad you were able to save the original kit barrel assembly.

    It's amazing at the tiny parts used in this one. The picture showing the nut sitting on the Euro coin puts things into perspective for me.

    I better get my magnifying glass out when I decide to build mine...

  • Profile Photo
    Michel Verschuere said 6 years, 2 months ago:

    Hi everyone,

    I managed to get the Tiger ready for painting. There are still a few construction steps to complete and some PE to add. I will start with the interior and that is ready for painting!

    I did not encounter major issues, but the paint scheme on the instructions regarding the fuel tanks and heat exchanger are incomplete. The ID numbers are not in the paint table, so I will need to look for original pictures to see what color goes where.

    The outdoor color will be a sandy olive drab then there is a camo scheme in green, but it's only faintly visible. The interior is flat white for those parts that can be seen from the open hatches.

    All help welcome!

    Happy modeling, Michel.