1/72 Privateer – enhanced Matchbox build

Started by Greg Kittinger · 44 · 5 years ago · 1/72, PB4Y-2, privateer
  • Profile Photo
    Greg Kittinger said 6 years, 4 months ago:

    Well, I've been working on this for awhile, and decided if I posted to a WIP thread it might keep me from getting too distracted and laying it down, as I can now see this is going to take more elbow grease than I initially thought.

    When I saw Ben Fulcher's 1/48 Privateer at a contest earlier this year (which subsequently took home some trophies from IPMS Nationals in Omaha), I was inspired to pull out my old Matchbox offering. I wanted to upgrade it a bit, so after some research, bought two sets of Squadron canopy replacements for all the turrets and glass, a set of QuickBoost barrels, and a set of engines/nacelles, along with some decals. Here's the kit:

    As I got to looking at the kit-provided turrets, I realized I couldn't just replace the clear parts and the barrels, as what was included with the kit was a laughable post with broomsticks sticking off of it, along with a gunner. So...time to fire up the scratch building. Here's a look at the kit provided upper turret (sorry - don't know why it's going in upside-down - Martin...?)


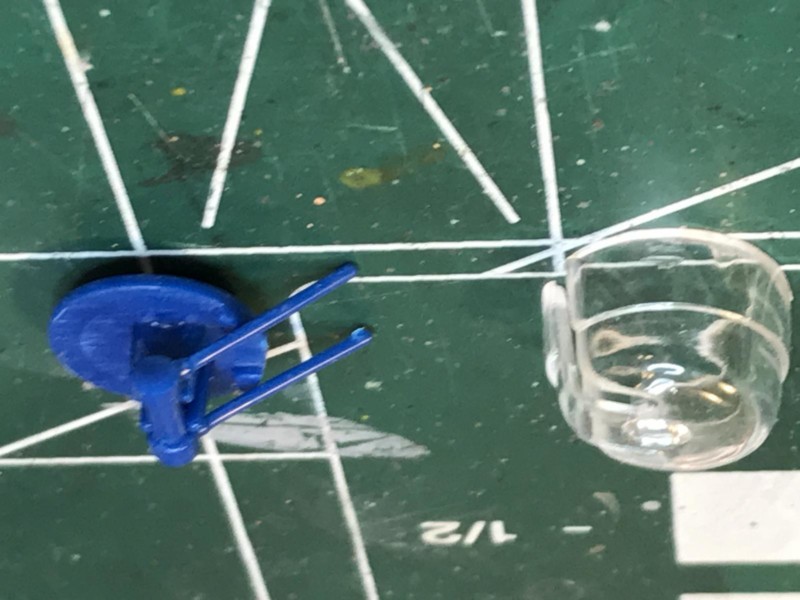
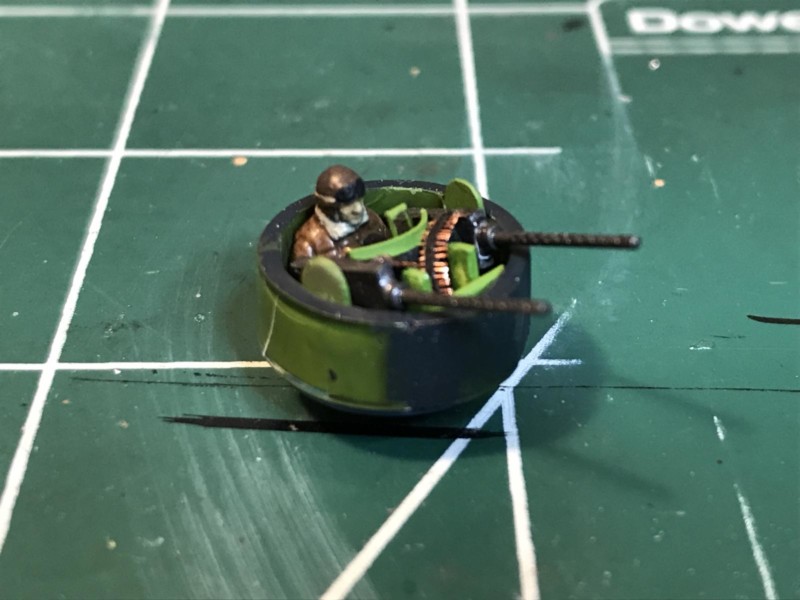
    Here's my work so far on the two top turrets. I cut the original clear part in half to use the bottom section, filled in the gun slots as they don't run all the way down, thinned the walls to try to make more room for scratch building, and glued that to the base. I had attached the crosspiece to the base and then sawed off the "barrels" to provide something to affix the scratchbuilt .50's to, then filed that section down quite a bit before connecting the clear piece to the base. Next inserted the gunner before attaching the guns, as I knew I would have to trim my guns a bit to make everything fit. Once those were in place, I build up the other elements of the internal structure matching as closely as possible reference photos. After heat forming that curved section in front of the gunner, I used a piece of left-over clear from the Squadron canopies to cut small gunsights. To create the shell bandoliers, I cut small lengths of copper wire and laid it on a strip of crepe art tape, then laid another thinner strip of tape on top of that, then trimmed the wire off. From a distance it at least gives the impression of a belt of shells!


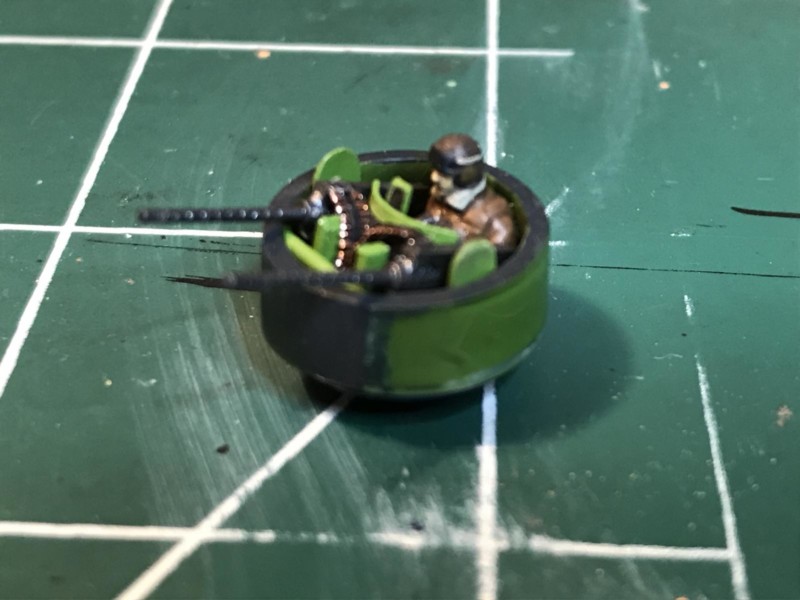
    This is the finished turret with the clear piece just setting on top of it. I haven't polished it up yet, nor done any work to highlight the plexiglass seams (still debating how I'm going to do that).

    I'm almost done with the tail turret. Here are a few of the early pics. I decided not to use the Squadron clear parts for this, and instead cut down the yoke, and then began adding all the internal structure using the yoke as my attachment point. I've almost got it finished - had to find a spare pilot as the kit didn't provide a tail gunner - and will post a few more detail pics shortly.


    I just began the teardrop turrets last night - that's going to take some work! And I haven't even pulled out the Eco ball turret for the nose yet...

  • Profile Photo
    Louis Gardner said 6 years, 4 months ago:

    Very impressive and ingenious work on the turret and machine gun ammo belts my friend !

    I have always wanted to see a main stream manufacturer do a 1/48 PB4Y and not have to rely on a Koster conversion set. My eyes just don't allow me to do 1/72 scale anymore...

    Here's a few pictures for you of an actual B-24 upper turret... it's pretty much frame less and is actually glued together on the real one...


    Don't know if this will be of assistance or not, but I hope it helps. I also have a lot of other B-24 detail pictures if they will work for you ...

  • Profile Photo
    Greg Kittinger said 6 years, 4 months ago:

    Here's a few of the almost finished tail turret. That white you see between the glass and the frame was the residue of some Tamiya polish that I've already taken care of, but had already snapped the pics. Added a "gunner" from my spares box, and some additional internal detail, including some more ammo belts. Guns were made from styrene and mated to the QuickBoost barrels. I just realized I didn't have the gunner in place nore the outside section glued on when I took these - will add another... later

  • Profile Photo
    Greg Kittinger said 6 years, 4 months ago:

    The first thing I actually built up was the cockpit. Added armrests to the seats, and added the engine control throttles. Also added a few decals to spruce up the center console. Here's a few pics.


  • Profile Photo
    Robert Royes said 6 years, 4 months ago:

    Great detailed work, looks great Greg. Always liked the Privateer.

  • Profile Photo
    Jeff Bailey said 6 years, 4 months ago:

    Cool PB4Y, Greg! Your extra work detailing the turrets sure looks great! You also did a great job painting the Zombies (called so because of the way they look) that Matchbox provided as flight crew.

    I'll have to remember the wire & tape trick to make ammo belts - it's quite effective in that scale.

  • Profile Photo
    Lee Fogel said 6 years, 4 months ago:

    This is super! Very nice work and attention to detail, Greg. This is a neat kit that just requires a bit of massaging to make it a knockout IMHO. Thanks for sharing and what company makes replacement cowlings for this kit?

  • Profile Photo
    Greg Kittinger said 6 years, 4 months ago:
  • Profile Photo
    Robert Royes said 6 years, 4 months ago:

    Greg, here's a few shots that may or may not be helpful.

    3 attached images. Click to enlarge.

  • Profile Photo
    Ferry Dierckxsens said 6 years, 4 months ago:

    Fantastic work Greg. The way you are building the gun turrets is just great! The ammo belts solution is really good! I keep that in mind too.

  • Profile Photo
    Greg Kittinger said 6 years, 4 months ago:

    Thanks for the pics - one can never have too many references!

  • Profile Photo
    Lee Fogel said 6 years, 4 months ago:

    Thanks for the info and link, Greg. Also, thanks Robert for sharing those reference pics!

  • Profile Photo
    Greg Kittinger said 6 years, 4 months ago:

    @lee_fogel - if you decide to build the Privateer, I can send you additional reference photos, and a list of the other items I secured (barrels, canopies, etc.)

  • Profile Photo
    Greg Kittinger said 6 years, 4 months ago:

    I'm part way through the blister turrets so thought I'd show my progress. It's going to take awhile...

    I first blanked the gun slots per reference photos with styrene (painted with metalizer).

    I then added the armor plate, and built out the bulkheads that sit on either side of the guns, gun sight and gunner seat. I don't know the name for the tool I used to find the shape (see pic), but it was a huge help in getting the styrene cut to fit against the internal shape of the blister.

    I haven't finished out the bulkheads yet - need to sand/file them a tad, and figure out how much detail to add once I have a good idea of how much will be visible though the blister windows.

    Then I'll add the guns (sans barrels for now) and the internal framing for the gun sight, etc. I don't have any schematics, so am kind of making it up as well as I can from reference photos.

  • Profile Photo
    Louis Gardner said 6 years, 4 months ago:

    Coming right along ! Looks good...