F-111F Aardvark Desert Storm USAF 1991

Started by Chuck A. Villanueva · 69 · 4 years ago
  • Profile Photo
    Chuck A. Villanueva said 5 years, 10 months ago:

    Coming soon whats next in the pipeline.

    1 attached image. Click to enlarge.

  • Profile Photo
    Chuck A. Villanueva said 5 years, 10 months ago:

    It is amazing how really old this series of 72nd scale kits are now from Hasegawa. When the K-series came out in the late 70's mid 80's they were an instant hit, along side with their 48 scale kits they were state of the art. The series of F-111's too me are still the best in any scale. The only criticism they received were the decal consoles and instrument panels. Otherwise despite the parts these kits had, they were not difficult to build. Except for the F-14 which is not an easy kit to build by anyone until Tamiya's recent release. I had intended to do all the F-111's and so far I have only built the Echo, but it has since disappeared on me, and I have no idea what happened to it. I built that kit back in 1993. I found this one at a Hobbyshop in Riverside back in 2002. Been in the stash since. I also have the EF-111 Sparkvark in the stash. So let see what we in the box.

    The instruction sheet is good in typical Hasegawa directions, in several languages. With color callouts based on the Gunze line of paints. But with FS numbers as well so it will help to substitute with other brands.

    I have the Eduard's basic cockpit set, which is more simpler than their normal zoom set, which I don't believe there is one for this kit. As this kit pre-dates when Eduard's started that line. And don't believe Eduards went back to produce a more detailed set. Other than a full interior/exterior set. Verlinden does have a resin/PE set for this which is hard to find and expensive.

    Next a set of masks from our old friend Cutting Edge. Remember them, rather controversial company with all kinds of real nice sets in resin and PE. Decal sets as well. Now getting hard to find as well.

    The kit itself has about 130 parts in the kit. A lot for a 72nd scale kit but great details. Finely engraved panel lines were the rage when raised panels were the norm on the early Hasegawa first generation kits of the 60's and 70's. And not just Hasegawa. The first 2 sprues have the lower main fuselage intake ramps. The 2nd sprue has the forward fuselage and intake faces. Very nice fine detail.

    The 3rd "special sprue" specific for the "F" variant holds the Pave Tack lower fuselage panel to mount it on and the IP panel and coaming for this version.

    The clear sprue has the canopy and various lights on the air frame.

    My favorite part of the kit is the wings, which can be displayed with fully deployed flaps and slats. Though it will take some work to close them up and the wings swept back. I will build it with the wings fully open with everything down.

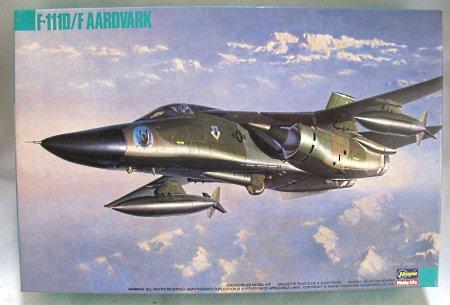
    Another point and I was one is that these kits were not cheap for a 72nd scale model back in those days. You can buy 2 Monogram 48 scale kits almost 3 for one Hase 72nd scale kit like the F-111. And no weapons were provided on most of them. You had to buy a weapons set sometimes 2 to get a proper load out for your subject. And you know they are still pricey today when you find one. Even on Ebay. This kit provides a pair of drop tanks and Durandel anti runway bombs.

    The wheels are excellent for this scale. Nicely done. There are some resin wheels available. But these will be fine for the "F"

    The final sprue holds the upper main fuselage section, Landing gear components. And again Hase had great details within the main gear bay. These kits were very good. And still hold their own today.

    Now to find some decals, and might just see if a Verlinden set is around. This will be a Desert Storm era F-111F out of Lakenheath. 66 F-111F's operated in Desert Storm.

    Thanks for viewing.

  • Profile Photo
    Chuck A. Villanueva said 5 years, 8 months ago:

    As my usual way of starting a swing wing aircraft I start with the wings instead of the cockpit which is the norm. The details on the parts are quite petite and well done.

    The main wings consist of 4 parts of upper and lower halves. With the option of full flap and slats in the down position.

    Once the wings are quickly assembled, I will leave the flaps and slats off for now.

    Next I drilled out the holes for the inner pylon which will be only one used on both sides for the configuration I will represent. The pylons are a one piece unit and next attached to each wing. Hasegawa has designed this to have the wings deployed in the sweep position. If you want to display it closed with the flaps up will take some work.

    Once the those were attached, I did some clean up on one of the tips, otherwise they were ready for some paint.

    More to follow.

  • Profile Photo
    Louis Gardner said 5 years, 8 months ago:

    I have one of the Academy 111's in 1/48 scale. I have been looking at building it several times now, but each time it gets put back up on the shelf... Yours is progressing nicely.

  • Profile Photo
    John Healy said 5 years, 8 months ago:

    Great pick. Eldorado Canyon participant?

  • Profile Photo
    Craig Abrahamson said 5 years, 8 months ago:

    Looks like a pretty nice start on a pretty nice kit. 🙂

  • Profile Photo
    Richard Mcstay said 5 years, 8 months ago:

    These are really cool jets, I’ll keep an eye out for more posts on this one.

  • Profile Photo
    Chuck A. Villanueva said 5 years, 8 months ago:

    Thanks Louis, the Academy 48th series are ok, though some say the landing gear needs some mods to make them sit correctly. Funny I have never had one, which is unusual for as I should've have at least one in the stash. There is some reviews on them to fix the issues. Rather impressive when built quite large.

    Thanks John, no this will be a Desert Storm bird.

    Craig, it is an excellent kit, in fact as far as I know nothing has surpassed the quality and detail of this kit to date. Kit is from the 80's.

    Thanks Richard, this will be my 2nd one, built an "Echo' about 15 years ago, I have no idea what became of it.

    Thanks

  • Profile Photo
    Chuck A. Villanueva said 5 years, 8 months ago:

    Some more work on the wings, this time some paint. The undersurfaces of this is black. So using Vallejo Black Acrylic I airbrushed the lower sections of the wings. Also painted the pylons Euro Dk Green.

    Then flipped them over and did some preshading over the top surfaces.

    With some black still in the cup, I went ahead and painted the lower sections and doors black. Also the Instrument panel coaming. The stabs and some other bits.

    And for the heck of it preshaded the tail also.

    More to follow.

  • Profile Photo
    Louis Gardner said 5 years, 7 months ago:

    Another great update my friend !

    You're correct with everything you said about the Academy 1/48 kit I have. It's a fairly big model in that scale, and I have yet to build it up so I'll pay close attention to the landing gear.

    Do the wings swing on your model like on the real plane, or are the fixed in various positions ?

    Just curious... Thanks

  • Profile Photo
    david leigh-smith said 5 years, 7 months ago:

    Awesome Aardvark, Chuck. You know, I have never painted on the sprue before. In all these years, not once. And you know, it’s good to know SOMETHING good came out of the eighties...

  • Profile Photo
    Chuck A. Villanueva said 5 years, 7 months ago:

    Louis, no the Hase Aardvark is designed to be fully open and deployed or fully swept. You would have to modify the kit to close it up or partially swept forward as some 'Varks have been seen parked in that configuration. But the wings are removable when completed, makes it easy to transport this way.

    Hi DL-I have always done it this way since I started to airbrush. I wanted main parts painted already like the cockpit and gear bay wells. So I didn't have to stop and wait for paint to dry. The detail painting is done with a brush or pencil when most of the main components in the cockpit or interior are installed. Hasegawa was the bomb in the 80's with the 72nd series they introduced like this F-111 and the other variants. Not so over engineered. The only criticism was the lack of weapons. Expensive kit, no weapons and decals in a lot of them for the instruments and side consoles.

  • Profile Photo
    Chuck A. Villanueva said 5 years, 7 months ago:

    Putting the wings off to the side, and since during this time my camera was down, And was itchy to keep going so I went ahead and built up the cockpit. Starting with step one.

    This step involves assembling the cockpit, first painted in Aeromaster Dk Gull Grey, I added the PE enhancements for the side and center consoles painted semi gloss black. The seats painted Tester insignia Red headrests, Od seat cushions and belts in Polly S dirty white with silver buckles. The control sticks Grey with black grips, and the instrument panel PE Black with silver and grey details.

    Step 2 is assembling the nose gear bay and then attaching the complete cockpit tub over the completed bay.

    You know after working with the Revell instructions on the Typhoon and simple Buccaneer, it just so simple with the Hase instructions sheet, not so busy and confusing.

    The nose gear bay is 2 pieces that are painted Glossy White then the cockpit tub is attached to the bay. And step 2 is done.

    Next step 3, this will be the installation of the cockpit/nose gear bay into the RH fuselage half.

    First the cockpit tub is installed. The fuselage halves have the interior painted Dk Gull Grey in the cockpit area. Check alignment then attach the LH fuselage half sandwiching the cockpit, again check alignment then start the process of applying the cement over the seams and set. Next the IP coaming is attached over the instrument panel and cowl. Good fit here. You get 2 choices of the bomb bay panel that mounts under the nose section of the fuselage. One is for the "F" which also has the attachment for the Pave Tack Pod this one will be the one I will use for this build. This also goes into place very well. It is nice to remember that a lot of the Hase kits went together very well. The ease so far is like Tamiya. The F-111 is a complicated air frame. But not like the Tomcat, this one is much easier to build by far. And when we get to the next step we will see how quickly the F-111 comes together. With that the forward nose section is done less the avionics bay cover. Will need to add the weight before I close it up. More to follow.

  • Profile Photo
    david leigh-smith said 5 years, 7 months ago:

    That is some good momentum you have there, Chuck, and I like the way your narrative follows your line of thought. You can see how looking at the nose cone they christened her the ‘Aardvark’.

    Boy, your bench drives me nuts. This, Chuck, is a self criticism - no judgement at all on your work (in fact, quite the opposite). I’m totally retentive when it comes to workspace and although (possibly) not full blown OCD related, I’d lose sleep over a stain on the cutting board. There, I’ve said it, I need help.

    I really enjoy watching your work, not least because you always have little hints/teases at what else you are working on (or coming up) in the background. Looking forward to seeing more!

  • Profile Photo
    Chuck A. Villanueva said 5 years, 7 months ago:

    Thanks DL, your correct the nose does give it that characteristic. Slightly odd shape and low slung look when the F-111 is taxiing on the runway for a mission. Like a controlled crash my work bench is. I actually work on the white desk or the work bench. Depends on the day and how large the model is. So I have 2 spots i can work out of. Both an organized mess while working.