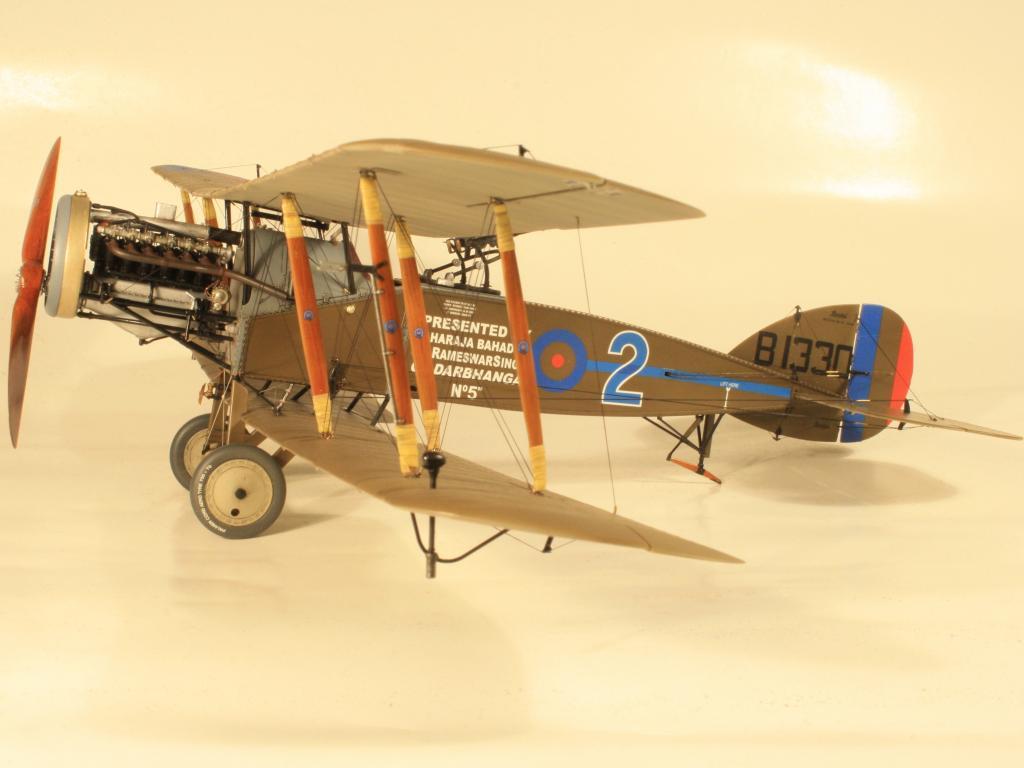
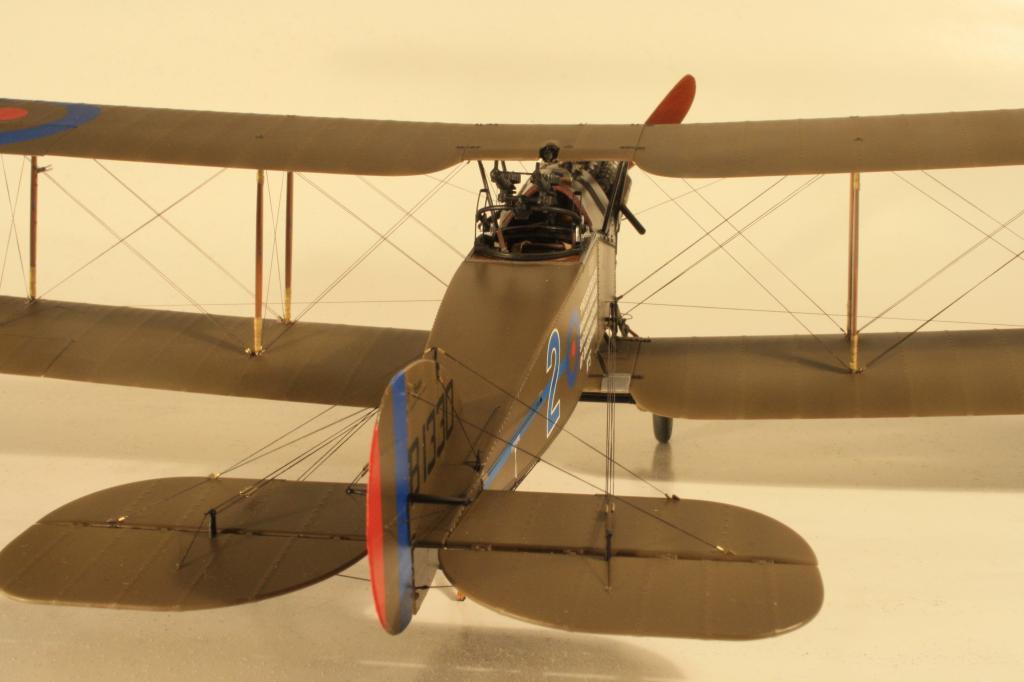
Wingnut Wings Bristol Fighter

This is my recently completed Brisfit. This was my first Wingnut Wings kit and I hope it won't be my last. I've got my eye on the new Walfisch, not so much rigging. The model was painted with Tamiya and Gunze acrylics and Humbrol enamel. The woodwork was done using acrylic base colours and oil paints, the prop was sealed with 2 coats of future applied with a brush. EZ line was used for the rigging, with brass tube for turnbuckles and attachment points made from eyelets of fine wire. The rigging was a long and tortuous process but looks great when complete. Along the way, I had a decalling disater and even dropped the model on the floor, breaking several parts. This almost caused me to shelve it, but I'm glad I didn't as I think it turned out OK.


Big beautiful airplane! And a great model!
Beautiful build, Mike. In any competition lately, it's often a WW kit that takes the trophies. Your time and effort show why these models are such favourites with both modellers and judges.
I know PC-10 is a bit of a moving target, but yours looks more brownish than I'm used to seeing (might be the light). I think of Humbrol 155 (Olive Drab), but I know some modelers mix their own colour. Not a criticism, just an observation.
Thanks for sharing.
Thanks Rob. I did mix up my own PC10 and did err more towards the brown. As you say, this colour is open to interpretation and I did want to try and capture something that was not just 'olive drab' (another contentious colour in it's own right).
Rob: the "official shade" of PC 10 is exactly the same as WW2 RAF Dark Green (no surprise, since the WW2 color was based on the same specification). In WW1, PC 10 ranged from an almost "grass" green to a 'chocolate" brown as Mike has here. There is no "correct" shade of WW1 PC 10. HTH
I would/could never build anything that had two wings and a potfull of rigging wires. I dunno how you guys do it. I'd go blind, cripple and crazy if I tried that. But I have to admit, from what I've seen of all the WNW kits, they're really quite nice if done correctly. Like yours is. Beautiful work, sir.
Thankyou Craig. The kit went together very well with few vices, as they are engineered so nicely. WNW seem to have worked out the potential pitfalls and design the kits to minimise their effect. The rigging... well I certainly achieved blind and crazy. My close up eyesight is not great so I had the model on a cake icing turntable on top of a waste bin on my modelling bench and went through all manner of contortions, just to see and get to the attachment points. Seeing the model rigged is a very rewarding feeling though.
Craig
Go for it ! These Wingnut kits practically build like Lego ! Once you get to the rigging it is a lot of work, and as I work so slowly I usually give myself a week or so to complete it. I try to do about 7 or 8 lines at a time, and then I'm actually tired from it (believe it or not). The drama of these old fabric, plywood and string creations lends itself perfectly to our craft, and WW kits do not let you down.
Very impressive, and a good looker too. Nice work!
It looks sorted Mike, as Craig said loosely , anything with two wings and string is not my cup of tea but I can also see the craftmanship that goes into rigging etc.
A very nice build mate.
Wonderful work!
Best regards, Vlad.
Glad you carried on with the build. It turned out great.
Excellent work Mike!
Those kits are wonderful, and you achieved a great finish on it. Rigging is such a nightmare for modellers, but once you get it, the result is spectacular.
Best regards.
my God! it looks more like the real thing than a scale model, Beautifully done mate absolutely stunning, colour looks good to me 😉
Mark
🙂
Mike,
Beautifully done! Looking forward to seeing your finished Walfisch.
Erich
I just started rigging the new Revell-Monogram PT-17, and I concur on the rigging nightmare, even with mine being much easier! Nicely done.
Mike,
Beautiful job, I admire your perseverance.
You've almost shamed me into pulling my DVa off the "shelf of doom". Well almost any way, I'm stuck on how to paint all those metal inspection plates Albatross green.
It looks gorgeous, Mike, great job. Now you've mastered rigging, maybe you should try a sailing ship? (Only joking!)
Ha! No chance!
That's just flat gorgeous.
Nice work Mike! Great job all around. I've never used EZ line. Does it add any structural strength?
Thanks John. EZ line doesn't add any structural strength as it is elastic. It gets thinner, the more you stretch it so I tried to pull it just enough to tension it. It is very light and blows away even if you breathe on it. I used cyano glue to attach it but too much will distort it. It is fiddly to work with but gives good results. Hope this helps.
Thanks again, Mike. It's as I suspected. I use stainless steel and brass wire for rigging, but want to try EZ line on my Bristol and Salmson.
WNW sell two types, the round section stuff as I have used here and a flat cross section to mimic the British streamlined wires. I did try to work with the flat variety but did not get on with it so used the round for everything.
Cracking wood finish on the prop and struts - any tips?
I base coated the parts with Tamiya XF59 Desert Yellow. I then brushed on Burnt Umber oil paint and created the wood grain finish by wiping with a small piece of packing foam, the sort that you find in equipment cases. After the oil paint is completely dry I mixed Tamiya Clear Red and Clear Yellow to give an orangey varnish like colour and sprayed this on. I then brushed on 2 coats of future floor polish, applied the decals and finished off with one more coat of future. The propeller boss was hand painted with Humbrol Metalcote Silver. The tape on the struts is represented by thin strips of Tamiya Tape.
Thanks very much for all the kind comments guys!
Very nice work. The British types are all more rigging-intensive, and you have done this well.
For future reference, there is a very easy way to paint British props: they were often wrapped in grey canvas from just outboard of the hub. A much easier paint job.
Thanks Tom.
It doesn't help that many of the runs are double wires!
I have seen the grey coloured props. Didn't know they were canvas wrapped. I actually got a great deal of satisfaction from finishing the prop in all its' wooden glory.
Very nice model. The engine looks particularly well done and has a nice patina. I would like to get to the UK to see the real thing in the air. (Along with the Vulcan, so I'd better hurry up!) Also, thanks for cluing us clueless types in on a source for rigging wire. I do want to build a Wingnut Wings kit just because they sound sound so awesome! I just need to find one to cut my teeth on rigging.
Yes, having completed the rigging on one wing, it was quite difficult to motivate myself to start the other. Even though this was my first WNW kit and I enjoyed building it, I wouldn't necessarily recommend it as a first kit because of the complexity of the rigging and the many struts. But if you are up for a chalenge then go for it. Their Fokker D VII and the new Roland C.II have much less rigging and build into nice kits.
If anyone is interested, there is a build log on Large Scale Modeler.
http://forum.largescalemodeller.com/topic/1309-wnw-bristol-f2b/
Nice clean build, killer job on the engine.
Mike,
Absolutely gorgeous.
Impressive. I admire everyone who build these wirebirds... 🙂
And this one is perfect.