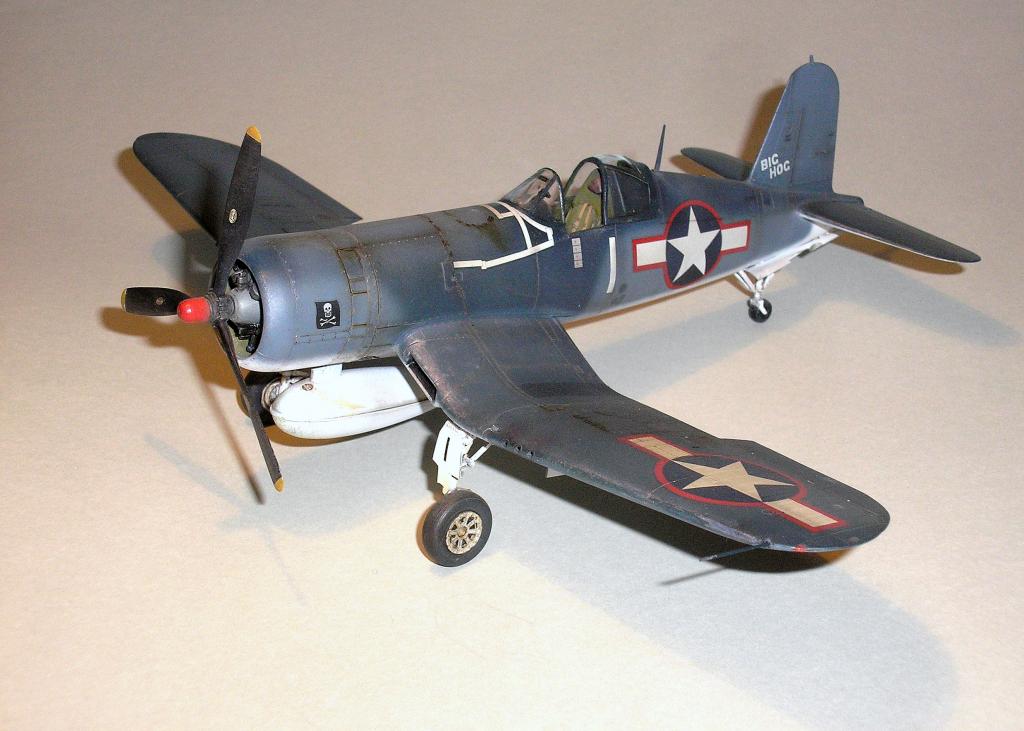
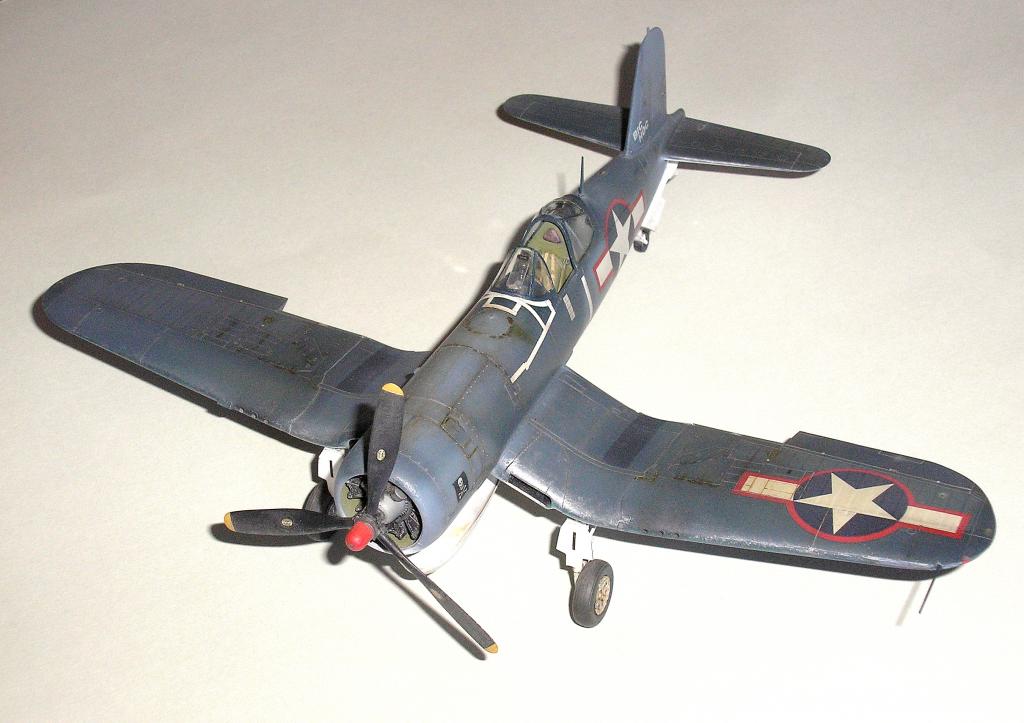
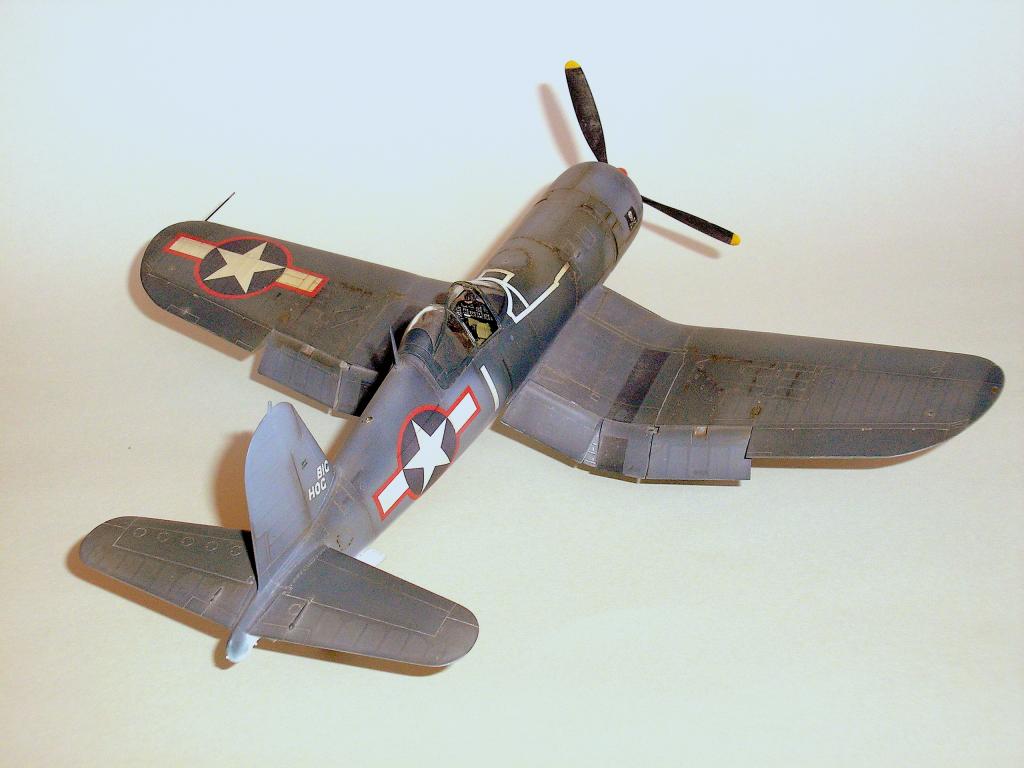
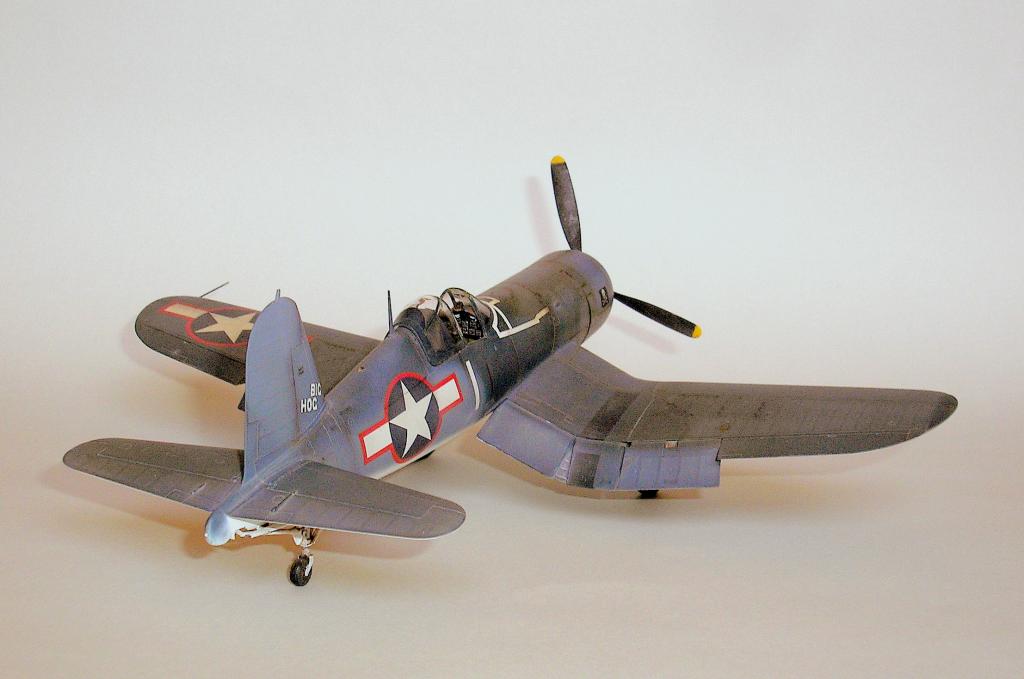
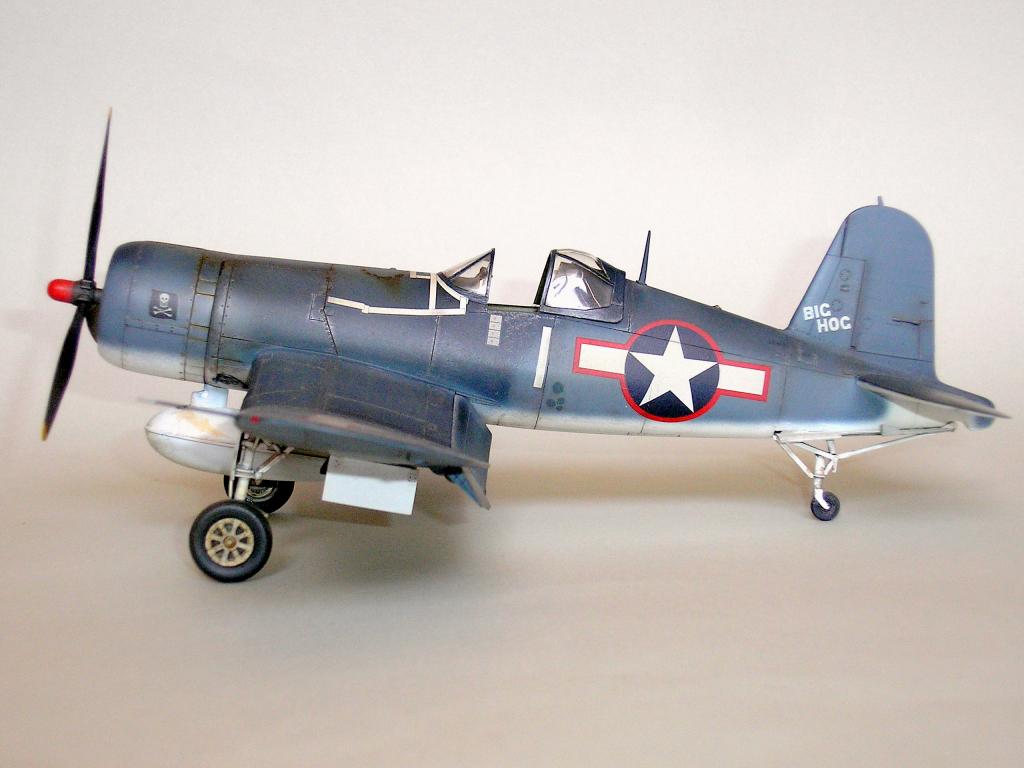
Tamiya's 1/48th F4U-1A Corsair
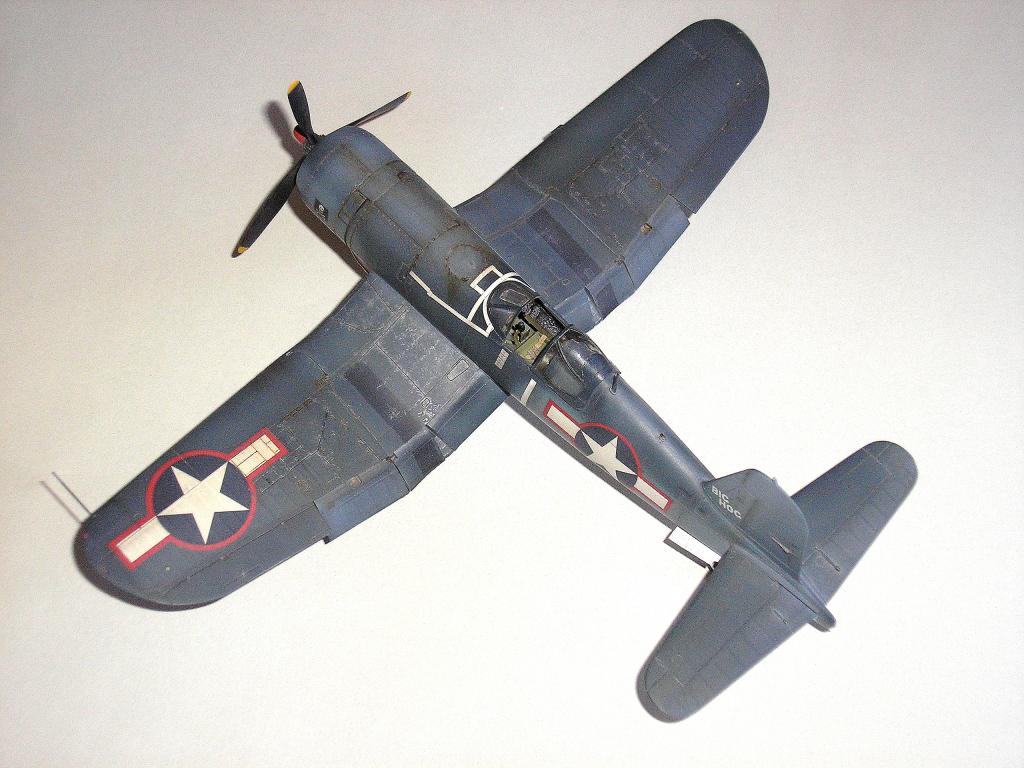
Representing Lt Cdr John T Blackburn's F4U-1A "Big Hog" as flown from Ondonga in November 1943 with VF-17.
The kit goes together beautifully, straight out of the box, as you'd expect from Tamiya.
I've built three so far with another two to go. I've tried to do a mid-level weathering job although my references show everything from absolutely sun bleached to freshly delivered!


AWESOME build. Love the weathering on this bird. She looks the part. You have inspired me to get mine out of the stash! Congrats!
Hi Morne. Thanks for the kind words. Yes, get yours out of the stash it definitely needs to be built.
Absolutely stunning Tony! Weathered to perfection.
Many thanks Gregor.
You've really caught the natural operational wear with this build. Well executed indeed.
Thank you Rob.
As above Tony,great build and very finely weathered.
Well done sir.
Thanks Simon.
Nice ...BIG HOG!
Thank you P.k.
It seems you can't go wrong with this kit, and you've done a great job with it, Tony, your weathering and build have lifted it above the norm.
Kind words indeed George. Thank you.
Gorgeous corsair - Gregor said 'stunning' - I concur
Thanks Ralph. It's always a pleasure to do a Corsair!
That's really nice Tony. I love the fine paintwork.
California Steve
Thank you Steve.
The sun bleached weathering on this really sets it apart Tony. Don't think a person could do much better.
Well done.
Thanks Al. I referred to a lot of reference photos to get the final result with this model, plus I bought two reference books (my wife is very understanding!)
Hello Tony...My compliments on an outstanding build of Blackburn's F4U-1A. Your weathering results are among the best I've ever seen. Very nicely done.
Thanks Jim.
I can only only concur with "all of the above", Tony...stunning build.
Thanks Craig. I appreciate all the positive feedback. Cheers, Tony.
Great build Tony! Love the weathering
Thank you Milan.
Excellent work. I really admire your weathering on this one - just the right balance of chipping and fading and it all blends together perfectly. Really first rate. Any of your techniques you would like to share - I would be all ears!
Hi Paul. Thanks for your comments. My weathering is usually based on pastels, mostly a very dark grey, applied with a small stubby brush along panel lines. Any excess can be removed with a damp cloth (in the direction of airflow. Exhaust stains the same although I do use the airbrush as well. Washed out, faded areas I treat to a fine mist of slightly lighter base colour or maybe a thin coat of clear matt with a tiny touch of "dust" coloured paint depending on the area of operations. I tend not to pre-shade although I know it works very well for others. I also use Faber Castell "Pitt" fibre tip artist pens in a variety of dirty browns, tans & greys for localised staining. I hope this is useful. I should add that after 50 years of model building I am still learning!
Cheers,
Tony
Thanks Tony - always appreciate hearing and learning about the techniques of others. I have been at it for a while as well, but always always learning new things - another plus for this site. Thanks a bunch for sharing your techniques.
Wow... very very nice Corsair!
Flawless paint and weathering job! NICE!
Thank you Ulrich, glad you like it.
Superb work, Tony, and an object lesson in weathering if I may say so. I wonder if you could post a brief description of how you got those effects?
Thanks K.J. I have given an outline in my reply to Paul Mahoney.
However I use pastels mostly (best on top of a matt finish) Artists' pens, some localised washes (Valleho & Tamiya) for wheel wells & cockpits (mostly) & misted airbrushing over faded areas with a slightly lightened base colour. Excess pastels can be wiped off if necessary & fixed with a matt or satin clearcoat. The beauty of pastels (in my opinion) is that mistakes are rarely "fatal".
My wife is an artist & I rarely miss an opportunity to visit the nearest artists' supply store. It can be a treasure trove!
Nice one Tony, excellent build.
Thanks Rick.
Hi Tony, a very nice Corsair, very well done. Your "mid-level weathering job"
is simply stunning, the chipping as well.
Again a very nice item from your impressive line of WWII fighters
Thanks Bernd. I forgot to mention chipping (see above): I use a silver artist's pencil although I have occasionally used Alclad alumimiun as an undercoat & made "real" chips with my modelling knife.
Sounds good to me, Tony. My kits look to new sometimes.
Did you have references about this typ of aircraft ? Got the new
RoG F4U-1A in 1/72, there is no window at the underside, is this correct ?
Hi Bernd. Yes, I have plenty of references on the Corsair but no definitive answer for you on the fuselage window, as in nearly all of the ground photos the "window" area is obscured by flaps, drop tanks, wings, shadow or pilot & ground crew having their photos taken! I confess that I followed the kit instructions & left it clear. Many sources say that these windows were basically useless as they became filthy from dirt on the inside & anyway, its original purpose was not implemented. I have found one photo of a -1A with a window, but I think you would be fairly safe if you decided to paint it. My references show a panel line only. I think the clear panel was probably installed for the early production aircraft but mostly painted over in service. If you're going to paint it, you might like to scribe it in anyway.
As with all these things, a photo is the best guide & there is one on p.30 of Detail & Scale Vol.55 F4U Corsair. The author's comments are on p.21.
Hope this helps.
Cheers, Tony
This helps a lot, Tony. Thank you very much.Sadly this
Detail&Scale books are somewhat rare here in Germany. The RoG kit was a bit dissapointing for me,
they have done better kits in the past.
After all the best way to do an early -1-1A is Tamiya in every scale. i am looking forward to your next one 🙂
All the Best
Bernd
Hi Tony, Really nice job all around on your Corsair. The F4U-1A is my favorite of the lineage and although only used for a short time, the red outline on the national insignia really adds to the look of the model.
Thanks Erich. Yes, I like the red outline too. It gives the model a bit of a lift I think.
absolutely beautiful Tony great weathering
Tony,
Everything I would have liked to say has been said. So I will just say this is absolutely marvelous.