Modifying Minicraft’s 727-200 to the shorter -100 version
The lack of a 1/144 727-100 kit in my inventory made me wonder if I could take Minicraft's 727-200 and convert it to a -100 (to depict Boeing's original, shorter version). My first attempt was a nightmare as I figured simply taking an additional .83" cross section from the rear fuselage wouldn't be a problem--until I saw afterward how much puttying and sanding was necessary to cover my botched surgery. Not only would I have to repair the fuselage joint (amost impossible as the cut was extremely close to both the number 2 engine inlet and under-fuselage rear fairing) , but I'd have to putty/sand/reshape the entire rear fuselage almost to the tail. I knew there had to be a way to do the conversion simpler, cleaner, and quicker, and after a few more attempts, I found out how.
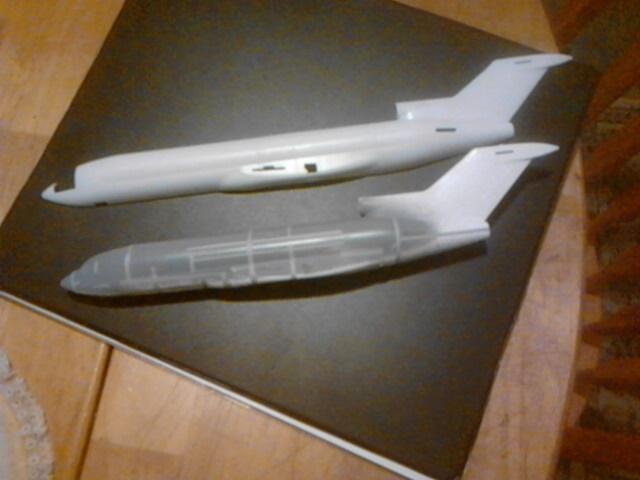
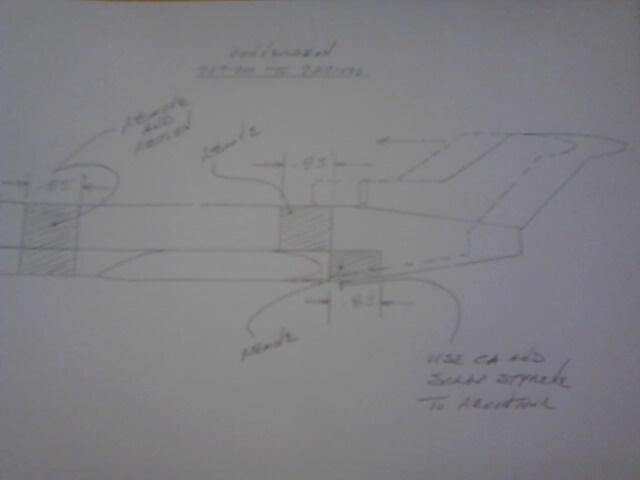
I finally did the conversion successfully, but it was a real pain when it came time to cut away/shorten the fuselage at one of two points; the removal of one .83" section forward of the wing root was no problem, but the one aft of the wing fairings, or the aft/bottom cross section cut-away, was a real puzzle. Unlike cross sections forward of the wing, aft wing conical cross sections (both above and below the AC centerline) are of different diameters and won't match so easily when it comes time to reattach them. I had to also be careful and avoid cutting any of the lower-fuselage fairing as I didn't want to have something else that had to be reshaped if not needed. Additionally, the 727-100 centerline engine inlet is not round as on the 727-200 but oval shaped instead. Heated pliers solved that by allowing me to compress the inlet and fuselage intake to a nice oval with minimal sanding afterward, but I still had to tackle the cutting and subsequent reattachment of the rear fuselage cross sections.
I solved this by NOT cutting two complete parallel cuts to remove a full cross section from the rear fuselage, as I did on the forward fuselage. Instead, I made two step-shaped cuts on the rear fuselage: two vertical cuts downward, spaced apart .83", just forward (about .375) of the number 2 engine inlet, (for leaving myself room, clear of the inlet, to sand afterward) until the fuselage was cut through on both left and right sides, ending just above the wing fairing, and then turning the model over, I did the same two types of cuts, first cut at about .250" aft of the fairing, second cut spaced .83" from the first, and both cut vertically until they were at the same horizontal points as the cuts made above the fuselage. The last cuts were horizontal, cutting full span between upper and lower cuts on the left and right sides of the fuselage until the upper and lower cross sections released, allowing me afterward to slide the upper and lower fuselage halves (as if they were on a track) back together. It seems like a lot more work (admittedly, it was and still will be) as compared to a straight cut-through, but this method preserved the under wing fairing shape (odd as it may be on this model) and allowed it to be moved aft, just under the inlets of the number 1 and number 3 engines. Predictably, the underside fuselage cross sections didn't match (the top cuts mated almost seamlessly), so I cut open the bottom centerline seam all the way to the tailpipe, flaring the fuselage halves outward, re-intersecting and gluing together cross sections, and then afterward, inserted a small triangular-shaped piece of thick (.100") styrene to fill the resulting gap.
An hour later, after filling both vertical and horizontal seams with quick-setting CA and a touch of accelerator (love this stuff but it has to be sanded before it's harder than the styrene) and some vigorous contour sanding, the conversion was done, the model ready for initial priming.
I now plan on converting a fair number of my -200 kits as I know I'll get not only better with each attempt, but faster as well. I do need to tell you the method I used above was put to the test on on a built fuselage. I didn't want to have the additional worry of matching nose and tail section halves, only to find afterward my cuts irregular and not flush, so much so that additional trimming and sanding were needed (while I'm not a purist when it comes to models, I really didn't want to take off anymore plastic than needed to adequately represent the 727-100 version...besides, it's extra work).
I'll admit I'd prefer to get my hands on the old Revell or MPC kit rather than go through the what I've just described, but when you have a closet full of unbuilt 727-200s and tons of -100 version decals, something's gotta be done to put the two together. I'll post more photos later as I progress in the build. I plan on decaling it in the original Piedmont colors.
Thanks for reading and happy modeling.
Welcome to iModeler, Mr. Vaughn...I think you'll like it. Your project appears to be quite the undertaking. I/we look forward to its' progress. Keep us "in the loop".
Thank you, Craig. Glad to be aboard!
Looks good. Personally I've hacked up a lot of plastic to build Canadian replicas. (a little twin rotor comes to mind) It's time consuming, but with results usually worth the effort. Good luck !
Thank you, Phil. You're absolutely right...well worth the effort!
OzMods do a 1/144 Boeing 727-100 resin fuselage, mainly to convert the Airfix -200 kit.
Hi, Greg. I have a few of the OzMods resin conversions, but I also have a closet with too many of the 727-200s AND a bunch of -100 decals. I plan on cutting all but just few down and finally getting the combination of planes and decals together. I didn't know Ozmods was still in business (I've been out of the modeling loop for way too many years). Thanks for the info.
Still here, and alive and kicking! Way past retirement age, with new kits (1/72 PC-9s - injected) recently released and lots of new kits on the way. Stay tuned!