1/48 Scale Monogram Junkers Ju-87G2
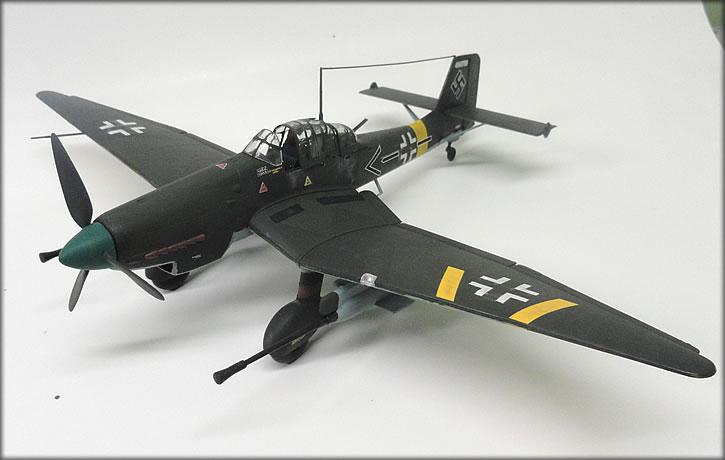
This bird is a Monogram issue from1968. It is a late model Stuka Ju-87G2. I had built another issue of the Stuka, the Ju-87D5, which was issued in the early 1980's while I was in college, but never this one.
What I love about this aircraft is that the Germans basically slapped some medium size anti-aircraft guns under the wings of obsolete airframes that had been reconditioned, and then turned those obsolete aircraft into one of the most successful tank busters of the Second World War.
In the Beginning
Opening the box, one will find a kit with, once again, not a lot of parts. The wing sections are huge for a non-multi engine bomber, as the Stuka had a large wingspan, and the fuselage is quite long, but except for the gun assemblies, and the undercarriage, there is not, as it turned out, a lot of assembly. I did notice that the canopy lines were not very well defined (those of you who visit this site regularly know how much I love canopy lines). Since this kit is an early 2000's reissue, I guess that this should not be a real surprise, since the molds are over 40 years old. After going over everything, the fun began.
Main Assembly
Assembly began with the cockpit, and cockpit area. The cockpit detail is not all that bad, with instrument panel, flight deck, seats, joystick, and rear gunner section, with a passable machine gun. The cockpit components were assembled, and painted PolyScale RLM 66, Dark Grey. After this was done, the cockpit assembly was glued into the fuselage, and then the fuselage was glued together. As I said, not a lot of parts.
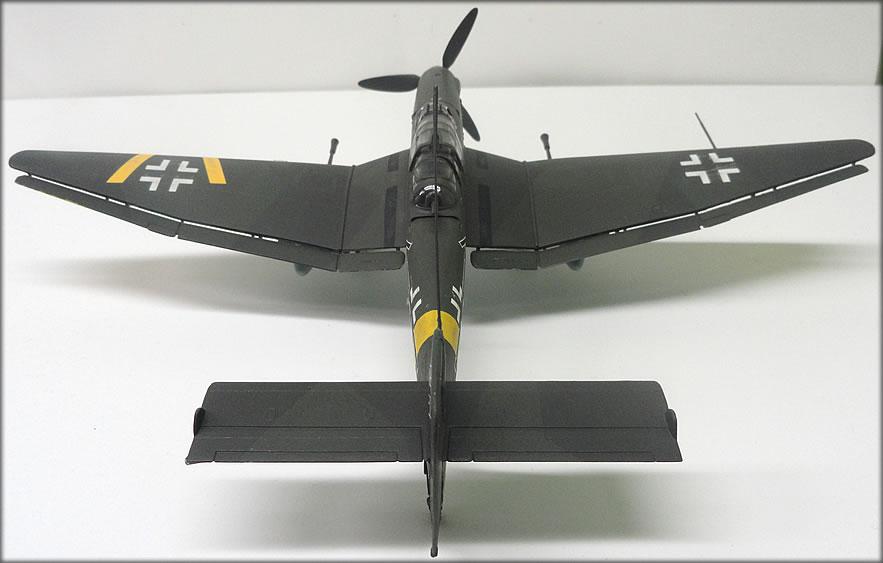
While the fuselage was setting up, I assembled the wings, the under-wing guns, and landing gear assemblies. There were, oddly enough, no real problems with any of these sub assemblies. After the wings were done, I put the stabilizer through the notch in the tail, which was pretty much held in place when I glued the rudder on the tail. This part was the only real problem I had with the major assemblies. There are struts under the stabilizer that help hold the stabilizer level, which I waited to put on until near the construction cycle, so I would not break them off. Because the struts help hold the stabilizer in place and level, you should make sure that the stabilizer is straight once you glue the rudder in place. When this was completed, I worked on seam filling the wings, fuselage, landing struts, and gun assemblies.
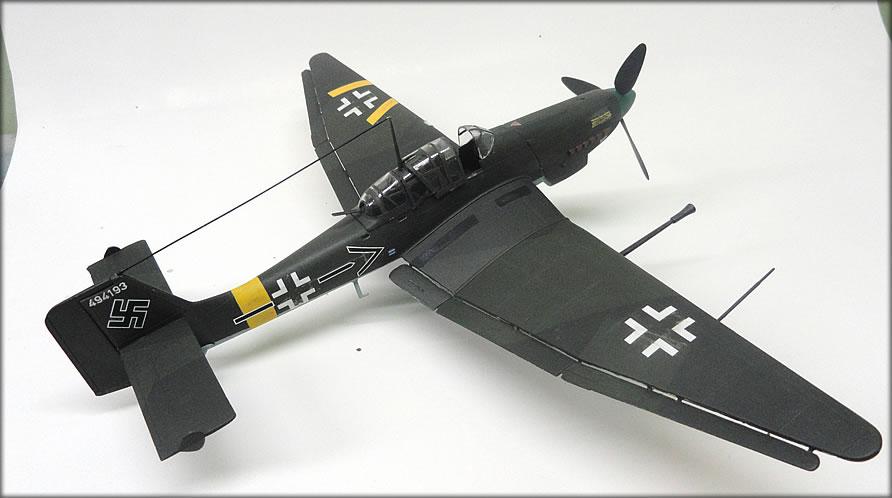
After the entire seam filling was done on the major assemblies, I installed the wings, and landing struts. Again, there were no major hitches. The only issues I had were the wing walk areas on the wings. On the G2 model, the black wing walks were replaced by strips of raised metal. I really did not want to sand off the wing walks, so I left them. I also felt that these would give a good color contrast. After giving the aircraft a final once over, it was onto to the paint shop.
Painting and Decals
This aircraft had the standard RLM 70/71 (Black Green/Dark Green) on the upper surfaces and RLM 65 (Light Blue) on the underside. The underside was painted first, then I masked off the underside to paint the upper surfaces. The masking was the hardest part of this whole process (except, of course the Canopy Lines). Because the demarcation line between upper and lower paint colors were hard edged, it should have been easy, and for the most part, it was. But once you get to the nose of the aircraft, there are more projections that are in the way (like the radiator housing). For some of this section, I had to do a hard edge by doing it freehand with my trusty 00 brush. All paint that was used was Pollyscale.
After the masking was completed, I started on the upper colors. The base color I laid down first was the RLM 71 Dark Green, then I began to mask off the upper wings and fuselage for the RLM 70 Black Green, and this is where I had a little bit of trouble. On some German aircraft, there was a soft edge demarcation line between the upper camouflage colors; this was mainly on late war aircraft. As this was a somewhat late war aircraft, I did some research, and discovered that the upper colors were indeed hard edged.
The other issue I ran into was what the actual fuselage camo patterns were. All my references show what the upper wings, and the Left-hand side of the aircraft looked like, but I did not know what the Right-hand side camo pattern was. Was it mirrored, or something completely different? So, I went to a few of the Modeling websites, but again, they showed the left-hand side, and not the entire fuselage. So, I went the old-fashioned route, and look at all my printed references (e.g. "books"), and I discovered, quite by accident, that the right-hand fuselage camo pattern was mirrored. I discovered this on the back-end page of my old Squadron Signal Book JU-87 Stuka in Action. I guess books are not quite out of style yet.
The masking of the wings was easy and straight forward, but the fuselage sides were a different matter. Some of the masking had to be done in stages and the tape cut into small sections and shapes, because of some of the odd angles that the camo edges had. I used a lot more tape than I thought I would. After the camo patterns were done, I sprayed a coat of Testors Glosscote straight out of the can, and the decal phase began.
The decals I used for this bird were Aeromaster Decals, Best Selling Stukas, Pt 1. The decals I used were the markings for one of Han Ulrich Rudels G2 Stukas. I was kind of hoping that there would be a different aircraft and pilot, since everyone does Rudels aircraft, but it was all I had.
The decals all went down good, and there were quite a few stencils. It took me almost an hour and a half to get all the decals in place. All the decals reacted well to both MicroSet and MicroSol. There were only three decals I could not get into place, and those were the stencils on the radio mast (2), and the spiral on the nose. In both cases, the decals seemed to be too big to fit. I suspect that the model that these decals were made for was the Hasegawa version.
After one more going over with the setting solution, I attached the stabilizer struts, and the main guns with Krystal Kleer white glue. I then laid down a layer of Dullcote.
Weathering
I faded the upper parts of the aircraft with my usual method of a wash of flat white, then I did the usual paint chipping along the leading edges and high wear areas. I did not go to heavy on the weathering; a lot of my reference materials show German aircraft to be well maintained.
After the fading, I did a wash of Grimy Black to tone things down, especially the upper wing decals. I then added exhaust and gun powder stains on the fuselage and flak guns, as well as fuel stains. I went somewhat heavy on the exhaust stains, because the Stuka engines were an inverted vee, thus quite a bit of oil would leak out of the valve covers, and run down the lower fuselage due to the slipstream when the aircraft was flying. I also did a light dry brush of mud on the lower tail and landing gear surfaces.
Finishing Up
After all the weathering was done, the canopy lines were painted. As I mentioned above, the canopy lines were not well molded, but I worked it out. I did check one of my original issue G2's that I have in the stash, and the lines were really not much better on the original issues either. The camo pattern went right over the canopy in a few areas, but this came out good.
After all was judged to be good, my G2 Stuka took its place on the display shelf. I was surprised how big this aircraft really was. It took up more room on than I thought it would, but it looks good.
Conclusions
In general, the Stuka is an ugly aircraft. Big bat like wings that are cranked for dive bombing, ungainly looking, and humpbacked because of the canopy over the pilot. But there is something about the plane that is appealing. I love the look of the main guns, even though they look lashed on, and they pretty much were lashed on to the wings of the real thing.
But I guess the real appeal of this aircraft for me was that it carried on with a role that it was not designed for, when the aircraft was, by that time, functionally obsolete. But when it was called upon to do that role, it did it extremely well.
Until next time...
I love dive bombers in general, and the Stuka in particular. Yours looks very well done!
"But I guess the real appeal of this aircraft for me was that it carried on with a role that it was not designed for,"
That is true for many great aircraft. The F-14 D became, the "Bomb Cat", the F-15 C became a two seater and fighter bomber. Hellcats and Corsairs during WWII where designed as fighters but, evolved into carrying bombs, rockets and even cleared to carry torpedo's...
Neat build and classic Monogram kit. This kit helped lay down the foundation for serious modelers in the shape and accuracy dept. Two thumbs up Kipling.
Hans Rudel bio is a must read if your into Stuka's. I don't agree with his ideology but, for a guy to survive against all of the odds its a interesting book.
Well done, Kipling! I like the Suka as well and you've done a great job on yours. I have the same Monogram kit in my little stash of doom. As you said; it's simple, but very nicely done. I LOVE those "lashed on" guns, as you called it!
Nicely done, Kipling!
great job...great kit...ugly not hardly