Tamiya 1/48 Ki-61 Hien “Tony” 244th Sentai 1945, covered using Bare Metal Foil
This article is part of a series:
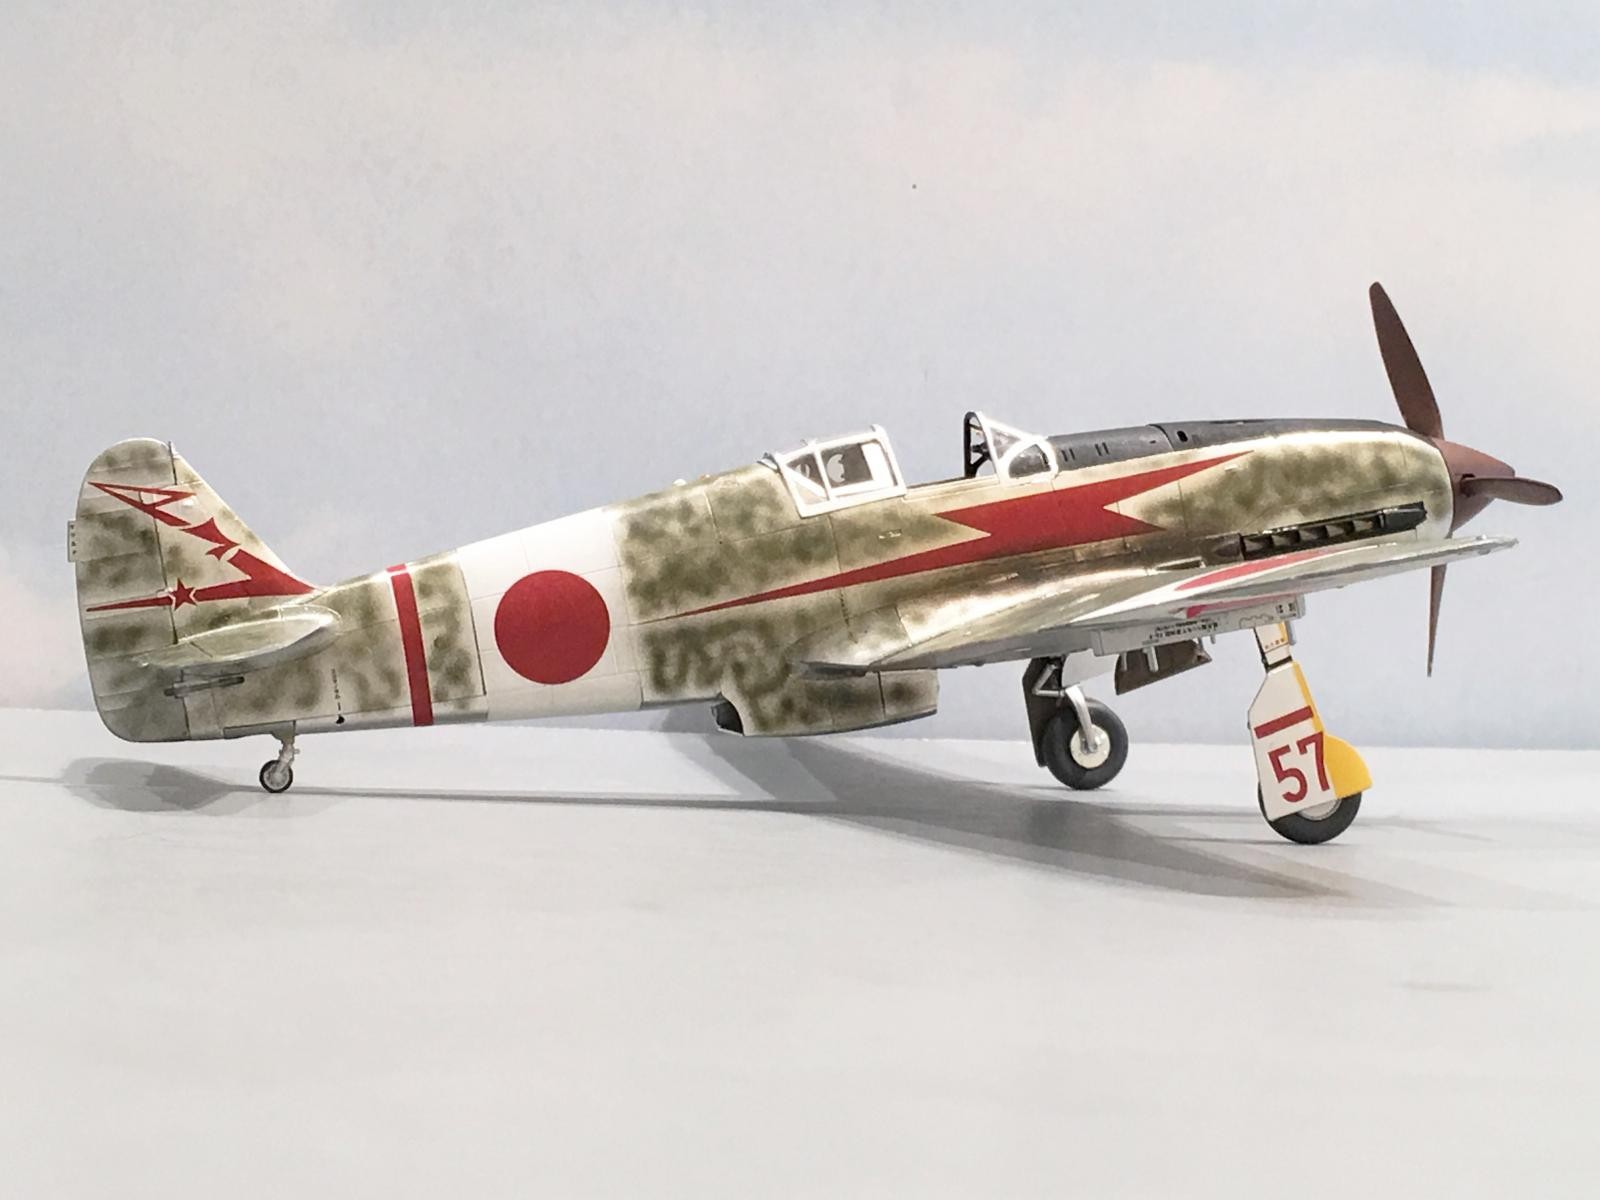
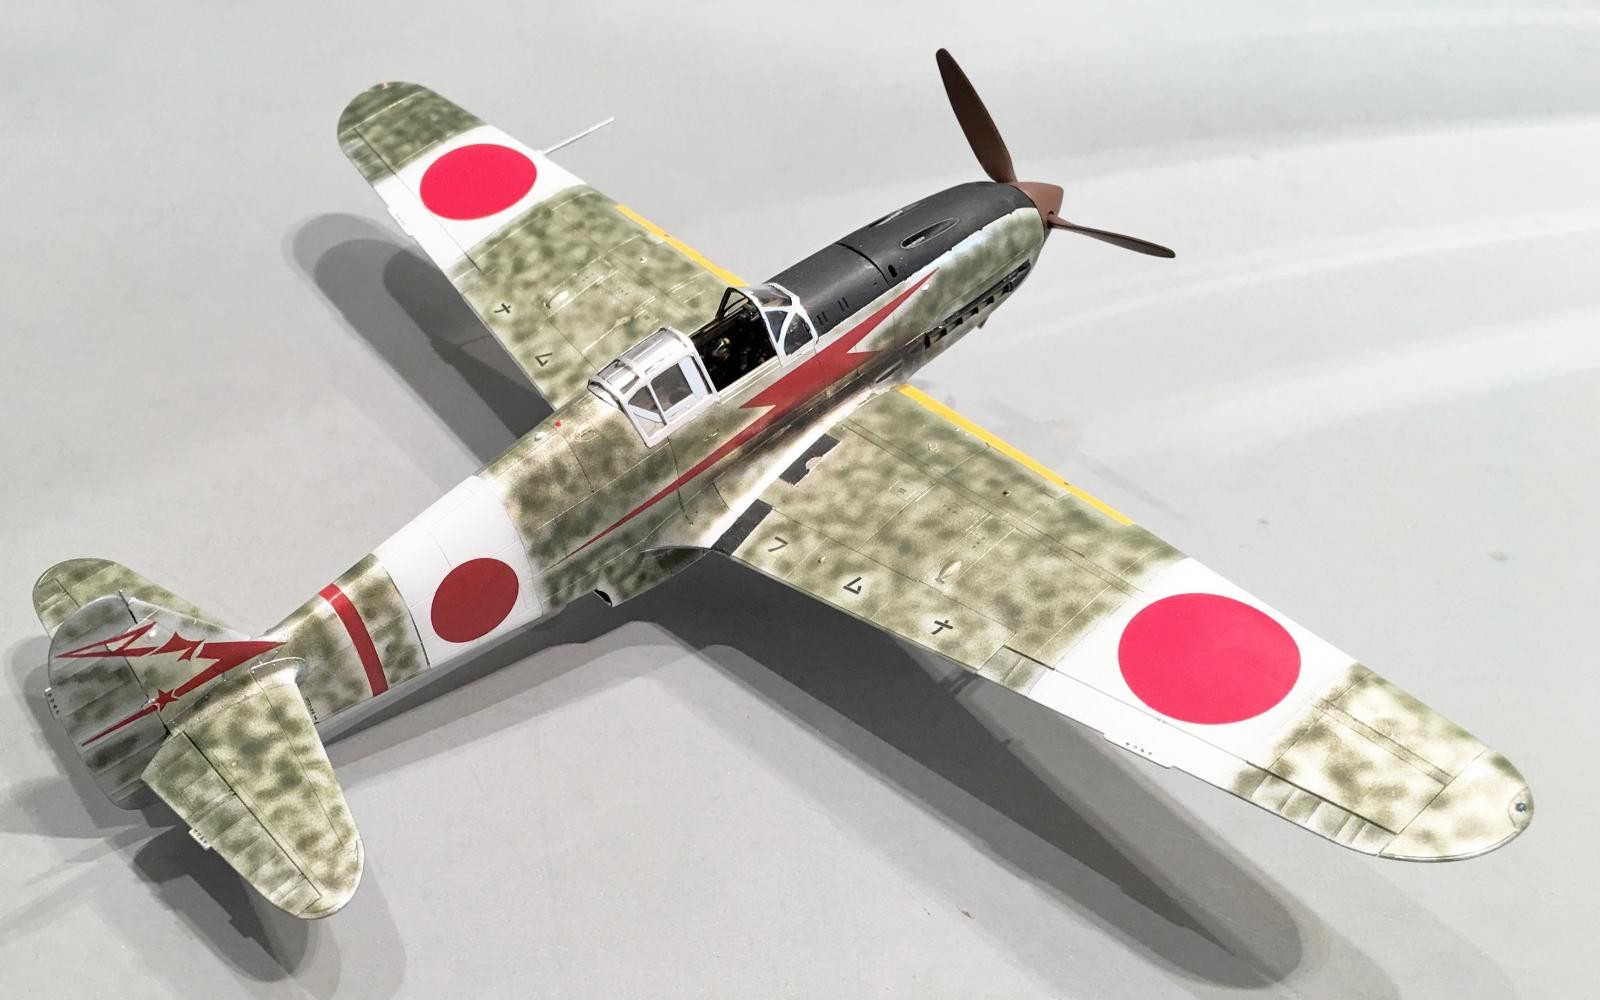
This is a model that I finished up a few days ago. It also happens to be my favorite Japanese fighter from the War. It's so elegant and streamlined... I call it the "Japanese Spitfire".
The Tamiya model fit together perfectly, and the engineering is so clever and precise that I didn't feel the need to glue several parts in place. I still used glue throughout the build however just to be safe.

The Ki-61 was a Japanese fighter that was powered by a Kawasaki Ha-40, which was actually a license built German Daimler Benz DB-601 engine with a few changes incorporated. The Japanese version of the DB-601 weighed in at approximately 70 pounds lighter than it's German counter part.
These changes made by the Japanese, caused the engine to be manufactured at even more critical tolerances, which was something that hampered production by making it even more complicated to build. The Japanese engine also required a higher octane fuel which was something the Japanese Military had a shortage of during the War.
When the plane was first encountered in combat, it was often mistaken as a BF-109 ! This is also why the plane was given the Allied code name of "Tony", since the engine was also used in several Italian fighters of the time, and the plane was thought to be of Italian or German design.
The airframe went through several changes during the production lifespan. One which occurred later on was the lengthening of the nose by approximately 8 inches to allow the installation of a larger caliber weapon in the nose of the aircraft. The Germans sent a shipment of Mauser cannons via U-Boat to the Japanese. The Japanese immediately placed these new canons into service and saw results right away with the improved fire power.

However the majority of the Ki-61's that saw combat were of the "short nose" variety... Most of the model versions in 1/48 scale today are of the long nosed plane. This Tamiya offering is no exception.

I wanted to build a version of the "long nosed" Tony. I wanted something besides the regular ones you normally see with the red tail that is commonly associated with the 244th Sentai. I had a set of older Aero Master decals that dated back from 1995. These showed a long nosed Tony with tail markings from the 244th Sentai. The plan was coming together... fortunately for me the old decals worked flawlessly. I found that Lifelike also produced a more recent set of decals for this exact plane. They also had the markings shown the same as what Aero Master did, so I felt better knowing this. Lifelike has a reputation for doing considerable research behind their subjects.
A while ago I did an in box review on the kit shortly after it was released. Every since then I have been wanting to build this kit since I was very impressed with the contents inside . I finally said "to heck with it" and simply opened the box. Sometimes taking the first step is the hardest thing to do.
The 244th Sentai was formed shortly after the Doolittle Raid. Originally it was the 144th Sentai and they operated the older Ki-27 "Nates". The Doolittle raid had impacted the Japanese in such a fashion that a lot of critical resources were used for homeland protection.
The main reasons we see so many pictures of Ki-61's from the 244th Sentai is that this unit was based near Tokyo. As such and since they were tasked with homeland defense, they became the subject of photography in a lot of instances. This became even more evident as the Americans started the B-29 raids over Japan.
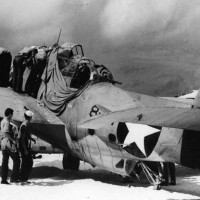
The Japanese had a very hard time trying to reach the altitudes that the B-29's operated at. They also suffered the effects from the Jet Stream just as the American bombers did. There were accounts given that the Japanese planes just could not operate at these "extreme" altitudes where the B-29's were encountered. Often the fighters would simply not be able to climb any higher and would stall out, causing them to plunge back to earth... until they regained control when the air became more dense.
The Japanese were very desperate in their attempt to down the B-29's. They had to remove unnecessary weapons, radios and armor in an effort to reduce the overall weight of the aircraft to help with the service ceiling. If you look closely at the model you will see that there is no radio mast. This is why. Not all of these planes had one...
This is a sight that was often the last for an allied airman... a Ki-61 coming in head on. Since the majority of the weapons had been removed, the Japanese pilots often resorted to "ramming" attacks. On occasion they would simply used the propeller to slice up a B-29. When this happened, the pilot would try to bail out if at all possible...
There were a few documented cases where Ki-61's were successfully landed after a ramming attack was carried out against a B-29. These pilots were considered National Hero's and often awarded the "Bukusho" which was Japan's highest award. This award was the Japanese equivalent to the American "Medal of Honor". The Bukusho was awarded in two categories. Class "A" and a Class "B". The pilots most often received the Class "B" version.
There are a few pictures floating around of these planes as they were placed on display throughout various Japanese cities later in the War. If you are at all interested in this B-29 aerial campaign over Japan, I can highly recommend you get the Osprey book entitled "B-29 Hunters of the JAAF". It was written by Koji Takaki and Henry Sakaida.
It is well illustrated and has numerous photos showing the various B-29 planes that were attacked, as well as the assorted Japanese planes that were used to attack the B-29's. The book also gives details about what happened to the B-29 crews once they were taken into captivity. Let me just say these B-29 crews were not treated very well at all... but that's another story.
The Ki-61 was used by many Japanese fighter units. Some of the more famous Groups were totally wiped out, almost to the last man while serving the Emperor in New Guinea. Among the units that were completely wiped out by Allied airpower was the 68th and the 78th Sentai. These were sister units and often flew together in combat. They flew the Ki-61 when it was available, and also flew the older Ki-43 Oscar.
I have a set of decals for a 68th Sentai plane and will eventually build one using the older, but still acceptable, Hasegawa offering. In order to build this model I will have to use the "short nosed" version, which was in combat earlier and more often encountered in the skies.
These units were under the constant threat of aerial attack from the Allies. Most often the worst was received from low flying B-25's dropping para frag bombs. The B-25's would fly in at very low level, strafing the Japanese airfields and dropping bombs. The para frag bombs were small cluster bombs that had a time delayed fuse on them and were suspended by a small parachute as they dropped. When they went off, the damage caused by shrapnel to both the men and the planes was often enough to reduce the entire airfield to rubble.

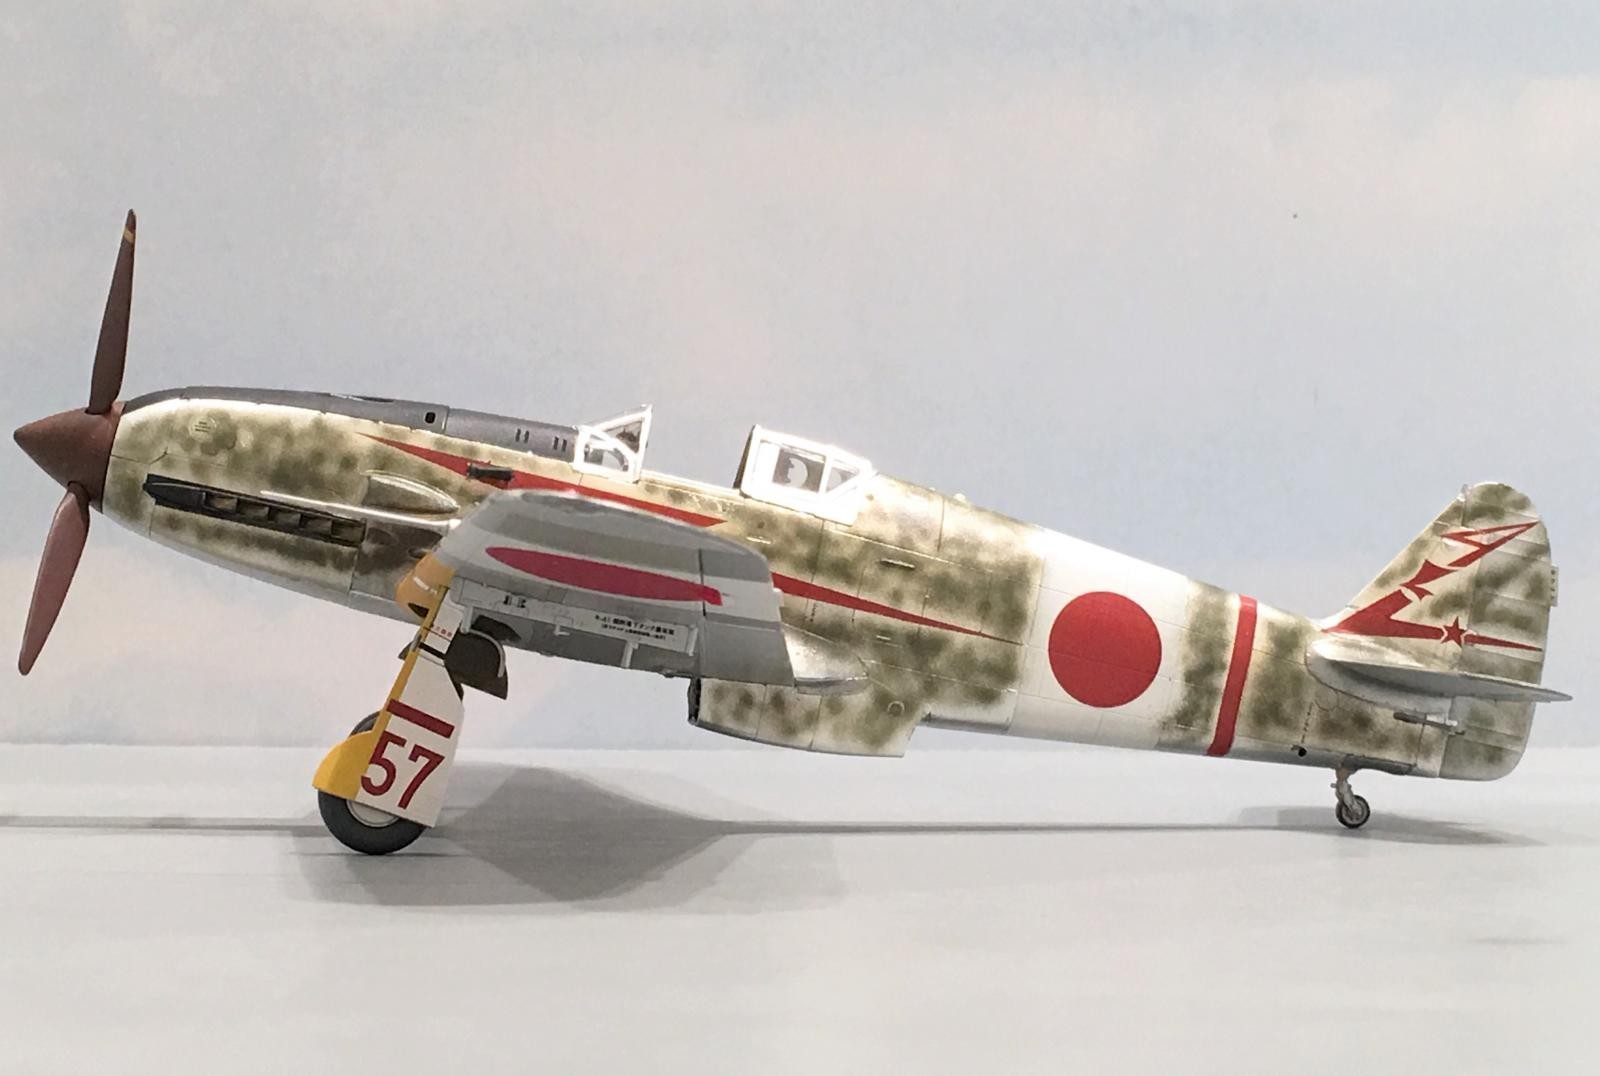
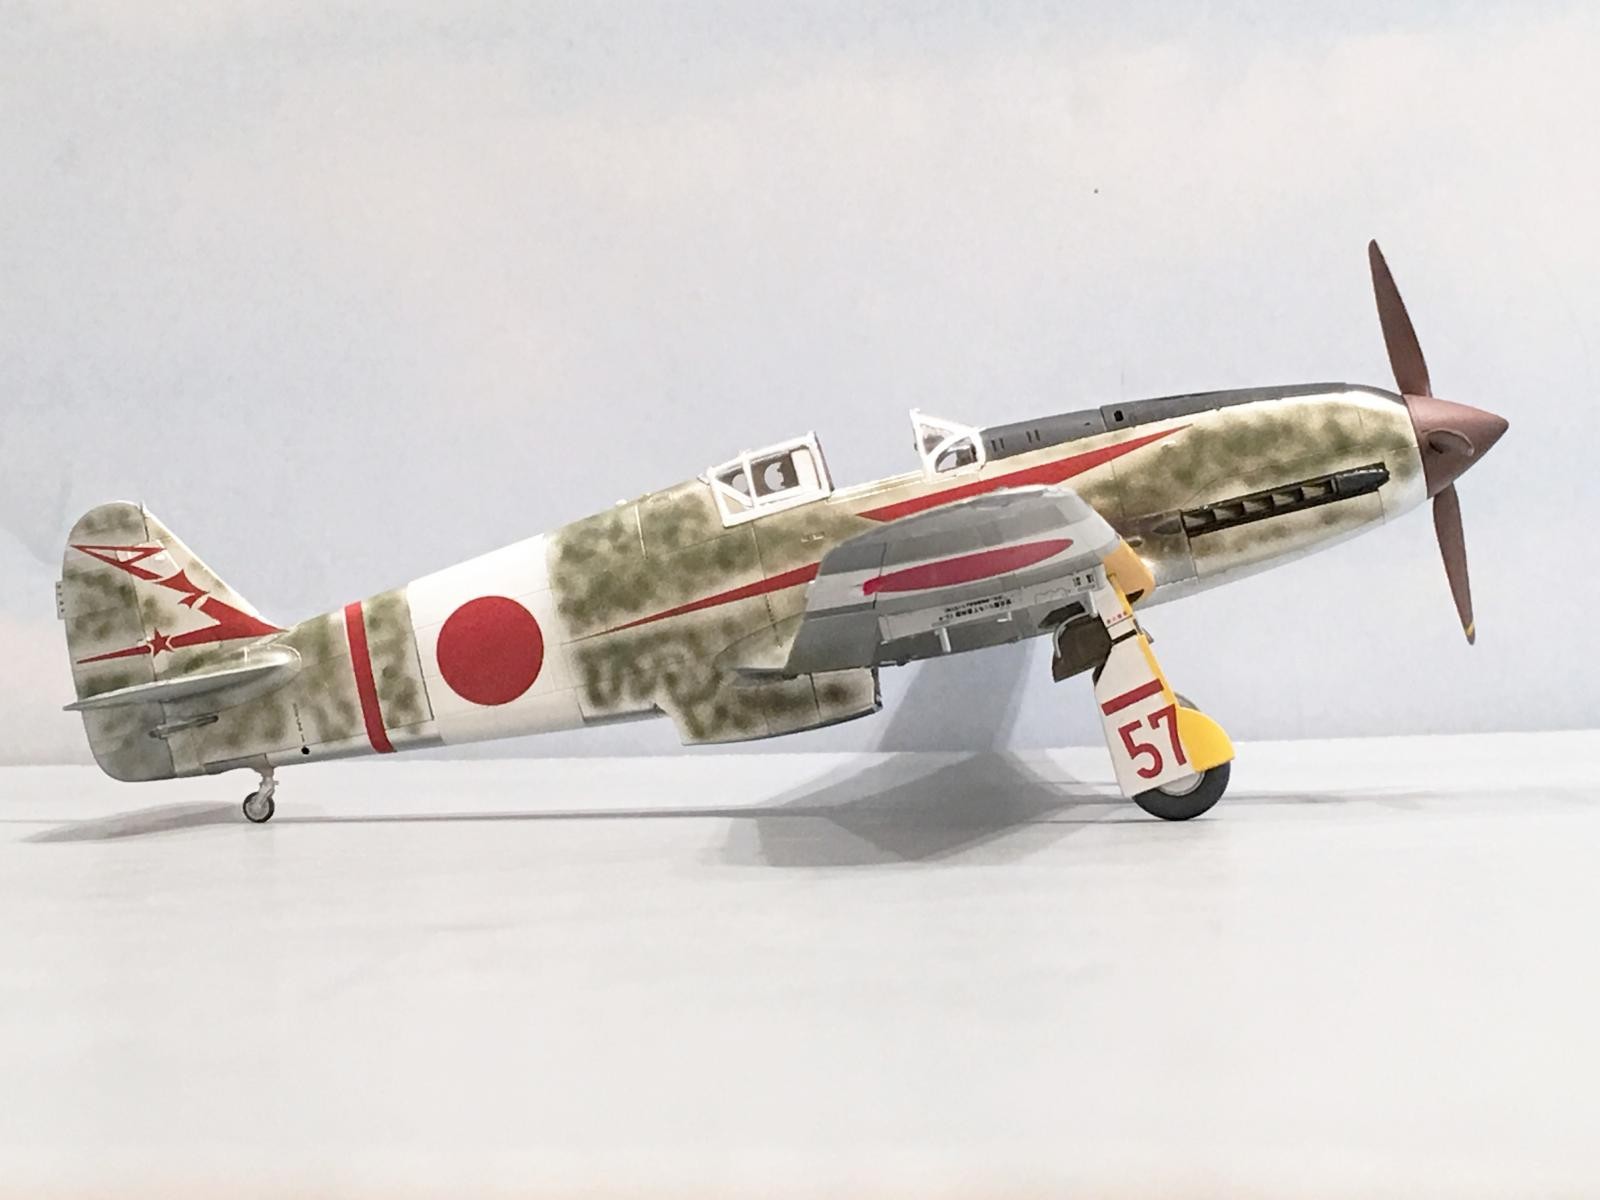
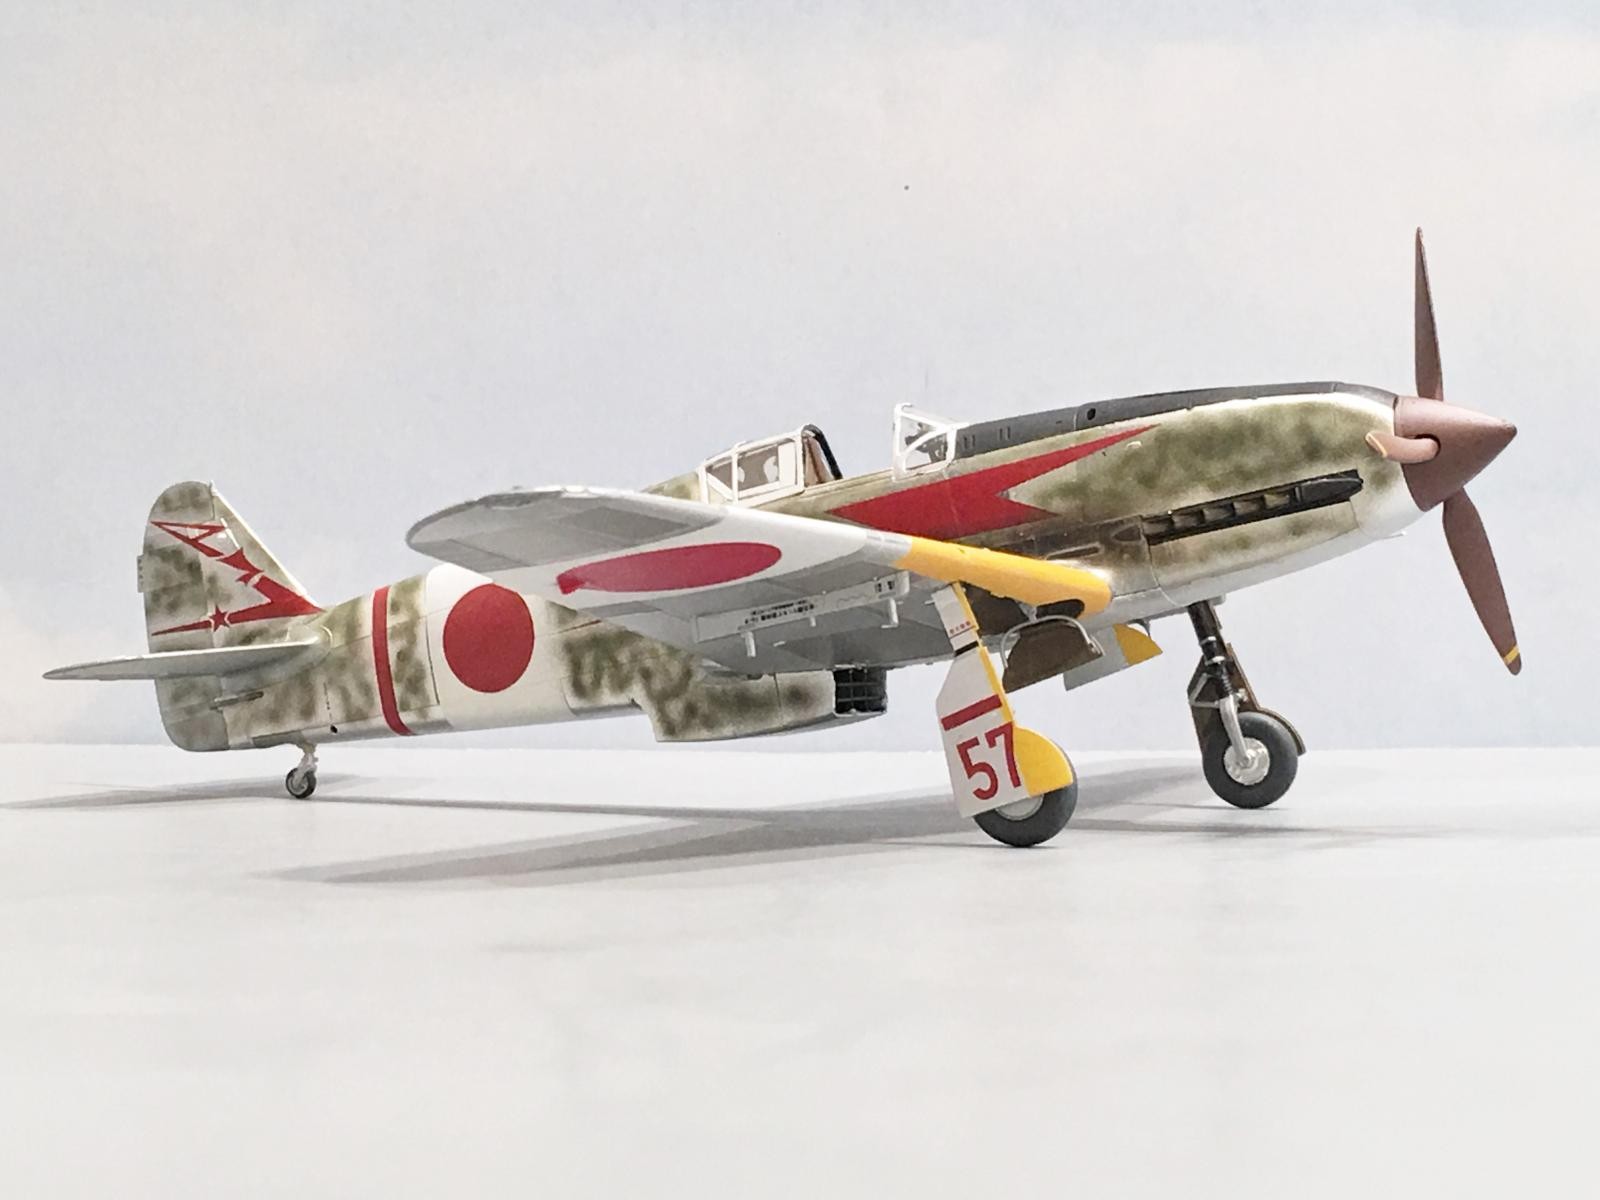
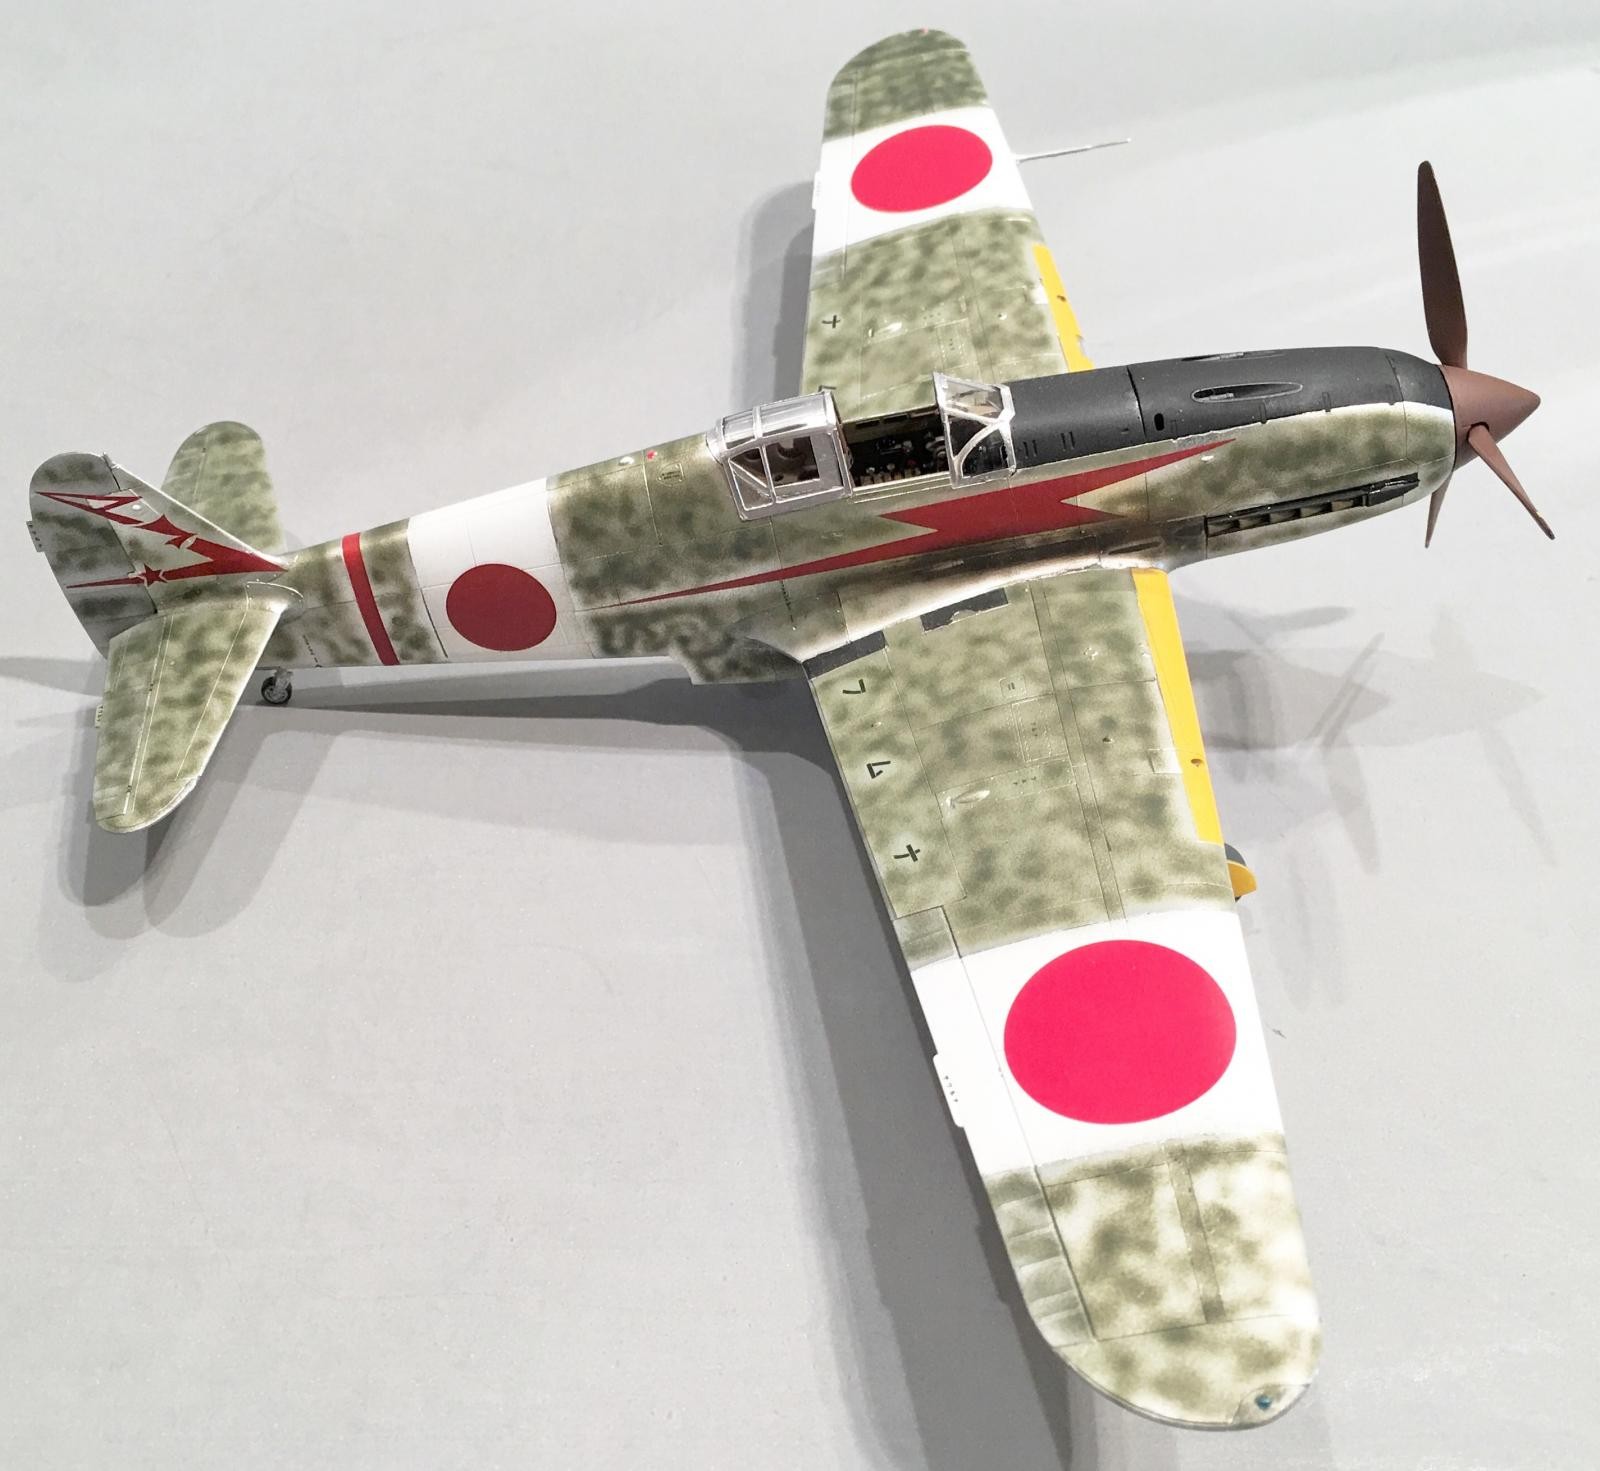
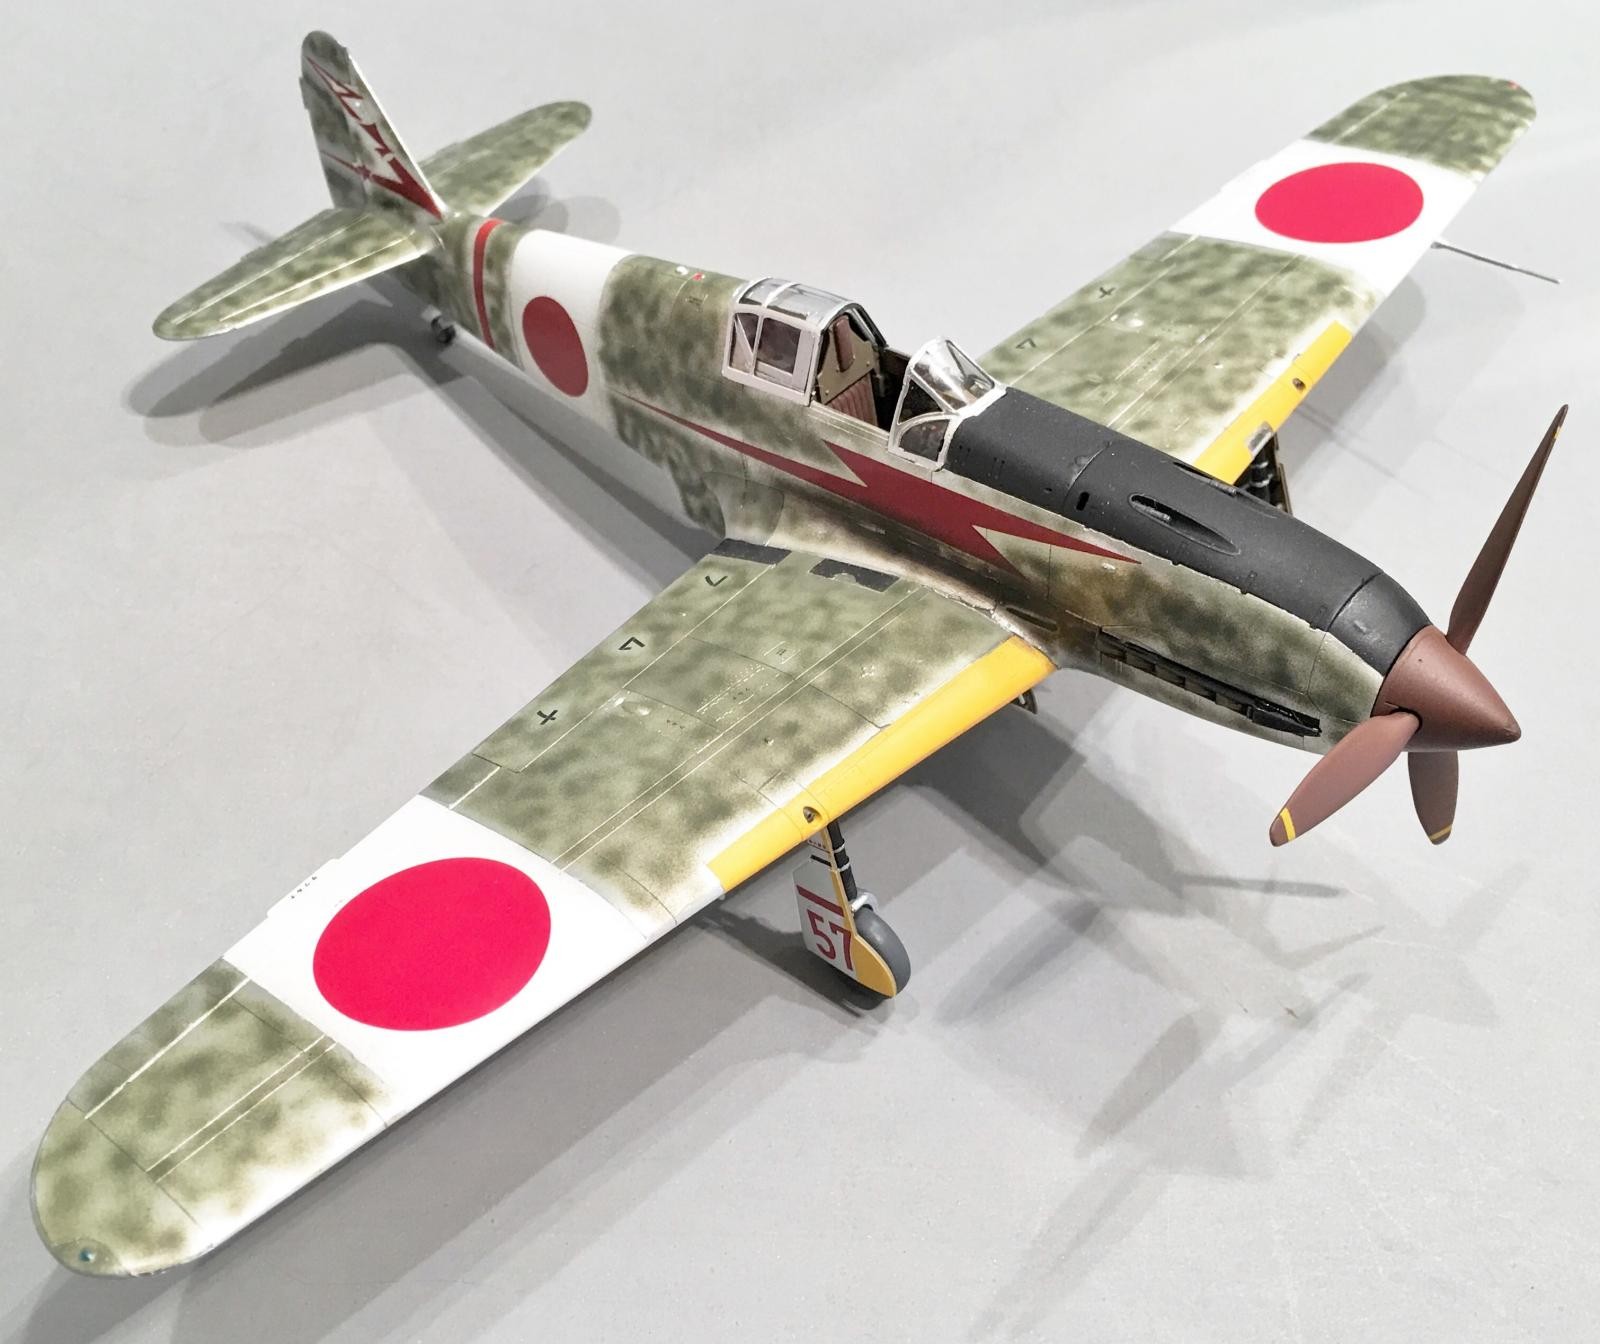
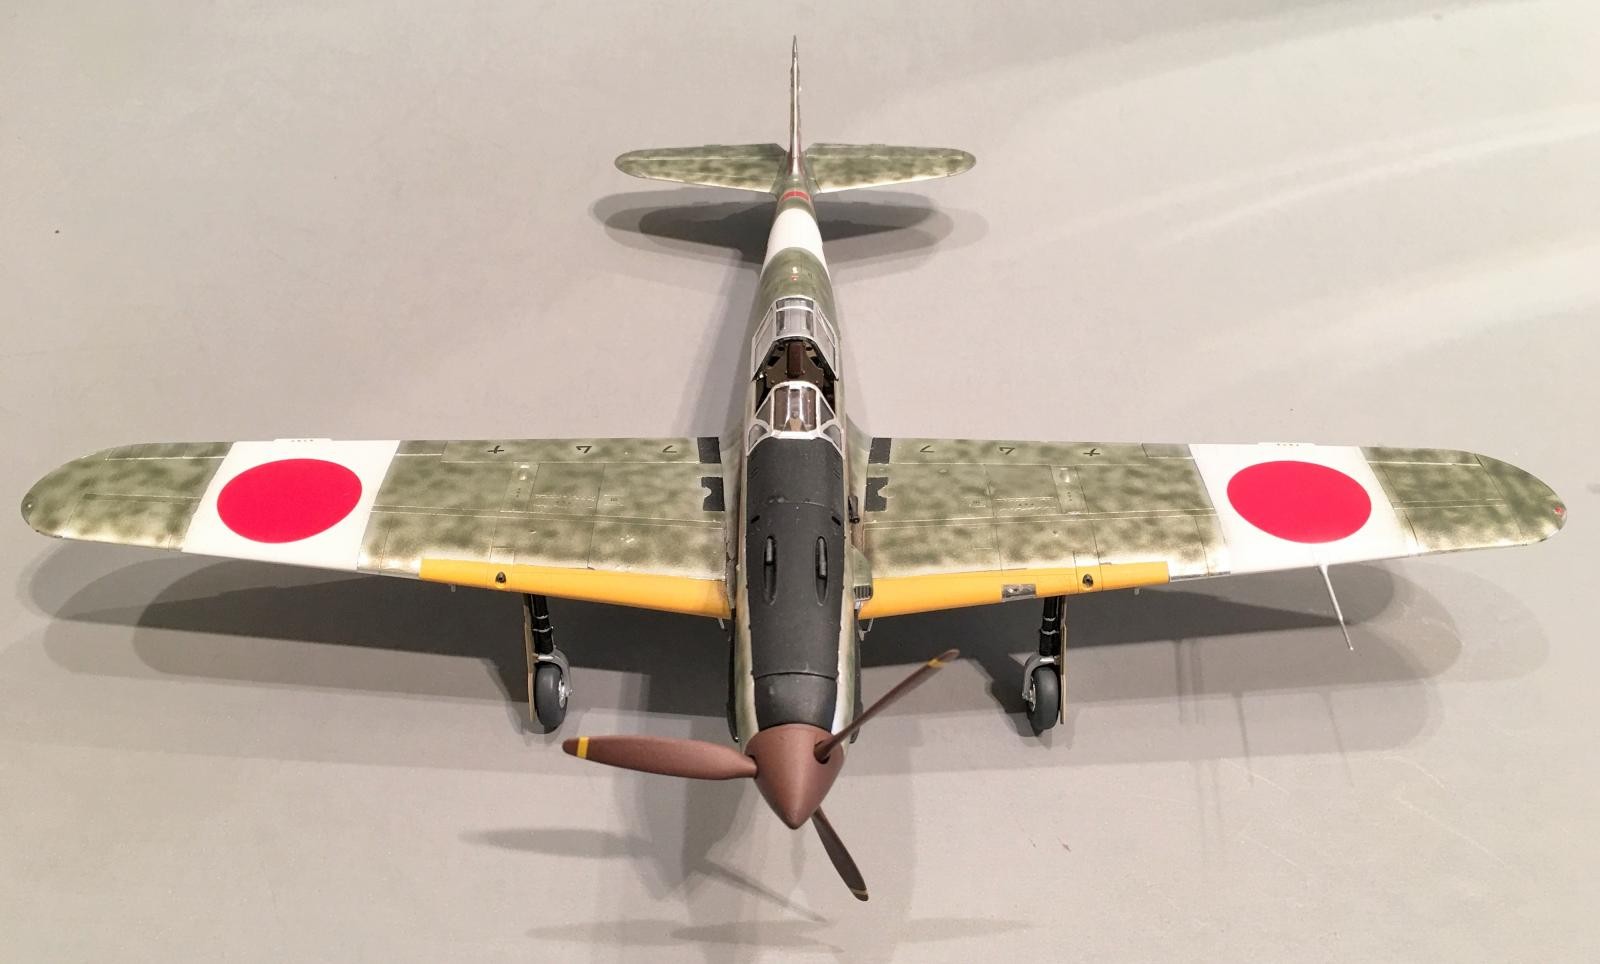
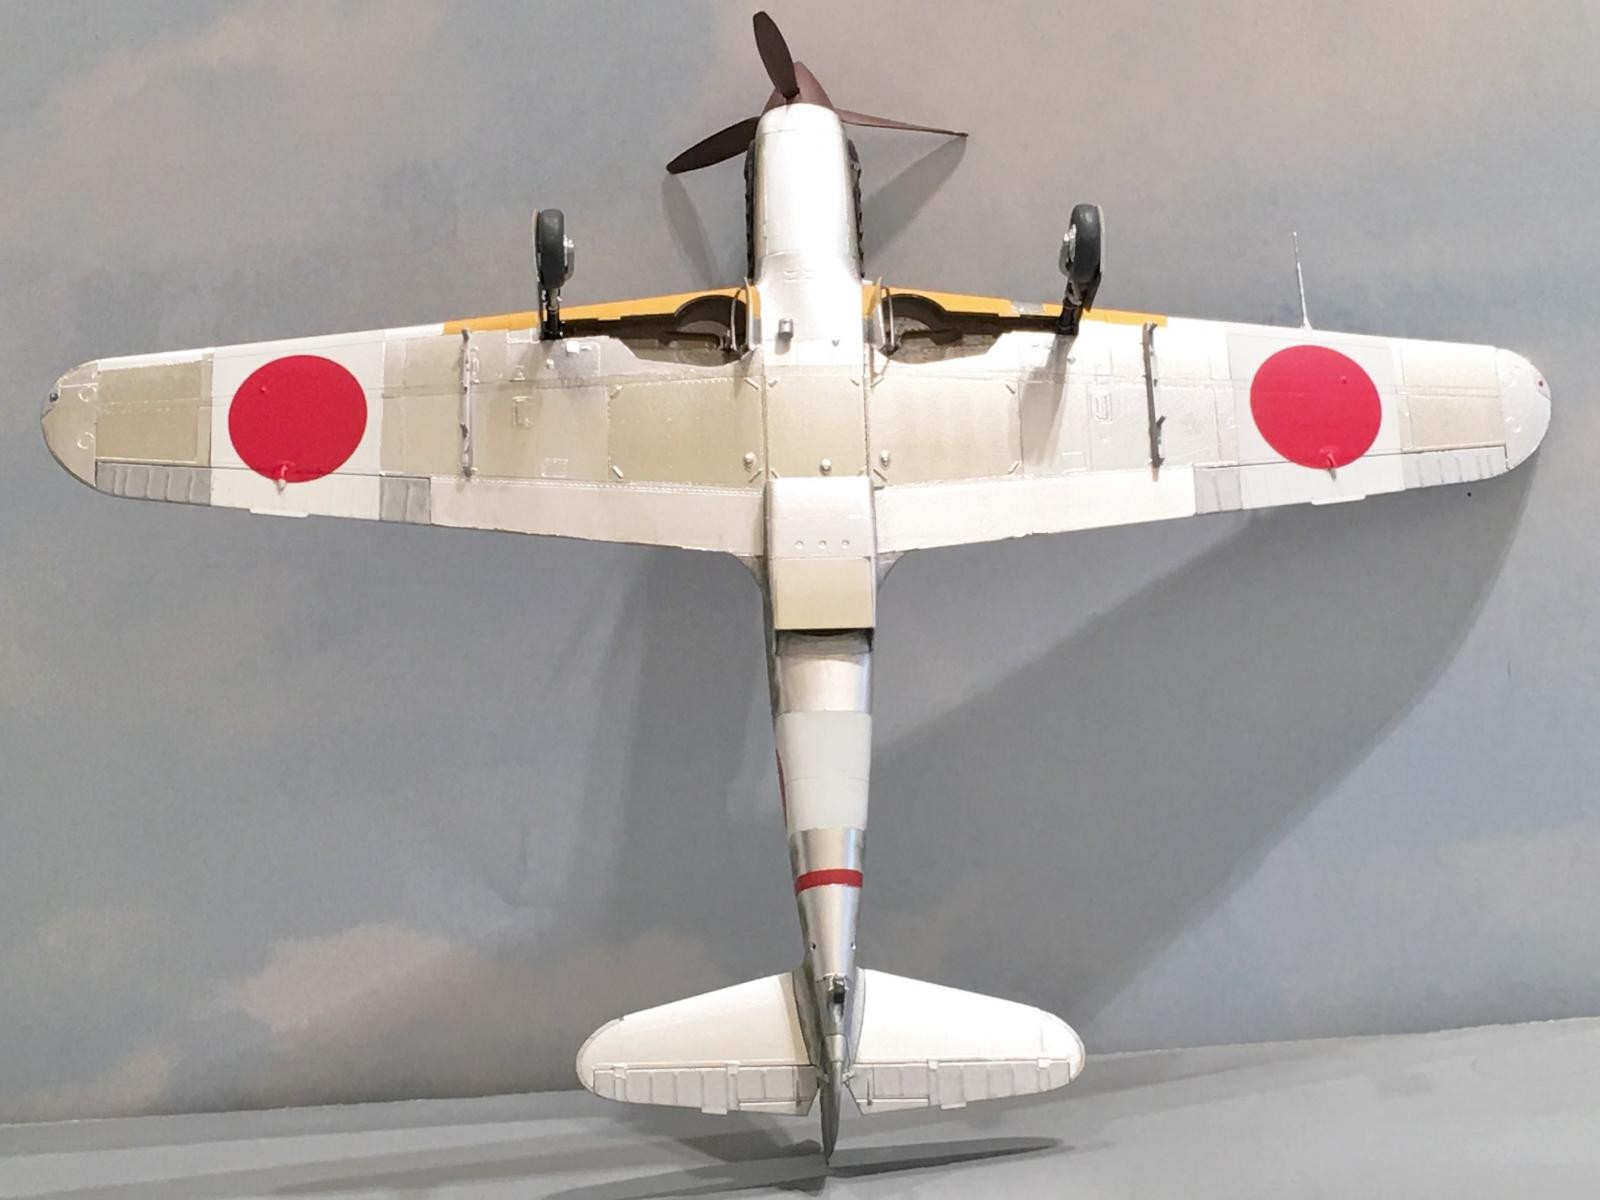
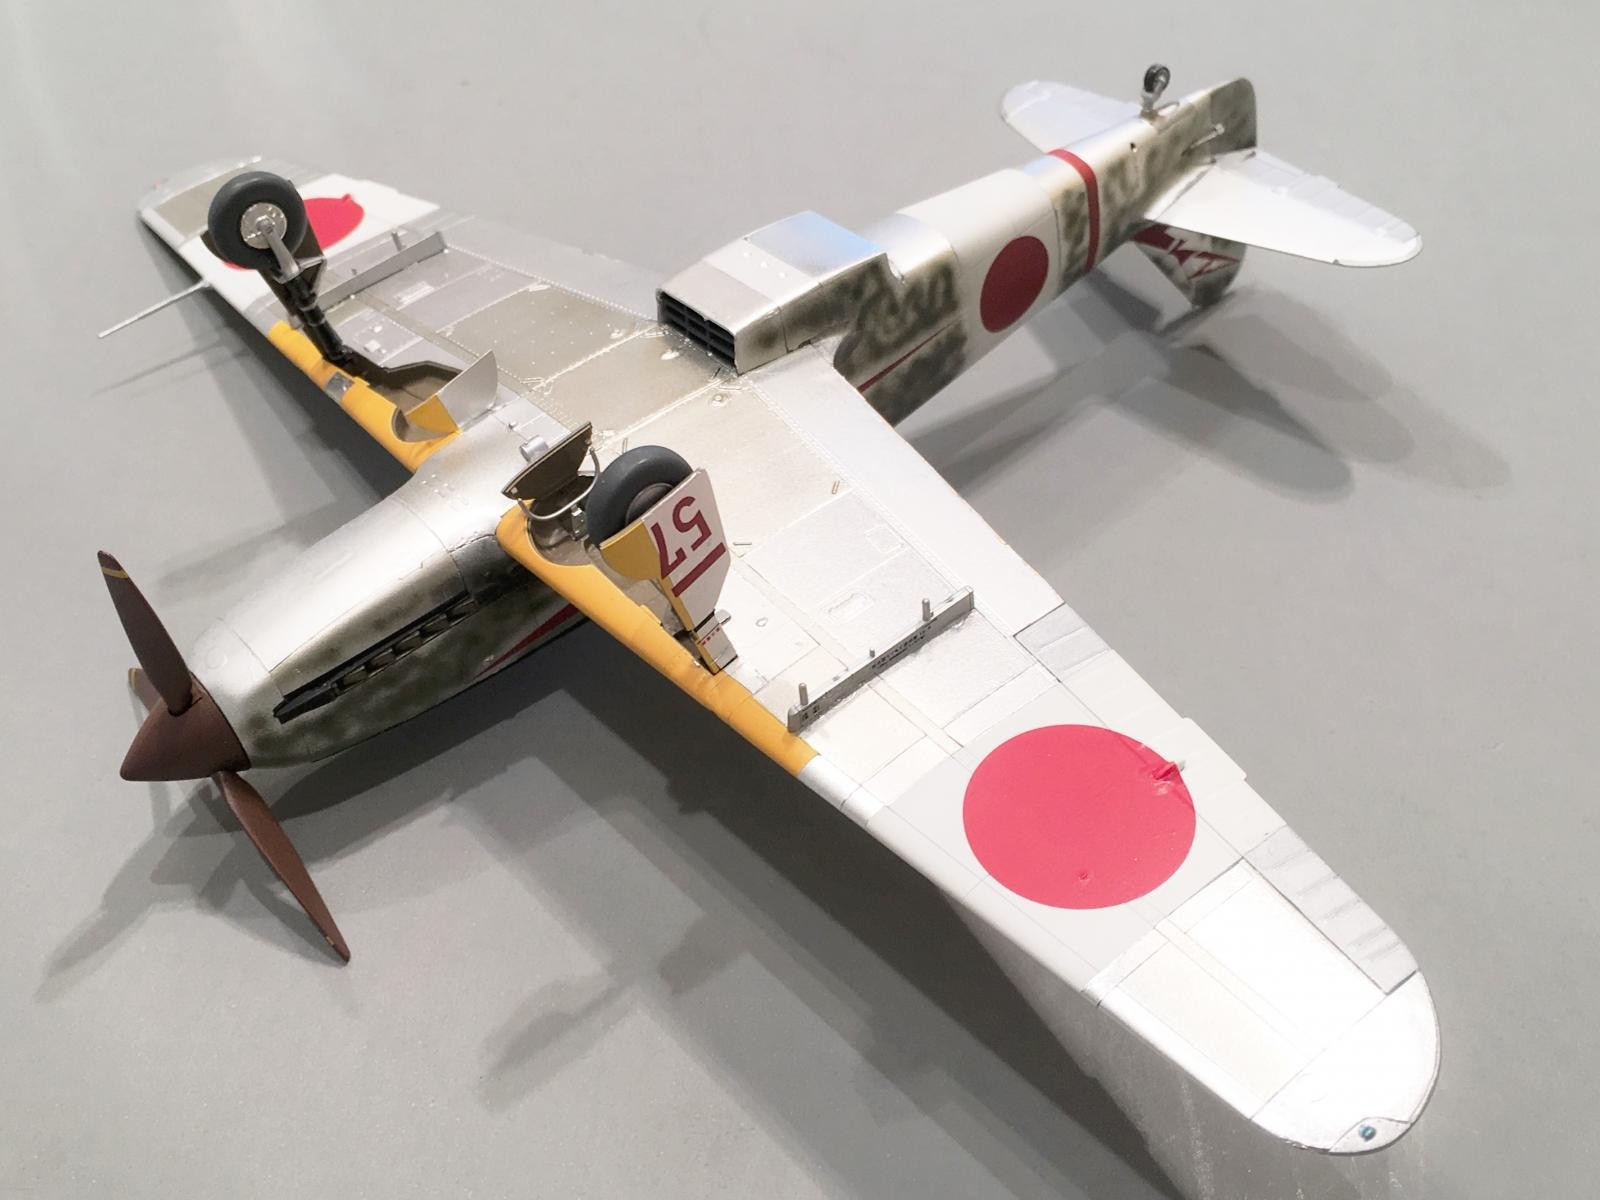
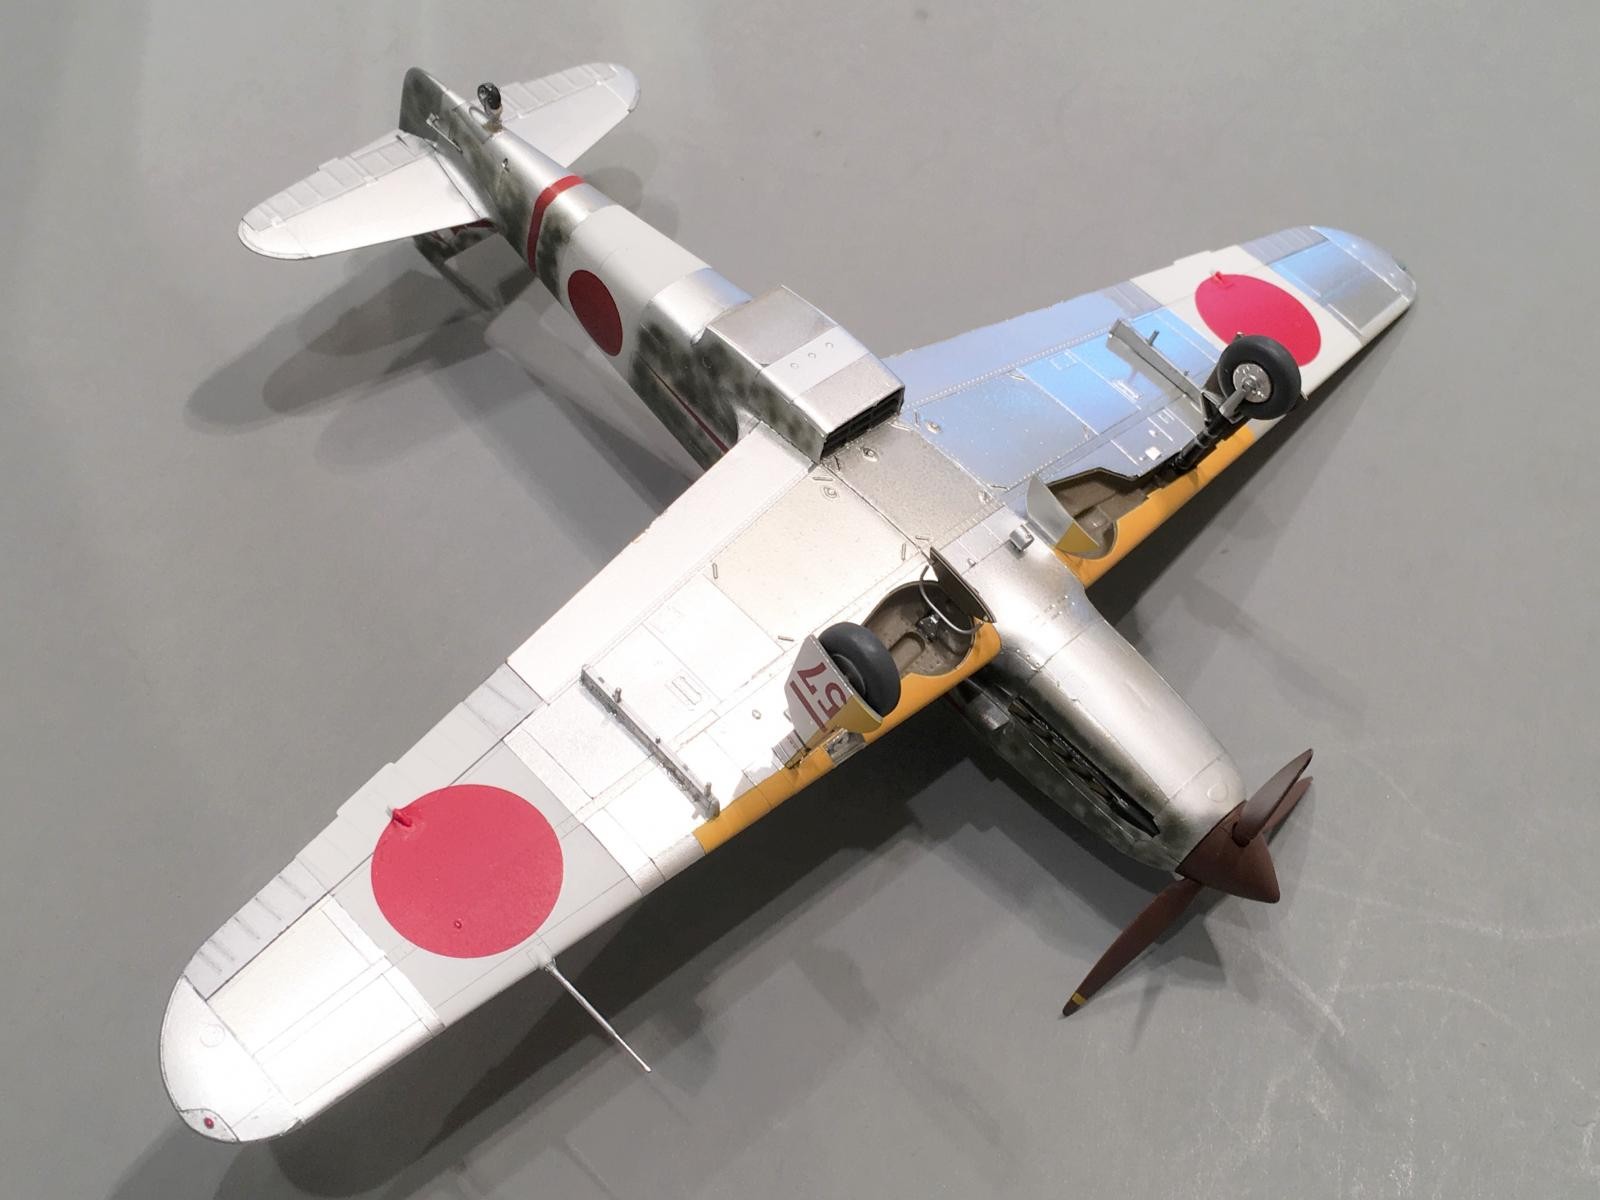
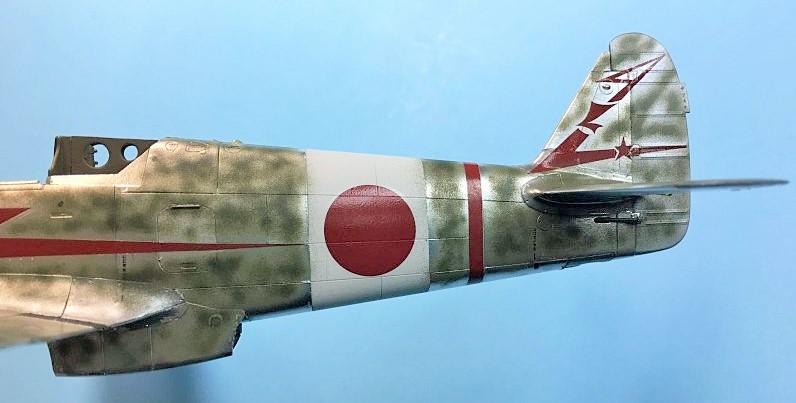
To help prevent this from happening, the Japanese became very proficient at using camouflage. It varied from using freshly cut vegetation from the nearby jungles to conceal the planes, to spraying on various squiggly lines and shapes over the natural metal finish that the "Tony's" were delivered in. This was often done using as little paint as possible. Just enough to knock down the "shine". Sometimes this paint was applied using a brush, while other times it was sprayed on.

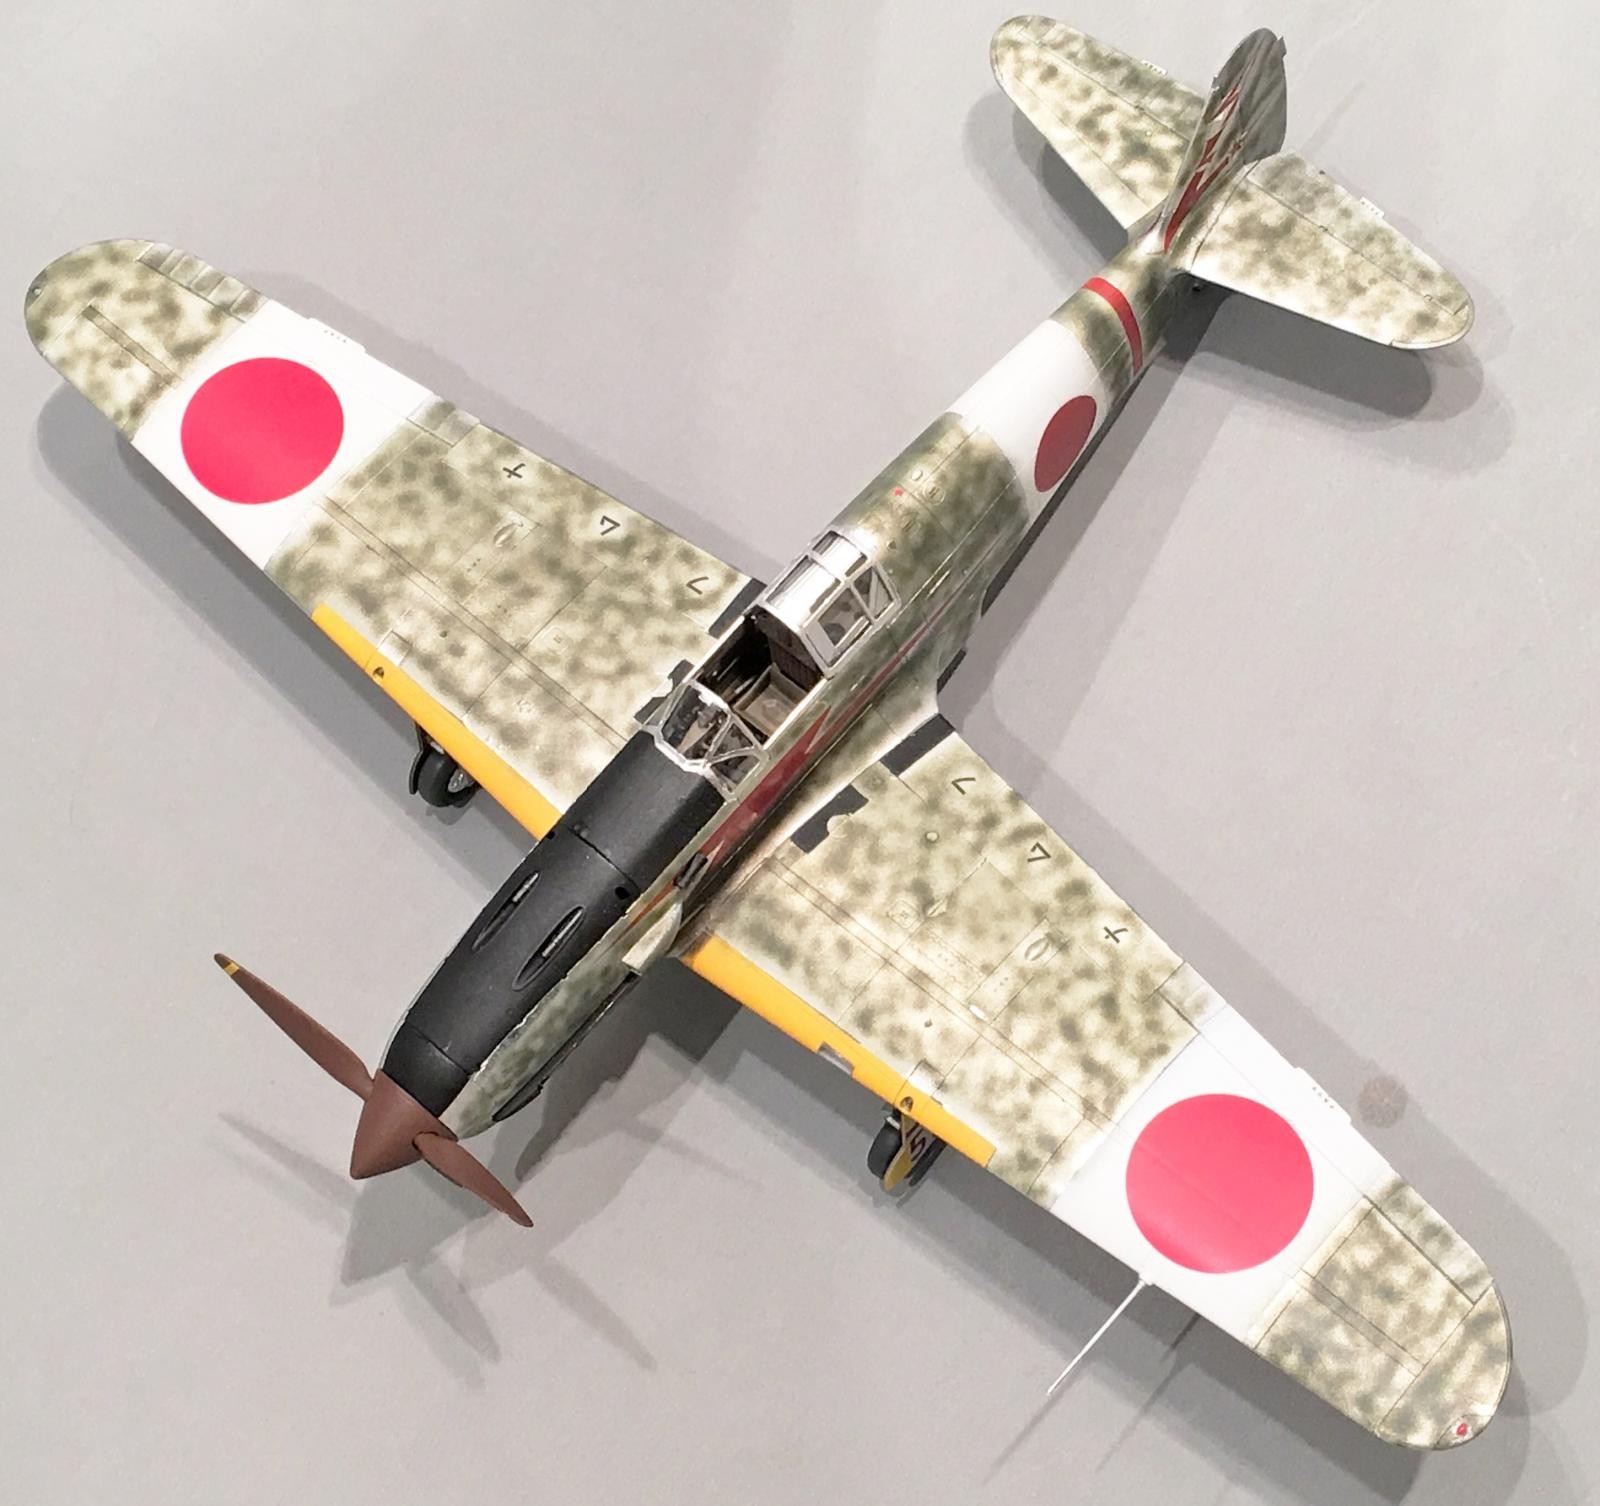
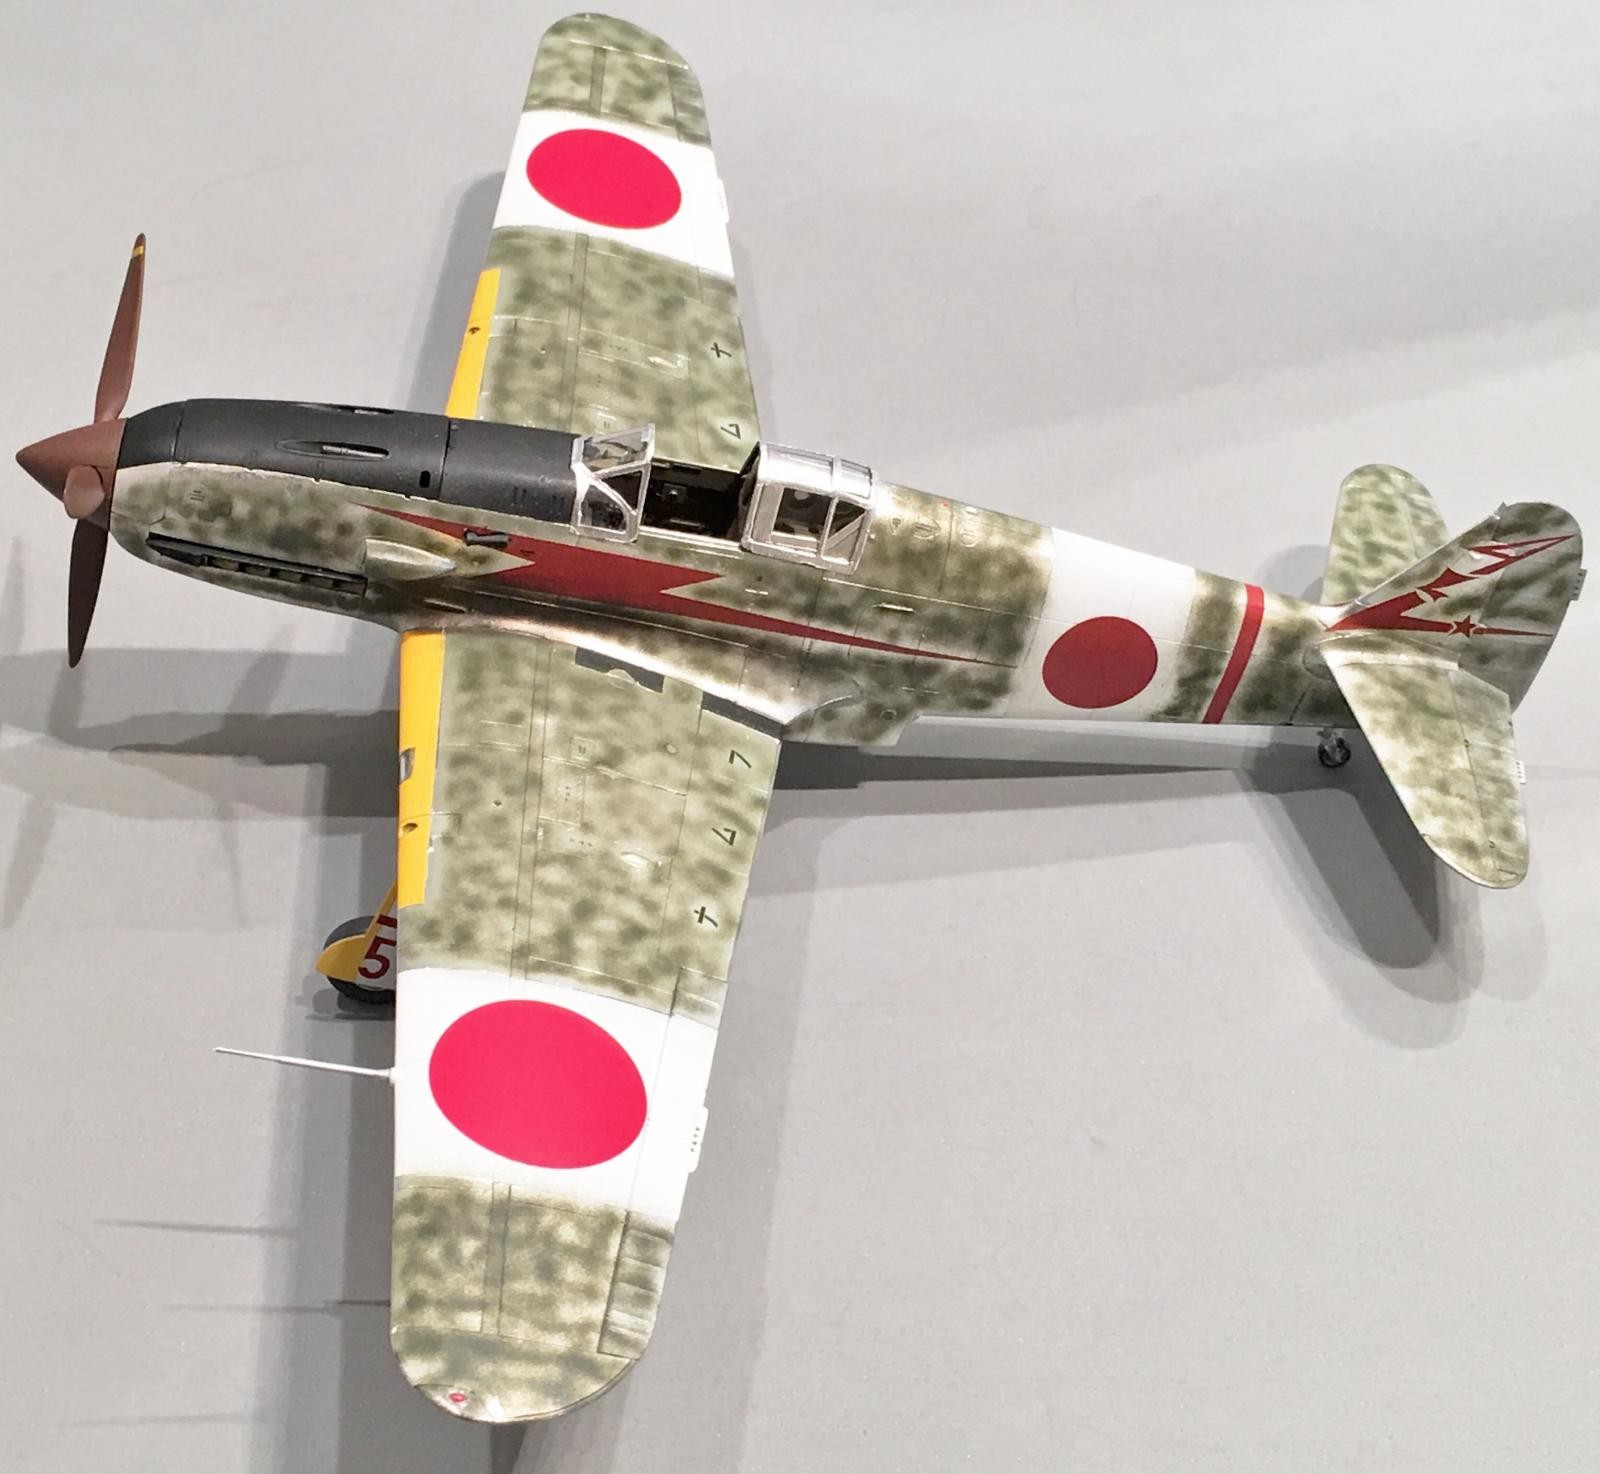
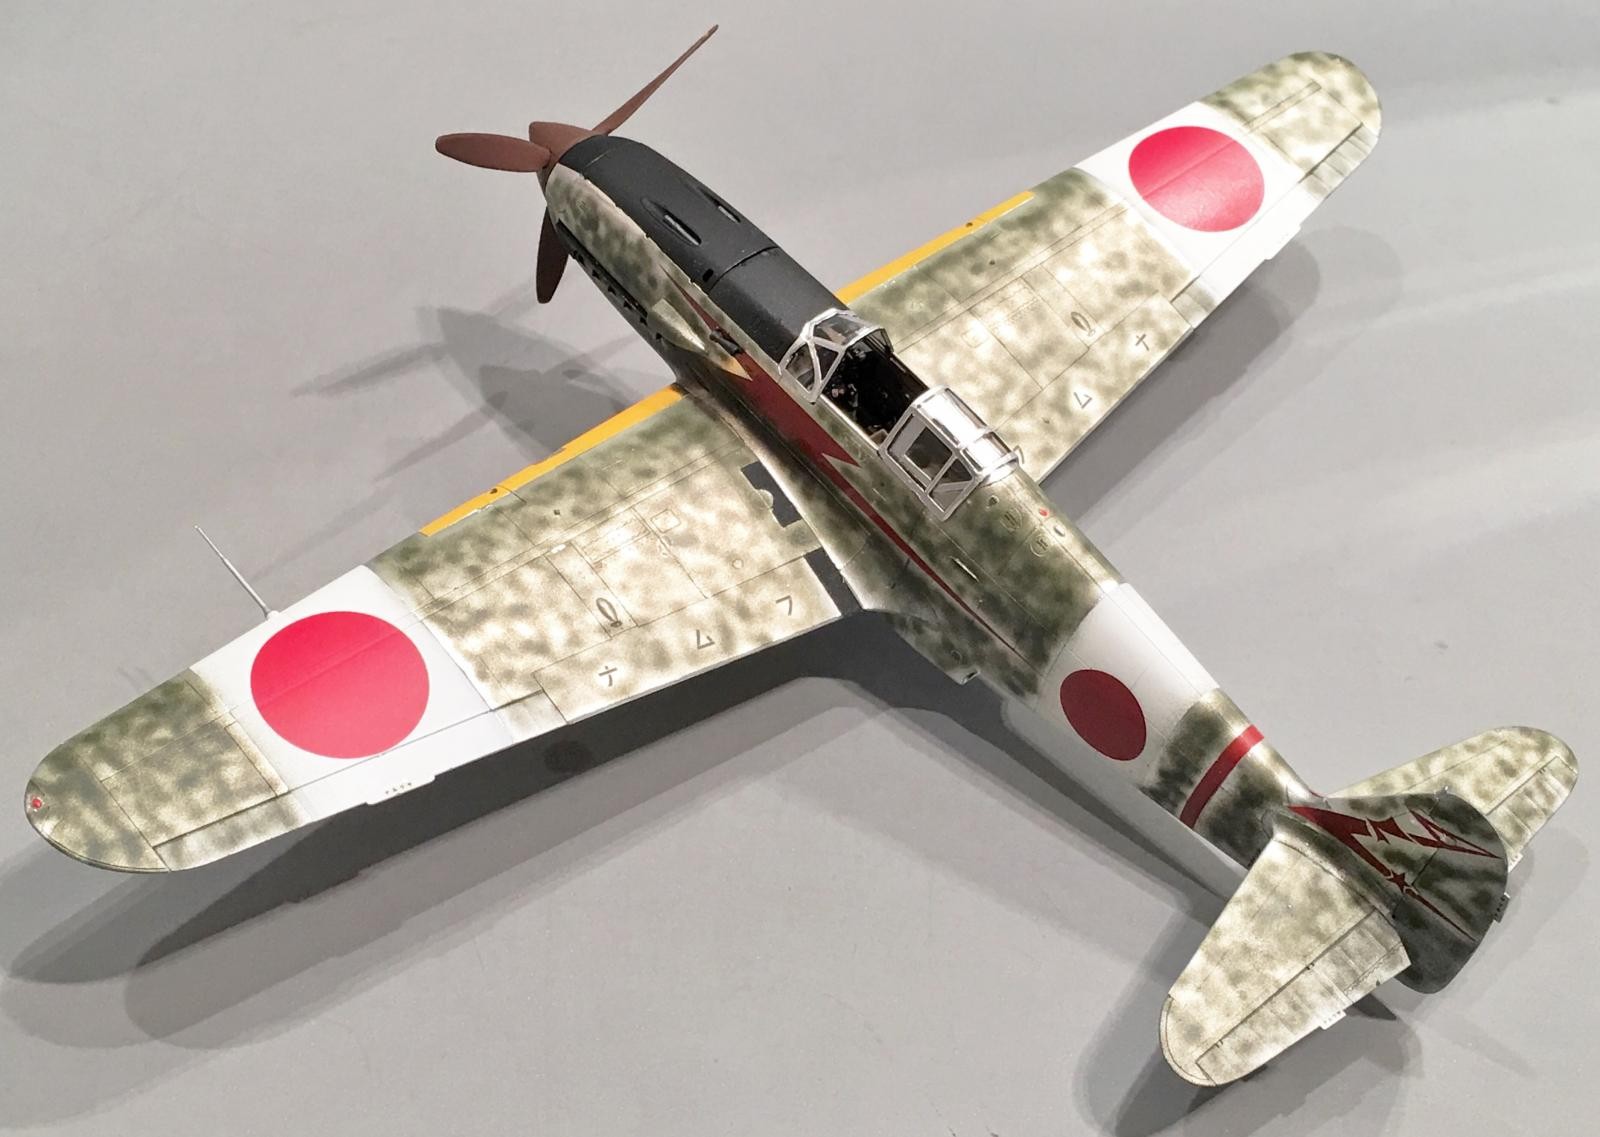
I tried to replicate the look on my model here by doing the same. If you look close, you can see the stencils are still readable... In this next picture you can see just how effective this process actually was... On one side I left the plane in a highly polished finish that was created by using the Bare Metal Foil. On the other side I simply sprayed on a light coat of green squiggly lines of various intensity.

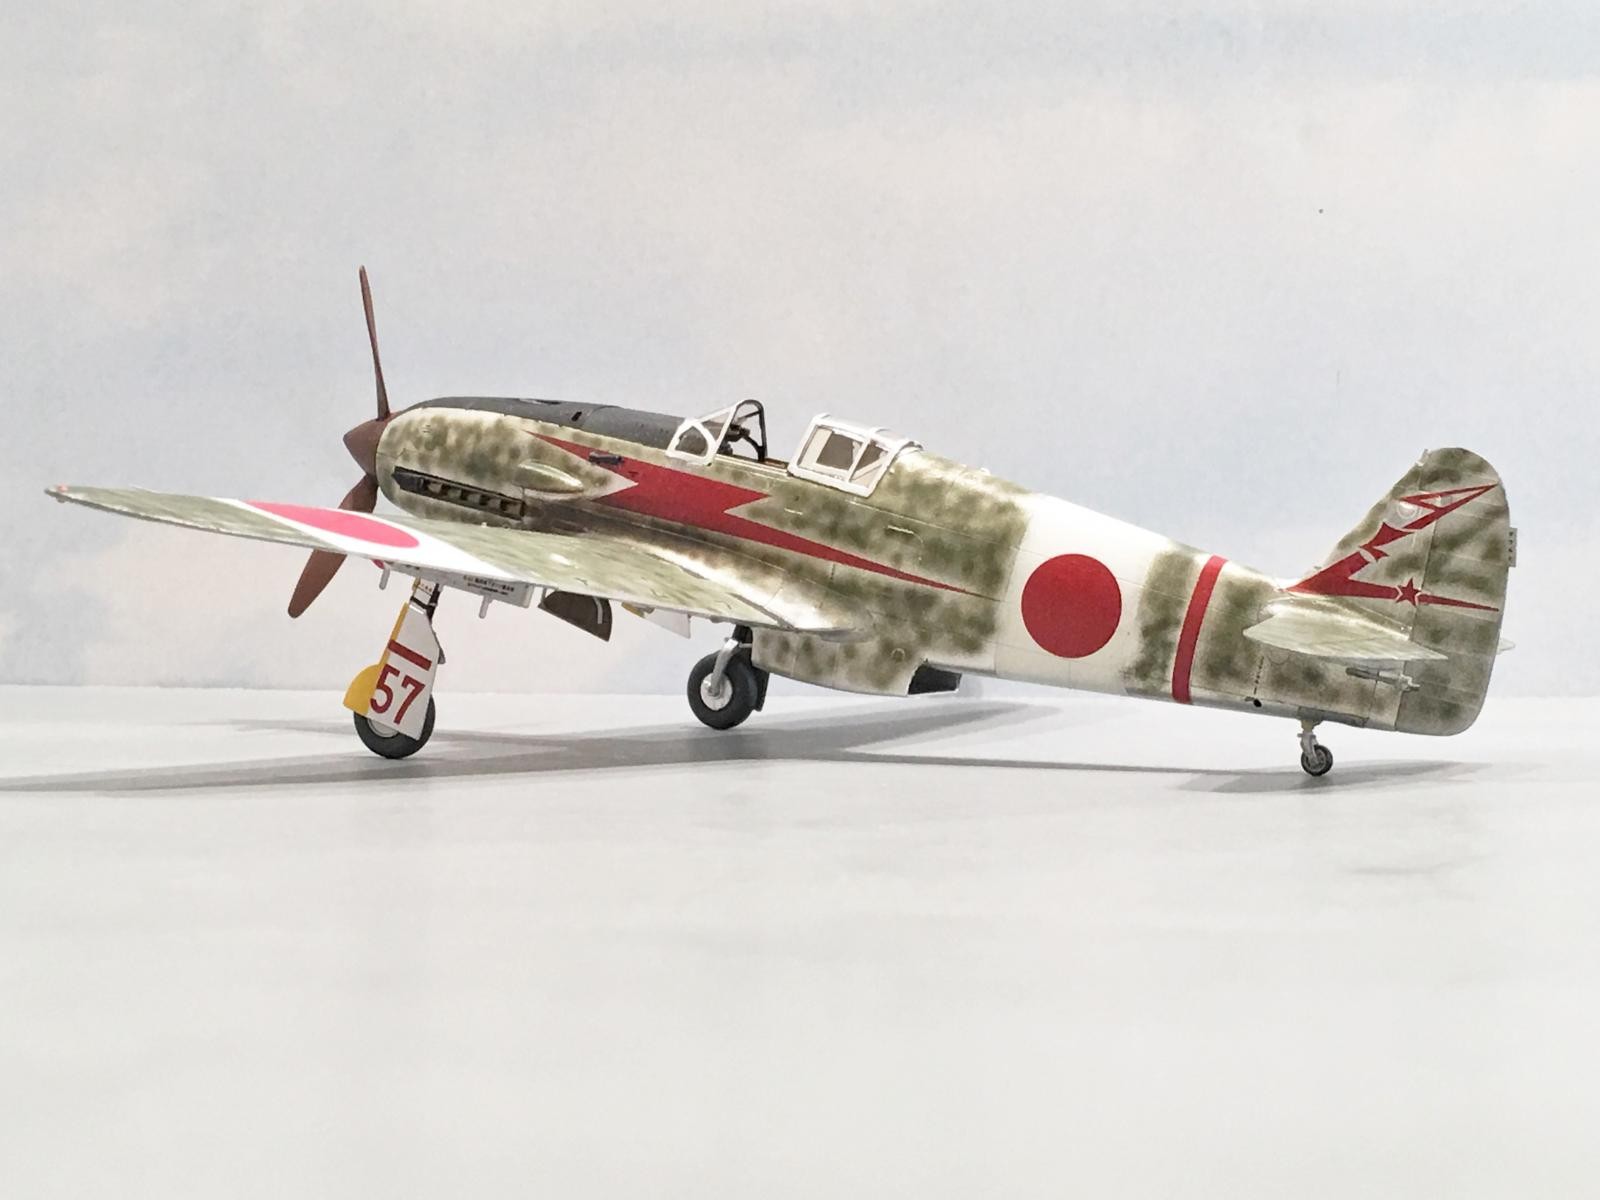
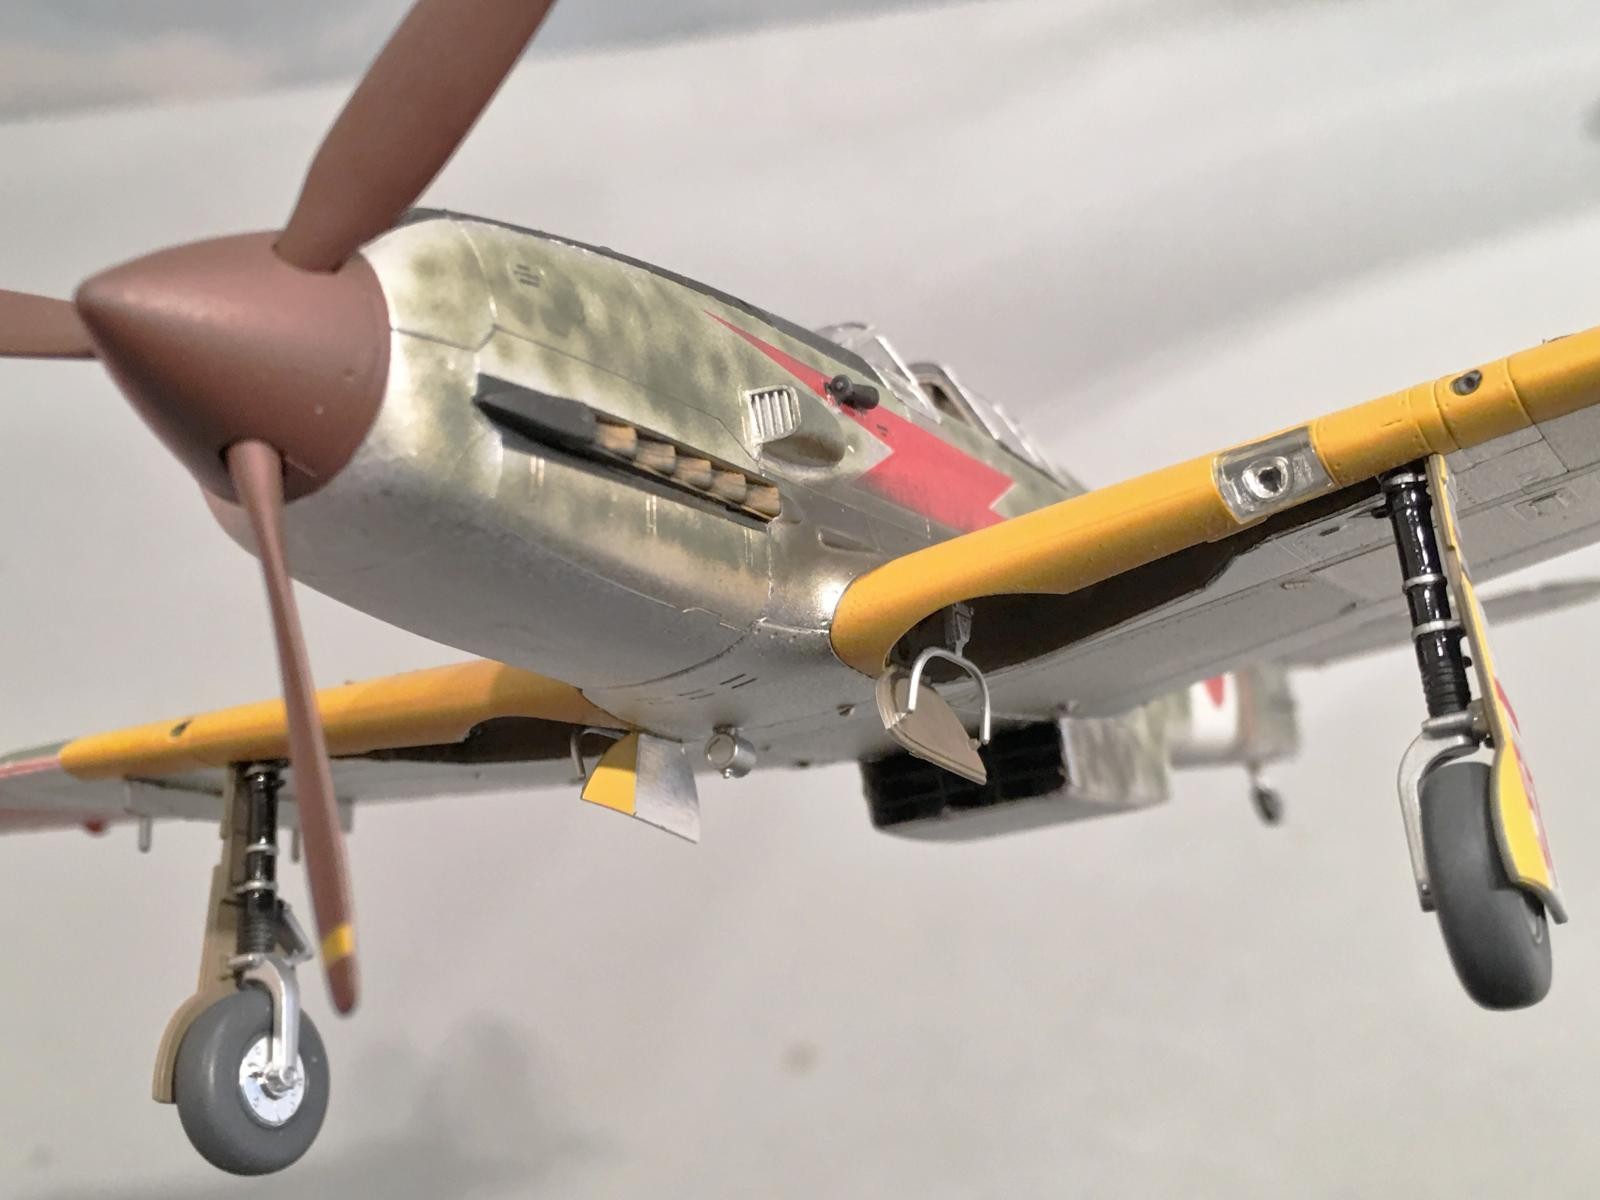
I wanted to make this plane look as if it was flown, but not "War Weary". So I added some exhaust stains using Tamiya weathering decks to create the exhaust patterns. You can see this darker streaking in the lower portion of this next picture. You can also see how the area around the canopy was left in a Natural Metal Finish. I also tried to recreate a few very small scratches into the green sprayed on paint. If you look very close... you can see a few where the pilot would have caused them as he entered the cockpit.
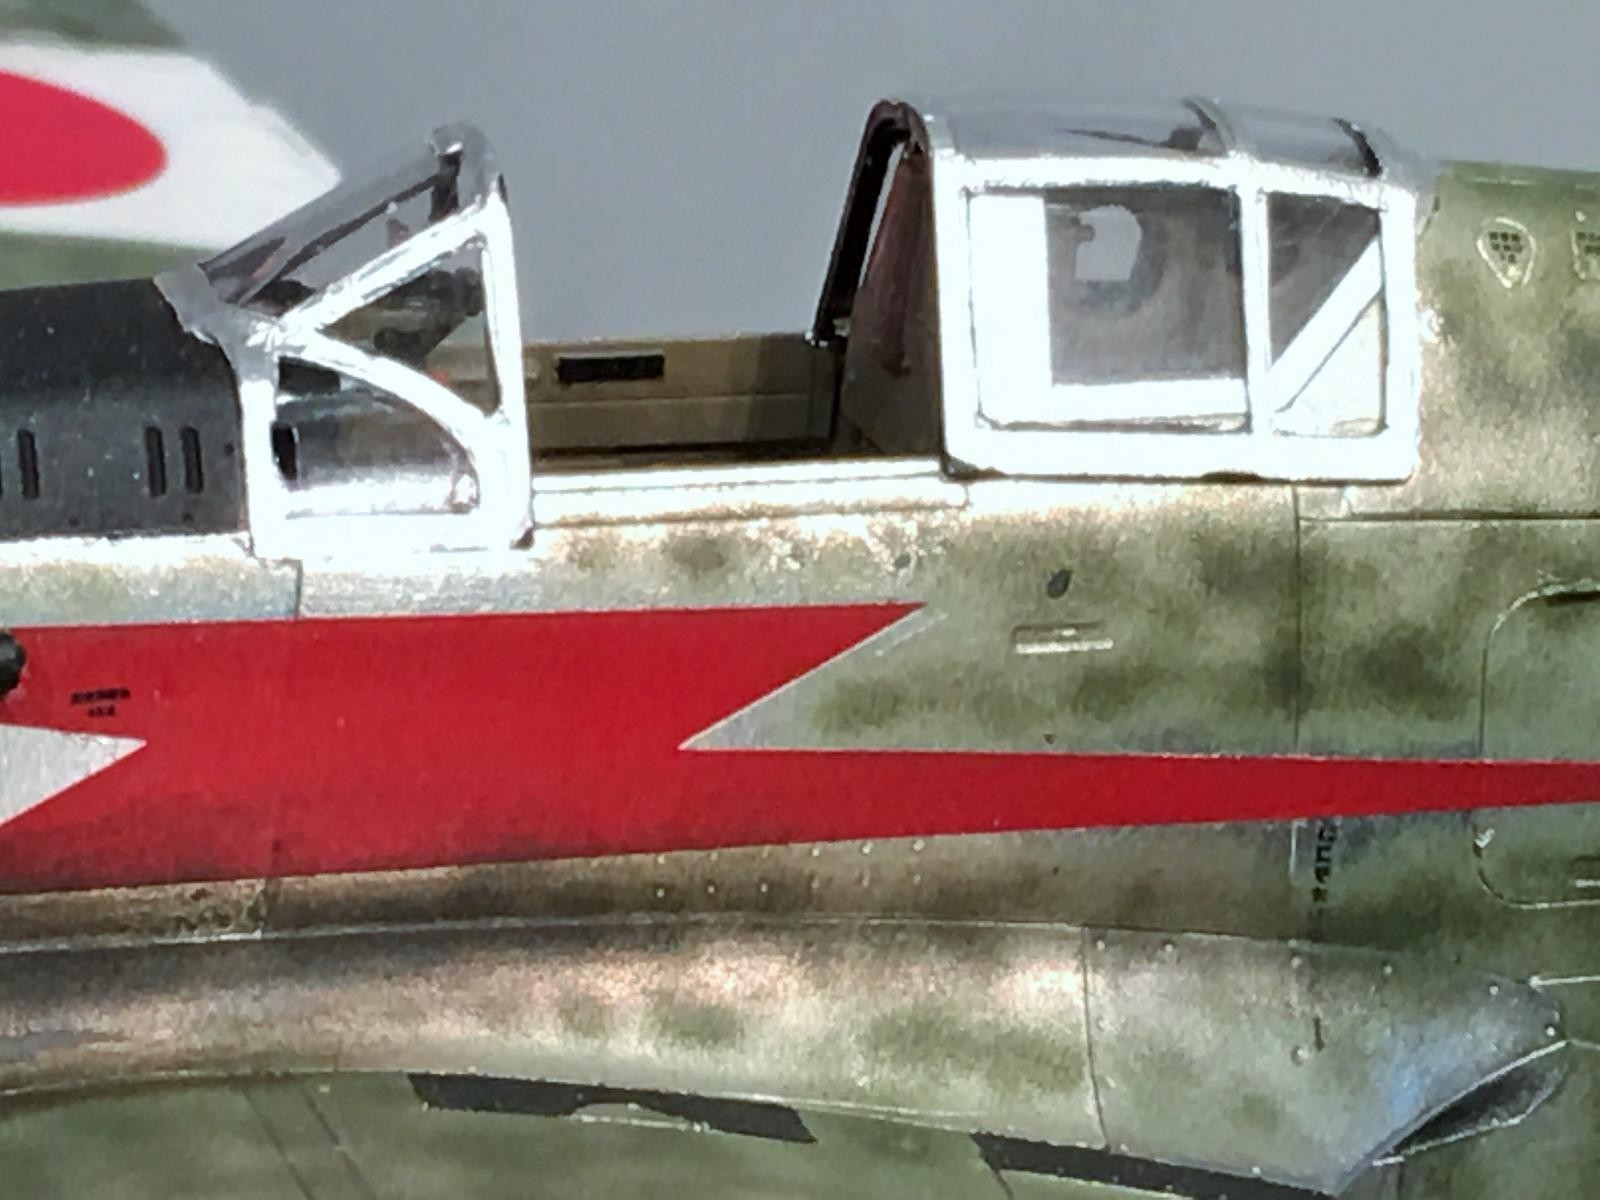
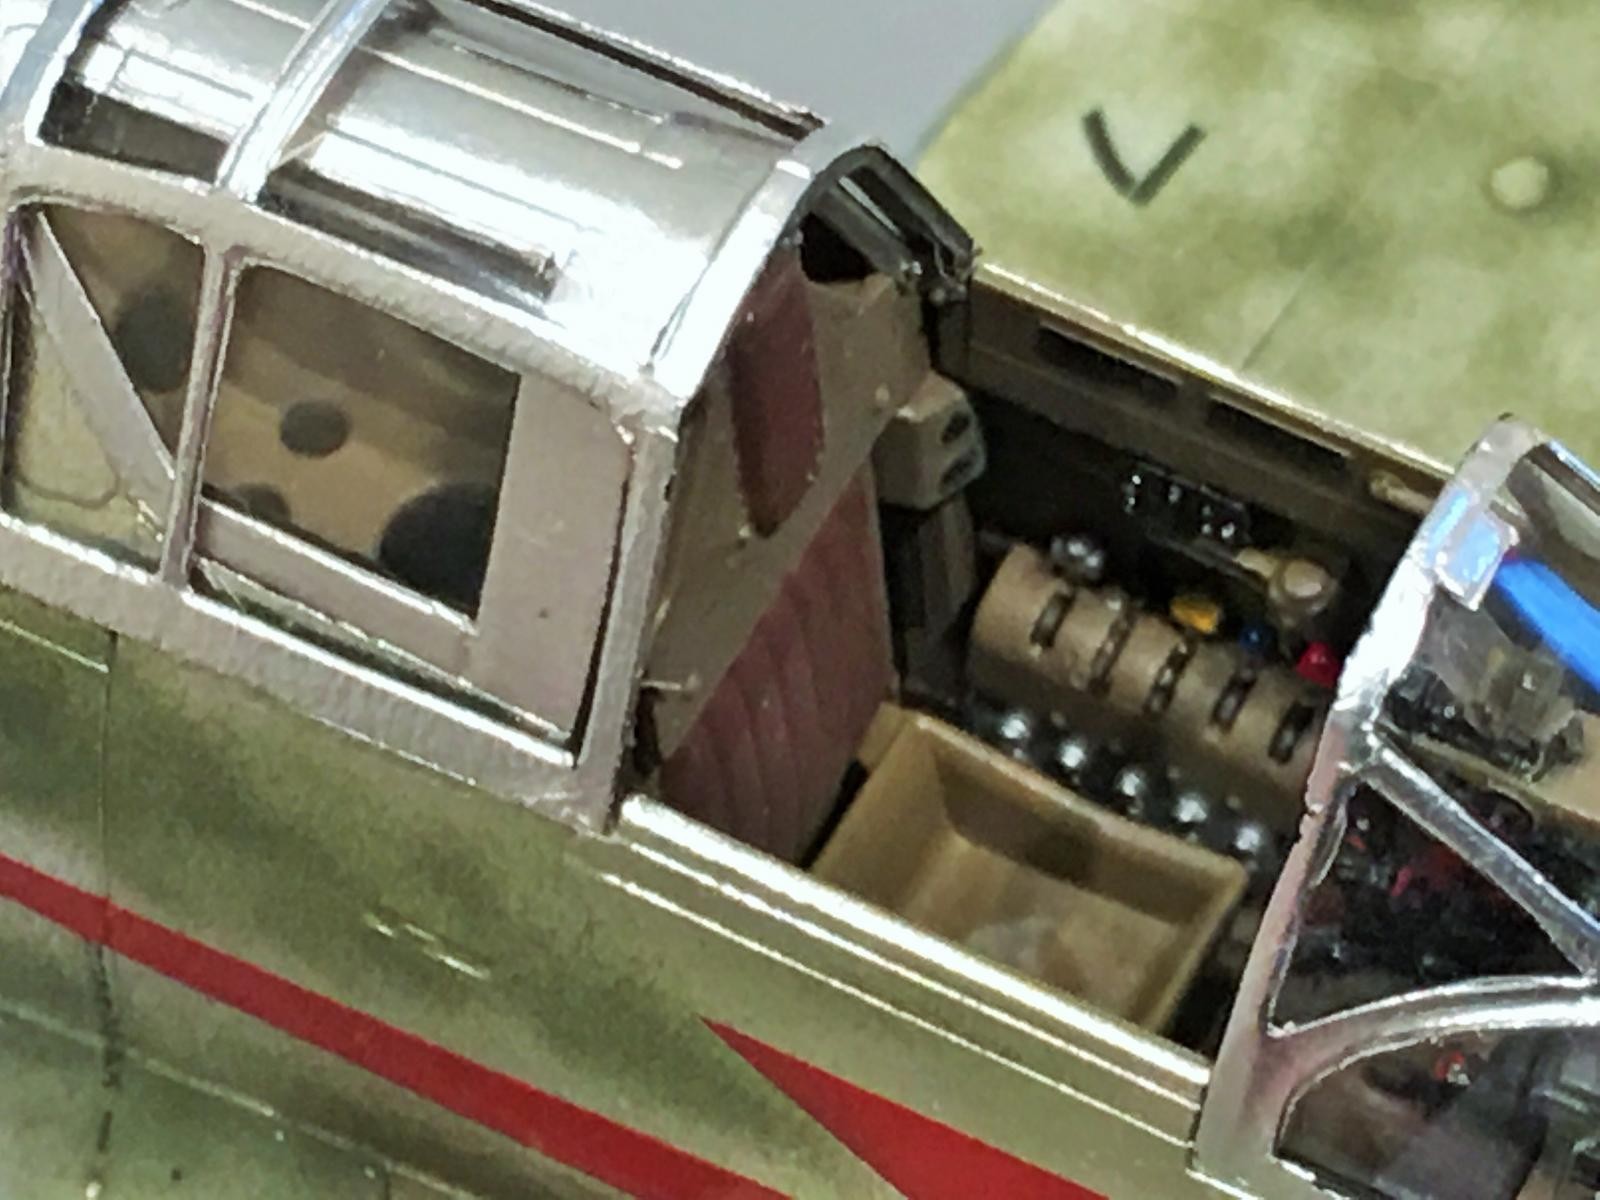
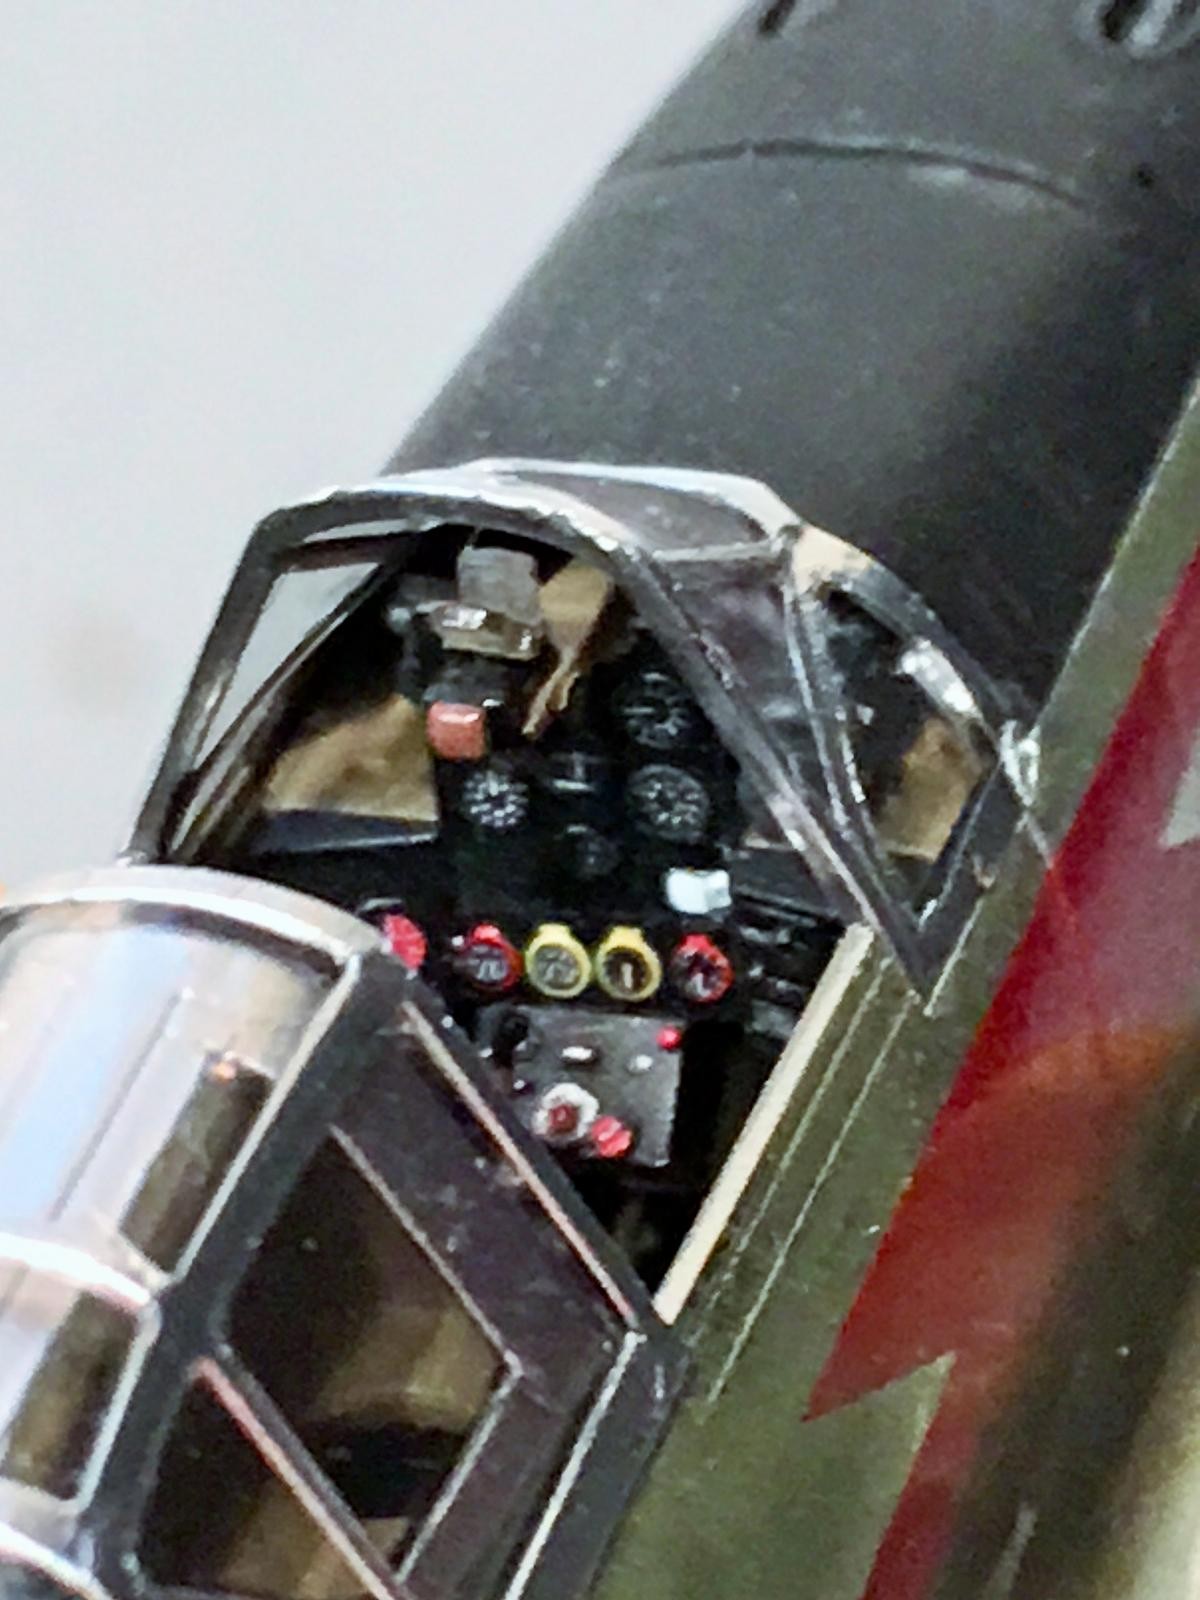
Tamiya has captured the cockpit very nicely. This is exactly how it looks right from the box. No aftermarket parts were added. However, if I were to build this one again, I would add a different seat harness ...

Again, contrary to popular belief, the interiors were not painted using RLM 79... This color is very close to the original from recent discoveries of relics that were found in an attic in Japan ! There's more about this color choice I made, and actual pictures of these original Ki-61 items posted in my build journal...
-
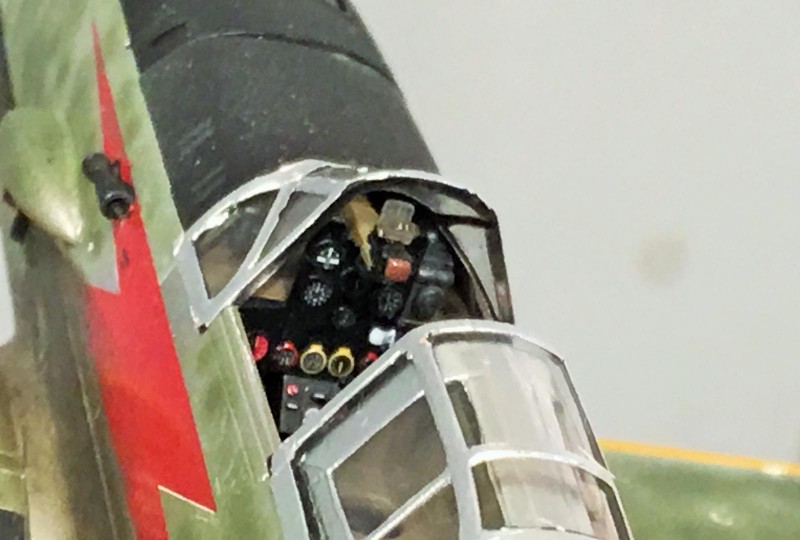
- 1. The instruments are a decal that is applied over the kit supplied IP part. The decal fit the IP perfectly.

-

- 1. The IP decals fit the plastic raised bezels perfectly. The end result is a very realistic looking Instrument panel.
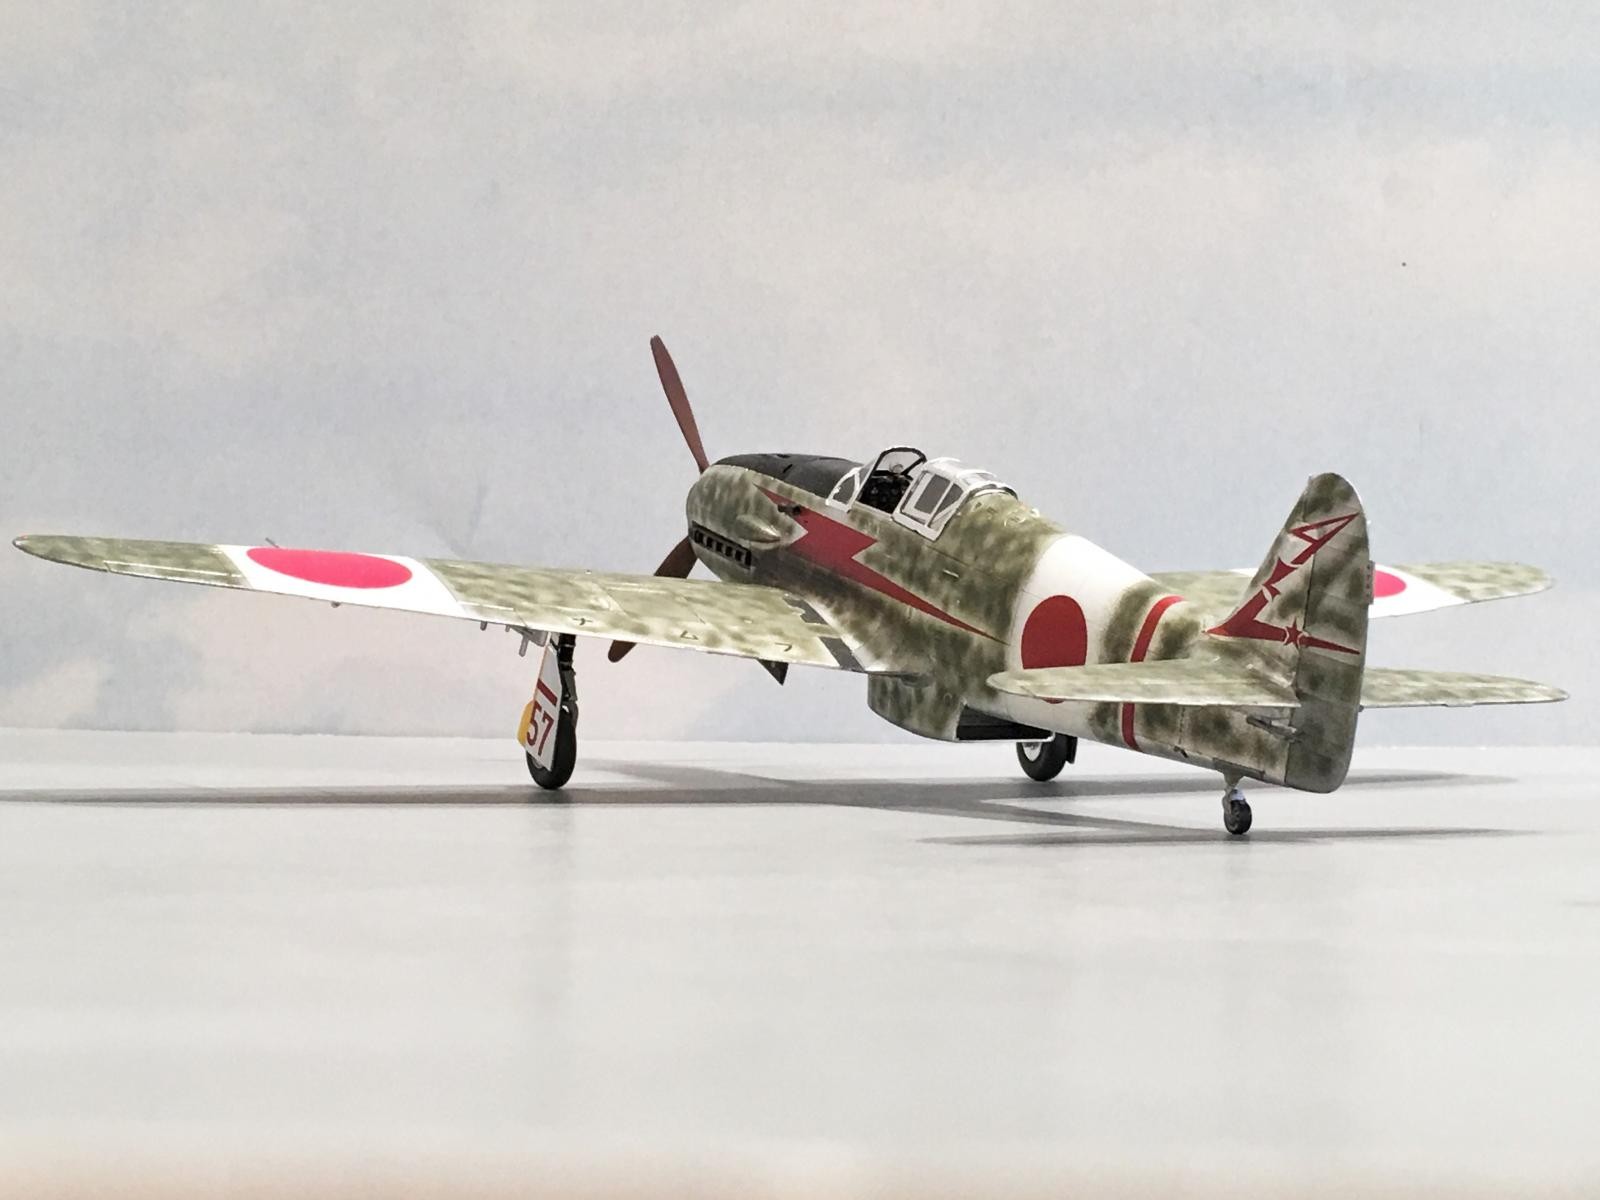
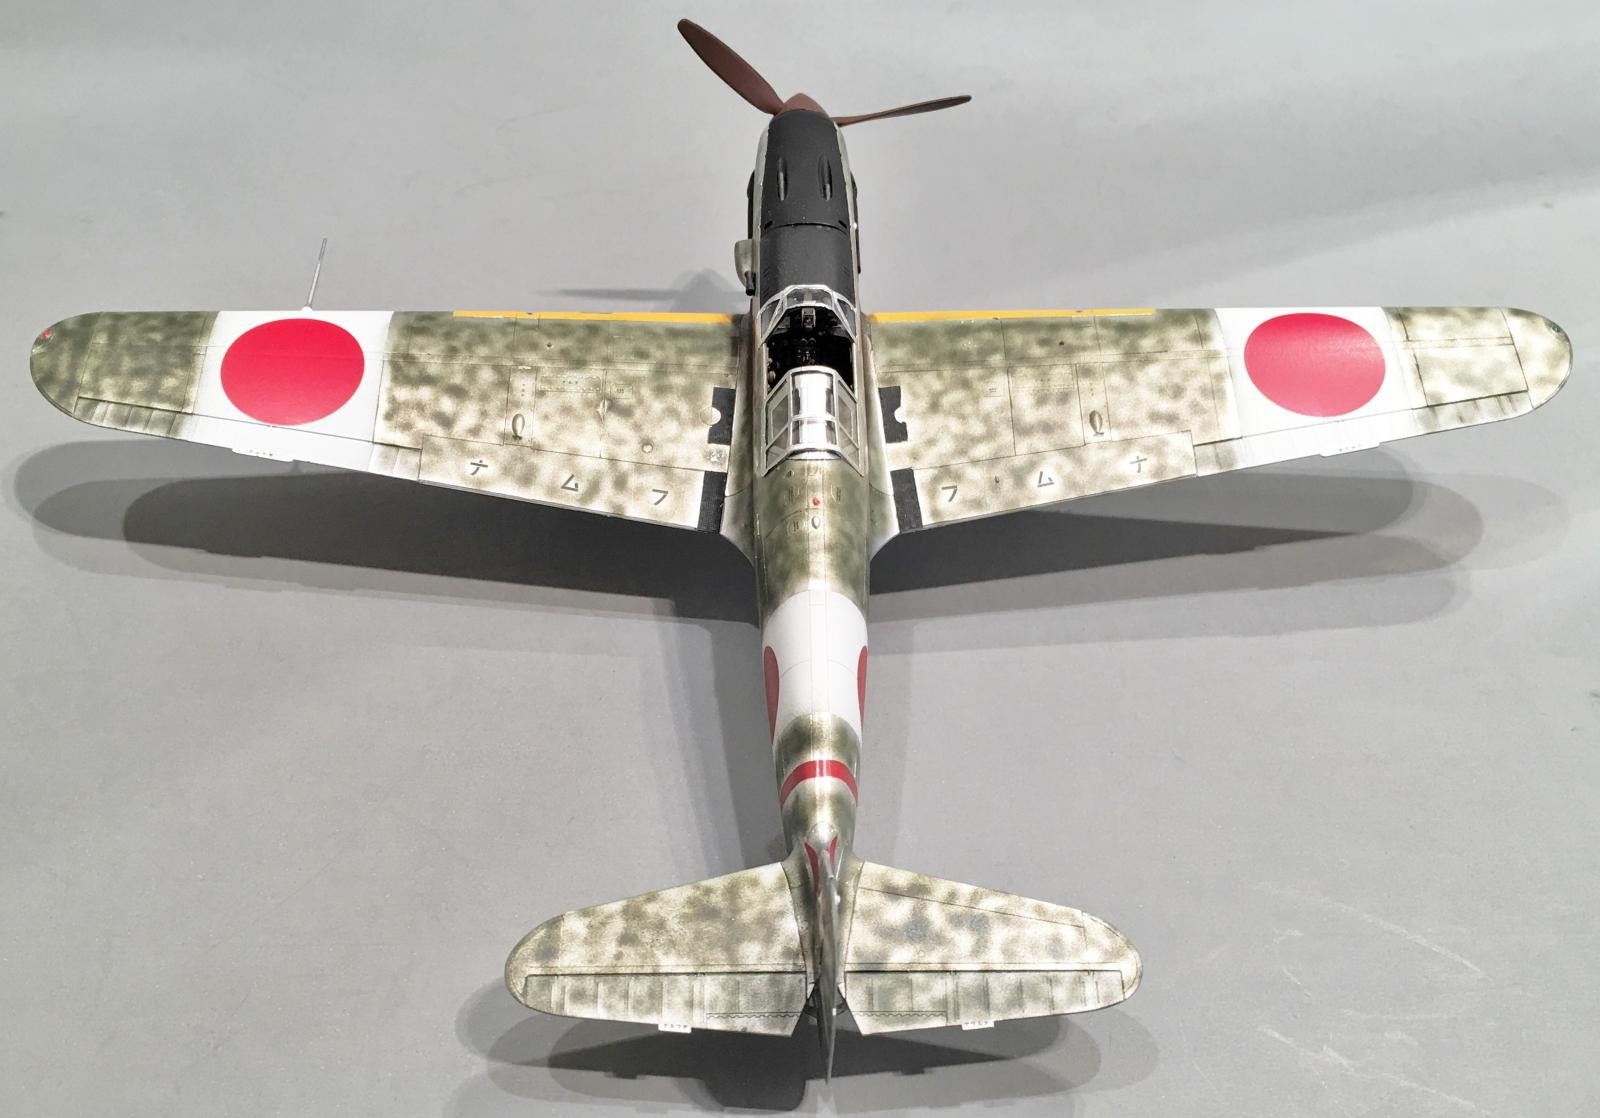
These next pictures show the plane as it looks from directly overhead, and from various angles. From this vantage point you can see just how effective the green paint was at reducing the shine. No other coatings were used on the top side of the model other than a very light coat of green... The shine of the bare metal was highly reduced with a minimal effort.

The kit comes supplied with a single clear side fuselage half. I didn't use it for obvious reasons. The nice thing about this is with a little effort, Tamiya should be able to release a new tool "Short nosed" Hien or even possibly a Ki-100, since the rest of the airframe was almost identical...
How cool would that be ?
So if you are looking at this Mr. Tamiya, I'm sure there would be a market for these additional planes, and it would be a minimal investment to provided them... Just think about the possibilities !
Thanks ... 🙂

As far as the underside of the airframe is concerned, it was too shiny "as is" by using the various shades of Bare Metal Foil. Taking advice from Tom Bebout, @tom-bebout
initially I tried using a "Semi-Gloss" spray coating to knock down the shine somewhat. This helped, and was a step in the right direction, but it needed more to achieve the look I was after...
So I went back a second time, and lightly applied another very light coat using Testor's "Dull Coat" right from the spray can. This gave me the results I was after... The light was still reflected from the foil, but now it had a more "oxidized" look to it...
If you look closely at these next few pictures, you should be able to see what I'm talking about... But for the best and most natural look, this one has to be seen in person... and in natural sunlight. It really Pops !
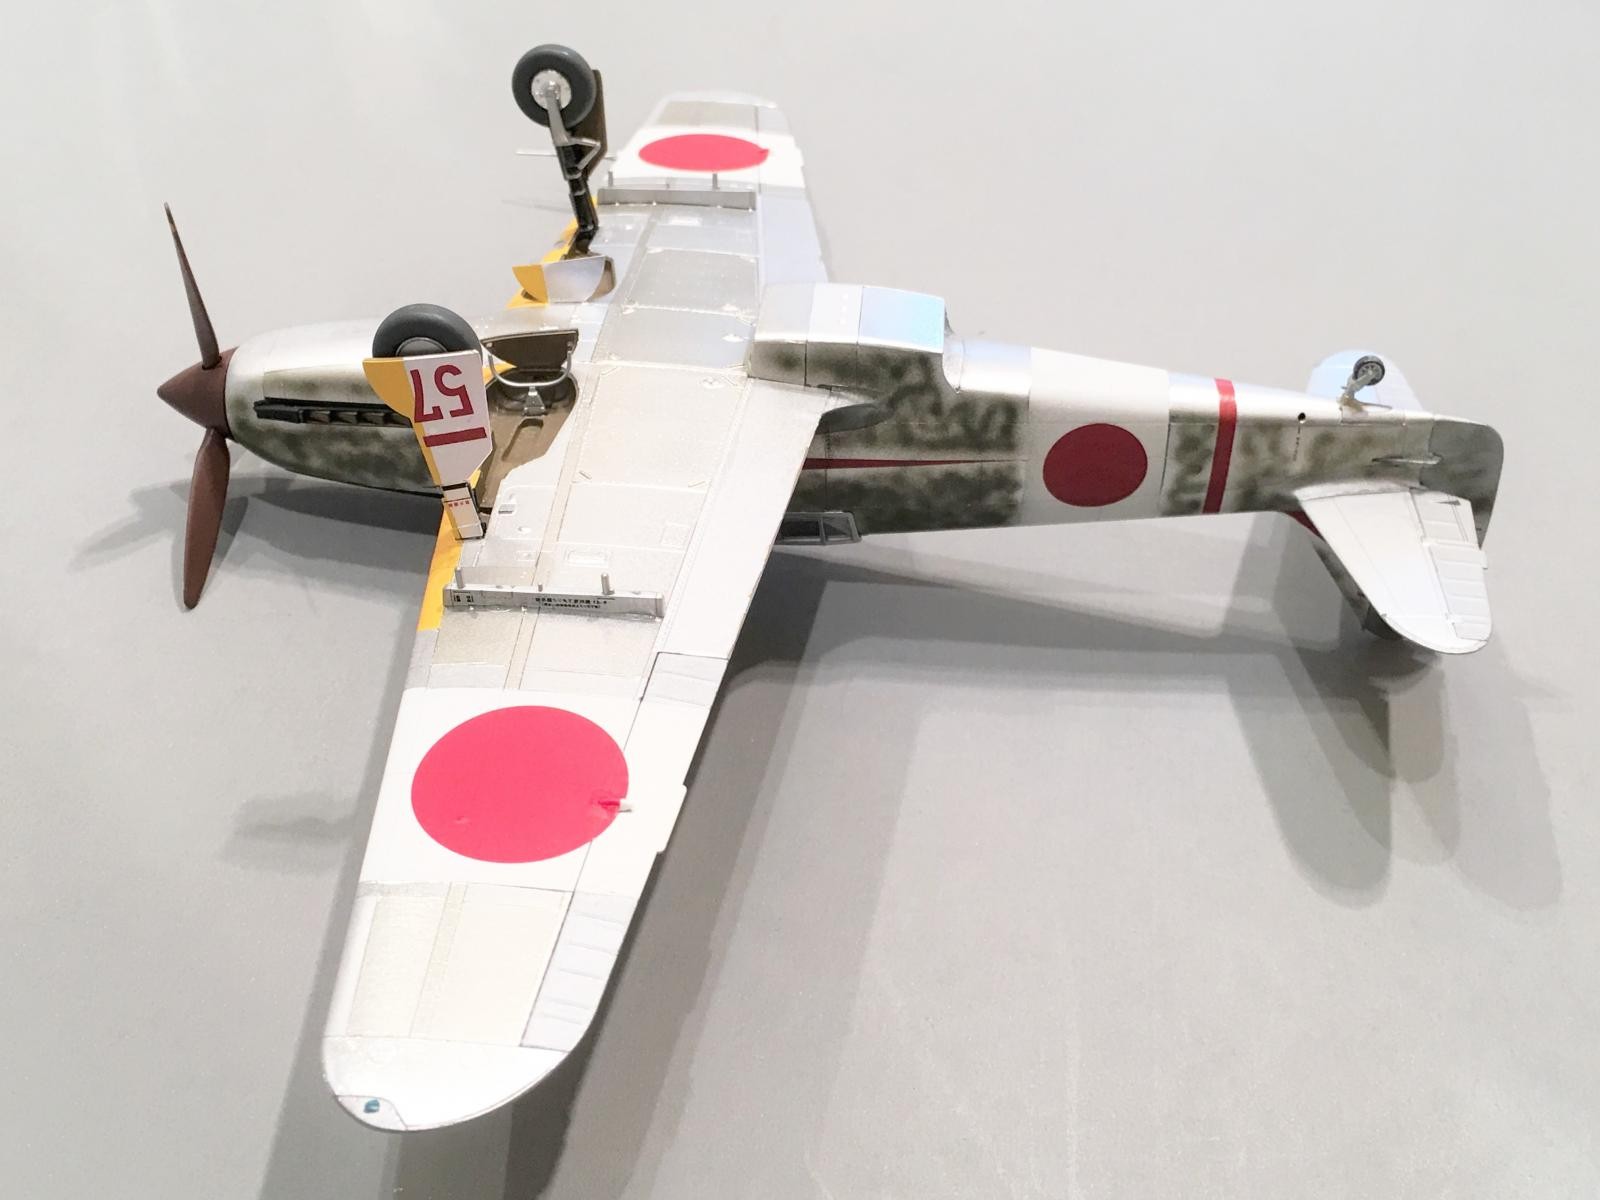

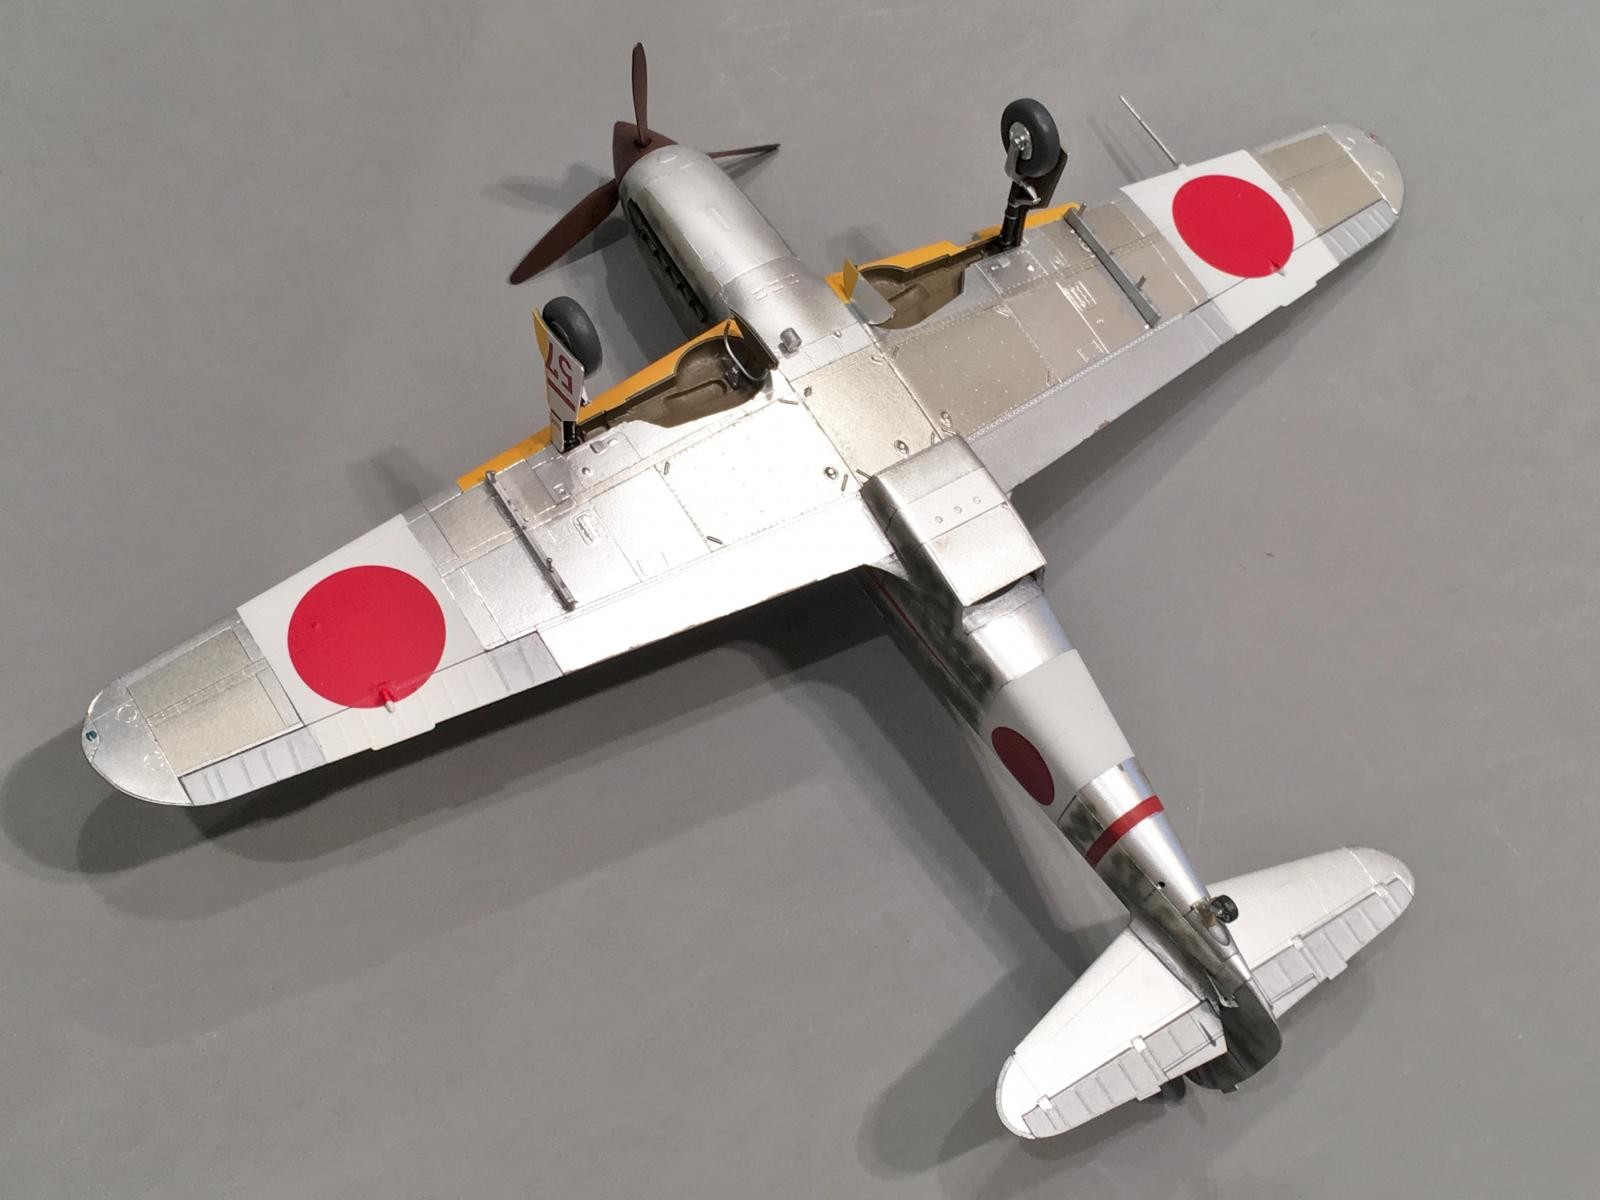
Here in this next picture you can see the effects of the exhaust stains and also see the "Venturi" that was often used on these planes as flown by the 244th Sentai. Rumor has it that the Commander named Kobayashi, was formerly a bomber pilot and trusted the venturi device more so than the typical "pitot" tube in use on these planes. So planes from the 244th Sentai will occasionally have both items that were necessary for proper operation of certain instruments...
The Venturi is painted flat black and is located in the red flash on the side of the fuselage. The Pitot tube is located on the leading edge of the wing...
-
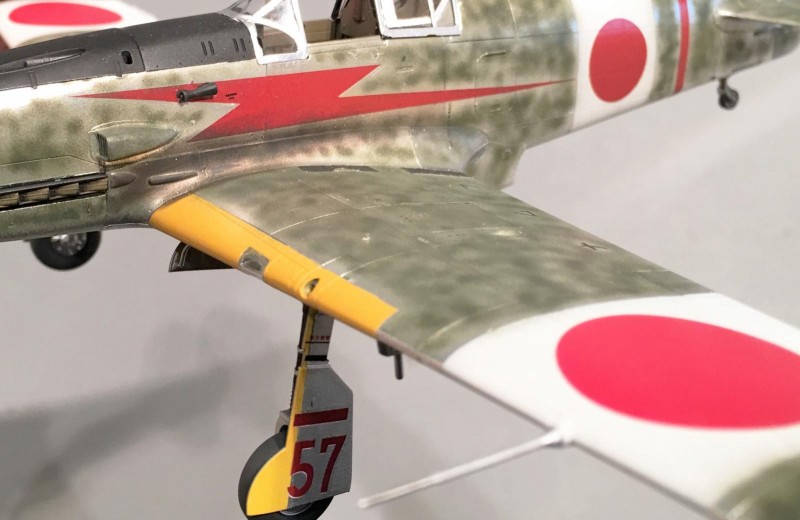
- 1. Pitot Tube
- 2. Venturi

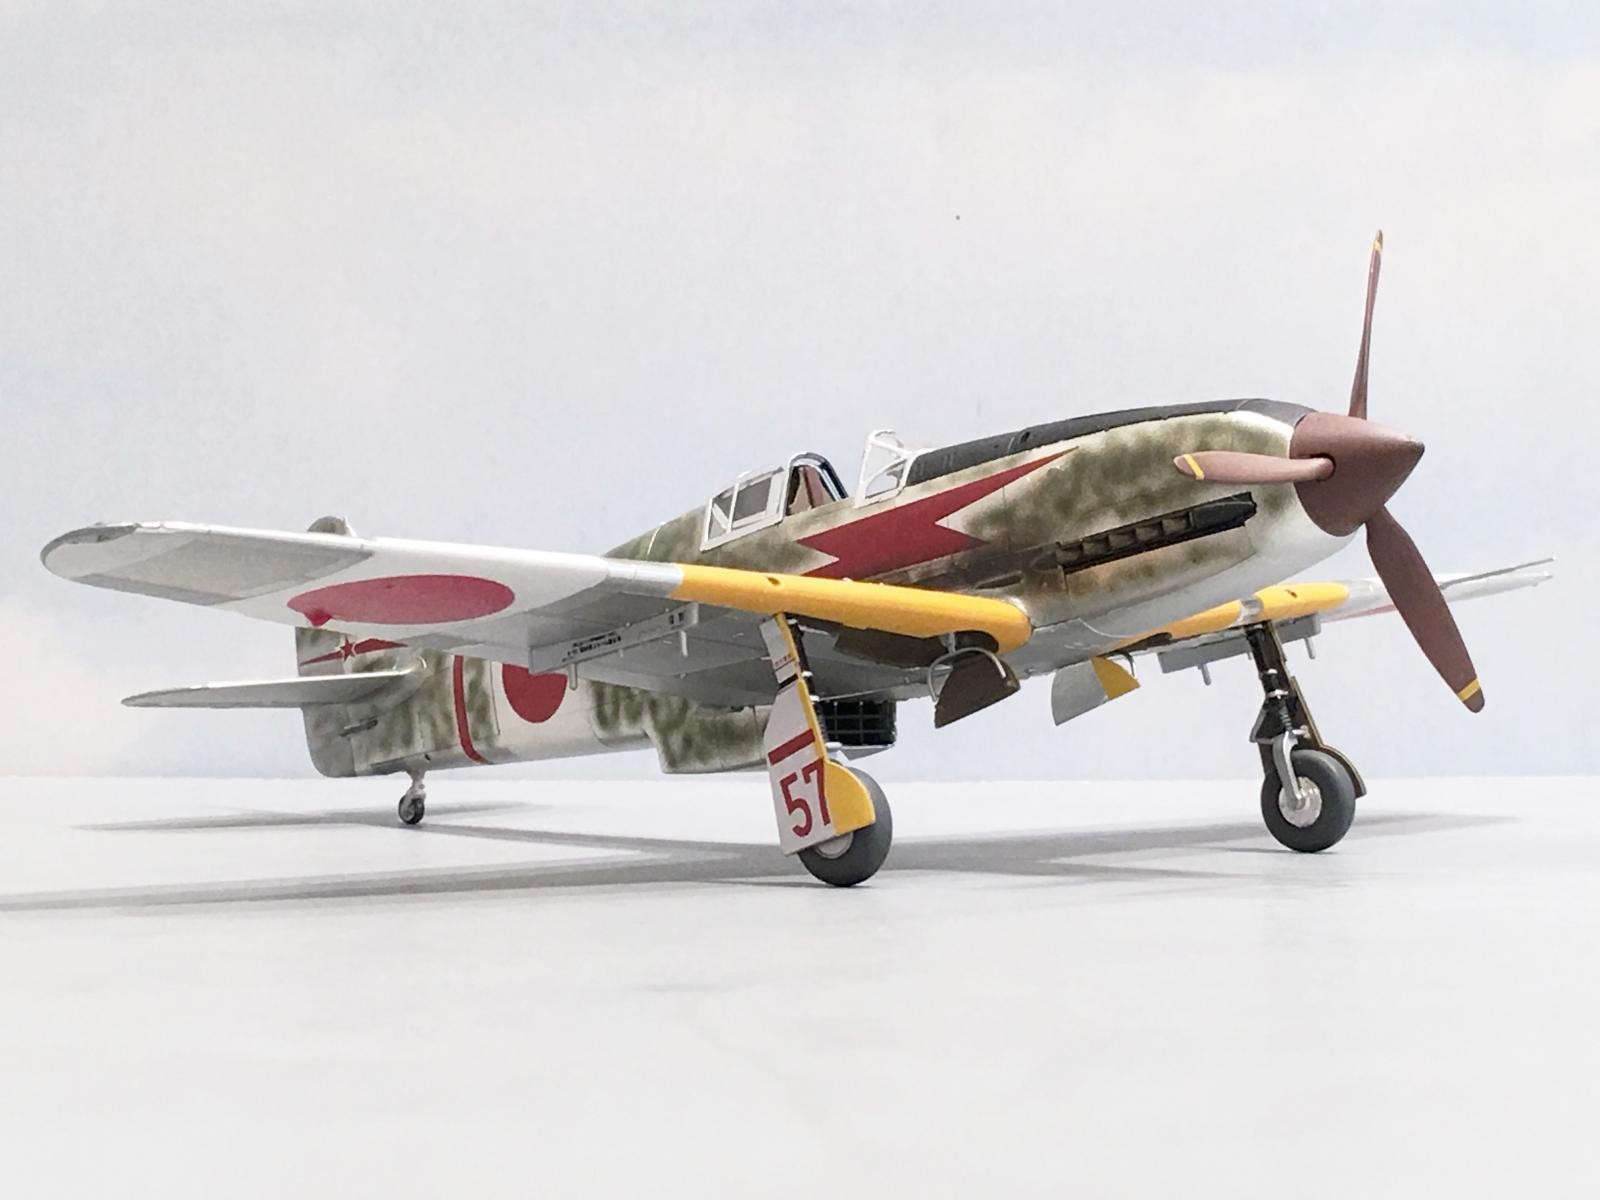
You can also see the nice details provided by Tamiya that replicate the landing light and exhausts ...
-

- 1. Notice the black panel that surrounds the exhaust pipes. This is something that is easily missed but it was present on the real planes.
and how nice the landing gear and wheel wells are depicted...
-
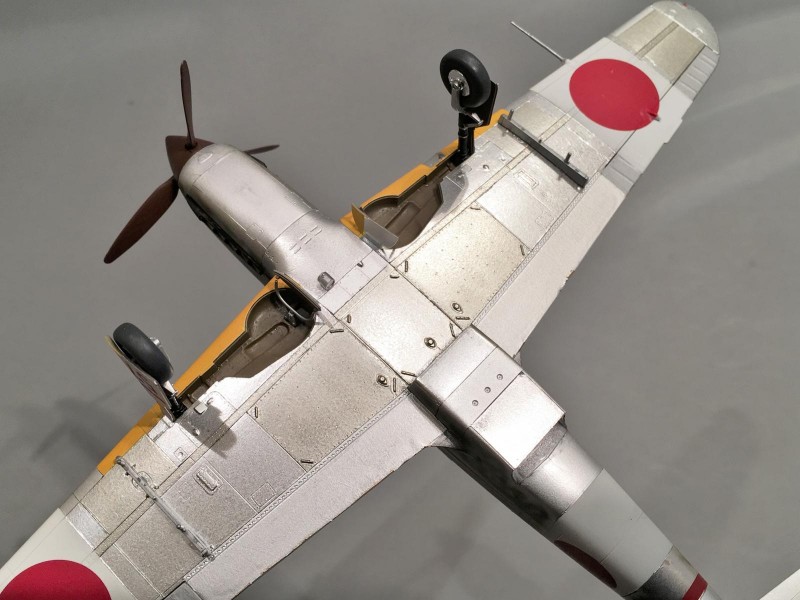
- 1. Notice the details incorporated into the wheel wells. The wells are also much deeper on the Tamiya kit vs. the Hasegawa............

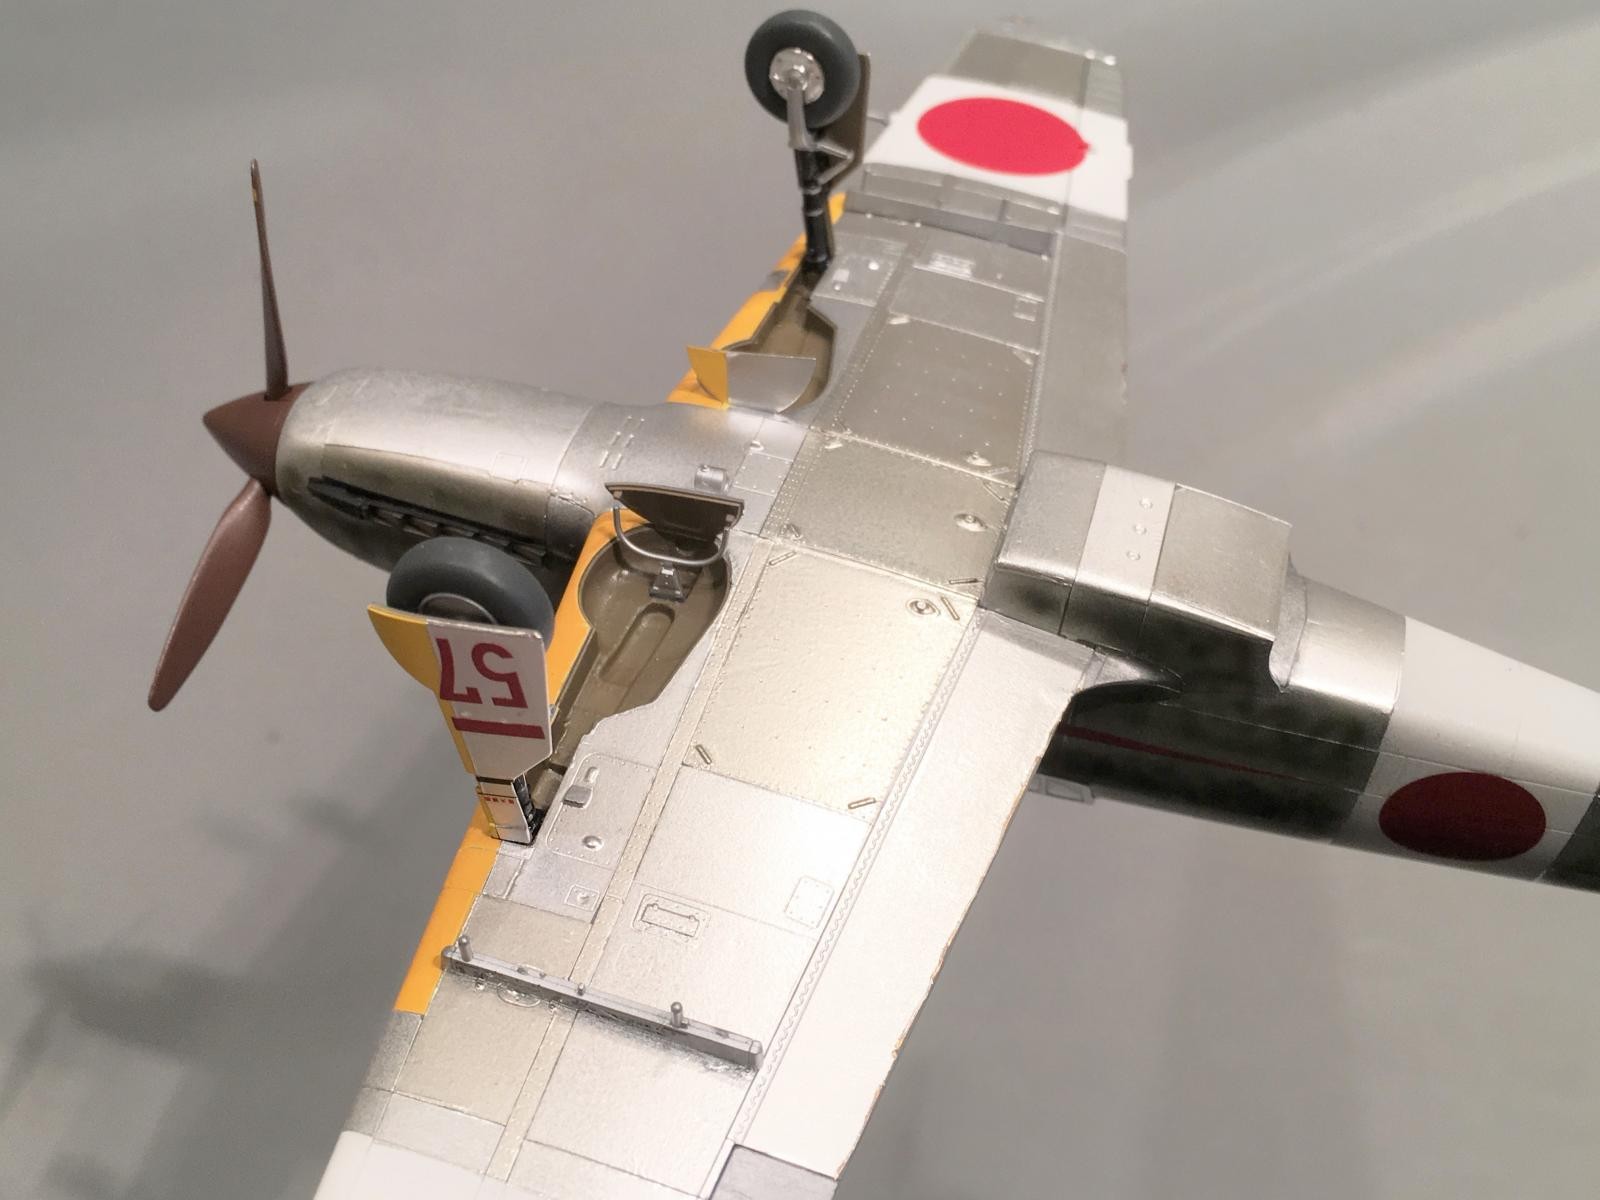
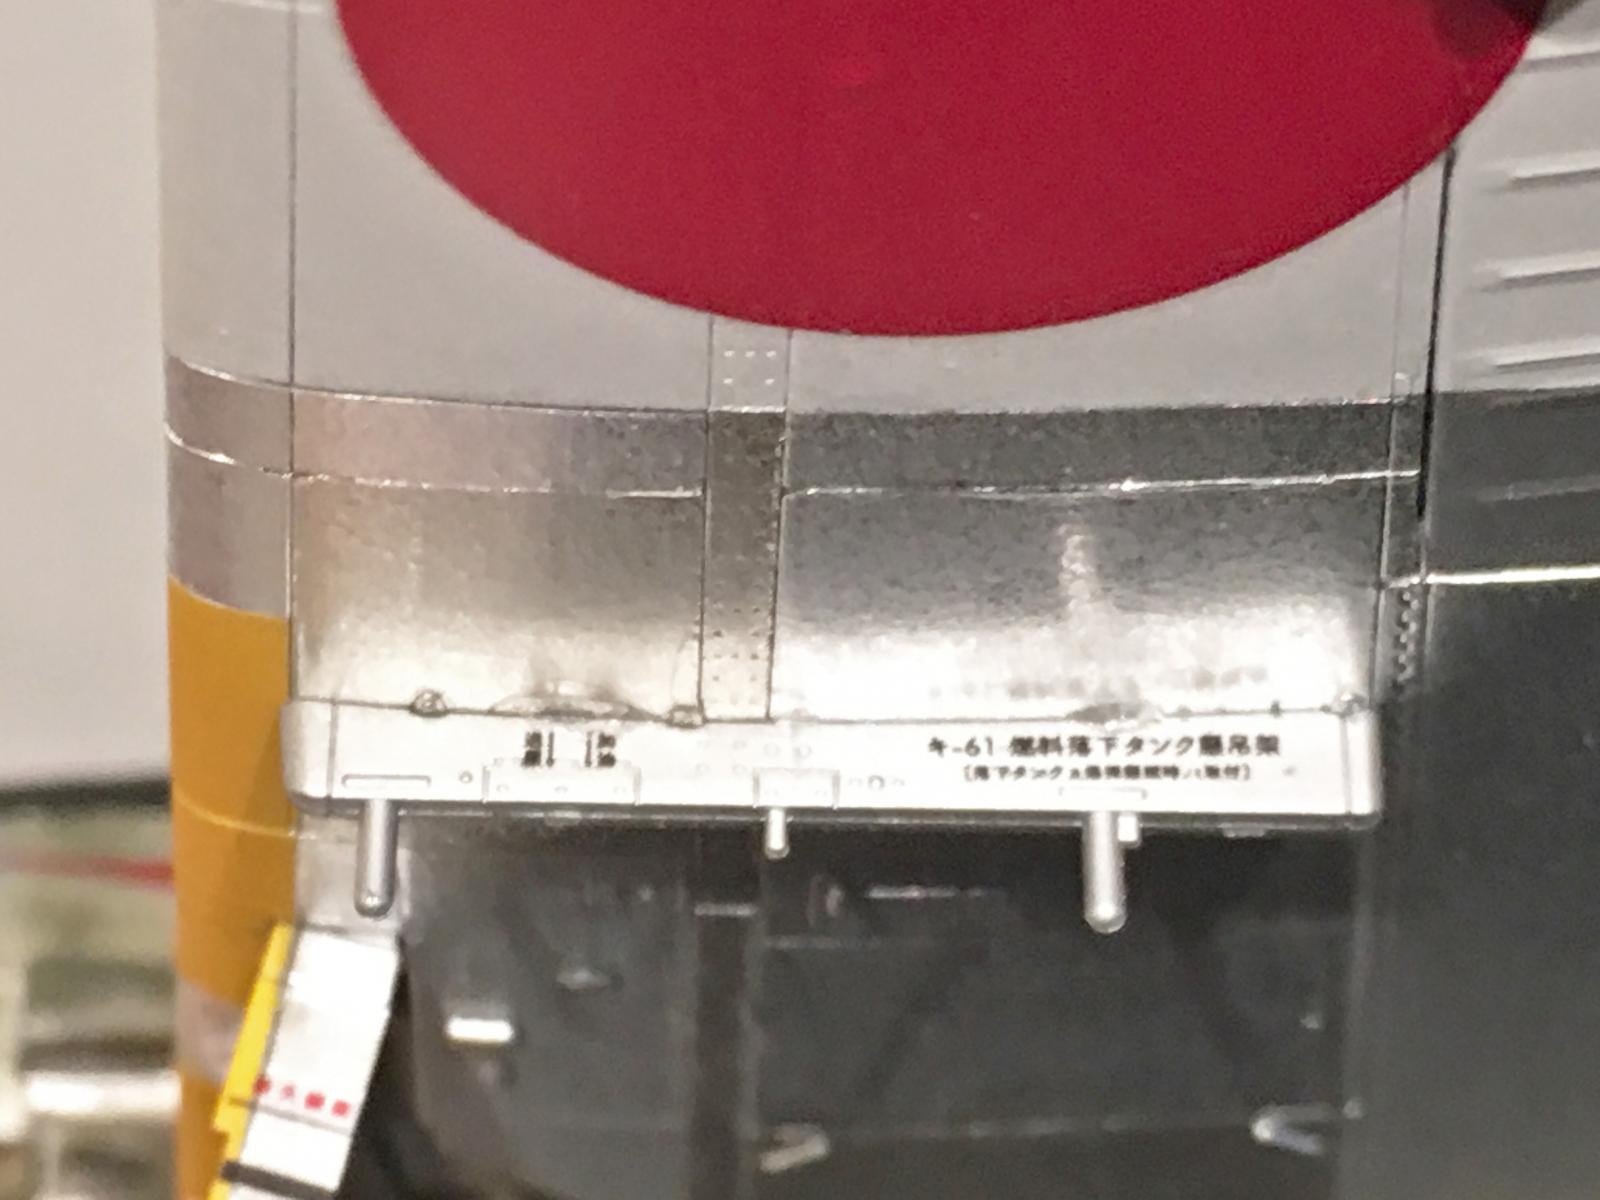
A drop tank under wing mounting bracket was included. I decided to not add the drop tanks, but still might do so at a later date. Tamiya even provided stencils for the bracket which is a nice touch...
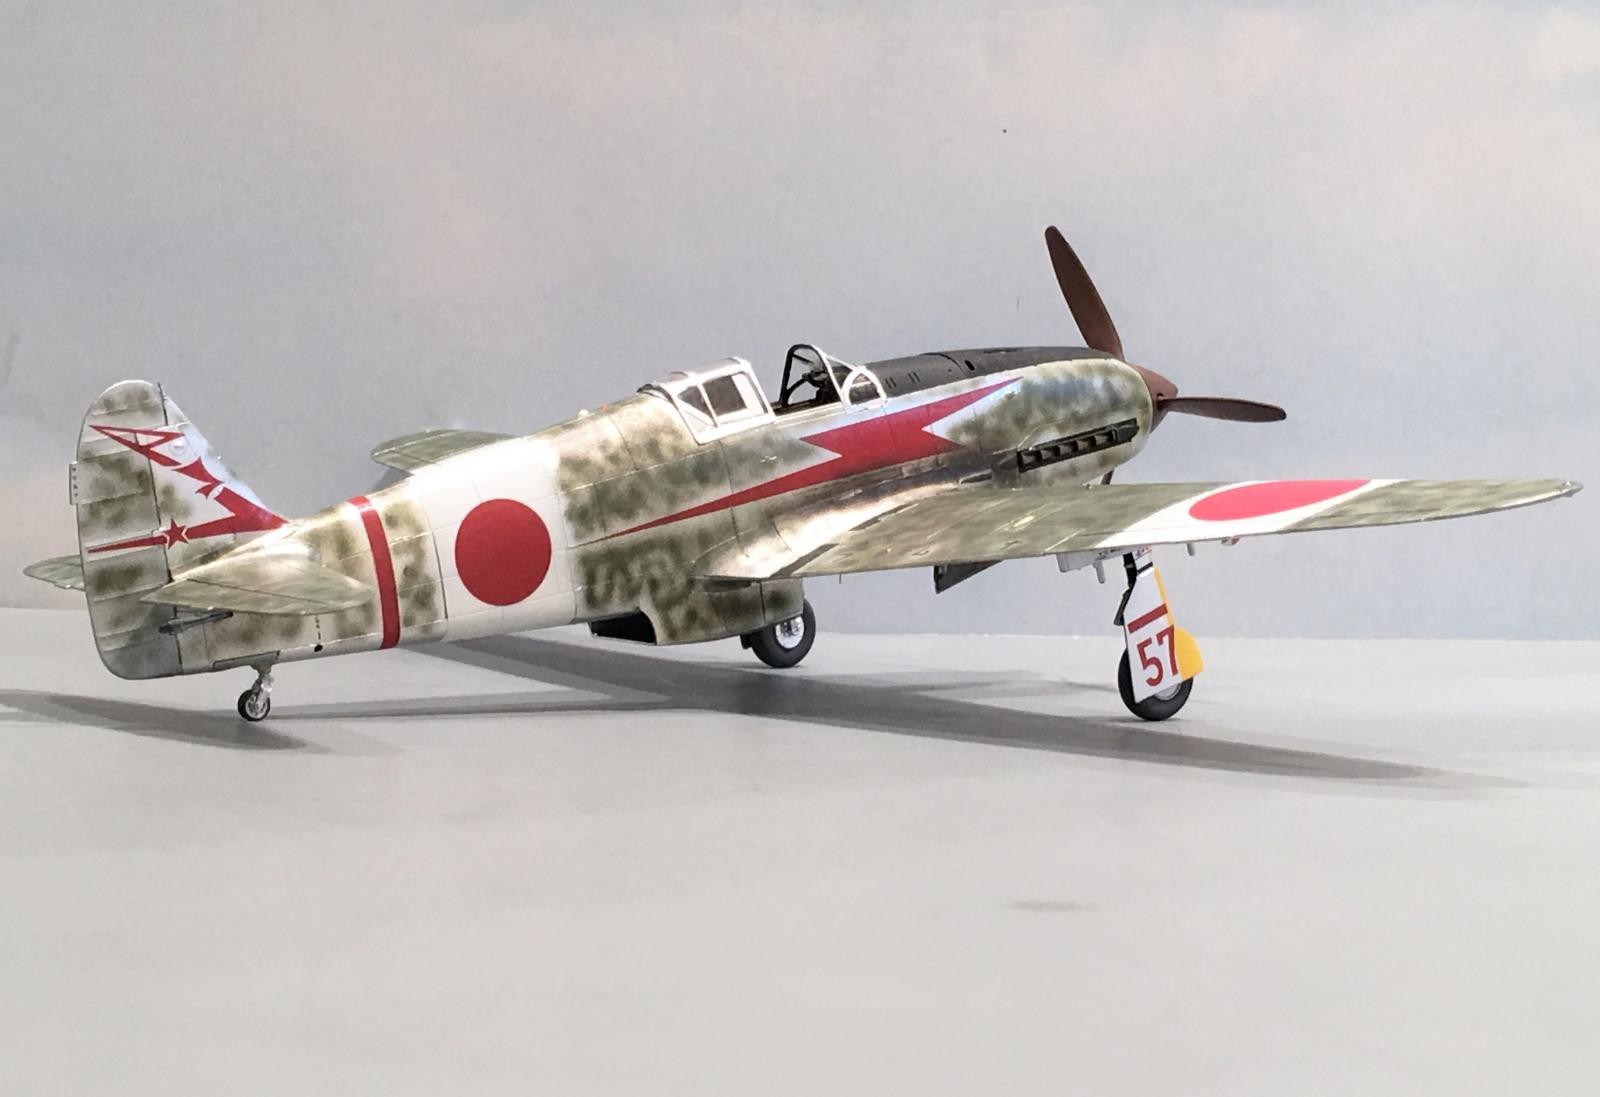
These next photos show the kit during the construction phase. Here you can see exactly how shiny the finish was by using the three different shades of Bare Metal Foil.
I used "Ultra Bright Chrome" in some panels, and 'Chrome" in others. Lastly I used "Matt Aluminum" for the remaining areas that had to be covered.

I tried to mix things up and not have two panels located next to each other in the same color, to give the illusion that each panel was a separate sheet of aluminum as it was on the actual plane.
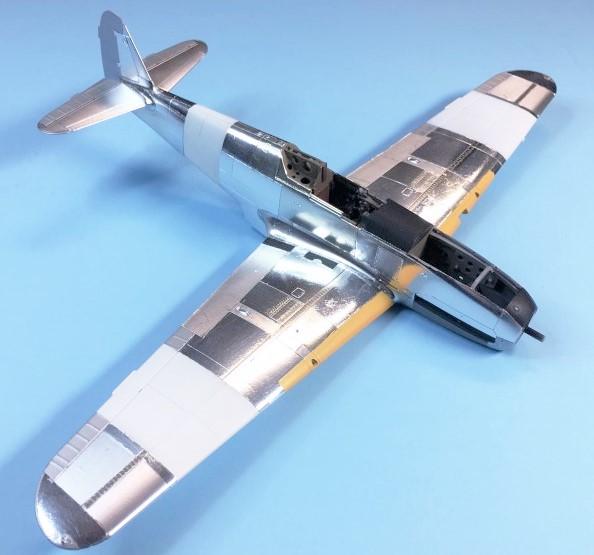
I also used "Aluminum Dope" color to spray paint the fabric covered flight control surfaces. Contrary to popular belief, from what I have read on Jaircraft.com, the Ki-61's didn't use "Japanese Army Light Gray" as most believe. If you think otherwise, try looking close at several B & W pictures of planes from the Akeno Flight school. These planes were operated in the Natural Metal Finish as delivered for the most part...

Here you can see the decals as they were applied... Believe me, it was hard to start spraying on the green over this beautiful Foil...

Part of me wanted to leave it alone, since I really like this look... But I wanted mine to look more authentic, so I decided to start covering this beauty with some green. Now I'm happy that I did... But I will be building a P-51 and this will be the perfect look for it.

Lastly, I leave you with this parting photo. It shows how I simply sprayed around the 244th Sentai unit markings... This is exactly how it was done during the War...
I hope you enjoy this article as much as I enjoyed the building and research process.
Tamiya hit a home run with this baby... Anyone that tells you anything different needs their head examined... 🙂 It's the best Ki-61 in this scale that I have built so far.
Now don't get me wrong, the older Hasegawa kit is still very acceptable. I'm not bashing the Hasegawa kit by any means. It still looks good when completed, but it is also a product of the early 1990's and has been eclipsed by this newer offering from Tamiya.
Go out and get yourself one of these... You'll be happy that you did.
Thanks for reading and for more information, please don't hesitate to check out the build journal on this one. Here's a link to it in case you're interested in how it was built, including the color documentation, and how I applied the foil...
As usual,
Comments are encouraged.

Wow Louis, you really hit the jackpot on this beauty! Looks really outstanding.
Hello Dale, @dtravis
Now part of me wants to build up another one... in a total BMF finish. I have a short nosed 1/48 scale Hasegawa Ki-61 plane picked out just for this ... so please stay tuned.
Meanwhile I also started a BMF P-51 Mustang in 1/32 scale... check it out if you can.
Thanks again !
Fantastic looking machine Louis
Thanks George ! @blackadder57
Wow! I’ve always disliked foiled models. They never look real to me...until today. You pulled it off, Louis. Nice job. What kind of dull coat did you put on it? It looks like typically oxidized aluminum.
Thanks John, @j-healy
I literally used Testors "Dull Coat" from a spray can... I sprayed on a few light coats, but only on the bottom side. I took this advice from Tom Bebout on the idea. I wanted to tone down the look of the BMF as it was too shiny for this type of plane.
The spraying of the green camouflage on top toned the rest of it down. The Dull Coat made the shiny foil look oxidized. I am sure that you can spray on too much and eliminate the foil effects if you are not careful...
Absolutely stunning! the BMF really does the trick, great job!
Jim
Thanks Jim... 🙂 @jimh
I have started a 1/32 scale Mustang build journal on "Cripes a Mighty 3rd", and plan on using this stuff on the fuselage and tail surfaces. I hope it turns out well... I may hit you up for some advice as things progress during the build if you don't mind. Thanks again my friend !
They've said it all, Louis...another outstanding example of modeling from ya ! 🙂
And a really nice presentation, too.
Thanks buddy ! @craigindaytona
Great to hear form you...
Well done Hein Louis, the finish of the scheme along with the bare metal finish in a state that looks quite realistic. Your the master of foil. I felt the same as Jim Healy in regard to this technique. You really have got this technique down. I don't do many NMF planes just only 3 built to date in my lifetime and one of them is a Hein in a similar scheme. Again well done presentations. Thanks for sharing.
Thanks Chuck. @uscusn
I like using the foil for several reasons. First it looks like real metal because that's exactly what it is. I found out during this build that it can be toned down by applying a flat coat over it if desired.
Secondly it is very easy to use. If you make a mistake or if it happens to wrinkle as you're applying it, simply lift it up and try again. It's forgiving and only requires a little practice to get right.
Give it a try sometime. I think that you will like this stuff.
Eventually I plan on building up a 1/48 scale Monogram B-24 using one of these J models in the stash.
covered with the foil and markings of "the Dragon and His Tail".
That one should be impressive once completed.
Thanks again buddy for the compliments.
Thank you, Louis, for that deep background story and these amazing pictures. This is a very convincing look done by using Bare Metal Foil and the following procedures. How much time did you spend on this kit?
Thanks Michael. @michaelg34
If you're looking for a great BMF this stuff is the way to go. I have found it to be superior to any painted on finish since you can't really get the luster look if actual polished metal using paint. You can come close but nothing beats metal when trying to replicate a true to form metal finish. This becomes more apparent with highly polished finishes versus one that has oxidation.
As far as the actual building time, the kit went together rather fast. Even for me it was fast. Most of my time was spent doing research on colors and locating information about the plane. The part of actual building that took the longest was applying the foil.
I'm taking a guess here, but I will say that I have approximately 20 to 25 hours of building with half of this putting the foil on.
Thanks !
Thank you for your reply, Dear Louis. It is encouraging me giving this foil application a try...
Onca again: it is a masterpiece!
You're quite welcome Michael, @michaelg34
I think you will find it easy to work with. It's a little intimidating for some, but please remember that you can simply lift it up again, being careful not to rip or tear it in the process if you are not happy with how it lays down. Once it has been removed from the surface, simply re apply it again. I use a Q-Tip or even my fingers to smooth it out. Start in one place and work outwards from there. The center of a panel is the best place to start. Trim things using a new razor blade. You can tell when it's time to replace the blade, as it will tear the edge rather than cut it. I use the same blade for cutting the material from the sheet as I do for trimming off the model. I typically go through 2 or 3 blades per model...
Please don't hesitate to contact me should you have any questions. I'll be happy to help if I can. Feel free to send me a PM anytime.
Thanks again ... 🙂
Thank you for your offer, Dear Louis. I do have 2 same kits in my stash: MIG 15s in 1/32; perhaps I make 2 variants: one laquered and one with BMF; as a comparison...if I do so I will contact you.../BR/Michael
Hi Louis. Your in depth work in progress build of this model is greatly appreciated. i will definitely follow your advice when tackling this kit. This is a masterclass build. Well done!
Hey Morne. @mornem
Thanks for the kind words and I hope that the work / progress journal helps you with your build. I have seen your completed models and they always look spectacular. If anyone does a master class build its you !
Thanks again and please post up some pictures of your build along the way if you can.
I will definitely keep you posted!
Well now you've done it Louis, another kit to add to my already semi-large stash. The misses will not be pleased. Great job there buddy she really looks good. If she was photographed with an airfield background it would be difficult to determine that it was a model. Two thumbs up.
Tom B, @tom-bebout
I'm not trying to cause problems for you with your misses. But this is a kit that is worthy of adding to your stash. Maybe if you build it up quickly she will never notice another box ... 😉
I'm still looking for the background poster similar to your mountain scenery that you use for some of your photos. So far I have not had any luck with finding something suitable.
I think I'll try to locate a picture of an island with lots of palm trees in the background and get it printed out to use as a photo backdrop.
I have a few Corsairs coming off the assembly line and they will look good with a palm tree background. This Ki-61 would be another worthy candidate for the picture / poster too.
Check it out with the B&W filter. It would look even better with one of your signature bases under it.
Thanks again buddy.
Gentlemen I have to take the misses to the hospital now so I have to cut this short. She's getting a blood draw through her chemotherapy port for the very first time.
I'll try to answer your replies soon. I promise.
Please keep her in your thoughts and prayers.
Thanks
We are done with this stuff for today. Man it's getting real.
I wouldn't wish this stuff on any living creature. It's horrible.
Anyone who took the time read your WIP could see where this Tony was heading...a spectacular finish, with a flawless build! Thumbs up, because going with a mix of paint and Bare Metal Foil is not for the faint of heart. I bet you could easily replicate the overall effect on a Hasegawa kit as well, it would be hard spotting wich kit is from what brand if you would put them side by side,
By the way 4 Liberators? You madman
Thanks Pedro. @holzhamer
I sincerely appreciate this comment.
I was seriously tempted to leave this one as is and not add the green camouflage. I'm pleased with how it looks now that I decided that it would get painted on top of the foil.
I have two of the Hasegawa "short nose" variants and plan to build up one in a total BMF flying with the Akeno Fighter School. Like these shown in the pictures below:
The Hasegawa kit looks like a very similar model but I think that the Tamiya version has a little more detail on it and a much better cockpit. I'll have to take a picture with both of them side by side as a comparison. Thanks for the idea.
Actually I have 5 unbuilt Liberators in the stash and two are built and sitting in the display case. The other Lib is blended in among the unbuilt B-17's so it wasn't visible in the photo.
I'm definitely a madman ! No doubt about that ... 😉
Just exemplary work, Louis. I love the work with the foil, and you "dirtied it up" just as if a ground crew in the field had done it. Amazing job! I've always wanted to build the Tony. But lots in line first!
David my dear friend ! @davidathomas
It's always great to hear from you... 🙂
Thanks for the kind words about this one. It was an extremely enjoyable build and I can't speak highly enough about the kit. Should you decide to give one a try I think you will be just as impressed. I understand the other kits in line philosophy... so many kits that we want to build, and so little free time to do it...
Thanks again... 🙂
Yes, he is.
Anyway, I just want to say that in my humble opinion this is probably the best modeling I have seen from you, Louis. You seem to be on a real learning trajectory that is very much on an upward curve. Every project you have completed recently has been better than the last.
The finish, artwork, and build quality of this are all first rate.
Brilliant.
'liked'
David L-S, my good friend, "AKA" @dirtylittlefokker
Boy you really know how to build up one's confidence !
I do indeed try to incorporate a few new things during each build if it's at all possible. Trying out the Flat Clear over the top of the BMF was something new for me on this one, as was applying a little weathering, such as the small scratches and exhaust staining...
Now I have a 1/32 scale Mustang among the other projects on the bench, and it will have a few "Firsts" with it too. Things like a printed cloth seat harness that is combined with some PE parts and a "ready made" Instrument panel that reminded you of a golf game... 🙂
It too will have a BMF finish on it, and it will be quite a bit brighter having a polished effect, sort of like your photo posted earlier today with all of the Squadron Commanders planes all lined up neatly for a drag race... 🙂
I sincerely appreciate the kind words of encouragement. You're the man !
Great work Louis, I think that you have really managed to do the elegant lines of the Hien justice!
If you are going to do 4 Liberators - how about an assembly ship!
All the best to you and the Mrs!
Thanks David ! @davem
I sincerely appreciate the compliments... Lately I have been on a Bare Metal Foil kick, and now I've started building up the "Cripes a Mighty 3rd" Mustang flown by Major Preddy. That one I'll only slightly weather so it should have the full BMF shine to it...
I hope I can do it justice too...
As far as the "Assembly ship" goes, yes I have one in the plans as an upcoming project. But like David Thomas mentioned above, I have a few in line ahead of it. It might end up being a project for next year, the Good Lord willing.
Thanks again... 🙂
Take care my friend.
Louis, I can't add much more to what has already been said but, Fantastic build!
Thanks Robert... @roofrat
I sincerely appreciate this comment.
Louis @lgardner,
Everyone has passed on numerous compliments which are justly deserved. But I've got one or two more to add.
Well done my friend, this is of a caliber that should be displayed in a Museum. You have set the bar so high that some of us mere mortal modellers can only dream of. There are going to be a bunch of iM members attempting this technique. There is probably, almost guarantied, going to be cursing and imbibing of Adult beverages, dog kicking and more cursing.
Sounds like quiet the adventure...I cannot wait to try this!
You did good!
Hello James ! @jamesb
Your comments are more than generous... Thank You !
It made me laugh as well... and that's the best thing. 🙂
I'm sure that your project will look good in this foil. I really like how it turns out, especially if you use different shades of foil during the process.
Thanks buddy.
🙂 … Greetings … 🙂 :
Very good work on that Tony … very eye striking work Louis. This model type is not too often seen, thank you for sharing the pictures.
Hello there #3 from a Daytona native ! @de4ever
I agree that this is a type that you typically don't see too many models built of. It's sad too, since they are the best looking planes the Japanese ever built. I'm happy that you enjoyed looking at the photos I posted. This thing really pops out in natural sunlight... It's a nice mix.
Thanks for the compliments ! 🙂
A great looking Tony Louis! I about have my Tempest and Tiger Eye wrapped up, and was about to start on my Tony. A little inspiration here!
Thanks Greg. @gkittinger
Please post up a few photos of your Tony along the way if you don't mind. It's my favorite Japanese plane and I'll definitely be looking out for a reveal article on this one. I've seen a lot of your builds posted on here, and they all are excellent. I'm sure the Tony will be no different, and will include one of your "World Famous" stands with the wheels up...
I sincerely hope this one will inspire others as well. Thanks again my friend.
Hey Louis! I am getting on about once a week currently, just to see how friends are going on iM.
And boy are you going well! This is just stunning craftsmanship - I like that underneath you can still very clearly pick out the work you did on the individual panels. You've turned out a stunning looking and very clean plane that is all the better for the 'complex' painting and finish. Fantastic work as ever, my friend!
Hello Paul ! @yellow10
I have noticed that you have been absent from here a lot lately. I have not been able to spend as much time on here either... 🙁
Hopefully things will improve for both of us soon and we can spend some more time at the work bench.
Thank you very much for the kind words... I also like the look of the bare metal foil, and by using slightly different shades of it in various places, this makes it look even more interesting.
I tried very hard not to completely conceal the stencils with the green paint and lightly gave them some over spray to keep this from happening. I'm not bragging, but you should see this thing in person, especially in the bright sunlight. It really pops.
Thanks again my friend. It's great to hear from you.
Outstanding build and article as usual, Louis! “Japanese Spitfire” is a spot on definition, as most japanese fighters look more bulky and unwildly. The Ki-61 has unique sleek lines among them, and IIRC, german designers who participated in the creation of the 109 were involved. I’ll be sure to check your build journal to learn about the foil application, it really looks the part!
Thank you Thiago ! @tcpacheco
Here are some more photos that I took earlier today outside. We had a beautiful day and the sun was brightly shining, so I took full advantage of this... 🙂
Even with the bright sunlight, it's actually very hard to capture the full effects of the Bare Metal Foil on film. It changes a little with different angles as the light reflects off the surface...
Enjoy !
Outstanding! Thank you for posting!