Eagle 4 From Space 1999
I profess that awful and/or cheesy British science fiction occupies a special place in my heart, top among them Space 1999. It is a very guilty and stupid pleasure, long considered one of the worst SF TV shows of all time because of its butchery of science and logic. Despite that it is also one of the premier shows for actual physical special effects and SF model making thanks to SFX giants like Brian Johnson and Nick Allder.
The show was based on the (some might consider delusional and others would say hopeful) premise that mankind poured resources into space exploration and not weapons (or dealing with man made financial disasters for that matter) during the 1980s and 1990s culminating with the construction of Moonbase Alpha. Alpha was the hub of human space exploration as well as the control site for the most dangerous and toxic garbage dumps in human history which were known as Nuclear Disposal Area One and the much larger Nuclear Disposal Area Two aka Area One and Area Two.
In the Space 1999 timeline (September of 1999, naturally) workers and astronauts were dying because of an unknown radiation (later called magnetic radiation. /physicist eye roll/) This “radiation” caused the nuclear waste in Area One and then Area Two to explode. The latter explosion was enough to send the moon flying out of the Earth's orbit and onto its highly unlikely and improbable journey into deep space. Yes, it is as terrible as it sounds.
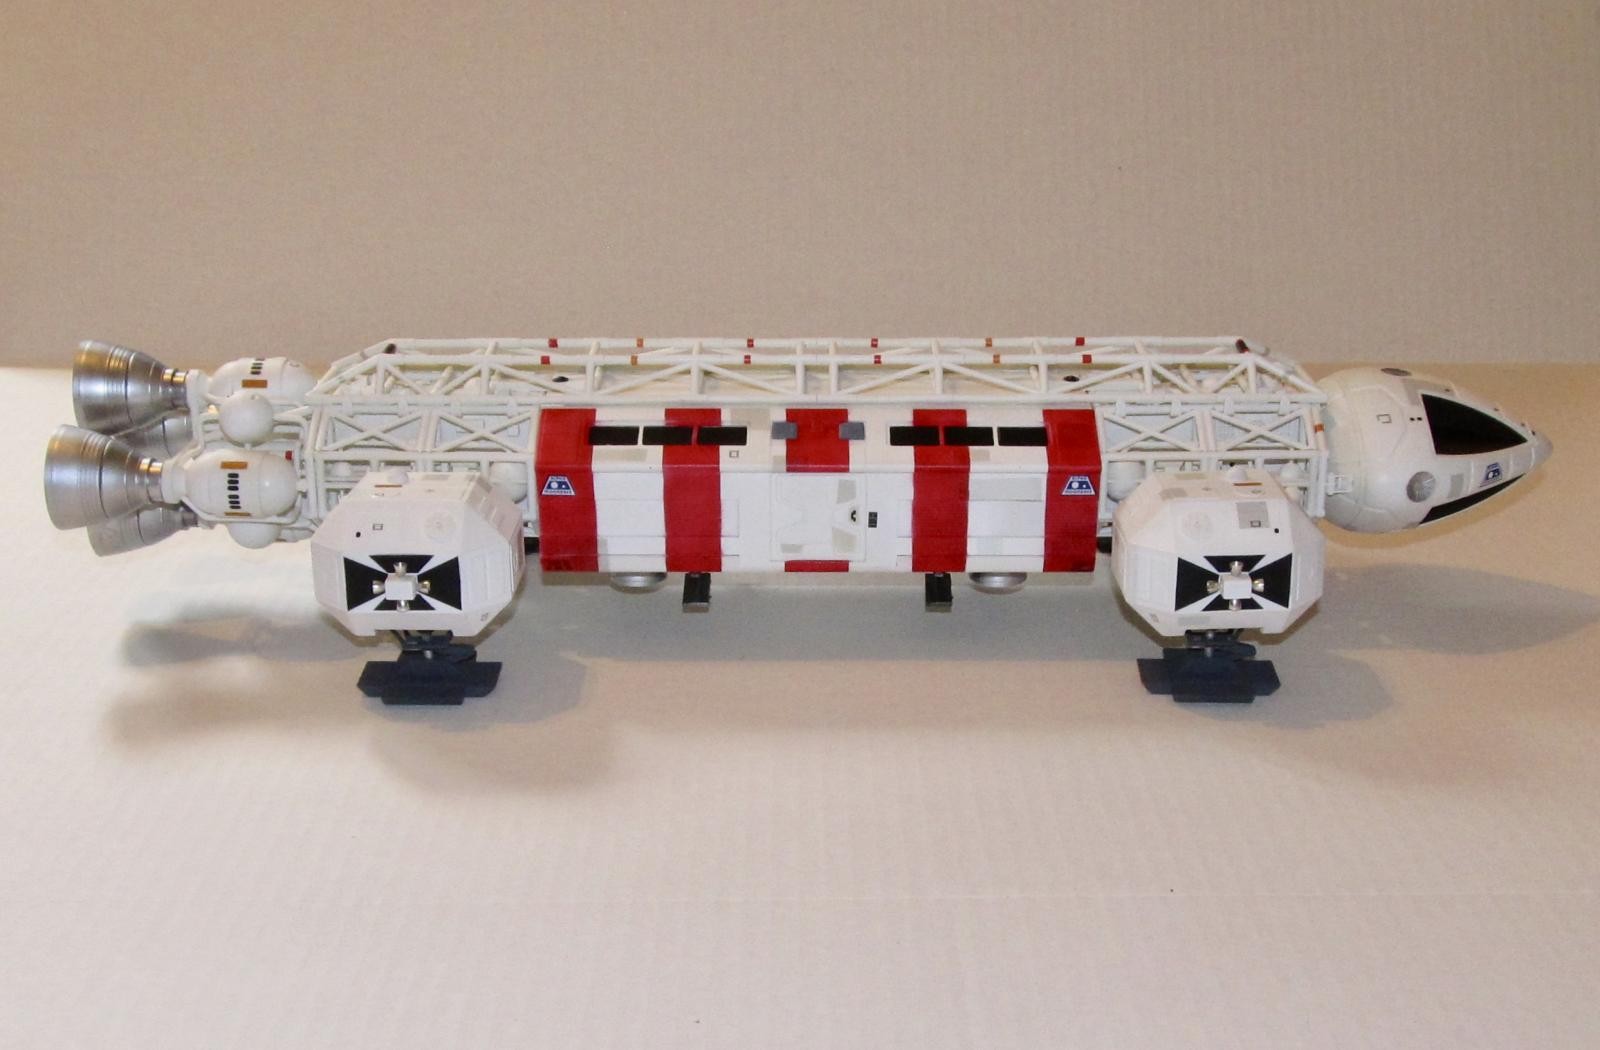
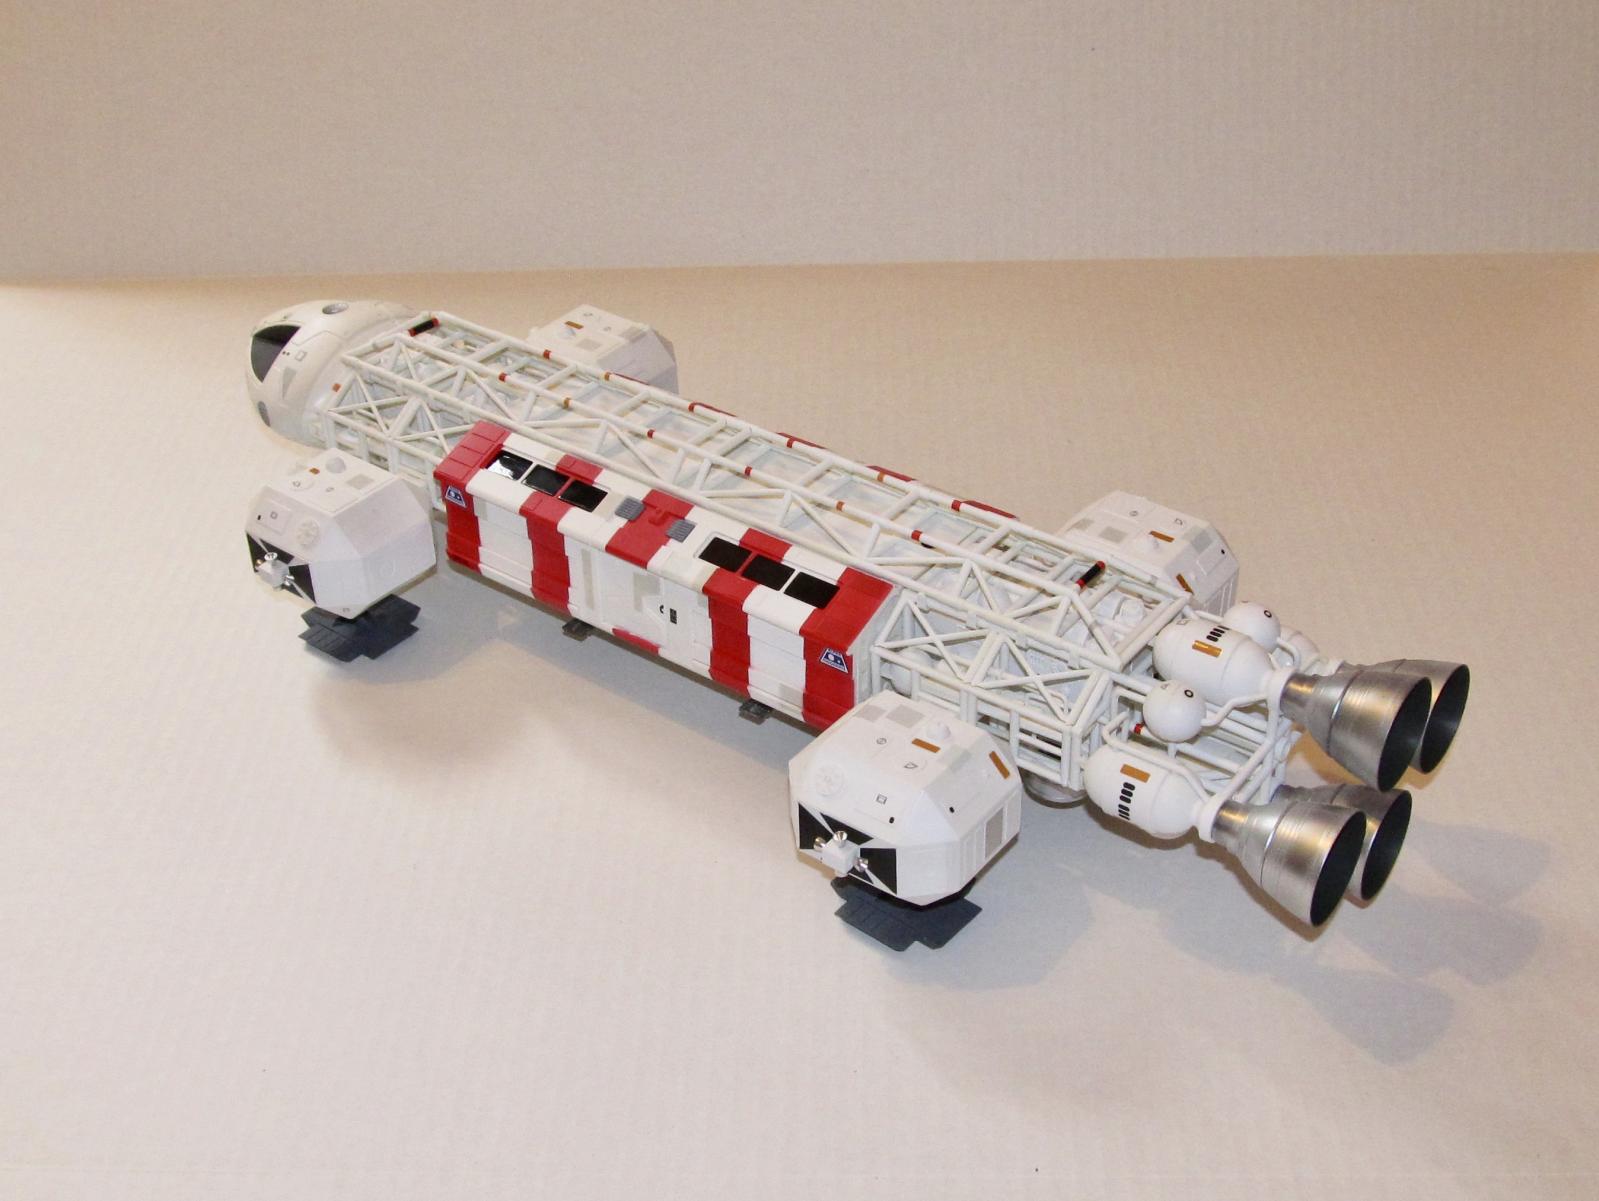
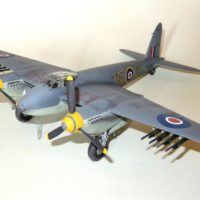
The main attraction for my inner five year old was the spaceships especially the Eagle. Unlike the rest of the show, the Eagle seems like it was designed in a logical and functional manner with a command module, service module which consisted of the frame and four nuclear fusion engines which one could attach a number of different pods to be carried including the following pods: passenger, survey, science, rescue, combat, freighter and cargo.
One of the things that bothered me as a kid was the number of Eagles the intrepid reluctant explorers of Moonbase Alpha had. I actually went through my Space 1999 DVDs (on fast forward) to get a rough count of the numbers blown up or crashed in every episode. By my count, the Alphans crashed/destroyed over 20+ Eagles over the span of two seasons. Strange that some 311 castaways (less as the series went on) could maintain a force of 20-30 Eagles without a strong industrial base while losing a number people on various planetary exploration missions or encounters with monster suited aliens.
THE KIT
When the series was active, there were several models developed including two 1/72 versions of the Eagle which both suffered accuracy issues and from the limitations of molding technology of the time. The original MPC kit is still available, but requires a lot of work (that even I don't want to do) to make it close to accurate including cutting out the plastic in between the struts and building new landing gear.
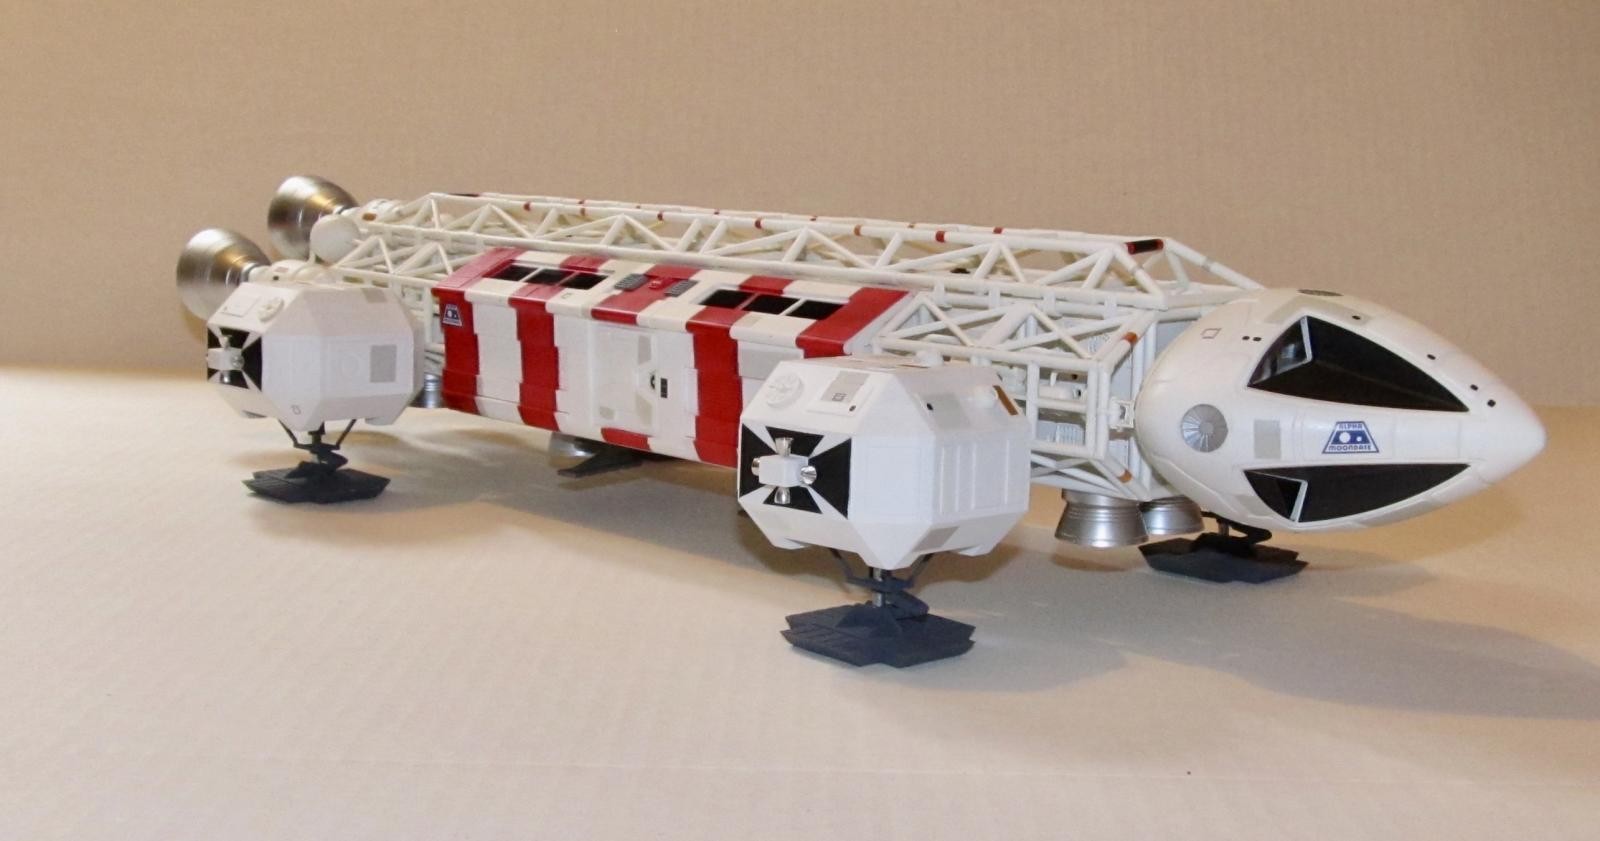
There has never been an injection mould version of the Eagle in 1/48 scale till 2015 when Polar Lights surprised most every Space 1999 fan with their 1/48 scale (or 22” long) kit.
The Eagle kit is very large box that is stuffed with some 300 parts on numerous sprues of off white plastic which are for the main body while the engine bell parts and landing gear were on several sprues of a light grey plastic. It also comes with a sprue of clear parts for the command module and passenger module windows. My copy of the kit had some flash on the sprues and there were some prominent mold marks that needed to be removed. It also comes with four metal springs for the landing gear. MPC sells two different sets of metal parts. The first (and quite expensive) set contains metal versions of the main engine bells, landing engines and landing pad struts while the second set contains the metal nozzles for the OMS clusters located on the landing pods. I only purchased the second set for this kit.
An instruction booklet comes with the kit, but the painting/decal instructions are actually on the bottom half of the box so don't throw it away/recycle it immediately. The instructions are clear for the most part so there shouldn't be any issue building it. However, do be careful when assembling the engine pods as the orientation of the parts is critical for smooth assembly.
The detail of the parts is excellent so much so that one can recognize for example the engine deck of a Tiger Tank (which was also used on the Millennium Falcon) among the surface detail.
Finally, there is a rather large decal sheet that will supply most of the generic markings including the Season 1 and Season 2 (?) Moonbase Alpha ID badges. MPC does sell a separate sheet of weathering decals that make the mostly white Eagle a bit more colorful which I bought.
CONSTRUCTION
Construction began three and a half years ago with the main engine nozzles. They were carefully removed from their sprues, sanded and polished. Afterwards, they were washed in soapy water, rinsed and dried. I opted to spray on Tamiya flat black as the initial primer before spraying on gloss black as the top coat of “primer.” I ended up letting them sit for a week before spraying on Valljeo Metal Color White Aluminum, Silver and Pale burnt exhaust in bands so that it gave a non uniform metallic scheen inside and outside. The inserts were painted flat black.
Next the eight retro rocket engine nozzles were cleaned up, primed the same way and painted Vallejo white aluminum.
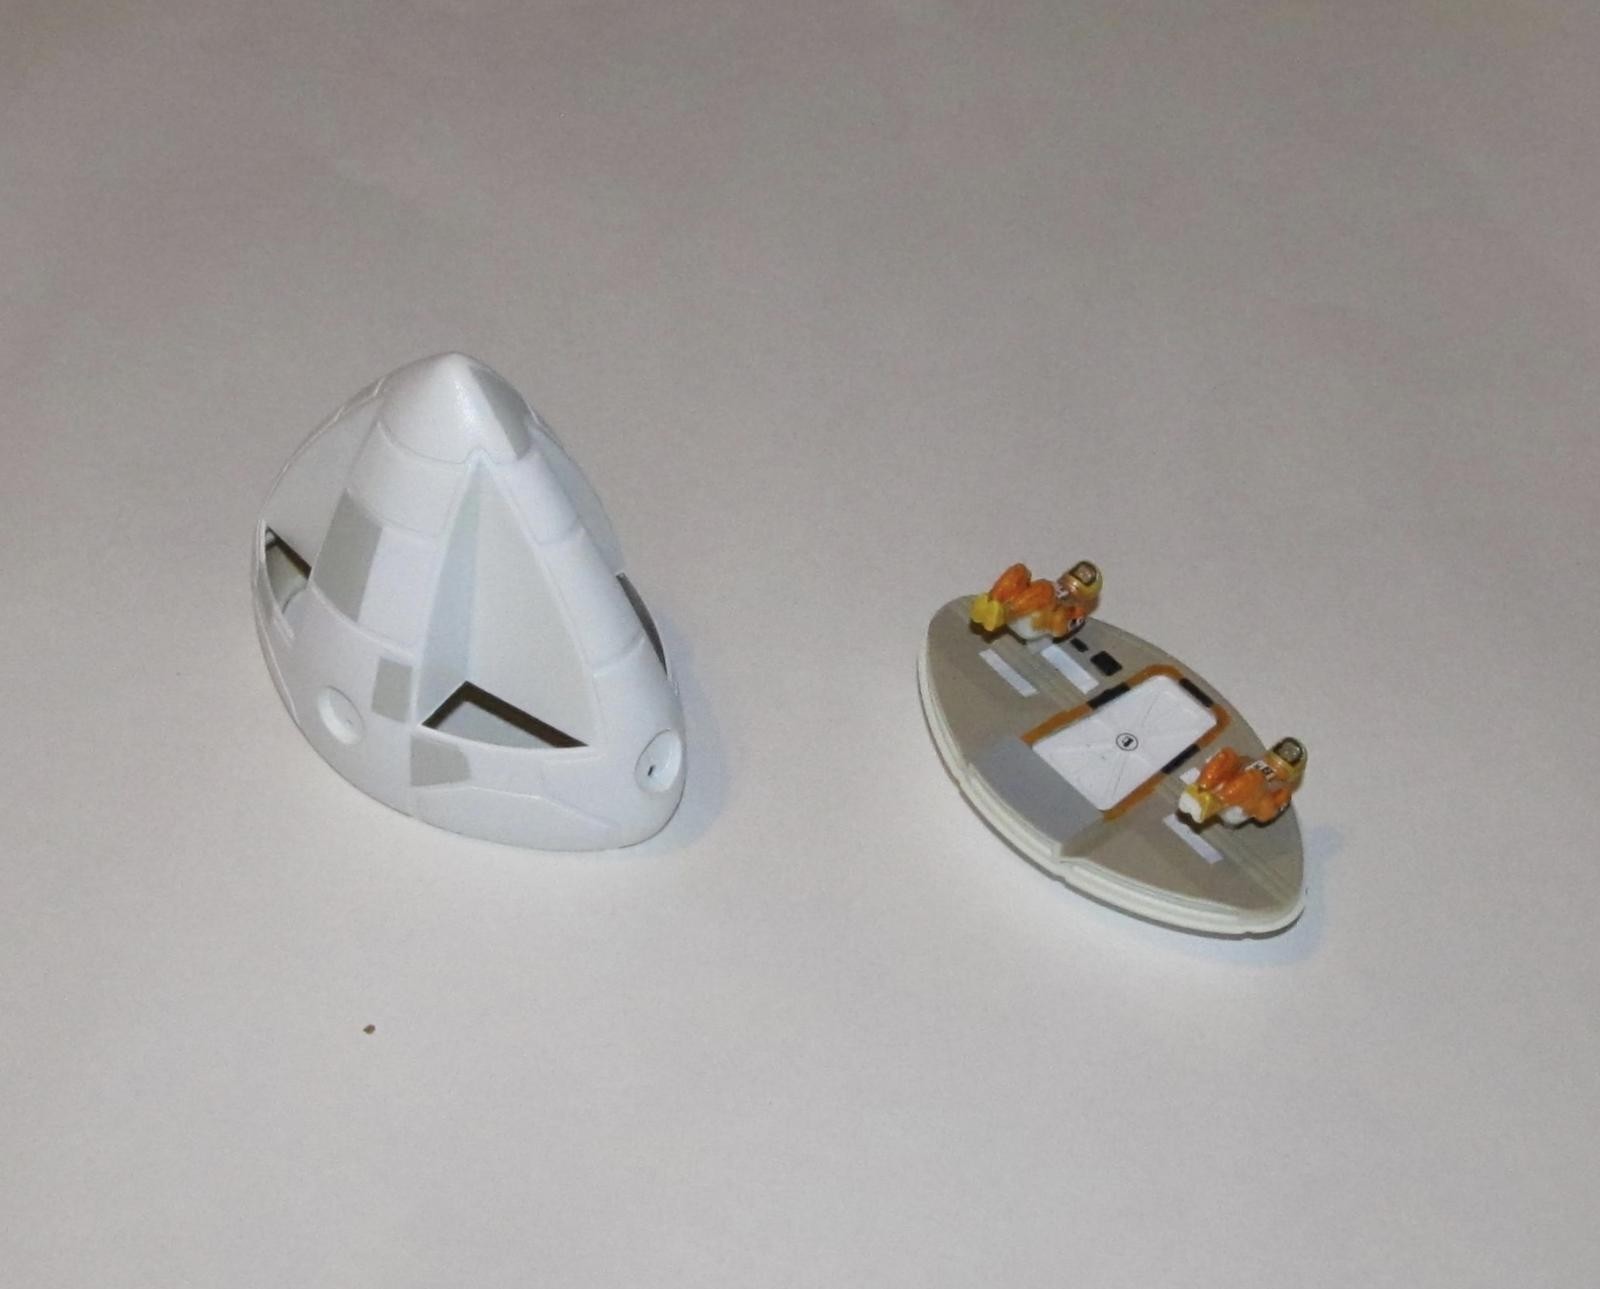
The command module was next. I first brush painted the astronauts as per the instructions. International orange suits, yellow chromate helmets, white chest packs, tan boots and clear orange faceplates. I sprayed the interior with Tamiya Buff. When it was dry, I masked off various areas and sprayed flat white, yellow, black and red (for the door trim.) After I glued the pilots to the butt stumps and added the decals to the door and astronauts ( I goofed on one of the astronaut's chest pack decals). The decals needed some help sticking so I used Solvaset and nearly ruined a couple of them. Fortunately I avoided any obvious disasters.
The forward hull of the command module and the landing gear pods were glued together and the seams were filled/sanded. I then glued the engine pods together. After all that the Eagle sat in the box for almost a year.
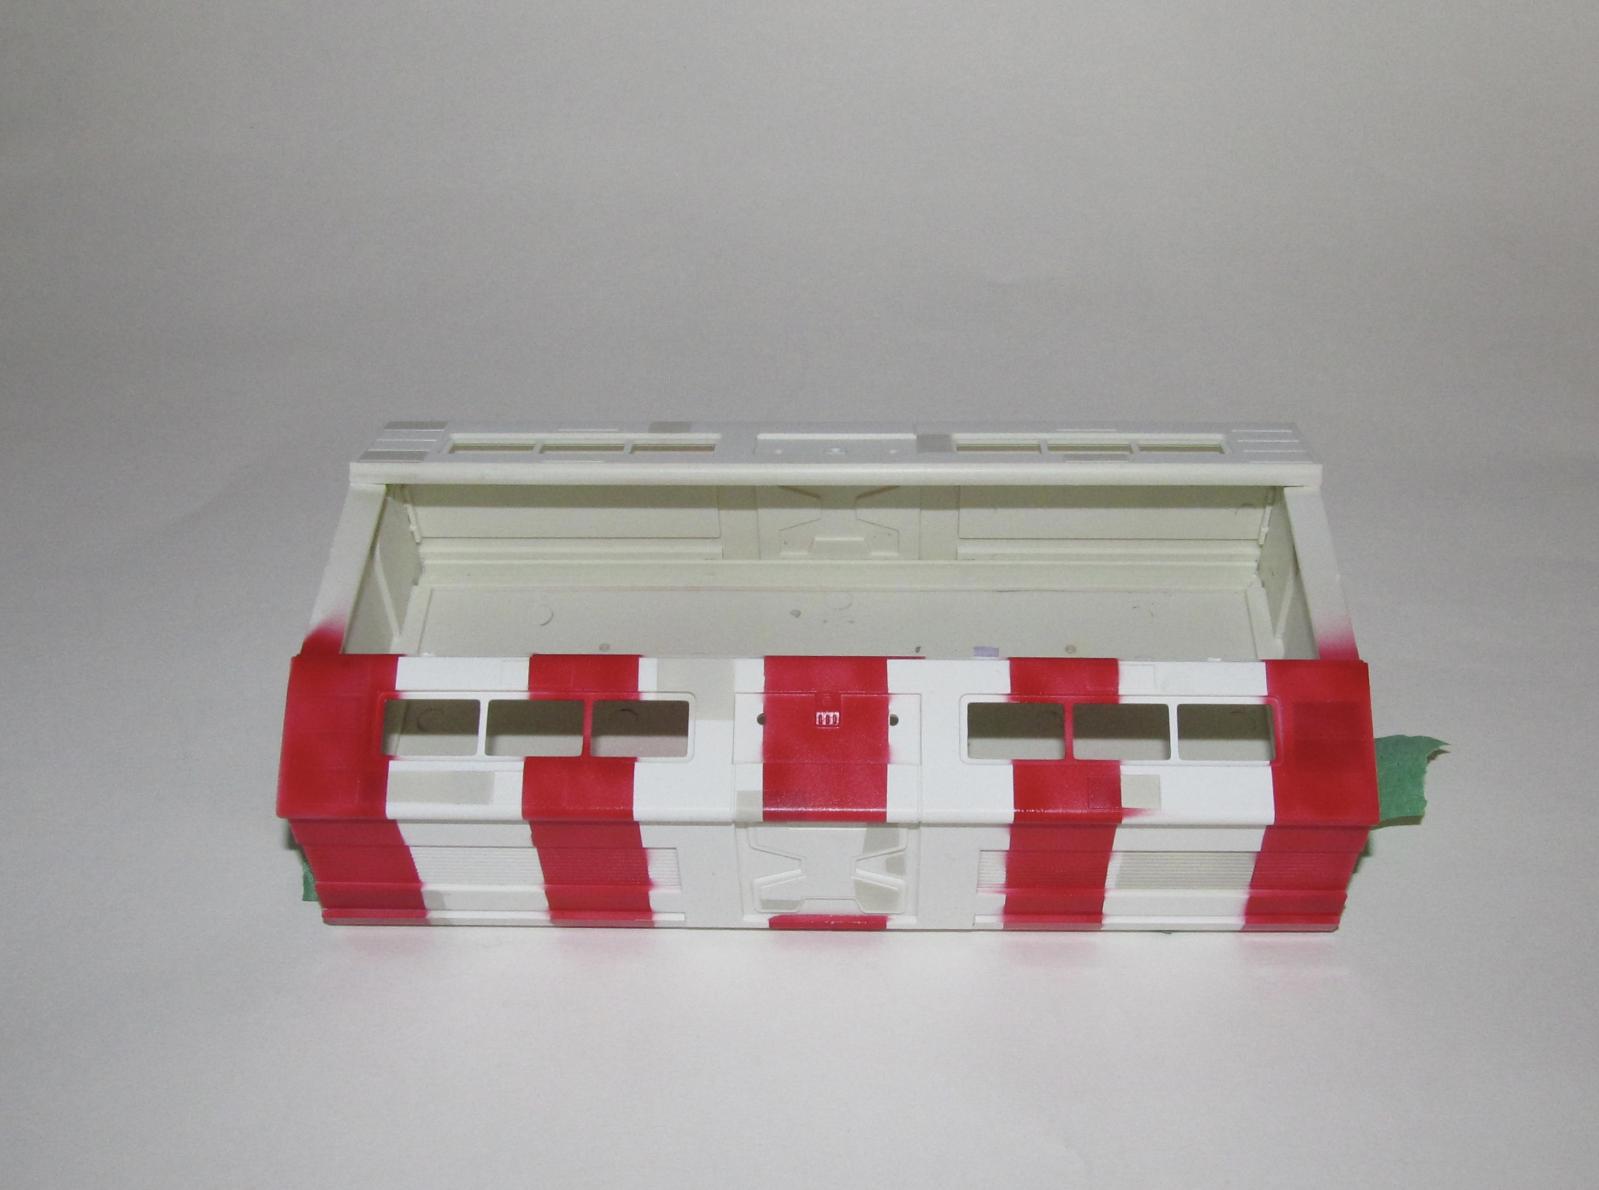
The passenger module was glued together except the top and windows because I wanted to paint it first. I used almost an entire bottle of Tamiya Flat White on the command module and passenger model hulls. I then masked off random areas on both sub assemblies and painted them FS 36622 Camouflage Grey to represent the random “paneling” seen on Space 1999 Eagles.
I decided to use the decals for the black (anti-glare?) panels on the command module, but discovered that the decals fragmented. Instead I masked off those panels and sprayed them flat black.
It seems that the effort drained me off all enthusiasm for this kit and it sat for another three or so months.
Next I masked off the white areas to paint red stripes on the passenger module as I have always been a fan of the “Rescue Eagle.” The bumps and lumps of the passenger module made for some tricky taping. Instead of using a ruler or some simple easy kind of measuring device that folks in my profession use, I opted for the old Mark One eyeball and did a best guess on the width of each stripe and it's location. Fortunately my Mark One eyeballs did a decent enough job so I didn't need to worry, but it took a while. I had some overspray to deal with but not anything major.
The interior portion of the Passenger module windows (as well as the underside command module windows) were painted flat black as there was nothing to see inside. There is a resin interior available but I passed so as not to make my build more dragged out than it already was. In the meantime I glued in the windows for the Command module and added the back portion of the hull so I had actually completed Command Module so it was something.
I took a long hard look at the service module frame and stopped for another two months.
After Canadian Thanksgiving 2018, I continued on. The service module frame parts required a lot of cleanup. I found myself spending three or so nights cleaning off the mold marks and flash off each of the individual frames. It was pretty damn tedious, but soon I found myself rapidly gluing the frame together. I did not glue the entire frame together as I had to decal and paint each sub assembly.
I purchased the Eagle weathering decal set from Polar Lights because I was getting sick of masking/painting in odd and random places. Each frame subassembly was gloss coated and when dry, decals were added to “jazz” up mostly white areas. I opted to use red, grey and yellow decal stripes to highlight critical areas such as hinges, fuel lines or explosive bolt attachments.
The interconnecting service modules required some more work. They had some pretty glaring seams on the bottom, but I chose to cover them up using strips of plastic card instead of sanding/filling. Eventually the frame went together without too much trouble. I didn't paint the interconnecting modules anything but flat white as they are mostly hidden by the framing or other modules.
After the main frame was done, I worked on the engine and fuel pods. These required a fair amount of filling and sanding to remove the seams. The fuel lines weren't any different than the frames because of the prominent mold marks and flash. I cleaned up each one and glued it in place. Once complete, the engine module was sprayed flat white and then sprayed with a clear gloss for the numerous decals that had to be added to it. The module was wiped down to remove any excess decal solution and then sprayed with a light flat coat.
Once it was dry, I added the engine bells to each end, added the engine nozzle inserts with a dab of Tamiya extra thin to hold them in place. The entire engine module was glued into the rear of the Eagle frame.
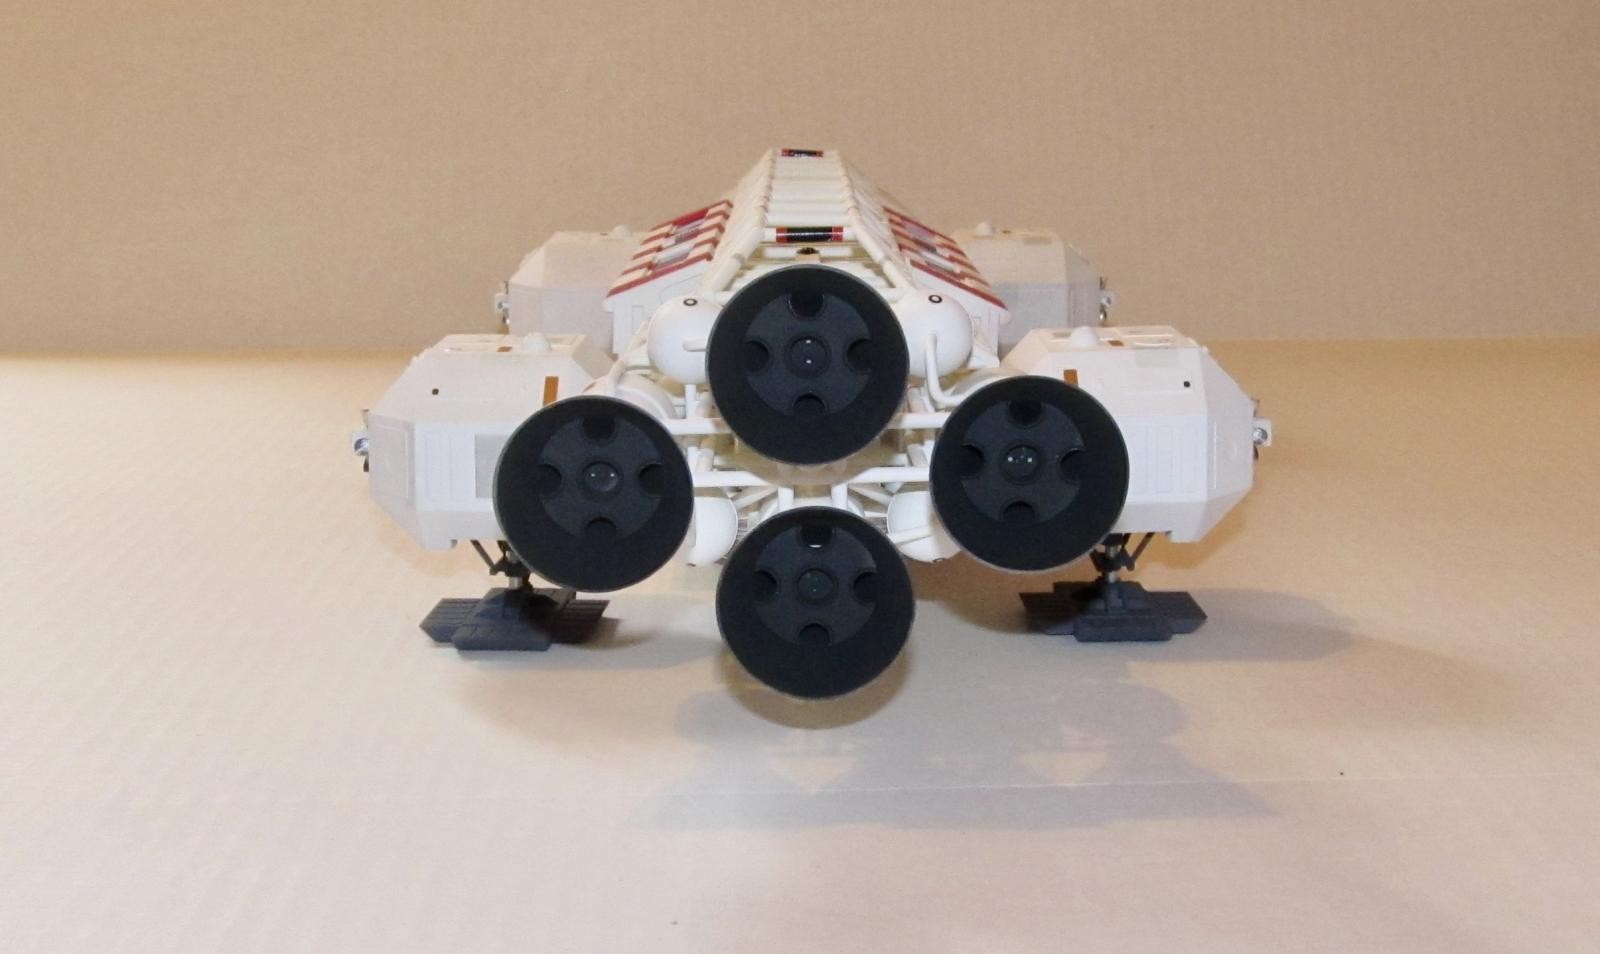
The landing pads were assembled. The only thing that was fussy about these particular sub assemblies was carefully attaching parts and gluing so the oleos worked. The landing pads needed Valljeo plastic putty around the edges.
Next the landing gear pods and landing pads were painted. I painted the landing pads German Grey (Tamiya XF-63) and when it was dry I brush painted the landing gear strut silver. The landing gear pods were then masked off and the black crosses for the OMS rockets were painted on. MPC supplies the decals, but I didn't use them after my bad experience with the anti-glare panels (the decals fragmented when wet.)
DECALS AND FINAL COAT
Many of the badges, identity markings and stencils were added after the sub assemblies were glued together. Once dry and clean, the model was carefully sprayed with two thinned coats of Tamiya flat coat.
FINAL CONSTRUCTION
The painted landing gear was inserted into the Eagle landing pods. At first I added the springs, but then realized that with the springs the Eagle sat way too high so I removed the springs and glued the landing gear in place. I had to use CA glue to secure these parts in place as for some reason Tamiya extra thin glue didn't hold the parts very well.
Meanwhile I added the retro rocket nozzles to the underside of the Eagle, securing each one with a drop of Tamiya Extra Thin glue. The metal OMS nozzles were added to the painted plastic mount with a small amount of CA glue. I have to admit that the metal OMS nozzles look much better than the plastic versions. Once the glue dried, I added each of the OMS clusters to the landing pods thus completing a build that lasted longer than the actual TV series did.


Never watched that show, but that's a cool-lookin' model, though.
cool looking bird...reminds me of the old monogram willie ley, space taxi
Cool thing! I remember watching Månbas Alfa, as it was called in Sweden back then. Later on I got myself, or was it a Cristmas present?, the Eagle transporter in Airfix´version. Remember having trouble getting the white to cover the plastic fully and the Humbrol red was gloss and took a while to dry...
Wow brilliant job on this ,believe it or not I watched a re-run only this afternoon. I have built the very basic Airfix version (it's on my gallery here) ,that version isn't even close to this , I may have to splash some cash on this version. Well done Dan.
Scratch that ! the cost is surprisingly high , around £150 is way out of my league.
I was surprised at how much MPC kits cost in the UK/Europe. A reverse geography wise of what happened to Italeri kits when MRC became their distributor.
Nice! I did the MPC Eagle and their Hawk when I was a kid too. UFO was another British sci-fi from that era also. The destroyed Eagle count is interesting, that's like doing a body count from the TV western Bonanza.
Very nice, I never saw the show, but I read the American comic book version, and loved the old MPC kits.
Wow! A trip down memorie lane of a 10 year old or so watching space 1999 on a B&W tv and sometime during the season my dad finally got a colour TV, and I was definitly hooked by the whole “universe” the show had, namely monsters and the morfo woman, Mia, I think was her name.
Great work with what looks a deceivingly easy looking space ship to build. Bravo and thanks for posting
Hi Pedro! Her name was Maya, not Mia 🙂 Did you play "Espaço: 1999" countless hours too? Wow... this bring some memories...
Thanks everyone for the comments.
As a child, I was a huge fan of the 1999 series, too!
I must admit your model really looks like the "real thing" piloted by captain Alan Carter, as it appeared in the show (which was a model as well, of course 🙂 ).
Brilliant work, Dan.
Loved Space 1999. Just loved it. Had a real crush for Dr. Helena Russell; as a 13 year old...
...she rocked my sci-fi world.
Great modelling, Dan.
‘Liked’
@dbdlee
I had a crush on Barbara Bain, too.
Hi Dan,
Thanks for this very nice rendition of the Eagle. Space 99 (Cosmos 99 in France) was very popular in the 70s, and I never missed any episode (Gerry Anderson's Thunderbirds were very popular too).
I still have this bird as die-cast metal from Dinky Toys, certainly my preferred toy whan I was young 🙂
If I had to do a model other than real aircraft, it would be the Eagle.
Bravo again for this beautiful work.
I had the Dinky Freighter Eagle because the passenger one was sold out at the local toy store. 🙁
Thanks again.
Hi Dan!
This is one of my most vivid recals of my childhood... I loved "Espaço: 1999" and played it with my friends at school... We were so happy 🙂
Thanks for this build, and congratulations!
I did the same thing too.
Great job on this model. I always wanted to build one, but was worried about getting the red stripes done correctly and cleanly. You obviously have the masking technique down for getting the stripes to conform to all the dips and bumps on the model.
When I wrote the review last year, I should have mentioned what I did for the red stripes. Oversight on my part.
After I laid down the tape, I sprayed a thin coat of white paint (Tamiya XF-2) on the edges then sprayed the red paint. It didn't work out perfectly, but it eliminated most of the bleed through.
I guess they just recycled the crashed ones and 3D printed new ones eesy peesy in the future as it was. Really good model.
Great work, Dan!
I had an old 14" MPC kit assembled Eagle back in the 1970's. While it was annoyingly inaccurate in some respects, it was close enough to tickle the imagination. I built 2 of them. One I hacked up so that the command module could detach. I used a rudimentary "hook" mechanism and weighted the command module with modeling clay. It was a bit cheesy, but fun. When Dinky came out with their diecast model, I was flabbergasted at how awful it was. I won't even get into the coloring atrocity. It was so wrong. Worse than the original Mego Star Trek phaser toy.
Fast forward many years... and I finally stumble upon Product Enterprise. Their 1/72 model looked amazing and naturally I missed out. Couldn't get it at retail price any longer. Scalpers were charging double. So I waited and finally nabbed one about $20 over the original price. Beautiful model. Good enough that I didn't feel inspired to dive into building a model.
But then... 1/48! I read up on the MPC kit and it sounds wonderfully detailed, so close to the original. I bought it and the metal engine bells option kit. But then, life got busy and I had to shelve my project. I don't know when I'll get around to it. Too many other higher priority tasks going, like finding a new job. But I'm determined to hold onto the kit and build it once time allows. I have rewatched the series... and cringe a lot. The failure of science and plausibility is so bad, it's painful. But the models... were just fantastic.
Seeing your build is very inspirational! Useful to know about the issues you faced and how you overcame them. Had you considered the Paragrafix photo etched set for adding detail work?
Thanks.
I didn't consider the Paragrafix set. I had a long build time with this beast and PE usually adds more time to it (which I didn't want to.)