Tamiyas Skyraider- I had to switch to the reserve tank to get her home.

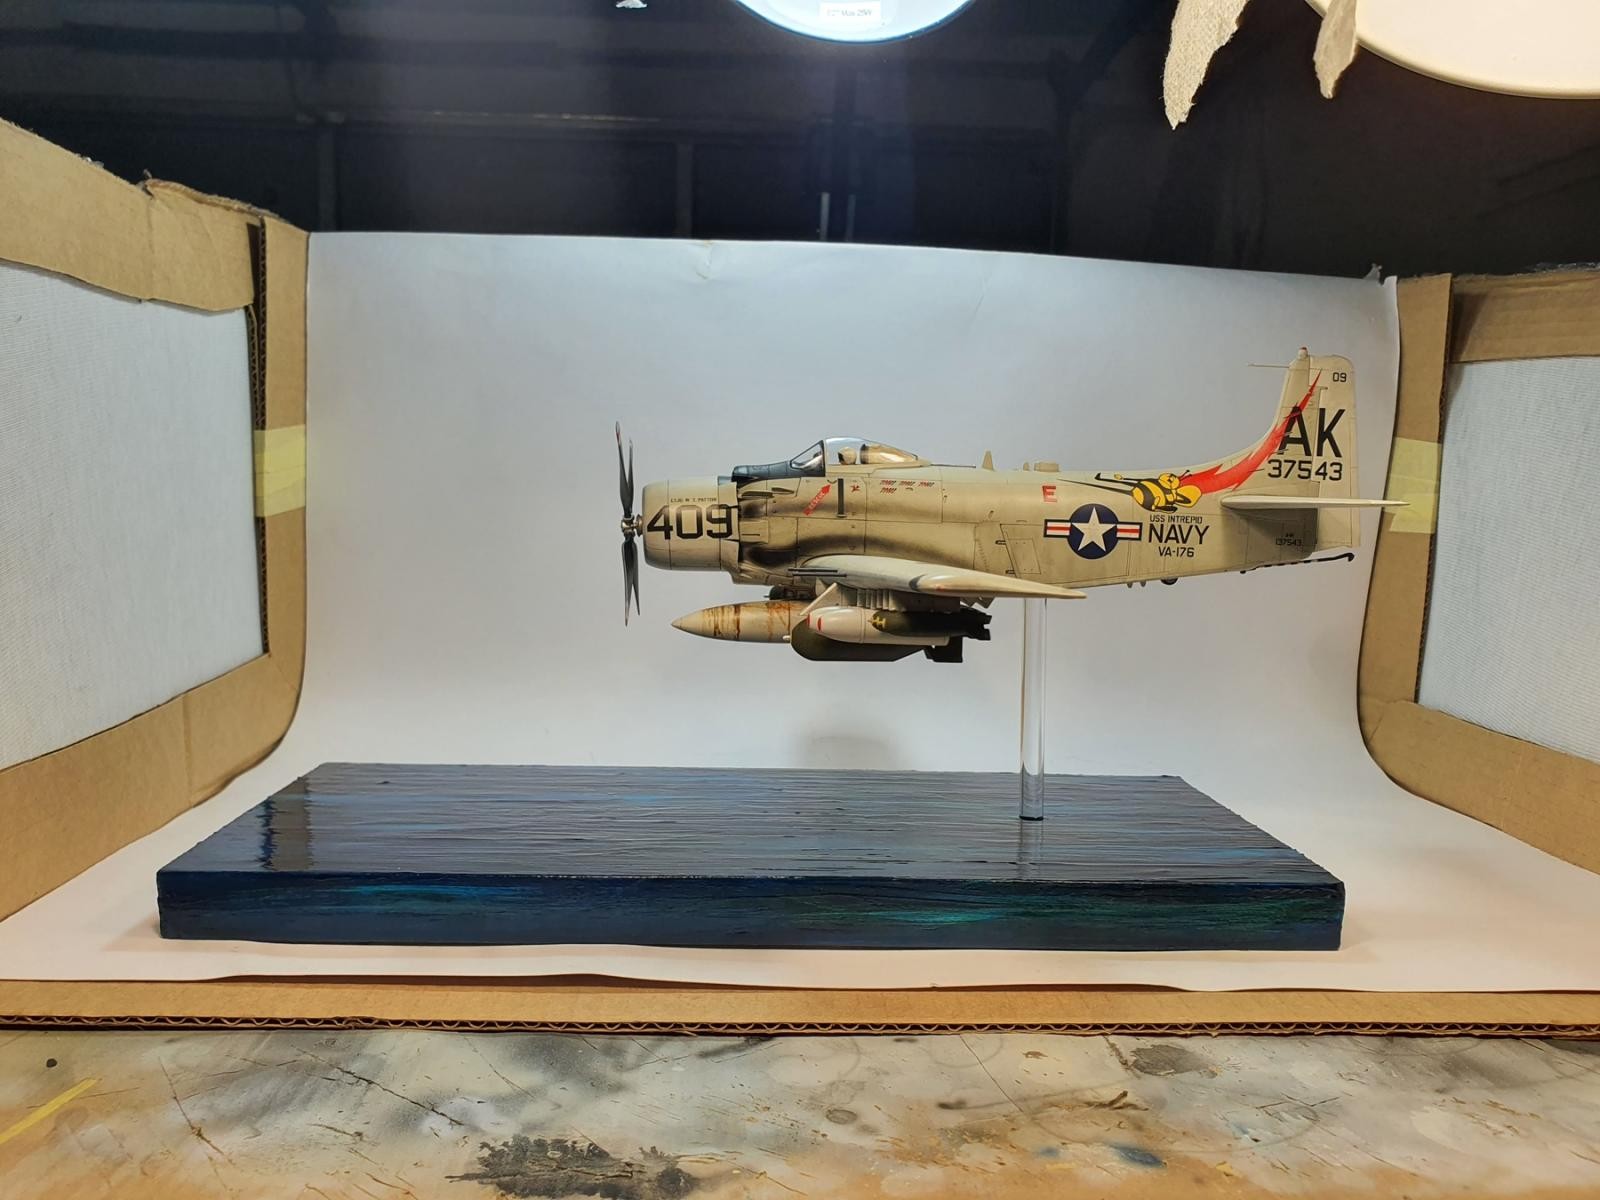
This was one of those builds where she ended up spending a few weeks in near solitary, staring at me from the workbench with worrying eyes as i left her unfinished and slowly gathering dust. A few days ago i looked at her sternly, flipped the switch and put in one more push to get her across the line. It was with a smile, and some relief, last night as i pushed the model support into the base for the last time and was able to call her completed.
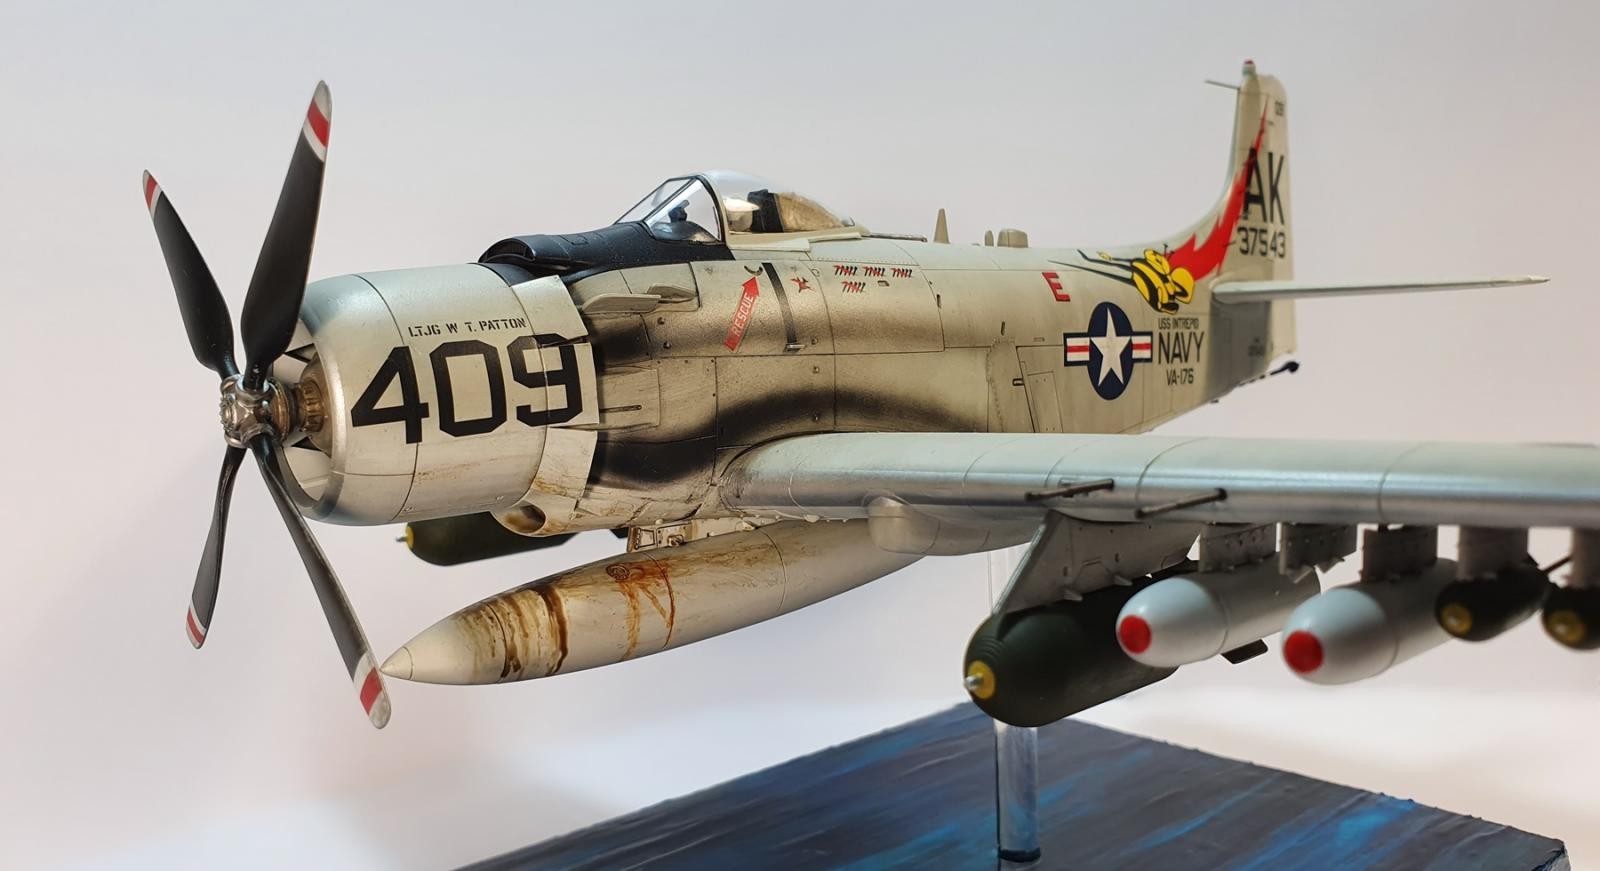
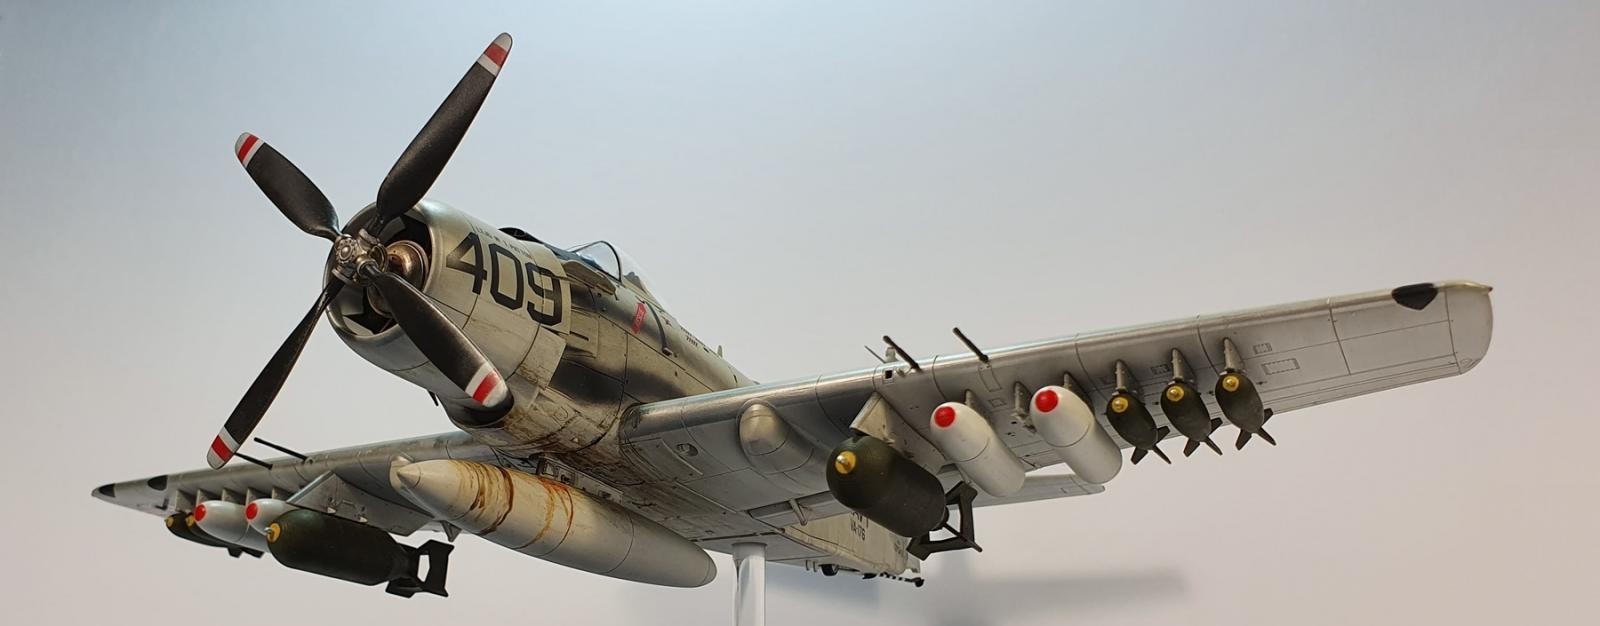
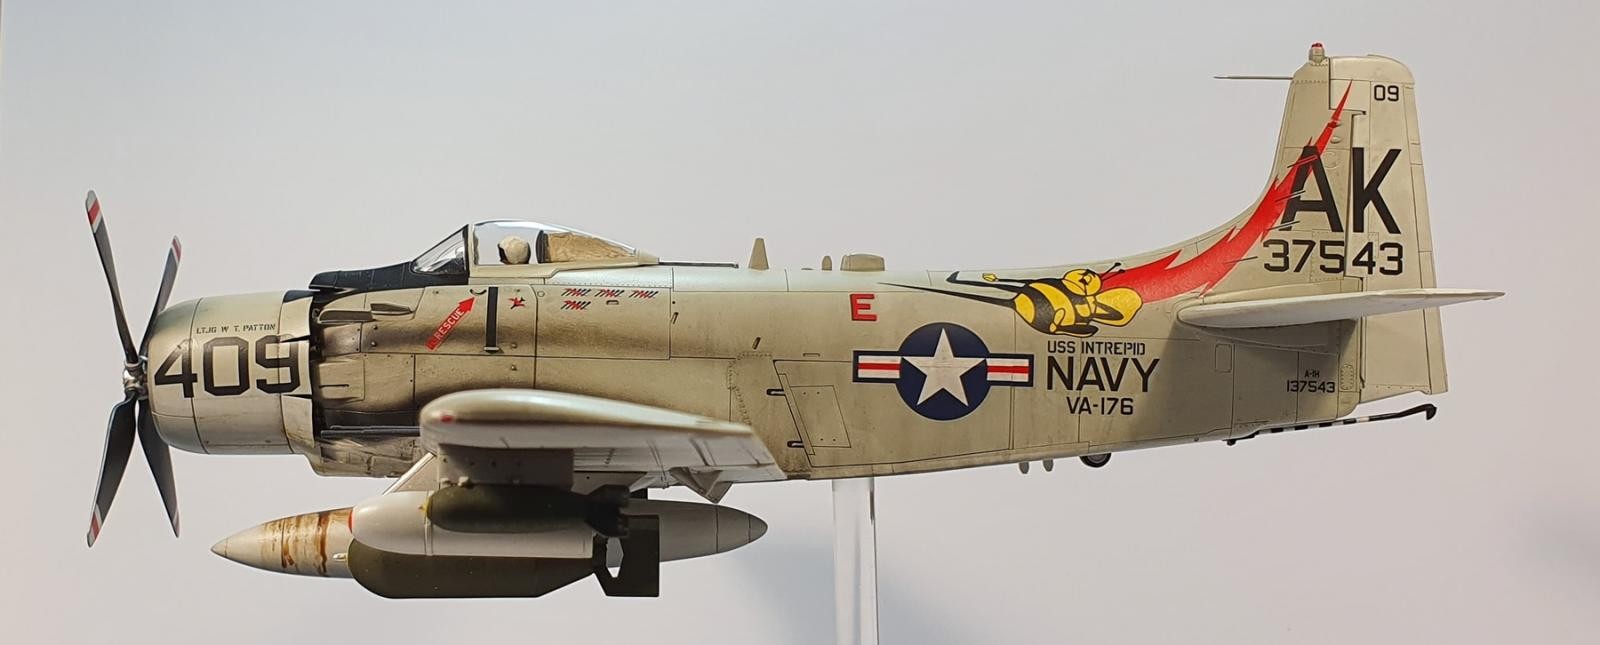
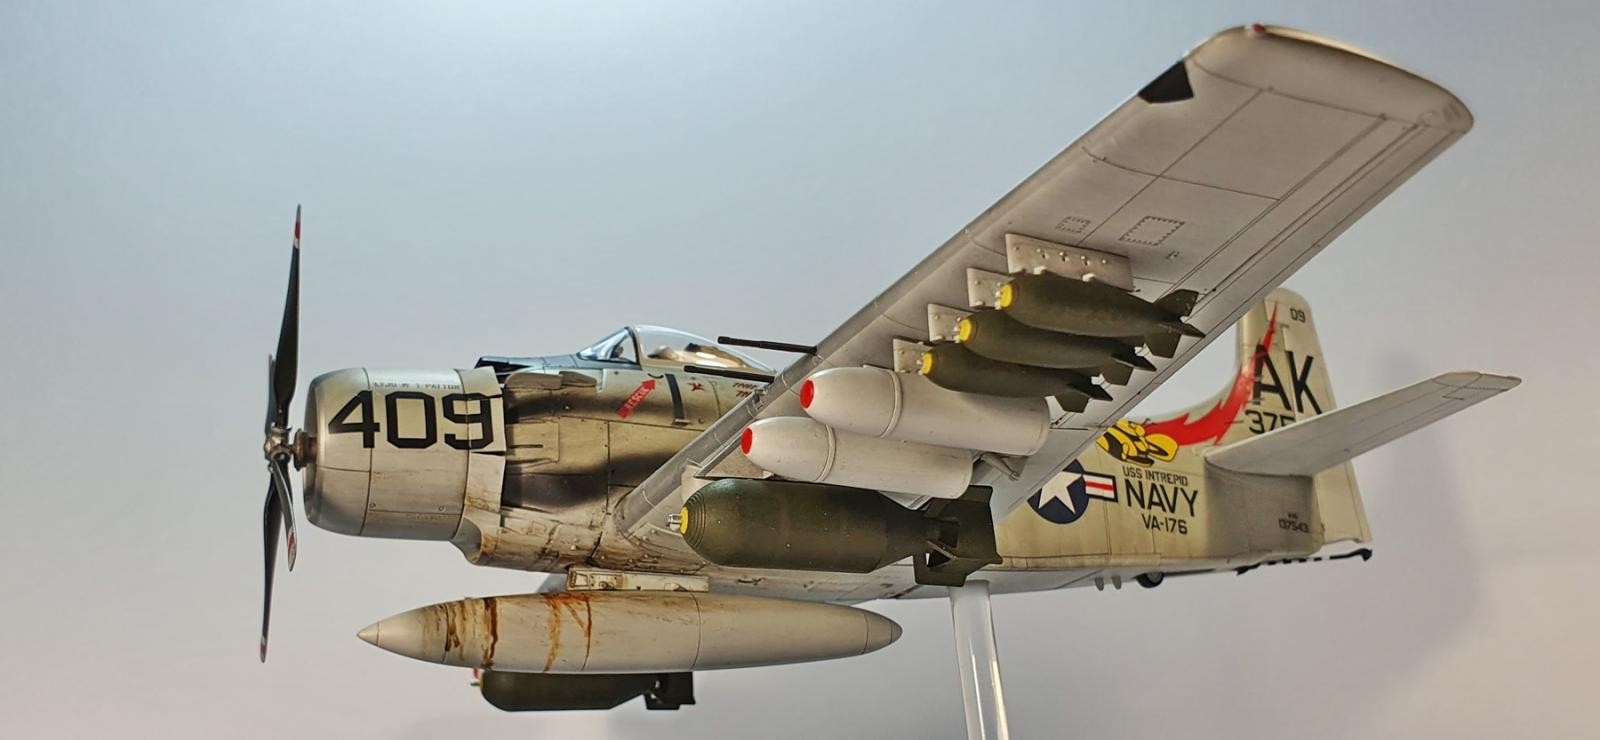
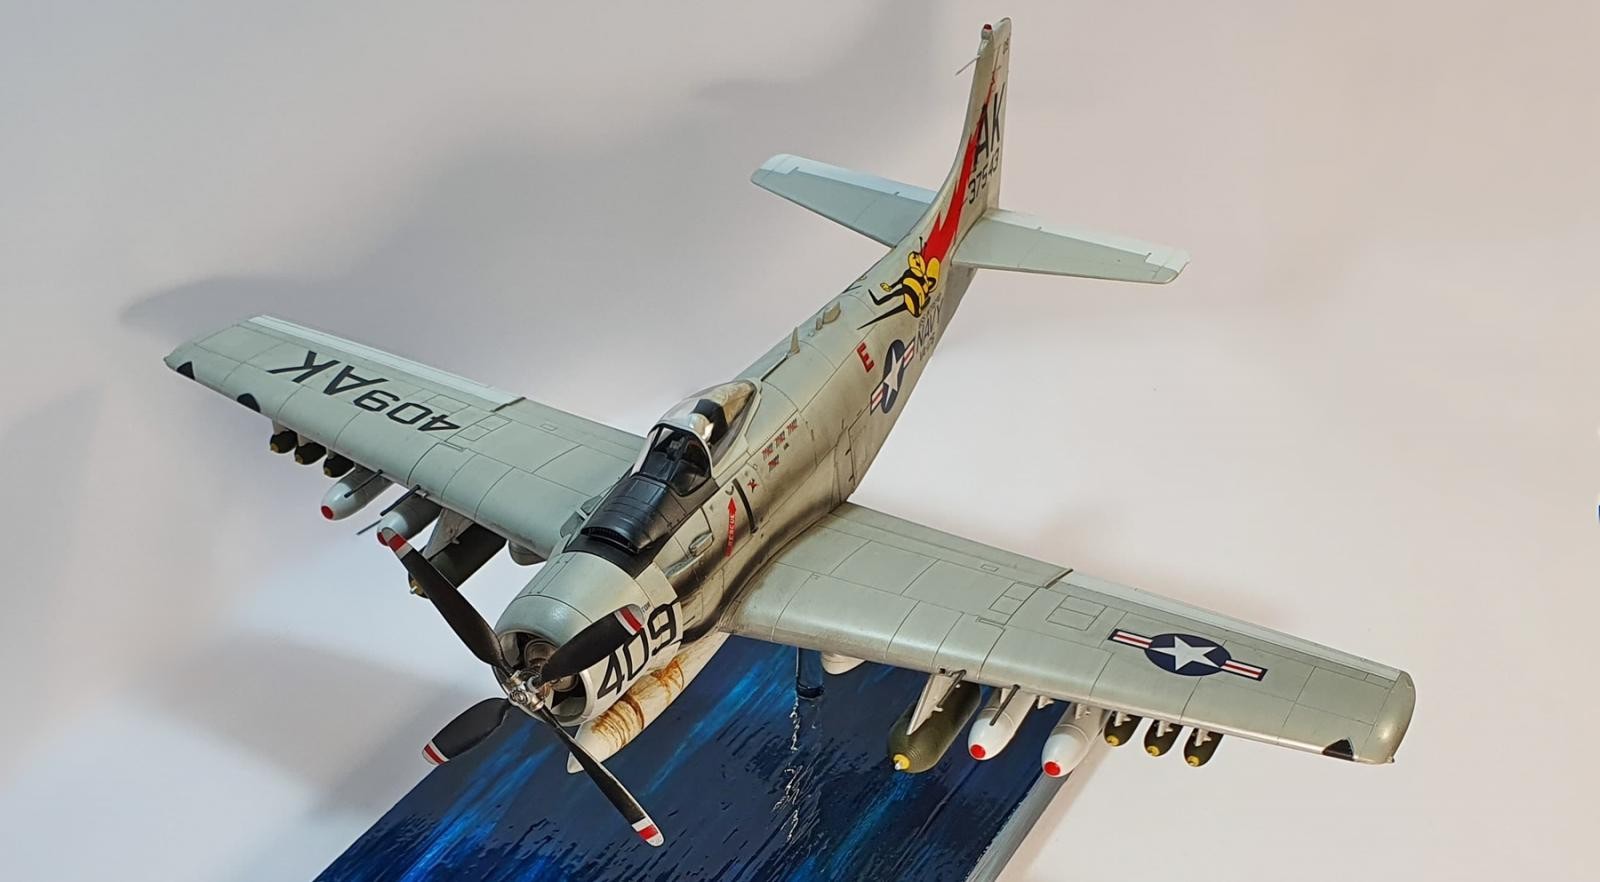
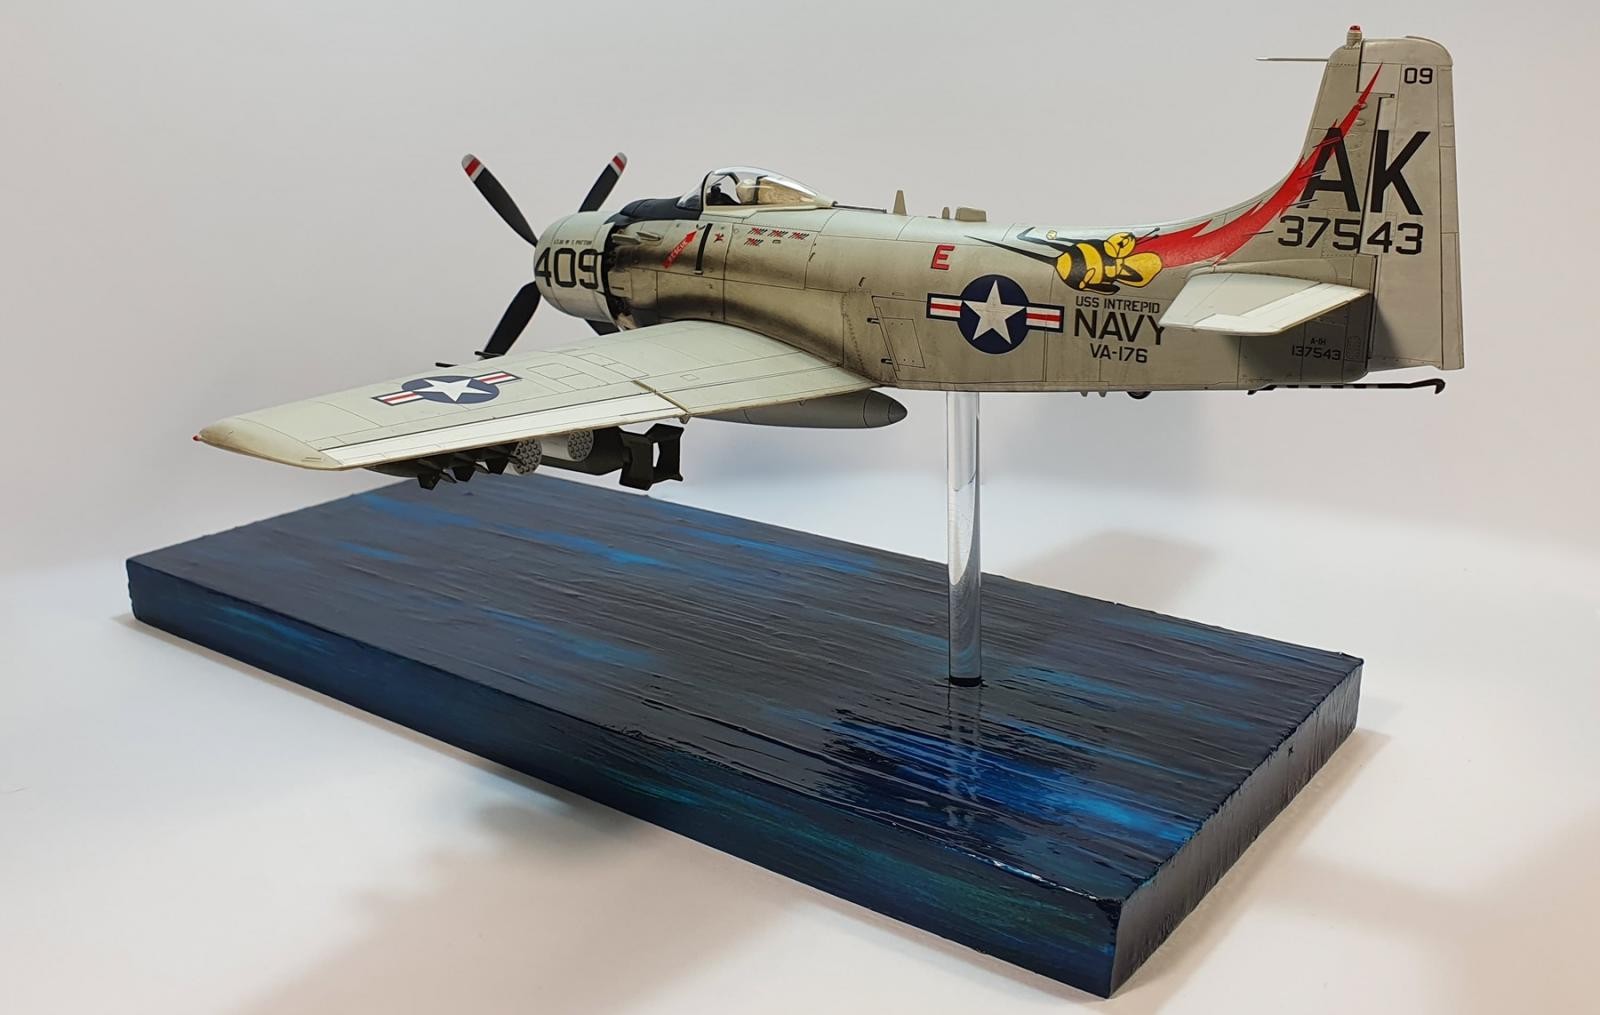
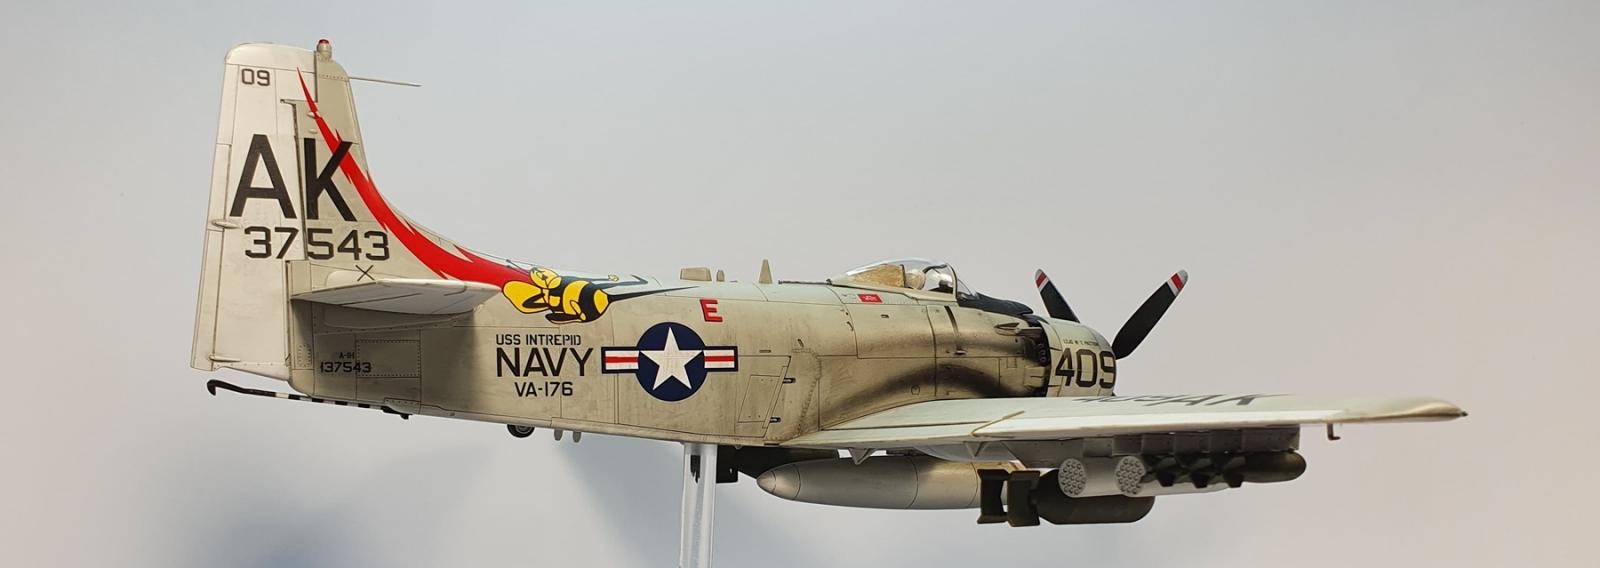
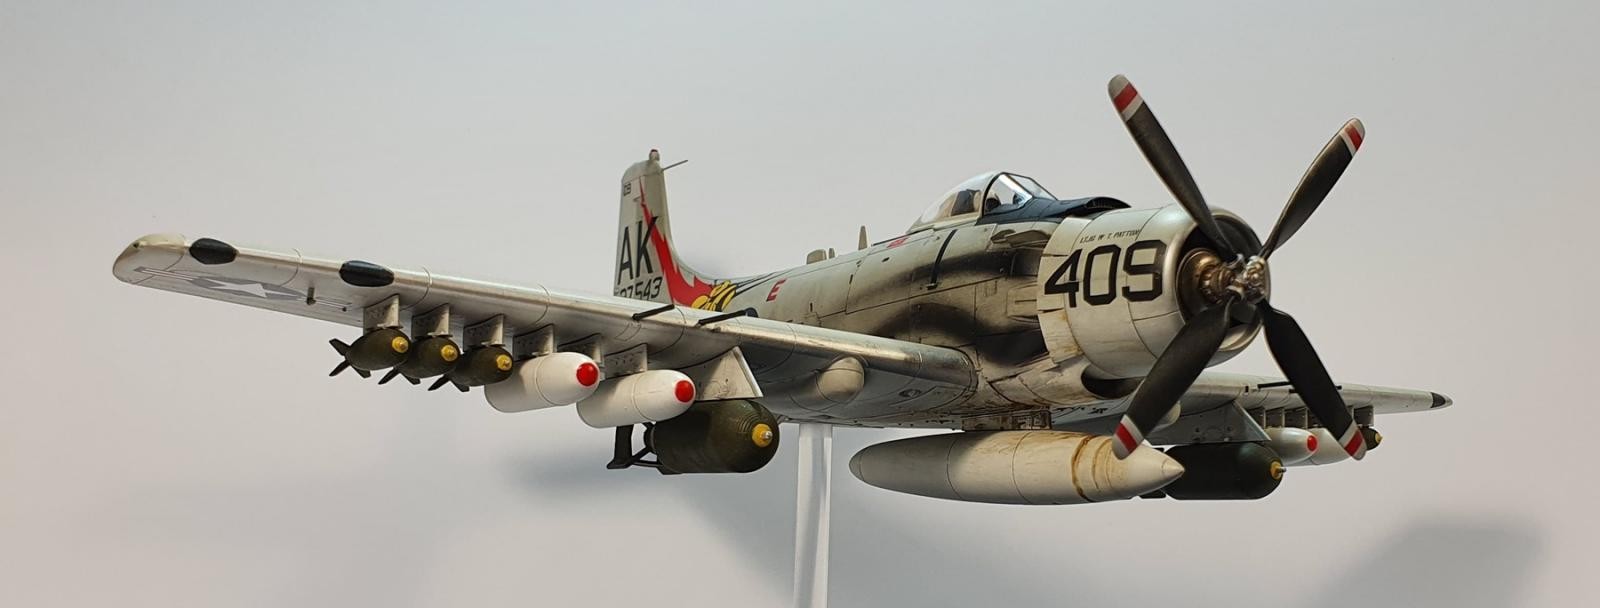
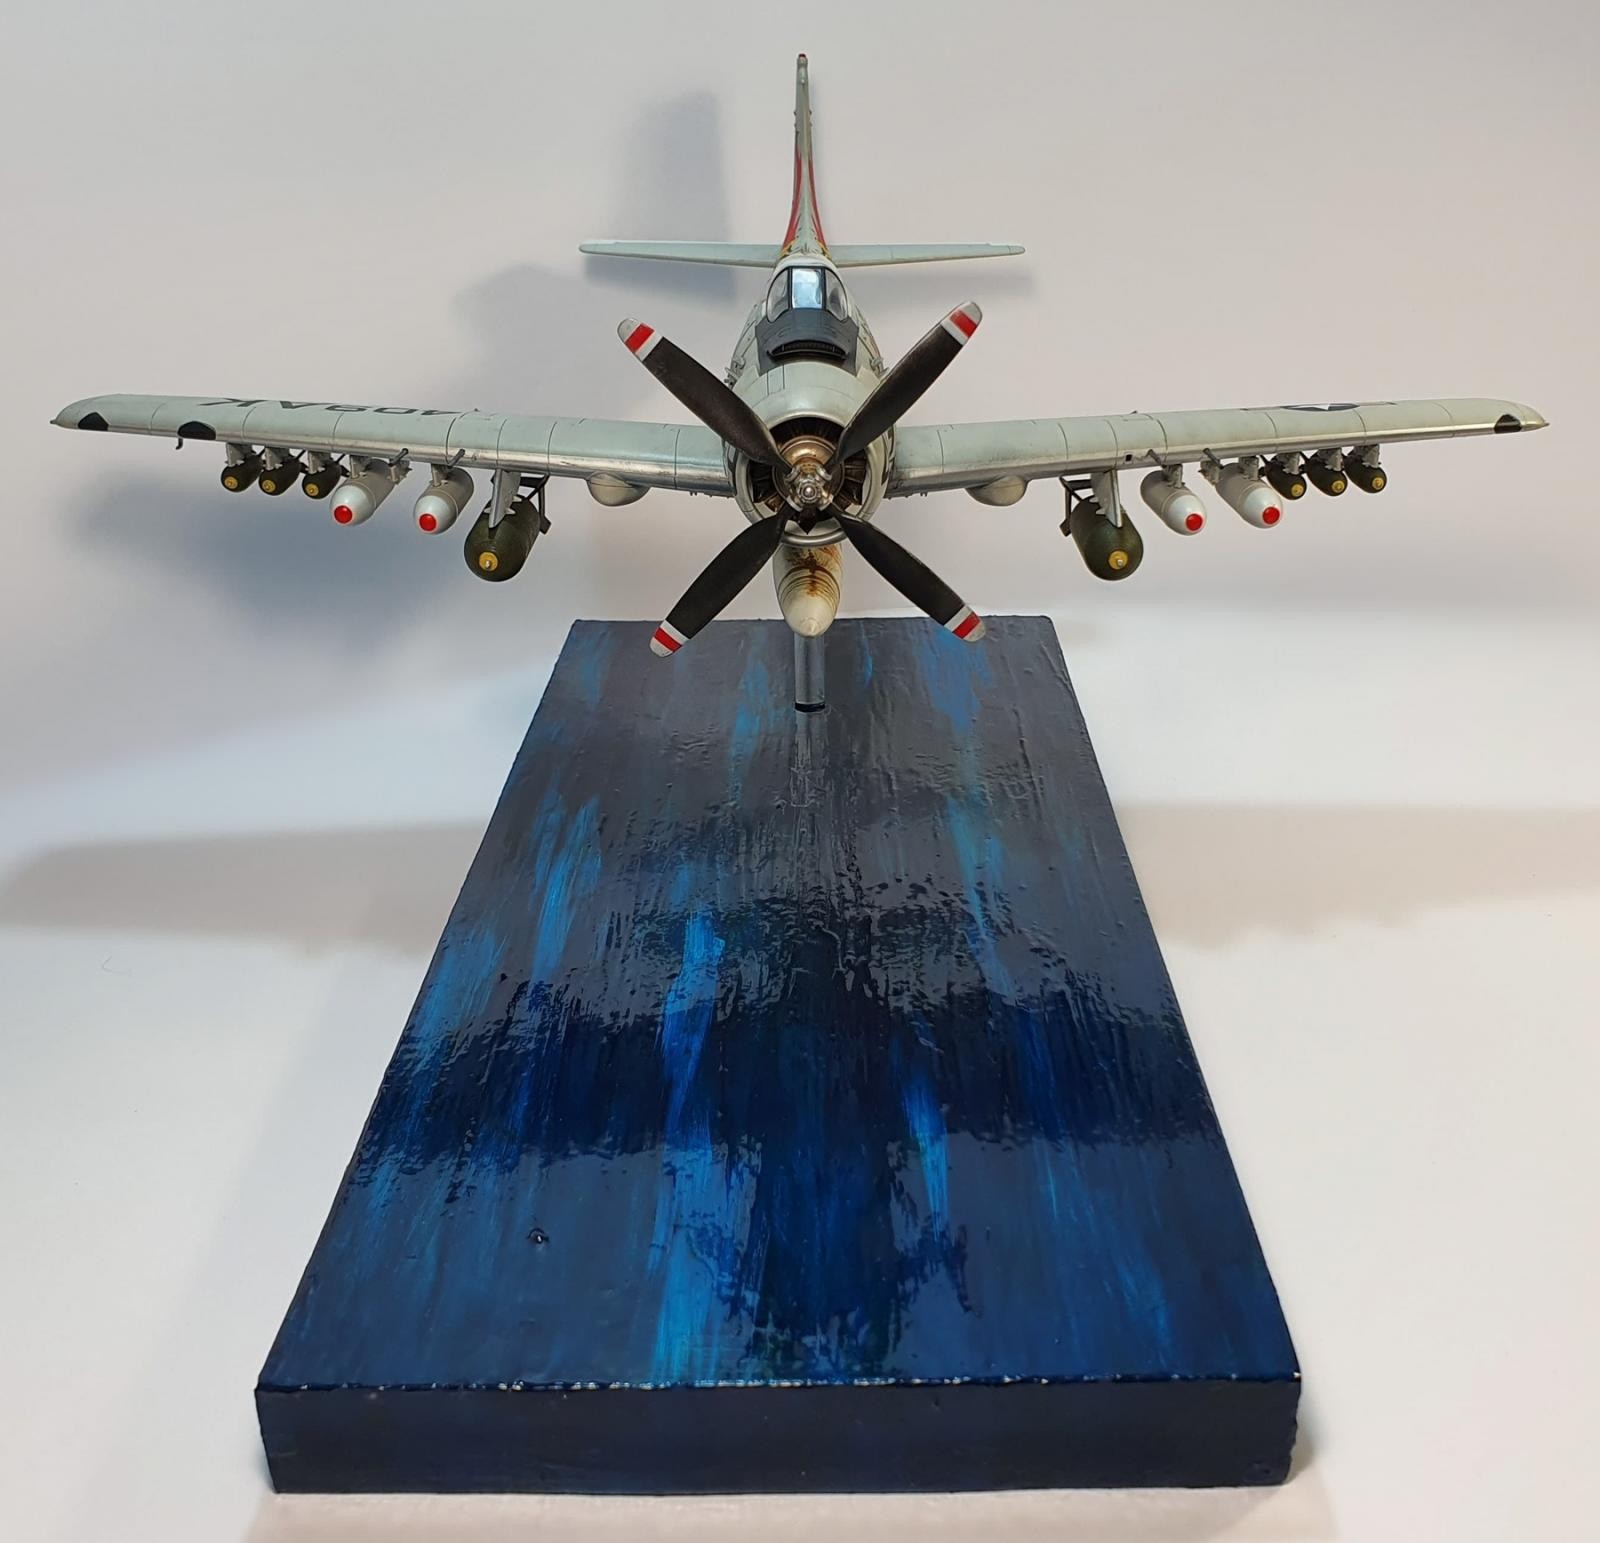
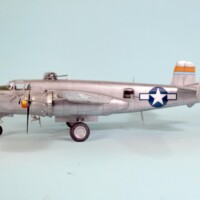
The idea from the start was to do her in the air so she had to be a wheels up kit. Of course the wheel bay doors don't fit so required minor surgery, putty and sanding and some rescribing to neaten up. The tail wheel was also modified to sit in its up position. The bigger deal, for me, was which way to go regards weathering. It's a Skyraider and the exhaust stains are part and parcel, but of course one can do it clean if one wants. Which is the way i was going to go with just some minor staining...but then i had a few quite drinks on a lovely Saturday afternoon outside...and got carried away.
Once i did the exhaust stains i had to do the fuselage sides and then the oil and grottiness underneath to match. I feel like some of it is hit and some other sections are miss but i had to stop dabbling at some stage and go ok, just pull up, clear it and then do some light touch ups where need be.
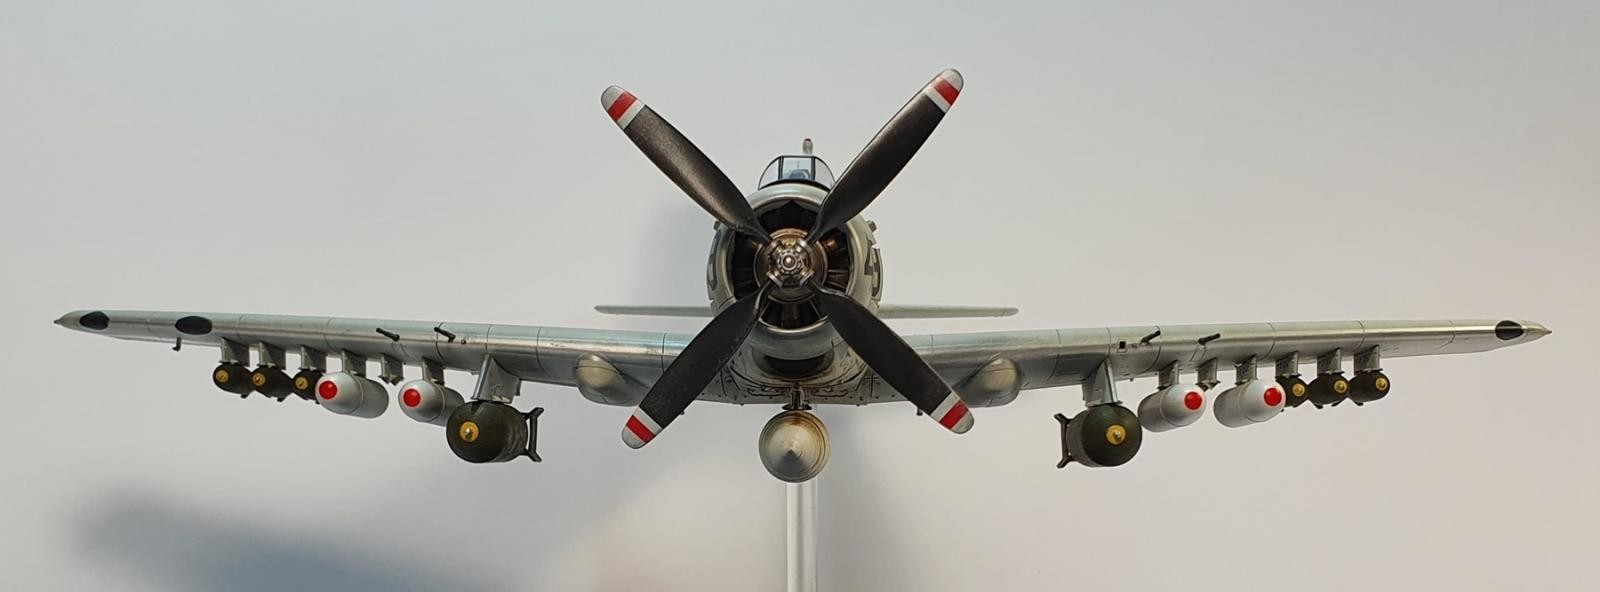
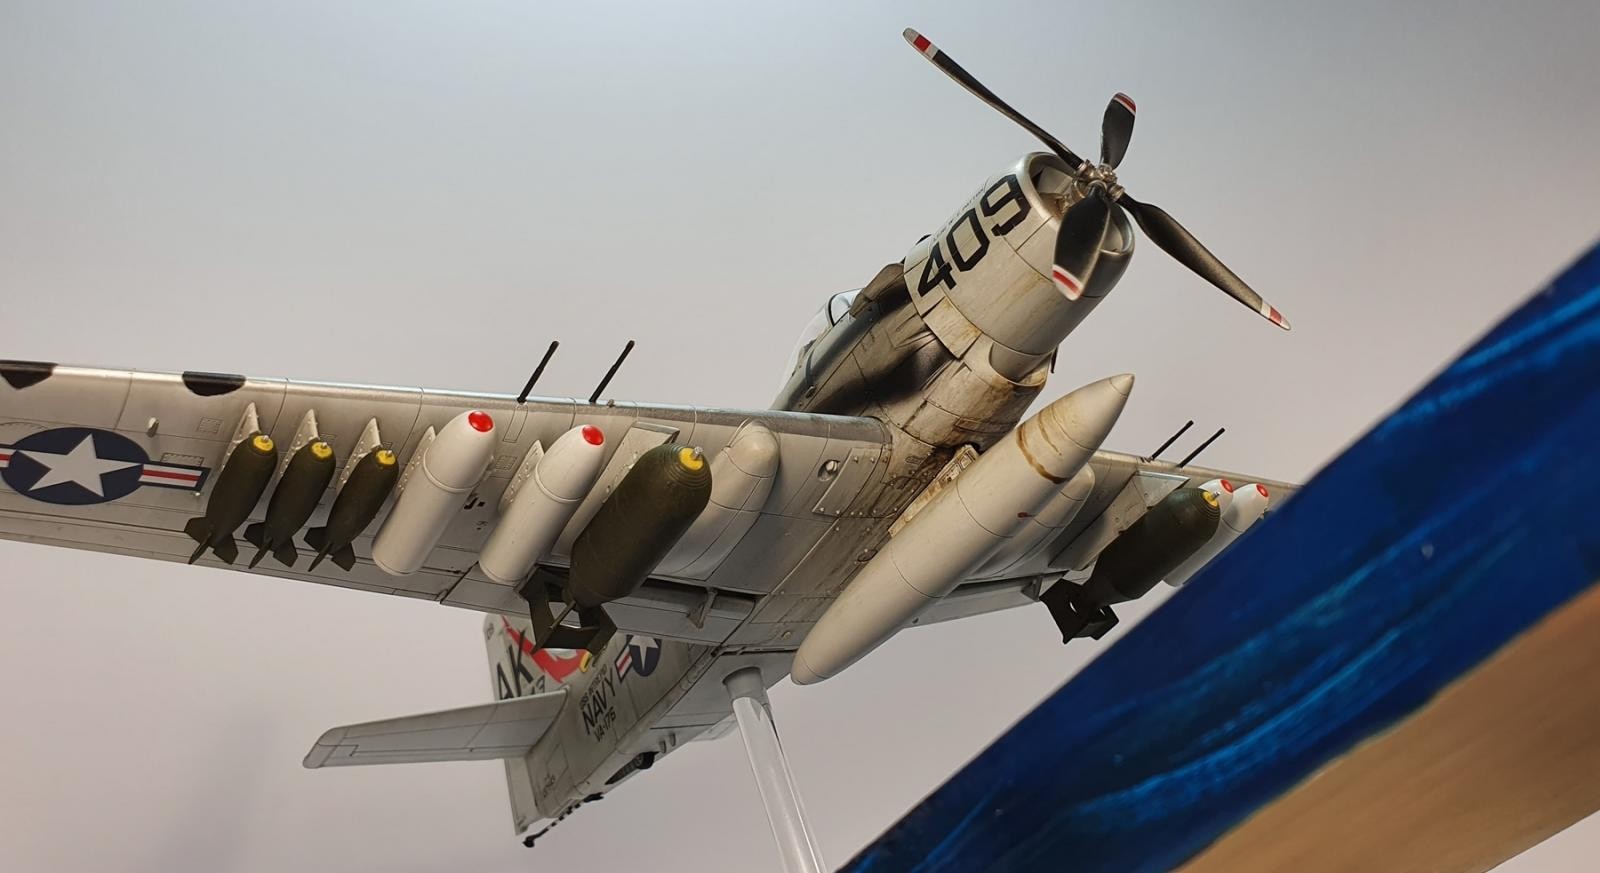
The loadout, i was going to swap the 2k bombs for some 1k versions but wasn't prepared to pay the price for them seperately so after much mixing and matching of bombs, missiles and rocket packs i decided on the what she has hanging under her wings purely on aesthetics. I liked the way the pods separated the bombs, the colours and adding of visual interest. I've also never been much of a missile fan on prop jobs.
The bombs were left over WWII stock and i read somewhere in my internet searching that some were stored strapped to pallettes or similar so i tried to reflect this on the bigger two bombs with some tape work and a really light mix of a ratty brown mix.
The canopy rail section behind the pilots headrest, what i started referring to as 'the iceberg', is a piece i made out of milliput. In one book i have it shows a material covering in much the same shape as what i squished together but is something i could have left off. After some further research i decided to remove it but alas, the two pieces were now one. It is what it us, the 'berg.
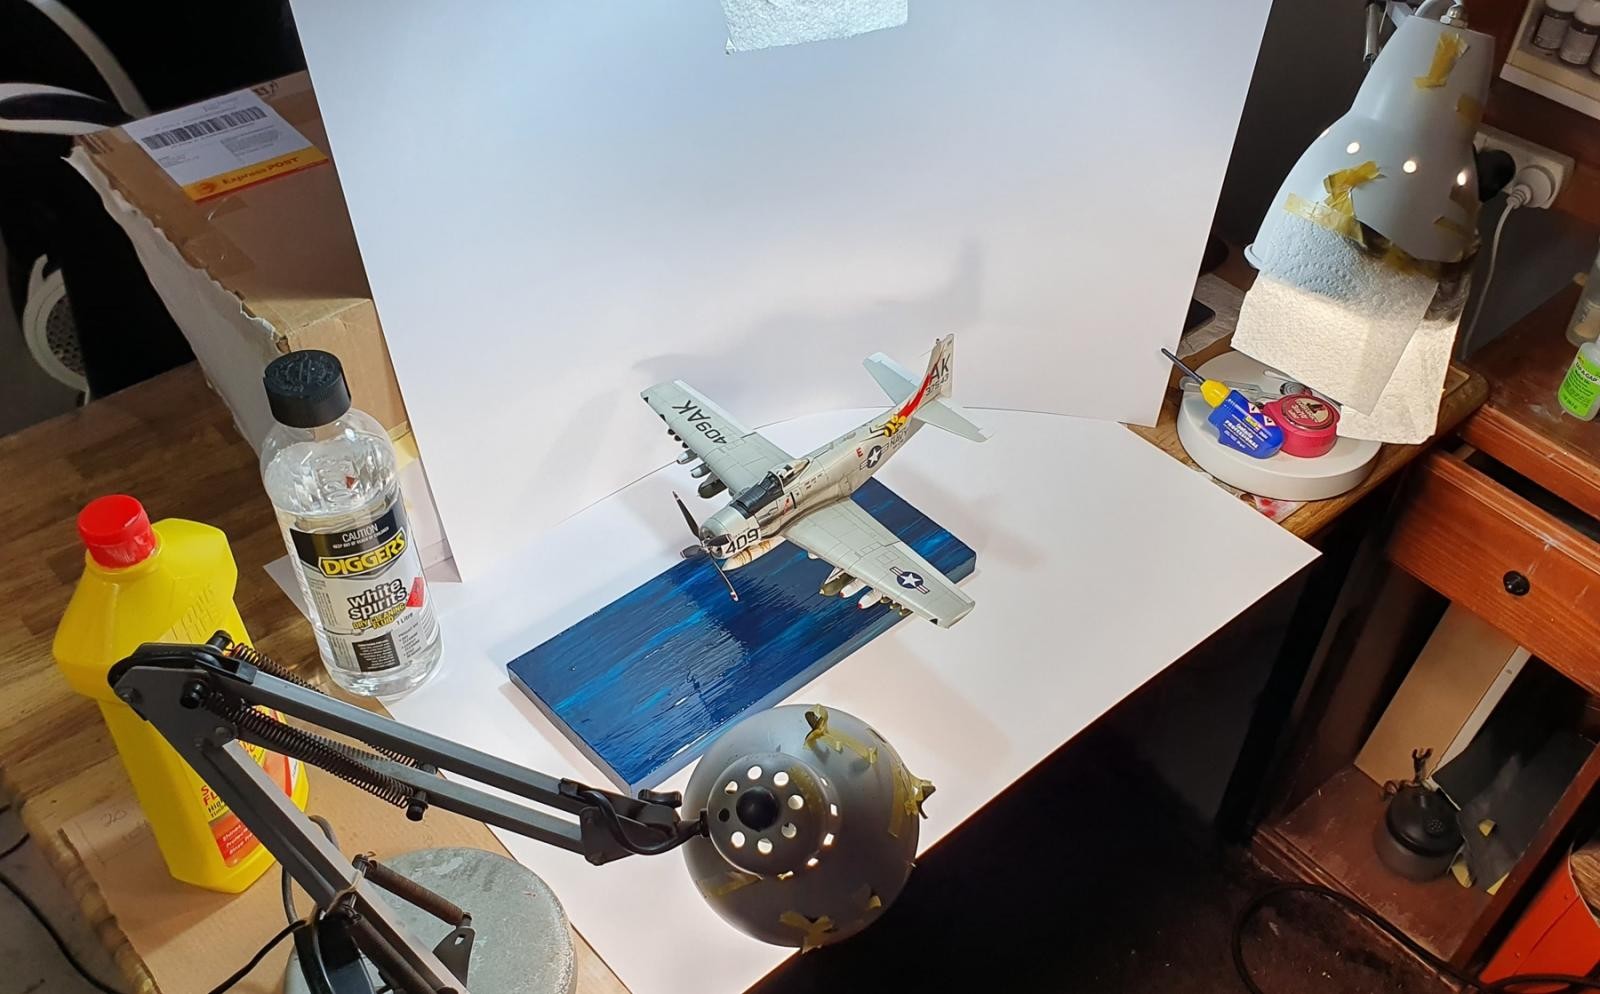
This kit also outgrew my old photo box and required i go back to single sheets of card for her photo shoot, it really is a beast of a plane.
Edit - i just noticed in the pics that one of the pod stations is sitting loose. It felt a tight fit so i left it unglued, doh.


Can't go wrong with a Skyraider. Really like the full side view of it flying close to the surface. Any chance of making a blurred prop disc rather than a frozen prop? Looks a bit like he is going to belly in at any moment...
I did look at a few versions of props but nothing really caught my fancy. It's something i need to look further into.
A clear acetate disc with a few airbrushed blades might do the trick. Have not seen any ready made ones look convincing. 10 minutes worth of hobby time only.
Yeah, I never understood that, you will also see dozens of "Big Beautiful Doll" Mustangs, and thats ok! There are lot's of great paint schemes for the Spad, the Bee is just the most colorful, and iconic.
You replied to the wrong comment but i'm hearing ya Rob 😀
Nice model and nice diorama idea, Jimmy!
Cheers Spiros, i always try snd keep it as basic as i can 🙂
Very cool. I know there's a whole "not the bee" movement in model building, but VA-176 is still the sharpest A-1 scheme, I may choose it for my Trumpy A-1. Nicely done! Support the Bee!
Seems funny, that would be like being against a Molders or Galland 109 lol. I suppose every hobby has its moments. Up the Bee!
Ill second that. Bee cool! Never heard about a whole movement against the stinging bee.
Jimmy @hetstaine, Fantastic job on the kit and the base. I just picked up one of these kits for my stash.
"Liked"
Thanks James, my 'stash' is only two planes deep and i intend to build the next two side by side. I don't want to fall into the trap of buying and not building 🙂 Dare i ask how big your stash is?
Too many. Actually it's about 37 with two in the mail. Need to thin the heard since some of them will probably never get built. When I got back into this a few years ago, I picked up quite a few at a local Craft store where you can get 20 to 40% off of prices with a coupon. Now that I'm more concentrated on certain goals, I don't need a few of them. I actually have 6 dioramas in various planning stages.
Only six huh 😀
This is a great build! Indeed they did use WW2 and Korean vintage bombs, they got then out of storage from the Philippine bases.
Ah i didn't know some came from the Philippines, i'll have to look that up, thanks!
Very cool, good looking in-flight scene!
Thanks Reinhard!
Nice presentation Jimmy, I am in the same mind set when it comes to the prop blur. What I have seen hasn't been to convincing to me as well. But your display looks ok and having the prop not rotating doesn't take anything away from it at all. The subtle weathering, the exhaust stains, oil leaks and grime on the center tank is all Skyraider. You got it. And of course the Bumble Bee markings are always a treat. Thanks for sharing a great model well done.
Cheers Chuck, always appreciatr your words.
This build and display looks great, Jimmy! The photographing must have cost a fortune, given you had to stick some of that expensive and hard-to-find toilet paper to your light! Liked!
Ha! That's my backup paper i keep hidden from the kids 😉
You didn't get "carried away," that's almost enough "grottiness" to be an accurate Skyraider.
Skyraider pilots have told me if it isn't dirty, there's something wrong with the airplane. 🙂
Very nice work on this. I like it a lot.
Thanks Tom. I find i look forward to the weathering side but slways end up a bit unsure if it's not enough or too much and struggle to get that middle ground 🙂
Great work on the Skyraider Jimmy! I gotta say, TLAR in regards to the weathering! Did you use dry pastels for the exhaust streaks? I have this kit in process myself!
I sprayed the main shape of it with a vallejo black/brown mix then used some Tamiya weathering compound, soot, to fluff it out a bit. Oil paint after clearing and then just played around with cotton buds and white spirits and some more oil. After the final matte finish she got a last light coat of the Tamiya soot.
I find the Tamiya compound is nice for exhaust stains as you can use the rust colour with the black to get some nice variation. It also looks 'exhausty', nice and sooty.
It all looked rather boring before the oils and compound work 🙂
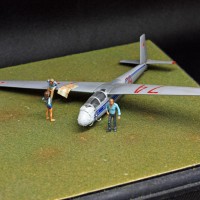
2 attached images. Click to enlarge.
Thanks for the details. Normally I build my kits as warbirds. Nice paint, but slight exhaust and oils stains to show use. Thing is, there is nothing slight about the Skyraider. They just get grimy!
It seems we also share another interest, cool old muscle cars. Love the Hornet man, sweet little hatch! I've owned a similar machine but an Aussie take on the muscle car hatch. Have you ever heard of a Torana? Look up A9X Hatchback, although that was the homologated for racing purpose version the standard V8 SS hatches were a lovely tough little streeter in their own right. Cheers mate.
Excellent looking Spad Jimmy and nice pics as well. You might want to look up the story where two Spads were jumped by a Mig-15 over Vietnam and they were able to shoot it down. Seems the Mig couldn't turn as tight as the Spad.
Thanks Tom. I read that as well as few more stories and watched a couple of docs as well. She truely was one of those planes that earned its place in the jet era 🙂
That's a real beauty! Love the weathering - really looks accurate to me. And I love aircraft in-flight mounted (only way I build them), so kudos!