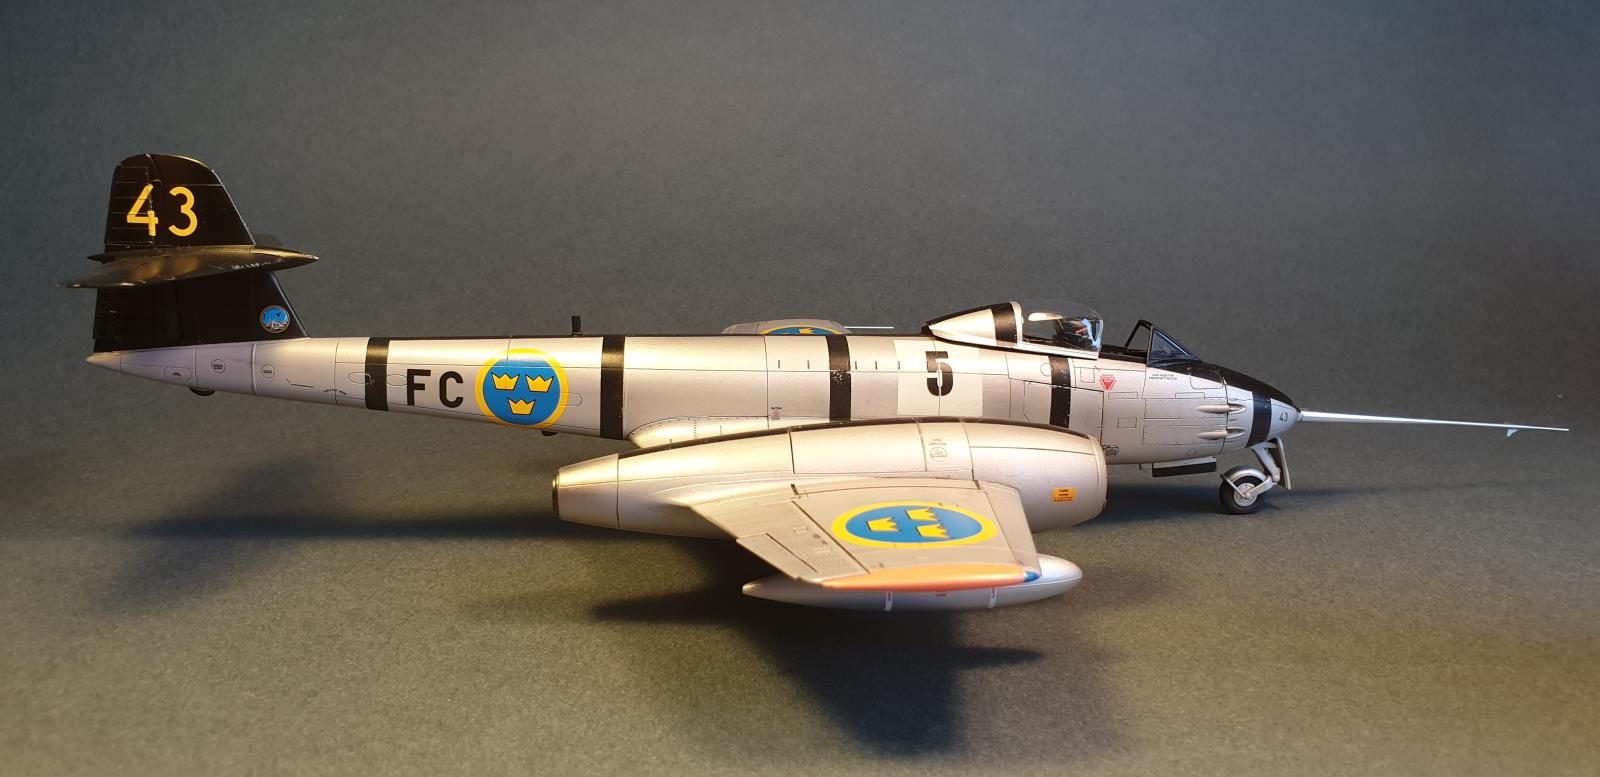
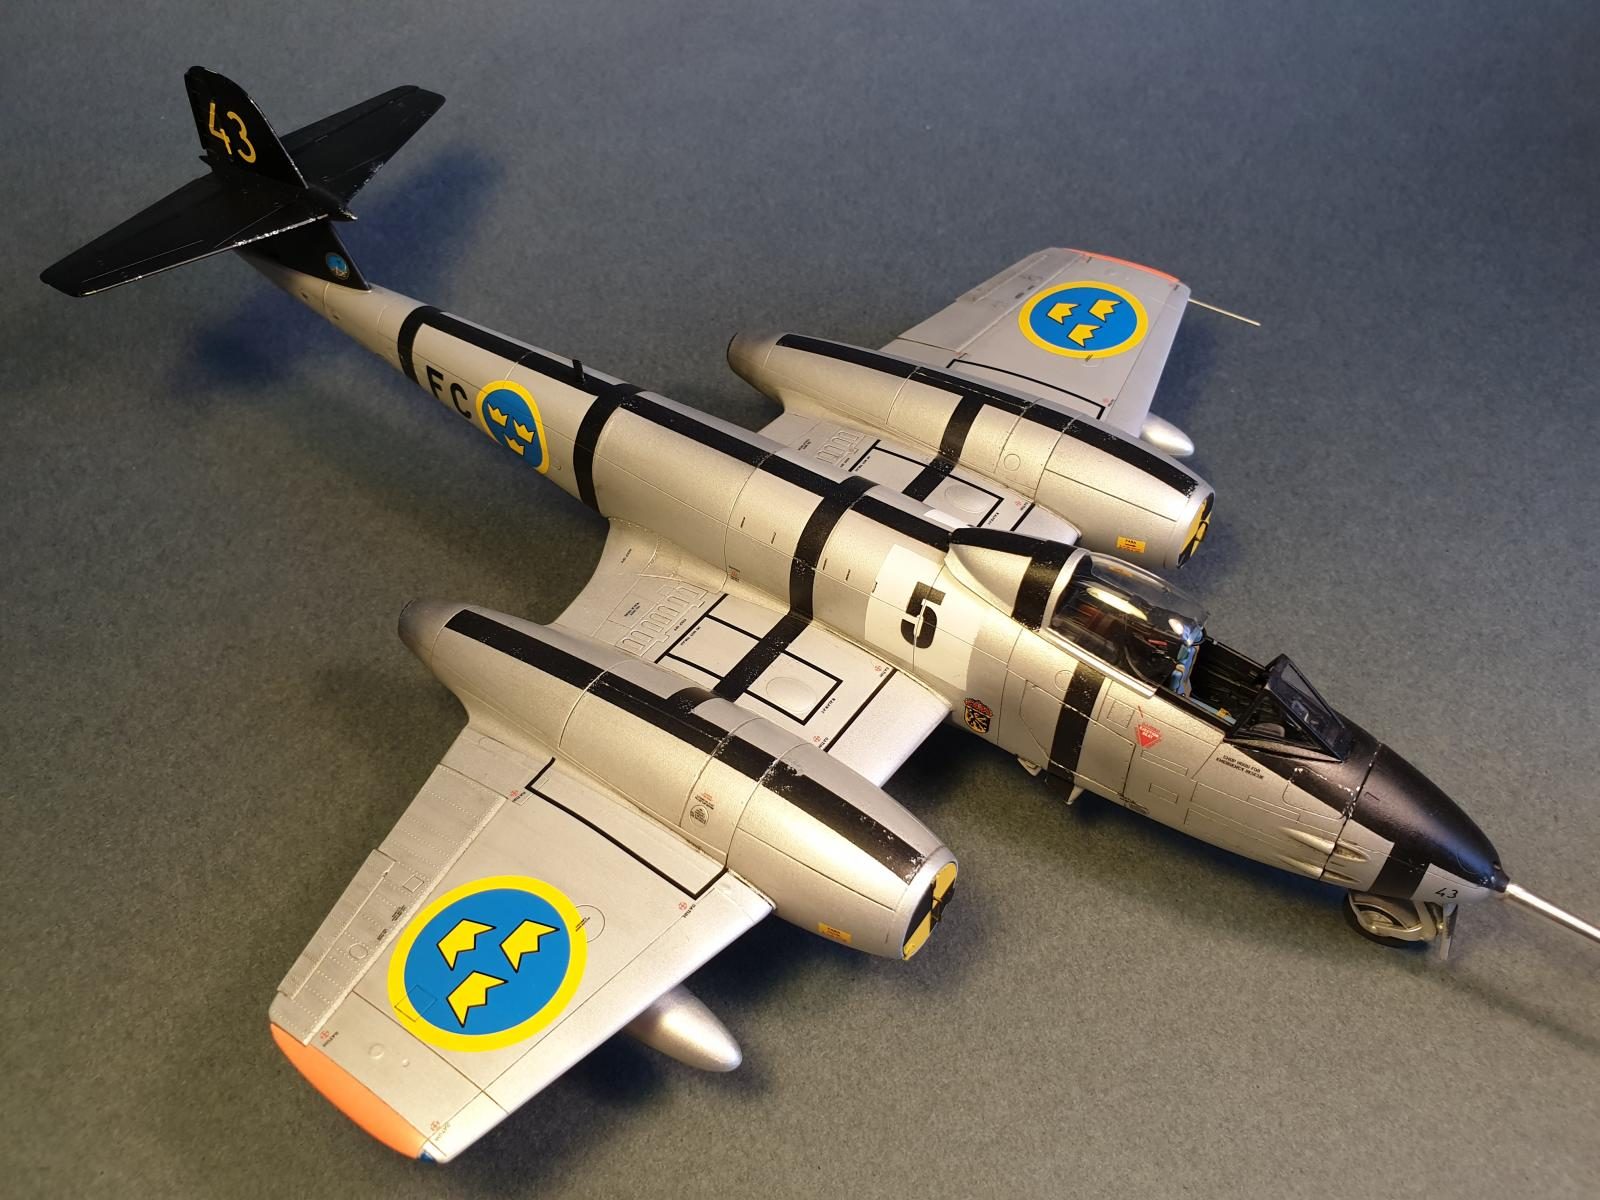
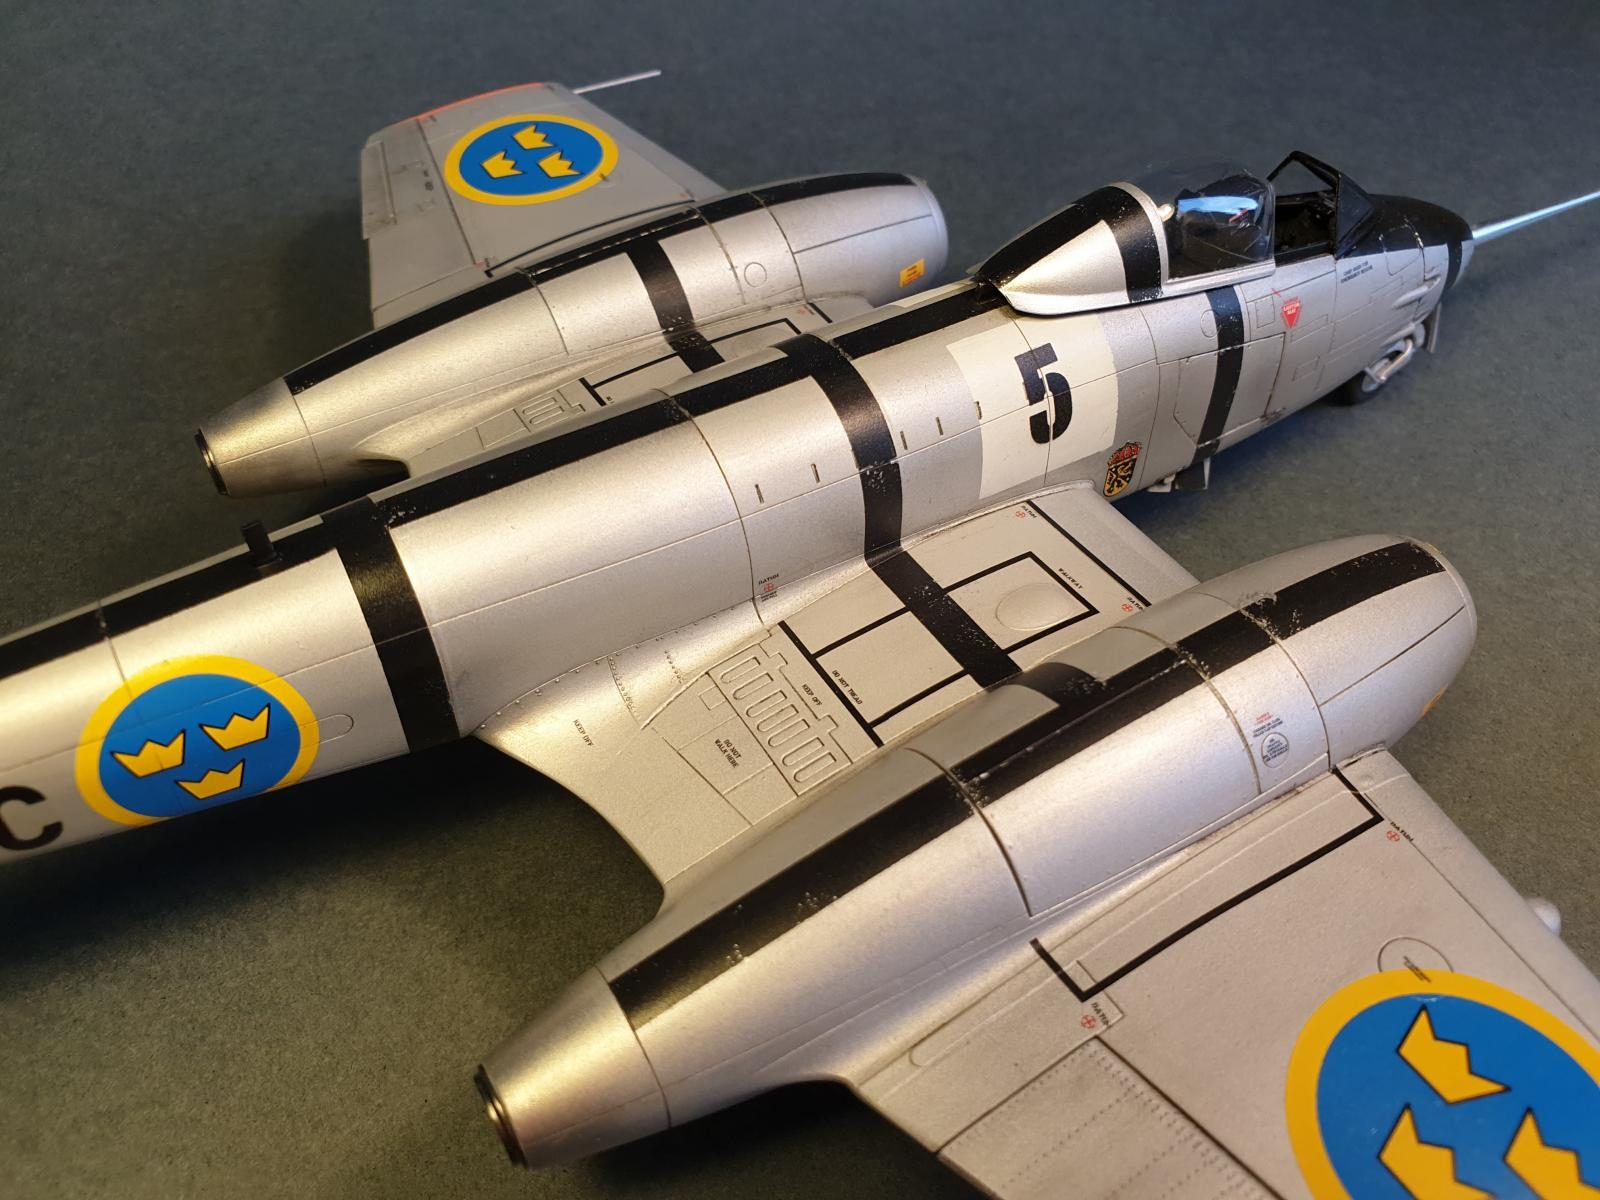
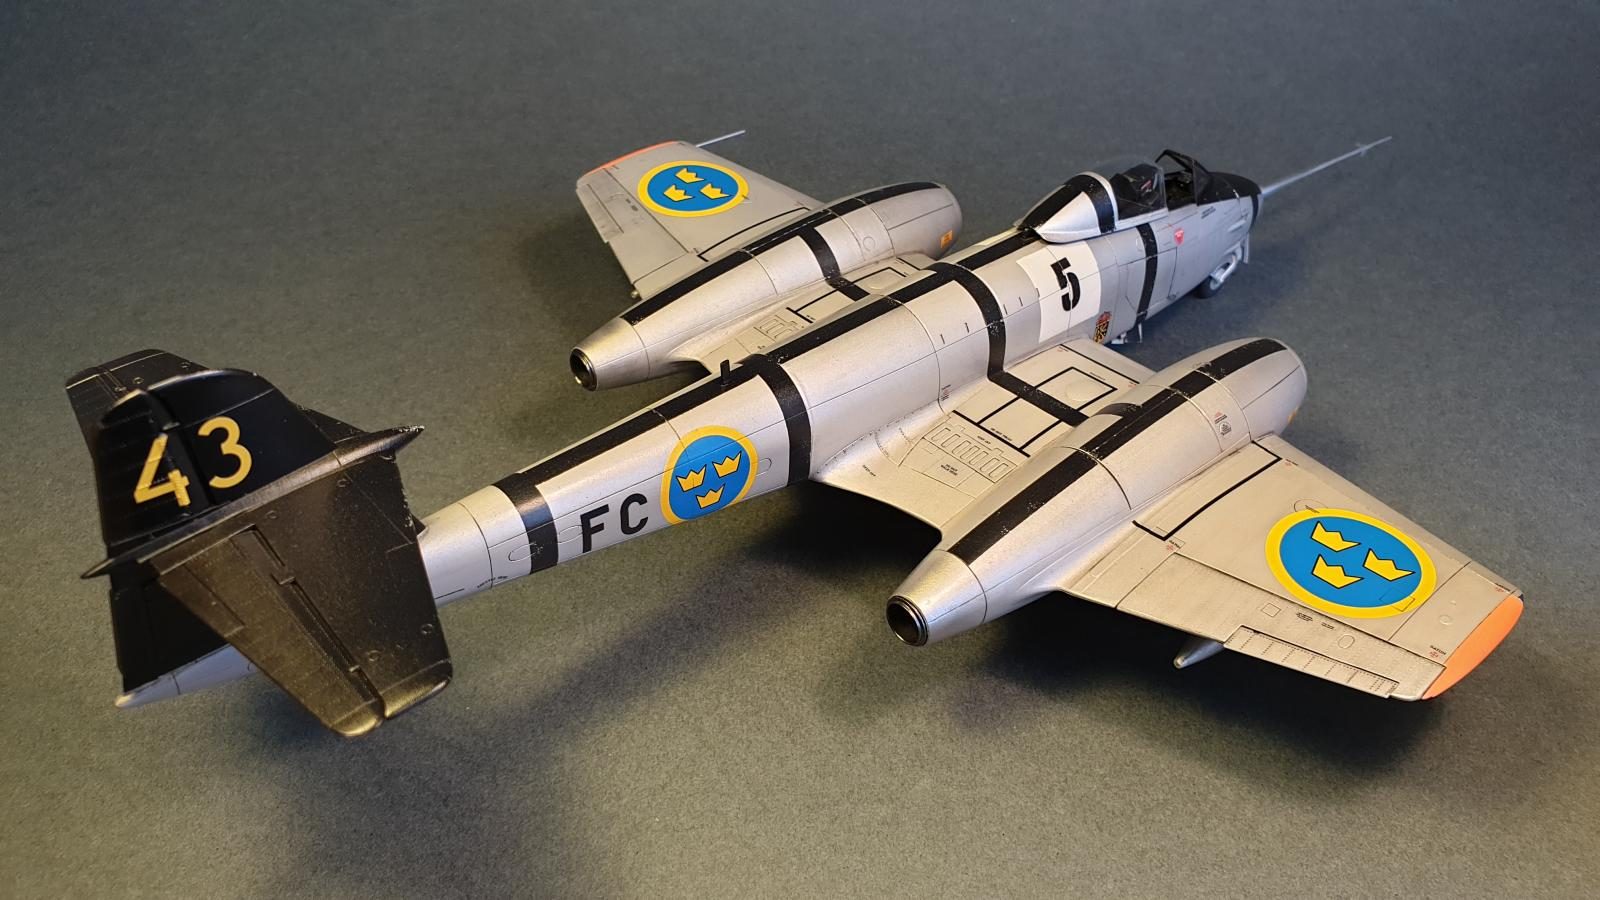
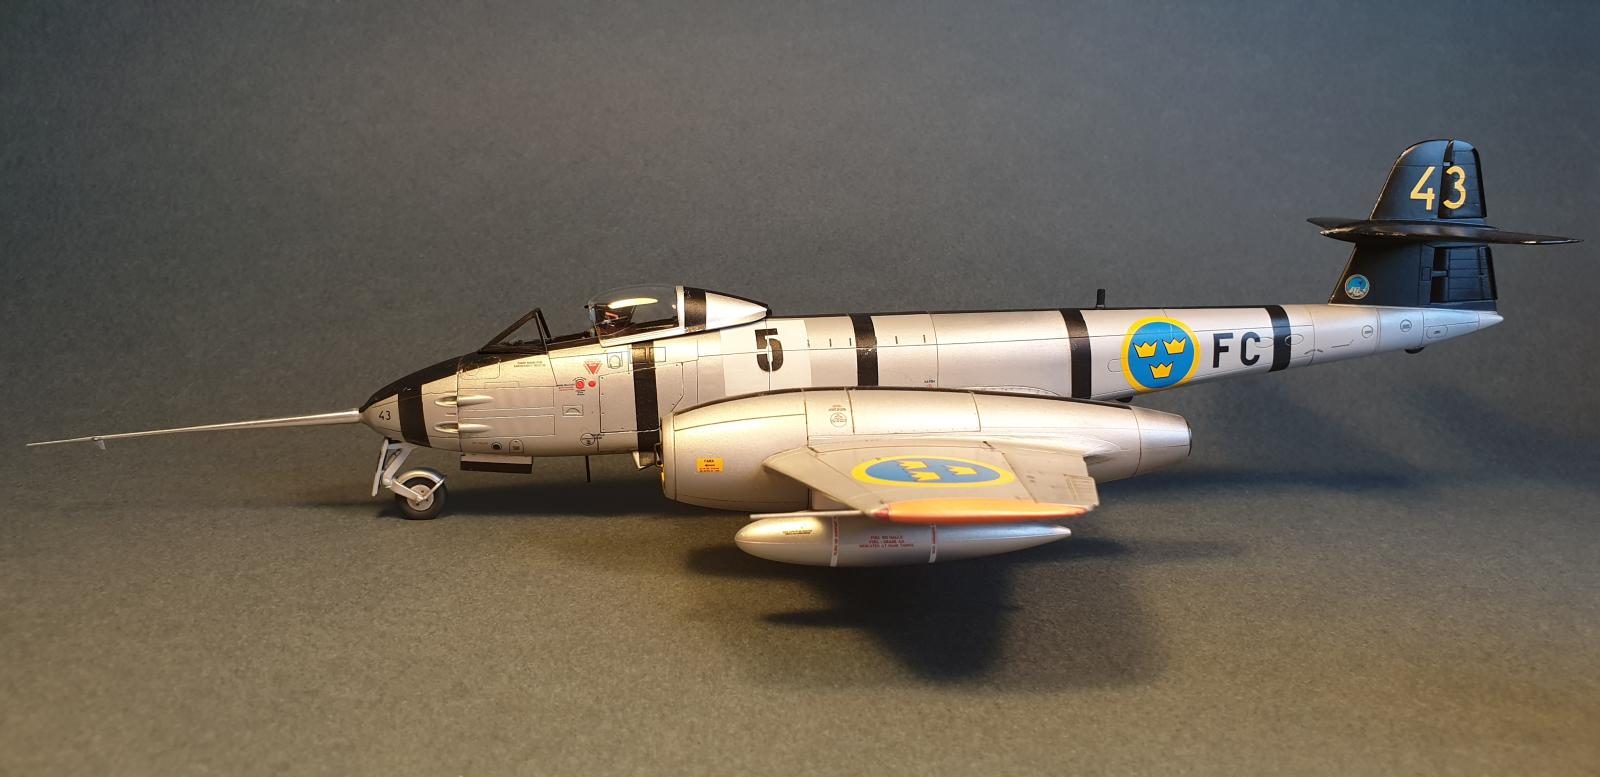
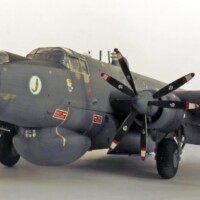
Gloster Meteor F.8 at Försökscentralen
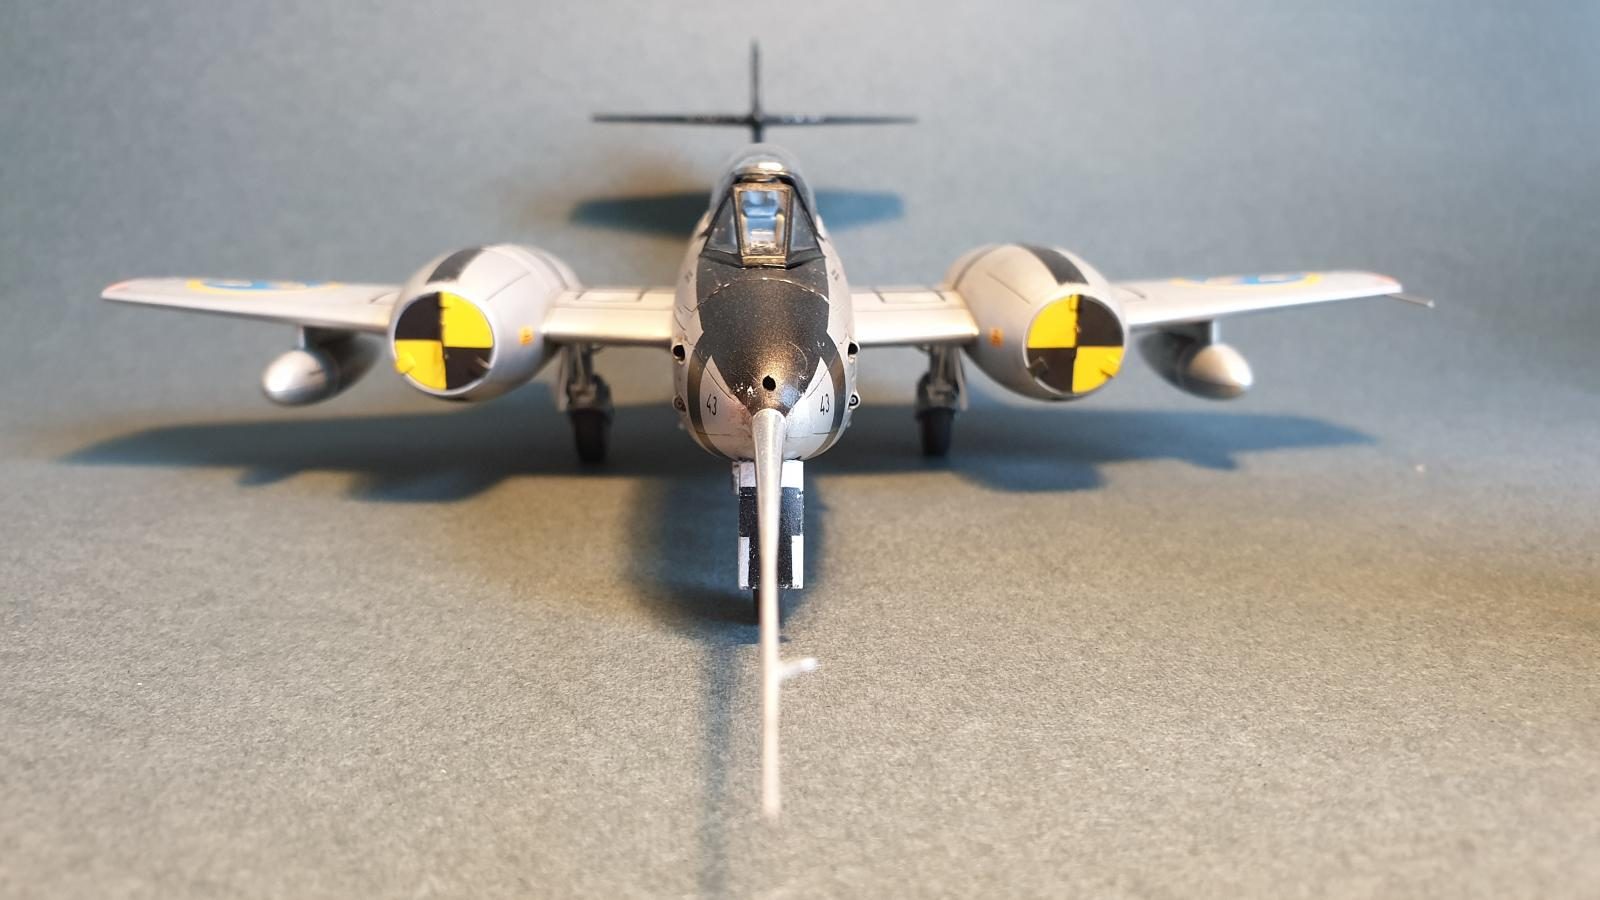
The Försökscentralen (Test & Evaluation squadron) is a lesser known part of the Swedish air force. It tests flying materiel, tactics and equipment. Although it probably got less money in the budge than Pentagon use for paperclips in a year, it seems to perform wonders. Usually it use quite normal aircraft but every now and then a machine from outside the normal air force inventory finds its way into the operations. This model would be a try to imagine the classic Meteor F.8 in Swedish service, it never flew with crown marks on its wings.
The Airfix 1/48 scale Meteor F.8 has been on the market for a few years and a fair number have been built. Some in a pain free fashion and with great results. Others have come to this world under more or less hard work. My Meteor took some effort and had a year or two on the shelf before I actually decided to not be let down by some issues. While most of the build was relatively care free I bumped into some less fantastic moments. The rear wing root sections are separate and didn´t fit too well and created a bit of a gap to the actual wing. The bits fitted nice to the body but took a bit of putty to close a bad gap which ruined all rivets as they had to go while sanding. Also, the front and its intricate "scaffolding" holding the nose gear must be test fitted, fitted and tested again and again to really fit. I managed to carve and snip and get things look sort of OK in the end. Then one has to get the nose cone to fit AND also make sure the front door get in the right position. Well, didn´t happen and I had to take some drastic measures... The hatches to the guns on the sides also didn´t fit 100 % alright. All could of course have to do with me...or was it that this was one of the dreaded boxes from India? The long test probe in the nose is from Maestro and actually for Saab 32 Lansen. The Airfix decals performed flawlessly, a very positive experience, and literally looks painted on since the clear film just disapears with some setting solutions. Just watch out as they are extremely thin and have a habit to fold over itself. To add some colour and hide the empty engine nacelles I scratched FOD covers in PC.
Anyway, after a long time on the shelf I decided to pick it back up on my desk and have a go at it, if for no other reason than have a good paint session to try out a few techniques. In the end I´m happy I never gave it up for dead and gone.
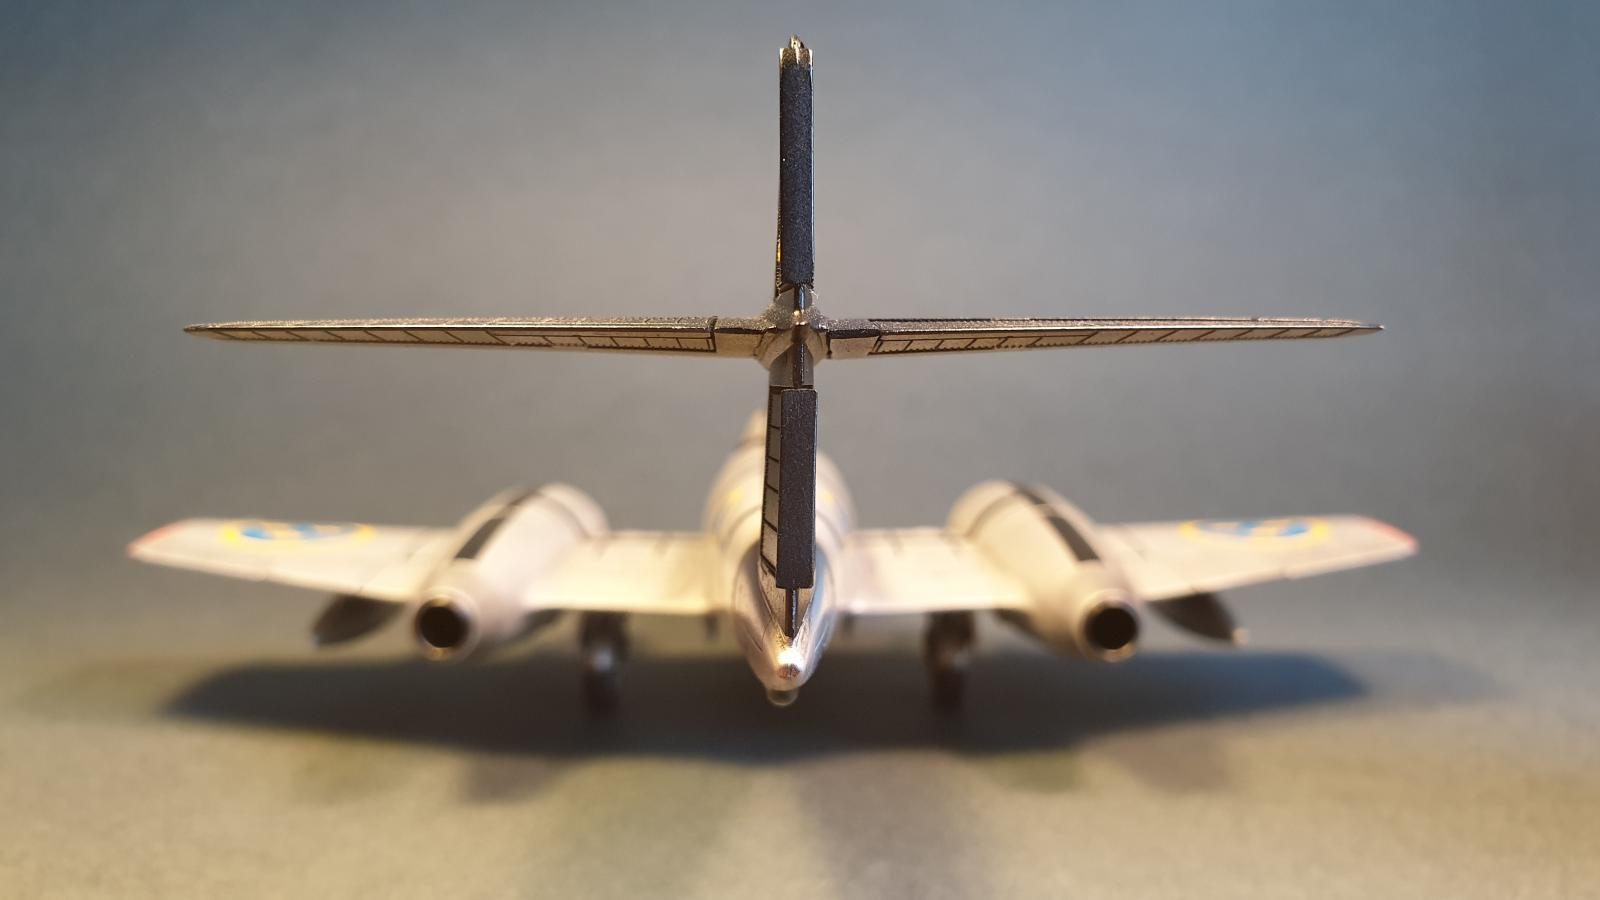
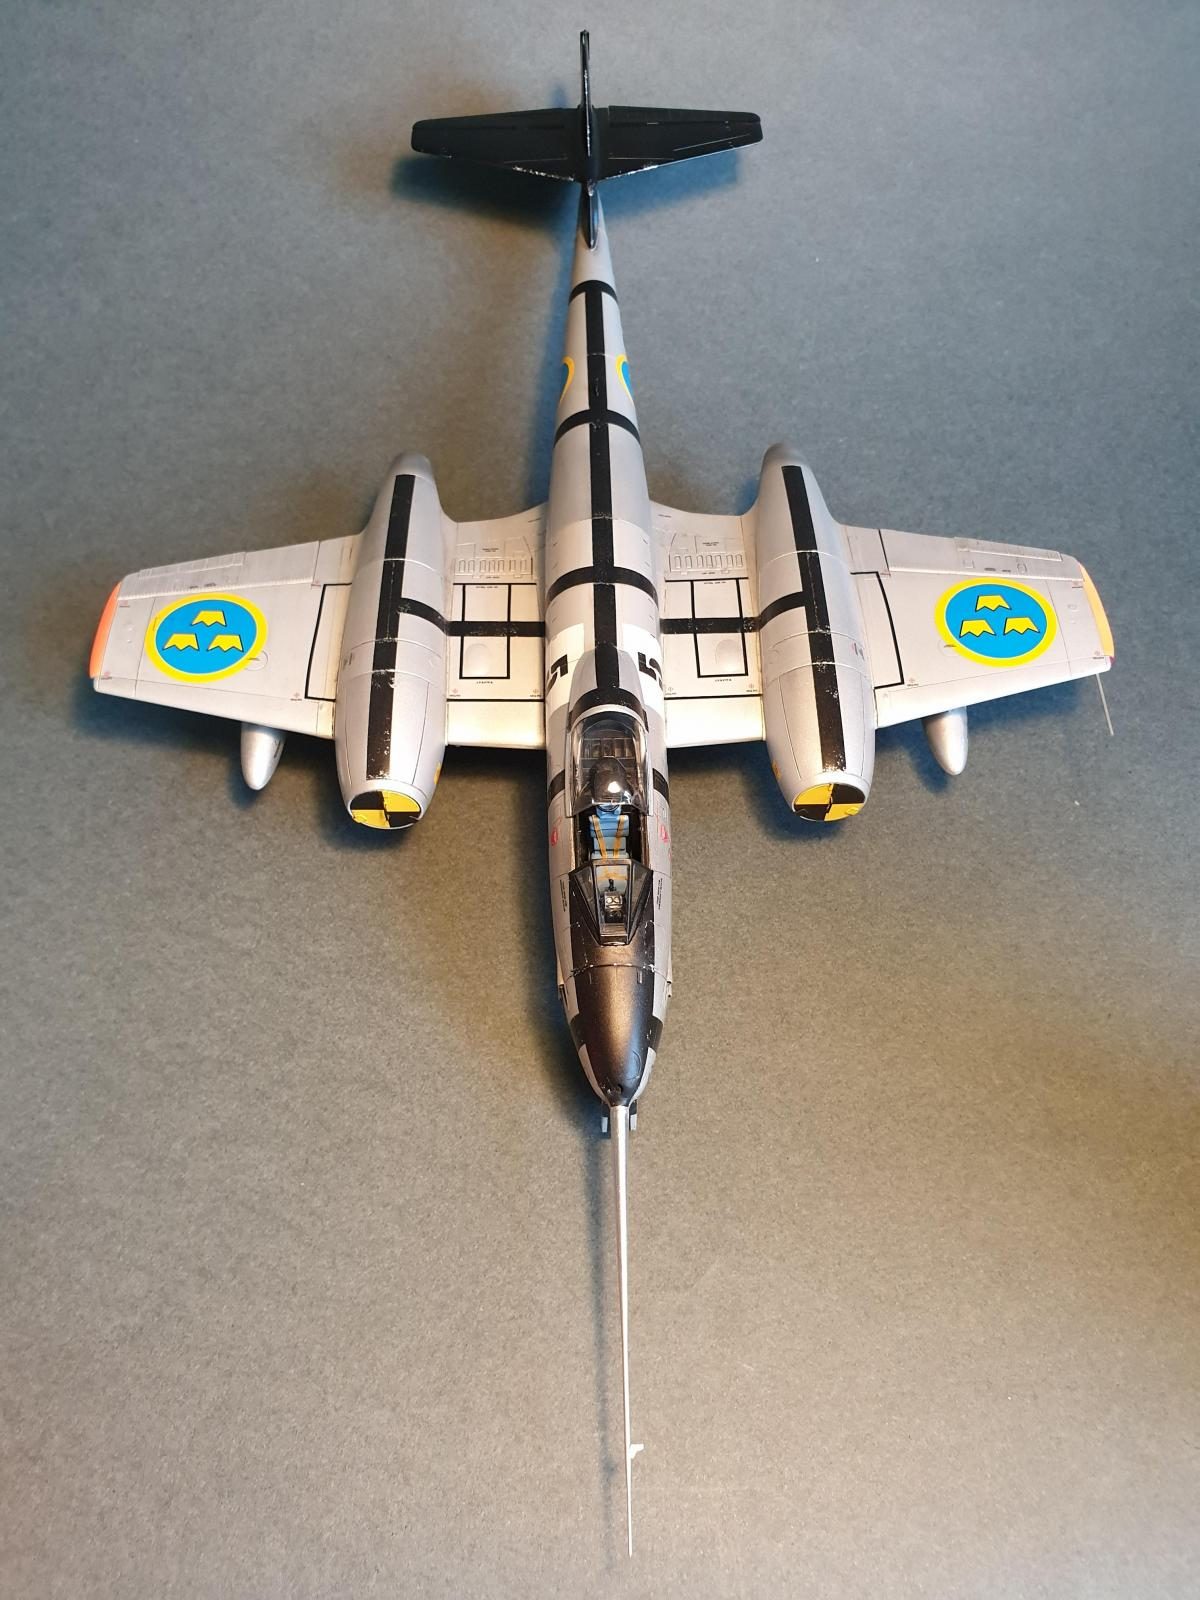
Paints were Vallejo metal colors and Vallejo model air. The black design was painted and masked in a negative way; black paint was shot over primer base then masked the proper width with tape. I then gave the entire model a good cover with aluminium shades before sealing it all with floor polish before decalling and weathering with old school oils. Decals were from Flying colors, Red bolt and Moose republic, all Swedish designed.


Great work on this. Looks like an "ought to have been." Thanks for the persistence.
For everyone else building one of these kits: DO NOT attach the rear wing fairing to the fuselage sub-assembly. Attach it to the wing and get the fit right there. It is much easier to get the fit right with the fuselage there when you mate the two sub-assemblies (said from experience of building four of these),
Hi Tom, thanks for your nice comment. Going the other way around would probably have eased a few moments for me, great idea to consider.
What an excellent built, Stellan, of a not so easy kit...
I loved the idea behind this project: a "what if" very close to reality.
Thanks, Spiros. Funny how Airfix put in a few old school "functions" like engine and gun hatches. Feels very old school. I think Airfix should focus on buildability before adding things they clearly do not master yet. Oh how easy it would have been to build if it was issued by Tamiya.
Very nice looking model. I built one long ago, but never posted any photos. My memory bank must have said it was a very nice & easy model to build. Cheer's BRO for such nice model and photos. Rodney Williams.
Thanks, Rodney. Really appreciate your words.
A clean beauty. Very impressive!
Now you make me blush, Tom. Thanks!
🙂 ... Greetings ... 🙂 :
Very nice different yet graceful appearance to this Meteor.
This is truly a nice clean sharp work you performed Stellan.
Appreciate your comment a lot, thanks!
Wonderful model Stellan. I’ll try your negative paint technique on my next striped models. What kind of Primer do you use ?
I get bad results with the Mig acrylics and looking a better Base coat.
Thank you.
Thanks, Bernard!
I used Tamiya´s Grey surface primer for this one. I usually use the grey or white and occasionally Games Workshop´s Chaos black primer, it all depends on what effects I want in the end. They stick like hell to the surface and really give a good grip for next layers.
What a fantastic build, Stellan. @stellan
I really like this unusual scheme. Very impressive.
Out of curiosity, which aluminum paint did you use?
Thanks, John. I used Vallejo´s acrylic metal color range of paints. Usually I add a bit of white or light grey to take the shine out of it and make it look like oxidized aluminium. Once you got floor polish and weathering on it looks perfect. Most combat type aircraft in Swedish service used to have a slightly grayish look. Just take a look at NMF J 29 Tunnan, J 32 Lansen, J 35 Draken and AJ 37 Viggen, they all look a bit grayish.
There is a story on how proud mechanics in the RSwAF polished the new J 26 Mustangs (P-51D) in 1945. It didn´t take long for the pilots to complain how they were blinded by the glare and told the mechanics to stop polish their mounts.
That is a fantastic scheme on this early jet! Really makes an eye-catching model, whether "what-if" or not! You're paint work and the subtle weathering are great.
Hi Greg, thanks for your comment. Good to know you like it. Eye-catchieness was the whole idea behind the scheme. I wanted to depict an aircraft in the test business and wanted something cameras and such could easily focus on and use the grid for measuring distance and angles.