Come on! Share your disasters.
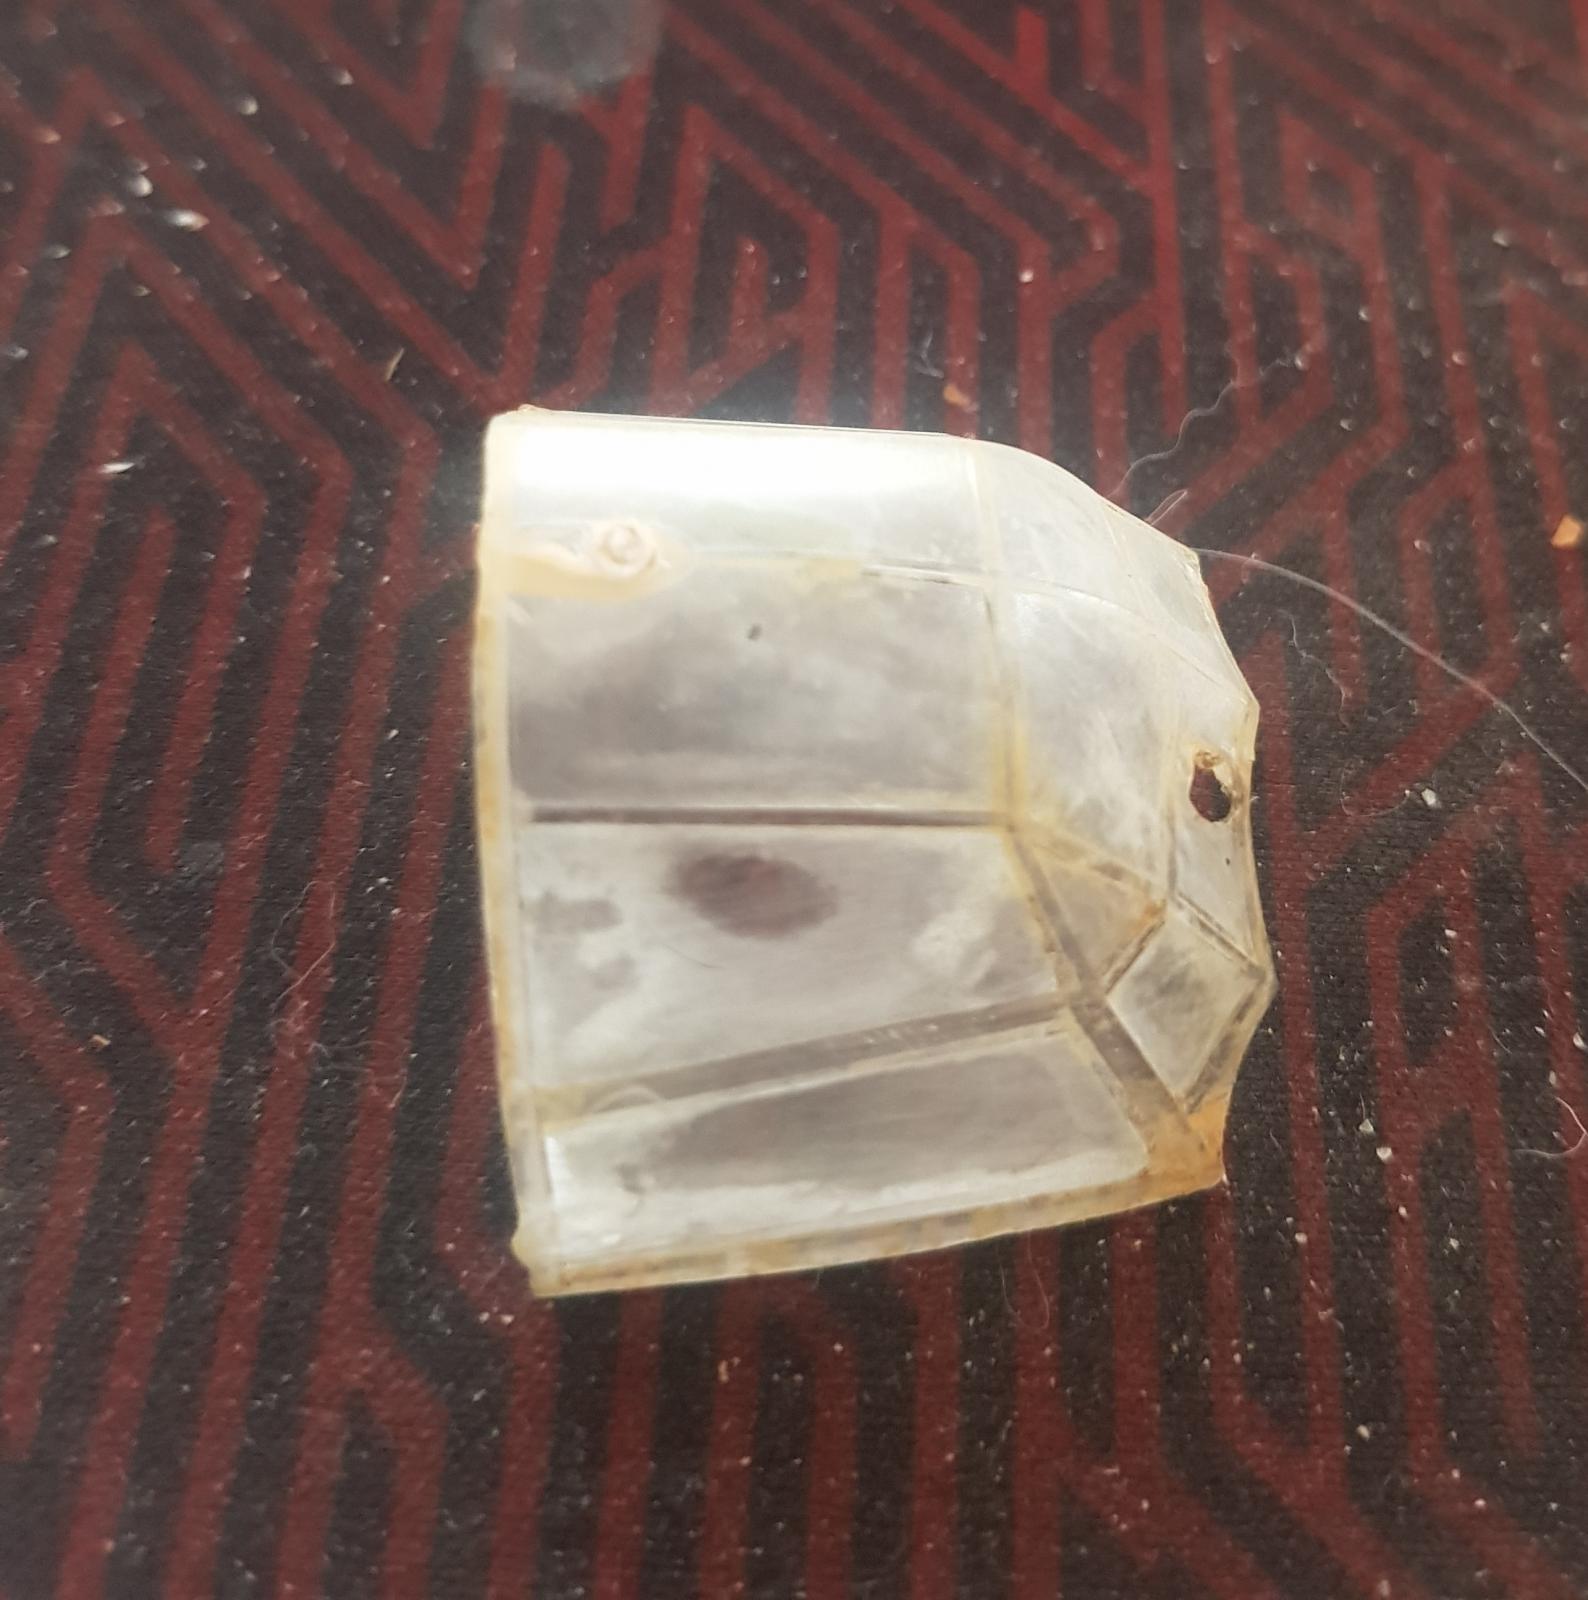
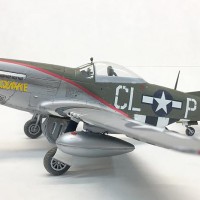
I have a Revell 1/32 Ju-88 which I was rather pleased with as part of my Malta 1942 collection. I had to hunt for this kit on e-bay, enjoyed building it. Now the canopy wasn't perfect but it was ok. Last month I foolishly dusted some models. Inevitably the aerial broke off along with it's antenna cable. In a rush I glued it back on with CA and used CA Accellerant on it (I know !). A few weeks later I noticed the canopy had got a whole lot worse. The second pic shows my attempts to fix it! Soaked in alcohol (that makes 2 of us). Rubbed with t-cut, sandpaper. Eventually soaked in undiluted Peracetic Acid at the farm. No joy.
Anyway, pleas to Revell for spares were fruitless (not unexpected as it's no longer available (not even the ludicrous flashy birling toy one). SOOO I ended up ponying up £80 + for a whole new model on e bay just for the clear parts. I couldn't face binning it. I just binned my attempt at converting the Revell Mossie to FB configuration (see other article) and am working on the Tamiya one instead. I have learned a lot about canopy care and this just taught me another brutal lesson.
Oh, after EXTENSIVE research found the equivalent of this FUTURE everyone bangs on about but doesn't seem to be available anywhere ! Pledge Revive It apparently. Revive this s****r!
Happy Modelling!
Every model I do is a disaster lmfao
I'm sure that's not true! 🙂
It's not, but the joke came to mind and I had to say it.
I had a 1:72 scale Tamiya Birdcage Corsair with full Eduard etched set and aftermarket decals, ready for final assembly. I managed to tip over my bottle of extra thin glue. Over. The . Whole. Thing.
My wife was nice to me, and I was allowed to order a new kit right away. Still in the stash - and this time I will be very careful with the glue.
2 attached images. Click to enlarge.
1. That happens to your plastic parts when submerged into a pool of extra thin glue.
1. Pre-disaster state...
Nobody ever learns a damned thing, other than through failure. An expensive lesson, but looking at the model I can see why you didn't want to do it a second time, having gotten it that nice the first time 'round.
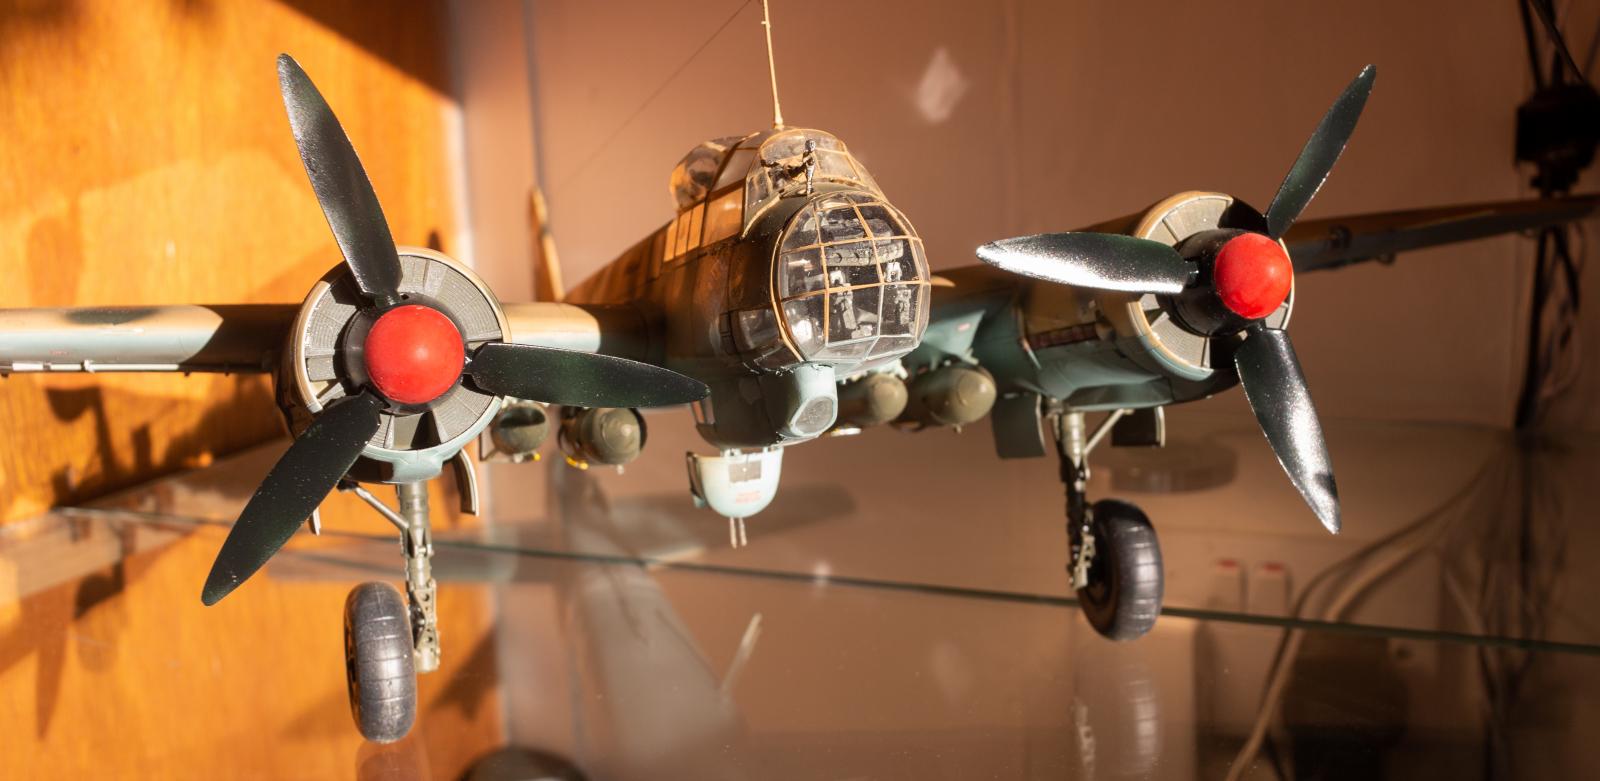
Thanks Tom. Yes It was a damned good kit. For Revell it was extremely good and it's sad it's no longer around. If I had botched other things I might have given up. It is really too big. But if any plane deserves a 1/32 example it's the JU-88! As Laddie Lucas said "The scourge of Malta and one of the outstanding aircraft of the war".
Building a Tamiya Ki-84 for the Japan group build, I was experimenting with some new ways to get a flat finish because the dullcote I was using just wasn't getting it done. Following the advice of a friend (it didn't work, Louis! LOL!) I mixed some Tamiya flat base with some Future and sprayed it on after paint and decals. It immediately proceeded to turn a pale shade of splotched gray all over the model. It either reacted with something in the paint job, had something to do with the high ambient humidity or I did something wrong (probably the latter). I spent about thirty minutes frantically wiping it all off with some alcohol, and the result turned out to be the weathered finish I had intended in the first place! So this disaster turned into a fortunate accident...
I won't go into detail about the hours I spent on some forgotten British bomber kit trying to get landing gear on only to find that I was trying to install it on the wrong side...
1 attached image. Click to enlarge.
Brilliant! I had a similar experience with my 1/48 Mitchell. Painted on a Matte Varnish (not Humbrol) over the OD and it wound up with whiteish blotches. Seems a comon problem with matt varnishes. Like you it looked weathered. Still got it.
Ross, @ross4, it is a common problem especially as the shelf age. Matte varnishes or dullcote are typically made with a carrier, a clear lacquer or acrylic carrying a suspension of basically talc power. If like me you use Testor's Dullcote you see it settle to the bottom because it is only a suspension like your paint. The white blotches or specks are caused by clumping of that talc. I keep a BB or two in my bottles and shake the living s#!+ out of it every time before using it. I also tend to throw a bottle away the moment I start to have that issue. Sometimes you can get the small specks to go away by rewetting them, but I have spoiled an otherwise great finish on more than one model with those damn white specks
Jaime, @jetmex
Dude, it worked for me... 🙂 It could have been exactly what they have described here with the talc separating from the liquid medium. I guess it doesn't matter now, as you managed to fix it and it turned out looking exactly as it should have. Take care buddy. Stay safe.
Oooh, I have a couple.
The worst one happened in 2007. I was really feeling confident building models after returning to the hobby 3 years earlier. I felt I could do anything (except vacuform.) A Squadron monthly flyer showed up and it had a bunch of things on sale. CMK resin bombbay and cockpit for the F-117. And a sale on the 1/48 RM F-117! I quickly bought everything and loaded up on the Eduard Big Edition PE set plus wheels. I was going to make a masterpiece F-117. It was going to be one of those fully loaded jobs that make everyone go WOW!
The hubris/joke was on me. I had a hell of a time trying to jam the CMK resin pit into the RM frame. The resin bombbay required a massive amount of grinding and sanding and swearing to fit in. This took some six months to do. The main problem with the RM F-117 is all the damn seams in awkward places. I ended up spilling CA glue everywhere. I stupidly added the fins and they snapped off during the rough sanding phase where I didn't notice I had blunted the sharp edges on the nose of the F-117 while sanding. Then the bottom seams cracked open because the bomb bay was still too big (designed for the Tamiya (I thought that's okay they're almost identical models... yeah right.)) That was it. I kicked this expensive hunk of self inflicted ego driven piece of S*** right into the garbage. All that resin and PE wasted. The time wasted. The effort. For nothing except it taught me a lot of things like trying to do too much. Also realized I had a ways to go before tackling a project like that.
The Polar Lights 1/1000 USS Enterprise was the only model I ever destroyed with a hammer. I made so many stupid mistakes with it that I lost my temper and smashed it into bits.
Finally, my first Hase 1/48 F-14A that I started in 2003. I took on a kit way out of my skill level because I really wanted an F-14 and didn't know that the F-14 is probably one of the most challenging models to build (pre Tamiya F-14). I had so many problems with the seams flexing/cracking that I didn't notice I had sanded down the cockpit hump behind the canopy by 1/8 on an inch. No dramatic hissy fits, I just threw it straight into the garbage and didn't try to build another Turkey till 2009.
Ha ha! Easy to laugh now. When I was a kid I used to shoot up old kits with my air rifle!
I brought one of my large ship models to school and one of my friends thought it would be funny to knock it off a table. Fortunately it landed right side up. The next day, his violin somehow got "accidentally" knocked to the floor.
Hope it wasn't a Stradivarius 🙂
Fortunately it wasn't. My model actually cost more than his violin and it wasn't damaged at all.
Over the last few years I botched a Hasegawa 1/48 Hurricane and a Promodeller F-84E. I have no idea how I screwed the Hurricane up but it had really bad steps at both wing root joints. I can’t figure what I did wrong, it’s not a complicated kit. I foolishly attempted to mask over some fuselage decals with post it notes on the Thunderjet. I thought a clear coat that I applied would protect them...Wrong! They all can’t be winners?
After finishing up an old Frog B-25, wheels up, I went to drill a hole in the bottom fuselage for a home made stand, well it wasn't pretty, nothing was salvageable.
I’ve literally binned a 1/48 Tamiya P-47M because I sh*t all over it so bad.
That line of P-47s are the easiest kits to build in the world.
I'm in the midst of a potential disaster of epic proportion (for me). I got a deal on a 1/32 Tamiya P-51D. I searched high and low for aftermarket decals for Mustangs sporting non-natural metal finishes. Unfortunately, the majority of them are for P-51Ds that don't have the dorsal fin installed and the Tamiya kit I bought (Pacific Theater) doesn't have the option of going dorsal finless. I did find out that the "Missouri Armada" sports a green/gray paint scheme, but good luck finding those decals. So now I'm in the process of creating an NMF by gluing sheets of tin foil on the model. It's nerve wracking and somewhat Zen at the same time. I'm taking my time on this one, so hopefully it will turn out.
Good luck there! It's very frustrating when you can't track down the decals you want. Aren't there company's making bespoke?
Most recent mess up was the 1/72 Sea Vixen - I thought I used a good primer.
1 attached image. Click to enlarge.
aaRGH!
Yow!
Ouch!
Had a learning session with a vintage Monogram..I know. 1/48 F-86 Saber. Have built one before in my younger years and made a decent rendering out of it, I wanted another to add to the collection. Many hours spent on bare metal finish, really made that old kit look nice, in my opinion. Made the mistake of spraying aerosol matt finish over the bare metal paint with out testing. To my horror, the finish on my F-86 basically cracked and split before my eyes! Even the decals curled up and self destructed. My faithful hound learned some new vocabulary words that day. No way to salvage this wreck, didn't even attempt to after all the time wasted. I just chucked the mess into the trash. I did buy another Saber and will apply my lessons learned on this.
Good to know. I'm going to be spraying a semi-gloss clear coat over my aluminum wrapped P-51. Now I'll definitely do a test to see if it will work.
When I saw the title of this I realized how un-alone I’ve been all these years. I just wish I didn’t have to re- learn the lessons! I suppose that’s why I keep trying...
I posted about mine a long time ago! Long story short, the fully-sprung, fully workable and low-rolling resistance of a 1/16 Trumpeter SU-100's running gear discovered that my workbench wasn't fully level and it did a nose-dive directly into the floor. Total loss. Well, aside from leveling my workbench and nailing a thin wooden "lip" around the edge so it doesn't happen again.
My first "disaster" took place in 1980: I was 13yo, tackling a Matchbox 1/72 F-5, that I had already fully assembled and hand painted red and white (yes! red and white...) per the Swiss pattern back then, but with USAF marklings (go figure...). It turned out it was tail heavy, a first for me. Of course, I cut a suitable piece of a thick nail, installed it in the nose from the IP area and "secured" it with vast amounts of Revell styrene glue...
You can imagine the outcome the next day: all nose area became pliable! For whatever reason, I did not throw it away, the Hubrol paints did not crack, so, believe it or not, I reformed to a reasonable shape the nose by hand and let it rest. I had no idea at that time that the glue would cure, but, after 15 days, to my joy, it did, yours truly being left with an OK model!
Since then a many disasters have happened and will for sure happen! It's all part of our amazing hobby and, apart from the initial despair and graphic language, we **** love it, don't we?
Thanks for posting this, my friend @ross4!
I did that "Unintended Nose Job" with a Monogram F-111A. The good news is that it took the focus off that awful canopy. Sort of.
It does the heart good know you are not alone in this universe of Messed Up Models. I have had many but the one that breaks my heart the most, is my venture into 1/32 scale with a gift from a friend, the Tamiya 1/32 Spitfire. What an incredible kit and joy to build, until trouble started with the paint. After I corrected the paint mistakes I went to decals and had disaster strike. Ended up stripping the paint starting over and tried using precut masks for markings and that didn't work. The kit now sits on the Shelf of Doom painted badly in pieces with fidely bits in bins in the box. A crying shame.
3 attached images. Click to enlarge.
This beauty of a model is begging to be finished, my friend @luftwaffe-birdman!
That was the very first model I made when I restarted. Not an easy one. I also have resprayed and improved mine but I had a helluva job fitting the engine. It's decorated as my dad's spitfire in 32 squadron. I might do it again now I've gained a lot of experience.
I always liked the Avro Vulcan in the anti flash white so many years ago i got the kit and spent a week putting one together . I used a halfords rattlecan and it was looking pretty good... nice not too matt not too shiny ,but wait that little bit needs just a touch . SPLAT went the paint a great big dollop .. total fail ? crash went the model into my bedroom wall ?lesson learned nothing has to be perfect .
Enamel paint too I expect. No going back!
A few years ago I was was working on a Revell 1/24 Shelby Cobra 427 commission. I wasn’t happy with my lacquer finish on the body, so I decided to strip it and repaint it. I don’t know what I was thinking, but I soaked it in a bath of lacquer thinner and melted it. Had to buy a replacement kit quick.
Ouch that's a sore one.
Oh, my disasters are too many to share in any one post. They are all shared in "work-in-progress" and other groups 🙂
Always great when people share these things for all to repeat - sorry to learn from. . . .