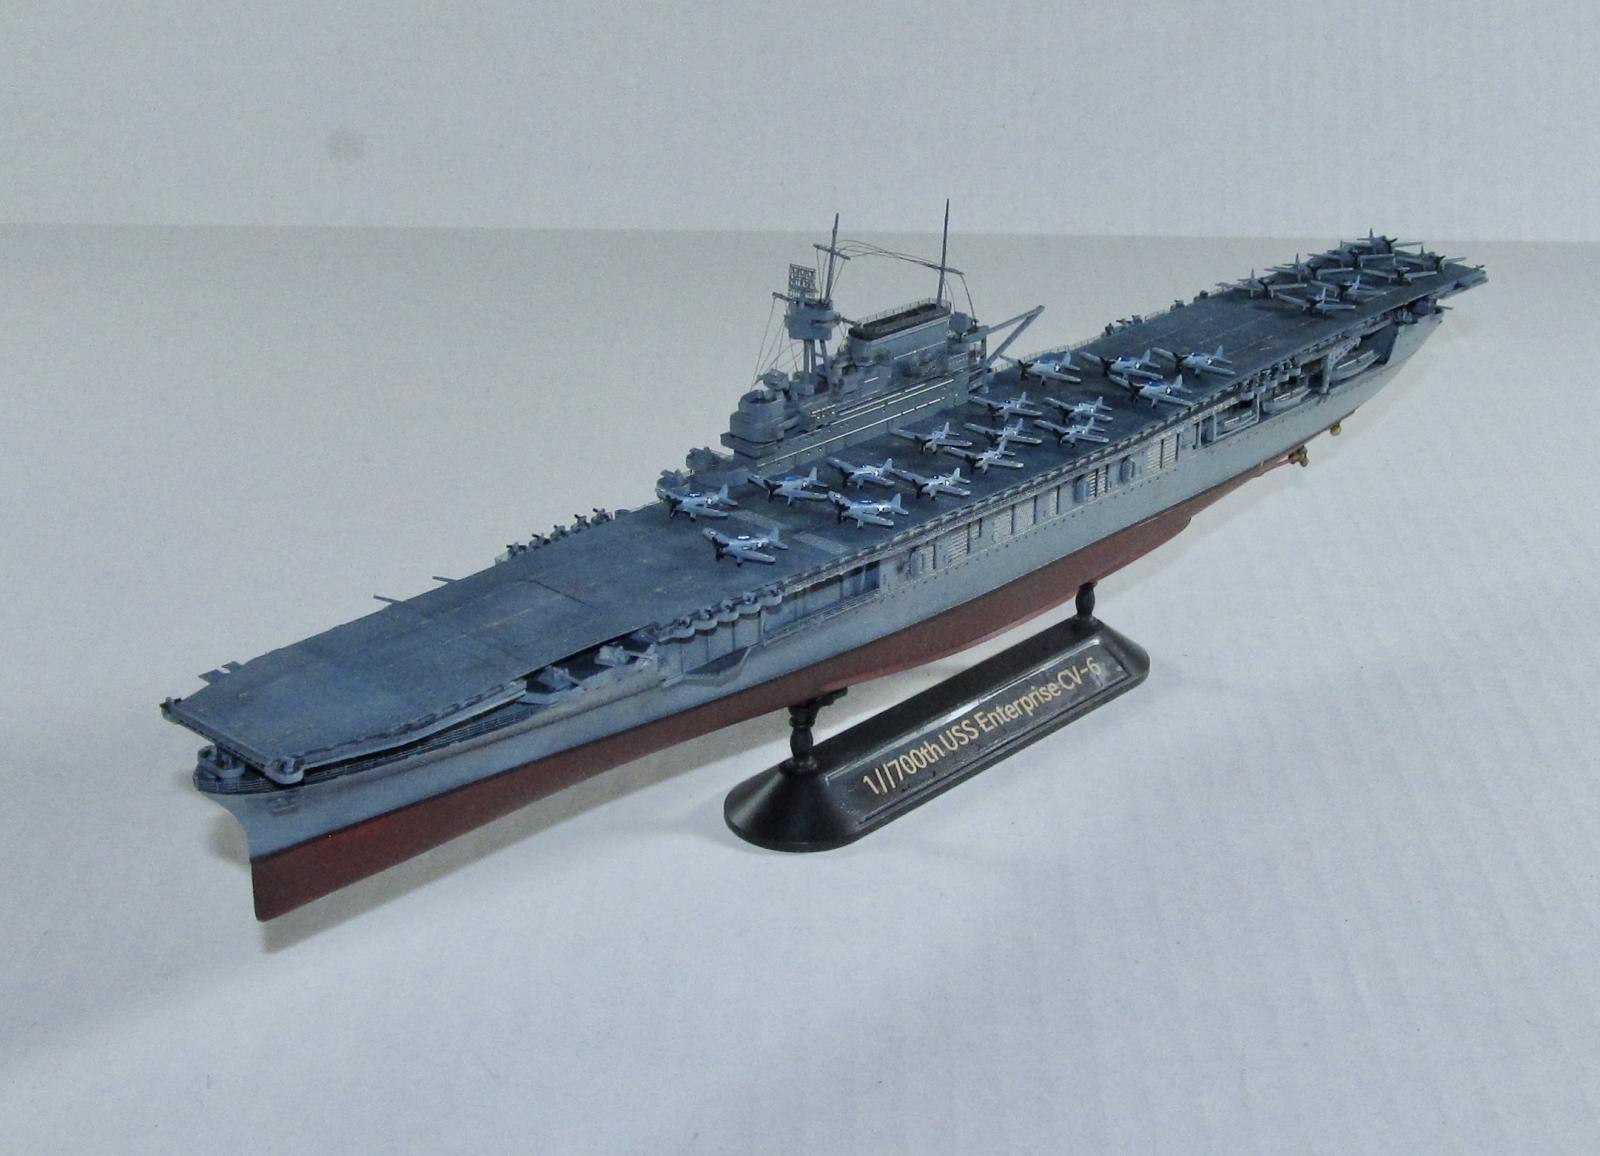
Academy 1/700 USS Enterprise aka The Grey Ghost aka The Big E
Today is the 79th anniversary of the climatic day of the Battle of Midway so here is a review of a build in honor of today. FYI, I did publish the original photo as part of my collection of PTO models but did not submit the entire review (the original published in Modeling Madness but here with corrections.)
The USS Enterprise was commissioned in 2245 at... what? Oh right, not THAT Enterprise. The ship in question is CV-6 aka the one whose name went from one of the most decorated warships in the US Navy that fought/survived the entire war in the grueling Pacific Theater and whose name graces a rental car company, a line of starships in Star Trek films/TV Series of varying yet questionable quality and the world's first nuclear powered aircraft carrier.
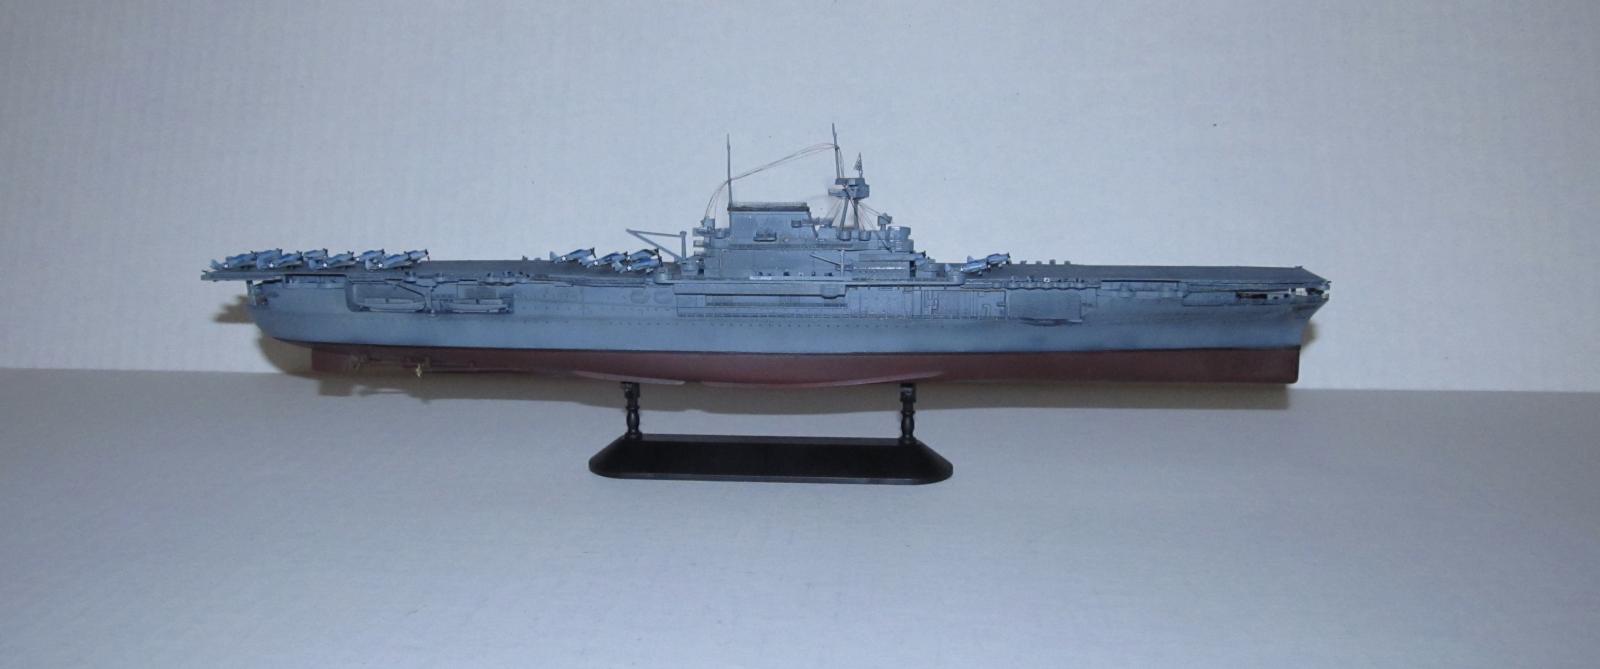
The USS Enterprise aka Big E or Grey Ghost was the 2nd of three Yorktown class carriers, initially weighing in at 19,800 tons due to the limitations of the Washington Naval Treaty. The steam turbine equipped carrier could travel at a top speed of 32 knots with a range of 12500 nautical miles @ 15 knots speed. The Yorktown class was designed based on the experience with the USS Langley (CV-1) as the Navy realized that bigger carriers were much more useful, the need for an island and a complete flight deck despite what the Bureau of Aeronautics originally wanted which was something similar to the HMS Furious' 1920s configuration. She was launched during Oct 1936 at Newport News and commissioned during May 1938. She served briefly with the Atlantic Fleet during her shakedown cruise and was transferred to the Pacific Fleet in 1939 and the rest they say is history.
The Enterprise first starred in the movie Dive Bomber (the Top Gun of its time with a much better story) before transferred to Pearl Harbor in 1940. She avoided the disaster of Dec 7, 1941 at Pearl Harbor by luck although several of her SBD dive bombers were shot down by angry AA gunners and/or Japanese Zeroes. She went on to become the flagship of Bull Halsey and Task Force 16 during several air raids on Japanese held islands that were more pinprick annoyances while gaining combat experience. Of course she escorted the USS Hornet in May 1942 as her role in the Doolittle Raid. She narrowly missed seeing action at the Battle of Coral Sea before coming back to Pearl in preparation for the Battle of Midway.
She was Admiral Raymond Spruance's flagship during that fateful battle and helped sink three of the Japanese Navy's carriers as well as the cruiser Mikuma. Meanwhile her sister ship Yorktown sank because of the damage she took at Coral Sea, several bomb and torpedo hits from Hiryu's strike planes and the final death blow from a couple of torpedo hits by IJN submarine I-168.
As one of the only four surviving USN carriers (the others were Hornet, Wasp and Saratoga) left in the Pacific in the summer of 1942, the Enterprise (along with the Wasp and Saratoga) was sent to the South Pacific as part of Operation Watchtower in Aug of 1942 which was the first major offensive campaign of the Pacific for the US Navy. Their goal was to protect the 1st Marine Division as they landed at Guadalcanal to take away a critical airfield from the Japanese. At the Battle of the Eastern Solomons, she was hit by three bombs dropped from Val dive hombers that knocked her out and sent her to Pearl Harbor for repairs. During this dark time the Wasp was sunk and the Saratoga was badly damaged by submarines leaving the US Navy with only two carriers in the Pacific.
At the Battle of Santa Cruz, the Big E watched as her only remaining sister ship Hornet got wrecked by IJN dive bombers and torpedo planes. Her speed and ship handling skills of her bridge crew (and the AA firepower of her escorts) saved her from getting hit by Zuikaku's torpedo armed Kates. Santa Cruz was one of the last Japanese victories of the Pacific War, but it was a very costly one as they lost many of their surviving elite aviators in the battle.
Despite bomb damage to the carrier, the Enterprise's Air Group proved to be the deciding factor in the Battle of Guadalcanal when they were sent to Guadalcanal to aid the exhausted Marines and Army squadrons at Henderson Field. Air Group 10 helped wipe out a big Japanese reinforcement convoy as well sink the damaged battleship Hiei in the Climatic November Battle of Guadacanal which proved to be the last major Japanese push for the island. In the summer of 1943 the Enterprise returned to the US for a badly needed refit and repairs thanks to the return of the Saratoga and the covert arrival of the USS Robin aka the HMS Victorious. The refit added badly needed torpedo blisters for protection and additional AA guns including total replacement of the worthless 1.1 inch AA guns with the much better Bofors 40mm AA guns as well as more 20mm cannons.
She would go onto serve in the island hopping campaigns including the Battles of the Philippine Sea and Leyte Gulf as part of the most powerful naval armada in history. Unlike in the early days of the war where US Navy doctrine kept carrier task forces split apart, the Enterprise was now part of a carrier task group consisting of three to four fleet carriers, a couple of light carriers and protected by numerous AA/ASW equipped escorts. No more Japan Vs Enterprise scenarios.
The Enterprise later became CV(N)-6 as she carried the only night capable air group in the fleet. She would be damaged again in a raid on Japan and knocked out of the war when she was hit by a Kamikaze while supporting the invasion of Okinawa in May of 1945.
She was on her way back to the war when Japan surrendered in Aug of 1945 thus being one of only two carriers that served the entire Pacific war and survived. The Enterprise helped return home demobilized troops in Operation Magic Carpet and was decommissioned soon after as she was too small to carry new jets as well as her machinery being worn out from the 4 year constant grind of combat operations. Instead of saving their most decorated ship, the US Navy scrapped her in 1958 to the dismay of her former crew including Admiral Halsey.
Her lengthy historical legacy includes the Enterprise Rental Company, CVN-65 and the numerous NCC-1701s.
THE KIT
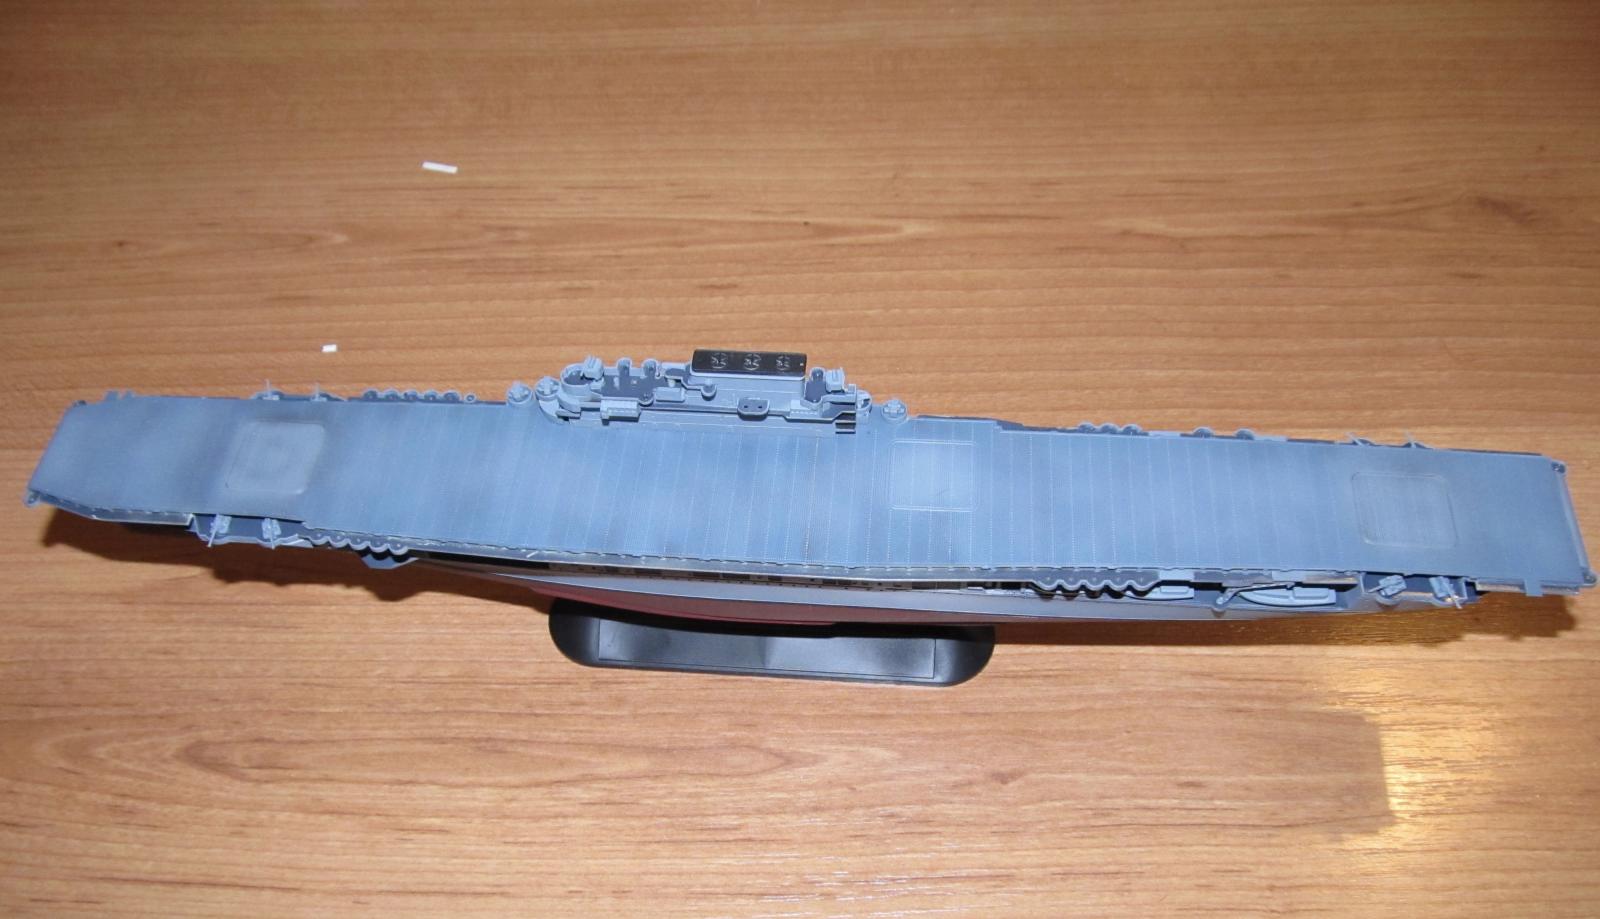
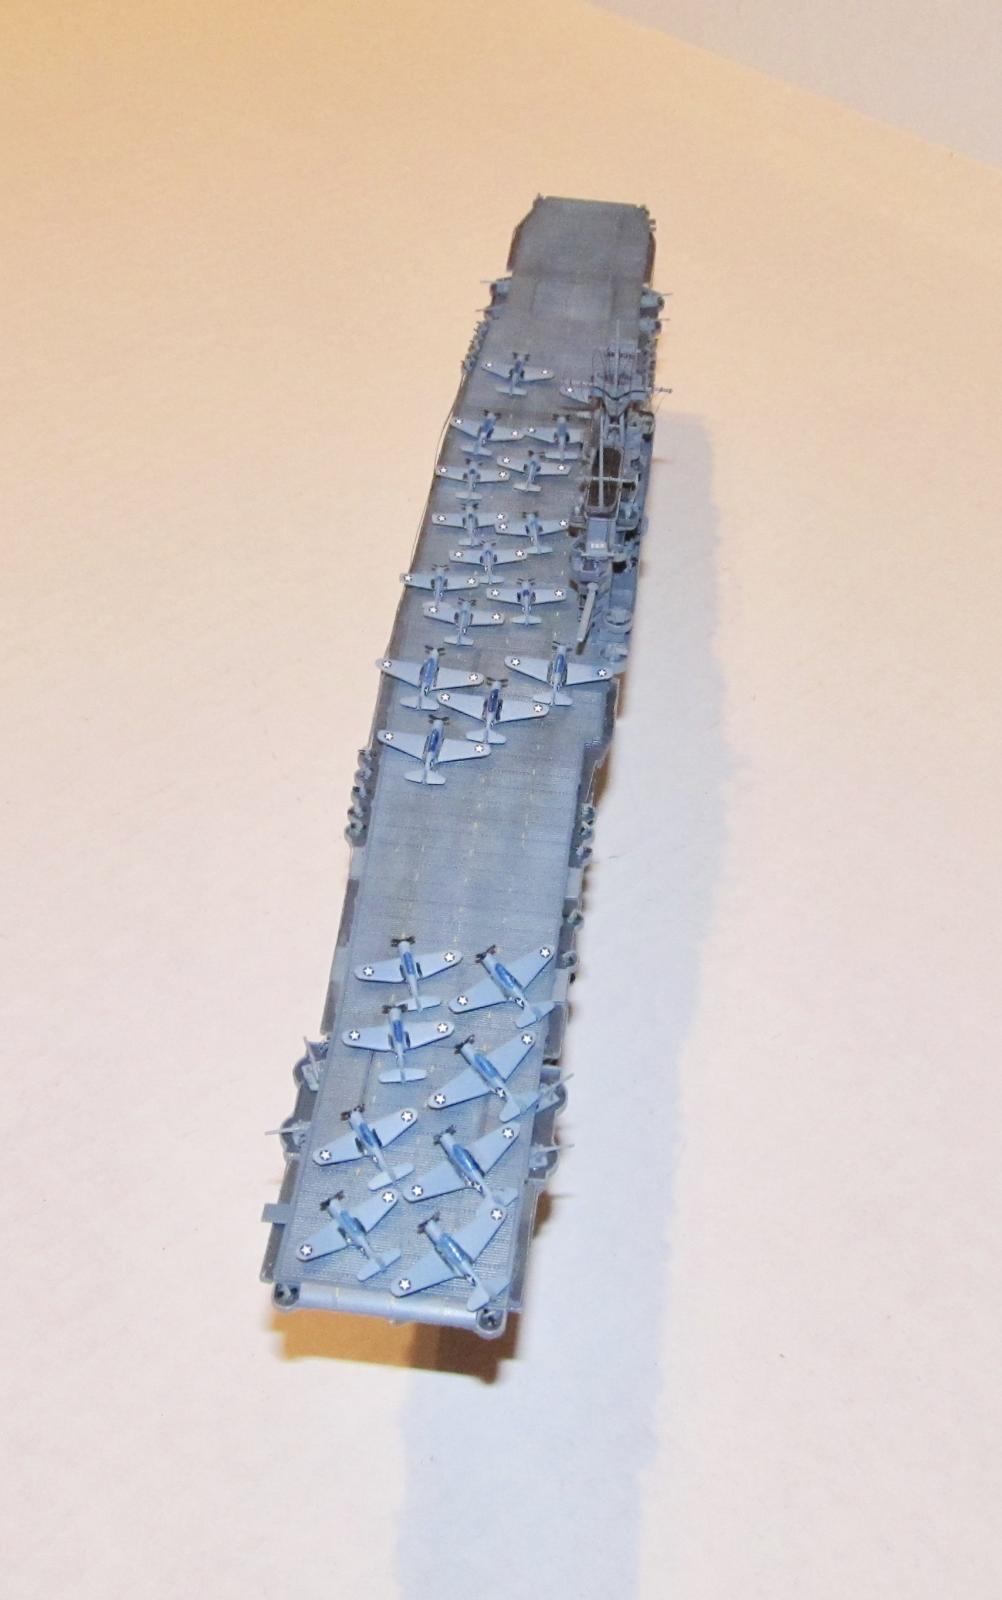
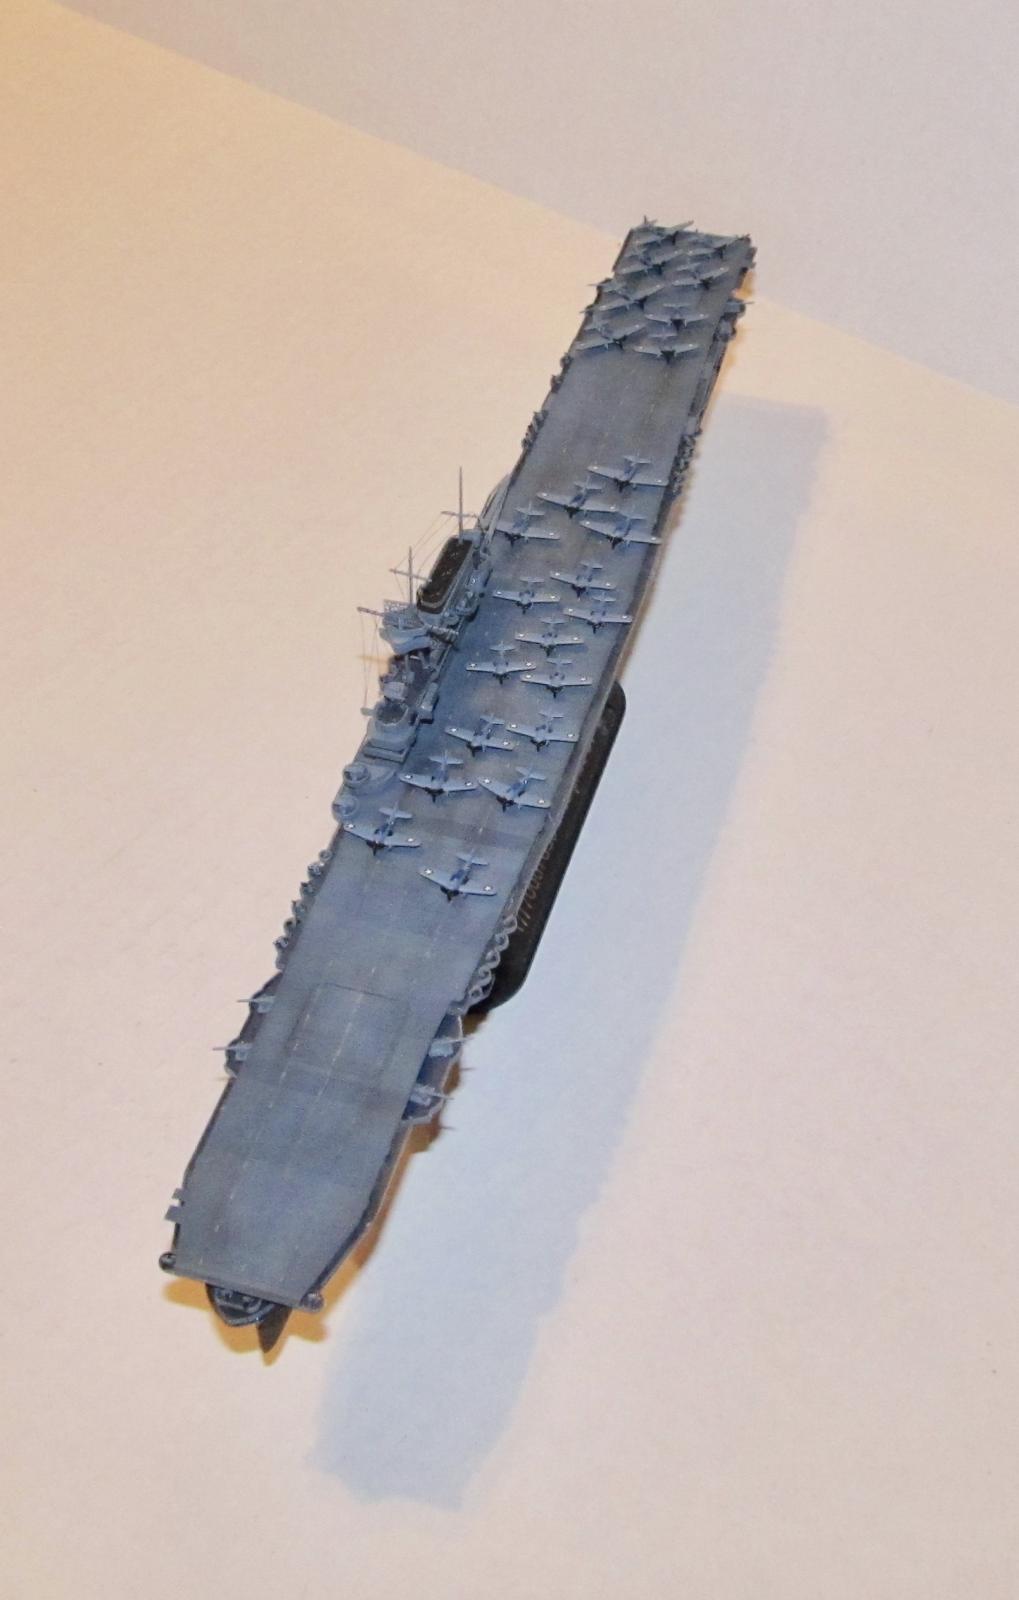
Academy released this kit in the summer of 2017. Strangely enough, the USS Enterprise CV-6 has been poorly serviced by the model makers over the years as there have been more kits of the Yorktown and Hornet produced. Academy produced two versions of this kit of the early war Enterprise (Pearl Harbor to Santa Cruz.) The basic edition contains all plastic parts including full or partial hull, with the option for open hanger (sort of) and 24 aircraft. The Modeler's Edition also contains PE railing/radar and masking for the decks which would prove to be very useful.
The plastic is Academy's traditional grey green plastic with no flash or sink marks that I noticed. It has some fine delicate details (too delicate as I would discover to my dismay later.) The aircraft look like aircraft even for 1/700 scale. Unlike Trumpeter, Academy molded their aircraft in grey green plastic not clear which I think actually makes clean up and painting easier (IMO.)
It comes with 13 plastic sprues including the one piece lower hull in red, one piece flight deck, the hanger parts, props and miscellaneous guns plus aircraft. The decals are actually incorrect for the early war Enterprise as she didn't get her flight deck painted with 6s till midway in the war.
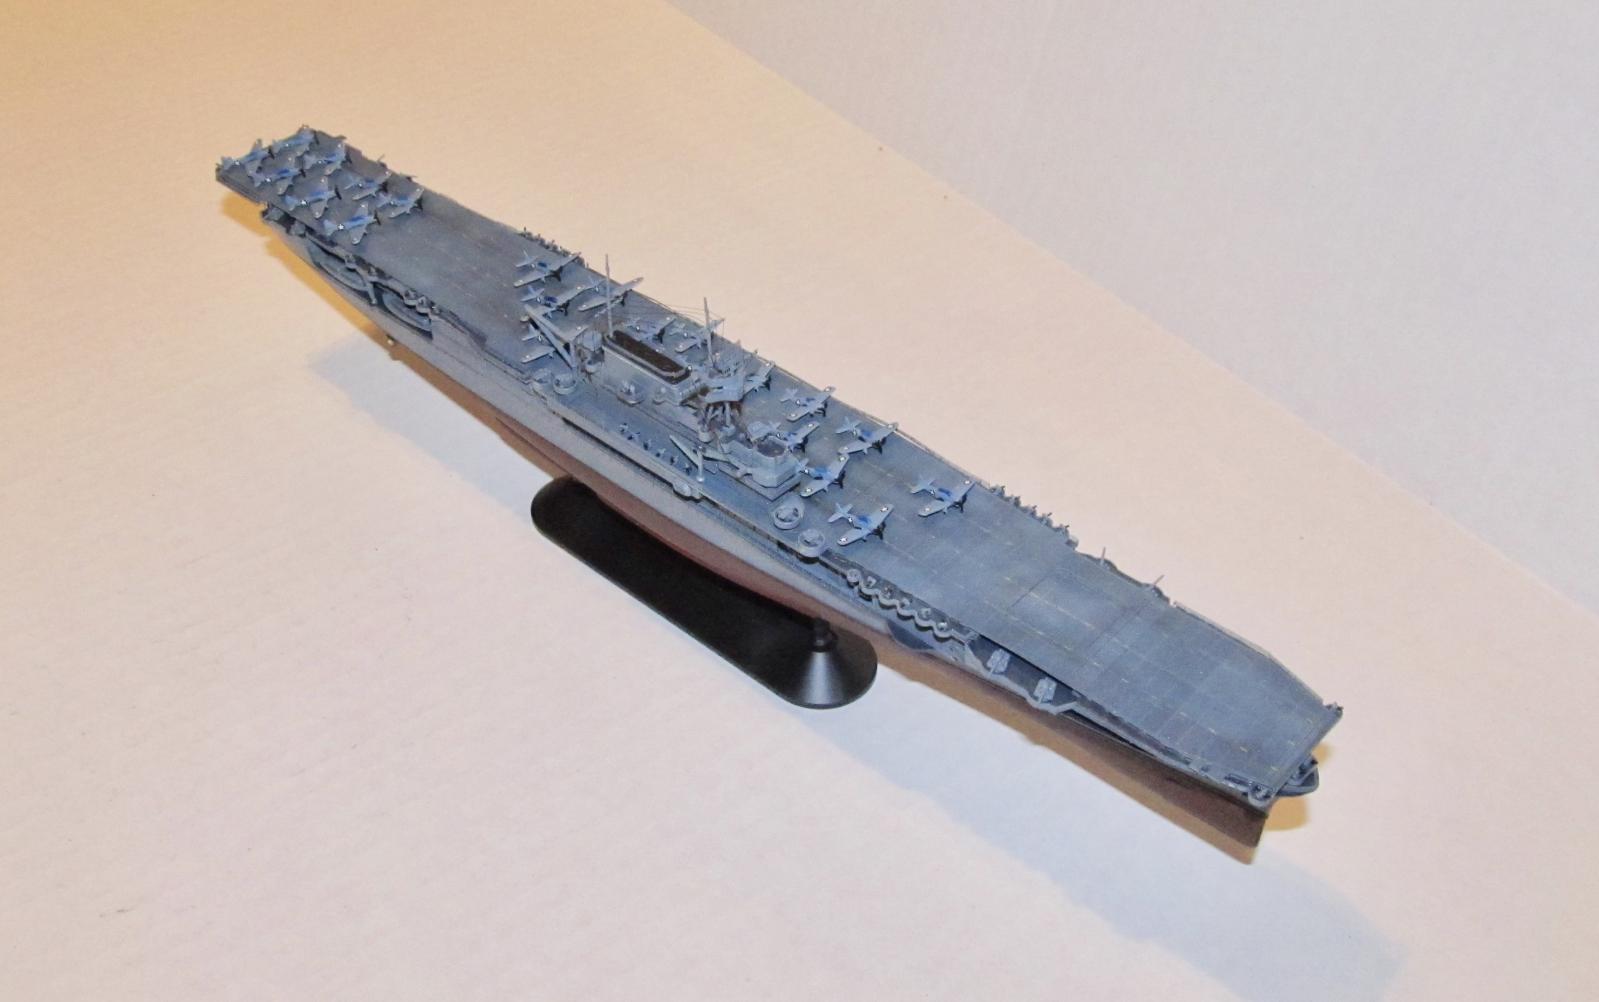
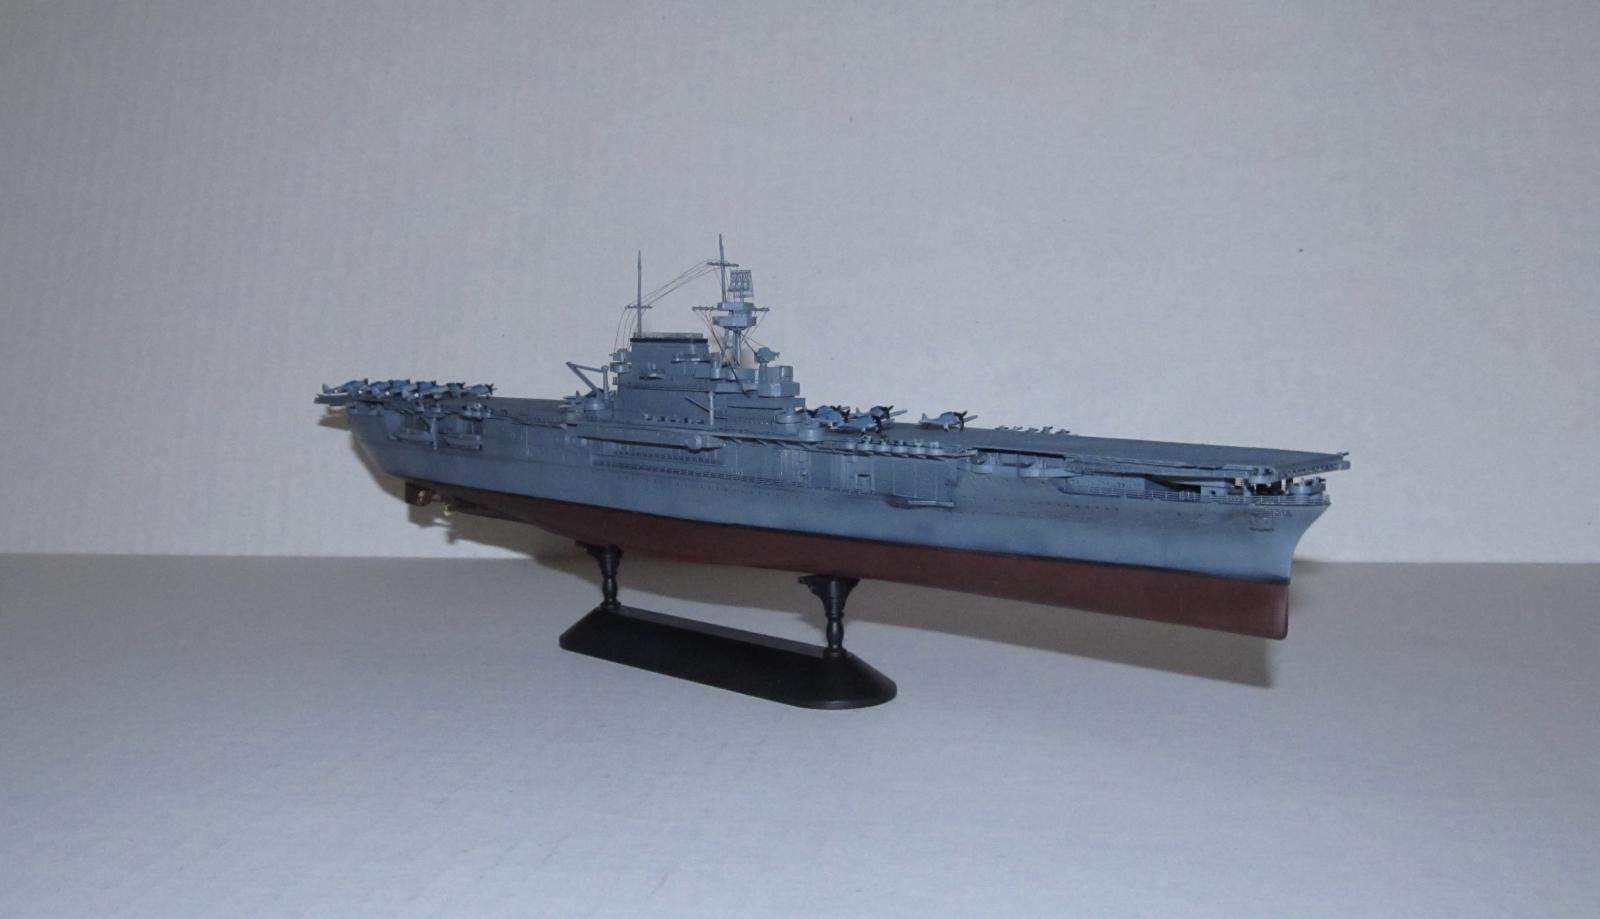
The photo etched parts are designed for the sections they go to which means you don't have to go cross eyed trying to measure and cut railings. You do need to bend them into shape, but that is still easier. One good thing that Academy did was pre bend spots in the PE so you need to orient them carefully.
CONSTRUCTION PART1
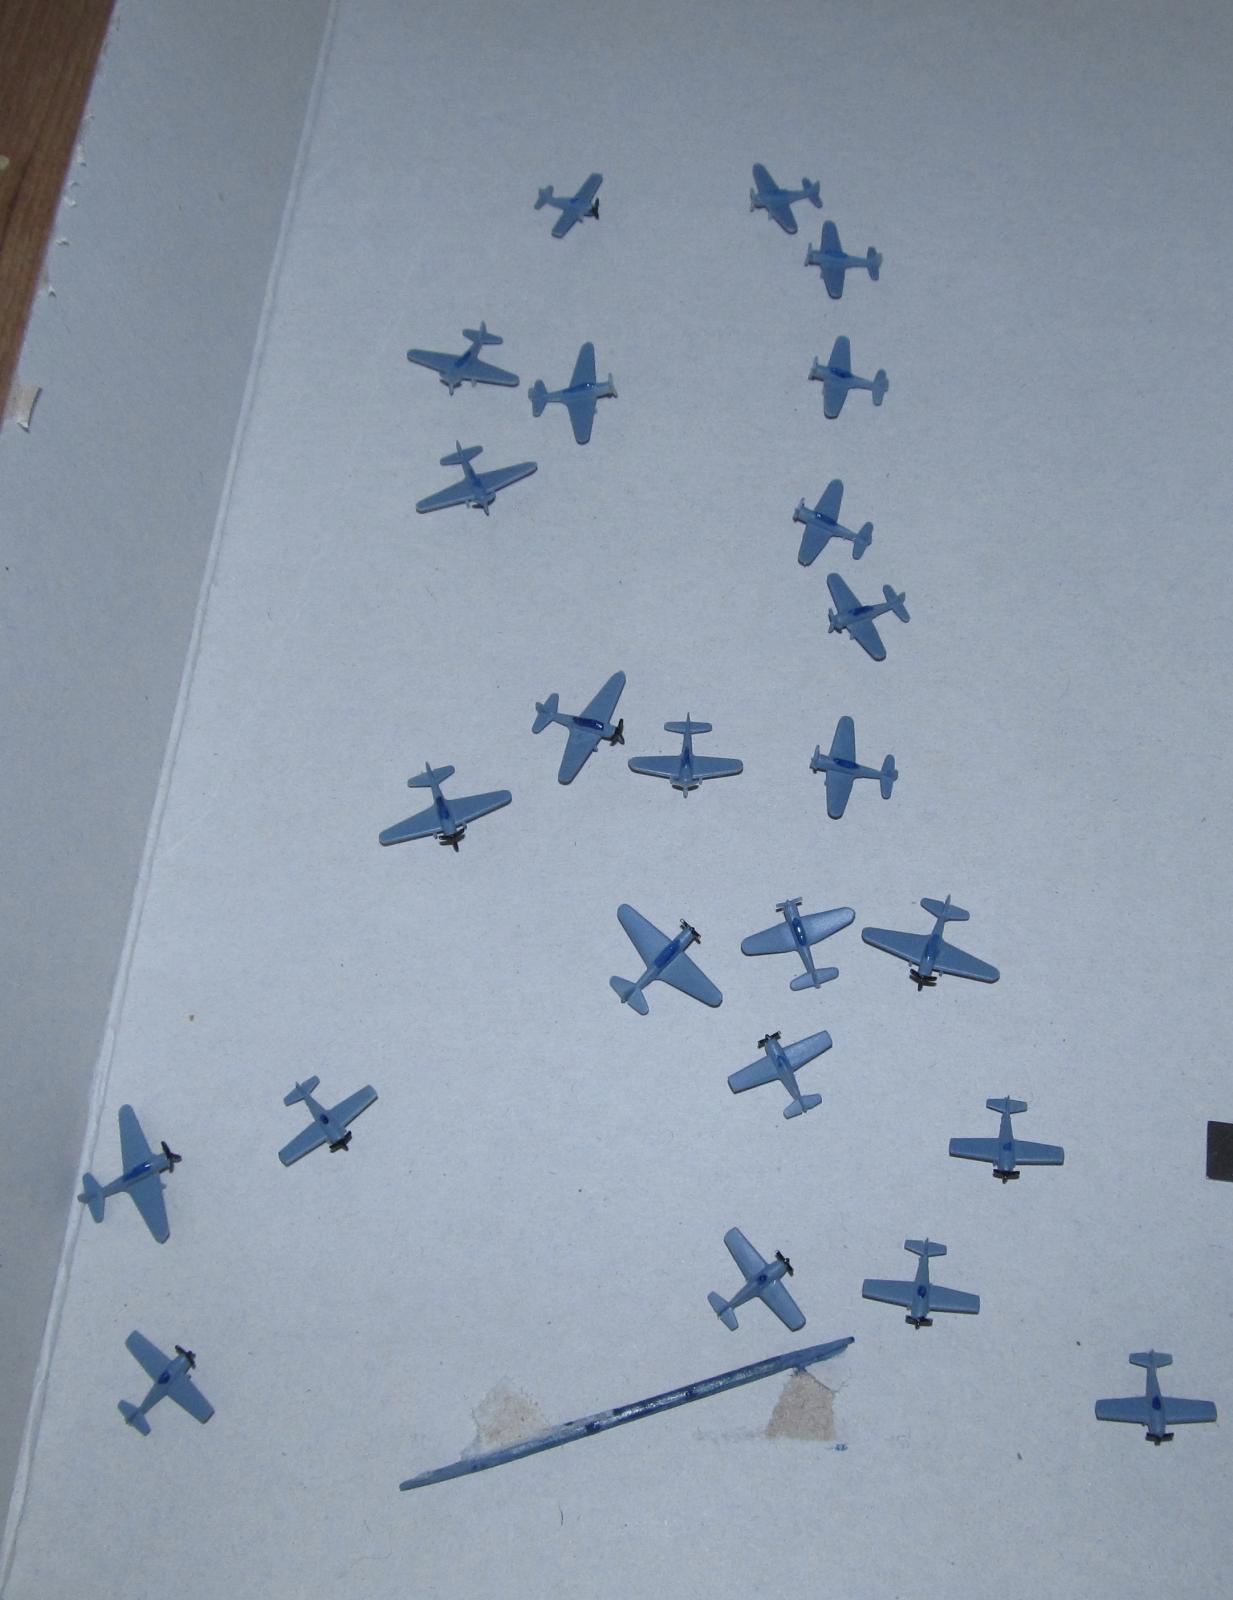
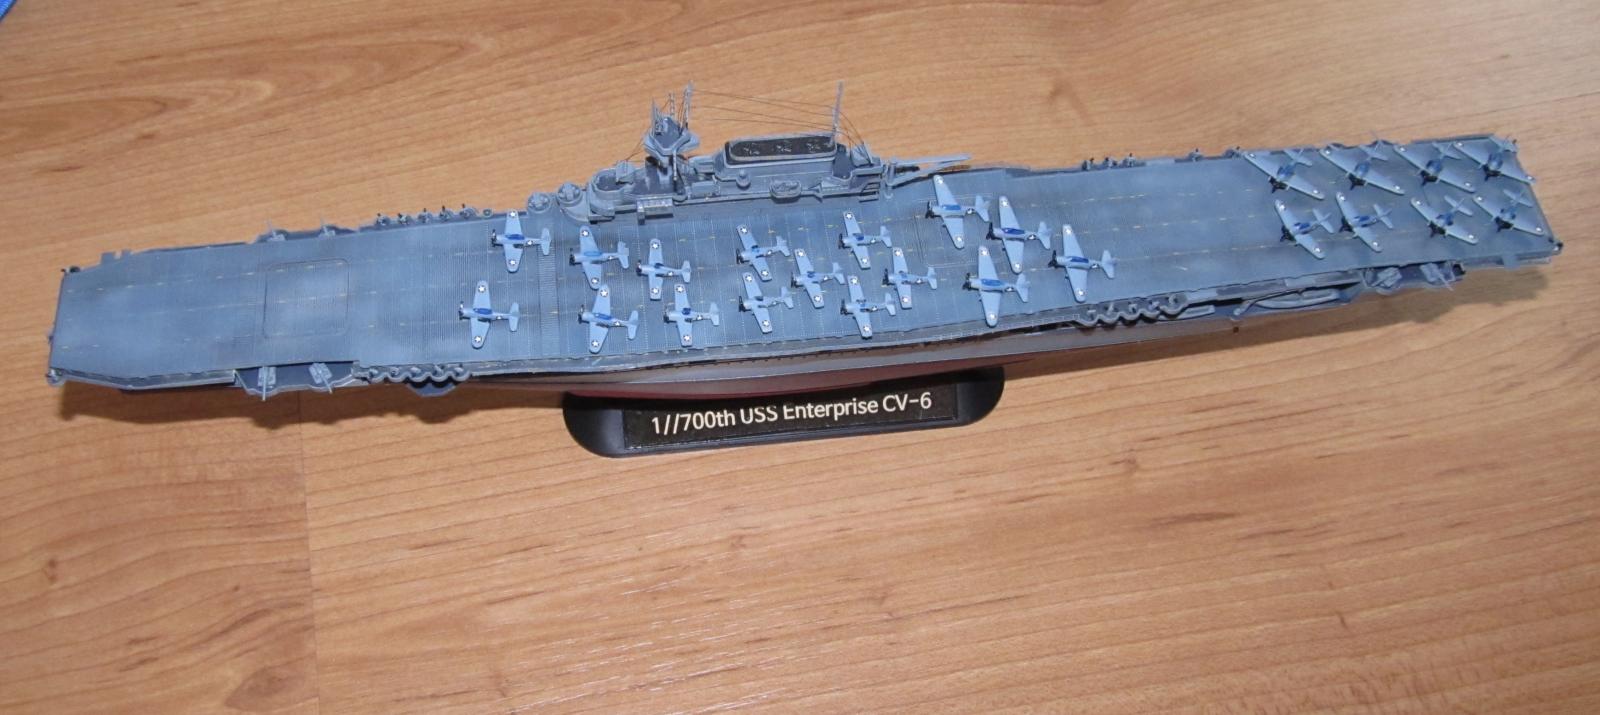
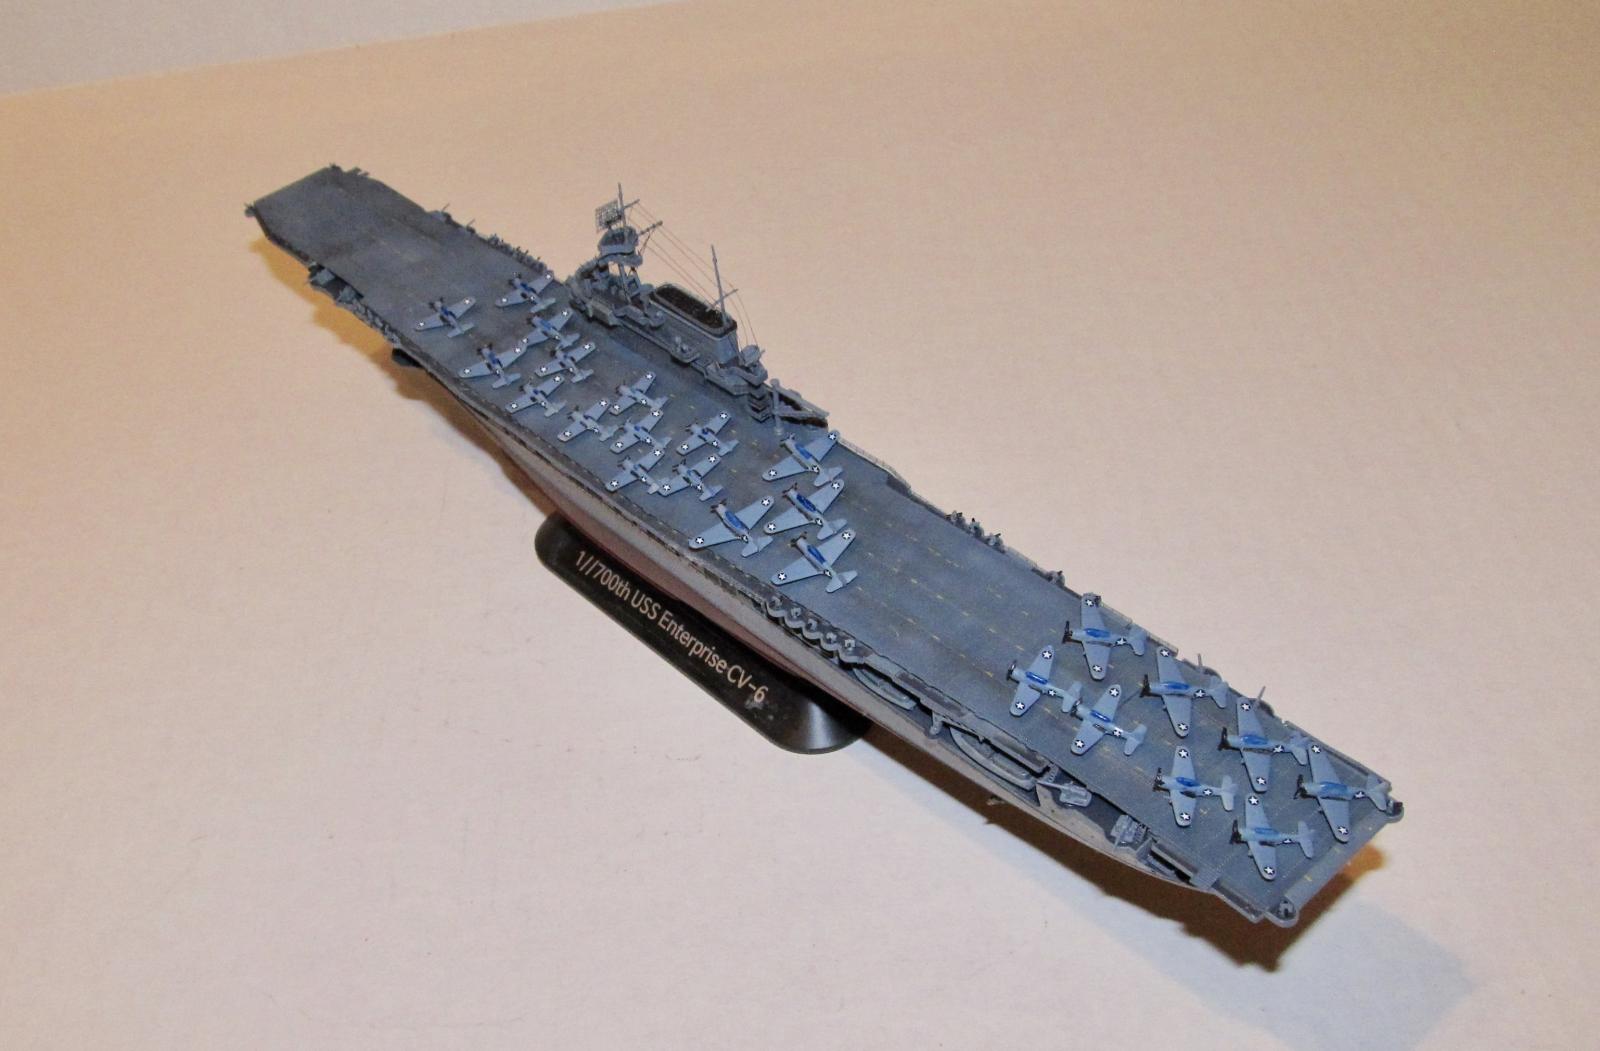
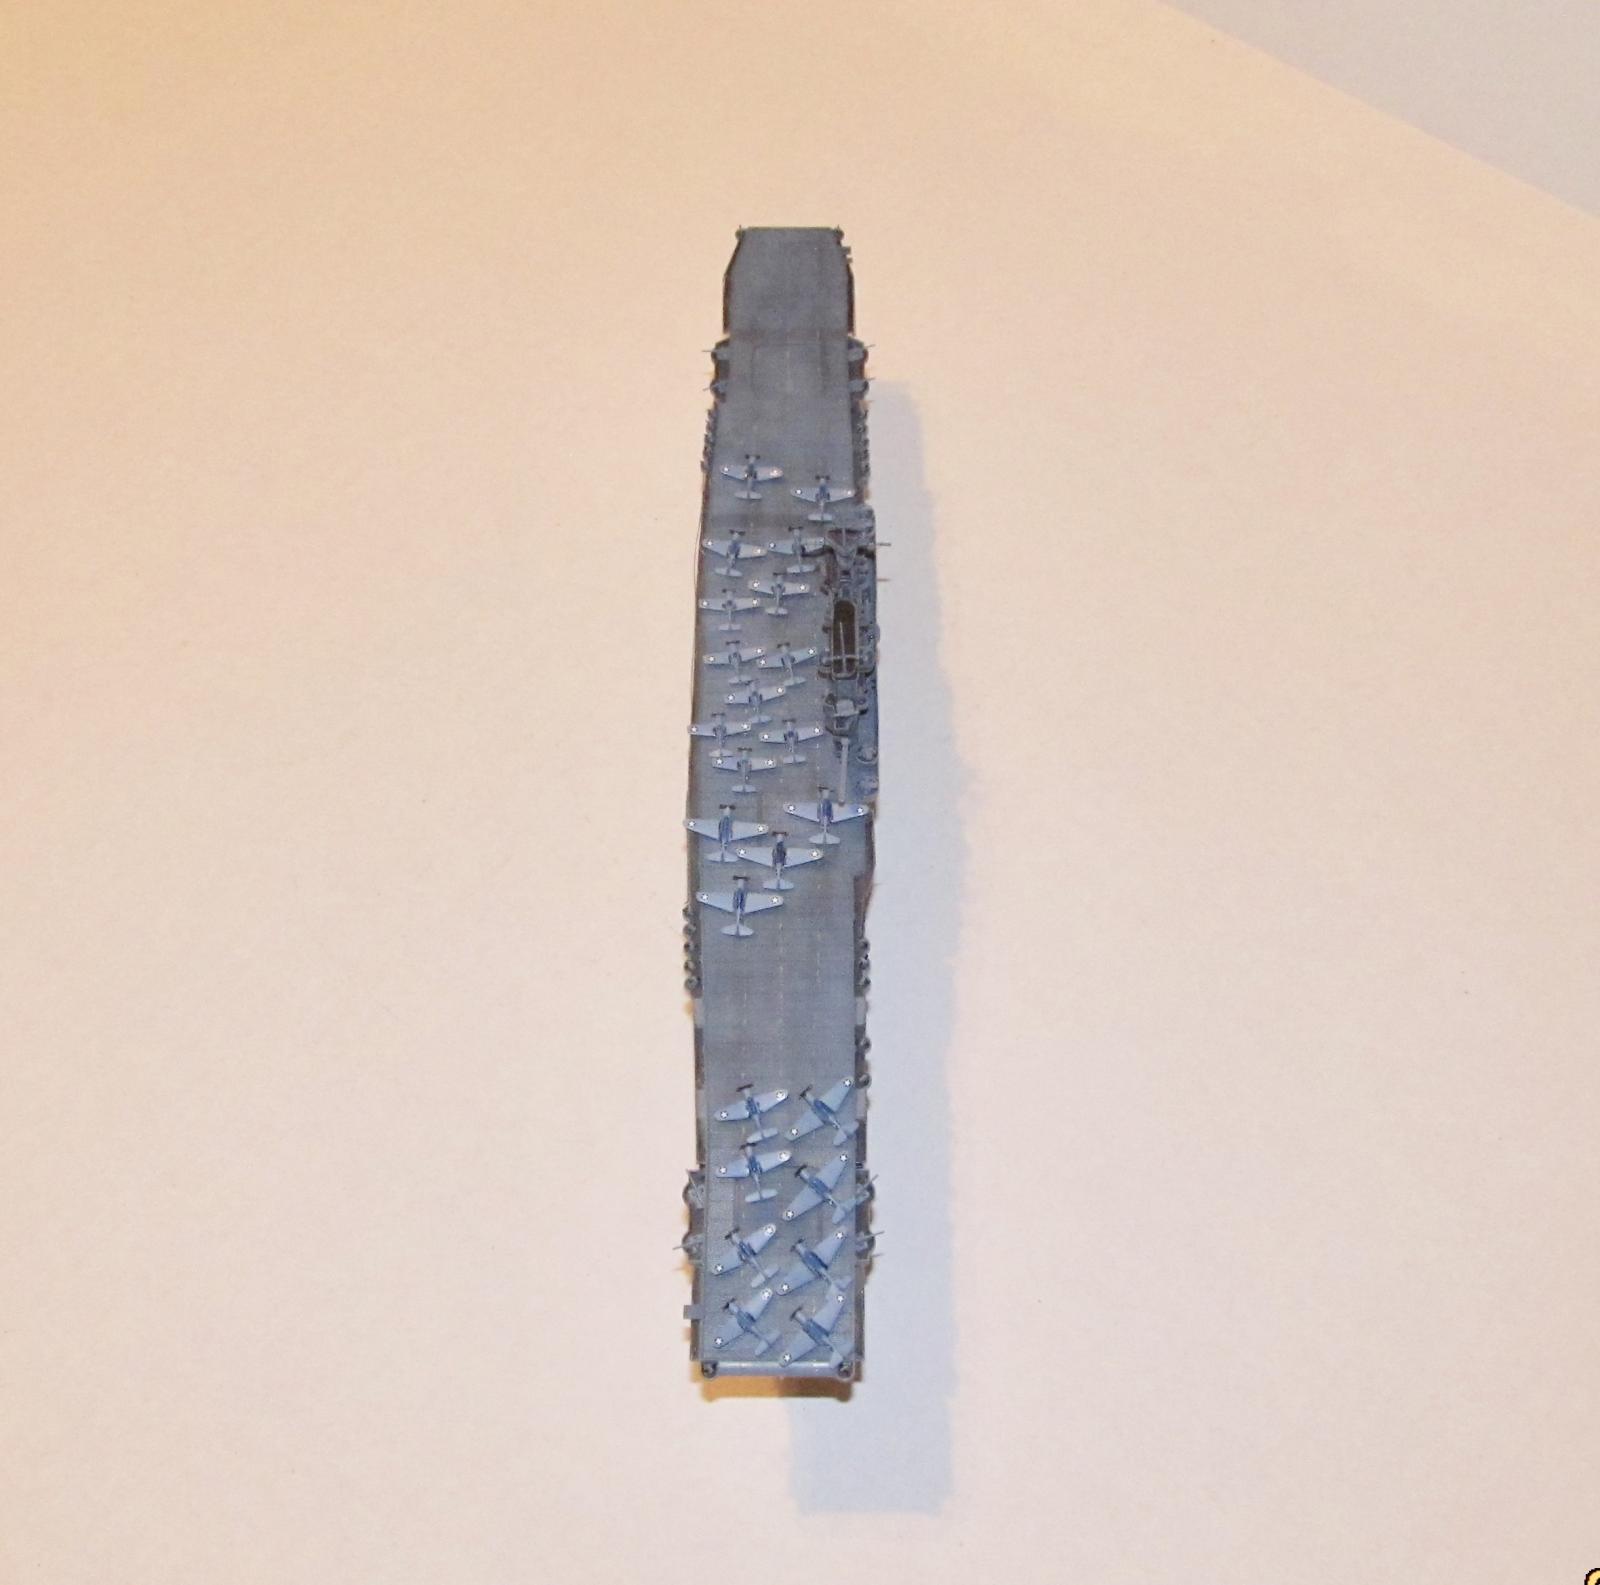
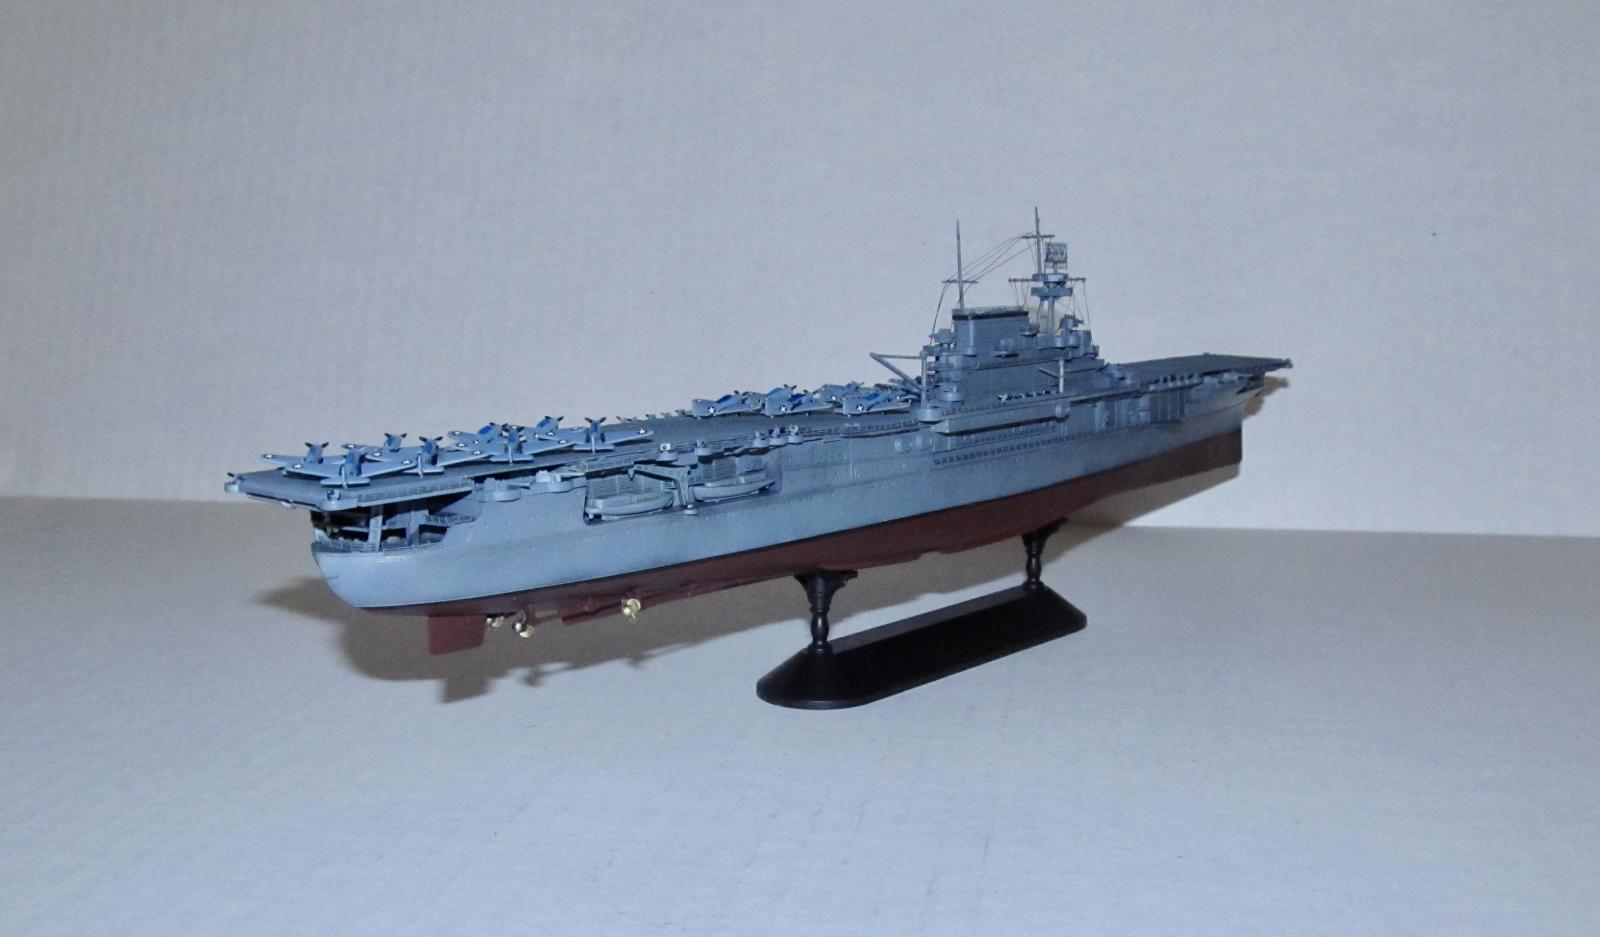
I began with the air group based on a suggestion from Herr Doktor Frank Spahr, a top ship builder. Since the air group is the most tedious portion of the build then it would be best to start it first not only to get it out of the way so as not to leave the tedium for the final part of the build. I removed and cleaned up the each plane from the sprue. Each plane was first airbrushed underside grey then topside blue grey. The fine details such as the canopy, walkways, tires and prop were brush painted. I thought about painting the prop tip markings and adding bombs/fuel tanks and torpedoes, but that was a level too far for me and left it at that. Eight F4Fs, SBDs and TBDs were completed that way.
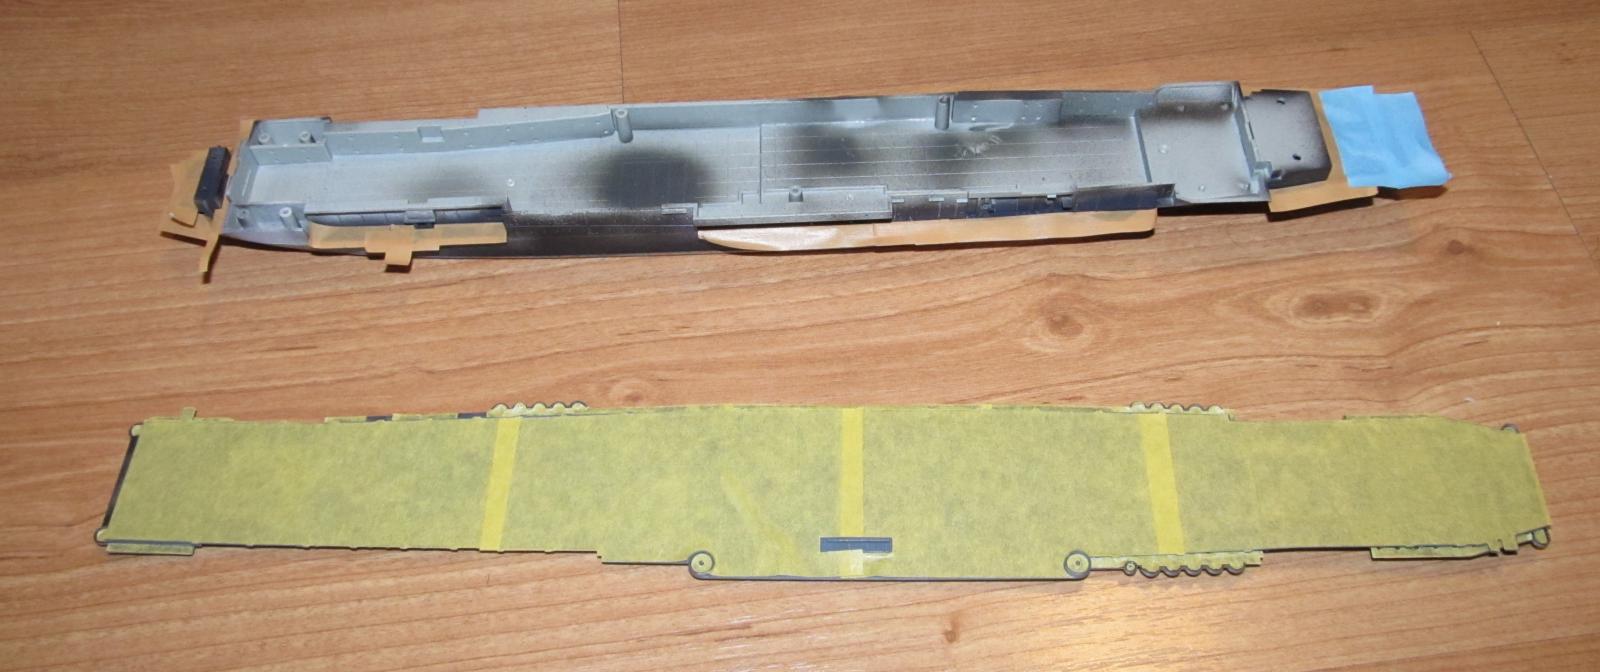
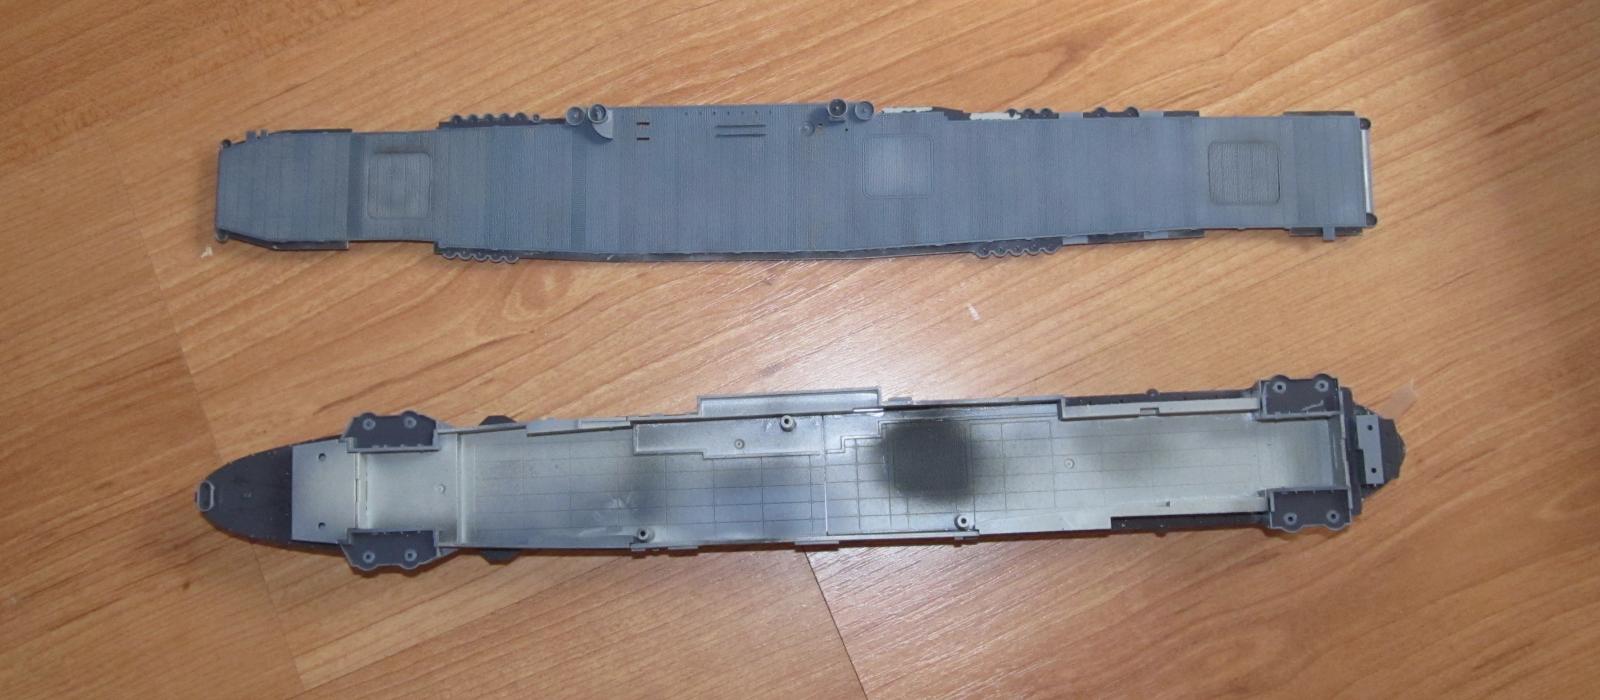
The upper hull and hanger deck were built up slowly. Each part was checked for fit before gluing in. There were a few gaps around all the gun bays that needed putty so I used Vallejo plastic putty to fill it with the excess removed with damp Q-tips.
I assembled the flight deck including the walkways and AA gun tubs when I noticed that the elevators don't fit perfectly. They needed some filler to deal with the small gaps and the weak join needed reinforcement so as not to fall into the hanger so I used some cut 30 thou thick plastic card as reinforcements.
Lastly I removed/cleaned up all the pieces of the island from the sprue (and kept them in a zip lock bag) in preparation for painting.
COLORS AND MARKINGS PART 1
Painting
Academy provides masking for the decks so I painted those first. I primed any part with decking first using Badger Stynylrez black because Model Master Maritime Acrylic deck blue doesn't stick well without primer then sprayed on the deck blue.
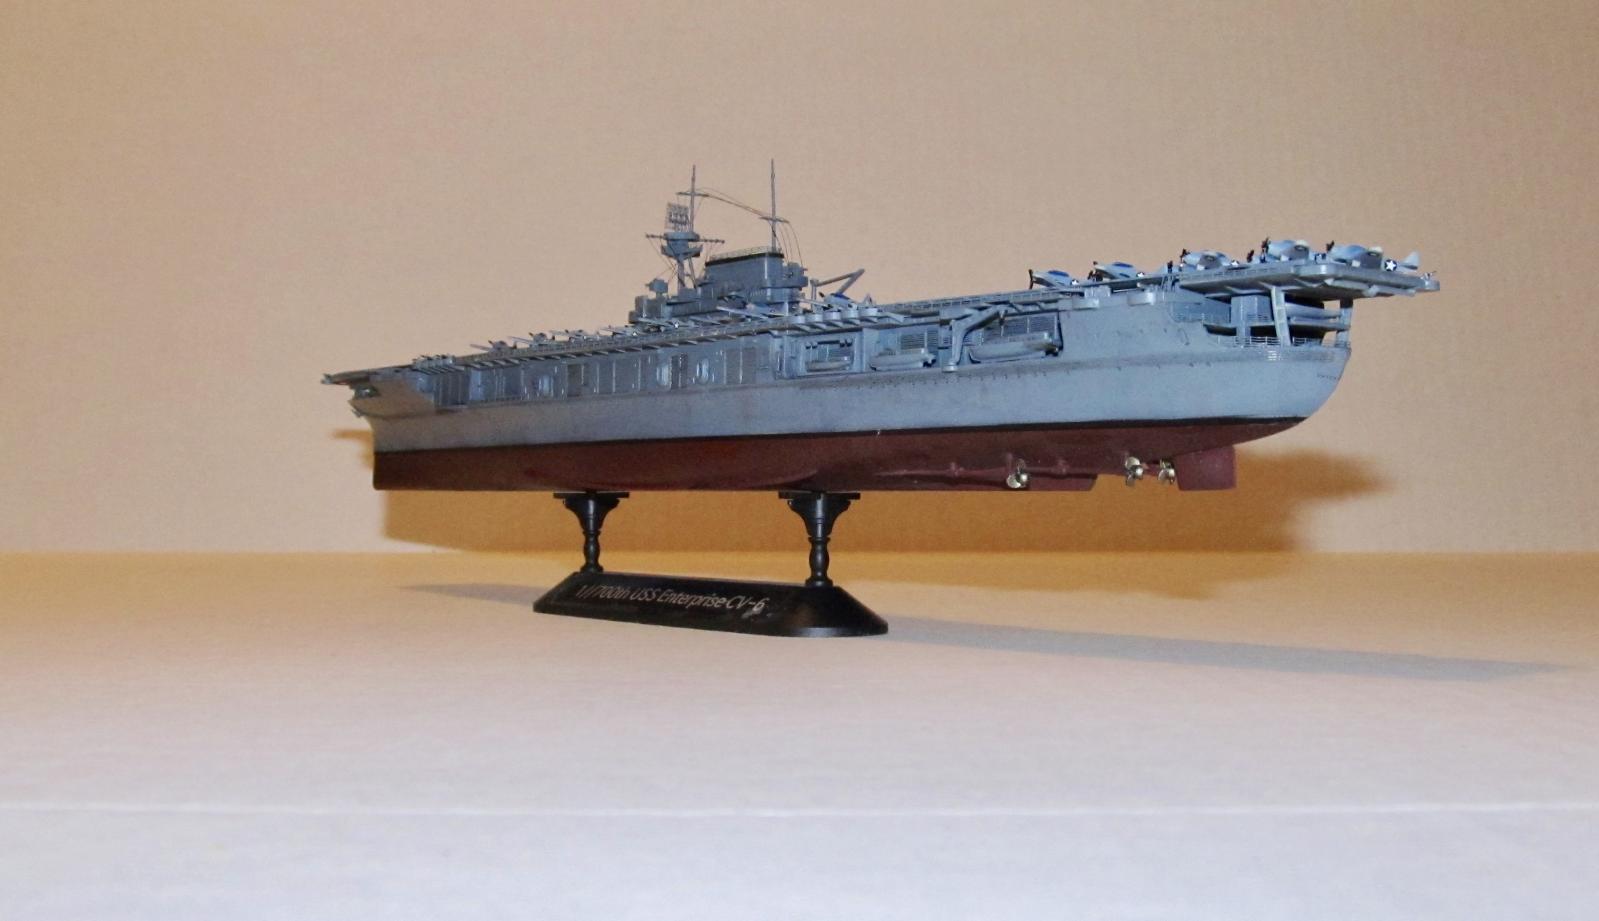
When the paint was dry I then spent several hours adding all the masking which was less tedious to type than to do. The USS Enterprise at that time was camouflaged using Measure 11. I sprayed all the vertical surfaces and underside of the flight deck Tamiya Ocean Grey which isn't 5-S Blue, but it could be considered a near exact match in 1/700 scale based on scale effect which is probably why Academy recommends Ocean Grey in their color chart. It also helps that I have a bottle of Ocean Grey unlike 5-S Blue which dried out a few years ago and got tossed in the trash.
The flight deck is supposed to be painted in Norfolk Deck Stain which is close to 5-S blue in color so I went with a thin coat of Ocean Grey first. All the pictures of the flight deck showed some wear and variation in the color so I sprayed on a 50/50 mix of thinner and Tamiya Intermediate Blue in random lines crosswise down the entire length of the deck. Followed by the same mix of Royal Blue and then Light Sea Grey in random crosswise lines in similar fashion I then sprayed in random patterns a coat of extra thinned (2 parts thinner to 1 part paint) Tamiya Light Sea Grey and then used a very thinned (3 parts thinner to 1 part paint) coat of buff to go over the flight deck.
The various guns, deck pieces and PE railings were painted Ocean Grey as per Measure 11.
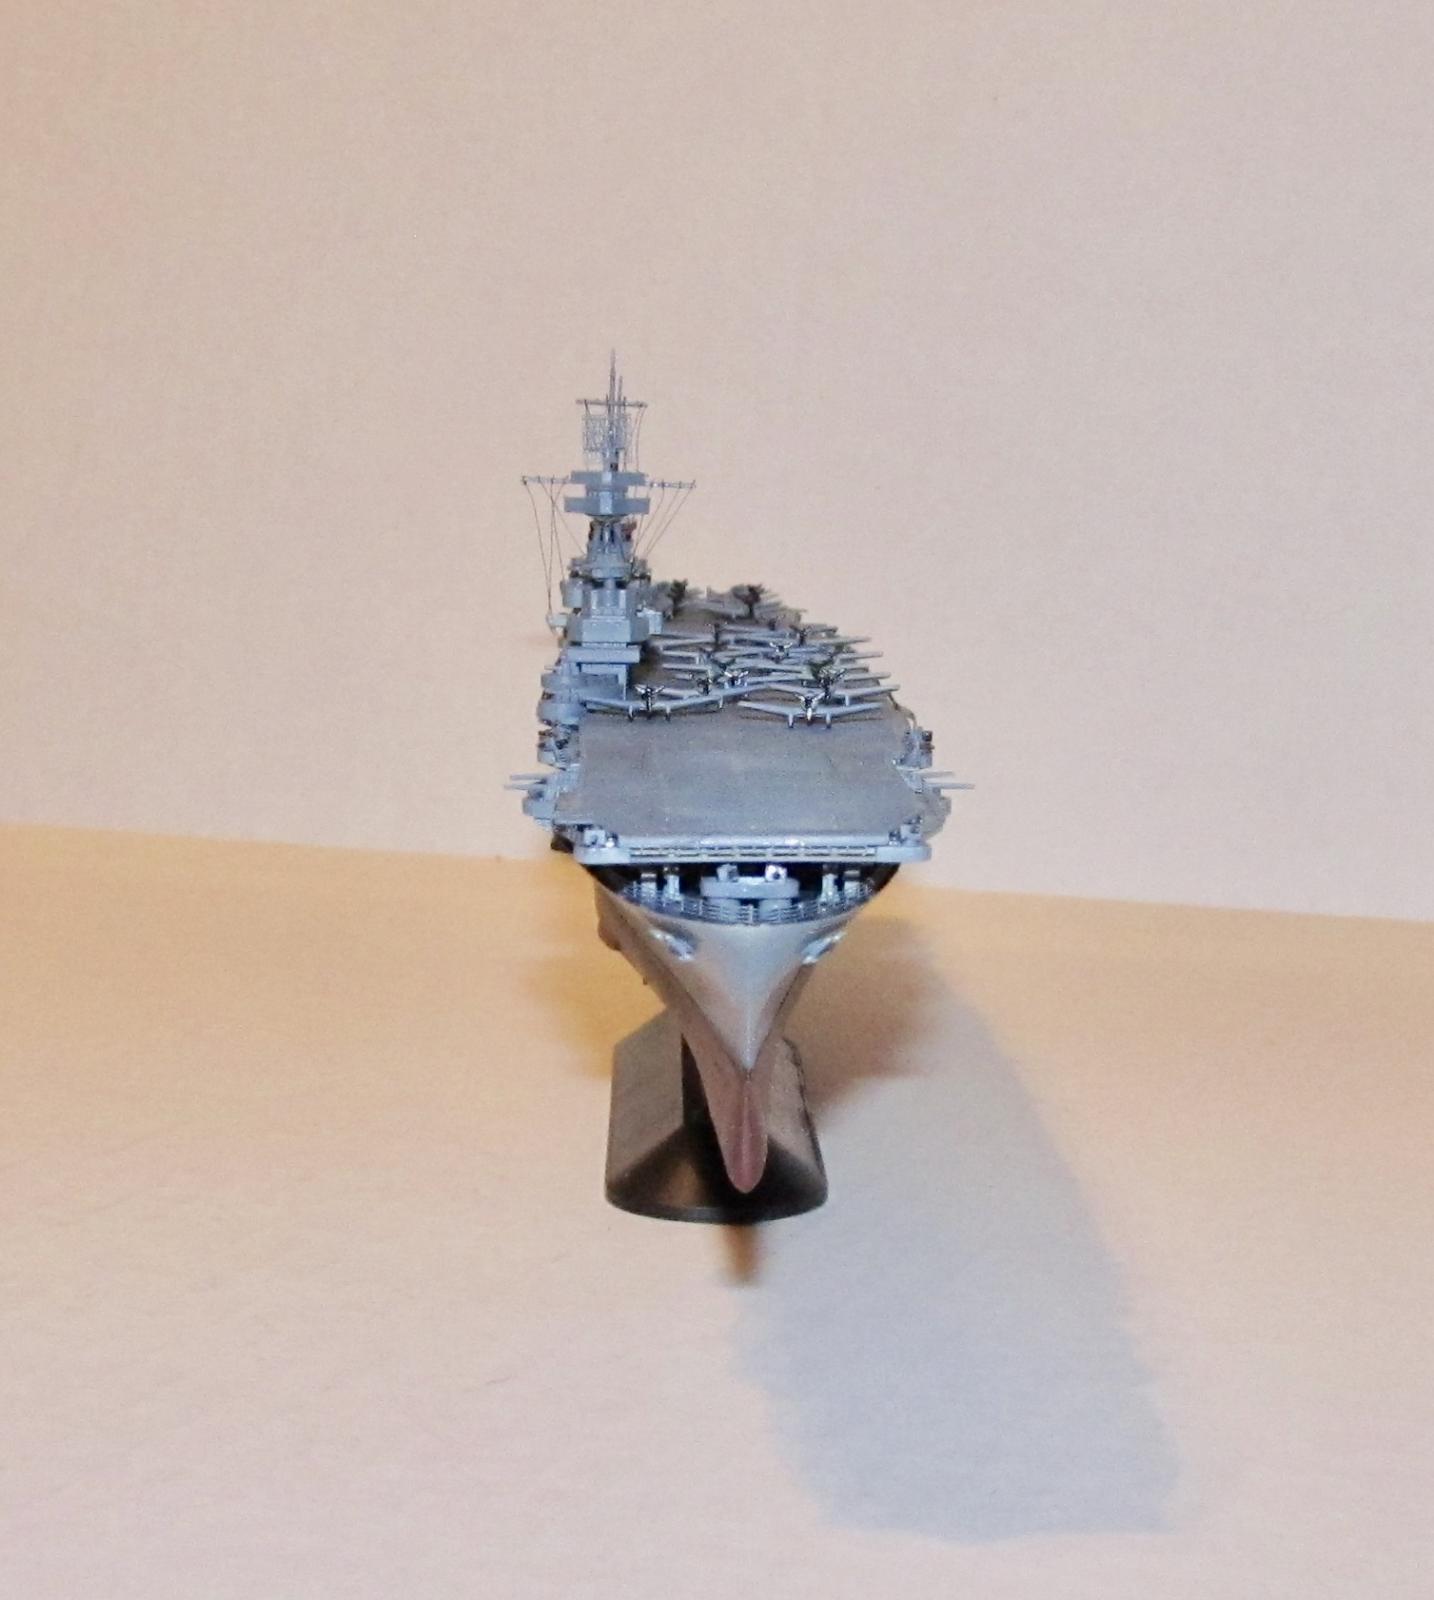
I masked off the main hull except the lower edge and then sprayed flat black for the waterline demarcation line. The bottom hull was painted Tamiya Hull Red. The props were removed from the sprue, cleaned up and sprayed combination of Tamiya Copper/Gold.
Decals
I used Starfighter Decals Sheet for Yorktown Class Carriers instead of the incorrect kit decals. The first decals I used were the national insignia for the aircraft. I tried to use the aircraft ID decals, but they turned out to be too small for me to manipulate so I stopped after a couple of mistakes. The Starfighter Decals worked well with MicroSol/Set.
CONSTRUCTION PART 2
I assembled the island with the pre-painted plastic parts gluing everything except the masts and observation tower. The guns and various other deck pieces were added. Thanks to rough model handling during the remaining assembly, some of the 20mm cannons would come off and/or get lost, but that is okay as Academy provides a number of extra pieces which I needed.
The masts turned out to be finely done, but also extremely fragile. I broke them while trying to remove them from the sprue. I assembled the PE CXAN-1 antenna and glued all the bits for the topside of the island on.
COLORS AND MARKING PART 2
Decals
The flight deck was sprayed with Future in preparation for the decals. I used the Starfighter Decals for the flight deck decals as the Academy sheet is for seems to be more correct for the flight deck markings of the post 1943 refit Enterprise. The three landing stripes were added as per their instructions and the nameplate was added to the stern. It took several applications of Solvaset for the flight deck decals to settle down.
Weathering
I used diluted oil paints (black and raw umber) for the first time for weathering. Mixed 2:1 mineral spirits to paint in order to dilute them and then used a flat wide brush run the mix down the hull in the vertical direction a couple of times and then on the flight deck cross wise. I then used the flat wide brush dipped in mineral spirits to thin the mixture even more and make the mess fainter. I let the oil paints dry for a week.
Next I used weathering powders (concrete and black) on the flight deck. It took an hour of brushing them around and removing the excess till I got the look I wanted.
Final Coat
I sprayed a couple of thin coats of Tamiya Flat to seal everything up. I did this after I completed construction and added the aircraft (which were held down by tie-down drops of white glue.)
FINAL CONSTRUCTION
I started adding the photo etch (PE) railings as per instructions. Academy provides an excellent guide that shows each location as well as the shape and type of bends required for each one (other major model makers might consider copying what Academy has done. I'm looking at you Trumpeter!) Adding the railings is always the long slow part of any ship build for me and it took me a month to complete the task. One thing I learned is how much easier it is to do railings with a set of good tweezers. I had bought a set from Amazon a few months earlier and found that a lot of my frustrations with railing disappeared with some delicate maneuvering with bent tip tweezers. I added most of the railings with PE railing with the bottom dipped in with some CA glue. Some of the railings were glued on with white glue.
Before I completed the PE railings for the island, I worked on the rigging. I used photographs and drawing to provide a rough idea of what and where I had to add rigging. First thing I had to do was I had to repair the masts using CA glue before adding the rigging thread (used UNI dark brown.) I made the first lines too loose, but the remaining ones were tighter so the rigging looks imbalanced. I wish it looked better, but there is no easy way to correct the rigging so I had to leave it. It is still better than my previous attempts at rigging but still flawed. Only way to improve on such things is practice.
Once the rigging was done, the last of the island PE railings were added.
Lastly I added the planes to the flight deck with a dot of white glue on each wheel to keep them anchored to the deck.
CONCLUSION
The Academy USS Enterprise despite its decal flaws is an excellent kit of a neglected historic warship especially the deluxe version which has PE and deck masking. Not recommended for the ship beginner, but definitely for someone with some experience with PE and ship models.
Don't expect it to be an easy build, as the PE and the fine details made for a long build for me. Despite all that and my self inflicted errors, this is a satisfying addition to my naval models.


Nice review of an excellent project, Dan. You got it all right in your history of Big E.
Jack Taylor, who joined VF-15 right after the Marianas Campaign and shot down two Zeros during the Philippines campaign that fall, transferred to VF-20 aboard Enterprise when CVG-15 went home in November, serving there until she became a night carrier with CVG(N)-90. He later founded Enterprise Car Rental, naming the company in honor of his QWW2 service (you have to admit, Enterprise Car Rental just sounds better than Essex Car Rental).
Of note about her service at night, after Saratoga was hit at Iwo Jima, Enterprise remained as the only fleet carrier supporting the invasion and became the first carrier to operate her air group 24/7, over 40 continuous days of operation.
And it was a Crime Against History that she wasn't saved. But as anyone who has ever tried to operate a ship as a museum, it is a Thankless Task (as the guys who run Iowa and Hornet will tell you).
Thanks for the excellent project and writeup.
Thanks very much.
I did get that little tidbit from your book about CVW-15 which was too interesting to not mention. I apologize for not mentioning that.
As for the rest, I can pretty much recite the history of the USS Enterprise from memory having read far too many books on carrier warfare in WW2 and the Pacific War as a kid. Never understood why the Navy let her be scrapped. Even here in Canada we preserved the HMCS Haidi (the RCN's most decorated ship and last Tribal class destroyer in existance) for posterity.
Excellent model and write up, Dan!
Nice in progress pics, too!
Thanks Spiros. I always try to photo in progress, but not always succeed.
Carriers in this scale are tough to build because they have so much detail to include, but yours came out perfectly, Dan (@dbdlee).
Thanks. You're right about the carriers being tough in 1/700. I actually thought they would be easy... oops.
Impressive looking Enterprise and an equally impressive write up, Dan.
Great way o remember the Battle of Midway and the definitive turning point of War in the Pacific.
I first learned of the battle from the epic 1976 Movie that starred so many big name Hollywood actors. Most memorable part of the movie is near the end when Charlton Hestons fictitious character Captain Matthew Garth crashes his plane while making a landing.
Very nice posting.
Thanks for the compliment. I loved the movie (despite all the factual errors) when growing up too. I'll admit I was rather confused when Garth's plane turned into a F9F Cougar though and became one of the more famous naval plane crashes of all time.
Gorgeous rendition of this nice kit! Nice job, Dan.
Thank you. I enjoyed doing both.
Beautifully done! Nice review and history.
Thanks very much.
It looks so great...I did the enterprise in 1/1200 from revell... definitively not even closer
1 attached image. Click to enlarge.