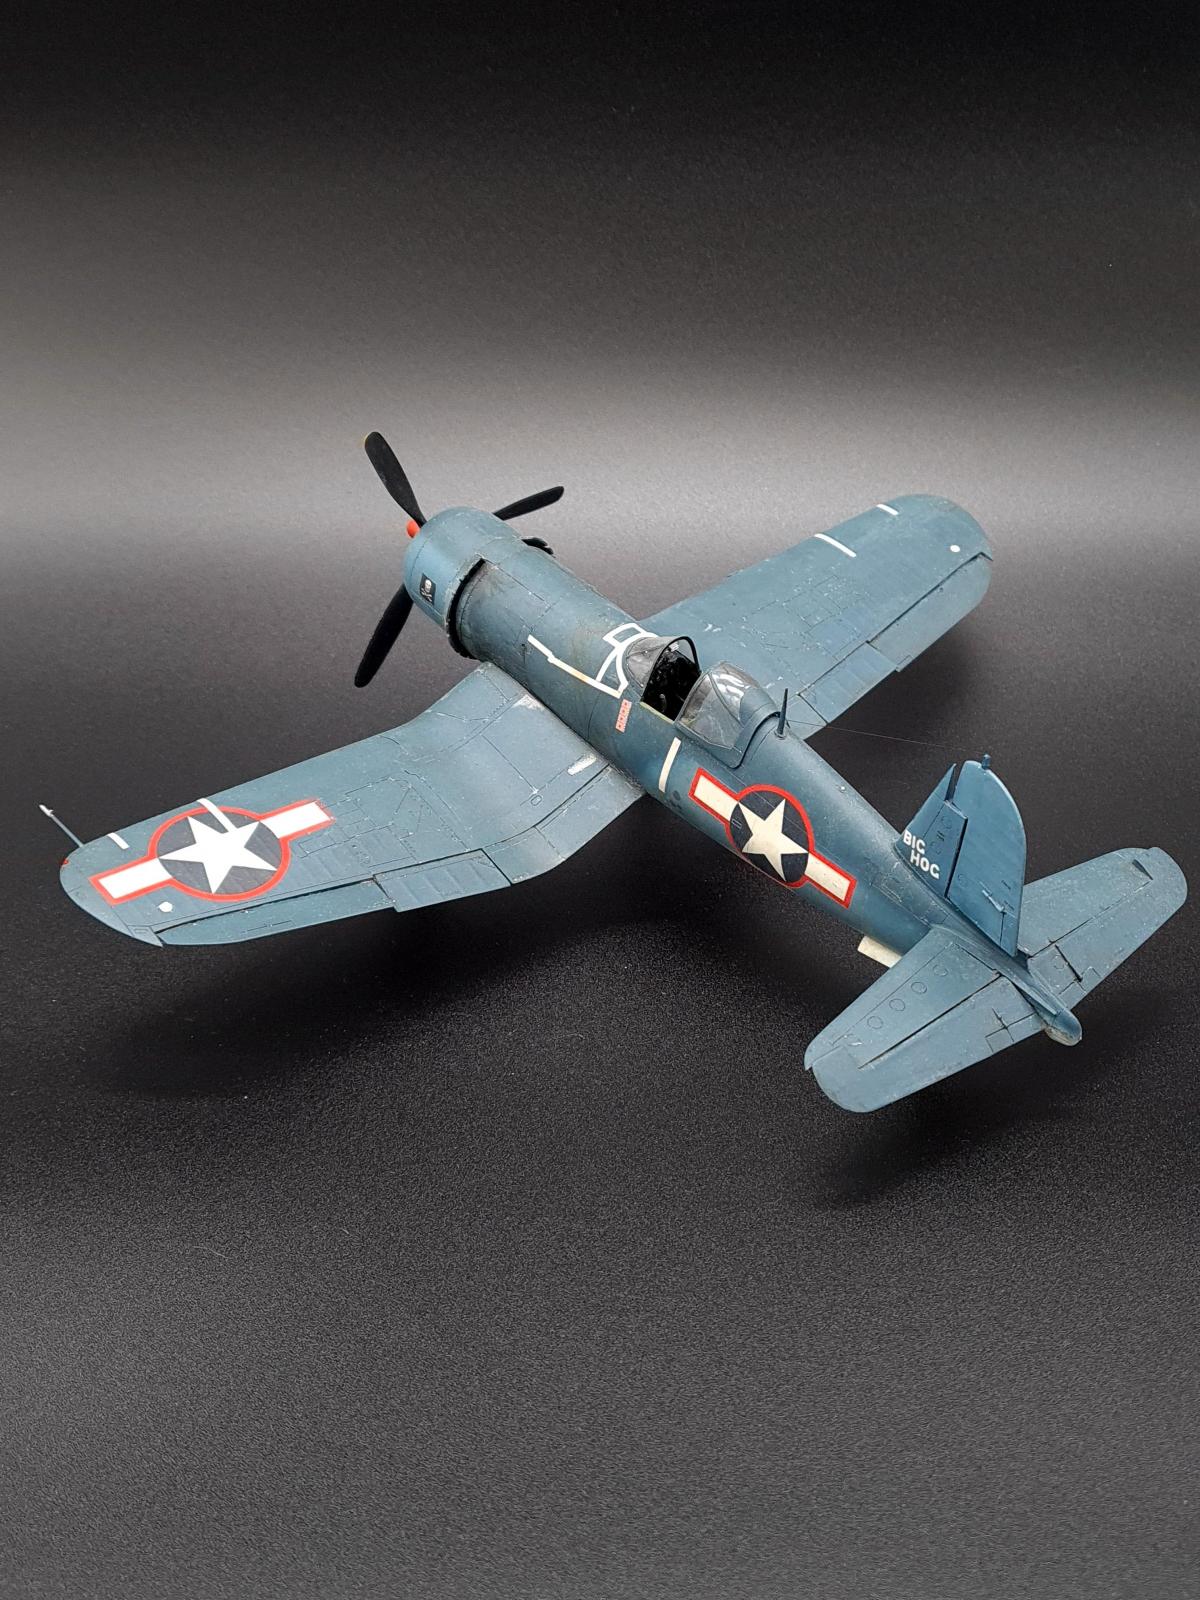
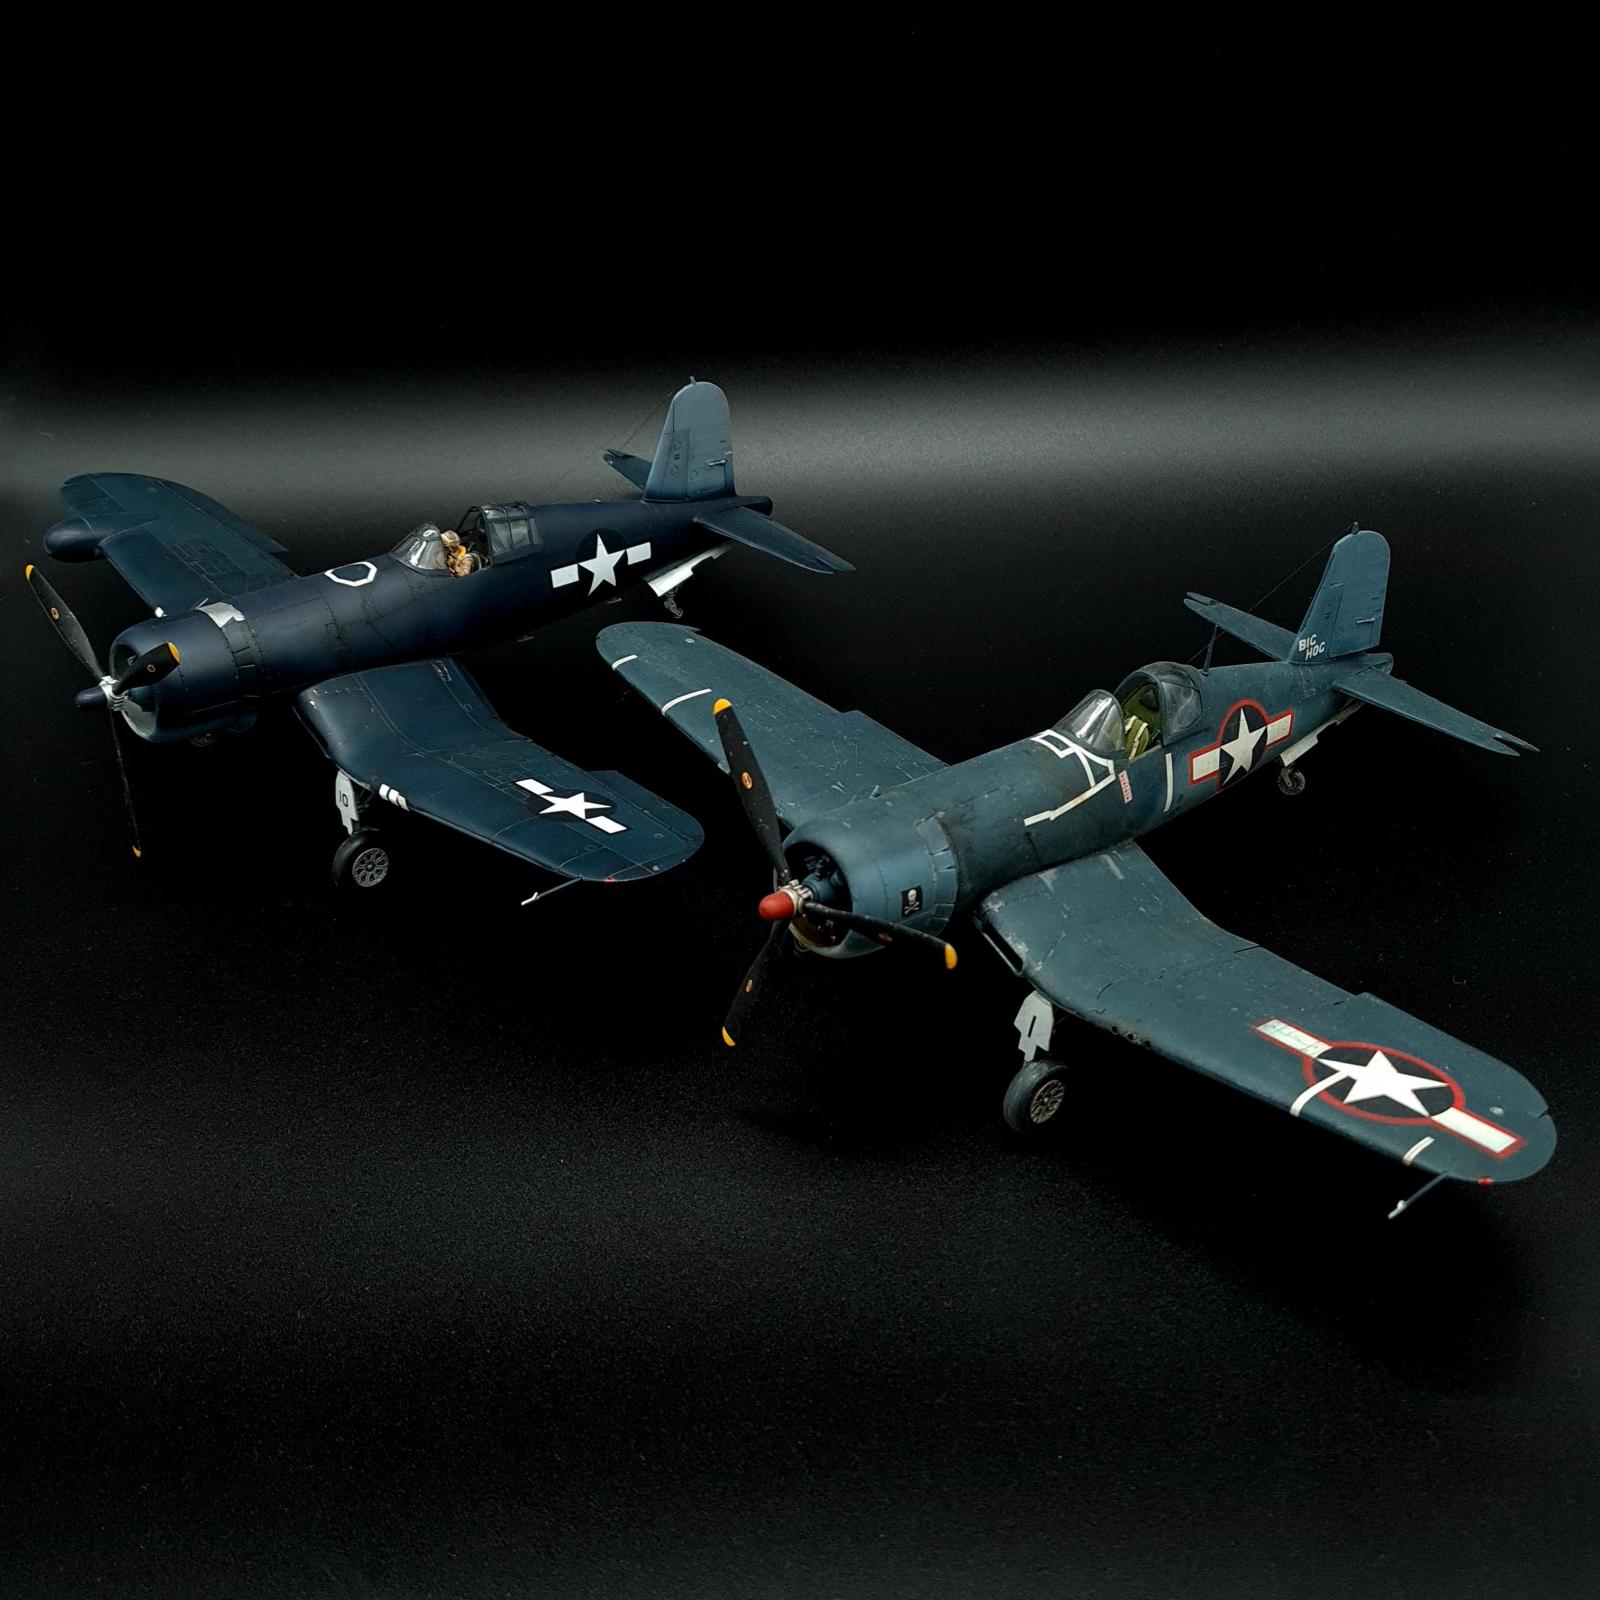
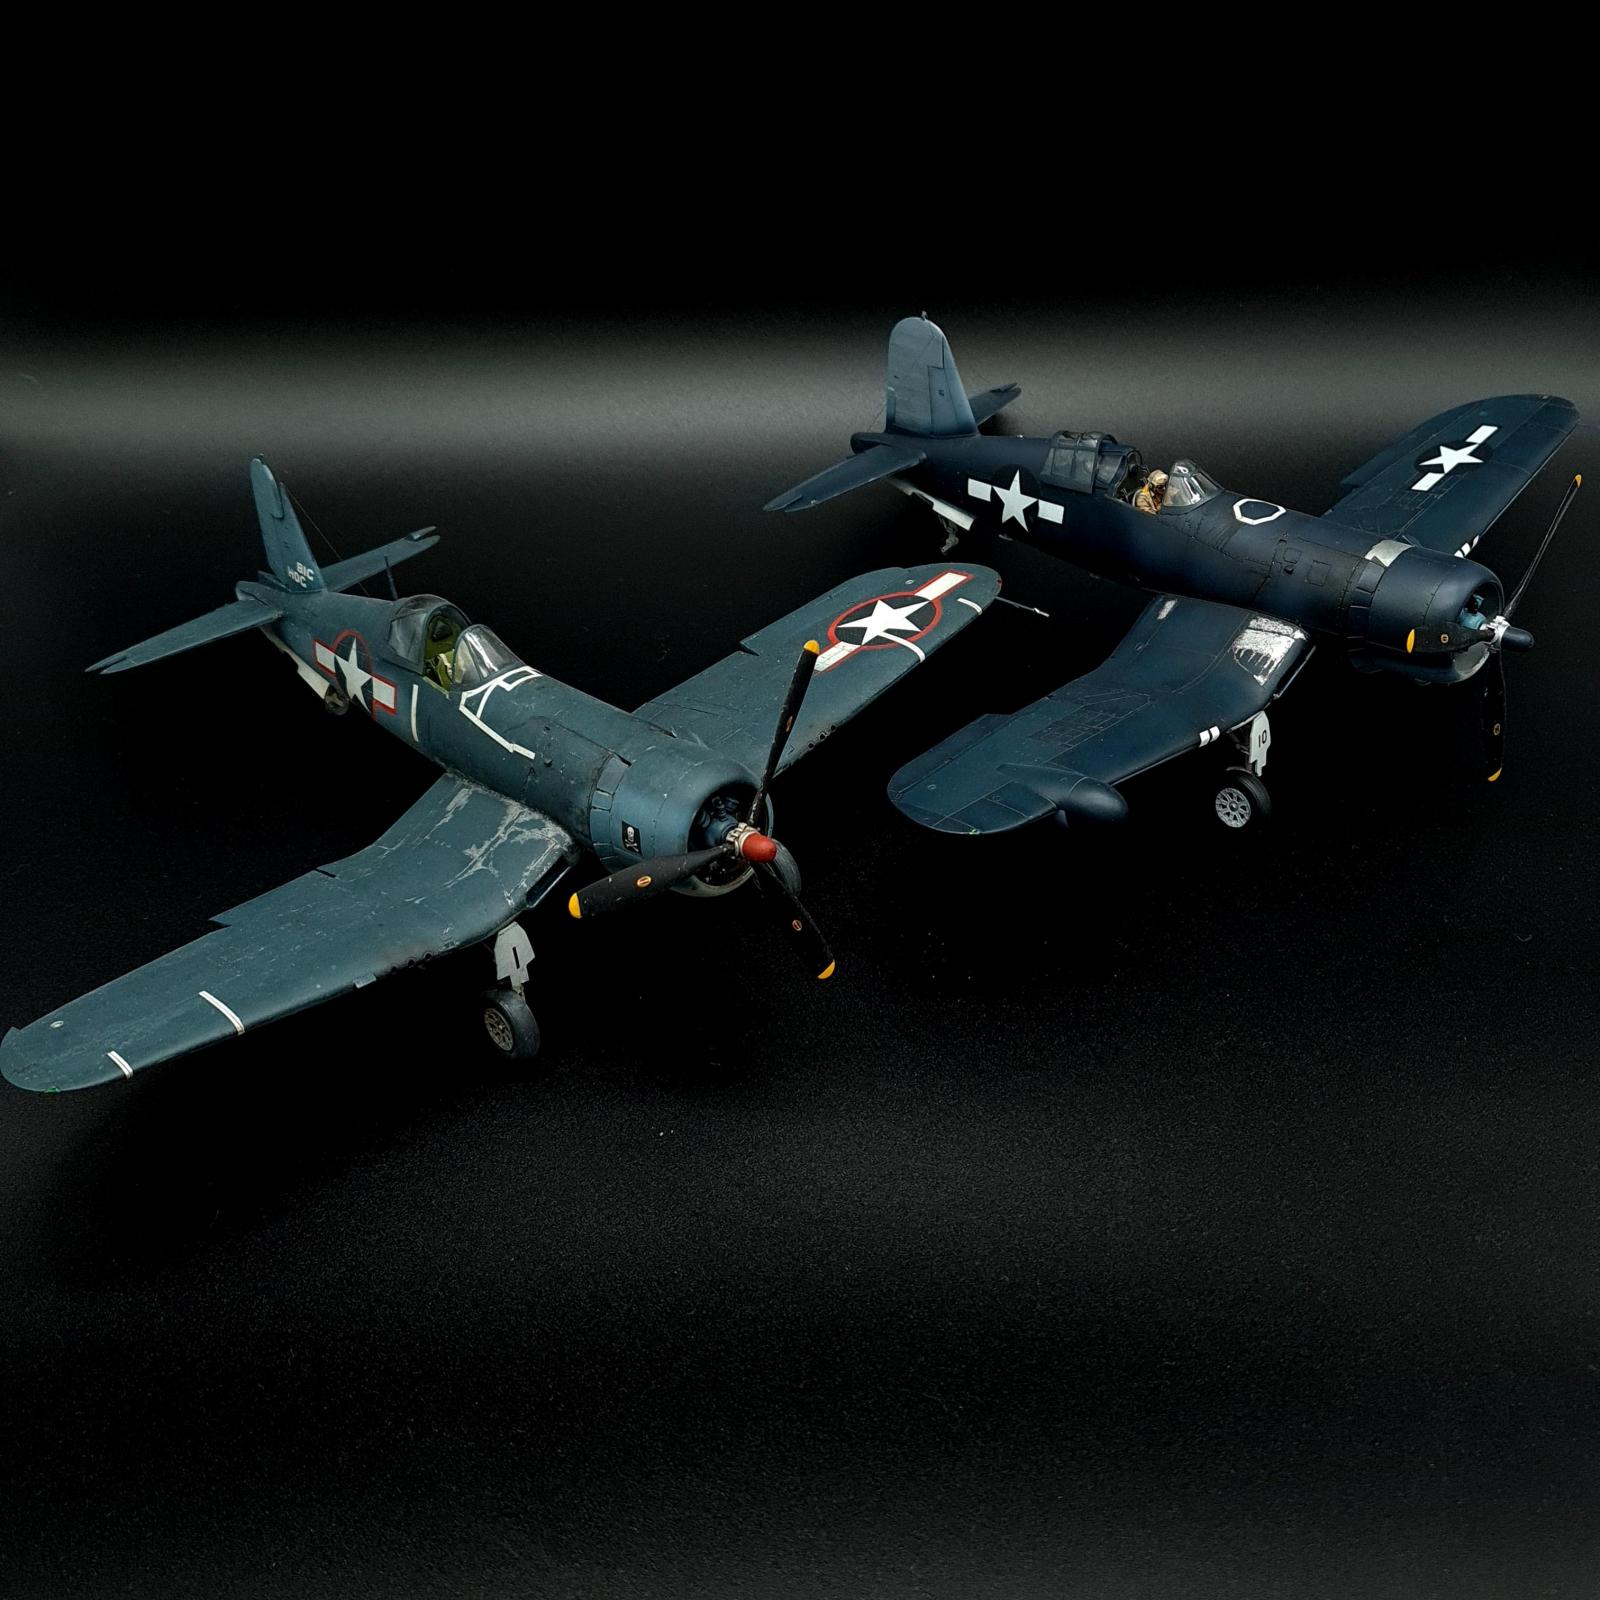
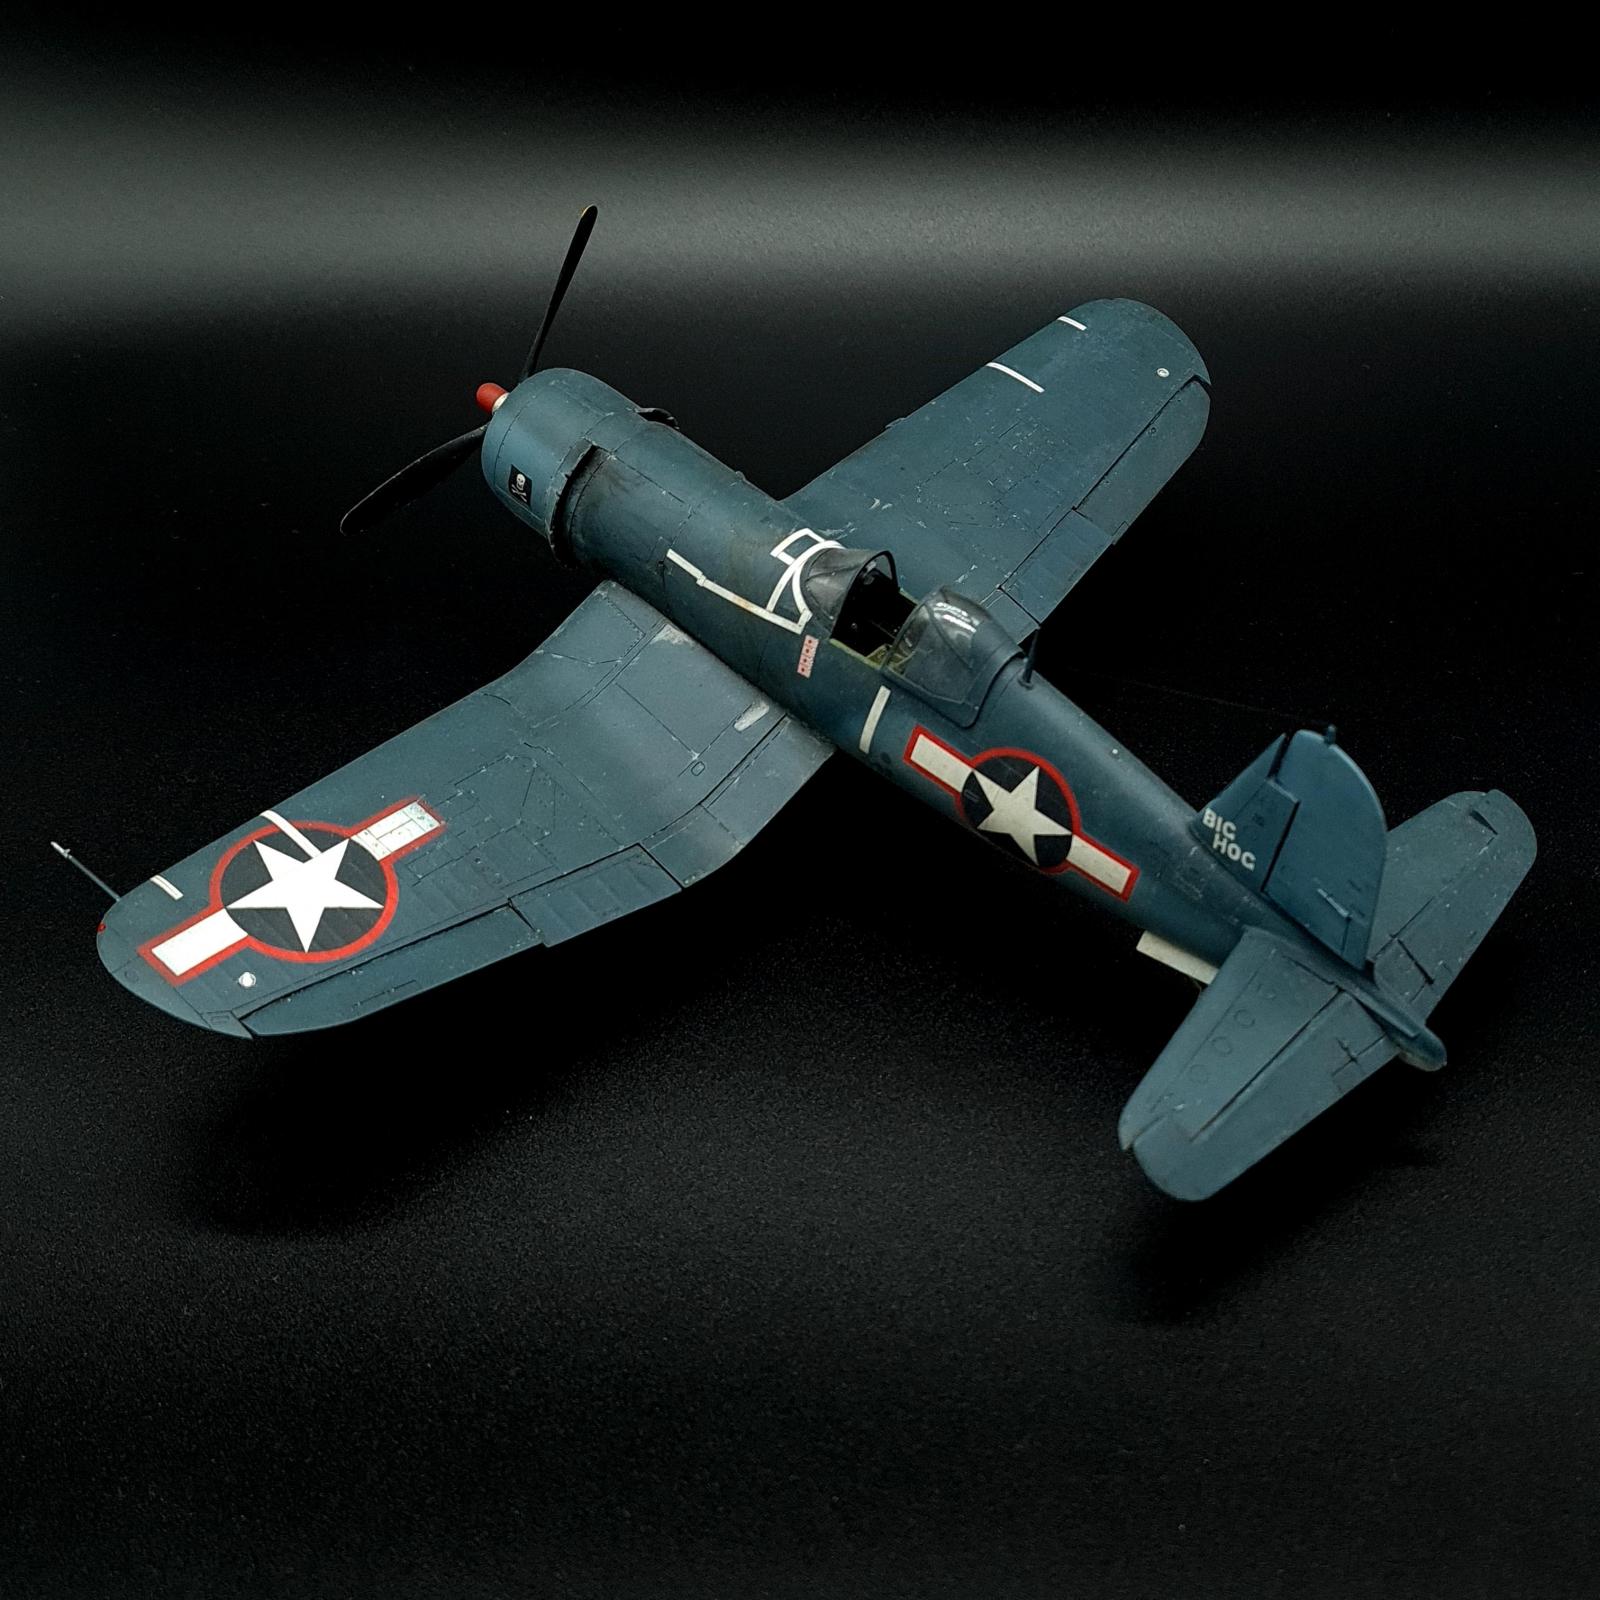
Tamiya F4U-1A Corsair, 1/48. The Big Hog.
I thought I'd finally get around to posting this Corsair I built last year, making it so all my Corsairs are uploaded here in one form or another. This model in particular taught me a lot and I am planning on basically remaking it (but as a different VF-17 bird) at some point in the future.

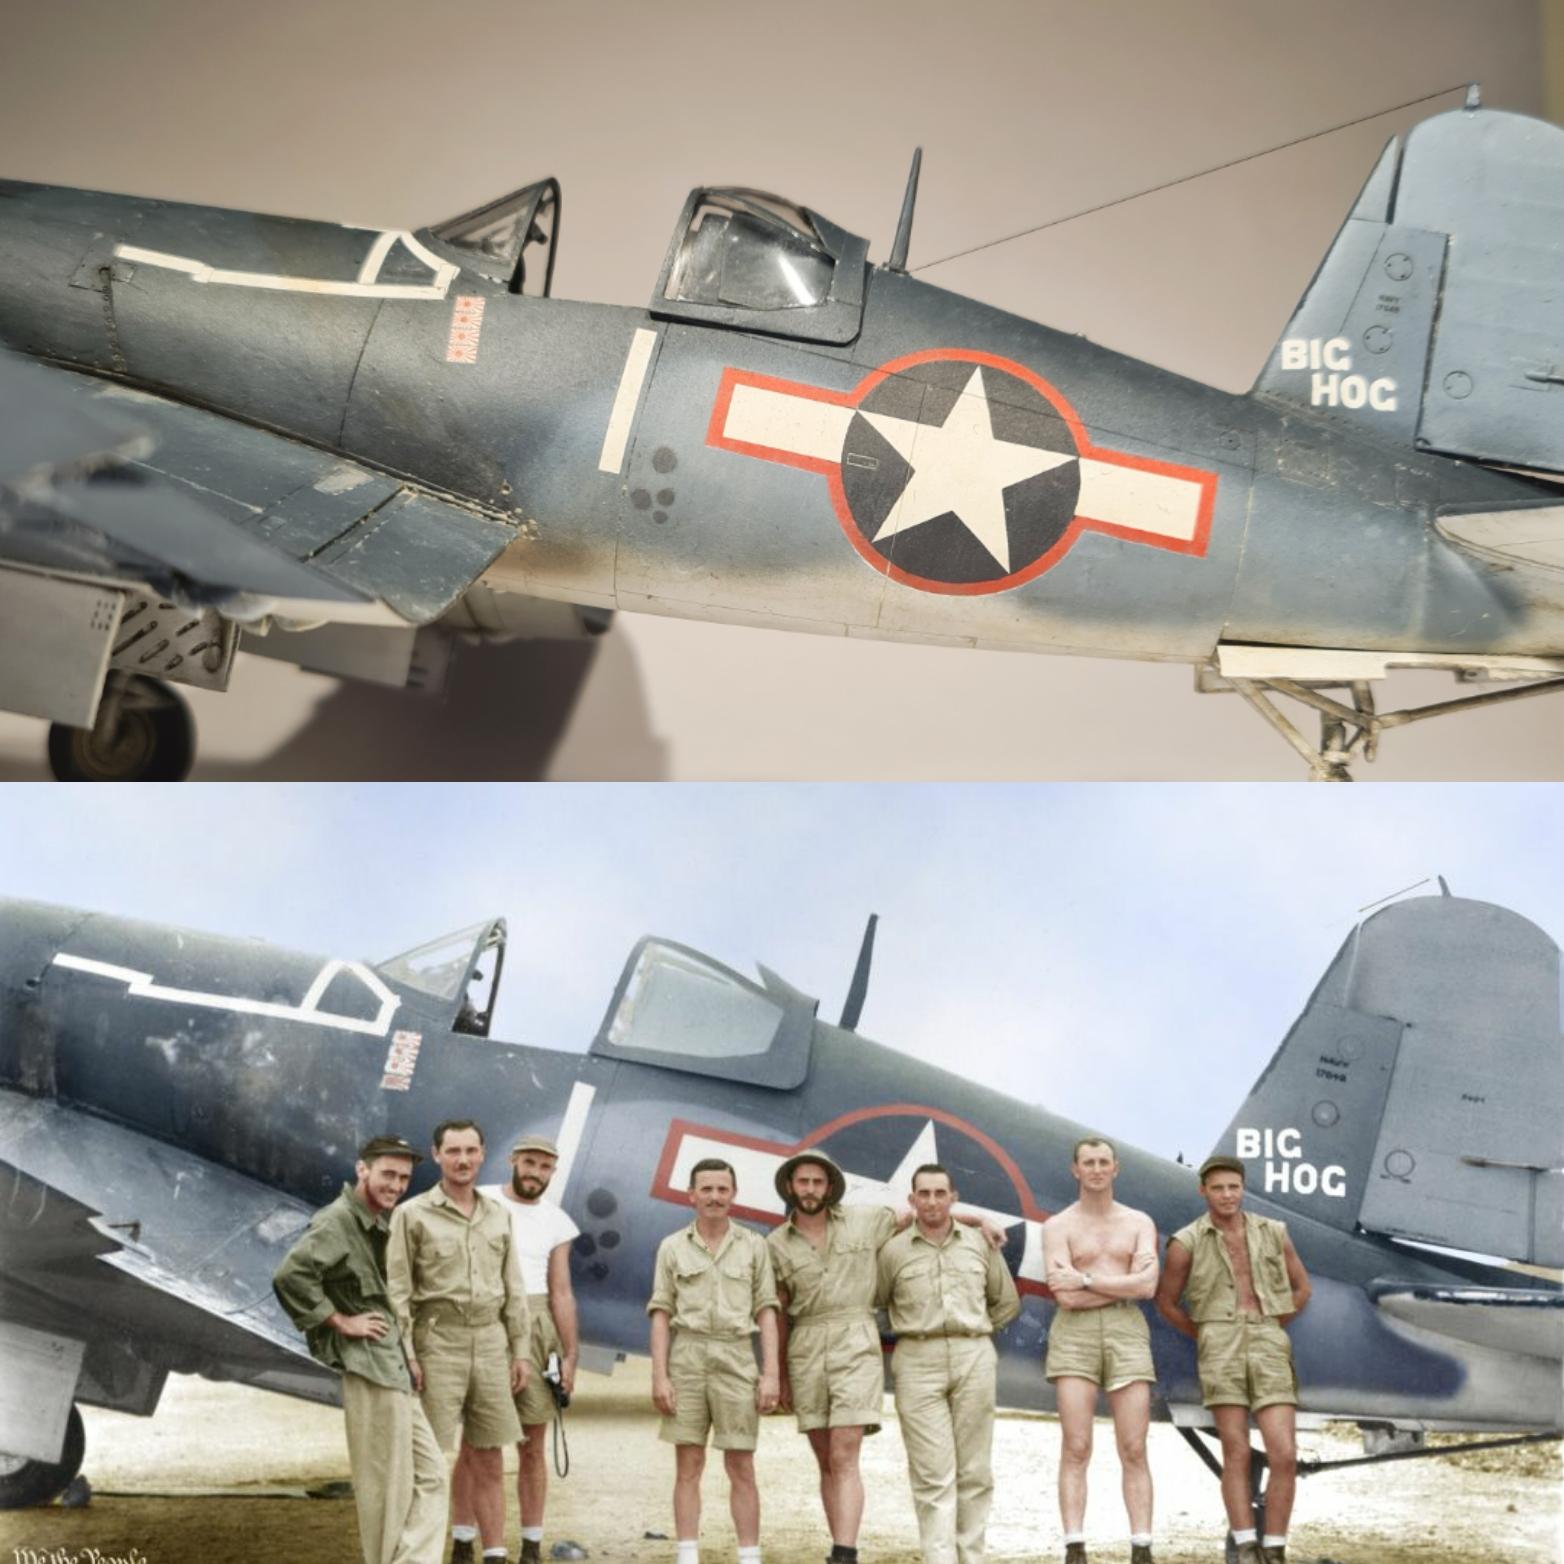
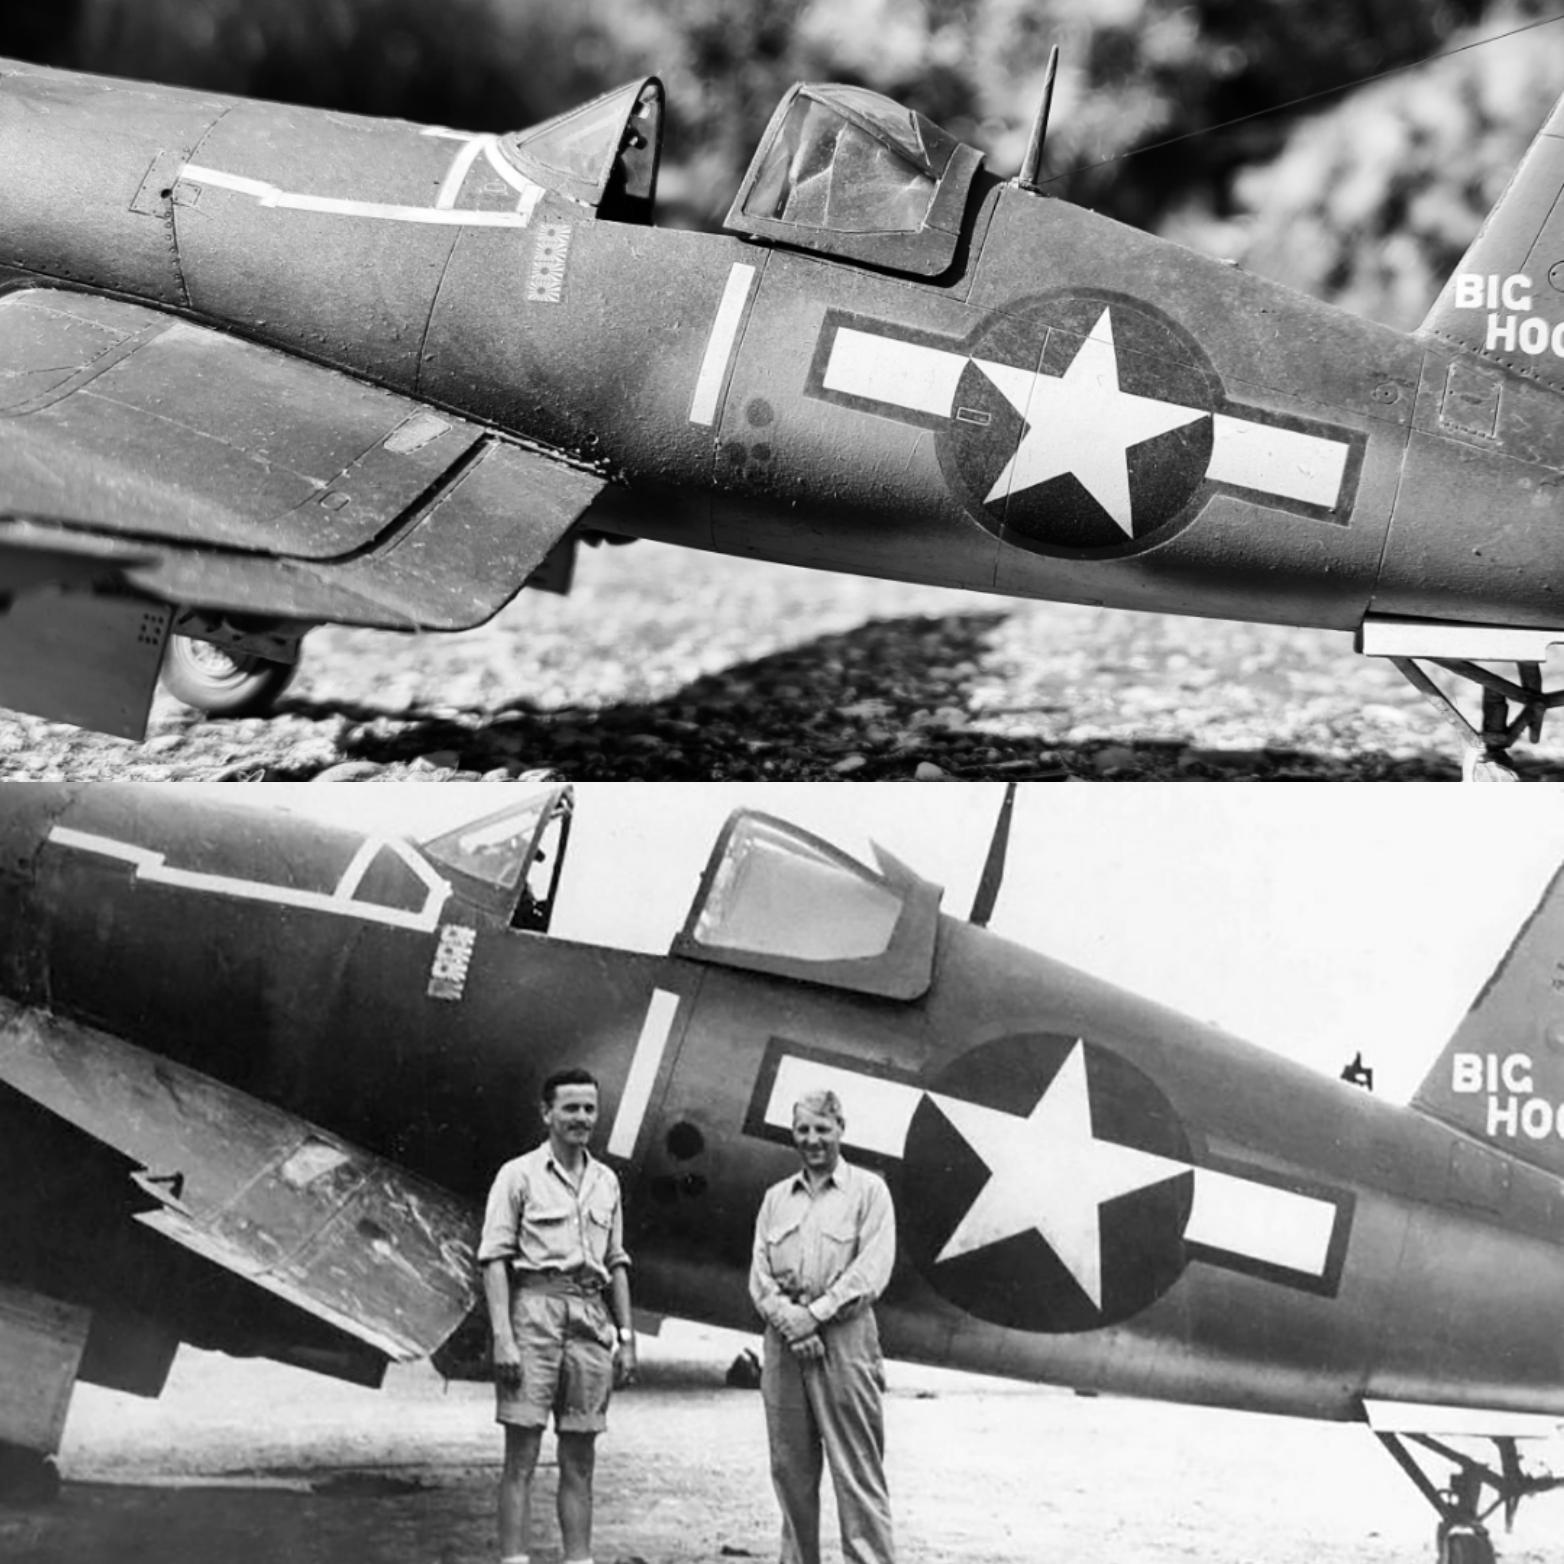
The build was simple as any Tamiya Corsair is, though I found this kit was somewhat misaligned. The tail and nose joined together perfectly, but some panel lines didn't match up as if the right side of the fuselage had the recessed lines a millimetre aft of the left side. This kit was an attempt to recreate a photo of the real aircraft, as such Aires quickboost resin provided control surfaces to give a slightly asymmetrical positioning, as well as providing flaps for an flaps up position. On top of this, Montex masks were used for the canopy as well as notably the markings.
With the construction underway the resin parts were placed in, the flaps don't really line up 100% perfectly so a gap can be seen which was quite annoying, I had the same issue with my previous F4U-1 Birdcage build. On top of this, the resin control surfaces had some issues, the rudder didn't fit perfectly but this is more due to my inexperience as later I used the same piece and it was fine, though one issue is it lacks the stub for a antenna wire. The tailplane has both the horizontal stabilisers and elevators as seperate pieces, with the elevators being quite bent so had to have a bath in hot water and then put under some weight to straighten them up.
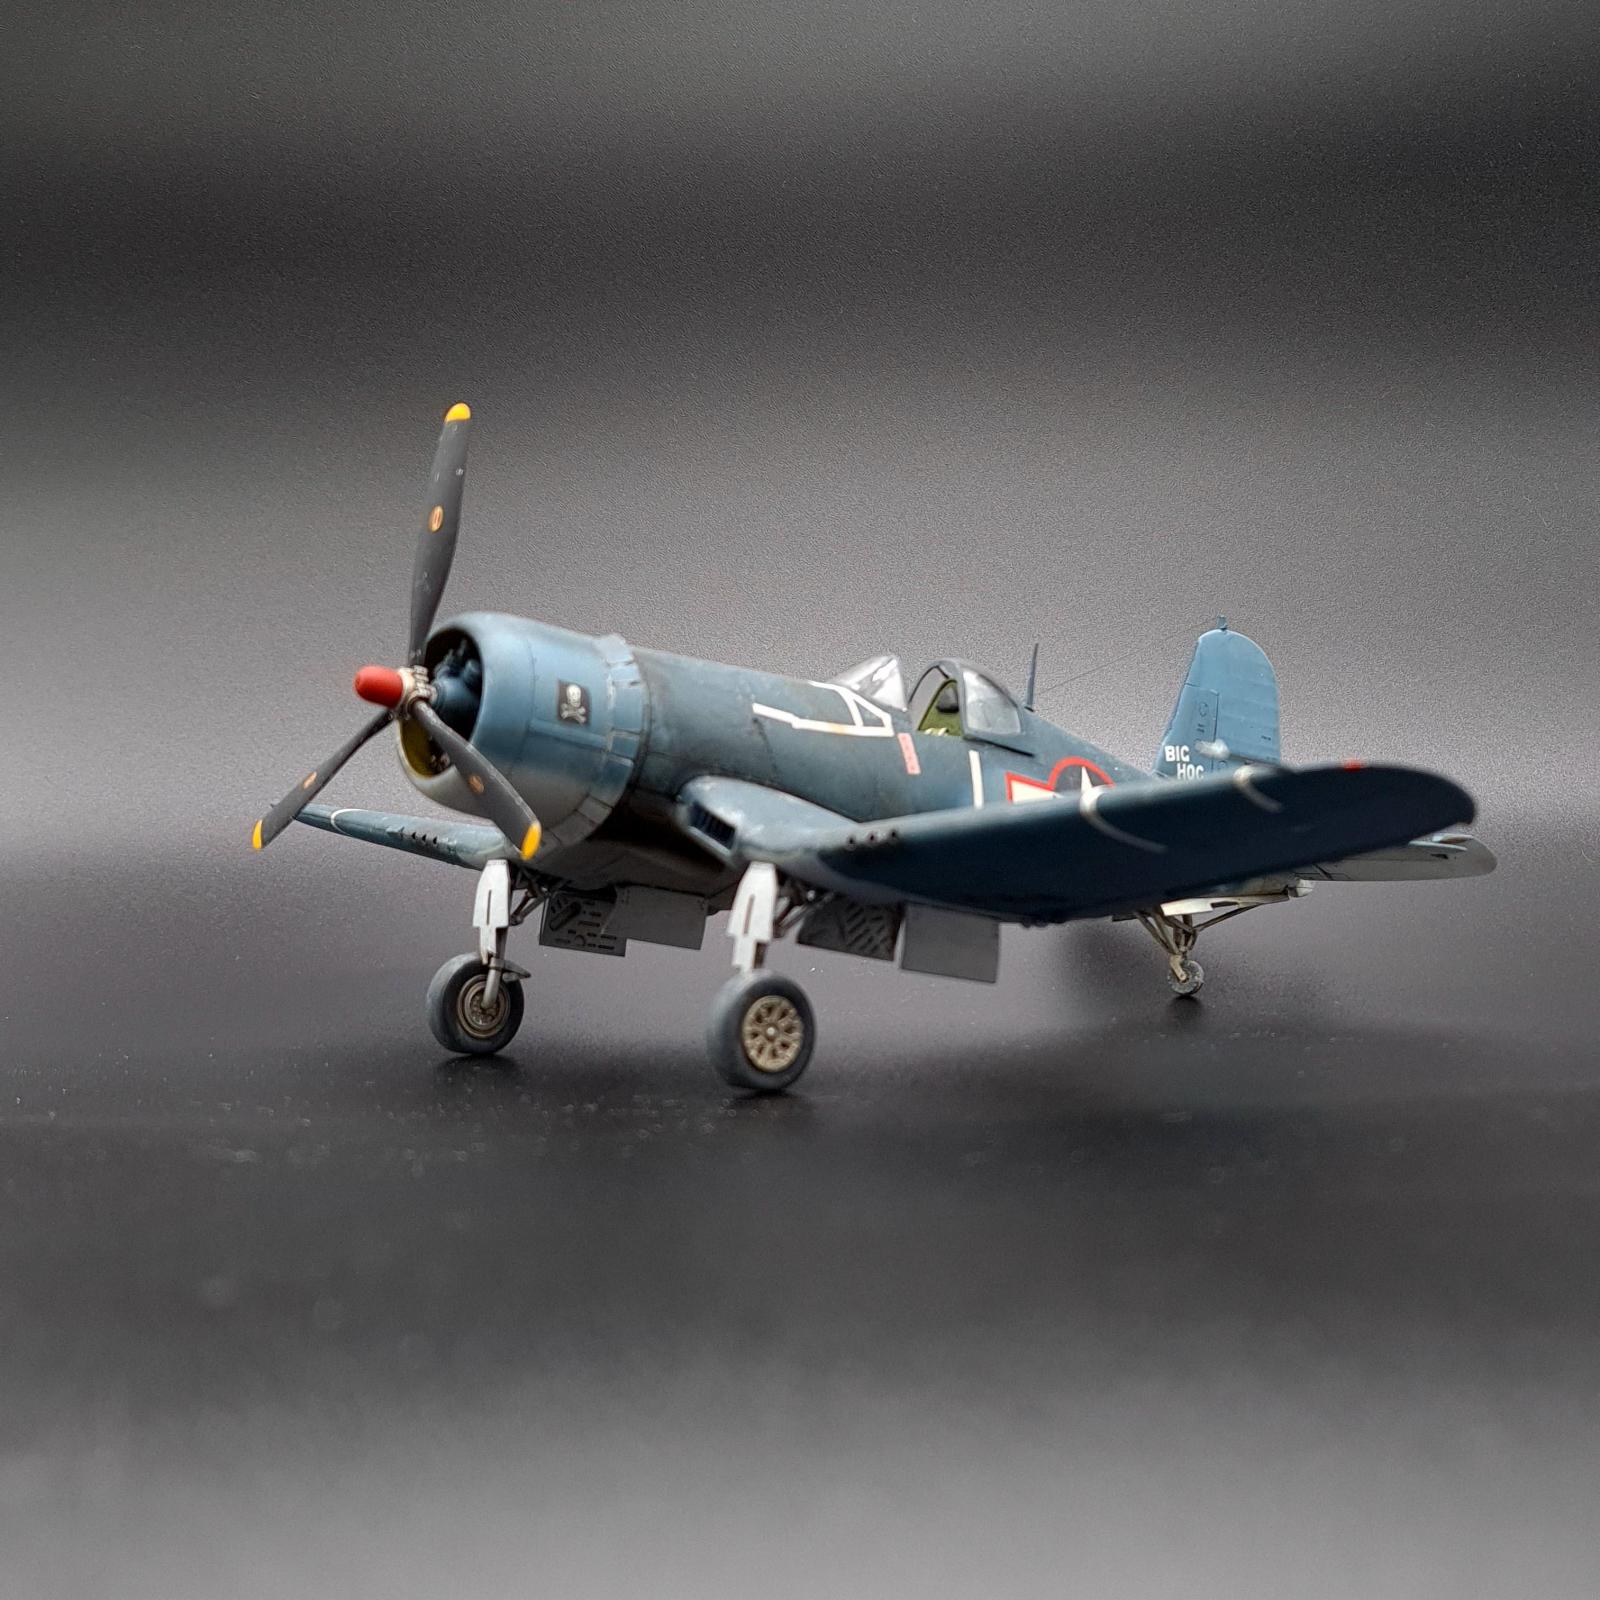
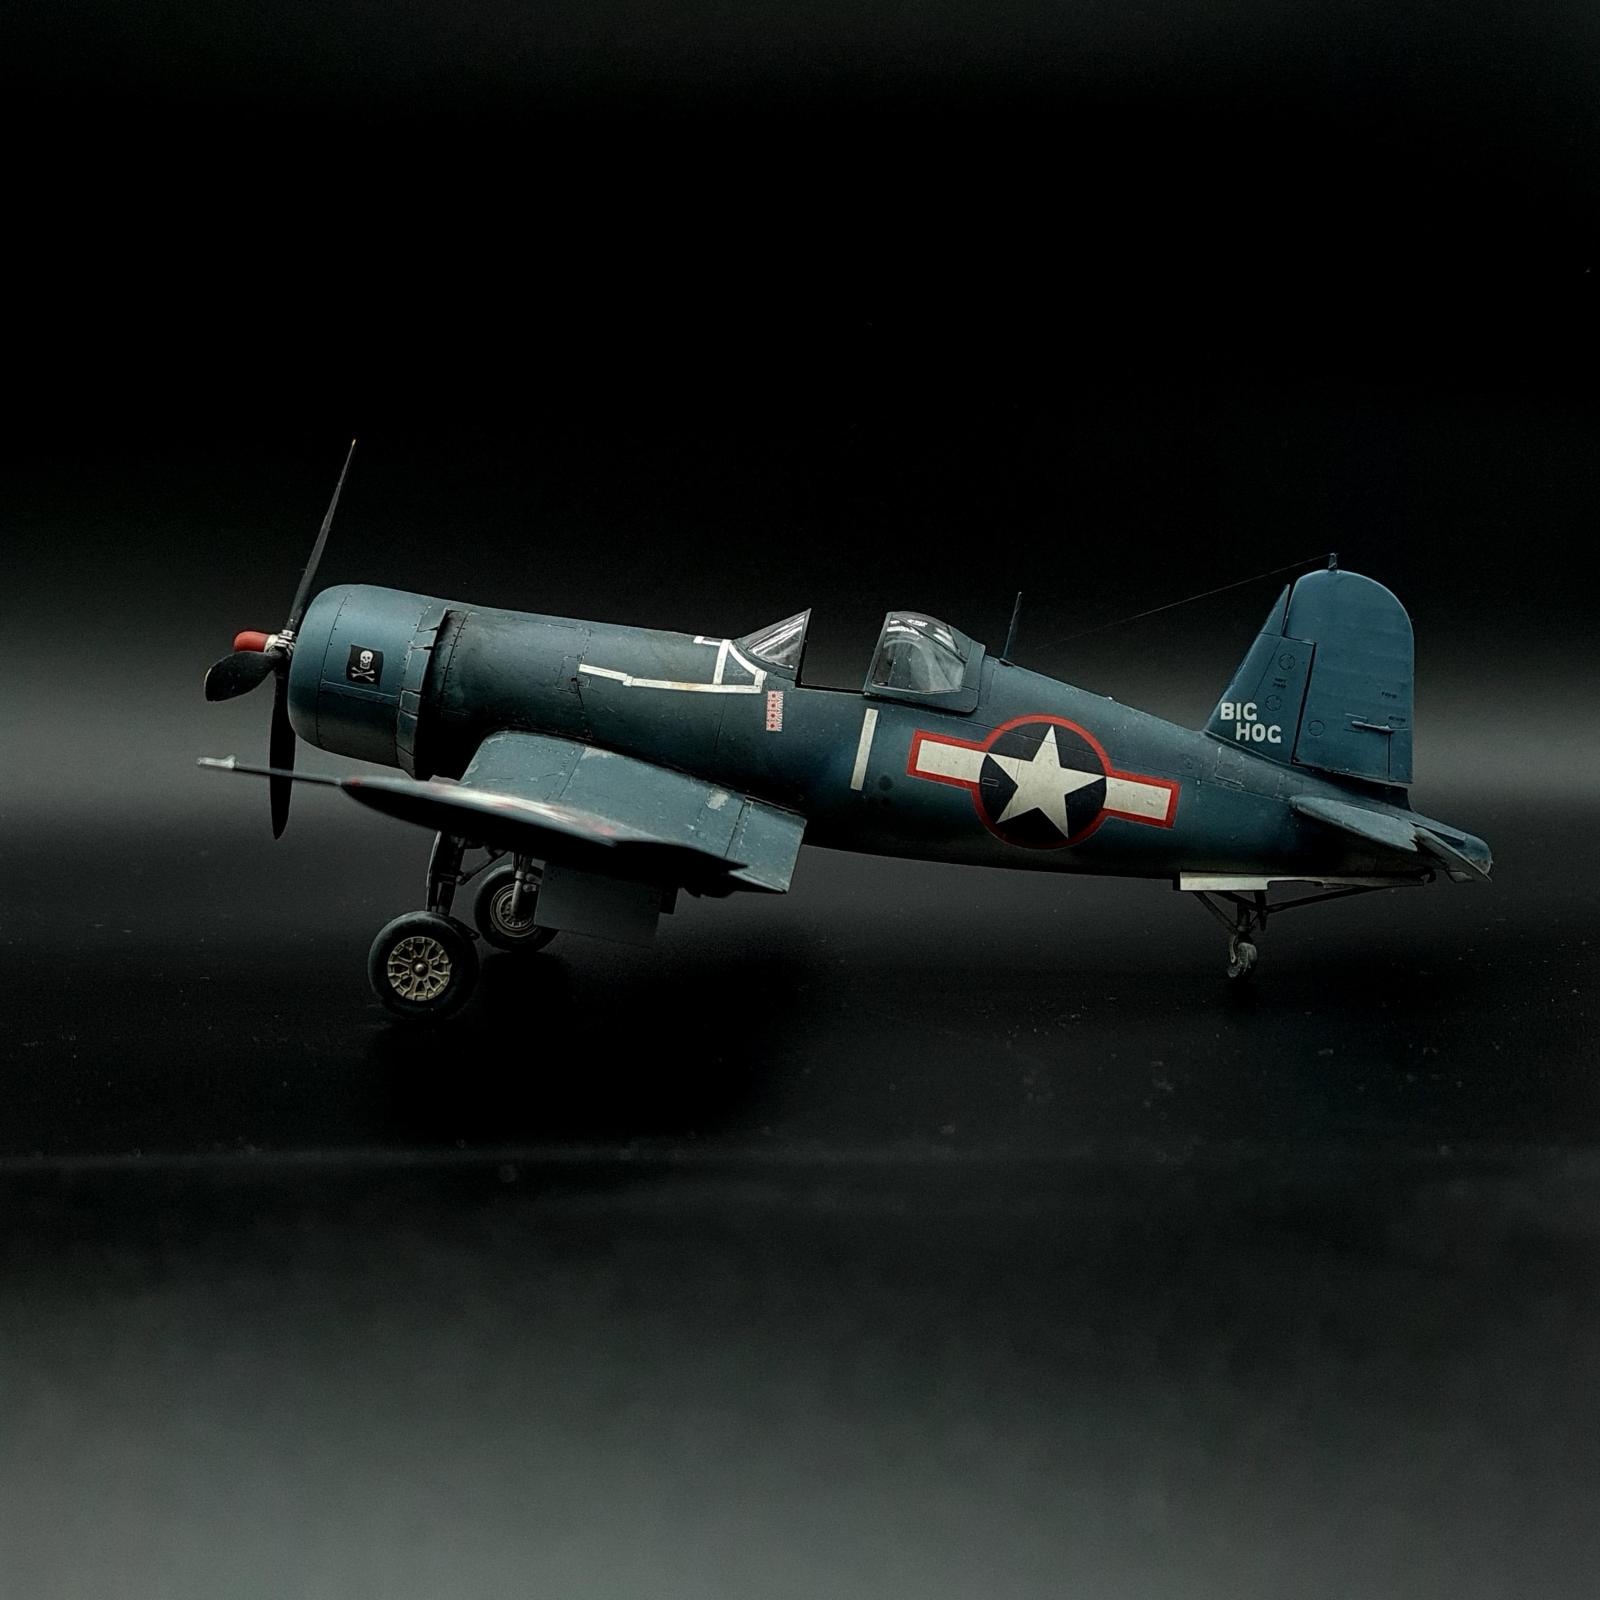
For painting I bought out my trusty MIG AirCobra, 0.35mm airbrush, and got to work spraying the plane with some Tamiya paint schemes. I did the camouflage free-hand, and what a beautiful camouflage the US Navy 3-tone scheme was. I quickly realised that painting freehand wasn't an easy task. I feel I barely got away with it, and it's not my finest work by far, one thing I learnt was that if I wanted to do freehand in the future I'd need to buy a smaller more precise airbrush and as such got the MIG Airviper 0.2mm airbrush, which I now use for probably 90% of my painting. This really comes down to the main reason as to why I want to reattempt this model and thats due to me freehanding the camouflage with MRP paints on my F4U-2 and wanting to have the same results I got on that but on a VF-17 Corsair.
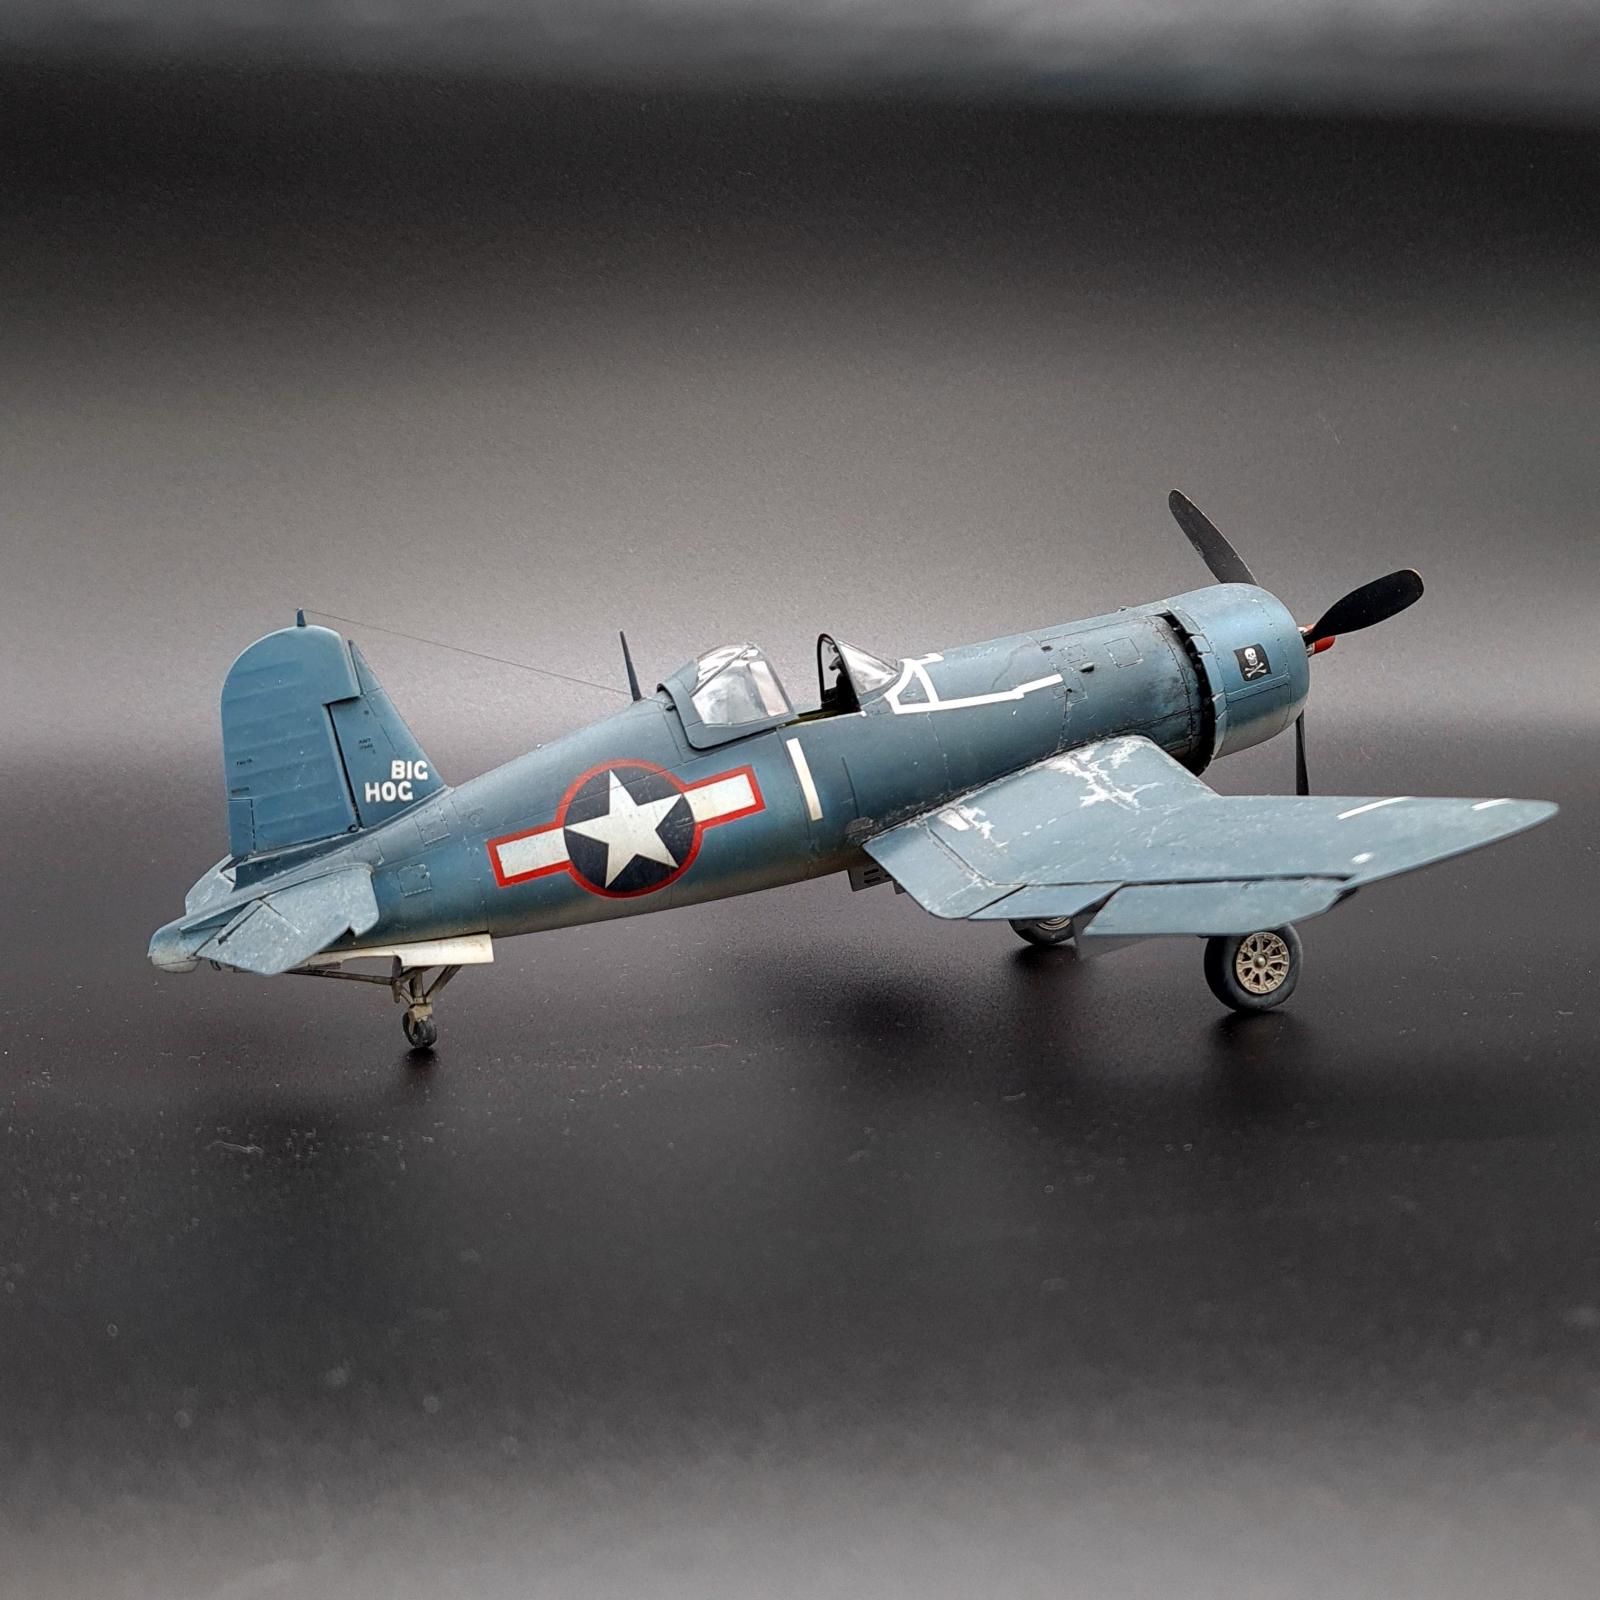
For paint markings I used Montex masks, I also used their vinyl masks for the canopy and learnt that I really don't like Montex canopy masks. I'll sing praises for their paint masks for markings, but the canopy masks are just awful with a poor ability to curve around the clear parts and with both too little adhesion to stay put for an entire painting phase but also too much adhesion as to rip off the paint and particularly and gloss coating on the clear parts. That being said, the montex paint masks worked great. They were quite fiddly in getting them all in the right position as the US Star and Bar is rather more complicated to mask off than a simple Japanese roundel, but in the end it worked out well and I honestly quite like the imperfect look you can from paint masks.
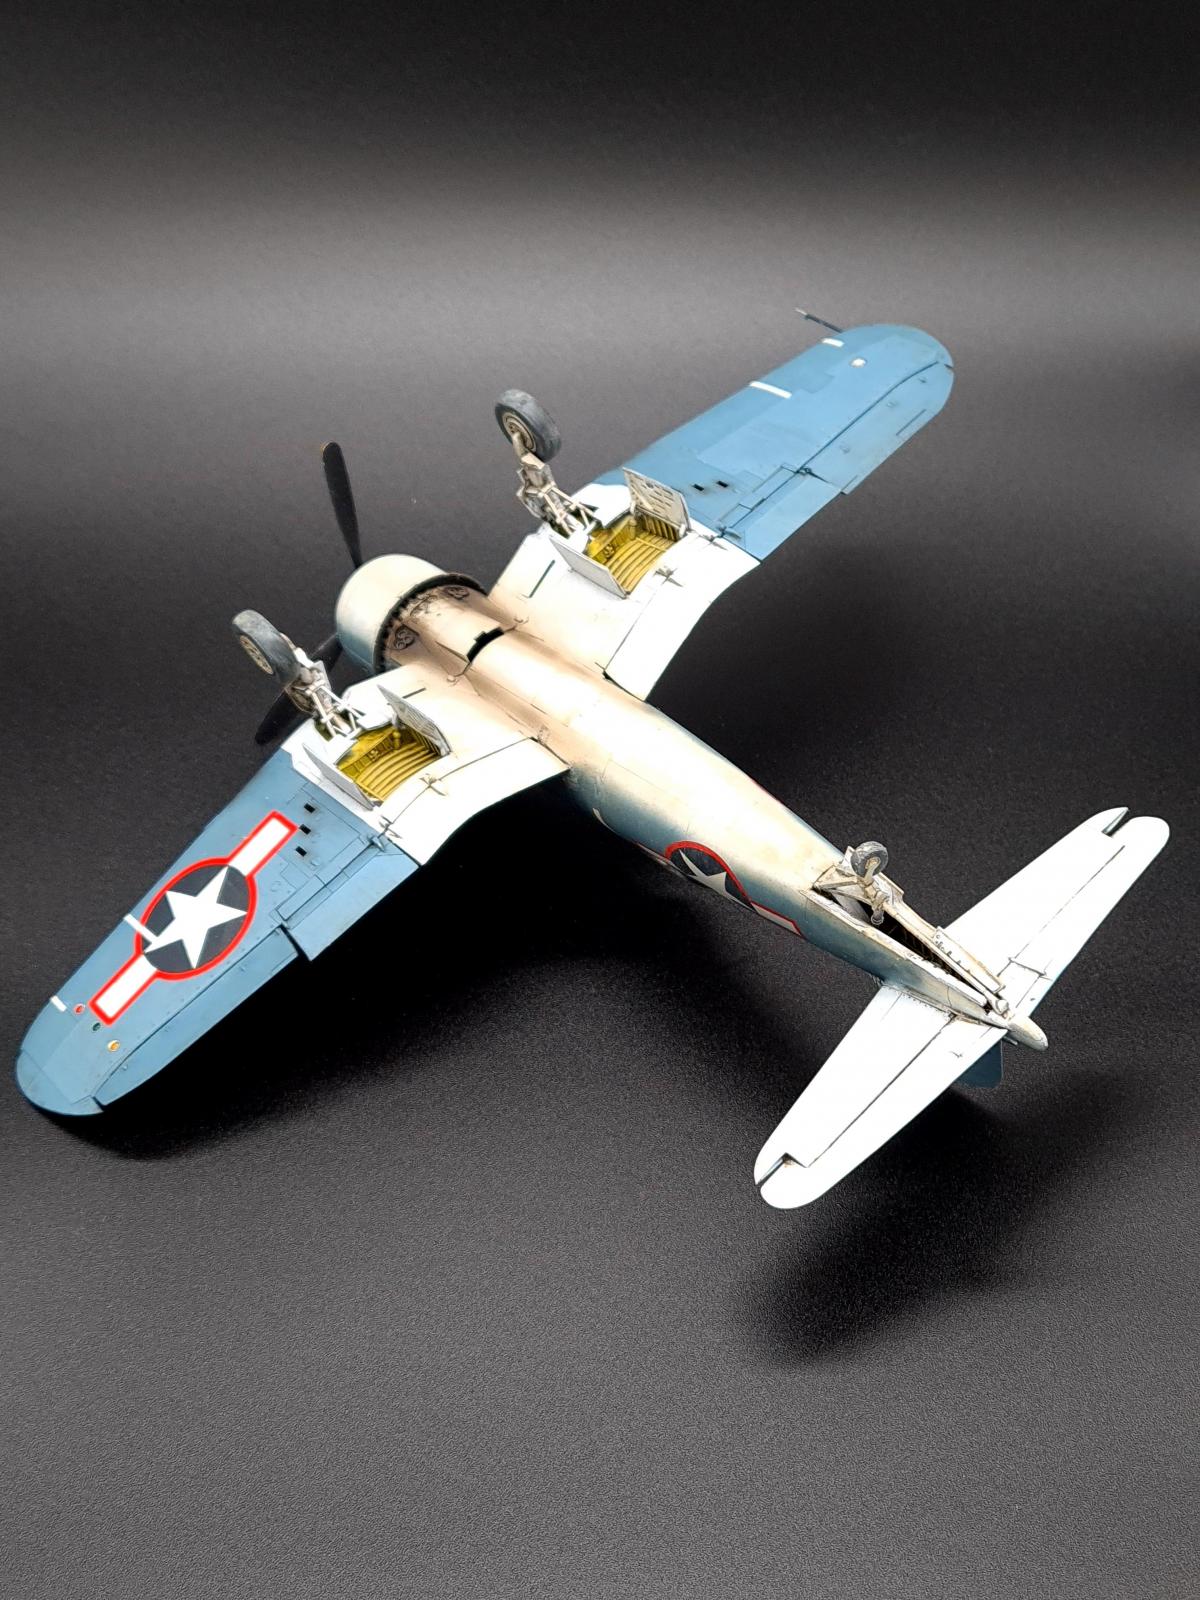
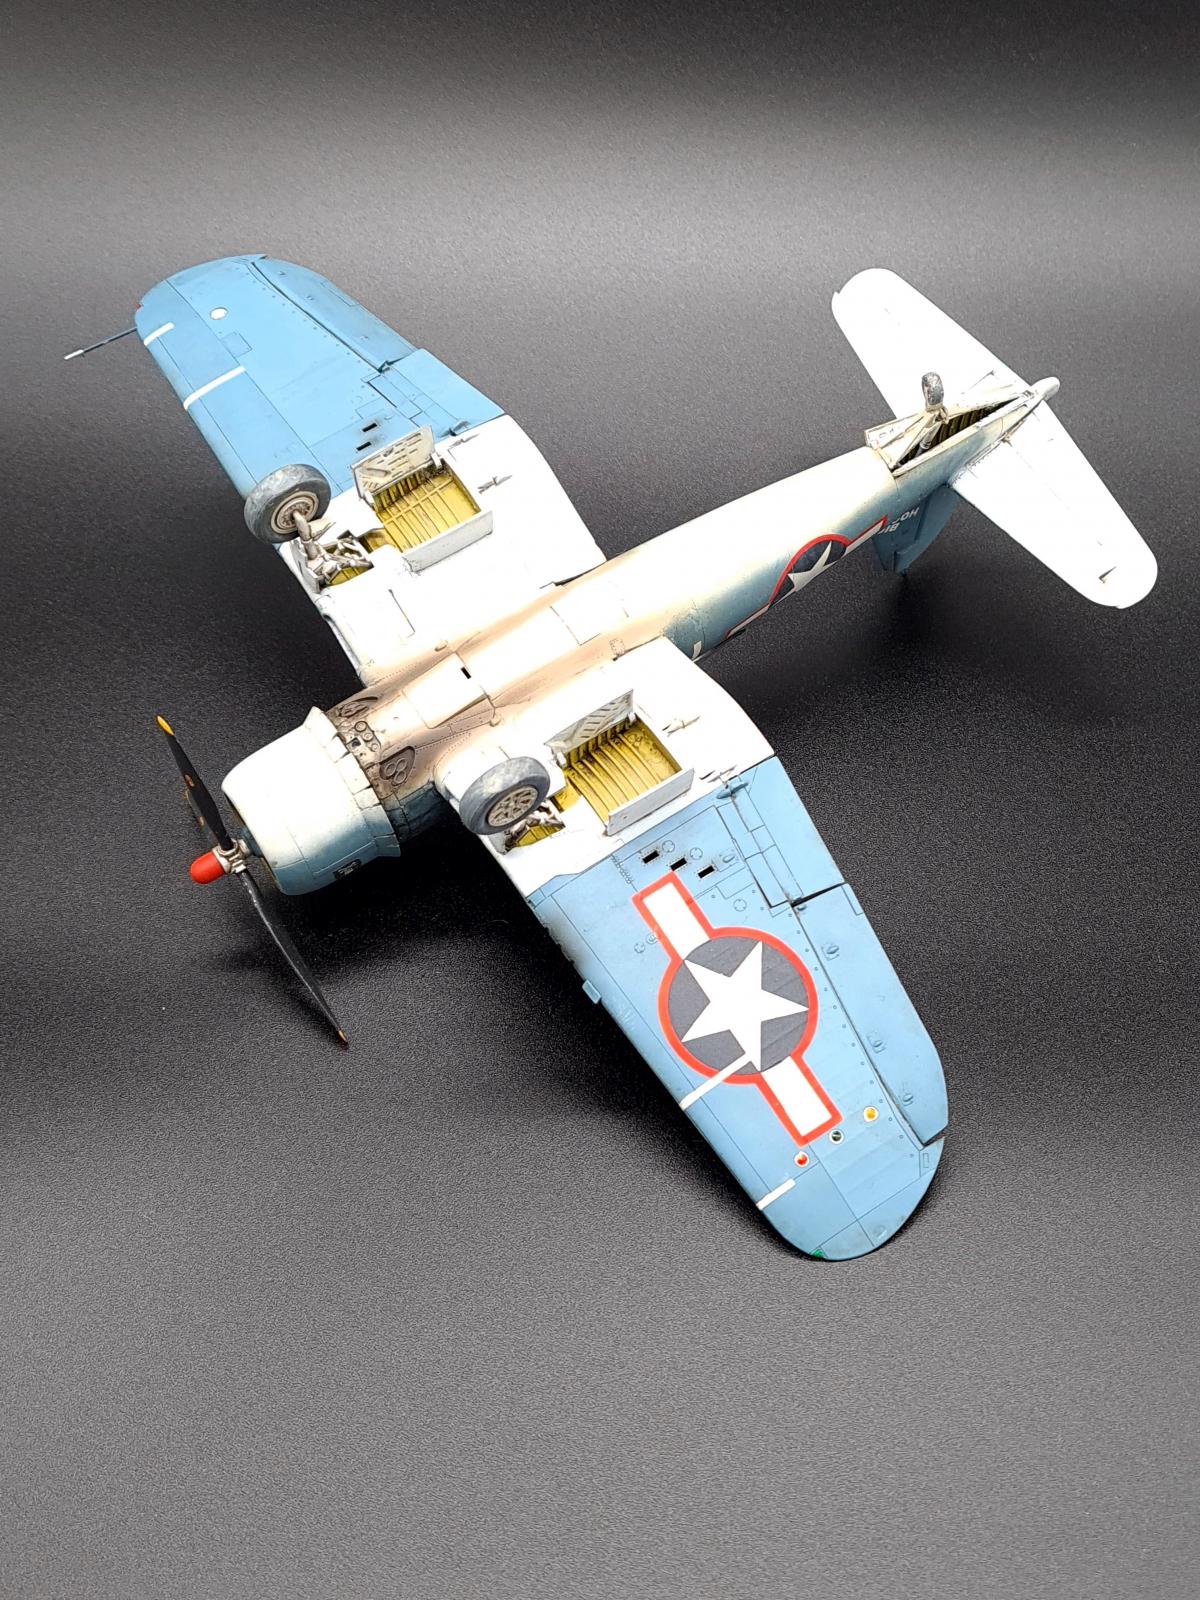
For weathering I decided to go simple after previously weathering the Birdcage and -1D Corsairs an extreme amount, as such the majority of weathering was done with a metallic watercolour pencil and some with a paintbrush. I feel like at the time I was happy with the result but nowadays I'm not sure how well it held up, when I redo a plane of this scheme I'd probably go back to using metallic paint and chipping fluid. I also used AK's Africa Dust to provide some dust and streaking, particularly on the underbelly and fuselage, as well as using thinned Tamiya Buff on the upperside. The final finishing touch was some seat belts, these were some odd ones I had laying around from an Eduard Tempest but are better than nothing I feel.
Overall the build was an interesting one and I think the end result was decent, but very quickly after building it and getting more suitable tools for the job I've had the desire to redo it, and will likely do so by making VF-17s 'White 29' as well as two other Corsairs, with another one probably being in the tri-colour scheme. When I do 'redo' this build I'll give it the full treatment of PE cockpit, resin tires, aftermarket decals, and try my hand at riveting, the plan is to put what I've learnt since last year to show on that build whilst also learning some skills that will come in handy for yet another future Corsairs build.


That's an amazing Corsair, Harvey!
Looks extremely well done, almost a pity to redo it!
Thank you kindly Spiros, there are a few kit's I'd like to redo/build something similar of due to them not aging well against my improvement of skills over the years, notably an A6M2 and a Hurricane. I don't think this Corsair quite falls into that region, but I really liked how things came out with the MRP paints through a smaller airbrush when building my previous F4U-2 so feel like I have to 'remake' it with new techniques, that being said I'm sure this one will look great next a sister plane from the same squadron.
An amazing match from the photos. Great work.
Thank you, I'm glad you think so!
Excellent build. Can never have too many Corsairs.
Agreed, hence why I'm currently sitting at 5 Tamiya, 1 Hasegawa and 1 Hobbyboss completed, with 3 more Tamiya in the stash (with another 2 on order) and 1 ugly-duckling Special Hobby too.
Love how true it is to your reference photos, and it's great to see the side by sides.
Thank you!
Hi Harvey R:
You have a couple of fine looking Corsair's:
My dad Harry worked on the Corsairs @Goodyear Aircraft Corporation; (GAC) during WW-II, so I got to go with him on week-ends to the factory that was located at our local airport in Akron, Ohio. I was a young boy of 10 years olds. I was in my glory to say the least. I got to sit in the fighter's on the assembly line during their building process. GAC's goal was to produce a F4U-1A every hour, but they could only get one out the front door ever 80 minutes.
They developed and produced the "Bubble-Top" F2G Corsair with the big R-4360 P/W engine, that had 14 foot diameter propeller attached to it. The war with Japan ended before the U.S. NAVY got it on the front line. After the war they had a Naval Reserver unit stationed @Akron with some Corsairs. The USA National Air Races resumed at the nearby Cleveland, Ohio "International Airport" in 1946 and in 1947 Cook Cleland and another pilot bought and entered a couple of F2G's in the annual air races. I have lot's of data and photograph's in my files.
AGAIN...VERY NICE CORSAIR'S YOU HAVE.
Thank's for posting them...Rodney J. Williams/Irvine, CA
Thats a great experience your Dad must have had, and by extension what a great experience for you! Thank you for the kind words and that interesting anecdote, I do actually have an F2G 1/48 in the stash but it's such a pig of a kit that I feel like I might as well be building a kit a kit with a blindfold on, upside down, with a hand tied behind my back, but one day I will get round to giving it some TLC. I haven't personally decided whether I'd go for one of the more popular F2G racer schemes or for one of the U.S Navy prototype schemes.
My compliments Harvey, that's a fine model of Blackburn's F4U-1A 'Big Hog'.
Beautifully done, Harvey.
She looks exactly like on the reference pictures, a perfect copy.
Excellent build. Love the photo reference. Your freehand camo looks great.
Love a fine model with a story behind it...well done Harvey!
An excellent build! I love the weathering and paint work. Well done.
Excellent scale modeling here! What a model plane!?! :).