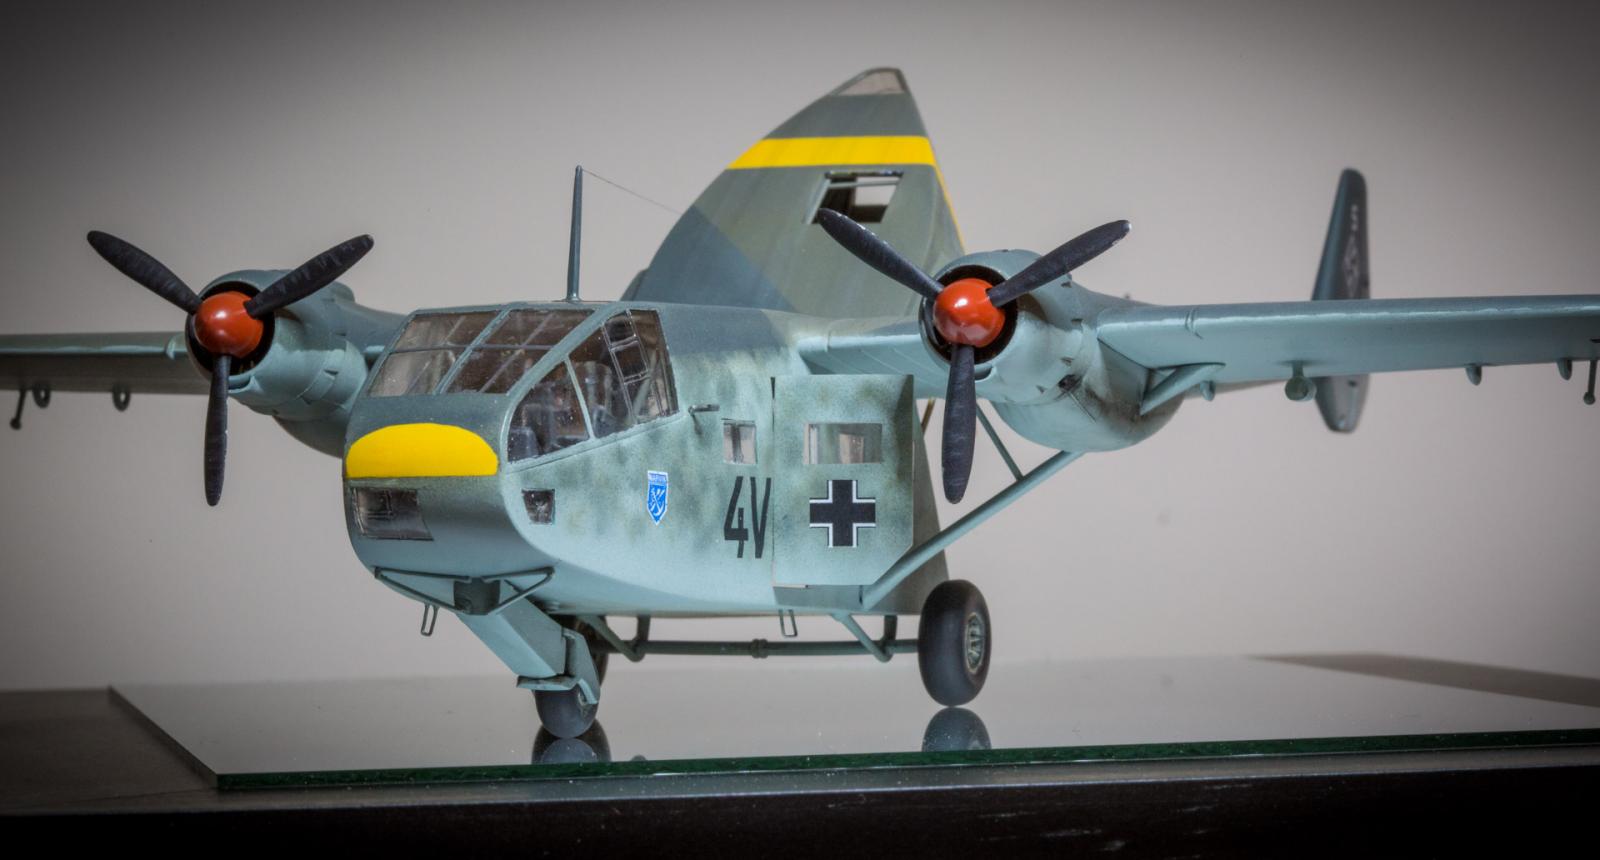
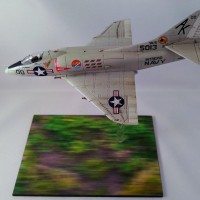
Gotha Go 244 in 1/72 scale – Italeri 1974
Having just made a tentative return to the modelling world, thanks to COVID-19 lockdown, it was with some trepidation that I embarked on this build! When I was modelling back in the 1970's I was probably just OK for a teenager, but looking at what folks produce these days has me ... well, amazed!
My folks bought this kit for me when I was about 14, and it has sat for four and a half decades, moving from house to house in one of those cardboard boxes that you're never quite sure what's in them, waiting for me to have a go at it! My dad flew gliders, and was perhaps tired of me making powered aircraft all the time, so I was supposed to build the Go 242, but was more interested now in modelling the Go 244.
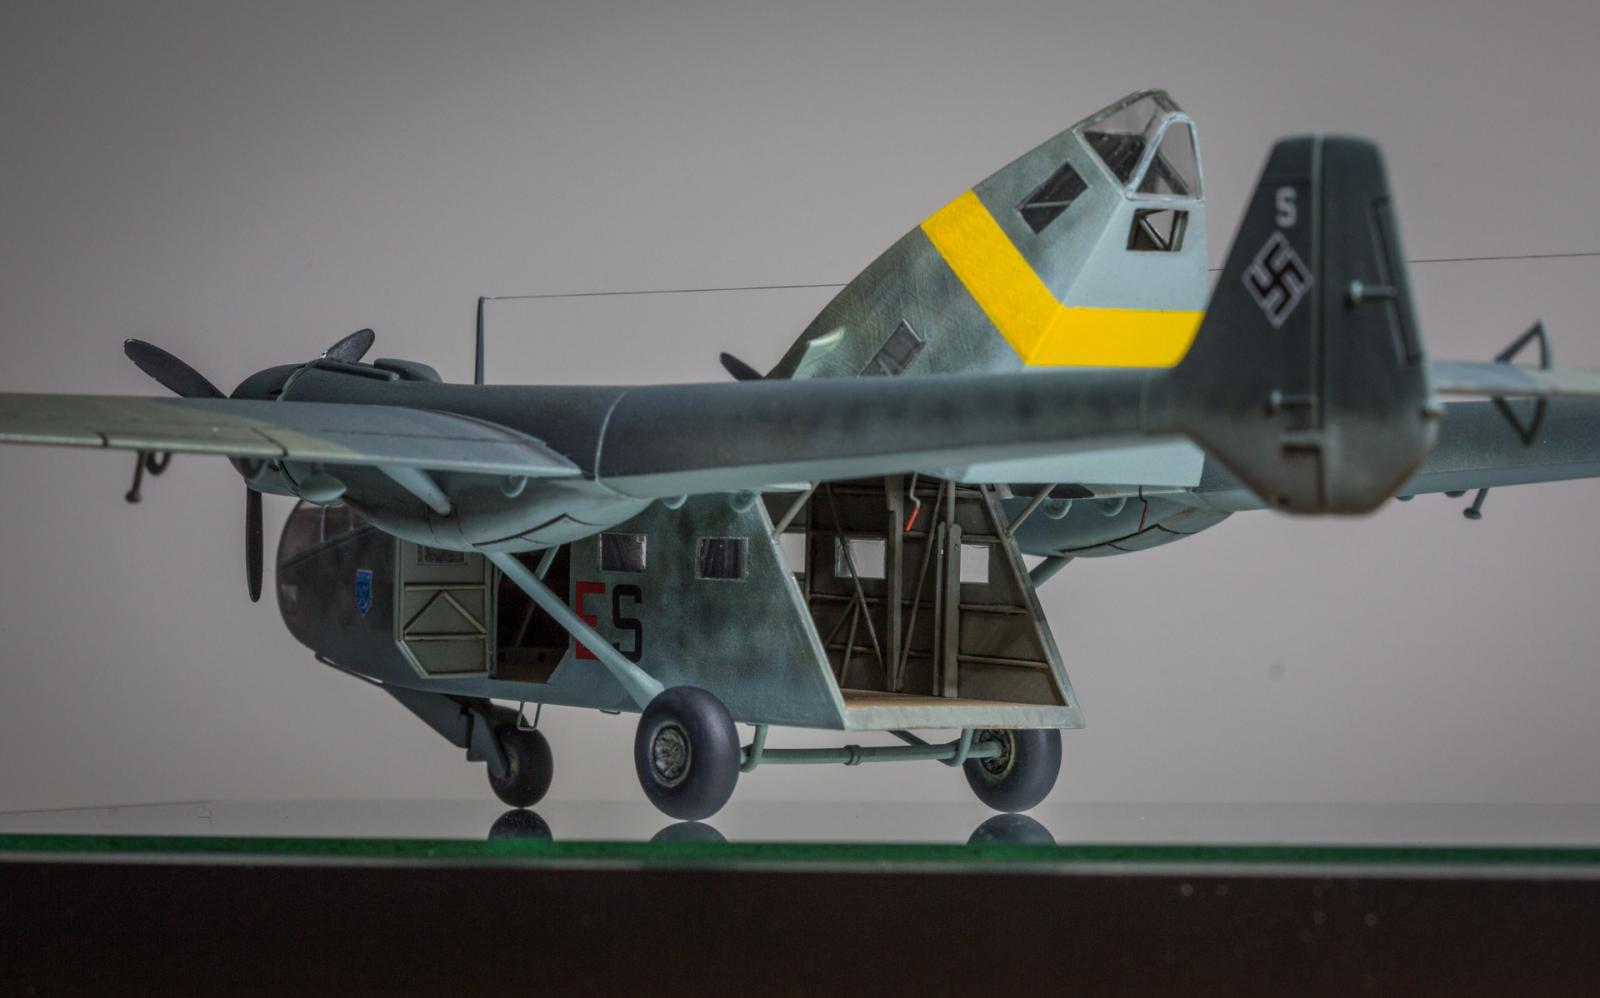
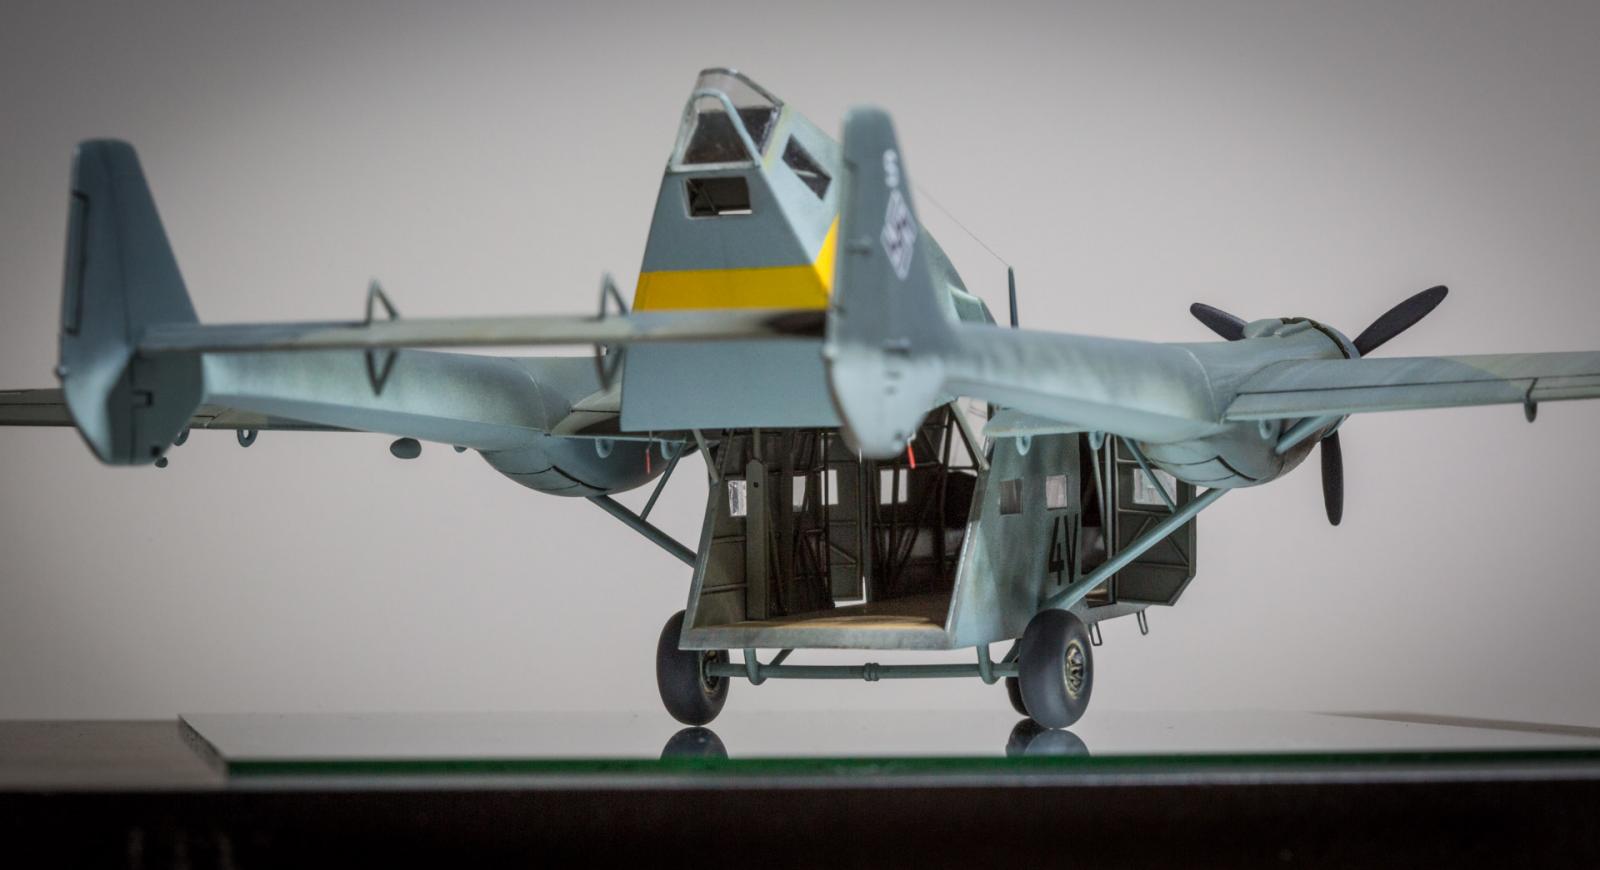
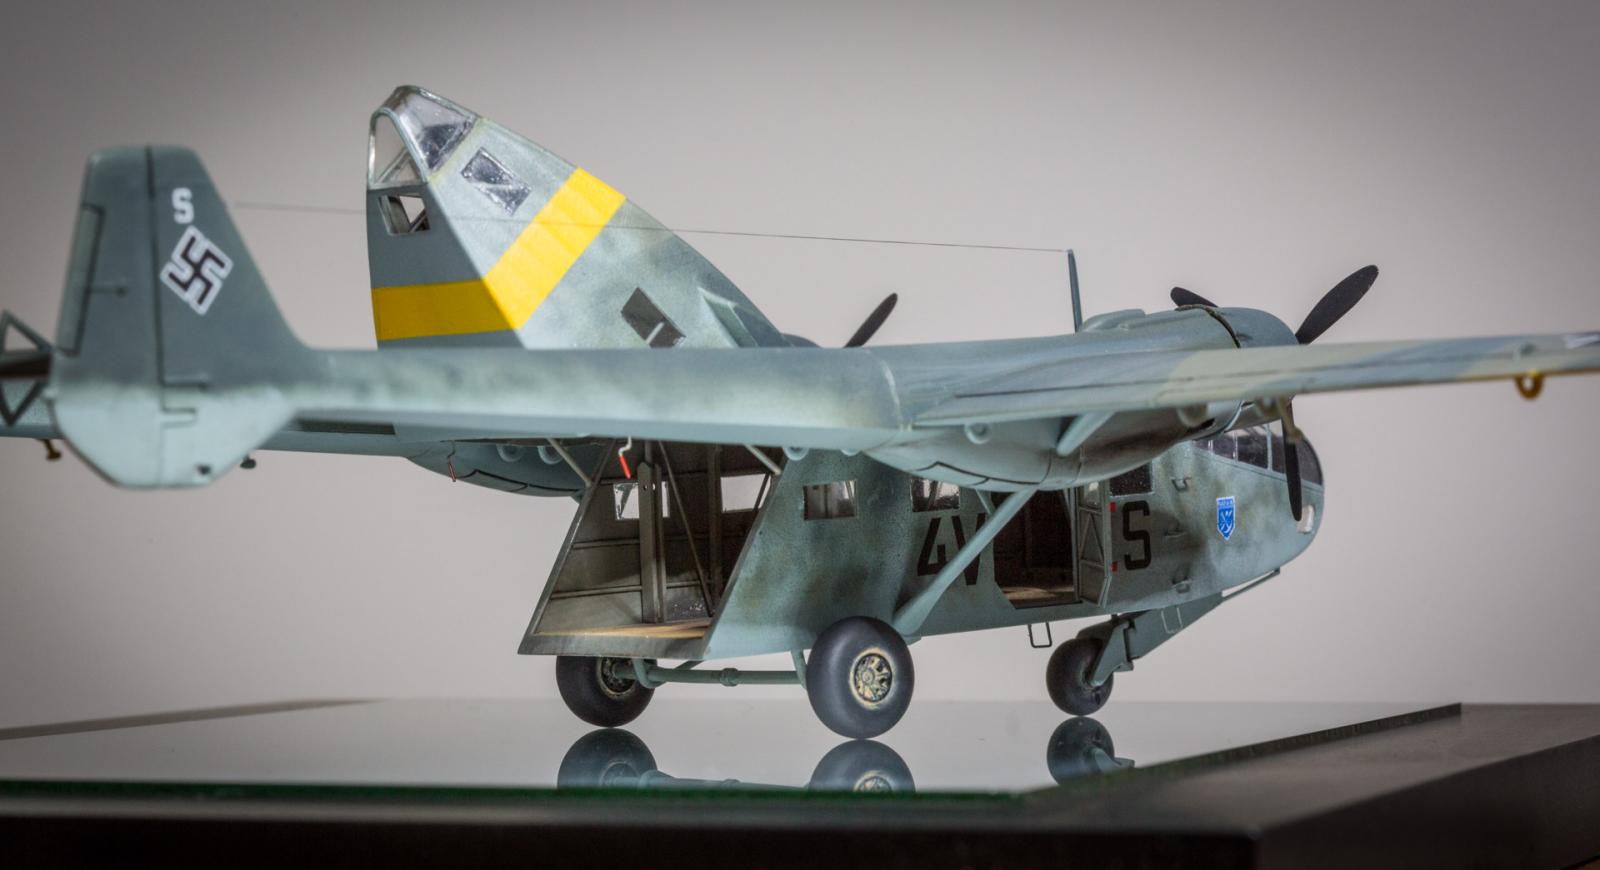
The Go 244 was the natural progression from the mass produced (and successful) glider variant, with less than 150 airframes built, mainly due to problems associated with sourcing engine spares. It was also somewhat underpowered, with one engine out performance being an issue. As a design though, it was trendsetting, with easy access loading/unloading due to the “flip-up” rear cargo door, and square section fuselage, possibly directly, or subliminally influencing the design of later cargo aircraft like the Fairchild C-82 & C-119 “Flying Boxcar”.
There are a few nice builds of this kit online… but as the Go 242/244 is not the sexiest aircraft ever built, and perhaps because this is the only (old) model available, it doesn't get shown off much. Initially I thought I might be Robinson Crusoe in attempting to depict the structural interior of the cargo hold but a bit more online hunting found a couple more builds on a French site that had put in a lot more effort than was standard.
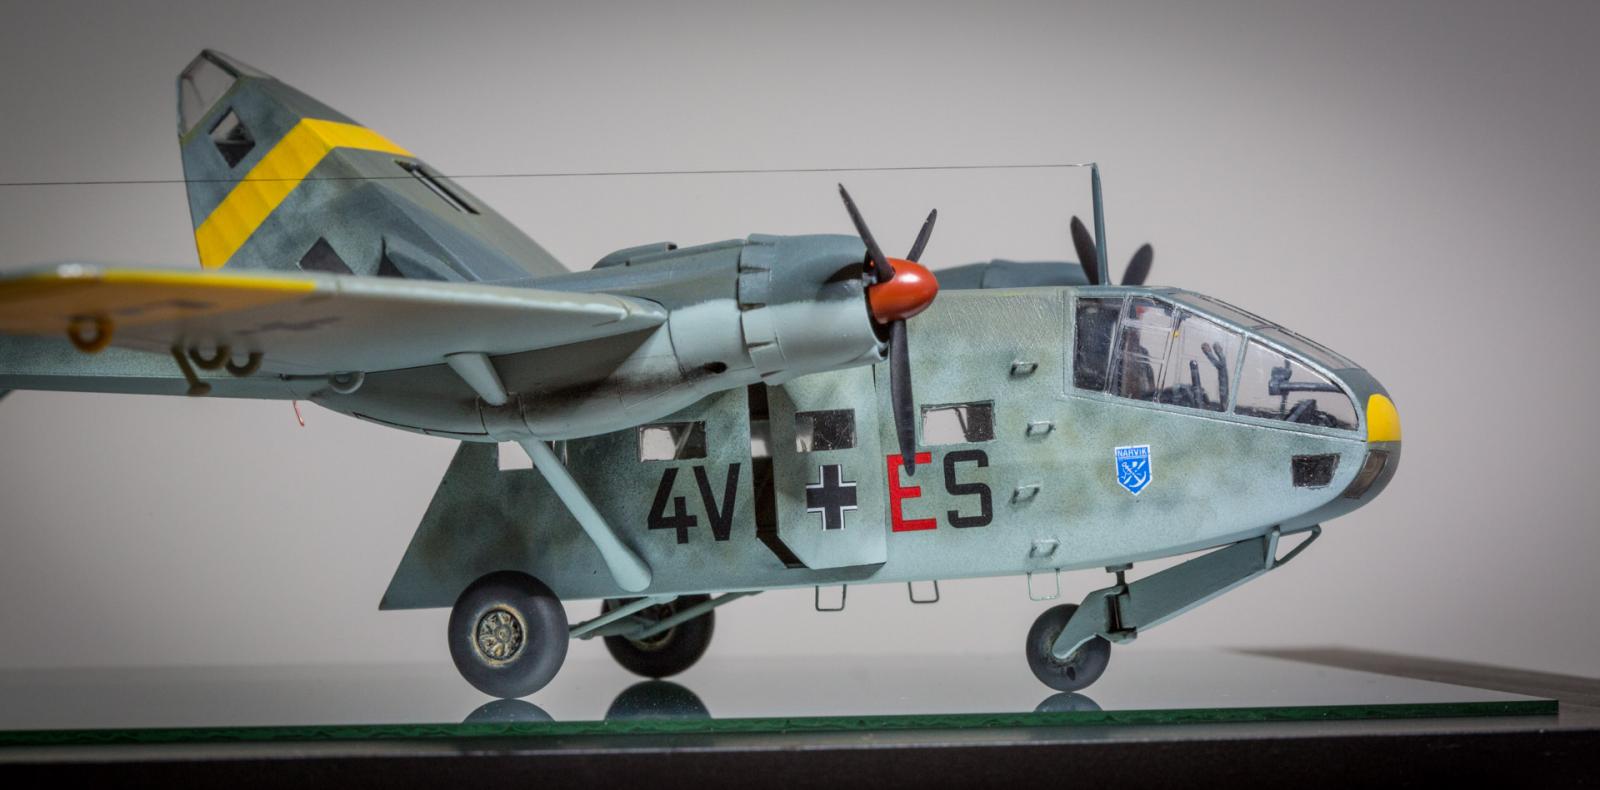
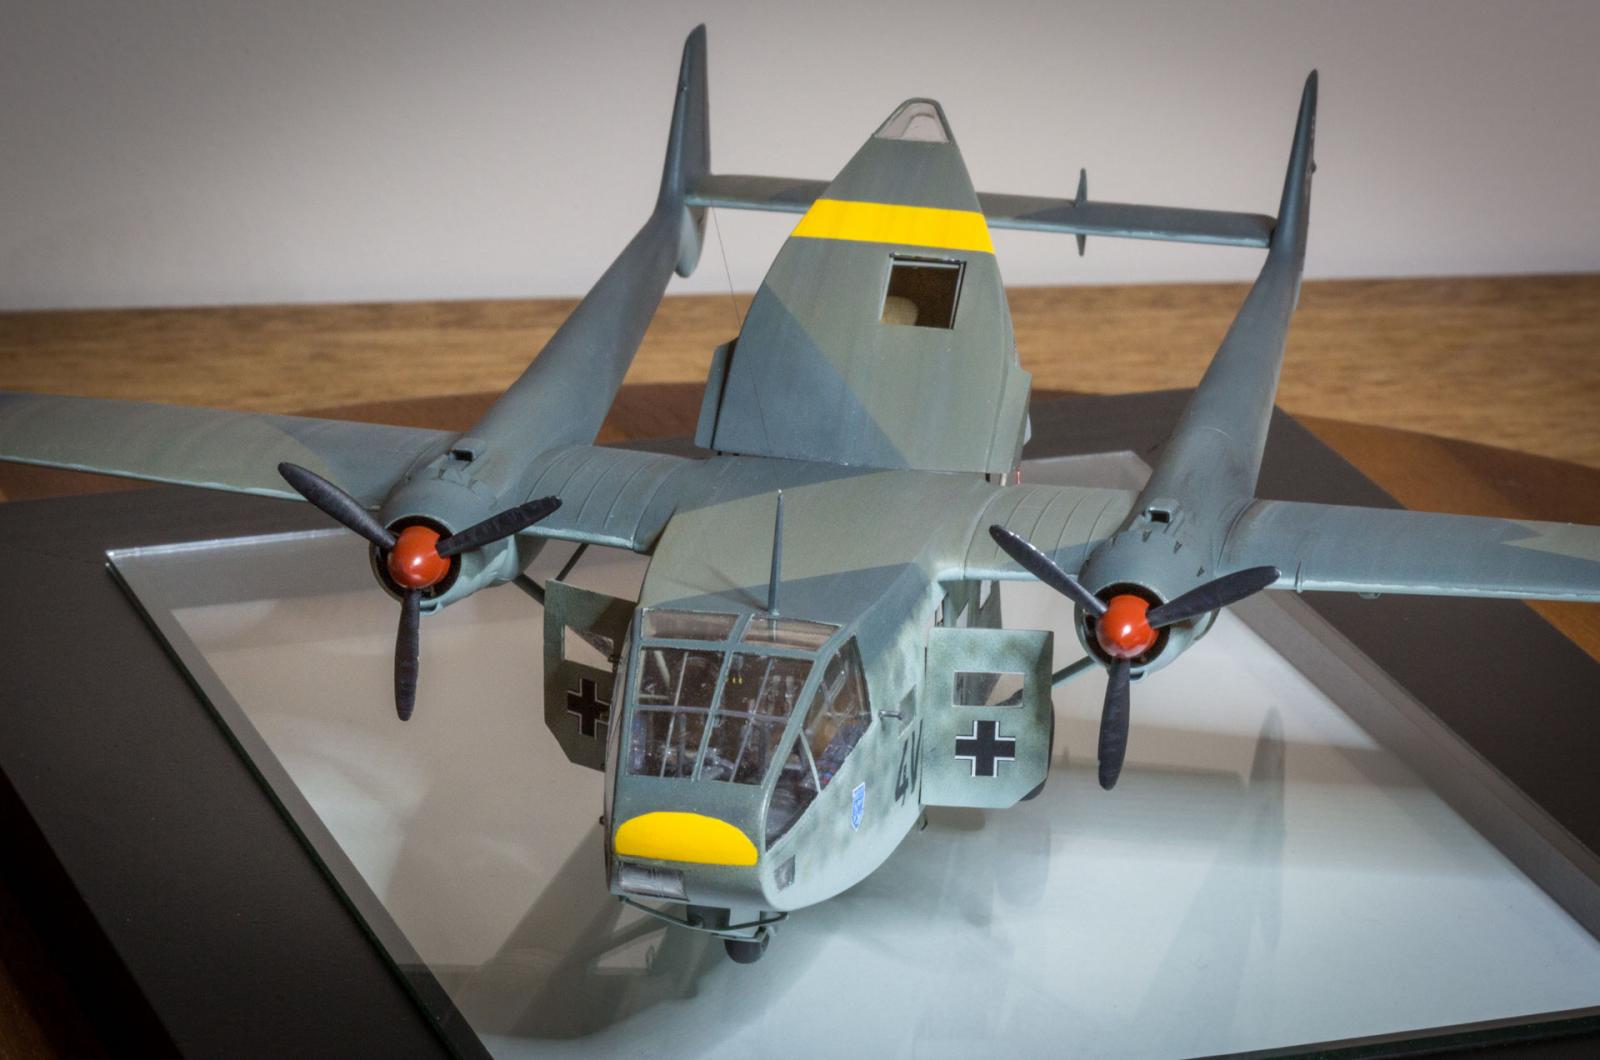
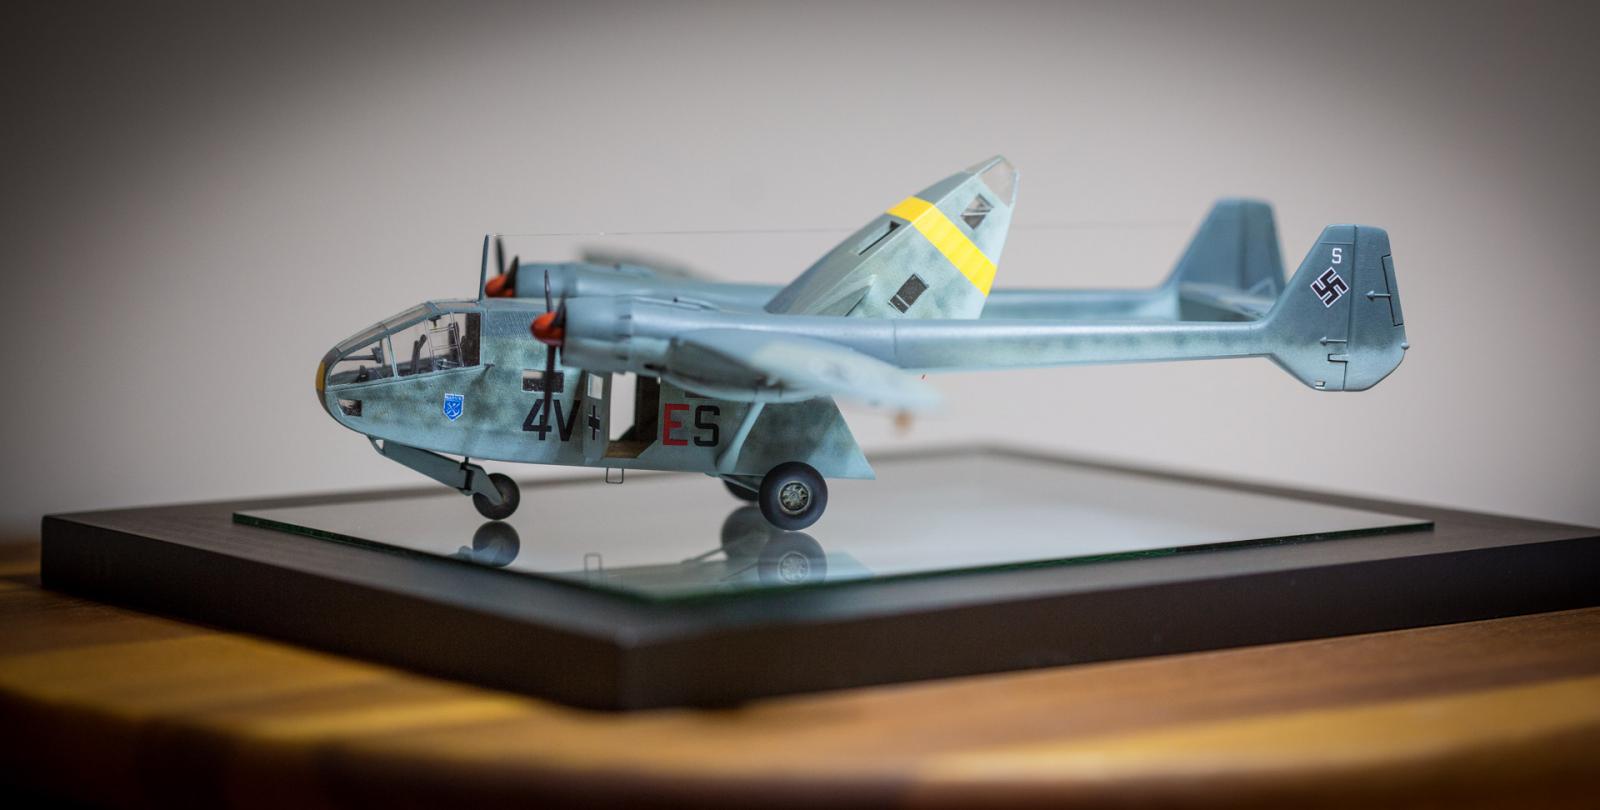
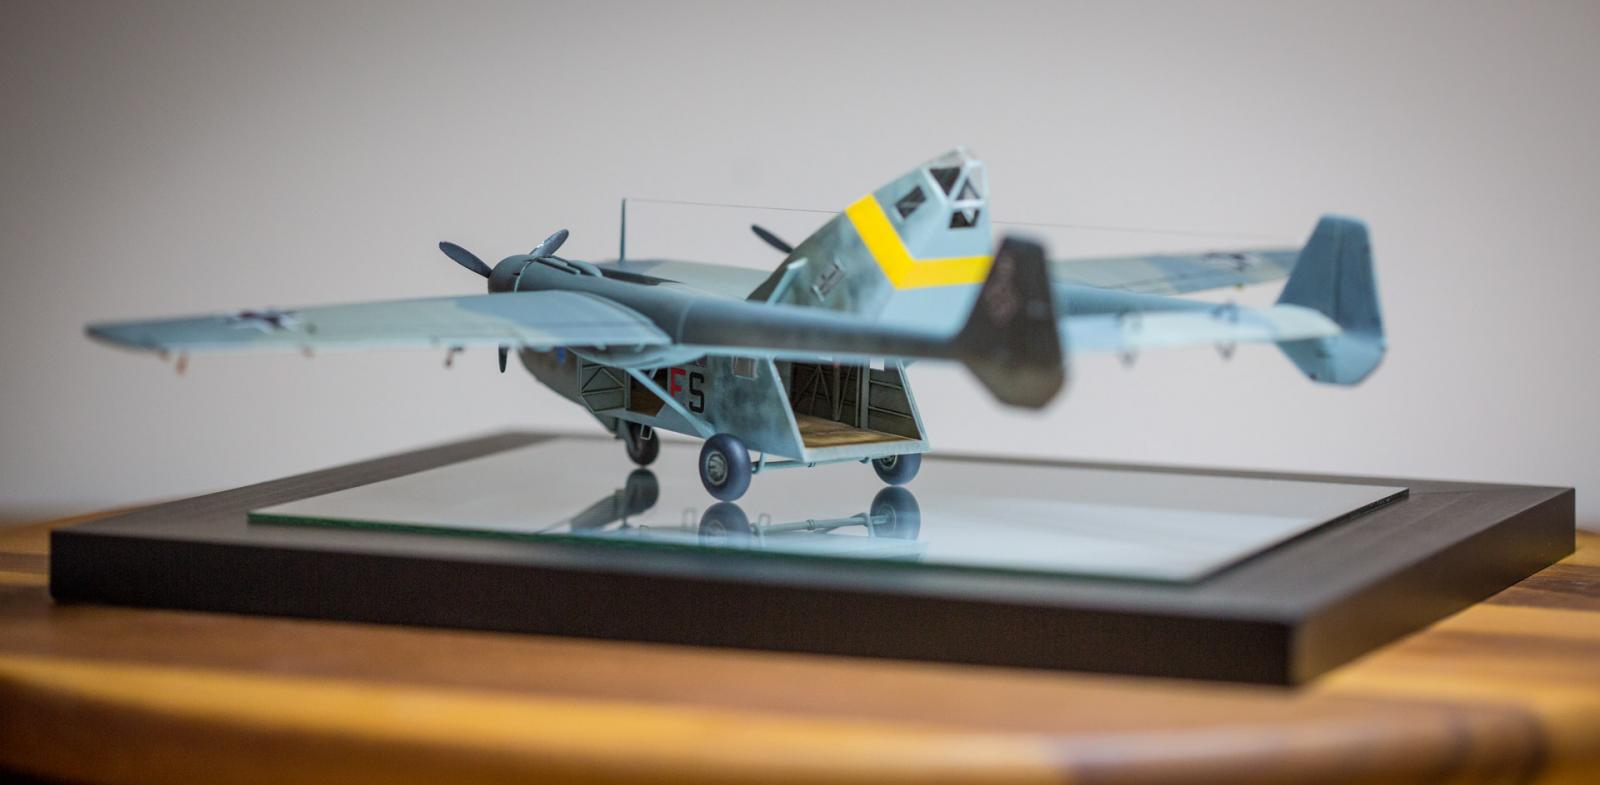
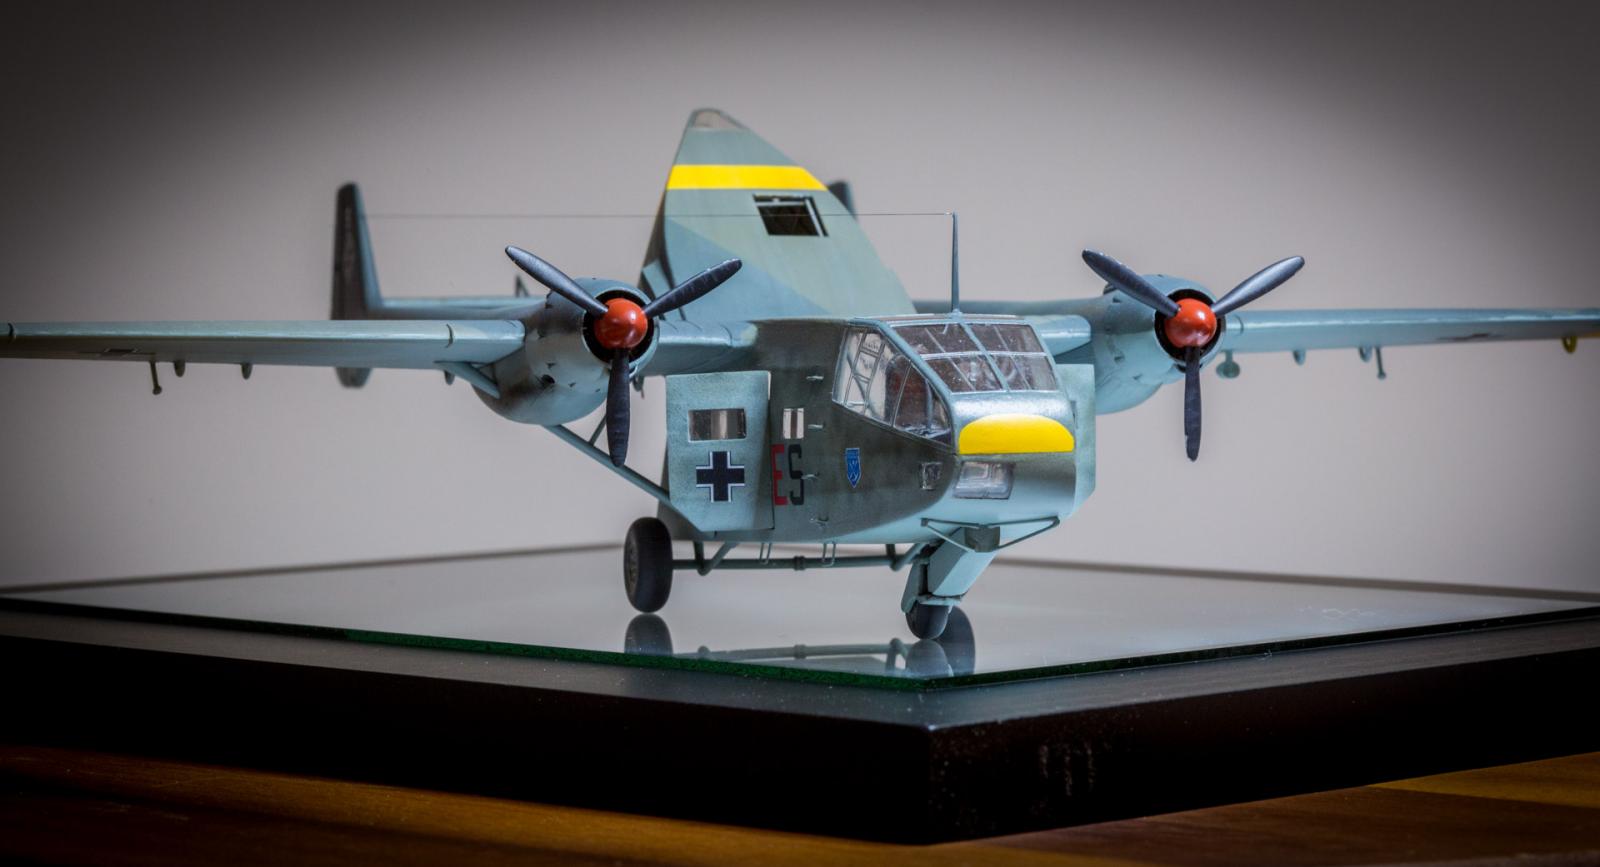
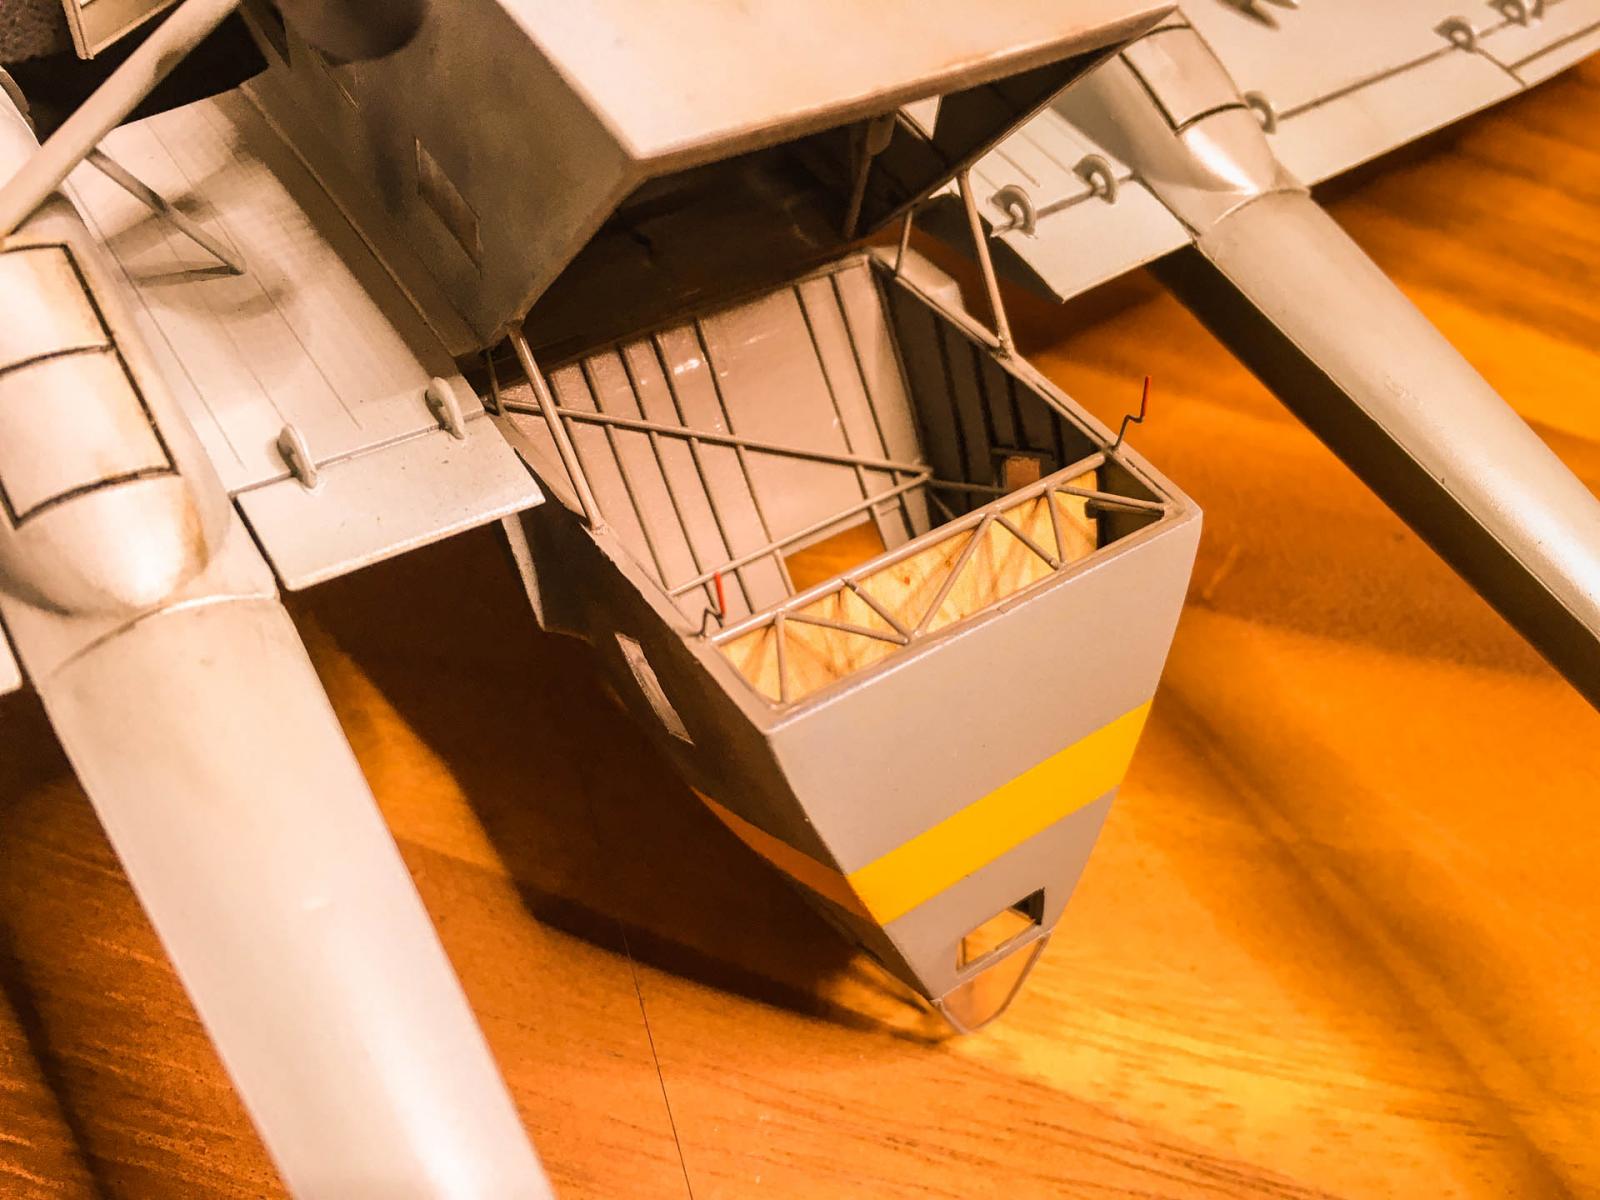
Being old, the kit has a number of imperfections and inaccuracies. The centre consol moulded into the floor of the cockpit floor did not exist, with the engine instruments (for the Go 244) being placed in front of the pilot's rudder pedals, and the throttles attached to the cockpit canopy framework above the pilot's right shoulder. The radio mast provided in the kit is a stubby affair that Italeri would have you gluing in the middle of the canopy, rather than quite a tall structure behind the canopy offset to the port side. The kit decals are also slightly wrong, with the font for 4V+ES being inaccurate for the “S”, and the “S” for the twin rudders should be a “5”. The wooden cargo floor is also pretty heavy handed, so I sanded it down and used a sheet of HGW decals, pine tree natural base white. I cut the sheet into four panels for the main cargo floor, and a single for the rear. In an effort to make each panel look less uniform (and after watching a video by PLASMO) I weathered the panels with oil paints; burnt sienna, raw sienna, and a bit of orange, concentrating on the joins.
I had already begun my first ever attempt at scratch building when I found the French builds, and was only slightly surprised that someone else in the world had stumbled on the same photos I was using, and had made a mud map of what-probably-went-where-in-the-guts of the fuselage in an attempt to give some credibility to the cavernous interior of the Gotha. I remember when my parents bought me the kit, I was marveling at the interior details that came with it! Times change… the attempt at replicating the doped fabric looks more like a hessian bag, and the “details” of the structural steel members are an artist's impression at best. If this was a popular aircraft, I'm sure Eduard would have a PE aftermarket for it, especially for the very visible but sparsely detailed cockpit. I used Evergreen styrene of various diameter to replicate the steel tube internal structural work.
As it is, aftermarket options are limited to a replacement cockpit canopy and tail cone glazing by Falcon Clearvax (canopy set 42: Luftwaffe Part 7), which I hunted down and ordered from NZ. Even though the canopy is pretty good with the kit, my intention was to have the two small outward opening side windows opened, which I knew I could only do with the much thinner vacformed unit. Sadly the Clearvax unit wasn't really as clear as the original canopy, and I was struggling with masking as well as attaching it to the fuselage, so ended up sticking with the original.
I also replaced the pilot seating, as the kit seats would be about 980mm wide in the real world, and take up most of the cockpit! I managed to cannibalize a couple of Me 262 Eduard cockpit kits for the Eduard Luftwaffe rudder pedals, as well as repurposing the side consoles and instrument panel to better reflect what was going on in the Go 244 cockpit.
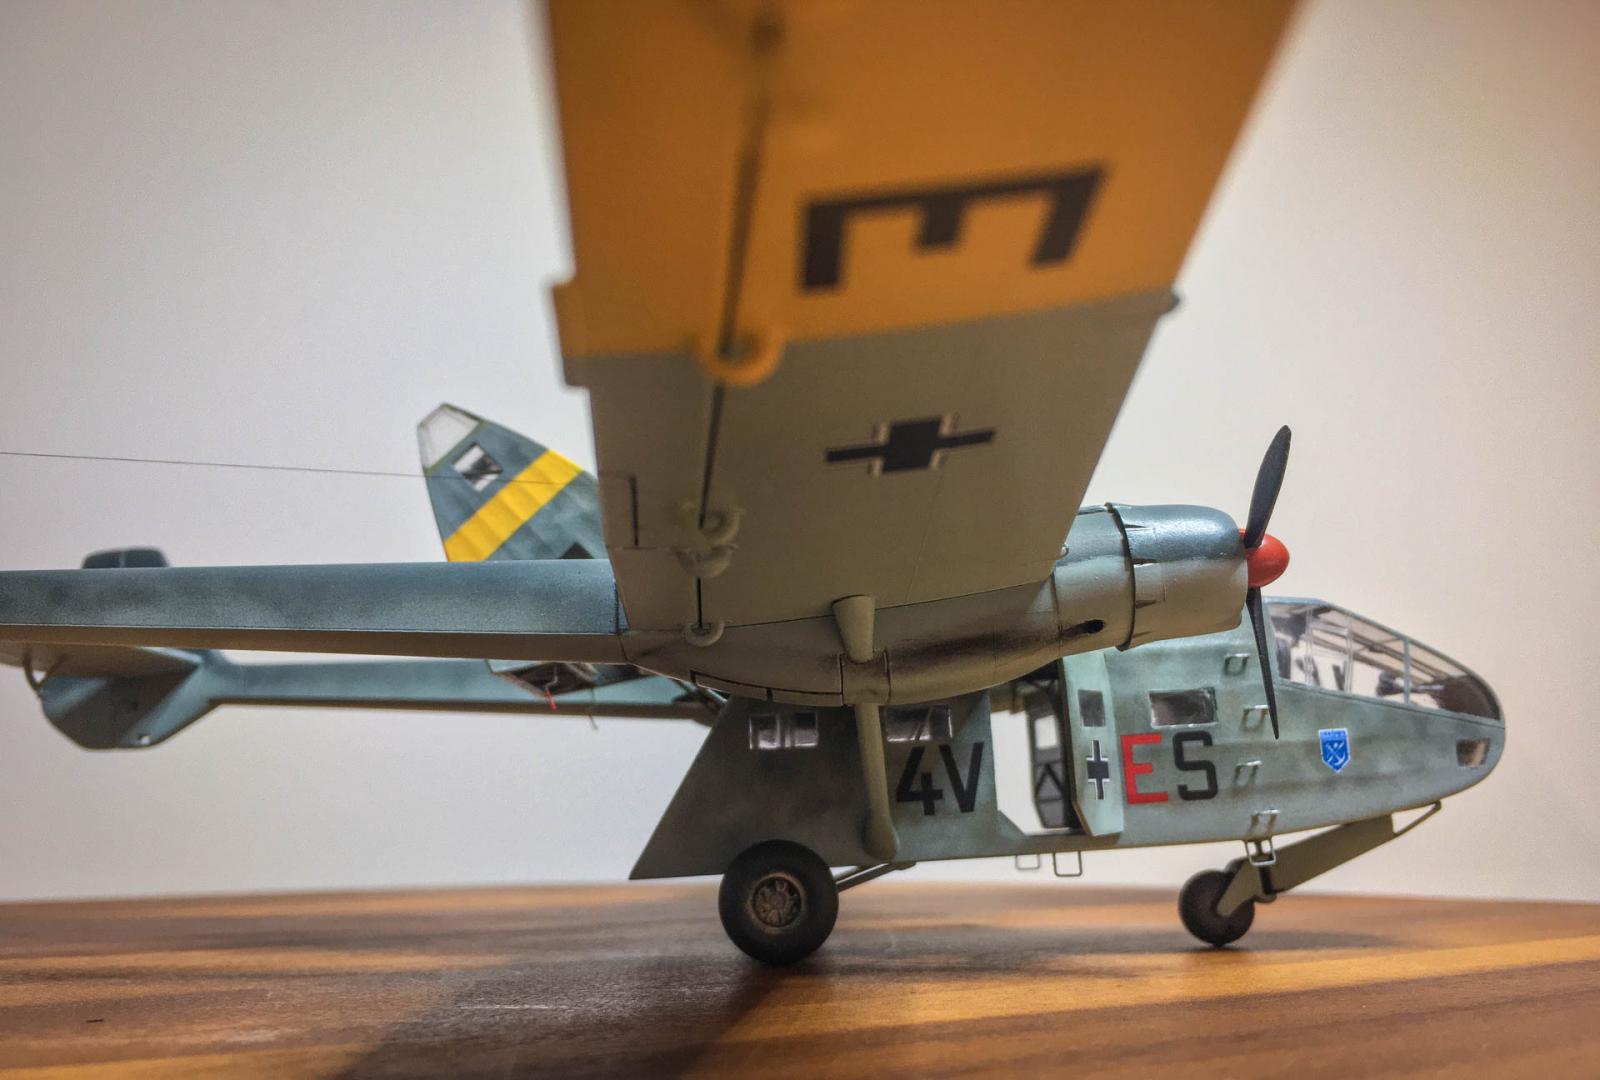
The Go 244, unlike the 242, had ladder access to the roof on the starboard side behind the cockpit. I fumbled about with some fine electrical wire until I'd managed to fold 4 almost equal-looking ladder rungs, and super-glued them to the starboard side. While I was at it, I replaced the kit steps for the side doors with wire, and made a new one for the first step below the ladder
Having applied the RLM65 to the undersurfaces, I moved on to the hardest part: the mottling on the side of the aircraft. Merrick and Hitchcock reckon the overall scheme is 70/71/65 with mottling of 02/70, with Ullmann going for a mottle of 70/71 (interestingly they both use the same image of a Go244 conducting engine runs at Stendal). I went with Ullmann, and wrestled with my new airbrush, trying to do the smallest mottles I could. This is my first time back with an airbrush since my teenage years, and first time with acrylics. I made a few bungles, and cleaned up with alcohol and tried again in a few places. Overall, I wasn't horribly displeased with how it looked, so moved on to the Dunkelgrün, followed by masking for the splinter camouflage pattern and Schwartzgrün.
I moved on to weathering, and my first attempt at using oil paints. I didn't want the "straight out of the factory" look, and opted for fairly heavy weathering to upper surfaces, and much less so on the undersurfaces. I smeared dots of oil paint over the wings and tailplane using thinner, with black washes in the control surface joins.
Fixing the cargo door in place required some brass rod as well as Evergreen plastic to replicate the main struts, but I have little idea how this was attached in the real thing, so they are dumbed down a lot. They are not super visible anyway. I also added the two small "handles" visible in some images of the cargo door, using fuse wire. Doors had glazing added to window ports, and were both glued in the open position. A landing light outboard from the port engine from a (very) old Heller Fieseler Fi 156 Storch that I fortuitously had left over from the 1970's, and a pitot tube from an equally ancient Hasegawa Bf 109E added some missing detail to the kit. Finally, a scratch built aerial of the correct height was added aft of the canopy (rather than the stubby one in the middle of it, as supplied by the kit) with some fine rigging by Uschi. I wanted to flatten the tyres where they contact the ground, but now they're attached, I'm a bit scared to try, due to how delicately the main wheels are attached to the axle.
I painted the nose patch yellow, based on a hunch more than anything. I decided (in the absence of any official information) that this was the most likely colour for this patch, as the aircraft of KGr.z.b.V. 104 and 106 had yellow on the cowlings of their Ju 52/3m's, which the Go 244 replaced (only briefly though). Some black and white images that I've found show this patch standing out as prominently as the yellow tail band.
And so, after 14 months, I finally finished! It fought me the whole way, but I've tried a heap of things that I normally wouldn't have, and have learnt a lot along the way. I've kind of come to admire the lines of this aircraft. It's still the only decent kit of the Gotha 242/244 in any scale, although I see ICM is due to release a 1/48th scale Go 242 sometime in 2021. Looking at the way ICM produce kits, that could mean a Go 244 will not be far behind. I could be tempted...


Welcome to iModeler Doug and welcome back to the hobby. Nice first submission! Well done.
Thanks Gary!
Great result on this old but good basic kit. All your work has made it shine.
Many thanks Haslam!
See? It IS like riding a bicycle! 🙂
Really nice work. You must have been a pretty "advanced" teenage modeler back in the day. Welcome to iModeler.
Ha! My eyesight is shot and my hands shake a lot more than they used to... but on the plus side I'm a lot more patient! Thanks for your kind words!
Looks great,nice interior work! Welcome aboard.
Thanks Robert!
Some really impressive modelling and a very interesting write-up, welcome to iModeler, definitely liked.
Many thanks George, appreciate your comment!
This is a wonderful build, Doug!
The model is really outstanding, let alone the fact that it is not so often seen built, simply great that you decided to return to the hobby with such an entry.
The accompanying article is great, too.
Welcome aboard!
Thanks heaps Spiros, really appreciate you dropping by for a look!
For someone who has been decades away from plastic models, your Gotha model is remarkable. Very nice work scratching up that interior structure, and the paintwork is also spot on. Welcome to iModeler Doug, hope to see more of your work
Thanks so much for the kind words Pedro!
Fantastic entry, Doug @doug
Welcome to this great community.
It is clear that you master all the techniques, even after being away for so long.
Looking forward to see more of your builds.
Thanks John! I think I'll take a while to be a true master at this, other than in age! Hope to post many more in the future, and looking forward to contributing to the community!
Bravo, Monsieur !
Hi, Doug... now it's my turn to compliment your handiwork with this very smart-looking Go244... :-).
This was one of my first 'second generation' kits, the 'first generation' being the old Airfix/Revell/Frog offerings of my youth in the late '60s/early 70's. By comparison, Italeri and also Supermodel, blew the opposition out of the water when they arrived on the scene and for me, they set the benchmark that little bit higher for other companies to follow.
Anyway, nice to see someone return to what I, too, find is a therapeutic pastime; I hope you will enjoy your resurgent interest, and that we will see more from you in due course.
Regards,
Paul
Thanks Paul @paulh
Looking forward to more therapy, and also diving into your reports about the He177, Me110 and Ju52... all on my list of things to do! But maybe not at 1/48 scale... you like 'em big don't you!?
Welcome back to modelling Doug on this great site. I build the Gotha as my second build after a 40 year absence too. Not nearly as nice as yours ! Then I struggled on learning the airbrush on other kits. Learning a lot and I got another Gotha from eBay that I hope to put together some day. First one was the glider, the motorised will be next
I have a soft spots for Cargo and troop carrier planes !
Thanks Bernard @bernardbedeur !
I look forward to seeing your report on the Go 244! And for what it's worth, if I was to do it all again, I would sand off the horrible "faux canvas" texture on the fuselage sides... it's possibly the worst part of the kit (apart from the lack of internal detail!), and plays havoc with decal placement (I found).
Ditto on all others' thoughtful comments. And thanks for the photo close-ups, giving good looks into your build and finish. Super.
Thanks Bob @bails !
Looking forward to seeing some of your 1/72 kits online!
Wowzers Doug! Nice work with this old kit, 'like' button punched!
Thanks heaps George @georgeswork !
Like you, I have many childhood memories of aviation that have stuck with me: watching the giant RAF V bombers landing at Singapore from our house across the ditch in Johore Bahru, as well as F4 Phantoms heading out for a training flight. Being buzzed by a Mustang at an airshow, and being overawed at the sound and power of a Merlin engine at full noise. All good stuff, and slightly resurrected as we quietly beaver away researching and tinkering at our "little plastic models" (as the wife calls them). Thanks for looking in!
Well done, Doug (@doug). My hat's off to someone who can nail the mottling and camo like this. Great job!
Thanks George (@gblair)! I remember seeing C141's in Sydney when I was a kid. The T37 must have been a fun aircraft to fly! Cheers!
that looks great! I saved the link to this article, as I have the same kit in my stash to build, and will use all your notes up updating as reference material. Welcome to the gang!
Thanks Greg (@gkittinger)! Hope you get around to yours sometime soon! There aren't many good images of the interior out there. Happy to share the ones I found. The best image of the actual aircraft was this one from http://www.luftarchiv.de/ but all the images there are such low resolution. I emailed him asking for a higher res version, but no reply, sadly.
1 attached image. Click to enlarge.