Nine Weeks of OOB
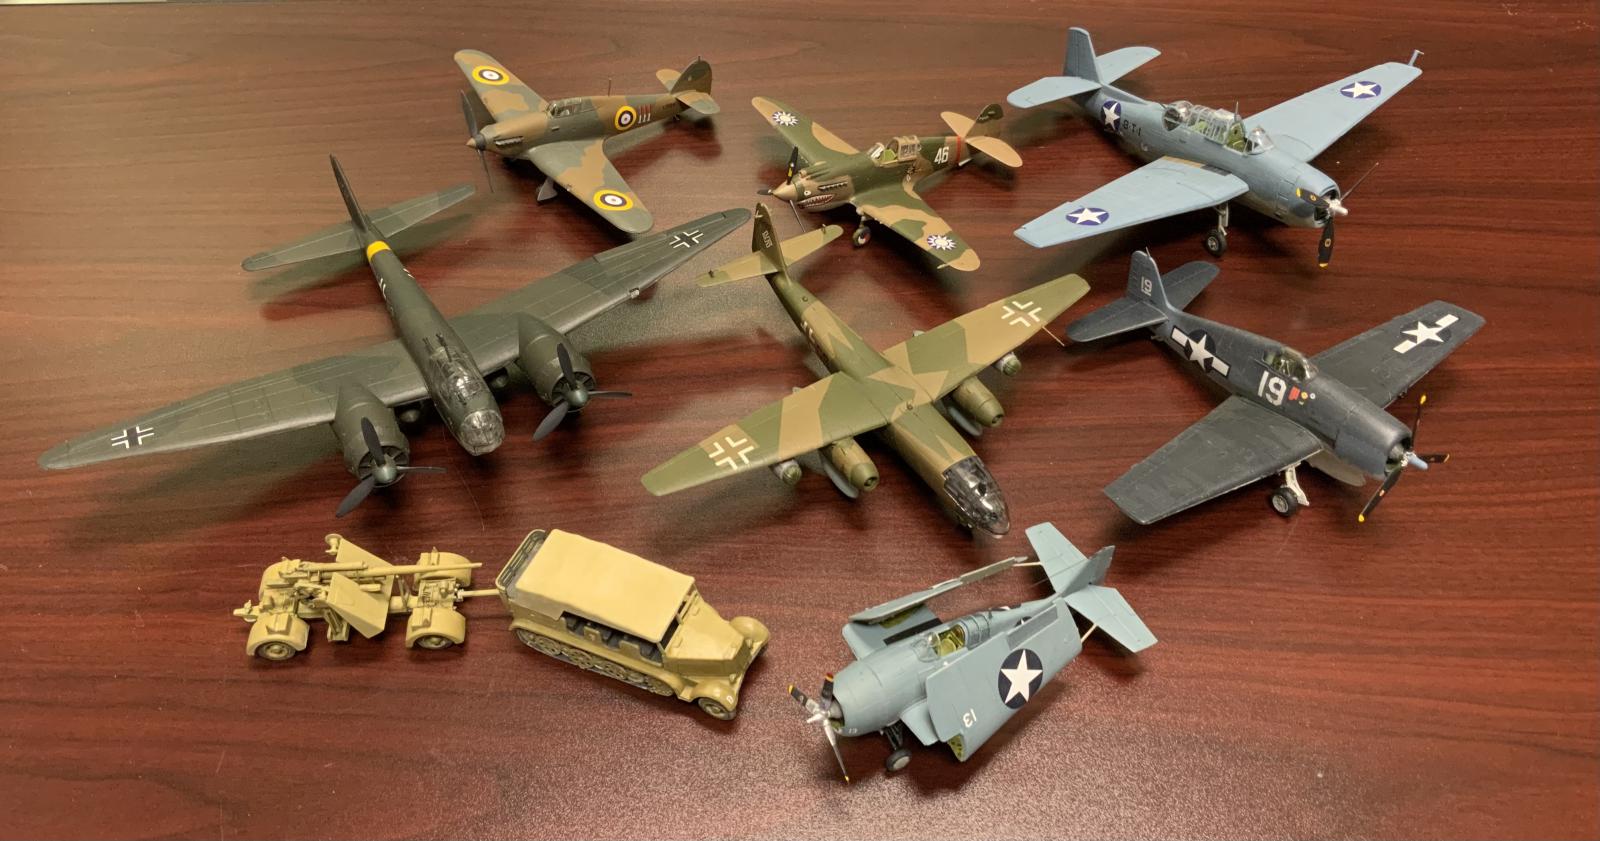
Back in mid-August I decided to take a little time off a nearly-complete 1/700 carrier model - yet another Essex-class ship - to try something a little different. I wanted to build one of the 1/72 aviation subjects I had been adding to my stash for years. I have been avoiding them because my airbrushing was poor, and a plane would show it much more easily than a 1/700 carrier, which has few large exposed surfaces that aren't broken up by detailing and weathering.
Plus, I was tired from several years of ship (and Apollo launch tower) scratchbuilding where almost every piece had to be hand cut based on study on old photos and plans. I was really for some OOB building for a while.
Little did I know that nine weeks later I'd have eight completed 1/72 projects, and a very different skill set for modeling going forward.
Equipment Changes
The first subject was a F6F Hellcat with an aftermarket cockpit and decal set with markings for Alex Vraciu's aircraft. The painting was terrible, highlighting that I really could not airbrush a dividing line. The model was saved by the fact that the matt finish was so bad it actually made the model look weathered better than my weathering attempts did.
Next up was the first of several kits I picked up in Austin in late August - an old Airfix Avenger. I had built a far worse kit as George Bush's aircraft a couple of years ago, and wanted to start building better versions. I decided to avoid the whole airbrushing dividing lines issue by building it as Bert Earnest's TBF at Midway so I could mask the line, and three good things happened. First, I switched out my airbrush tip from a 5 to a new 3 and the difference was like night and day. I could airbrush smooth coats and work in smaller areas. Second, I started using Vallejo Model Air paints and for the first time got the upper and lower colors right on a 1942 aircraft. While the upper was still Testors, and underside was Vallejo from their USN set. And finally, I was able to disarticulate the canopy and show the aircraft with the pilot's canopy pushed back. The final result wasn't great, but I was making progress, and getting good use out of the aftermarket decals I had to build a historically significant aircraft.
Next up was another of the Austin kits - a reissue of a class Airfix German 88mm with tractor. I had always wanted to build an 88 on its road wheels and this model was a great subject. I got to experiment with paints and weathering for an Afrika Korps vehicle, and saw what an 88 was actually made up of.
Better kits
Next up was a Trumpeter Flying Tigers P-40. This was the best aircraft kit I'd worked on in a while, and I really enjoyed the research into the subject. I also lucked out that this is where I tipped completely into using Vallejo Model Air paints after I found a set of China/Burma/Pacific paints at the local Hobby Lobby, including the bespoke paints Curtiss used for the RAF aircraft that were hijacked for the AVG. The canopy worked great, and the paint went down almost perfectly - until I tried freehand painting the camouflage. Not so great.
Worse kits.
Next up was the third Austin kit - an old (and cheap) Frog Junkers Ju 88 Luftwaffe bomber. I'd been wanting to build one of the awkward Luftwaffe twin engine bombers, and this looks like a cheap way to do it. Boy was I wrong. The research into the aircraft persuaded me that I needed aftermarket decals, so the final price ended up being the same as if I'd bought the newer kit that was also on the shelf.
The kit itself was the most primitive I'd ever built. I'd heard of Frog kits, but never built one, at least under that name. It was really more of a scale model toy than an accurate miniature. Then, although the airbrush was now giving me great results and more flexibility, and I was now masking camouflage panels instead of brush painting them, the 1942 paint scheme of RLM 65, 70 and 71 was giving me two dark greens that were almost indistinguishable - the same problem I'd had with a 1940 Stuka I built a couple of years ago, I ended up using washes to darken and lighten the panels to increase the contrast, but I was glad to finish this project and go back to a good kit.
Great kits
Next up was one of the “new tool” Airfix kits, here a F4F-4 Wildcat with folded wings. While not perfect, I finally felt I was hitting on all cylinders. The paint was good, the detailing was good, and I was able to see the improvement over the same subject - Bill Leonard's F-13 at Midway - over two years ago. The paint colors were right, the kit was better, and the modeling skills were as well.
More tools and better technique
The last of the Austin kits was a DML Arado Ar 234 C, but coincidentally my new trip to King Hobby generated an Ar 234 B, so I had one of both the twin and four engine versions. I decided to build the twin engine version, using all Vallejo Air paints, here RLM 76, 81, and 82. And taping off the panels was so annoying that I ordered a set of masks for the 234 B.
The final result was not bad. There were fit issues, more my fault than the kit's, but I learned from my mistakes on the Wildcat, and studied the instructions in advance to make sure I knew the order things needed to be painted and assembled to make final painting easier, and I could reason out what to do when the painting instructions were incomplete. The airbrush was also starting to spend a lot of time airbrushing parts on the sprue based on a complete list of which parts needed which paint.
Repeating
The Hurricane was another “new tool” Airfix kit, so I knew I'd have a fun time with it, but wasn't prepared for how quickly it would come together. I spent one evening painting most of the parts on the sprue, and after determining I could not find the aftermarket decals I needed, the model only took one day to assemble and paint, with a second day needed for decaling.
The biggest problem continues to be the gloss/matt finish. The glass finish is going on pebbled and doesn't provide a good finish in many cases for the decals, and the final matt finish isn't fixing the problem with a flat topcoat. I think I need to look for an airbrush-ready gloss coat - the Vallejo matt finish seems to be working okay, but the gloss is not.
But if the goal is to build skills for models that are more important and more complex - the Airfix B-25, the Tamiya F4U, and the Hasegawa SBDs and Airfix TBD that needs to take a step up from the old kit it's starting as - I think I'm there.
Nice work, Michael. That’s a very diverse collection. After decades of doing 1/48 planes, 1/72 has really grown on me over the last few years. Now I need to get busy on your specialty, 1/700 ships! I love ships, but PE doesn’t love me, LOL.
Michael: Airbrush with the finest tip you have, set the compressor for 15psi, thin the paint 30% (Vallejo is, IIRC, "airbrush ready" so don't take this step if so). Tighten the tip down til you get the finest line you can. Make your outlines with that, then open up a bit and fill in. Brush from 2-3 inches away.
Airbrushing's an art. I've been doing it for 50 years and just learned some new things this weekend.
HTH
Wonderful collection, Michael @mcsmith1964
Great collection, Michael, you did produce many nice models!
Thank you for sharing this information Michael.
I dread using my airbrush at times but slowly getting there. Like you, I have Had the starter or less valuable kits to practice on. I can’t wait to build the ones I really would like to see done well. your kits looks really good and inspiring.
A nice body of work! Nicely done.