1st Model Kit- Need Help & Feedback
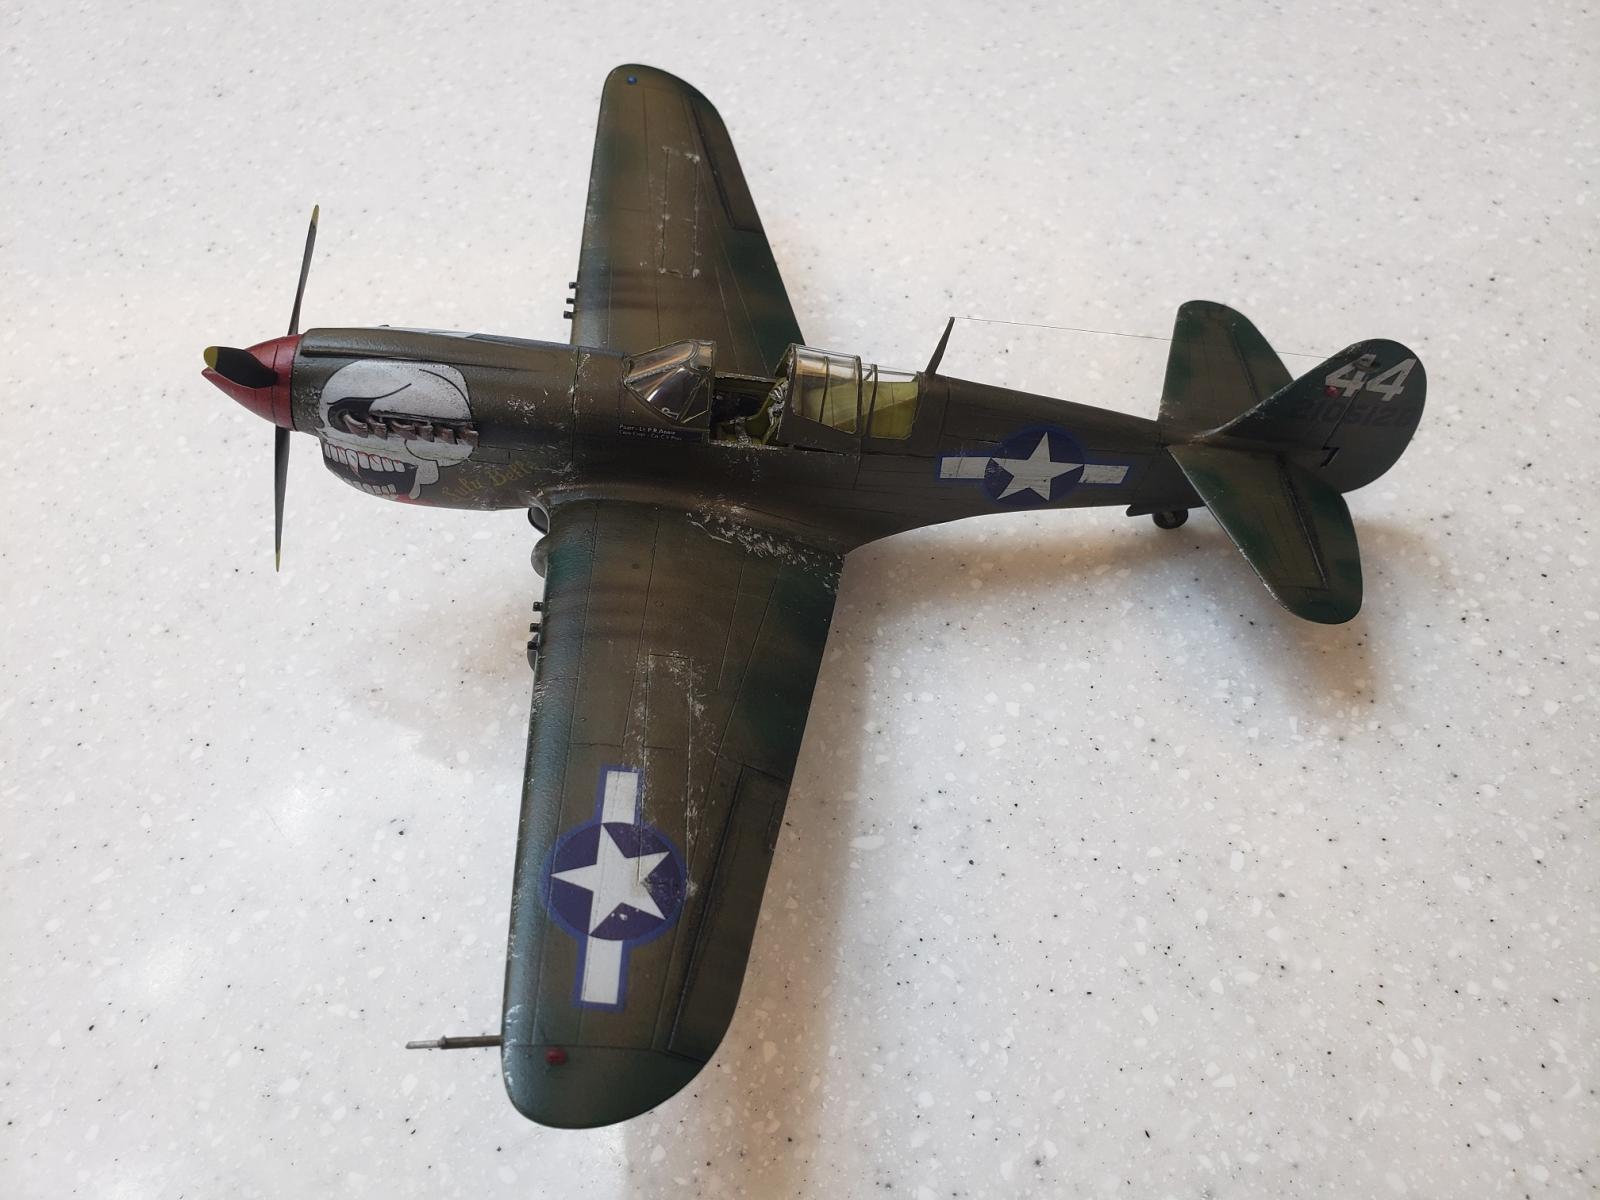
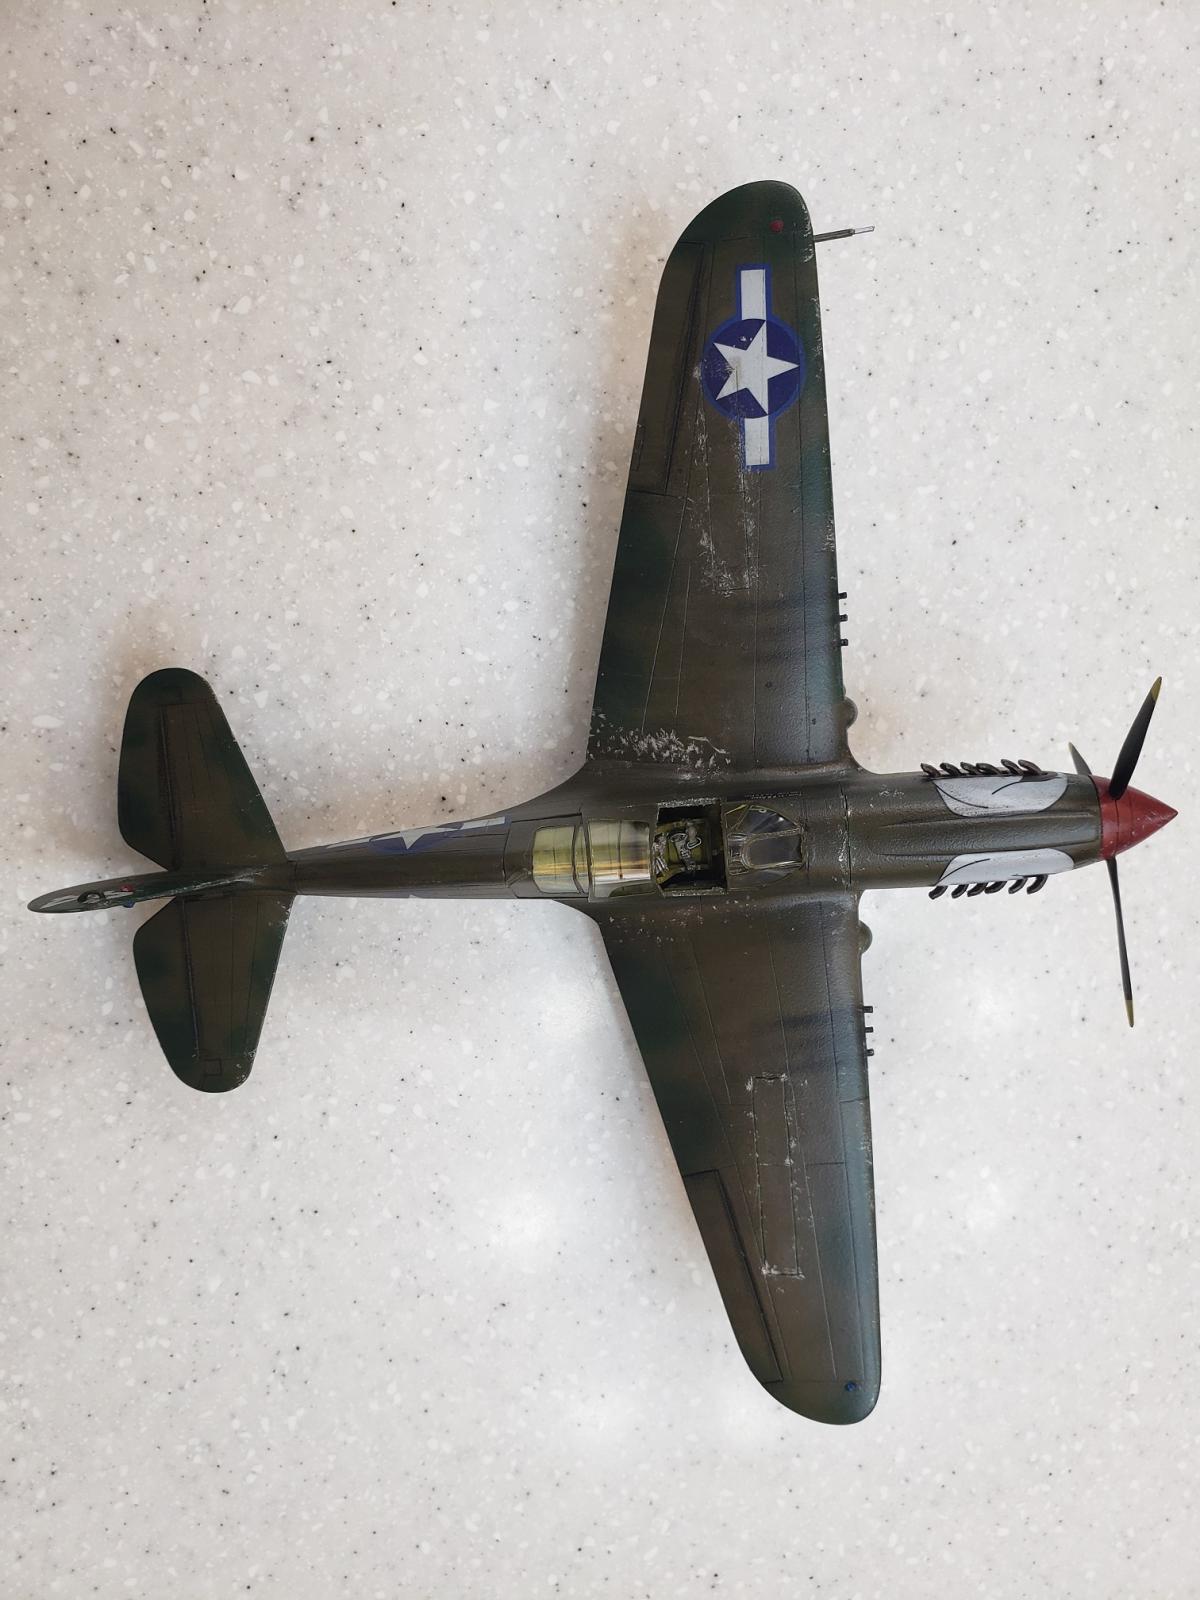
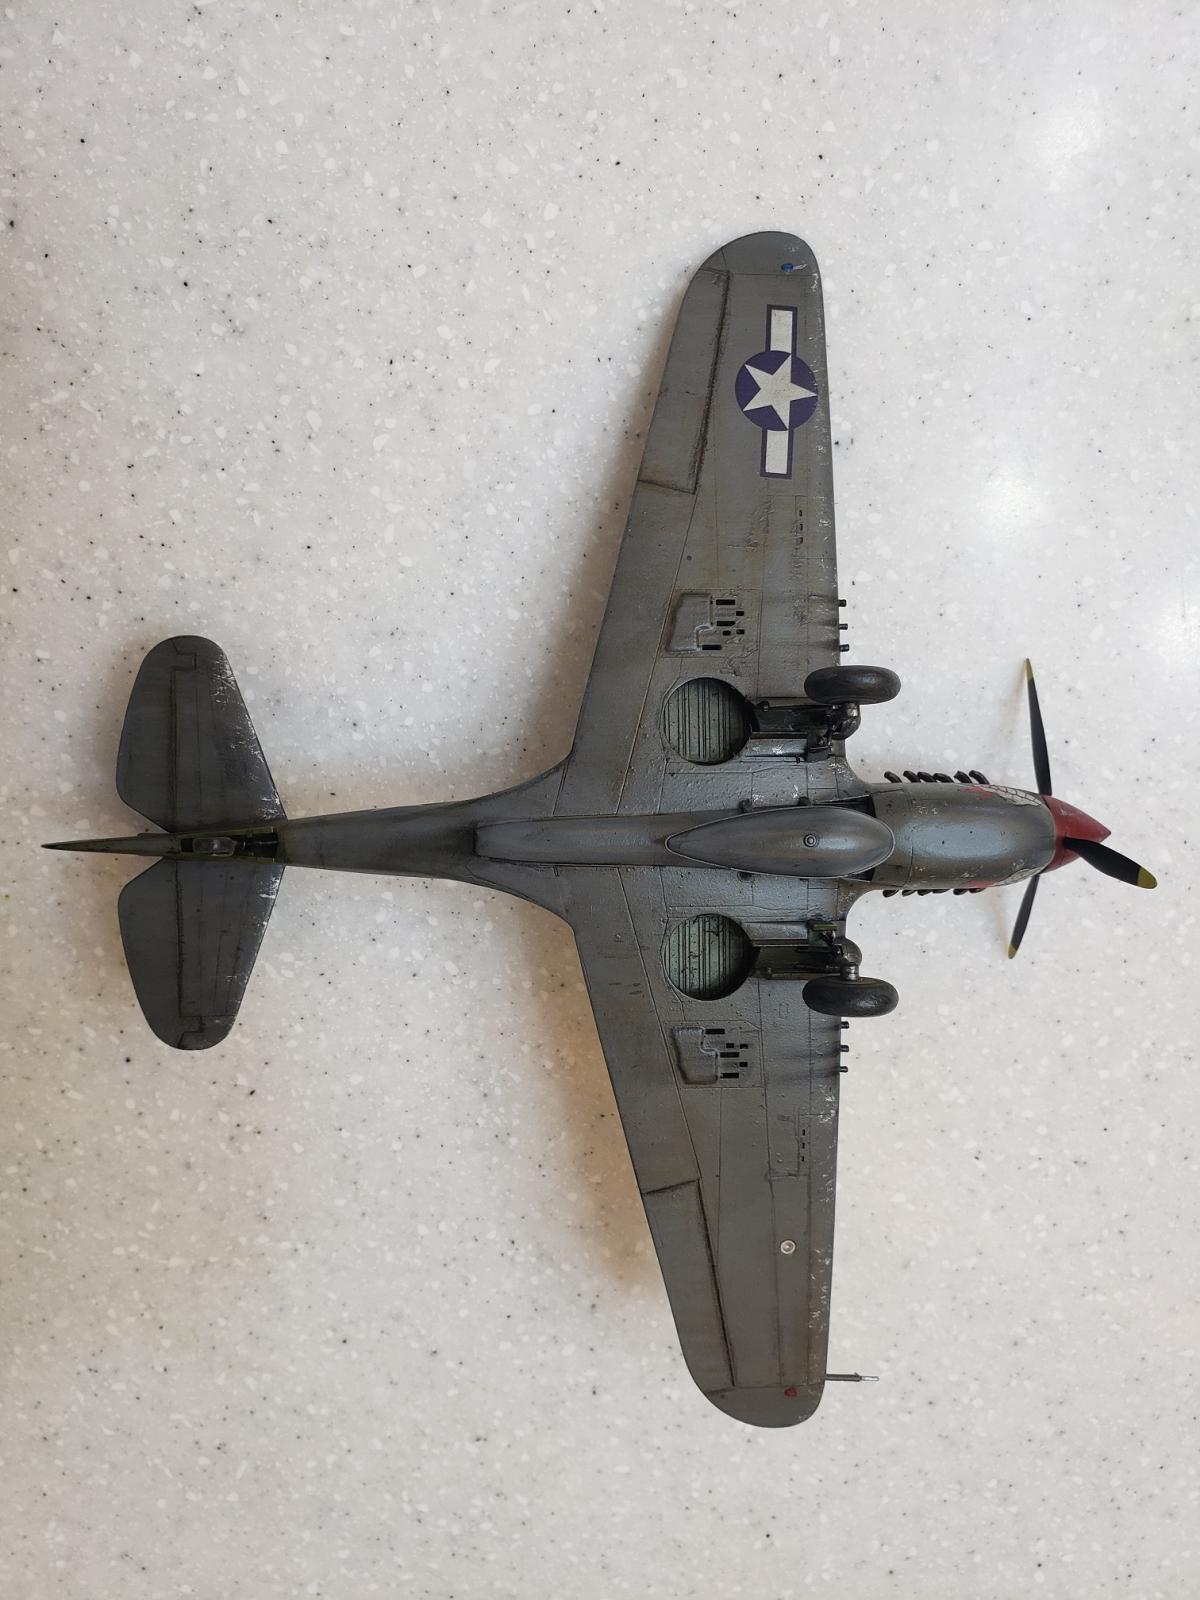
This is my very first model kit (1/48 scale Academy P-40) so my learning curve is vertical at the moment and some things I couldn't figure out at all. I use mostly Mr. Color paints. Please provide suggestions/feedback on how to improve. Below are some specific probIems I had and don't know how to resolve them. Yes, I know the engine exhausts are crooked and need to be fixed.
-
I tried using the Tamiya panel line wash but it removed the underlying gloss coat (Mr. Color clear gloss). I couldn't figure out how to protect the gloss coat from being damaged by the panel line wash.
-
I made an oil wash using oil paint and thinner but that also removed the Mr. Color clear gloss layer.
-
I can't figure out how to make tight lines with my Paasche airbrush. The spray pattern is just too wide. I am using a size 2 (.38mm) needle and usually stay around 18 PSI and mix my paint at a 50/50 ratio with thinner. I experimented with different PSI and distance of needle from the plane but couldn't figure out how to achieve a tight spray pattern.
-
The final matte coat is very bumpy. I used the Mr. Color spray bottle and sprayed the spray can directly onto the plane.
-
The gloss coat (Mr. Color clear gloss) I used never achieved the smooth clear finish I was expecting. I thinned the gloss 50/50 with thinner and applied four layers. It still had a matte finish to it after four layers and not very smooth or shiny.
-
I used Mr. Hobby Mr. White putty. I could never achieve the results I wanted with this product. Every time I sanded, it seemed as if there were air bubbles or voids in the putty so I would have to apply another layer. I'd sand again and then there would still be more voids in the putty. I could never get a perfect seam in the areas where I used this putty.
-
I could never get the yellow on the tips of the propellers to look good. I used Vallejo flat yellow thinned to 50%. Even after 5 layers of yellow paint, the black base layer was still visible.
-
Any suggestions for rescribing lines that were sanded away? I couldn't keep my lines straight.
-
What is the recommended color to use from Mr. Color to paint the cockpit interior and wheel wells for American WWII aircraft? The color recommended on the instructions was too "pea green colored".
-
Any suggestions for paint chipping using the paint brush and silver paint technique? Mine doesn't look convincing.


For the yellow on the prop I use white as a basecoat over which I apply the yellow. I mainly use enamel paint from the Tamiya, Humbrol and Model Master range thinned to the consistancy of milk. Your paint once thinned should run like milk on the inside of a glass. (Hope that makes sense lol). As a filler I use correction fluid that comes in a pen applicator for filling seams. It wet sands easily. I coat my models with Future floor polish or Humbrol Clear. Once it has dried properly, I run dark brown water colour paint along panel lines and wipe away the excess with a damp cloth. Hope these tips are useful to you.
Hi! For a first model is really excellent. Believe me, You are on the right track. Also not many people starts the hobby armed with an airbrush. Most of Your problems mentioned are can be solved by practice, patience and experience. OK, I try to answer some of Your questions: 1-2. Mr Color (if we speak about lacquer) are very strong and durable paint system as long as You prep the surfaces sufficiently and allow the paint dry. The latter is very very important. Gunze has the Mr Color Hobby Color line which is water/alcohol based acrilyc - that's not as durable as lacquer but after dried that can take enamel wash (the mentioned Tamiya) or oil. Especially oil. For oil wash use only and exclusively artists White Spirit because ordinary white spirit can damage model pants (I learned it by the hard way). 3. Sorry but with a 0.38mm nozzle You can't make miracles. Try to dial down Your pressure and thin Your pant more (but expect problem with "running" of the paint or poor coverage). For thinner lines You need: thinner paint + lower pressure + finer nozzle (in a good airbrush) + lot of practice. 4. forget the spray can. They are not good if You want really good finish. They okayish if You havent got an airbrush but... weel they are just "makeshift solutions" especially if You have an airbrush. 5. Gloss finish is not easy You have to find the right mixture/pressure/movment and distance from the surface etc. There are no such thing that absolute recipe for dilution You have too "feel" it. Believe me You will. Try to make the consistency of Your paint mixture as milk in general. Genarally speaking for Gunze (expecially Mr Color lacquer) 50:50 mixture is not enought so try 30 paint 70 thinner and use some retarder or yellow label gunze thinner (that one includes some retarder). You will be surprised. 6. I think of two possible problems: first You have to work the putty into the surface better, second You have let it dry at least 5-6 hours (better if You live thet thing to cure for a night). It may seems to be cured after an hour but in reality it is not. 7. Yellow is a b..h of a color. You have to make a white basecoat before spray yellow. 8. Use a thin steel ruler or scribing template or dymo tape. You can find them easily in any modeling hobby shop or on the net. 9. Well it depends on the manufacturer (Imean the aircraft), year, type - that's a can of worms so I leave this question to others 🙂 . There are several methods for chipping which is alone is a difficult ad long topic. The easiest is the brush/silver paint approach and the most life like is the chipping fluid/layers method - all needs considerable experience and practice. Don't rush things and see some forums and tutorials and try try try. Hope I could help. Happy modeling!
Thanks for all your suggestions. I still can't figure out how to do a panel line wash without ruining the paint and/or gloss coat layer. I use Mr. Hobby Mr. Color acrylic paints and Tamiya panel line accent color for the panel line wash. When I wipe off the panel line wash, it also removes the paint and gloss coat. I apply the wash and wipe it off with a dry rag about 30 seconds later. Any suggestions?
This is an amazing result for your first model, Derek!
The suggestions of @mornem and @remete are great and I fully agree
Here is what works for me:
1 and 2: coat your model with an acrylic based clear coat, so it will not be affected by oil based washes.
3: the usual way to go for fine lines is choosing fine nozzle/needle, thinned paint, lower compressor pressure, getting closer to the model and patience 🙂 Best is to experiment on a piece of paper first.
4: looks like the can is not working for you; you may airbrush your final coat.
5: you may try a different type of gloss varnish, did you use the recommended thinners?
6: you may try another brand that suits you better
7: yellow is hard to achieve! needs patience...and more layers!
8: use dymo tape or a metal plate as a guide. Best use a dedicated scribing tool. Good results will come with practice.
9: That's a more complicated answer. Best is to do some net research for the color you are searching. There are a lot of charts available that you can consult.
10: Choose a stiff brush, add some silver paint, then wipe it onto a paper towel until it is almost dry of paint. Then, carefully, apply at the areas you want.
All the above are my suggestions and by no means claimed to be the correct answers to your questions. They work for me, most of the times... 🙂
Welcome aboard!
Derek, welcome to this hobby, i believe watching your first model, that you will stay within hobby forever.
This P-40 looks excellent.
You already received all useful advices from colleague modellers, and part of the hobby related to chemical inter reactions is always fun and sometimes unpredicted...so be ready to perform some very creative corrective measures 🙂
But you will find your approach which will be the best, in time and with next projects. Simply, enjoy!
Looking forward to see next one
Best regards, Djordje
For a first-timer, that is a very impressive model Derek - well done! I was away from modeling for over 40 years, but COVID brought me back into it, which has been awesome. Patience and building on lessons-learned haven't always been easy for me, but it is very true. Couple of pointers that hopefully help you...
2 - I made the mistake of turpentine/thinner that was too strong & removed the paint. I use Mr. Thinner 400 to mix with my enamels for airbrushing, the mixture depends on the paint manufacturer. Or try using a milder thinner that isn't so harsh. I use Winsor & Newton artist white spirit (Hobby Town) to remove excess panel line wash with a q-tip, and it has never removed the gloss/matte coat or paint for me.
6 - I use Tamiya white putty, applied with either a flat toothpick or flat angled metal applicator. I've experimented by diluting it with water in a small cup too, to improve filling characteristics with smaller gaps. And I've found that the best way to minimize glaring patchwork is to keep moving up your sanding grit; usually, I end with 1500 to 3000 grit, using Tamiya's sanding sponges.
8 - Try taping off the area you want sand to avoid removing the panel line. I've found that using a worn-out X-acto blade, and either rocking or gentle back-n-forth, is more effective, at least starting the initial scored panel line. Using a cutting or drawing motion was disastrous for me, so get that initial score, then repeat to reach the desired depth, eventually using the blade (upside down or backside) tip to finalize the line. You may want to try using tape as a guide too, for the initial score; rulers just seemed to move all over the place for me.
Hope this helps, and welcome to iModeler where you'll really enjoy fellow enthusiasts who love talking modeling and sharing their work and experiences!
Joe
Derek, welcome to iModeler and Modeling. Both good choices.
To reiterate what's been mentioned from others...great job, especially for a first time build. To me it looks like you have the modeling bug and will only keep moving forward. So step back and say "well done".
Looks like you are getting good advice to your questions from others. If I may, these bits of advice are more for morale:
Pick subjects you like.
Don't get overburdened by the amount of information available...Keep it simple and keep building on your experiences.
Experiment on test parts before the actual model.
Don't get discouraged because your build didn't come out exactly like someone else's or what you wanted.
Once you get comfortable in one genre try something different...sometimes it boosts the mojo.
To me the most important...KEEP IT FUN!
Just my two cents. Hope it helps.
Looking forward to seeing more builds, Derek. Good luck!
Your first model is ten times better than my first (a Monogram A-10).
Fantastic! You should be really proud of this- especially for your first kit. Keep up the good work. I've found that it takes a lot of trial and error and then some more. Keep trying new things and find the techniques that work for you. This site as well as some great youtube channels have been very informative and inspirational for me.
Wow, Derek! Your first kit turned out awesome. You tried techniques and tools on your first run that most of us spend years exploring. The other guys have given you lots of good suggestions. Try them all out and have fun.
Let's start with that is a fantastic first project! They will only get better, and yes, you will continue to make mistakes (part of the process). There are tons of resources on YouTube for every little technique and question you have (and hundreds you have yet to think of!). I really benefited from a couple I found that explained the different chemical compositions of paints, thinners and top coats and how they all interact. That has saved my butt on several occasions.
I look forward to seeing how your work progresses!
Greg, do you know which YouTube videos you watched that explained the chemical compositions of paints and thinners and how they react to each other. I still can't figure out a good combo of paints, clear coats, and panel line washes that work together.
First of all, welcome to this great community, Derek @mrocs2000
If this is your first ever kit, then it is clear that in the near future you will building amazing kits.
This P40 looks great already.
Seems like most of your questions have already been answered.
Most important factor is to enjoy the building process and that in the end you are happy with the result.
Learning and improving will happen along the way and most of the modellers have their own prefered way in achieving the result they want.
I wish you all the best for your next model, any idea what that will be?
I'm working on a SB2U-3 Vindicator (USMC version at Midway) right now. I live in Korea so the stores principally carry Academy Hobby (Korean brand) models which limits my options.
You have a lot of good, useful comments here, Derek @mrocs2000. Read and digest them.
First, I'll start with the fact your "first model" is a whole lot better than the first models of 99% of the people here. You have many of the basics well under control.
I'll speak to your airbrushing. You have a good airbrush with the Paasche, it's a good reliable airbrush. First, get a #1 fine tip. Second is get a pressure regulator - you want to be shooting about 15-18psi, and just shooting as you are is probably up over 20psi, which guaranteed the splashes. Third is mixing the paint: I've been airbrushing since 1973 (and still learning new things - it's an art). I generally use a mixture of 60% paint, 40% thinner, and I use acrylics, mostly Tamiya. Tamiya is a good, reliable paint that's generally available at many modeling locations. Gunze Mr. Color that you are using is good, also the Gunze aqueous acrylic line is excellent.
And the best lesson of all: practice practice practice, and know that failure is the key to ultimate success. Nobody learns anything any other way than failing, and analyzing the failure so you don't do those things.
And then there is the Al Superczynski rule: Build YOUR model the way YOU want and HAVE FUN.
Hi Derek,
It was just pointed out to me that I posted this to the wrong P-40 posting.
Here are some suggestions and pardon me if they were already made as did not read all the other responses.
I tried using the Tamiya panel line wash but it removed the underlying gloss coat (Mr. Color clear gloss). I couldn't figure out how to protect the gloss coat from being damaged by the panel line wash.
I made an oil wash using oil paint and thinner but that also removed the Mr. Color clear gloss layer.
-I believe the Tamiya panel line washes are enamel and mostly likely any oil based product will remove the Mr. Color gloss. When working on a Bell X-1 I used the Mr. Color gloss then put an enamel wash over it which mad a mess and I had to repaint the model. My approach to painting is not very scientific, but the rule of thumb is to put acryilic washes over enamel or lacquer paints and the opposite if using acrylics.
The final matte coat is very bumpy. I used the Mr. Color spray bottle and sprayed the spray can directly onto the plane.
-Not sure what the issue is as I have used the spray cans successfully except if the can was cold. When that happened it did not turn out well and possibly could be the cause. Now I immerse the can part way in hot tap water for a few minutes especially now since it is cold here.
The gloss coat (Mr. Color clear gloss) I used never achieved the smooth clear finish I was expecting. I thinned the gloss 50/50 with thinner and applied four layers. It still had a matte finish to it after four layers and not very smooth or shiny.
-When I used their clear gloss I use the leveling thinner they produce. It works great and have used it for Tamiya and AK paints with no problems.
I used Mr. Hobby Mr. White putty. I could never achieve the results I wanted with this product. Every time I sanded, it seemed as if there were air bubbles or voids in the putty so I would have to apply another layer. I'd sand again and then there would still be more voids in the putty. I could never get a perfect seam in the areas where I used this putty.
I have never used that stuff bought a tube of 3M Acryl-Blue Glazing Putty and I never get any voids. Mine I got on Ebay as I think it is out of production. Most likely other fine texured glazing putties would work. Sometimes I mix talcum powder with super glue and use it on troublesome spots. If you do not let it sit overnight as it will be harder to sand. Also, depending on the size of the cap you can use straight super glue.
I could never get the yellow on the tips of the propellers to look good. I used Vallejo flat yellow thinned to 50%. Even after 5 layers of yellow paint, the black base layer was still visible.
-For this first I do a reverse process as opposed to I believe most guys. First Ipaint my prop and spinner the appropriate colors then mask off everthing except for the prop tips. Then I spray a thin base coat of flat white and once dry apply the yellow. I always screw up the tips doing the other way. To make the masking easier I use as little tape as possible and the fill in the spaces with Silly Putty. If you ever do a WWII RAF bird with the yellow ID bands on the leading edges here is my suggestion. Trace the outline of wing on a sheet of paper or masking tape to make a template. Once you have applied the exterior paint cut out the template. If you use tape just apply it, but if I use a paper template I tack it in place with Blue Tac or Silly Putty. Then I apply the whtie paint and then the yellow. I have found it very tough to get the ID bands right doing the opposite due to the compound curves and getting the widths even on the top and bottom.
Any suggestions for rescribing lines that were sanded away? I couldn't keep my lines straight.
-Try to get some Dymo tape the stuff they used on the old label makers. To stretch it I cut it in half as I find it works OK. One thing I use is the discarded subway cards there in NYC as they are very flexible and can be cut to make thinner pieces. If you want soe let me know and I can send you a few.
What is the recommended color to use from Mr. Color to paint the cockpit interior and wheel wells for American WWII aircraft? The color recommended on the instructions was too "pea green colored".
Any suggestions for paint chipping using the paint brush and silver paint technique? Mine doesn't look convincing.
-I have been using Mr. Color 27 Interior Green for my US birds. For chipping I use a silver pencil as I have more control and if I make a mistake I can wipe it off.
Good luck and I hope some of this helps you.