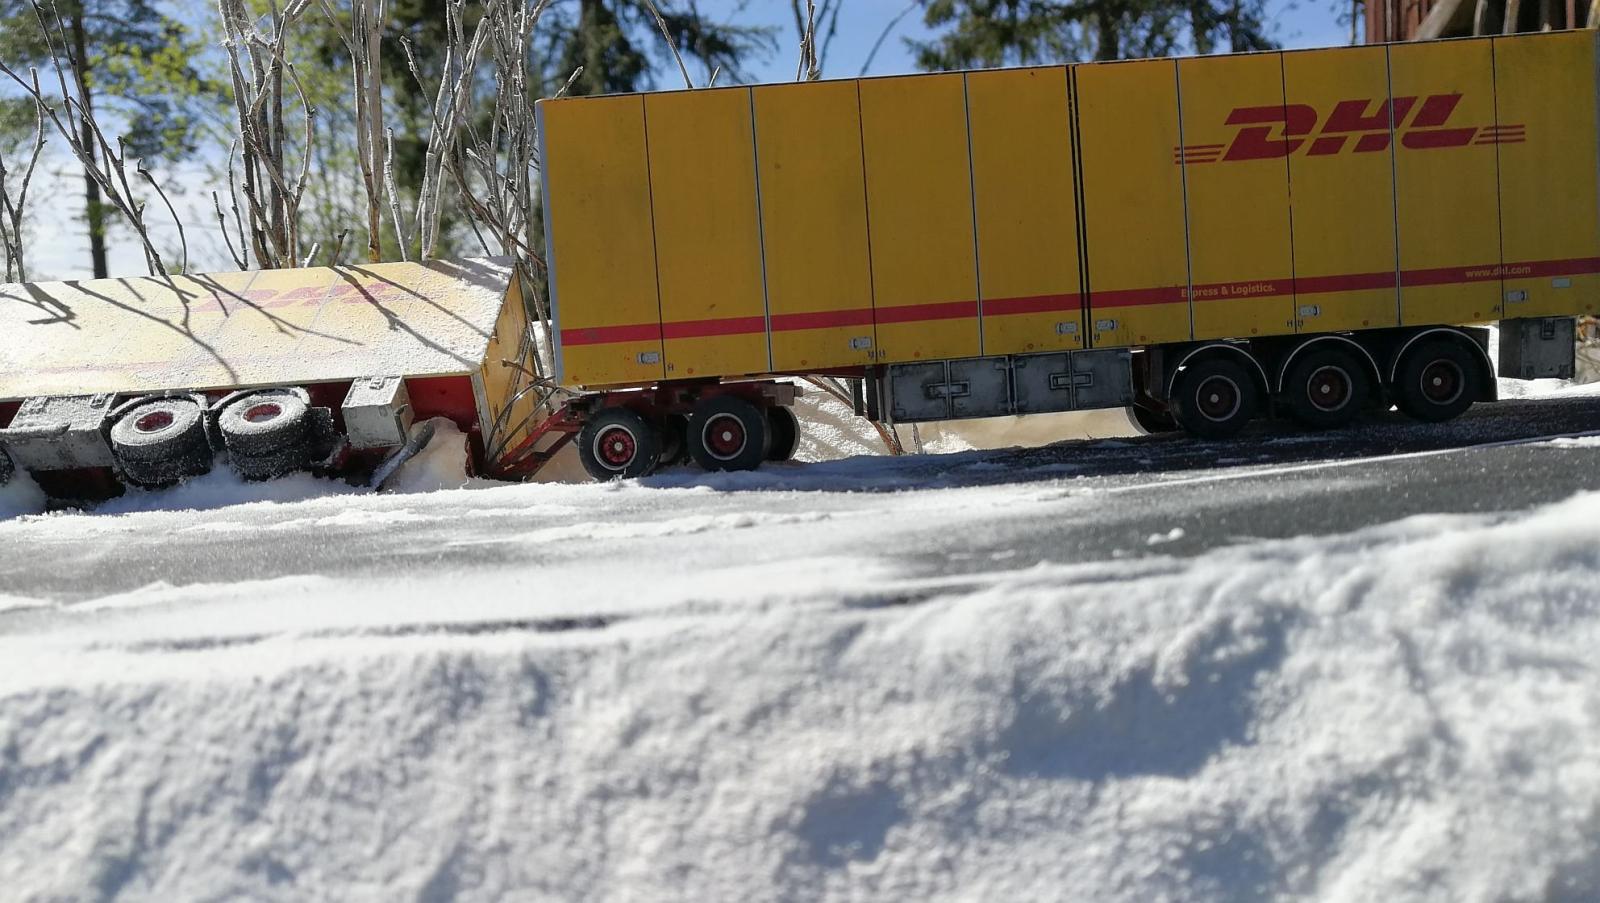
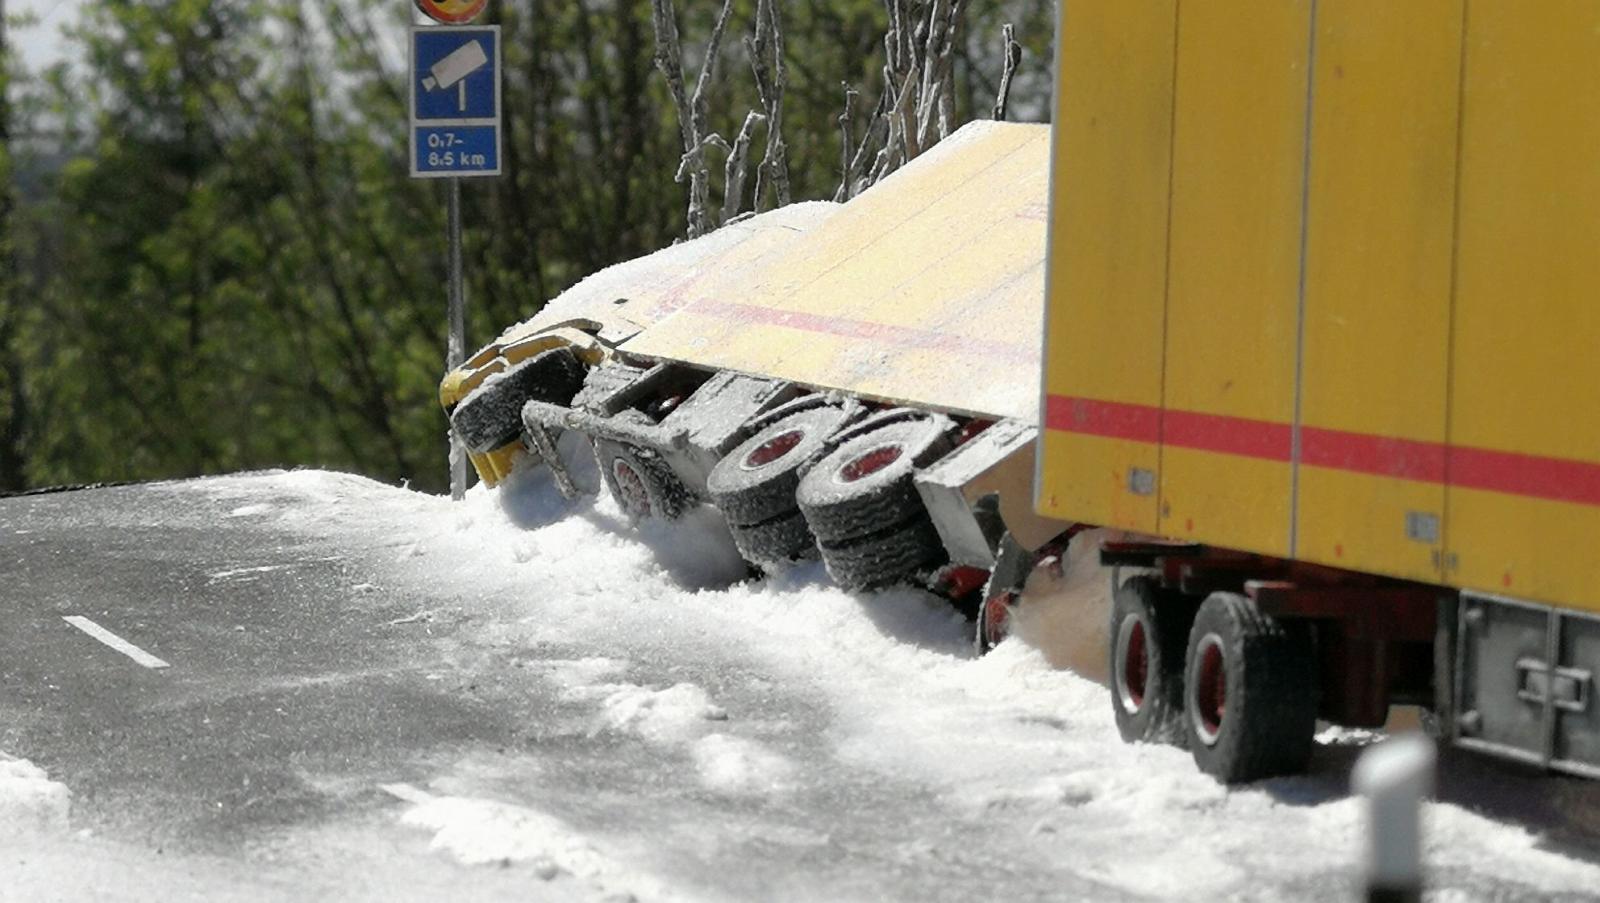
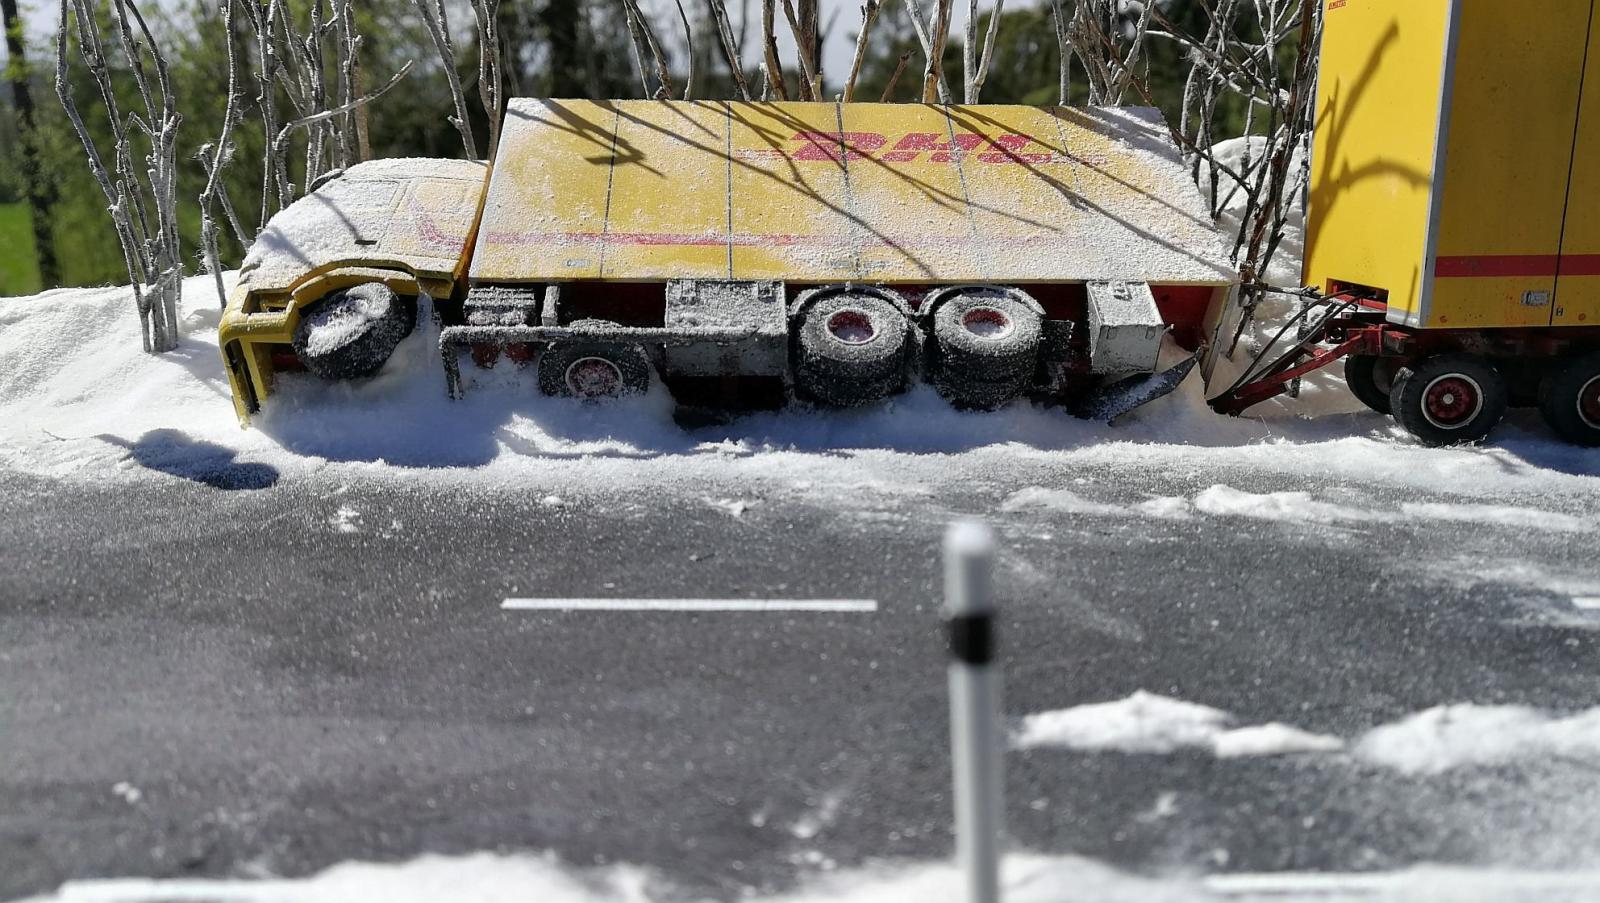
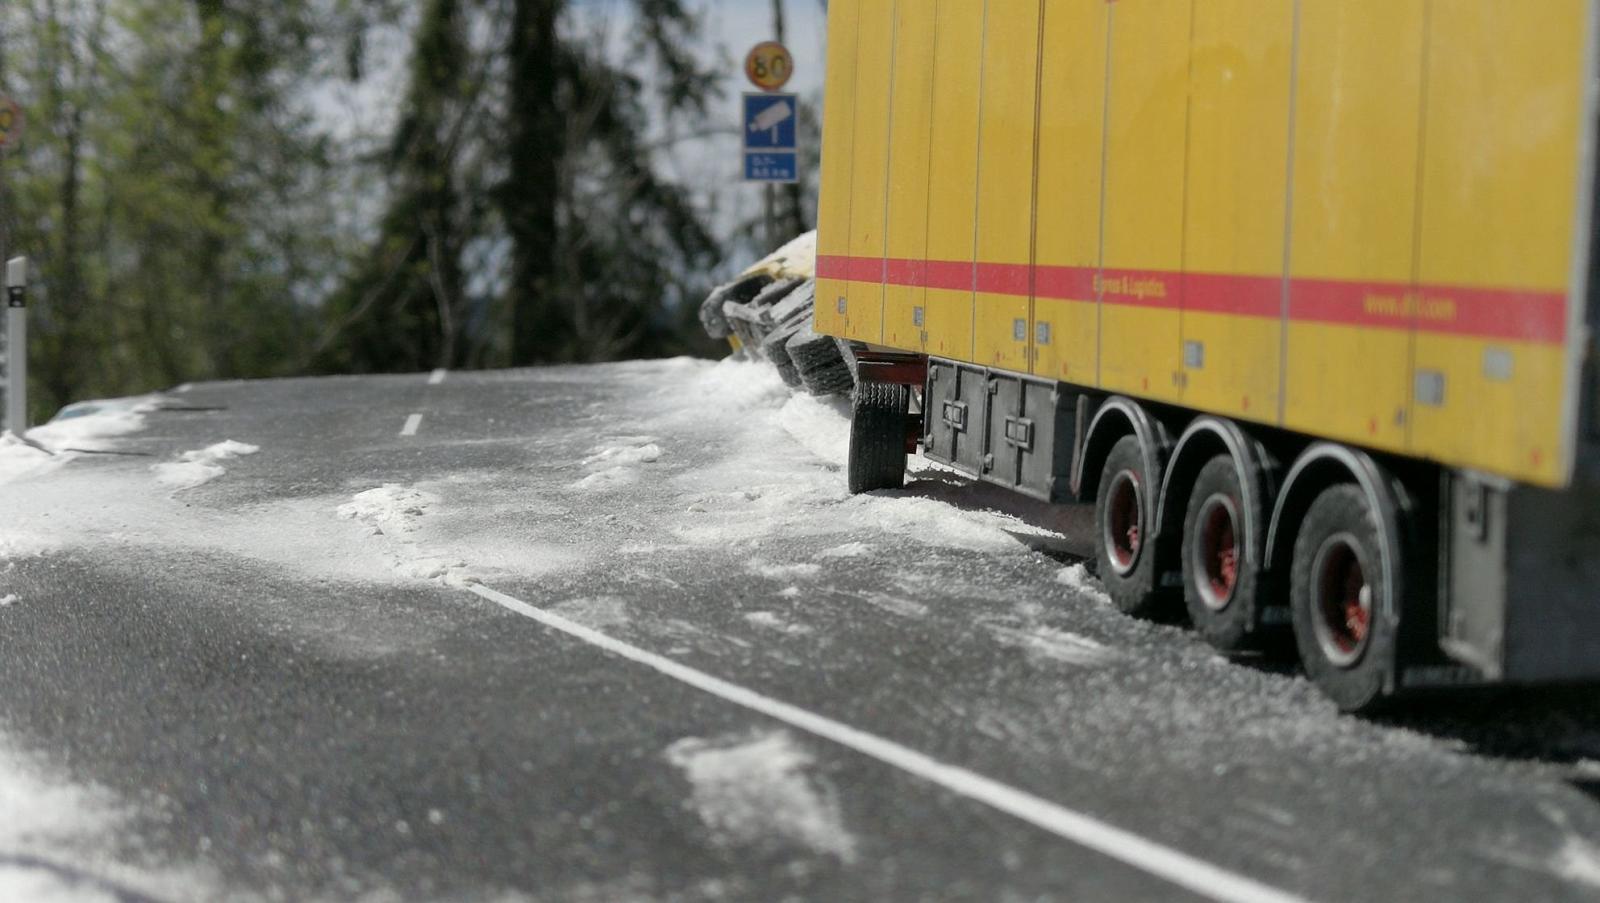
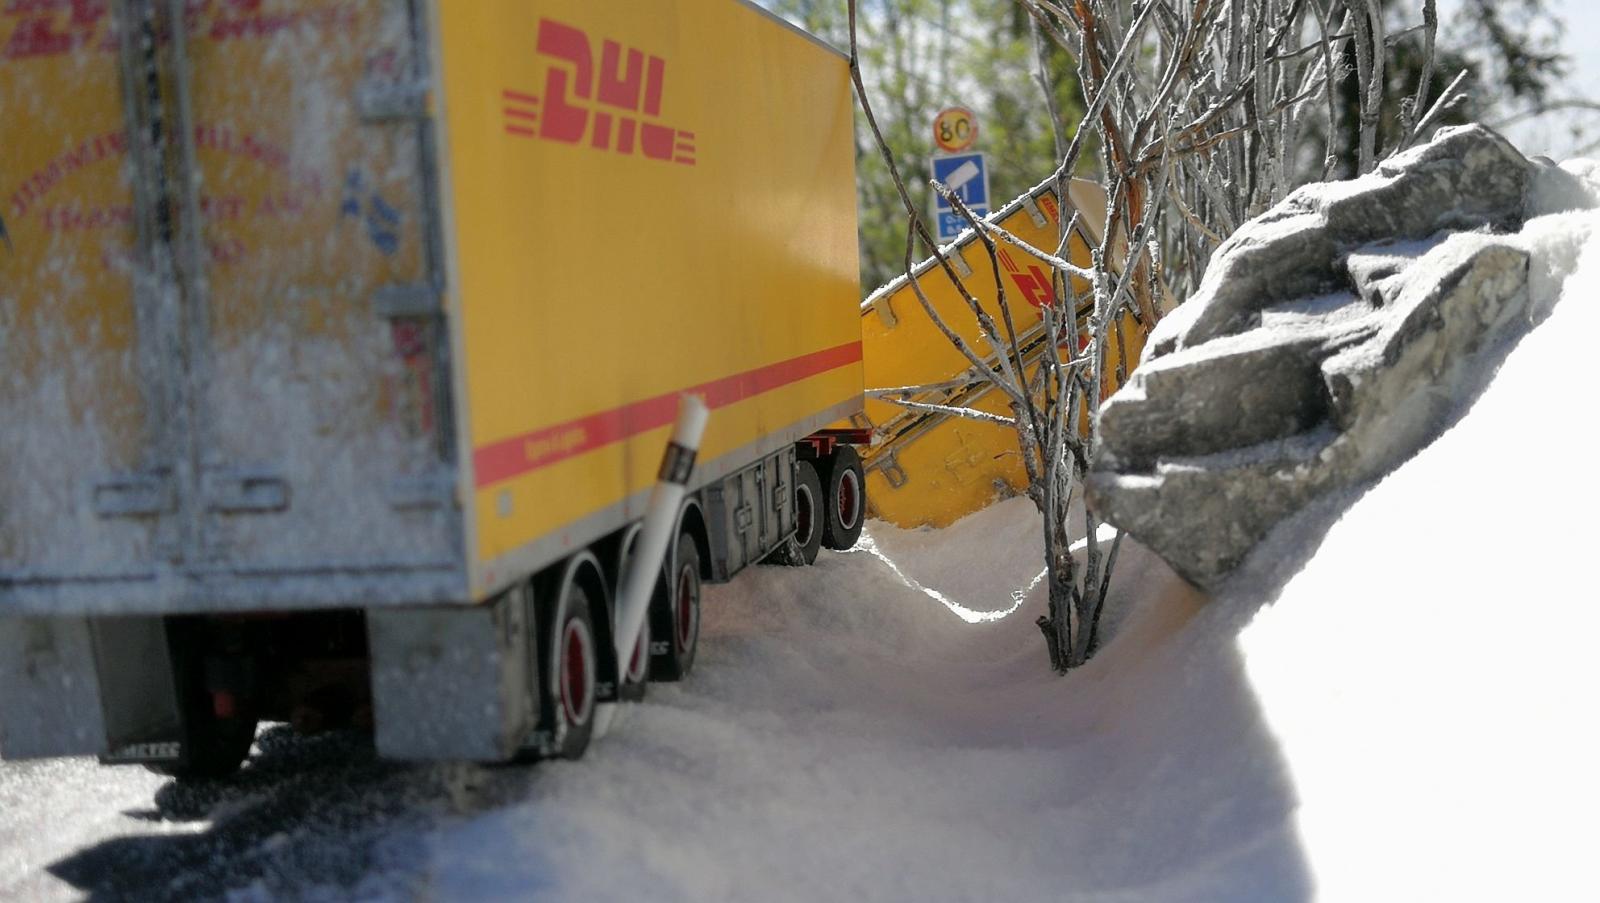
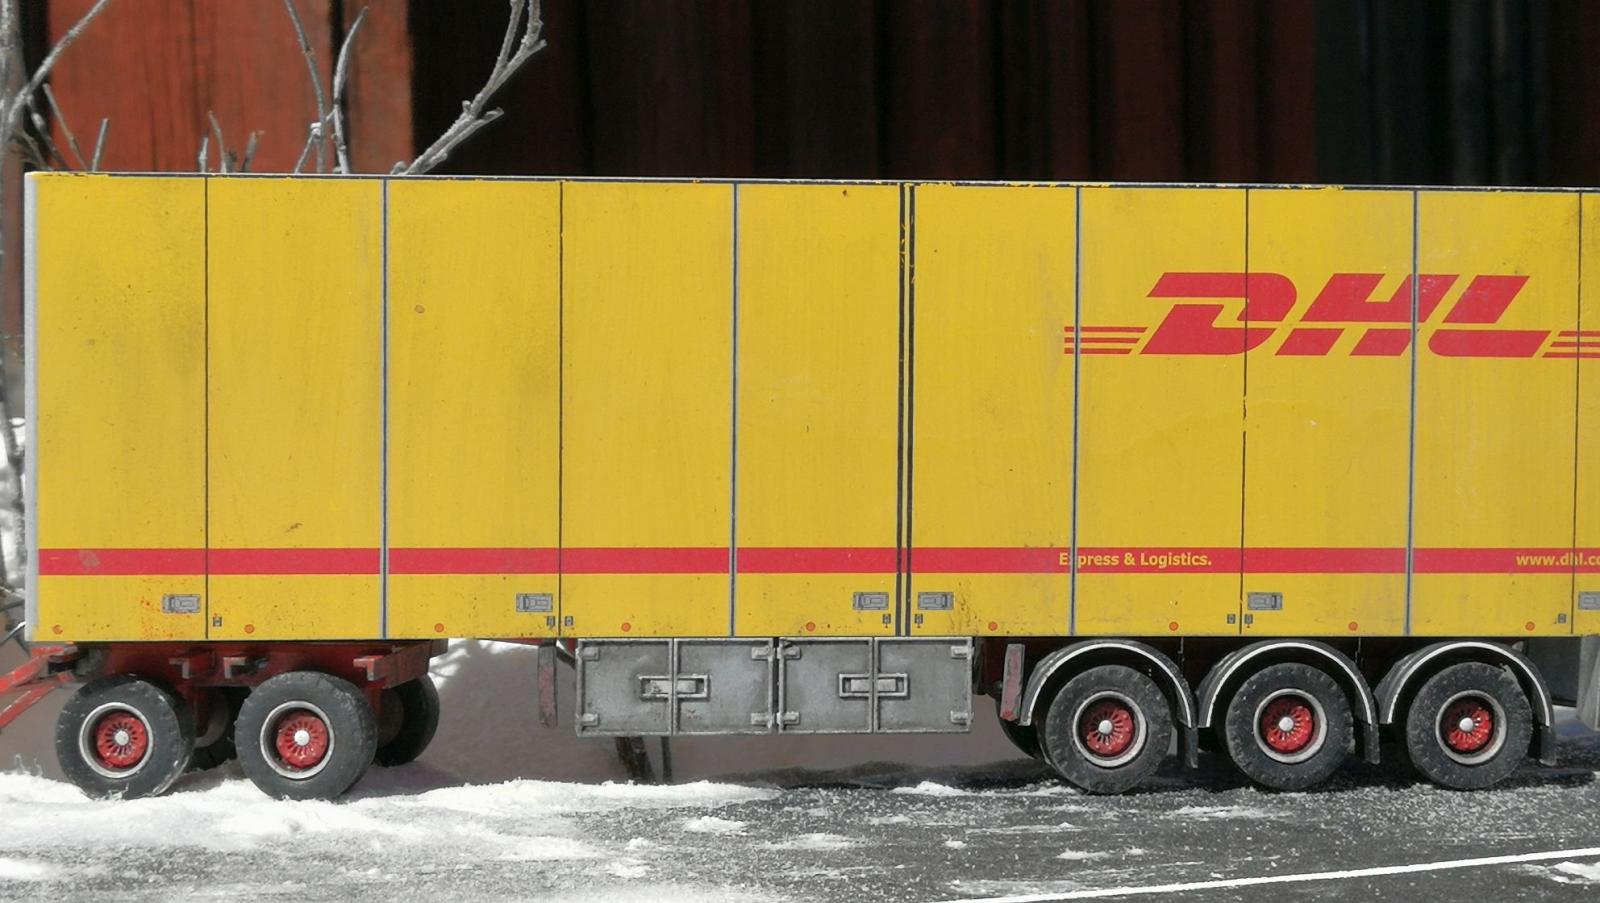
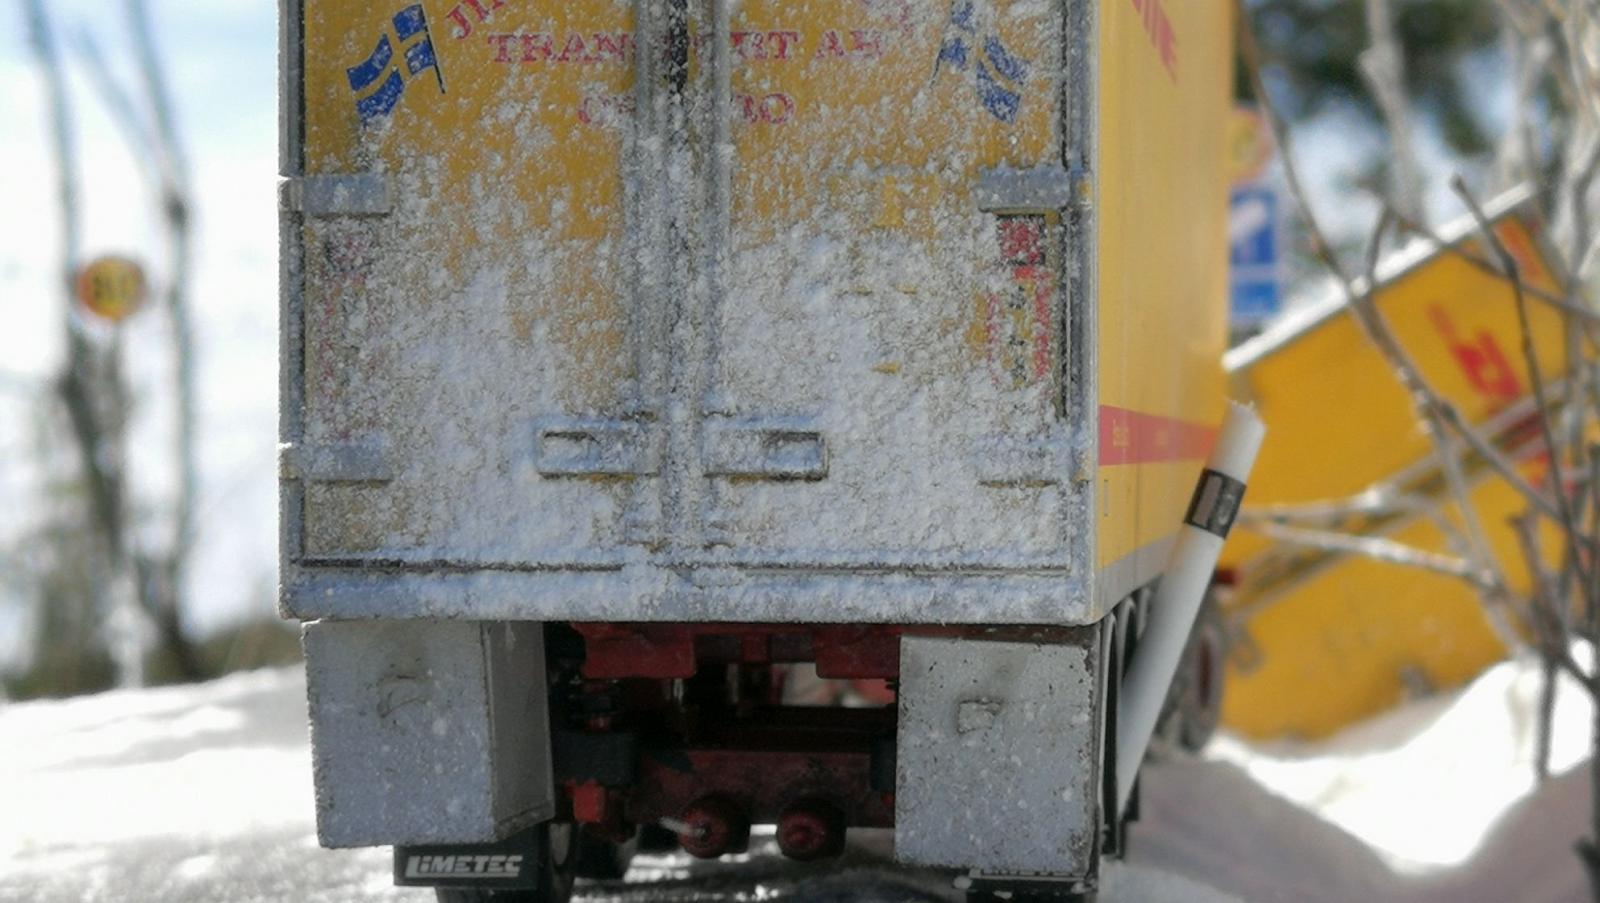
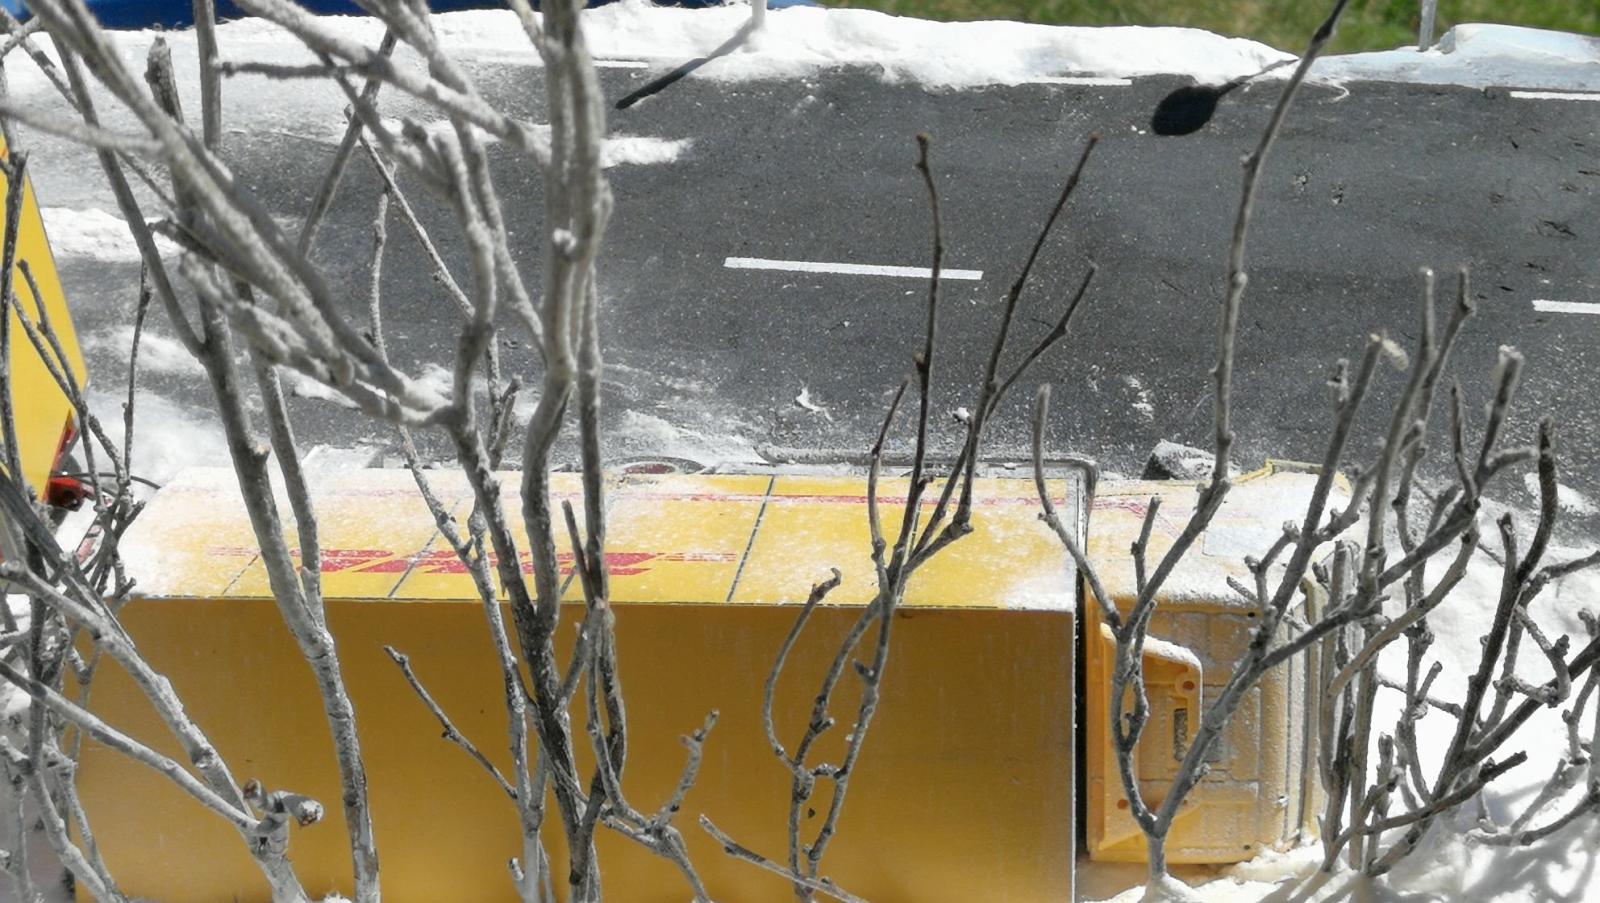
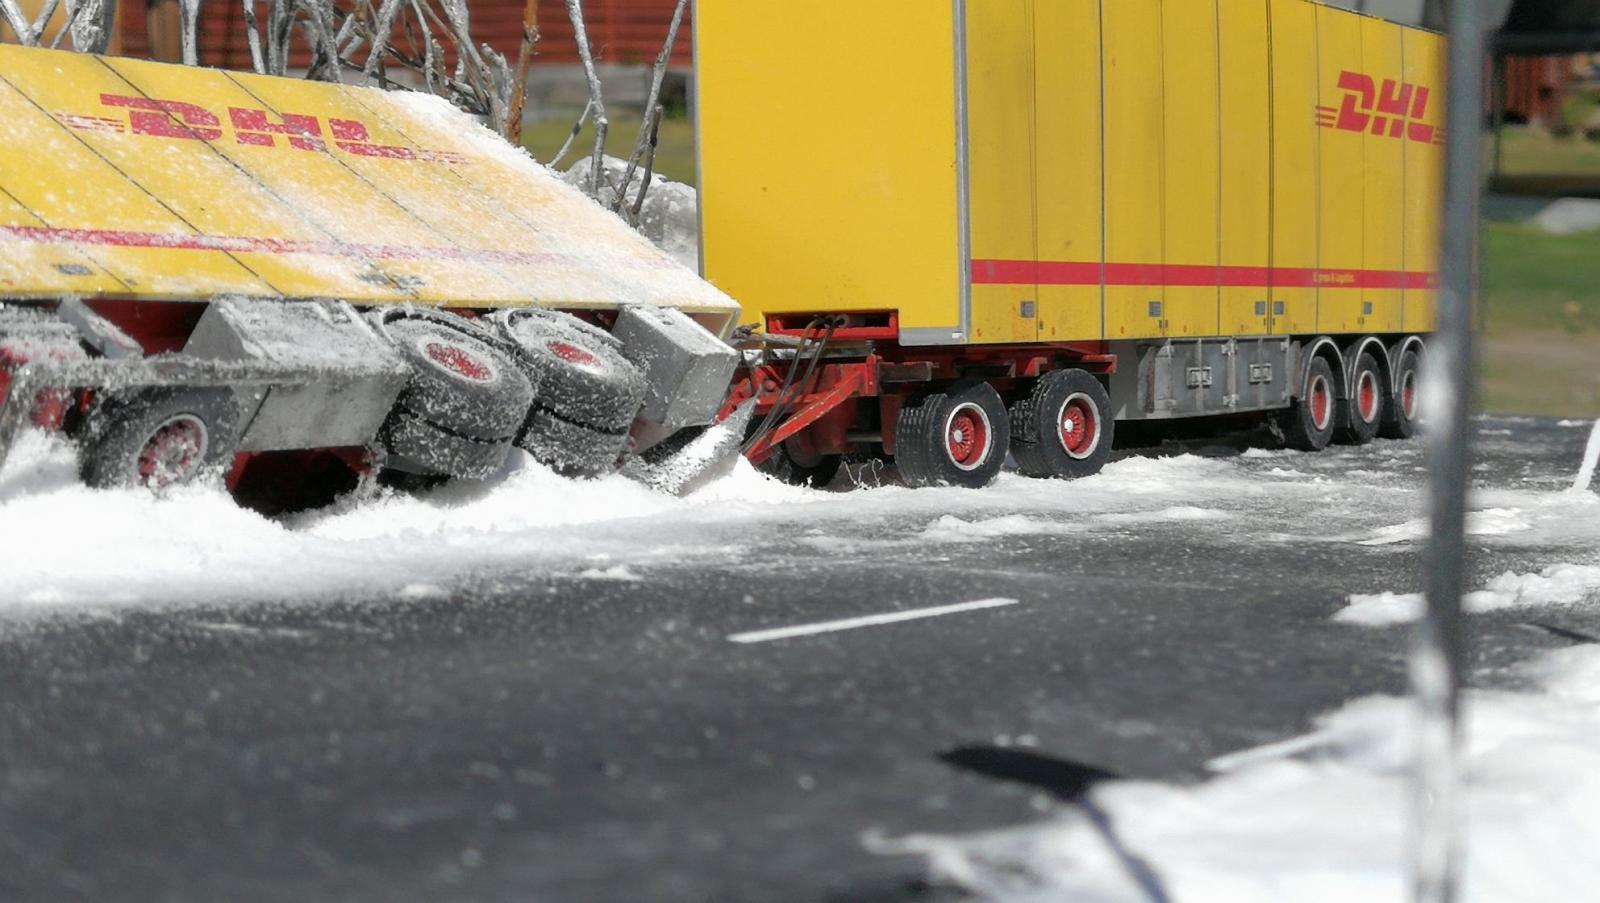
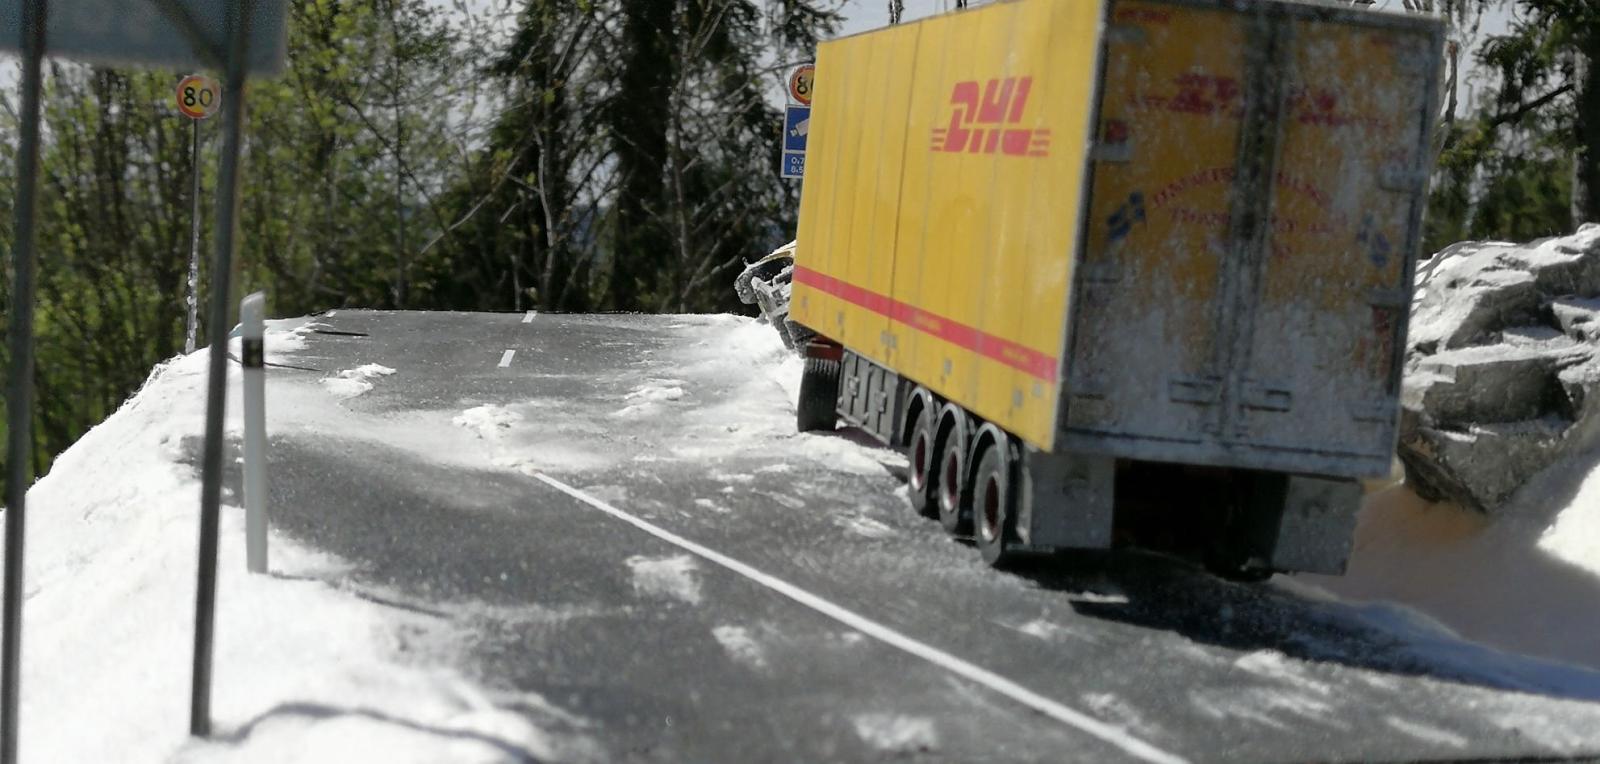
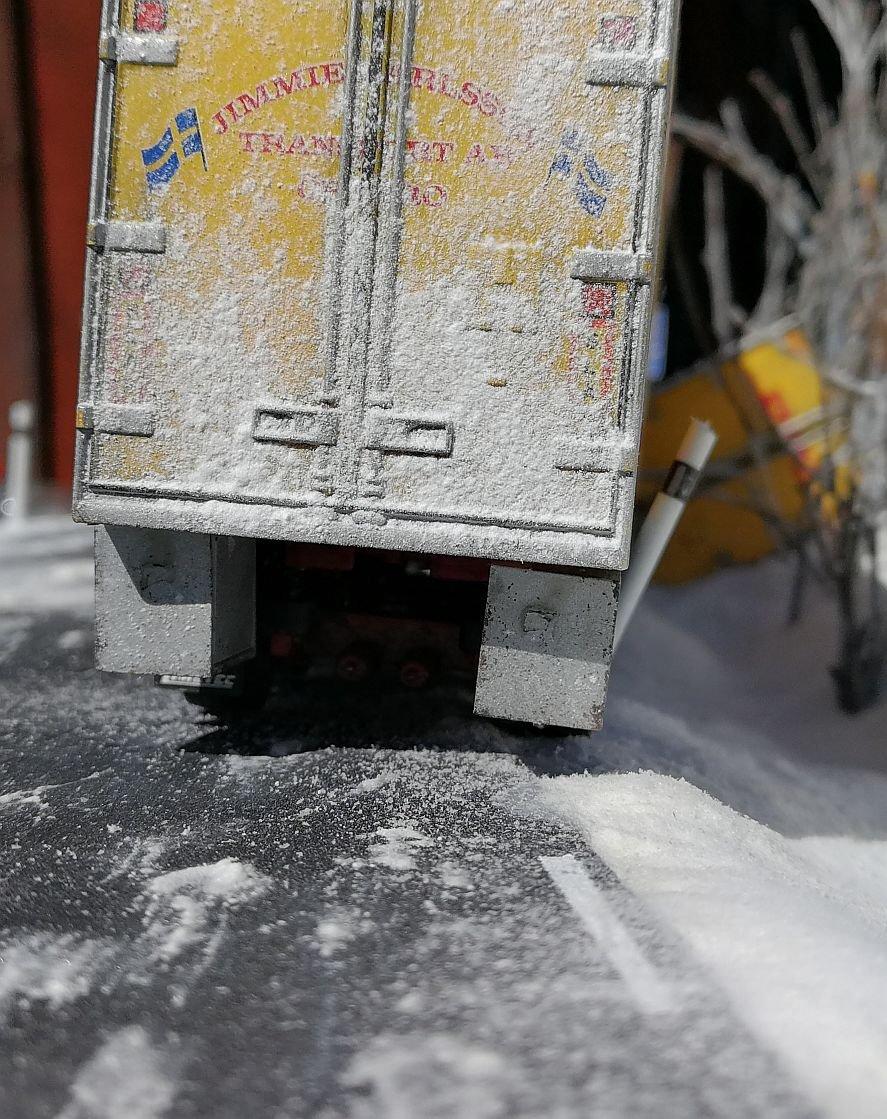
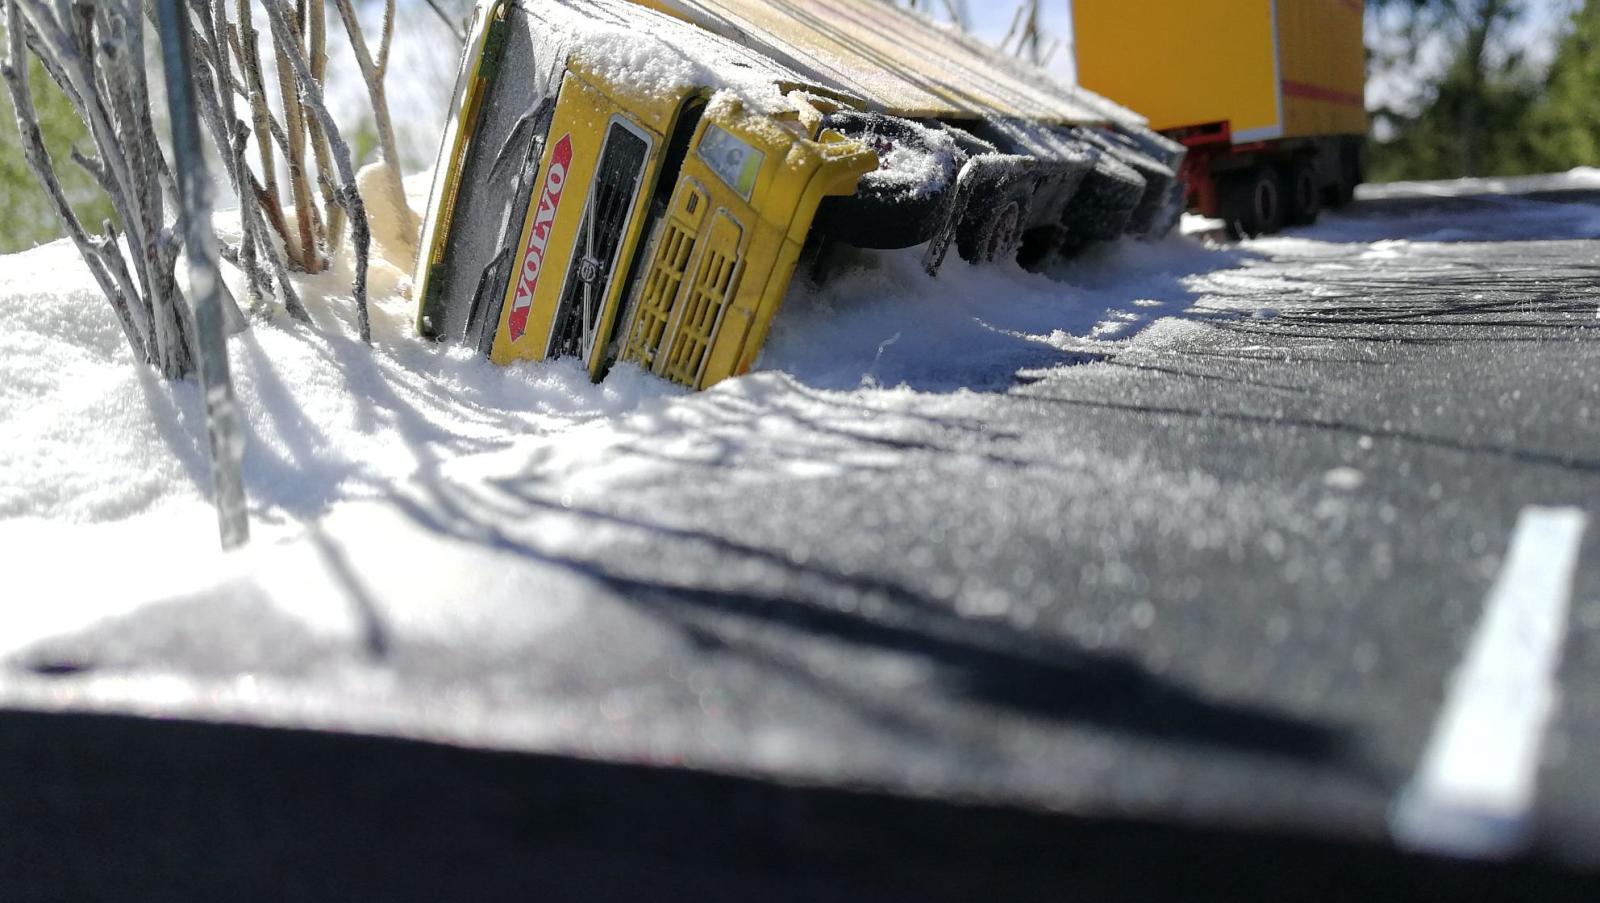
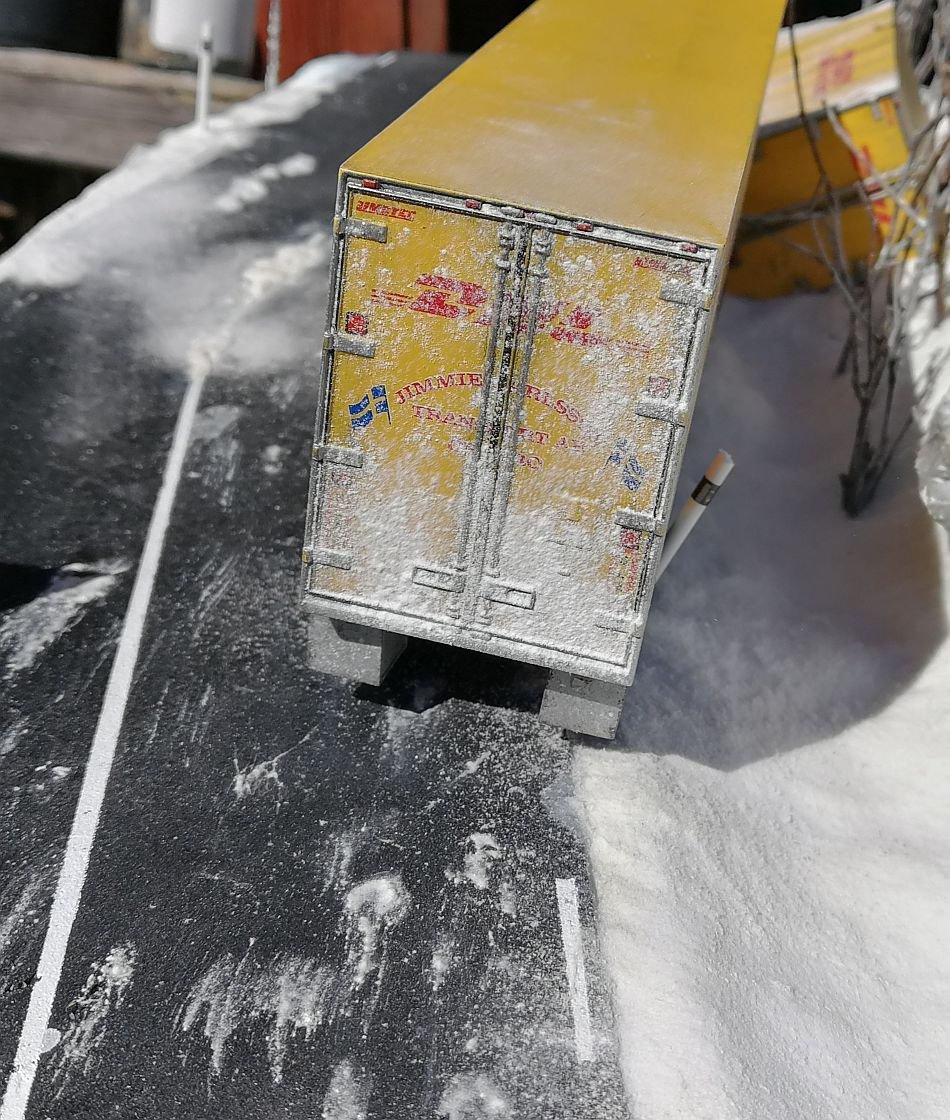
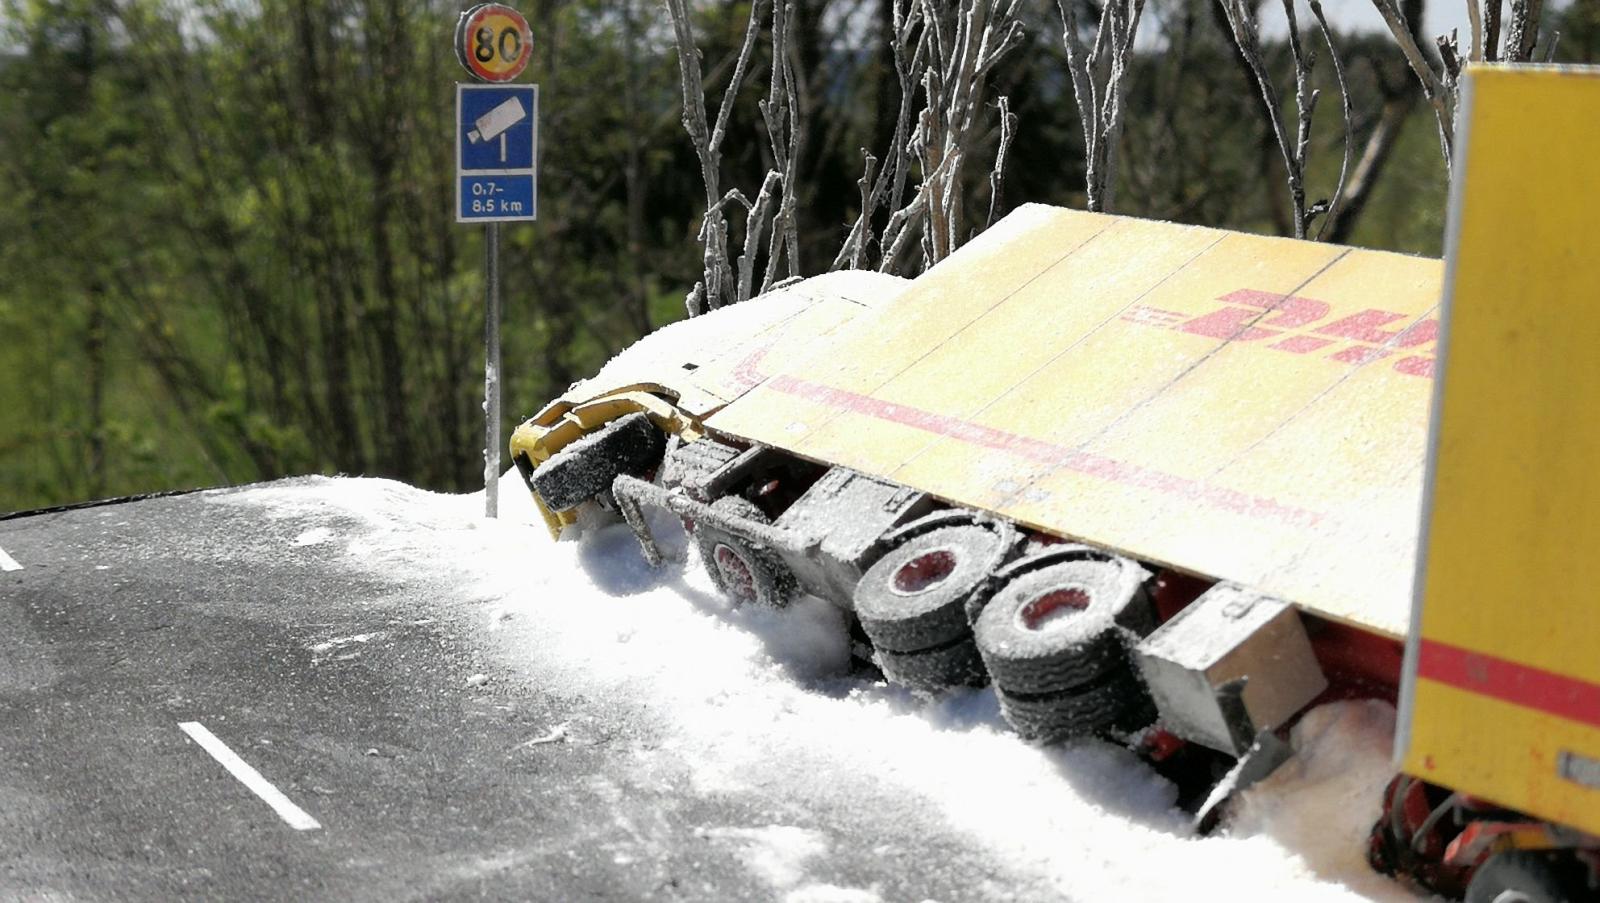
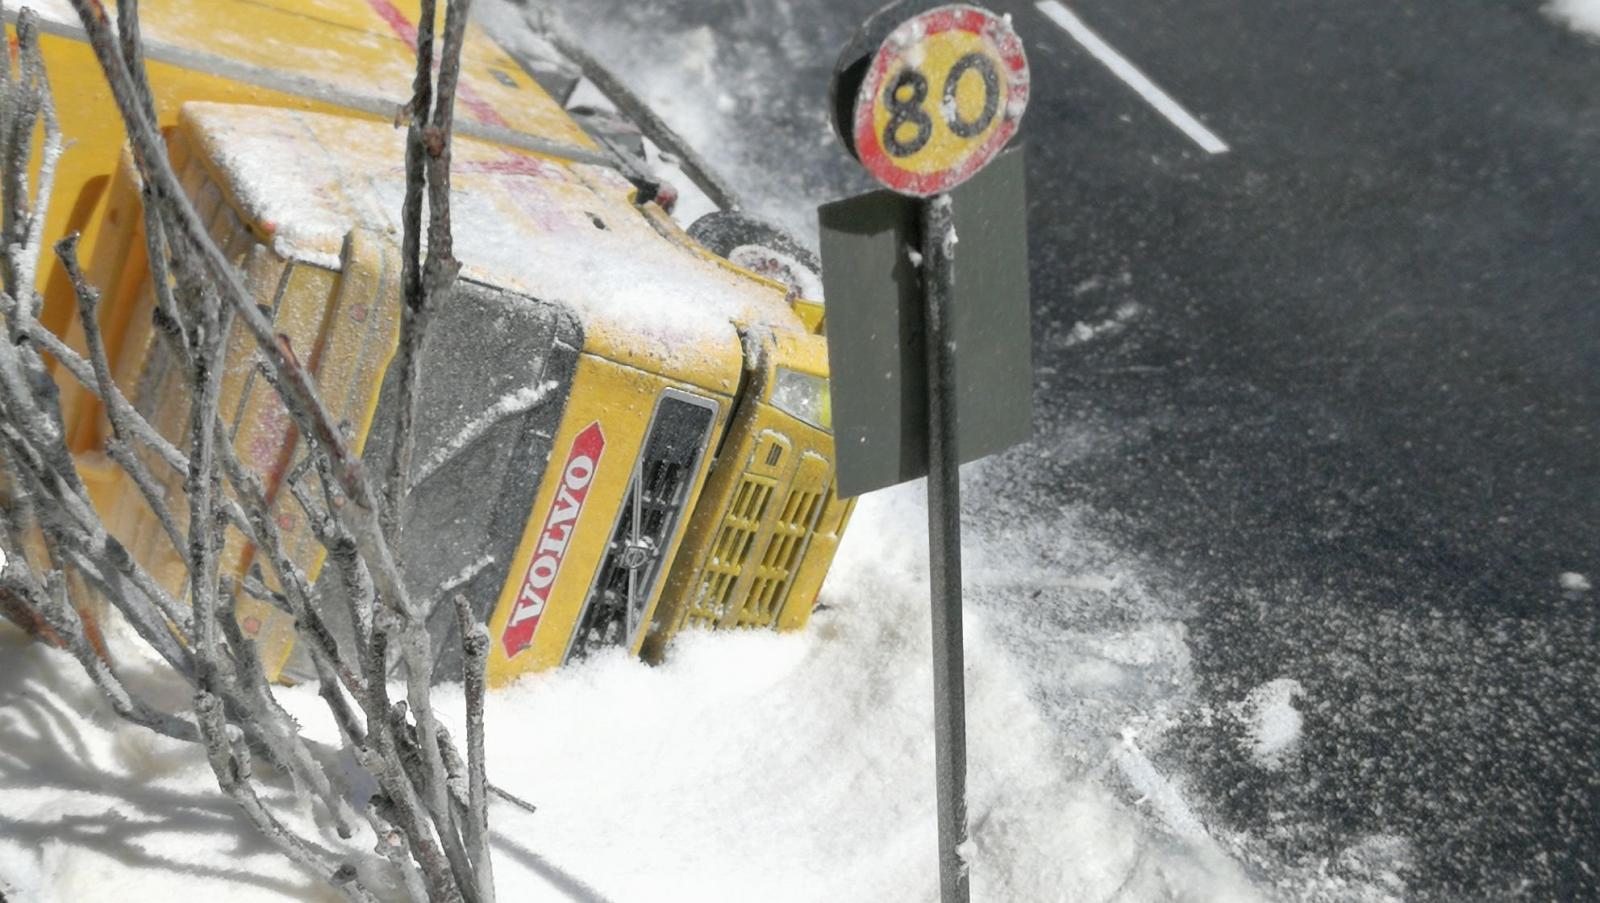
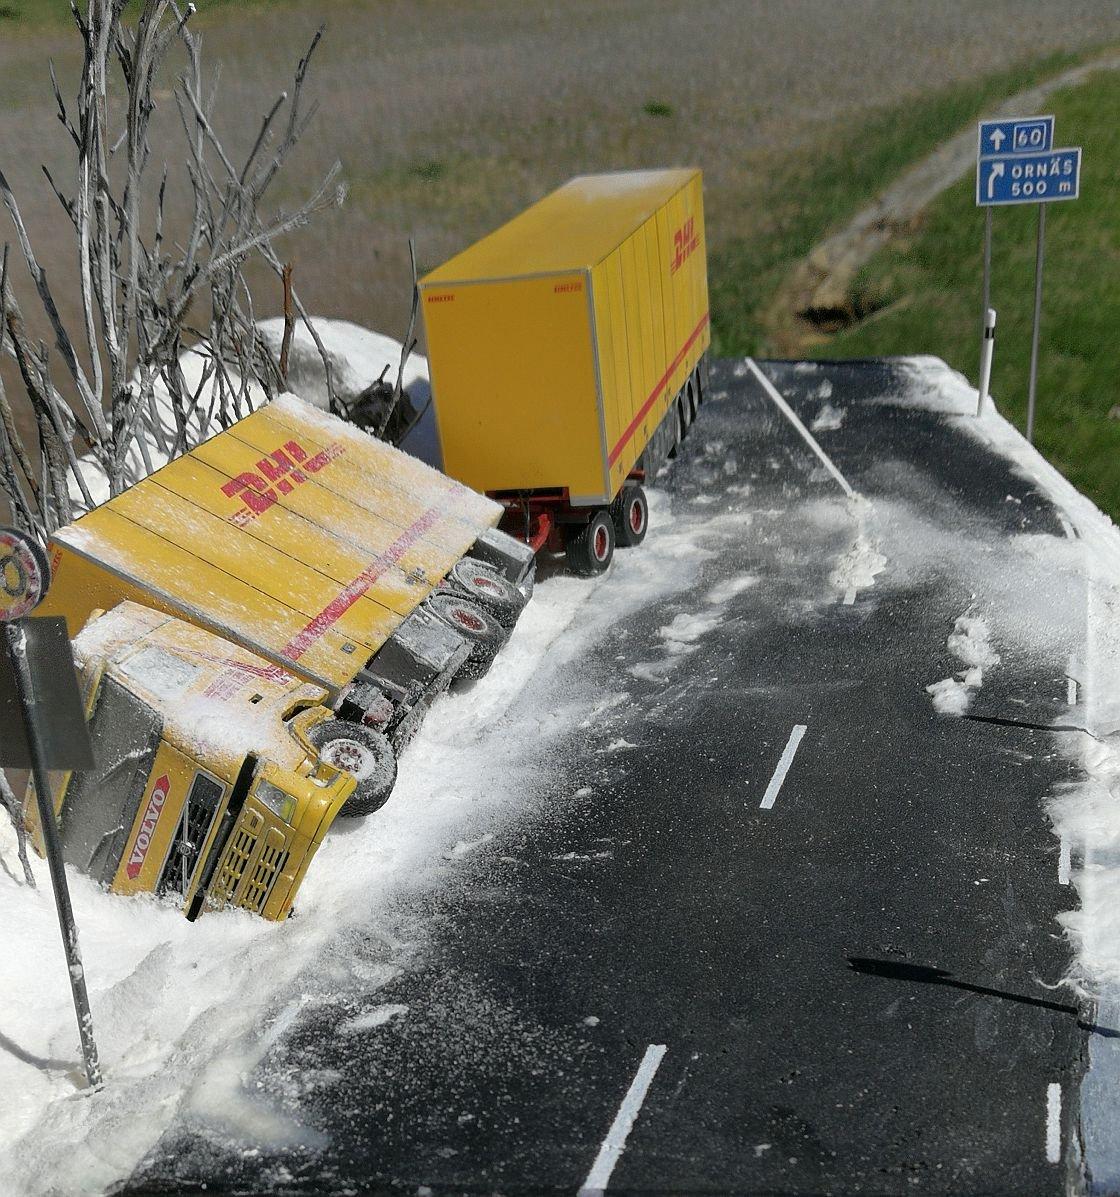
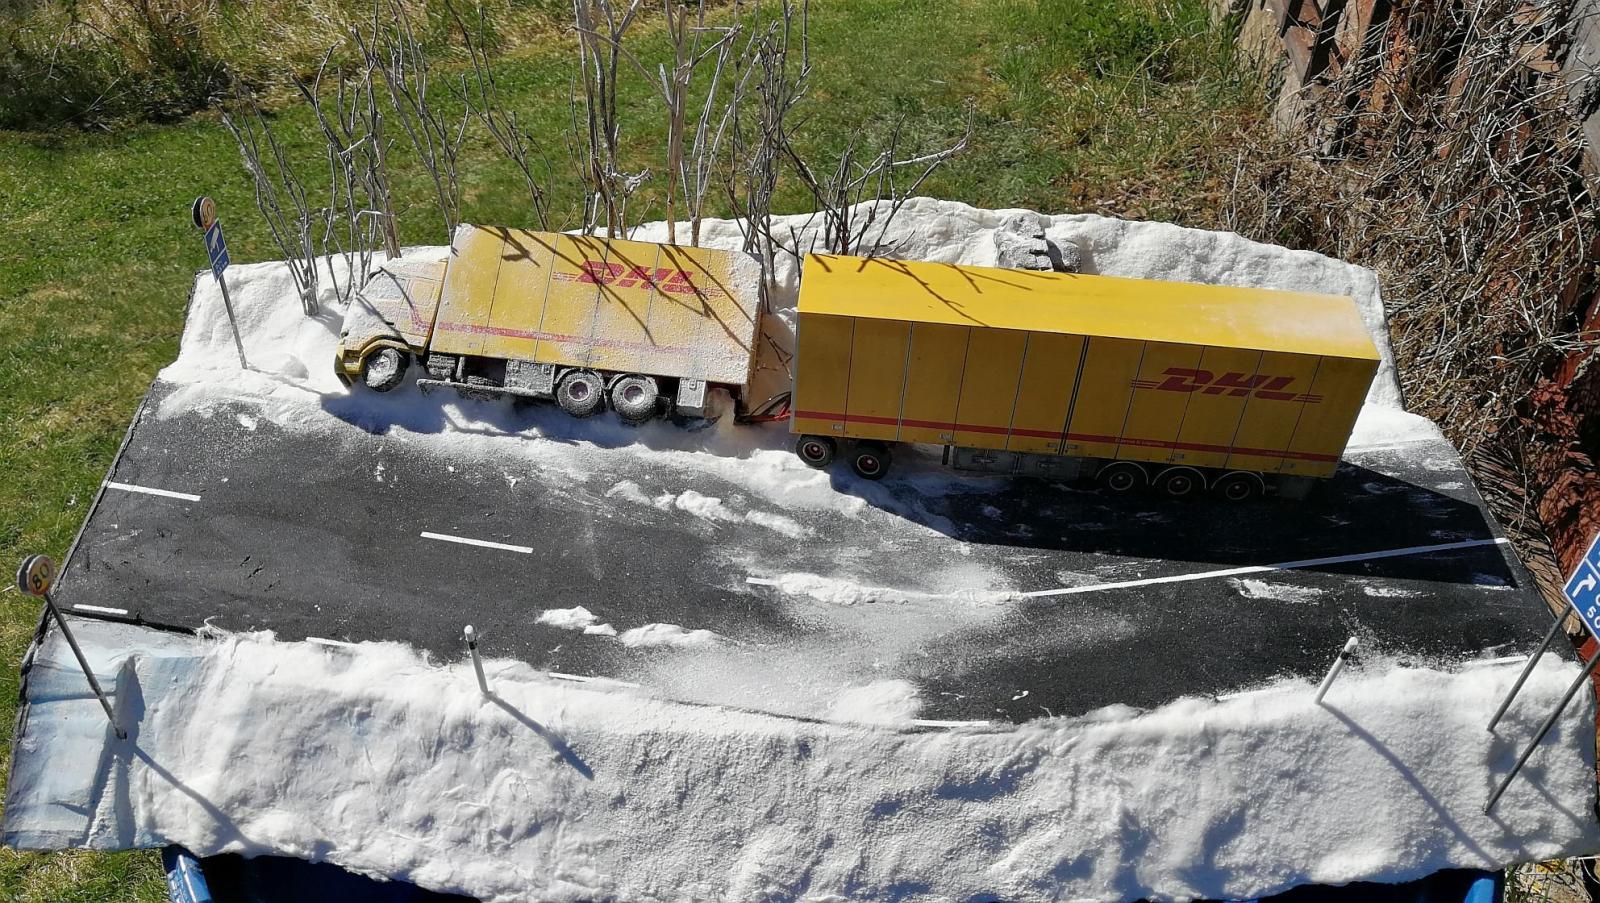
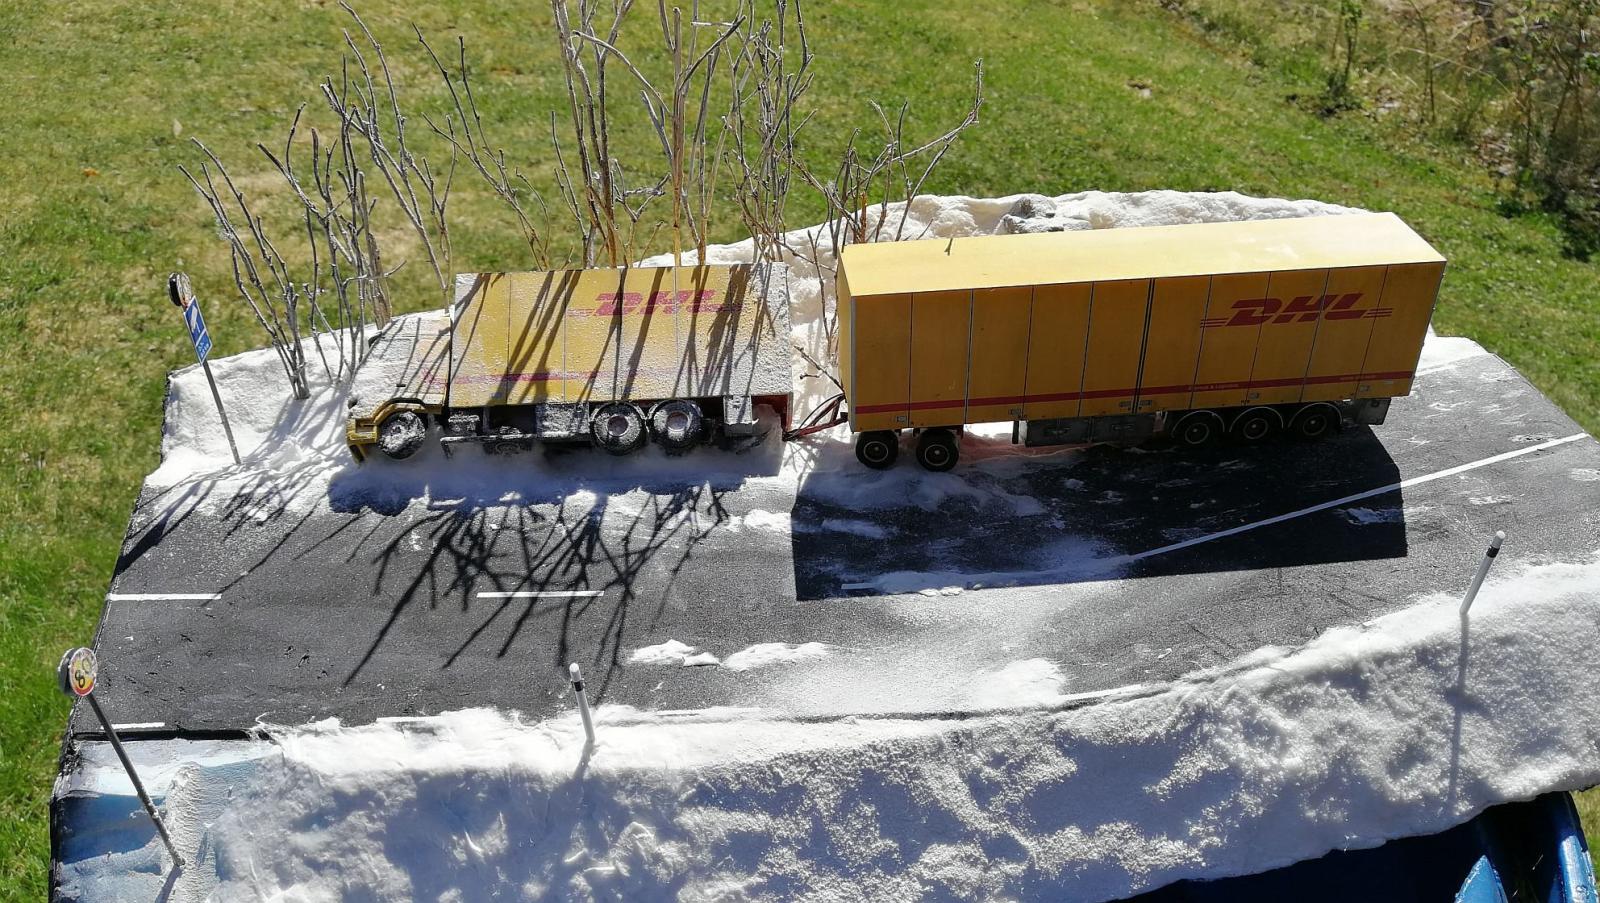
1:50 Scale DHL Truck Accident (90% finished)
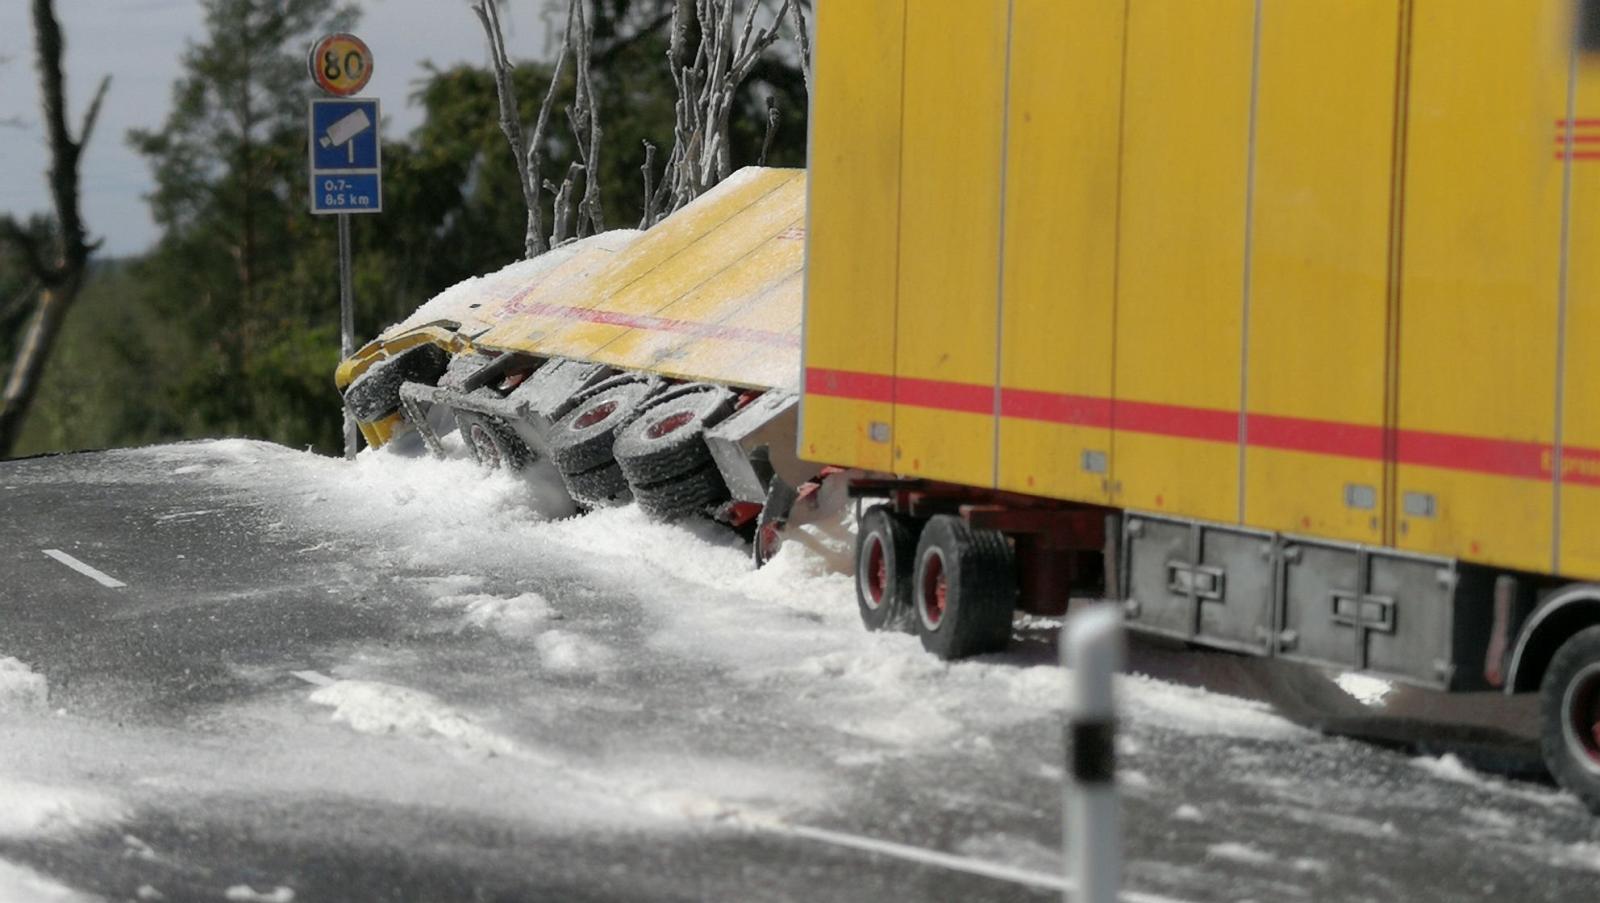
Yep, its's another 1:50 job in the works. Rikard Algotsson has Commission me, to build another 1:50 scale diorama. This time a snow diorama. Now this is my first snow diorama has I have never felt comfortable about doing one due to the lack of knowledge. The diorama is about 90% done. Still have some weathering to do on the trailer as well as add some snow effect on top. There is also an unfinished area that has yet to be completed. Also needs some snow on the road and perhaps some ice( if I can mimic it correctly). Also added some hydraulics but will get them to sit better than how they are now, as this was just done to get the overall look. But so far, I am pretty impressed by the snow effects I've created, being my first. Anyways, just wanted to show you all(and Rikard) how far I have come. Thanks for looking.


Charles,
I liked it,would you please tell us how it was done,the snow mainly?
All the best!
Hello. Sure. I looked at many Youtube clips and methods. There are many.
Materials:
1-. Cotton (I used the ones that come in a wider form. Not the buds. Although it would work but you can get thicker layers in a package for little or less. The idea of using cotton was an idea I got from another modeler)
PVA (any good grade PVA will do)
Johnson Baby Powder ( that's the one I used. I am thinking the better the brand, the better the results. Although, I don't really think its necessary.)
Woodlands Scenics Soft Snowflakes
A good hairspray( I used one with 'stronghold')
I laid out cotton as the base first (The idea of using cotton might sound strange but really I like the idea. As this method is simple. The cotton is already white and easier to mold as you apply it with the next step. Also it makes a nice under structure for the other effects you will finally put on top of it.
Then I take a mixture of water and PVA glue( I have no ratio figures. Just mix until it is the consistency you like. Just as long as it holds the cotton together. Dab or brush on the glue mix until you flatten out or formed the cotton you will want it)
You can either wait until the glue completely dries and put more glue on or do what I do in the next step.
I did not wait until the glue dried. I took the Woodlands Scenics soft snowflake and using a sieve, I sprinkled the contents unto the area you want your snow. The material will hopefully be soaked up by the glue as it dries.
I then sprayed the area with a hairspray, holding the can from high above, about 50cm or 60cm. This way, you don't blow any snowflakes. (This process can be done after everything dries. But just being me, I sprayed on it before it had time to dry. you can also spray another coat after the drying time.
This next step I used mostly for the vehicles.
A. Spray a coat of hair spray over the area of the vehicles you want the snow.
B. Then take a sieve, again,and sprinkle baby powder over the area you just sprayed the baby powder. I used baby powder instead of the Woodlands Scenics snow, because it is much finer than then the woodlands Scenics and looks much better.
C Then from a distance, spray more short burst of baby powder over the area again to kind of seal in the powder. It is better to do this in layers.
D. You can also sprinkle baby powder over the Woodlands Scenics snow, after the whole thing as dried, just to get that extra finer powder look of snow then seal everything with hair spray.
E. As for the little small clumps here and there on the road was done by taken small stands of cott0n strands and pulling them gently so it gives that small patch ice/snow look. I am still experimenting but so far the effect looks good.
F. The small snow blown patches on the road signs were done using a mixture of PVA glue, white acrylic paint and a little baking soda. I just took a small old brush and dry-brushed with small minute clumps on the post and signs. Do this until you are satisfied.
That's it. Hope it helps.
This is a fabulous diorama. As a Minnesotan who sees winter accidents every year, you definitely nailed the look and feel of a winter road and the vehicles that travel them, right down to the snow built up on the rear of the trailer. Well done!
Thank you David.
90% finished, 100% wonderful, Charles! You really nailed the snowy looks!
Thank you my friend. 🙂
Very solid work, Charles.
Thank you Dave.
Another awesome truck-a-rama, Charles.
Thank you Eric.
Don't let DHL see this - they'll start an APB to find the accident and rescue (and then fire) the poor driver!
Haha! That'll be up to the new owner when it is done.. HEHE! Thanks Greg.
This looks like a job for Jamie Davis and his wreckers.
Send me his number and I'll send him the gps coordinates. 😉
Even at 90%, I'm speechless, Charles @tiking
A fantastic diorama already.
My humble thanks John. 🙂
Brrr, we’ve only just got over our winter, here in north east China we have about 4 or 5 months of snow and ice, your baby powder techniques are very realistic and must smell nice as well! The trucks here often have snow chains on the tyres, just a thought...
No snow chains in this part, unless you are way up north or some really rugged terrain.
Charles:
Since you imply you're not familiar with snow, let me tell you it doesn't take much - what you have there, plus an i***t behind the wheel with a lead foot, is more than enough to create your diorama.
Looks good to me.
Thanks Tom. BTW, what word is it that you wanted to write with the asterisk?
One more superlative for Charles' work...ASTOUNDING.
Awwwwww! Thanks Bob. 🙂
A chilling scene! Well done! @tiking
Thank you Robert.