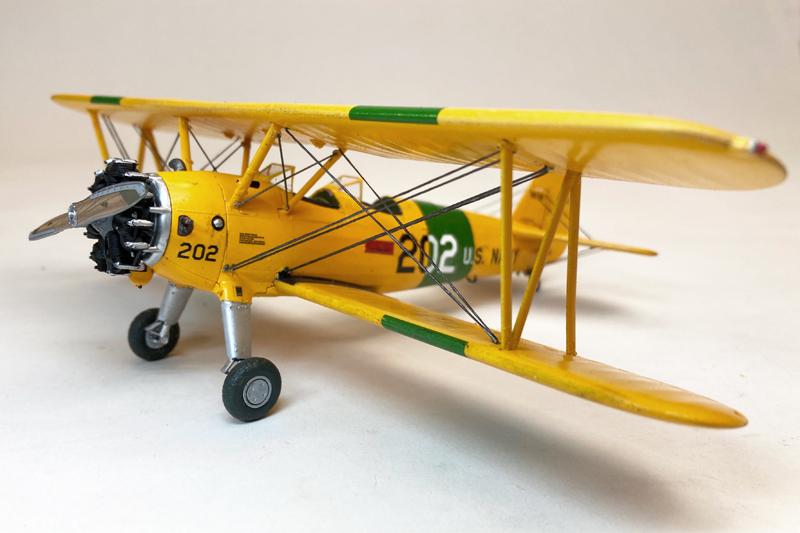
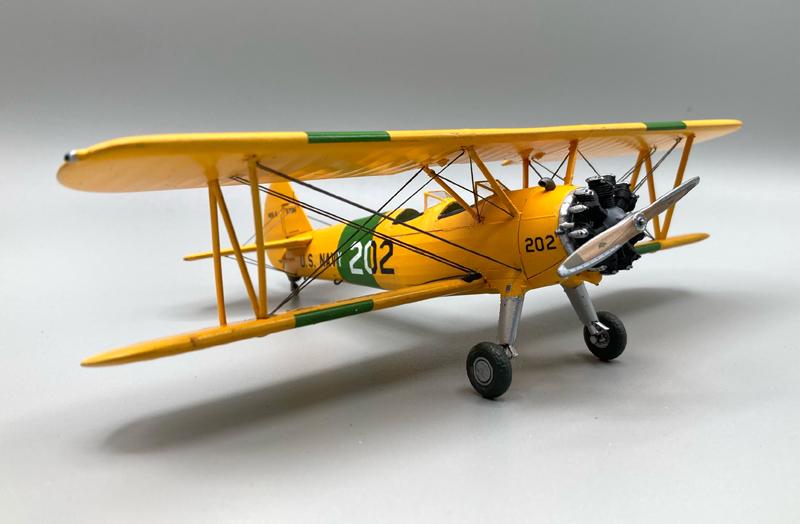
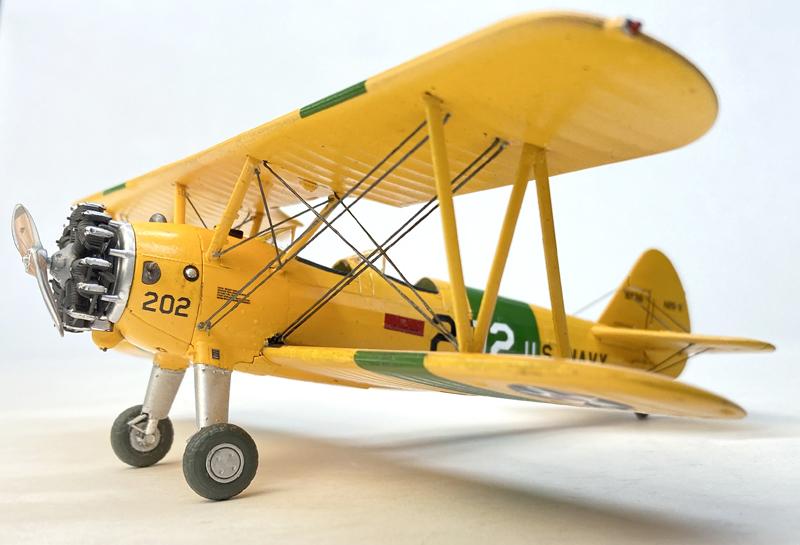
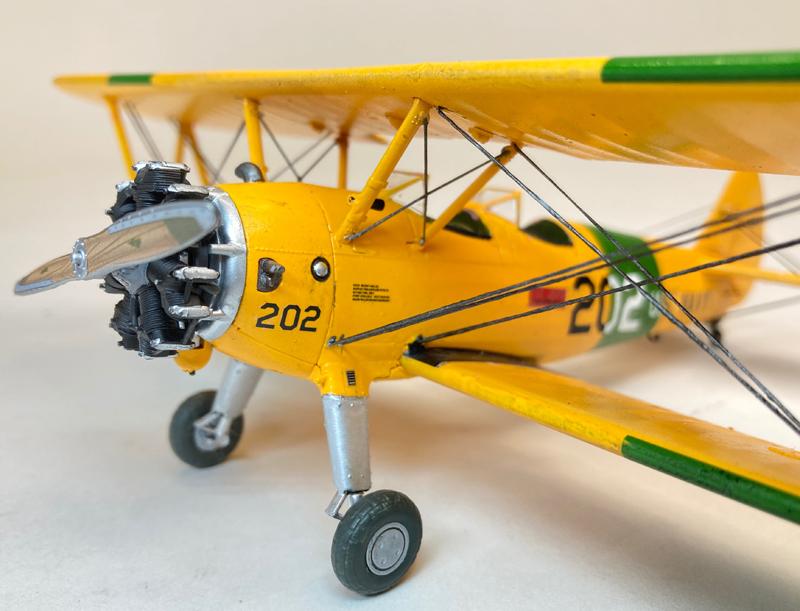
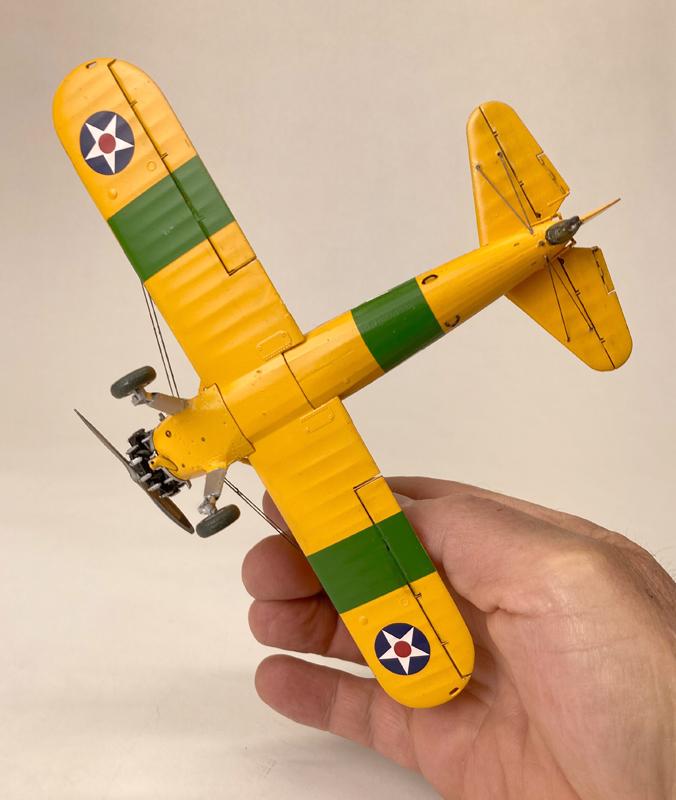
1/48 Revell Stearman PT-17 "Kaydet"

The Boeing Stearman is probably the most well recognized biplane of all time with plenty still regularly flying today since its inception in the mid 1930's. Used by the military during WWII, the PT-17 was the primary trainer for both the U.S. Navy and the U.S. Army. Nick named the “Kaydet”, this rough and tough little biplane has been used ever since for everything from pilot training to crop dusting, plane rides, aerobatics, movie star - you name it.
Now please note: this is my very first time figuring out how to assemble and rig a biplane without making a spider web like entangled mess out of it all. Revell's 1:48 Pt-17 is the perfect kit to practice on. This 2014 tool and its later Stearman companion releases is one of Revell's best fitting kits in a long time. The only exception for me was where the top fuselage “cover” piece mates to the assembled main fuselage curved sides. Little bit of fiddly work and quick setting glue was needed to keep the two from bulging unevenly where they meet along the seam.
I recommend pre-assembling this kit in sections and set each aside: fuselage, top and bottom wings plus the two main wing struts. I saw a build thread over at CyberModeler where I picked up a paint tip about using light pink shades instead of white as a base primer to bring out depth in yellows. I tried it and it works great, but test different pink shades first!
I painted each assembly separately and set all them aside for curing. I used this time out to assemble and paint the engine and cowl ring plus prop and set those aside for absolute last. Revell's simulated wood prop decal looks great and is well done. Use it. And watch out that you don't break off the tail wheel as I did.
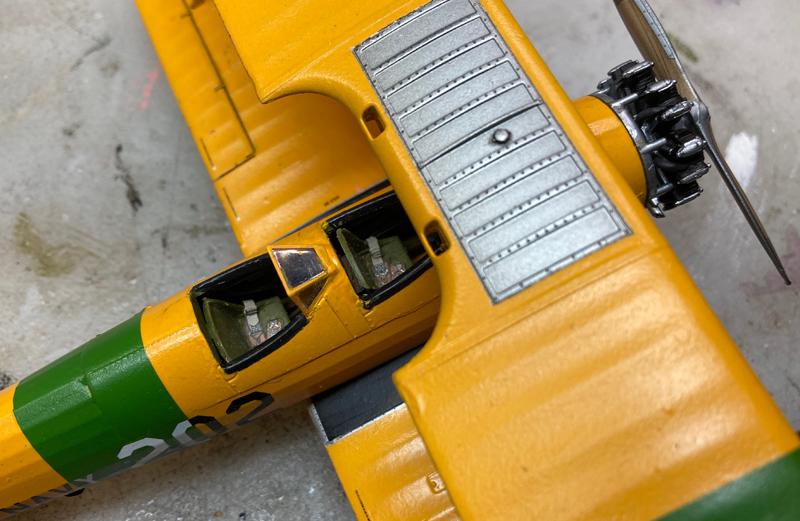
I cheated a bit and used Eduard's PE cockpit enhancement set that came with perfect lap belts and dials.
For paints I used Tamiya X-17 pink mixed with white, Vallejo Air Yellow, Alclad Aluminum and Klear Kote Light Sheen lacquers. This particular EZ Line was translucent blue/green and didn't look right to me so I painted it with Tamiya Metallic Grey XF-56 when finished to give it a “wire” look. Unfortunately the rigging looks much darker and thicker than I originally intended.. I also admit to over weathering my Kaydet with Tamiya accent black.
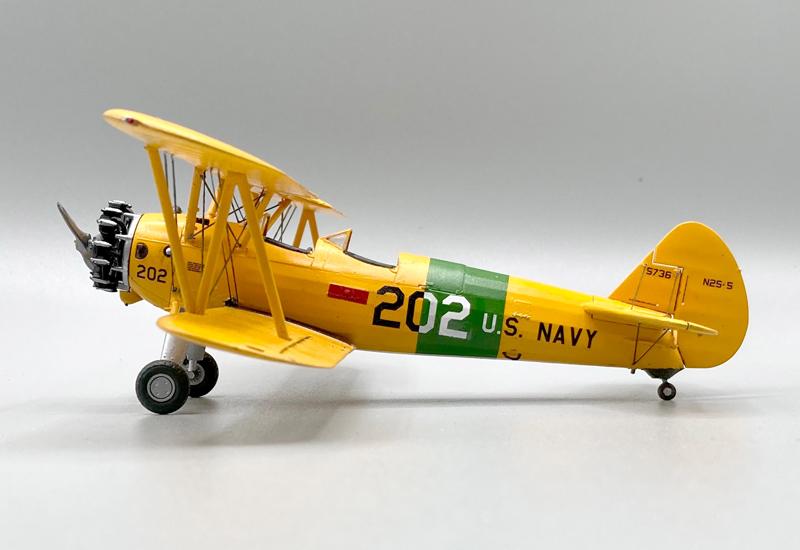
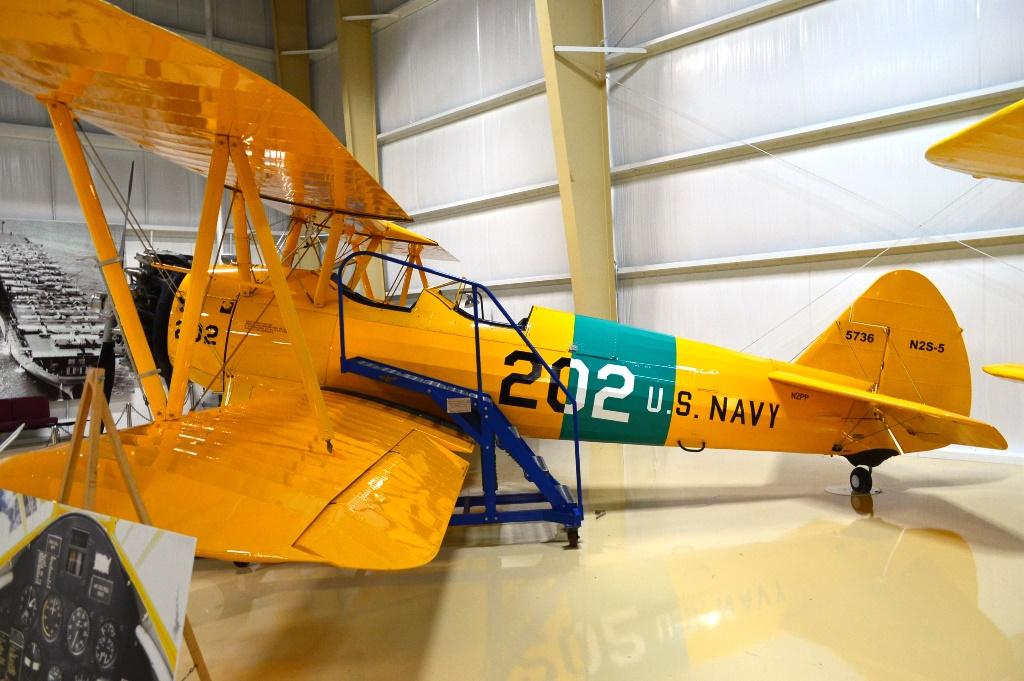
I used the excellent decal set by Starfighter Decals N2S-3 Kaydet USN Primary Trainer sheet 4810 that provided everything I needed to mimic Yellow 202 that currently resides at the Kalamazoo Air Zoo in Michigan. I sealed it all with two coats of Alclad Kear Kote light sheen.
When everything was out of the paint shop and ready to go, that is the time to attach the two windscreens prior to installing the top wing. This avoids a lot of irritation later.
Time to Rig: Thank goodness Revell provided a rigging wire guide for cutting various lengths to size, because it's still helpful for figuring out elastic rigging as well. I realized after consulting as many online “how to” rigging articles I could find, there are a zillion different methods. Regardless of which way you go, I recommend predrilling any insertion holes prior to assembly. Use Revell's wire instructions as a guide and note that they left out the cross set directly in front of the cockpit windshield for some reason. (I didn't rig that section either.)
I could have used all kinds of rigging material: wire, invisible thread, stretched sprue, fishing line or guitar strings. However, I ended up using EZ Line because that's exactly what it is and I like how it bonds instantly to CA glue. Rigging does tend to mess up the finished paint job as soon as you fiddle around with it or try to correct mistakes, so I knew I had to be extra careful. Even so…
First, I started by cross rigging the two small already molded in place struts on both sides of the front fuselage ahead of the cockpit. I also recommend rigging these before attaching the top wing.
Next I glued one end each of the cut EZ Line lengths to the their proper pre-drilled holes on the bottom of the top wing and left the opposite ends unattached and set it aside.
I glued the bottom wing with the predrilled holes and no rigging to the fuselage bottom and attached the main wing struts. When that was dry, I added the top wing with the dangling underside threads taped out of the way so it could be glued in place to the strut tops with the help of two rubber bands. Fit was great. After everything cured, I stretched the remaining free ends of the EZ Line and attached them to their anchor points. Then came lots of touch up. Absolute last were the wheels, engine assembly and prop.
I pronounced it “done” or maybe it was… “good enough”!
I had a boatload of fun with Revell's little Kaydet and highly recommend it. Mine's far from perfect but I am happy with my very first biplane model, tho' I admit, I had no idea what I was doing.
I'm game for another one.
Thanks for looking. Comments and modeling tips always appreciated.
-

- 1. Whoops! I have since corrected the direction of this scoop.


-
- 1. Air Zoo, Kalamazoo, MIPhoto: One Inch Guy
-
- 1. gas tank masked off
- 2. this is where finesse is needed to assure flush fit on both sides of this top piece.
- 3. go easy on the intensity of the pink

Beautifully done!
Much appreciated Robert.
Nice work on this one, Eric! The pink primer is interesting. I’ll have to try it.
Make some samples of various shades of light pink and then hit it each one with yellow and see what you get. You will be surprised what a difference the pink makes popping out the yellow compared to using white.
Really nice! Reminds me of the one I used to go flying in. Great result for a first biplane. Here's a trio flying a few miles north of La Casa Berg 40 years ago.
1 attached image. Click to enlarge.
@tcinla: That photo looks like it was taken southwest of Watsonville Airport above Sunset State Beach. Was it? I see Stearmans flying around here all the time. Got a recommendation for my next biplane build? What about an Eduard kit? I need more practice.
That's where it was taken - Watsonville West Coast Antique Airplane Fly-In, Memorial Day weekend, 1981.
Get hold of an Accurate Miniatures F3F-1 or F3F-2 kit - you can find them on eBay. Worth the collector's price, you should be able to get it for under $45. Very "buildable." Decals will let you do any one of them ever built.
Attached is the airplane Fred MacMurray "crashed" in Dive Bomber.
1 attached image. Click to enlarge.
Academy just finally began re-popping the AM F3F, for sale at about the same price you should reasonably be paying for a sealed AM box, just FYI. I dont know if it included the etched rigging, but new decals can all but be guaranteed.
Nice work on the whole build, very attractive scheme and it looks great!
Thanks. It's the pink that brought that yellow out but the photos don't do it justice.
Looks superb, Eric! A great article as well!
Well, @fiveten - you're the master so I value your comments.
Excellent performance on the Kaydet, Eric @eb801
The rigging approach did work very well as it looks superb.
Thanks for sharing.
@johnb - this is a great kit. Drop a hint to your daughter.
Everything worked out great on your build, Eric. Superb model and a great write-up of how it went together. Congrats and thanks for posting it.
Thank you Bob. I've already started a second bi-plane.
Great build Eric, of what looks to be a great kit.
@pb_legend Thanks Andrew. It's a pretty good kit considering that Revell was going through some upheaval when this was issued. It sure looks tiny compared to other planes. I am looking in to the Academy re-pop of the AM kit. Then I started thinking about their Gulfhawk II limited kit with the resin wings...
SUPERB! Well done, Eric. Just like the real aircraft, it is a great trainer for your step into the biplane world.
Not to mention you did a great job on the Yellow...always a tough color to paint.
Yeah, Gary - yellow is a tough one to paint. But this pink primer idea has made painting yellow a heck of a lot easier. It's all about density of the pink.
Well done, Eric (@eb801). Nothing says "Navy trainer" like an overall yellow plane with green "instrument" stripes. You are definitely a braver man than I am, since I am still trying to work up the courage to build something with more than one wing. I have several Stearman's waiting in the box, as well as a really old 1/32 Revell F3F. Interesting info about the pink primer. Maybe that is why Tamiya released some of their Super Fine spray primer in a pink color.
Gee, thanks George @gblair but it's really a two footer attempt. I was just getting my feet wet with the yellow paint and the first time rigging. Speaking of yellow paint, I am sure that's why Tamiya came out with a pink primer. Might have to get some as it sure makes yellow painting not so scary any more.
This is good info, Eric (@eb801). I plan to use the pink primer on my next red plane. I was wondering why Tamiya came out with pink primer, now I know.
Excellent model. Didn't know about using pink instead of white as a base for yellow.
Give it a try.
Very nice article Eric, and a great looking "first' too! ? Now, with "your feet wet", you'll be handling more biplanes I'm sure. ? They do offer some challenges and I've only attempted two thus far. But they aren't a big step for a modeler like you; a true "high-stepper". ?
Your Stearman is a superb introduction to those two-winged machines. @eb801, well done dude! ?
@gbrantley - Hey thanks man. This Stearman was just a distraction from that Havoc I’ve been working on forever.
Guess what? I just started the old AMT Staggerwing biplane kit via Round2.
A great-looking build, and the scheme really pops. Well done!
Thank you thank you Greg. I learned a lot with this one.
Fabulous result! Inspiring build. I saw one of these fly over the other day so between that and your amazing build it may be time for me to take on some more rigging and yellow painting!
That’s a sure sign you need to build one of these David @dbutlr