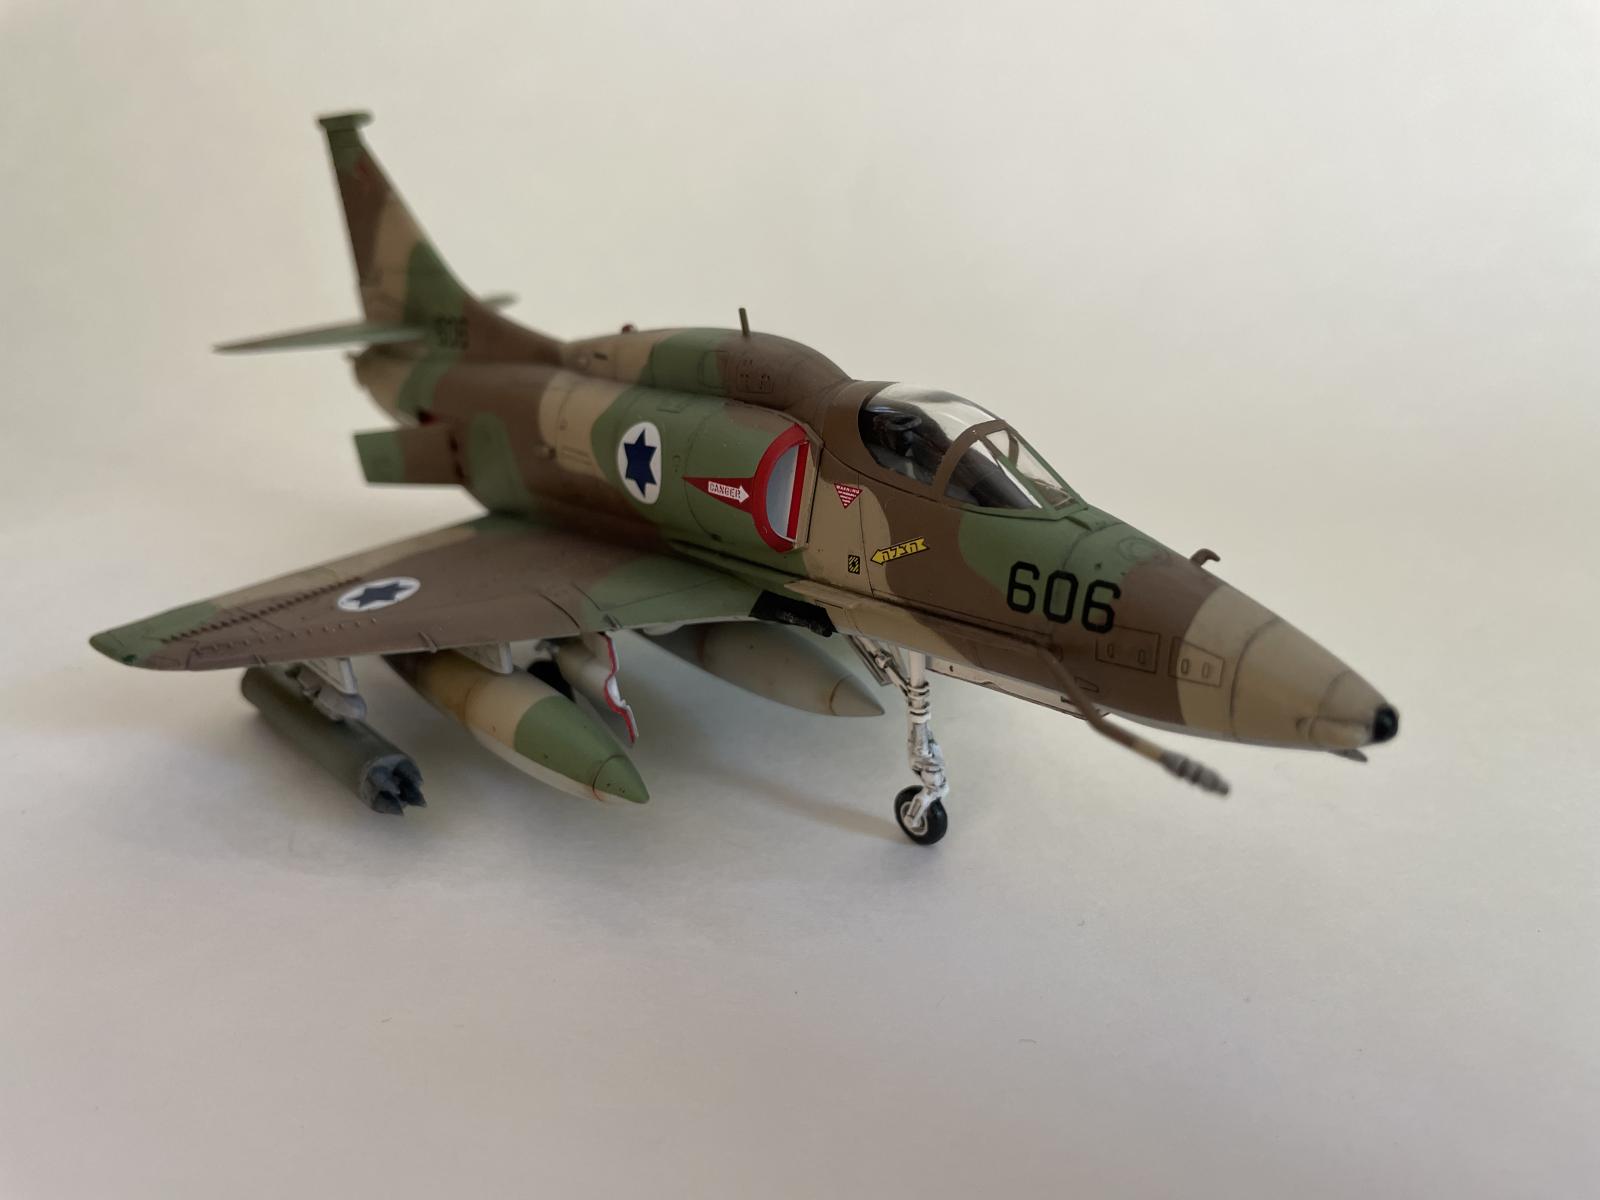
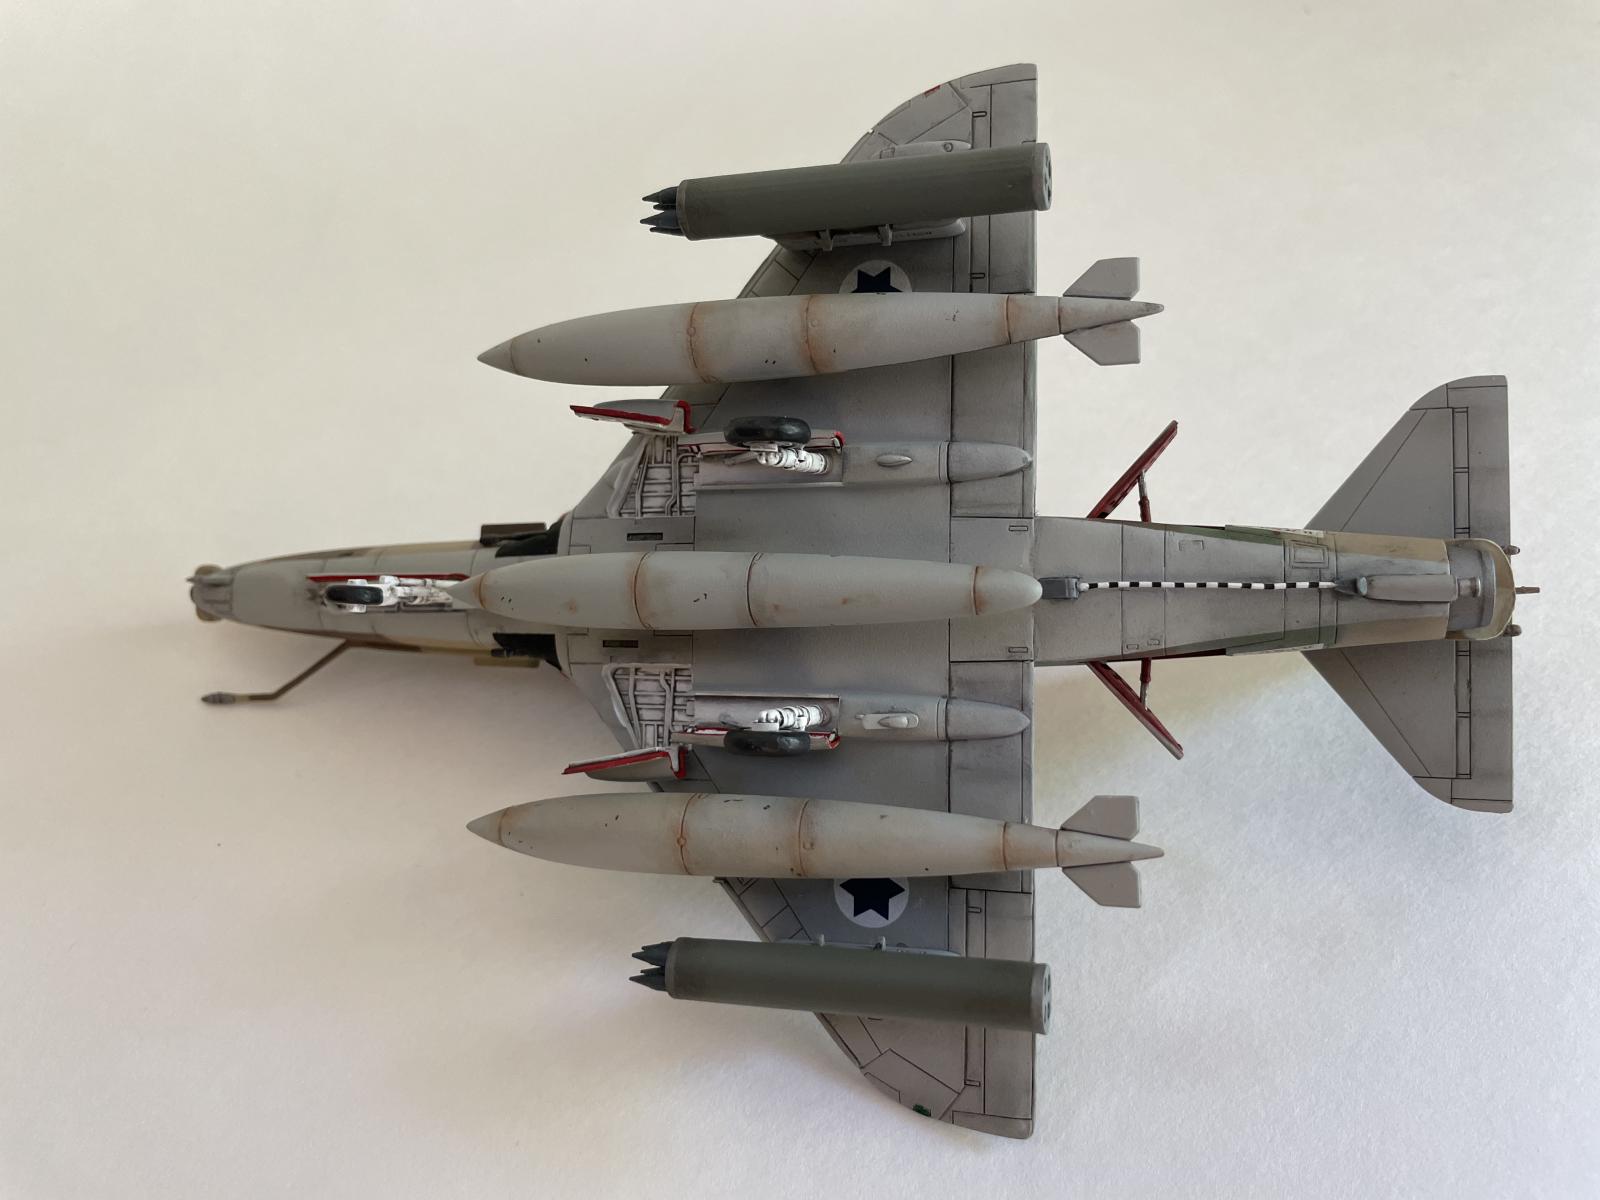
1/72 Fujimi A-4M Skyhawk

The Douglas A-4 Skyhawk was introduced in the 1950's as a carrier-based, light attack aircraft for the US Navy and Marine Corps. It served in the ground attack, close air support, and light bomber roles for the US military, retiring in 2003 after half a century of service. It could carry a wide range of missiles and bombs, and could even deliver a nuclear weapon; because it was sub-sonic, “dropping” a nuke actually involved “tossing” it into a ballistic trajectory by releasing it while gaining altitude, giving the aircraft enough time to beat it on out of there.
Light and compact, it was quick and highly maneuverable (earning it the endearing nickname “scooter”). It was selected to simulate the nimble Mig-17 in dog-fighting training at the Navy Fighter Weapons School (TOPGUN). It had a couple notable design elements: its short delta wing design obviated the need for wingtip folding for storage on carriers, which reduced its weight by a few hundred pounds and enabled it to fit on smaller, mid-century carriers. Airborne refueling meant it could take-off with mostly empty fuel tanks, allotting its weight allowance instead to maximize armament load. The A-4 had multiple external drop tanks which, in addition to providing extra fuel, were meant to serve as “cushions” in the event of a crash landing.
The aircraft was popular with militaries around the world, finding use in nearly a dozen foreign countries. The Israelis made extensive use of the A-4 in the Yom Kippur war, where it performed ground attack and bombing missions and even went head-to-head with Mig-17 and Mig-21 jets in the skies. Though decisive in securing Israel's victory, the war took a significant toll on the A-4 fleet, with some 53 aircraft (roughly half) lost in nearly 3 weeks of fighting.
The Kit
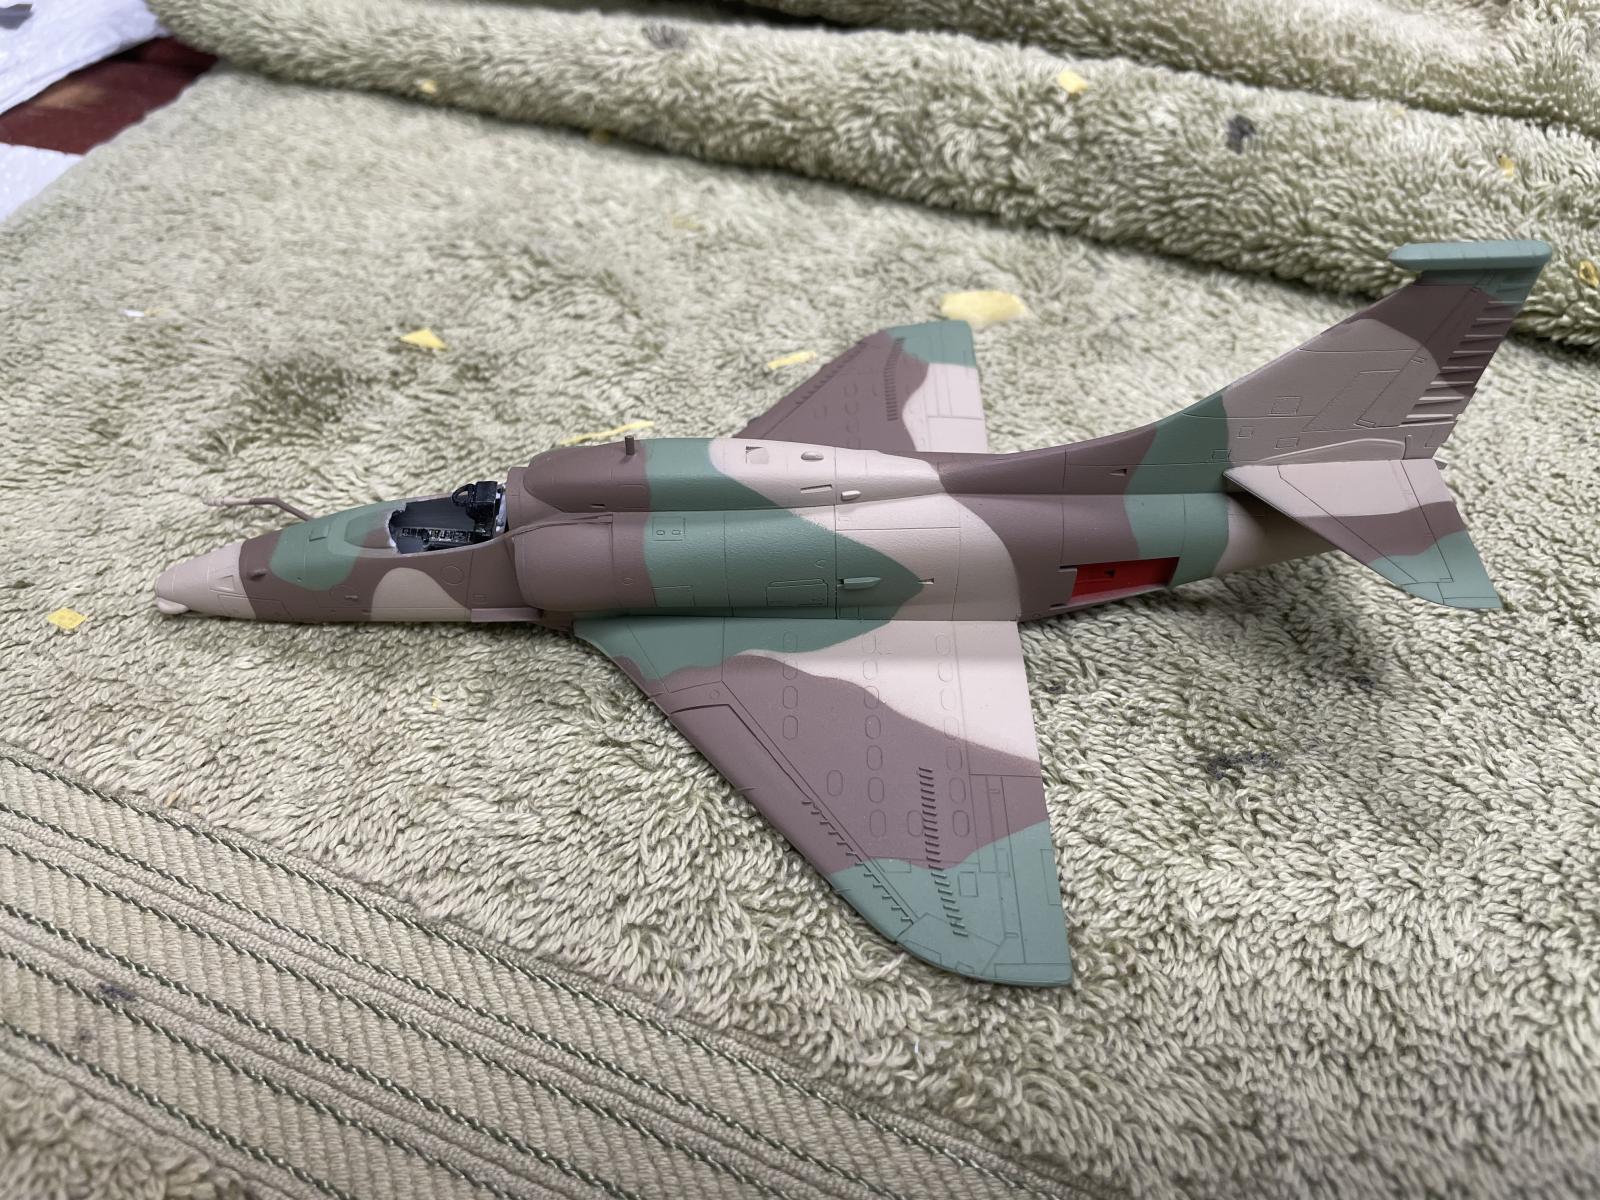
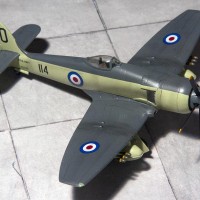
This kit is the Fujimi 1/72-scale A-4M Skyhawk of the US Marines Tomcats. I've always wanted to build an IDF A-4 and, though they didn't fly A-4Ms, they did fly A-4N's which were structurally identical. One important modification to the IDF A-4Ns was a lengthened tail exhaust port to reduce heat signature; in fact, parts to modify the model are available, but I couldn't justify spending $20 on a tiny piece of plastic in the quest for realism. I did manage to hunt down several 3rd party decal sheets with Israeli squadron markings and such, and so was adequately confident that I could pull it off.
The Fujimi kits are widely considered the best A-4 models out there, and I can see why. The kit came together very well, with only small amounts of corrective work needed at a few joints; the dorsal pod in particular didn't sit flush. The model includes three external fuel tanks and two Zuni rocket launchers, which IDF A-4s did in fact use in the Yom Kippur War, though I'm not sure if they are the correct size or type. The leading-edge slats on each wing can be made open or closed, as can the airbrakes. One slight annoyance worth noting is that the tail hook comes molded to the fuselage, which makes it difficult to paint. I cut it off, painted it, and glued it back on. It was super thin and I snapped it in half at some point (perhaps the reason that it was molded on) which required me to glue it back together and carefully sand the joint smooth without breaking it again. Like doing spinal surgery on a mouse.
For this build, I played around a little bit with oils and tried out Mig's Shaders, which are apparently highly-thinned acrylics for airbrushing shadows, highlights, and other effects. I'll talk a little bit about my experience with these below. My overall process was:
- Prime (Stynelrez at 25 psi)
- Base coats (Tamiya acrylics thinned ~50% with Tamiya X-20A at 20 psi, Alclad metallizers at 15 psi)
- Gloss Coat (Alclad Aqua Gloss at 15 psi)
- Enamel pin wash and weathering with oils (Tamiya Panel Line Accent and Mig Oilbrushers)
- Shading effects (Mig Shaders at 15 psi)
- Gloss Coat (as above)
- Decals
- Gloss Coat (as above)
- Some additional pin wash and weathering (enamels and oils) over select decals
- Dull Coat (except for landing gear and interior surface of doors) (Alklad Klear Kote Flat at 15 psi)
- Lights (Tamiya Chrome Silver X-11 followed by Tamiya Clear Red (X-27) and Clear Green (X-25))
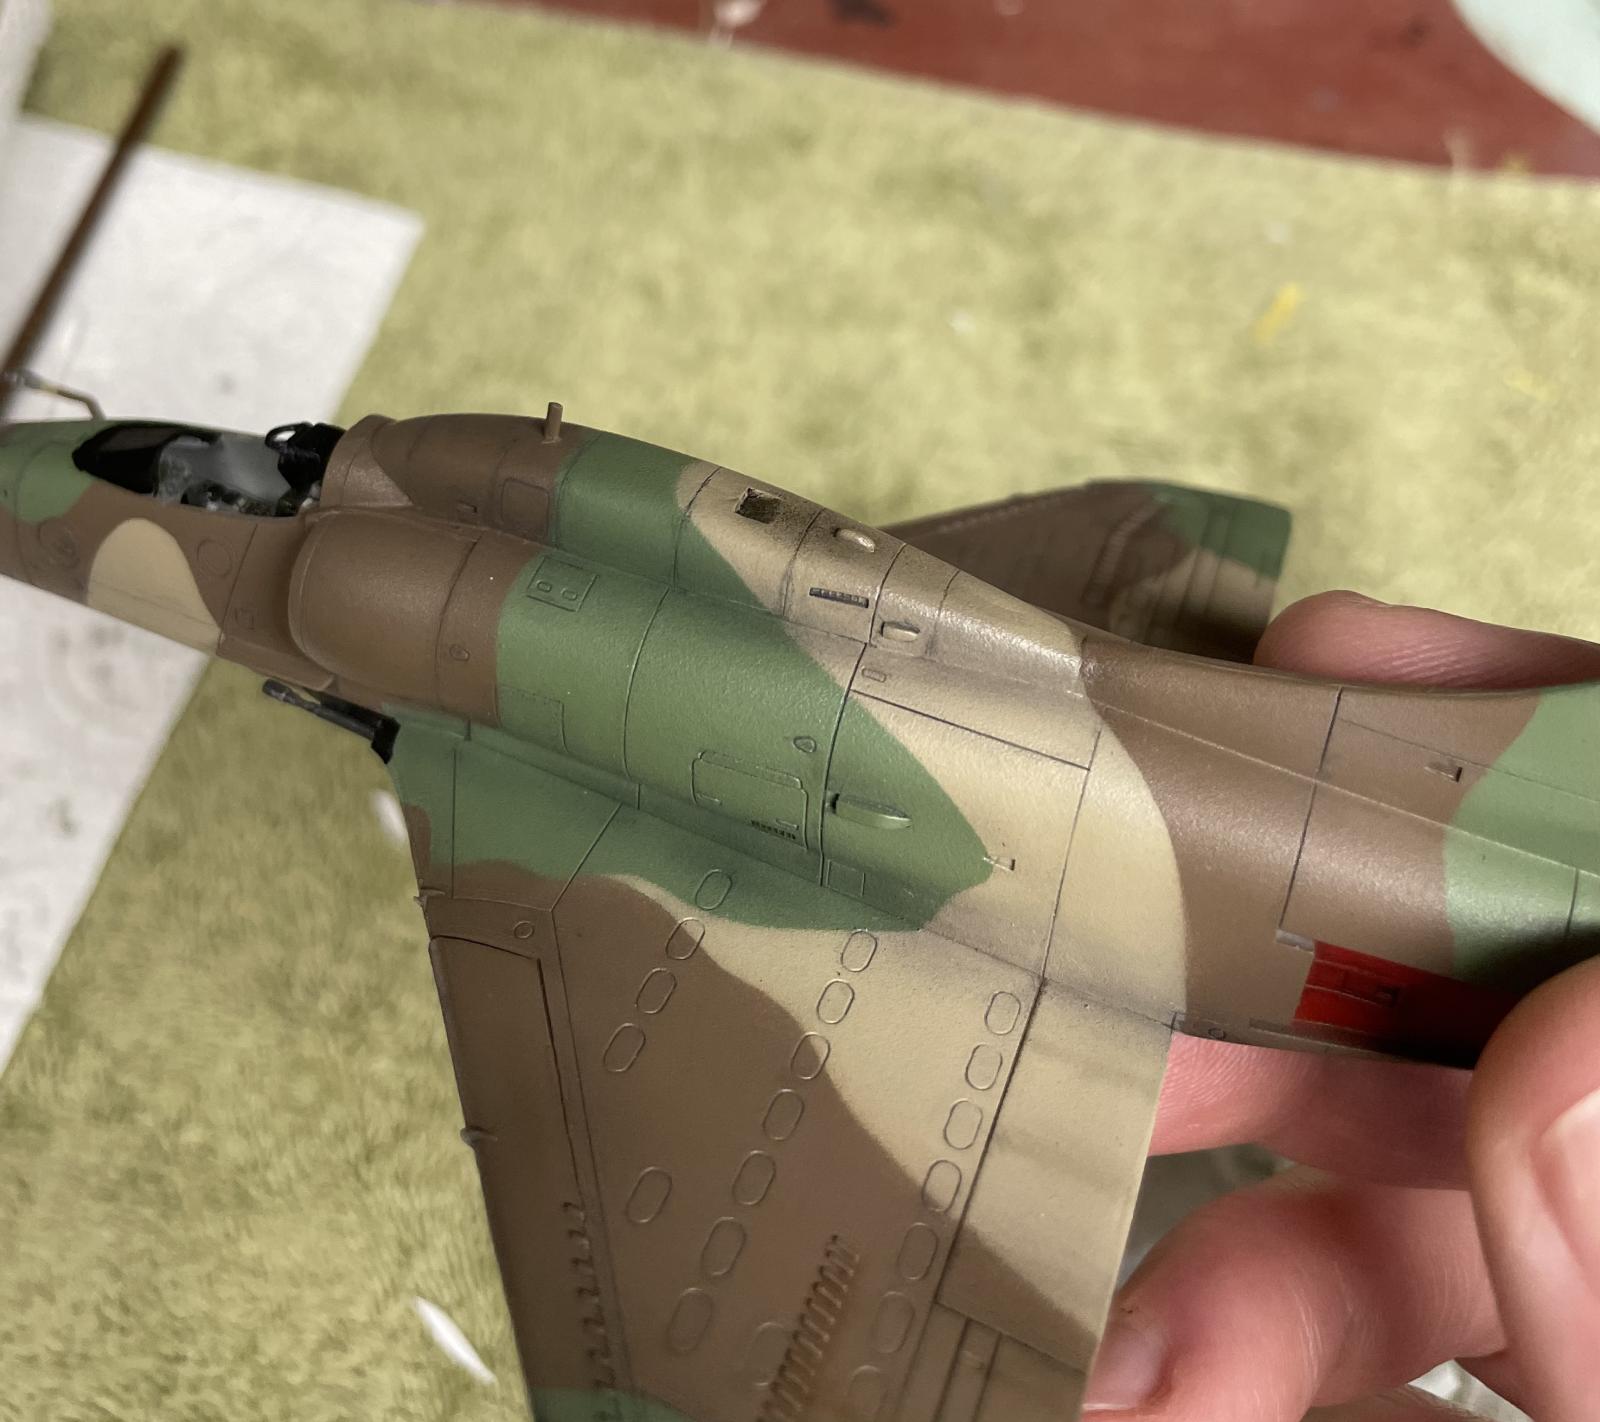
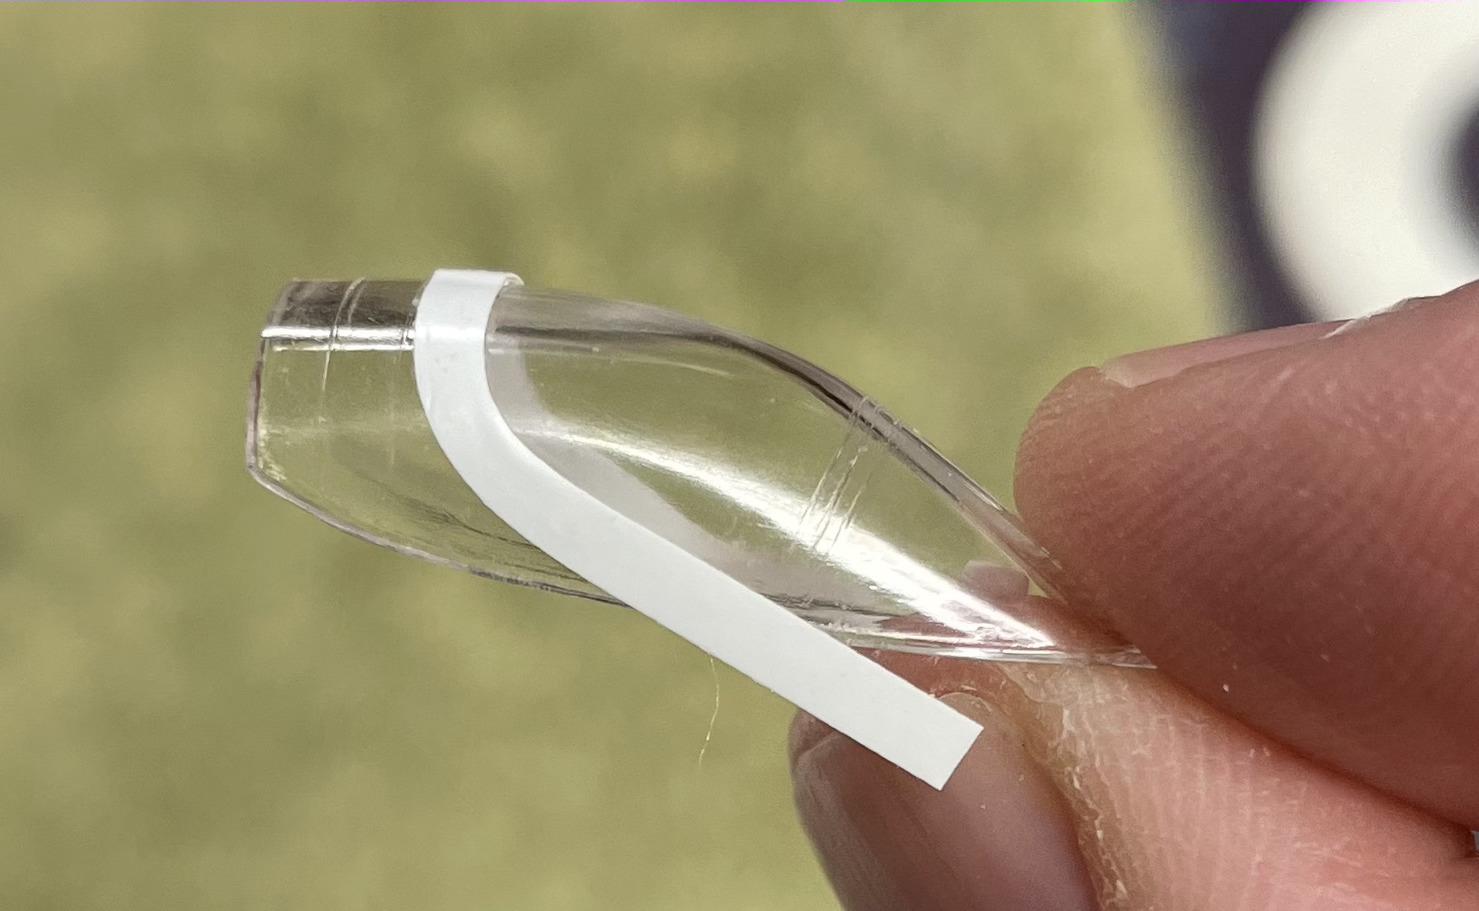
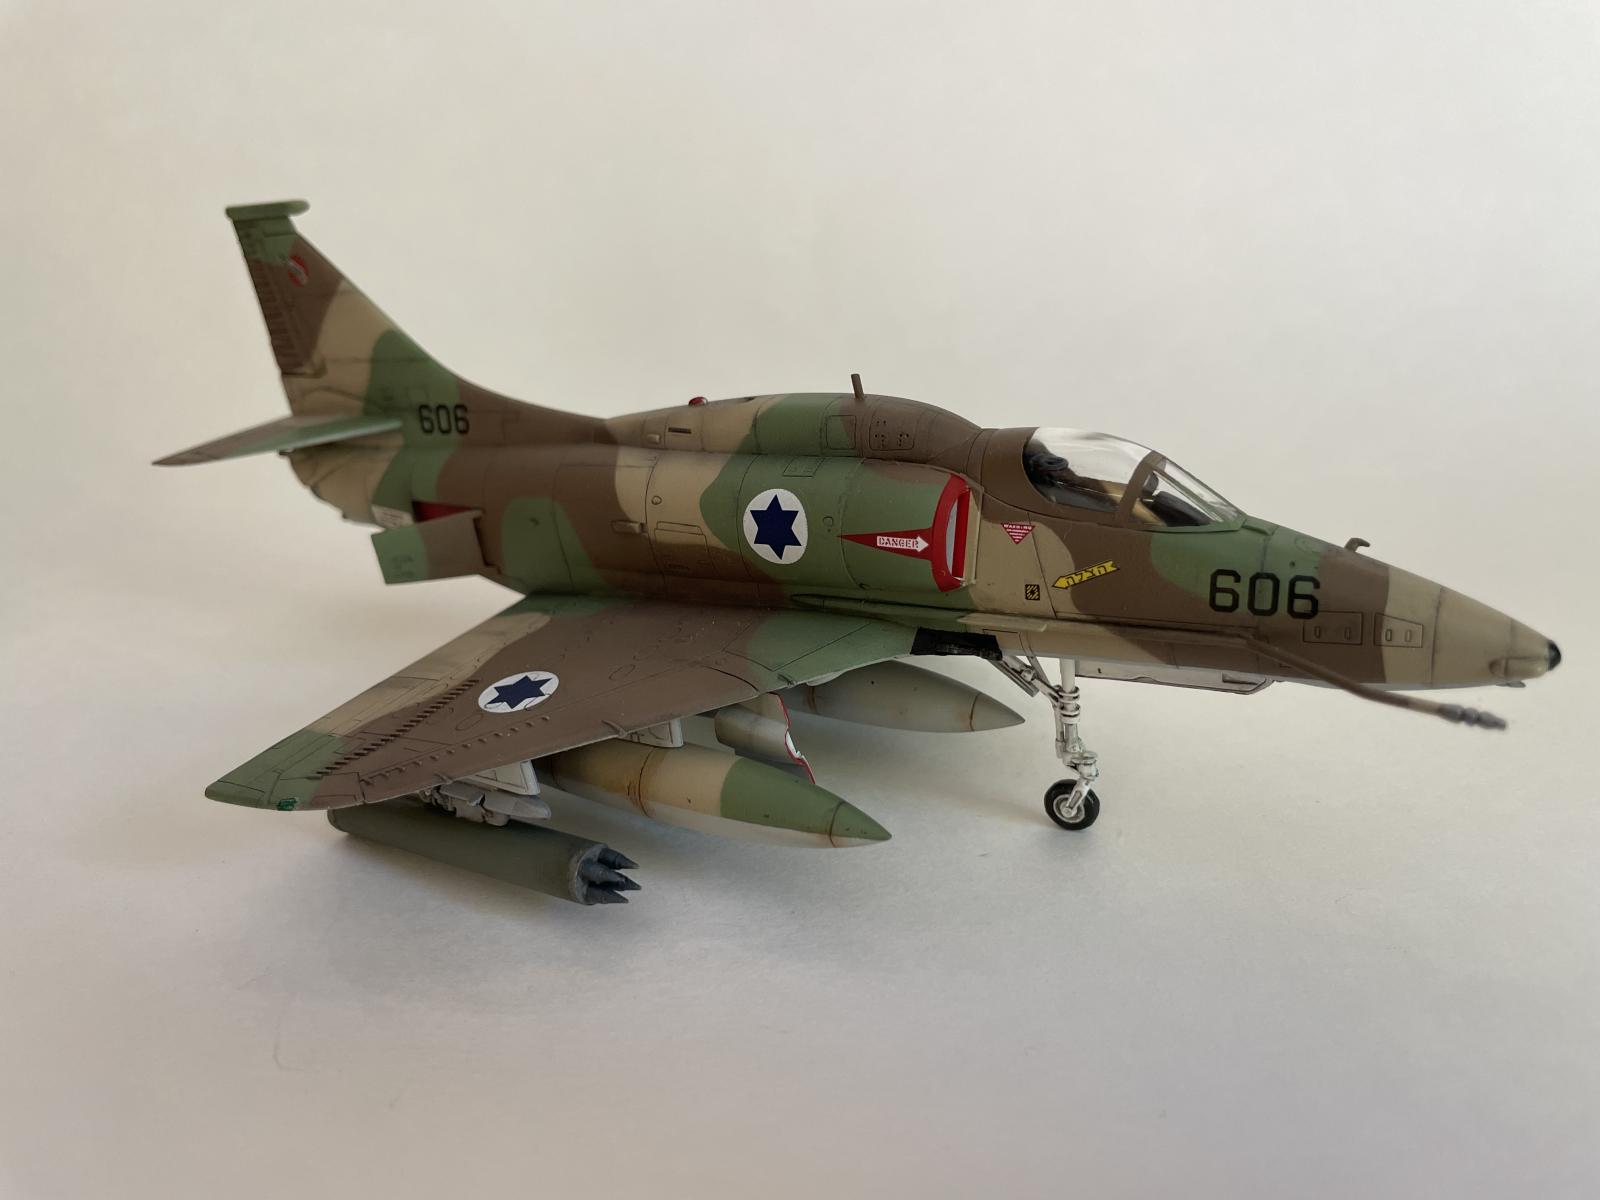
Being still quite new to modeling, I have a tendency to use what works: I find that confidence to try new things generally requires, well, confidence. And so, having had good initial success with Tamiya acrylics, these are my go-to paints. But, the pallet isn't that extensive and so it was a bit of a challenge matching the IDF camouflage color scheme. I settled on Cockpit Green (XF-71), Brown (XF-72), and Buff (XF-57), with the underside of the aircraft done in Royal Light Gray (XF-80). This was my first attempt at tri-tone camo, but the “paper masking” method that I used on my Harrier worked well. Here she is with a fresh coat of camo:
Panel lines and weathering
Lots of people tend to think that black panel line washes are too stark, leading to an overdone, unrealistic look. I'm not sure yet how I feel about that, but I was wary of it: the buff and green are lighter tones that would contrast strongly with a black wash. I therefore tried Tamiya's Dark Grey Panel Line Accent and I feel like it struck the right balance. I used Tamiya's black on landing gear and wheel wells, and on control surfaces, like the rudder below:
I used Mig Oilbrushers black to do some grease/grime streaking on the control surfaces. In an earlier post, I mentioned that these oils should go down before any gloss coat, since I found that the clear coat seemed to prevent good blending; this might be true in general, but I have since found out that the oils can go on afterwards and still seem to blend OK. The advantage of applying them on top of a lacquer coat is that you can very easily clean up mistakes and remove excess paint; application directly on the acrylic paint results in some of the pigment getting absorbed into the base coat that can't be removed. I learned this the hard way.
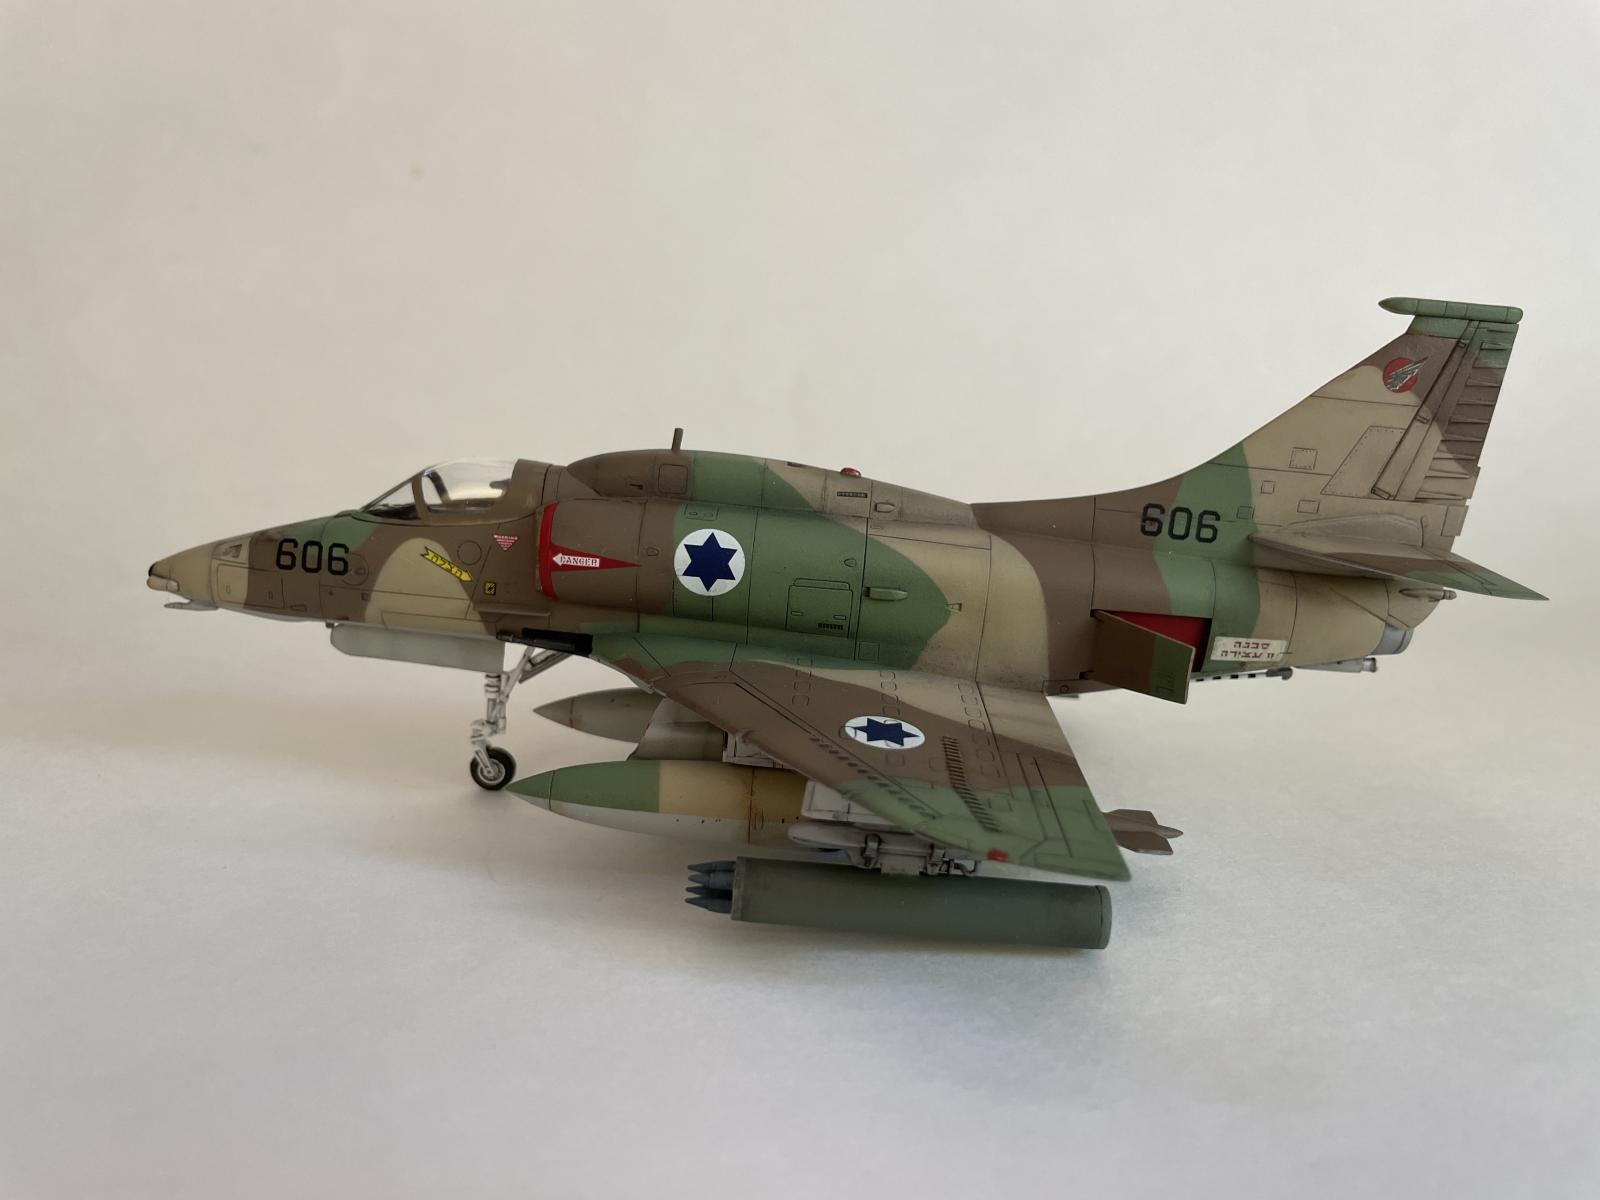
I was keen to try some rust effects on the drop tanks. These things are reused and old and I assumed probably rusty (then a friend reminded me that Israel is rather dry…) Anyway, it's a fun effect and I wanted to give it a go:
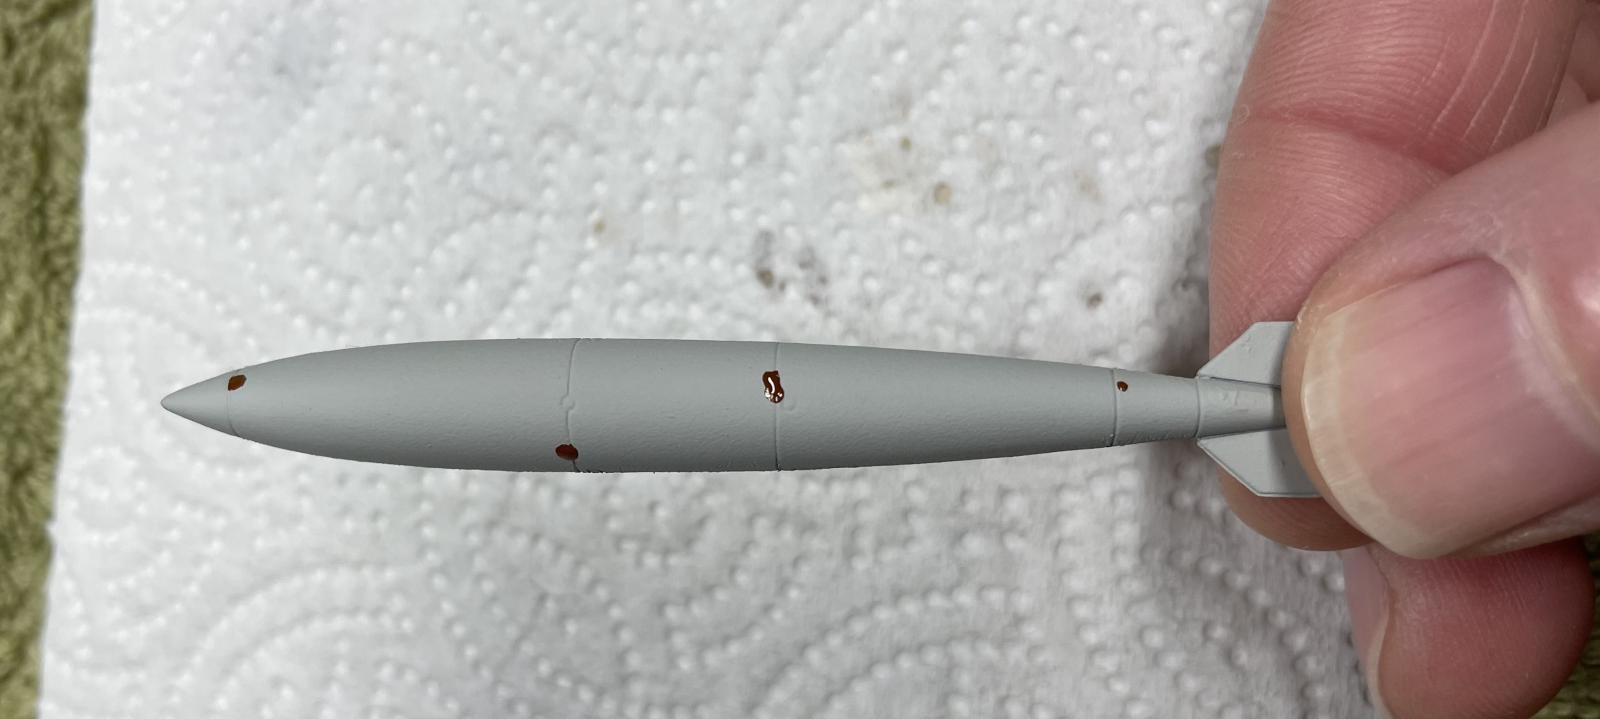
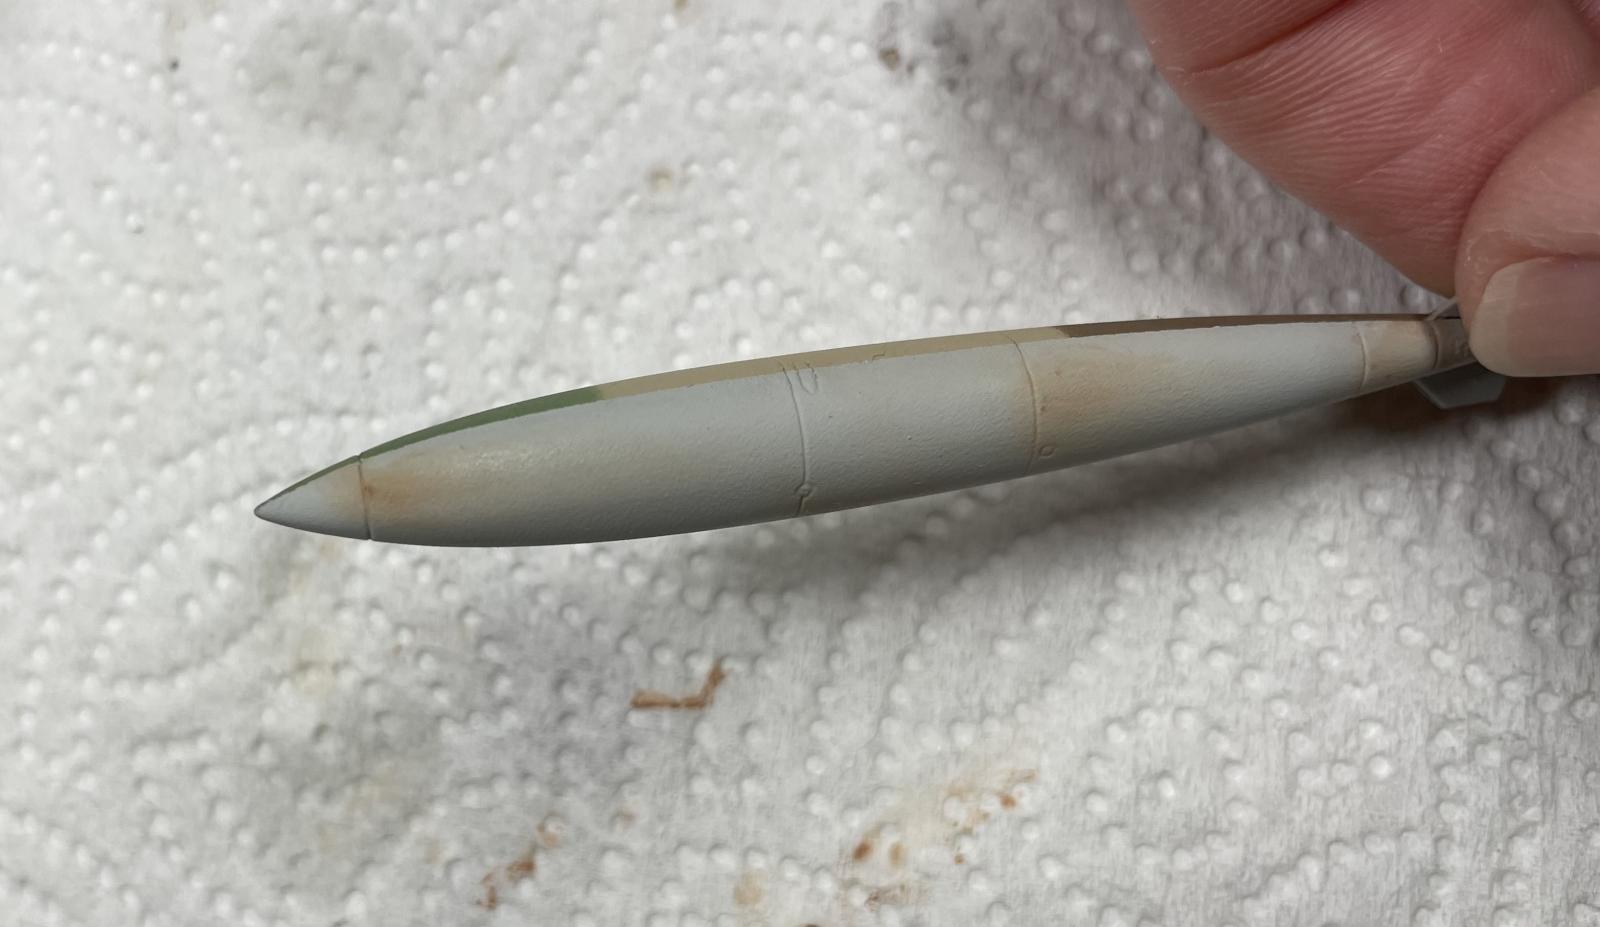
The bottom photo is after I vigorously sought to remove the oil with white spirit (with only partial success), since I realized I didn't like the look of such wide-spread rust. I ended up going back over some of this excessive rust with the gray acrylic base color; I ultimately still over-did it and next time will go for a muted look:
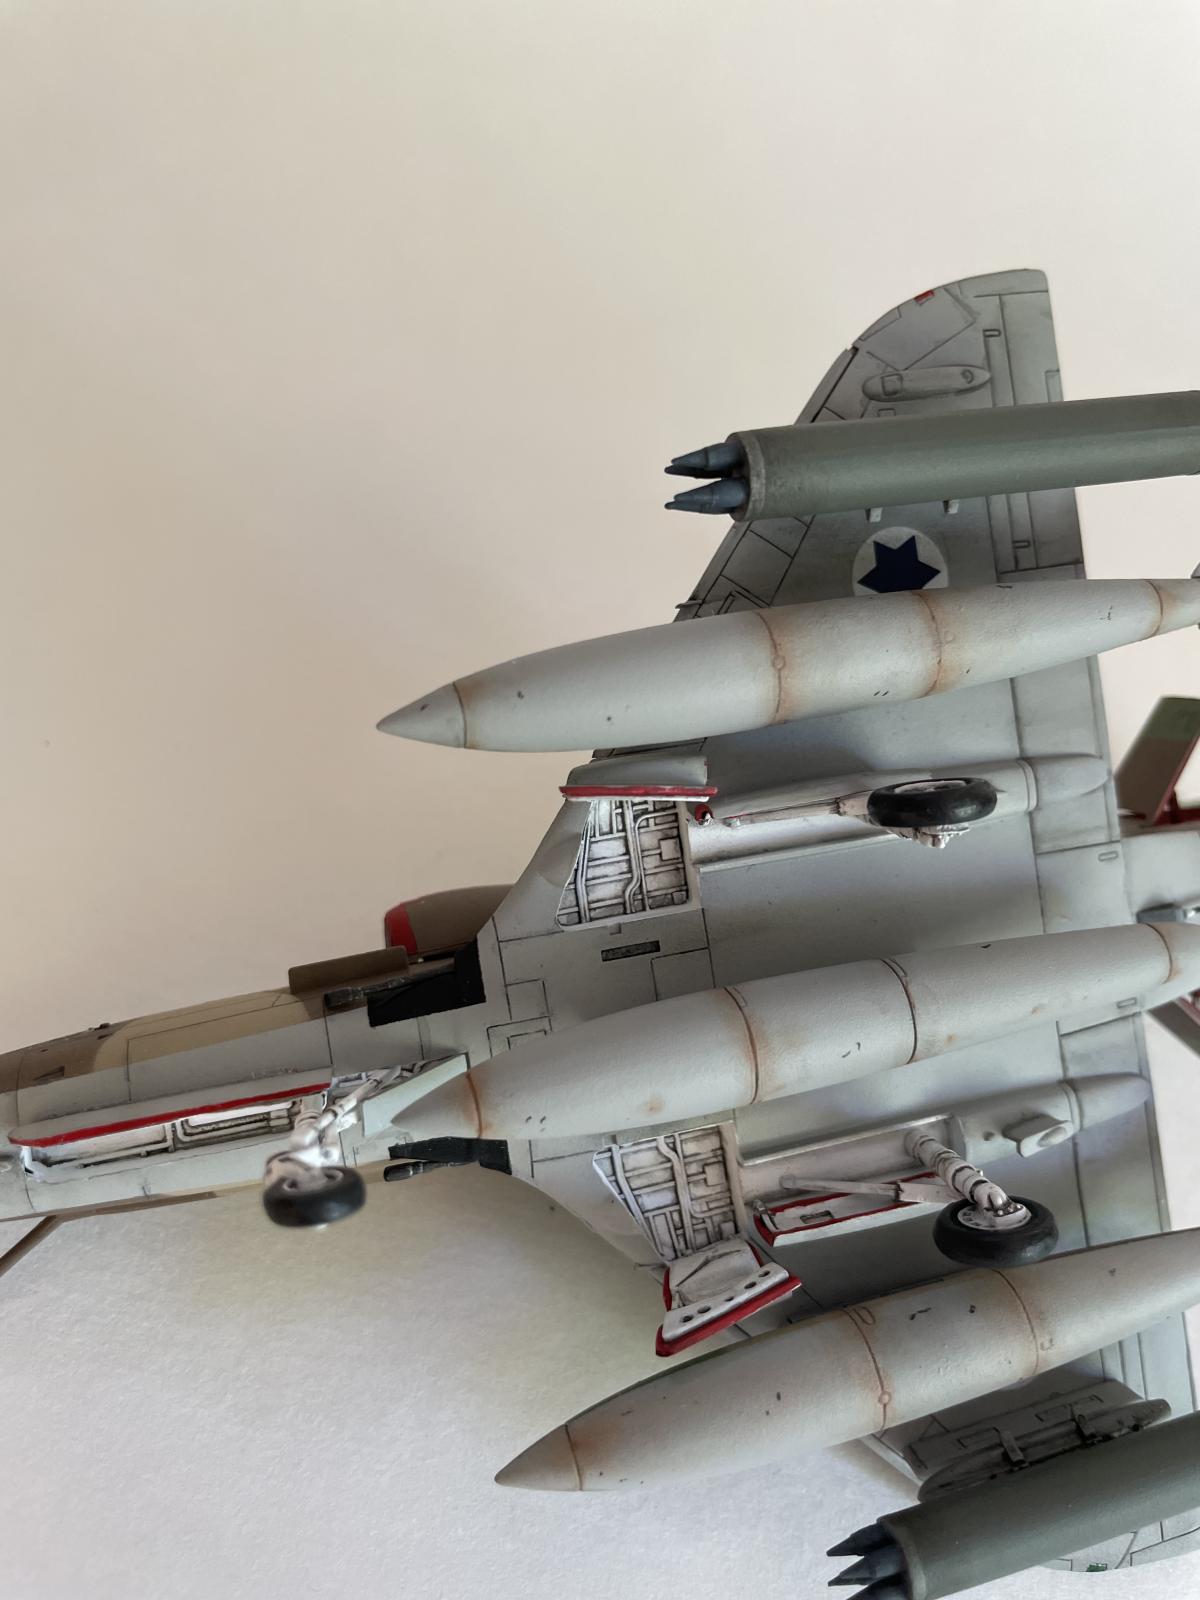
I finished off the drop tanks with an enamel pin wash and stippled some Tamiya Dark Iron (XF-84) to simulate chipping.
Shading
While watching videos on the Mig Oilbrushers, I saw some guy using things called Shaders to interesting effect.
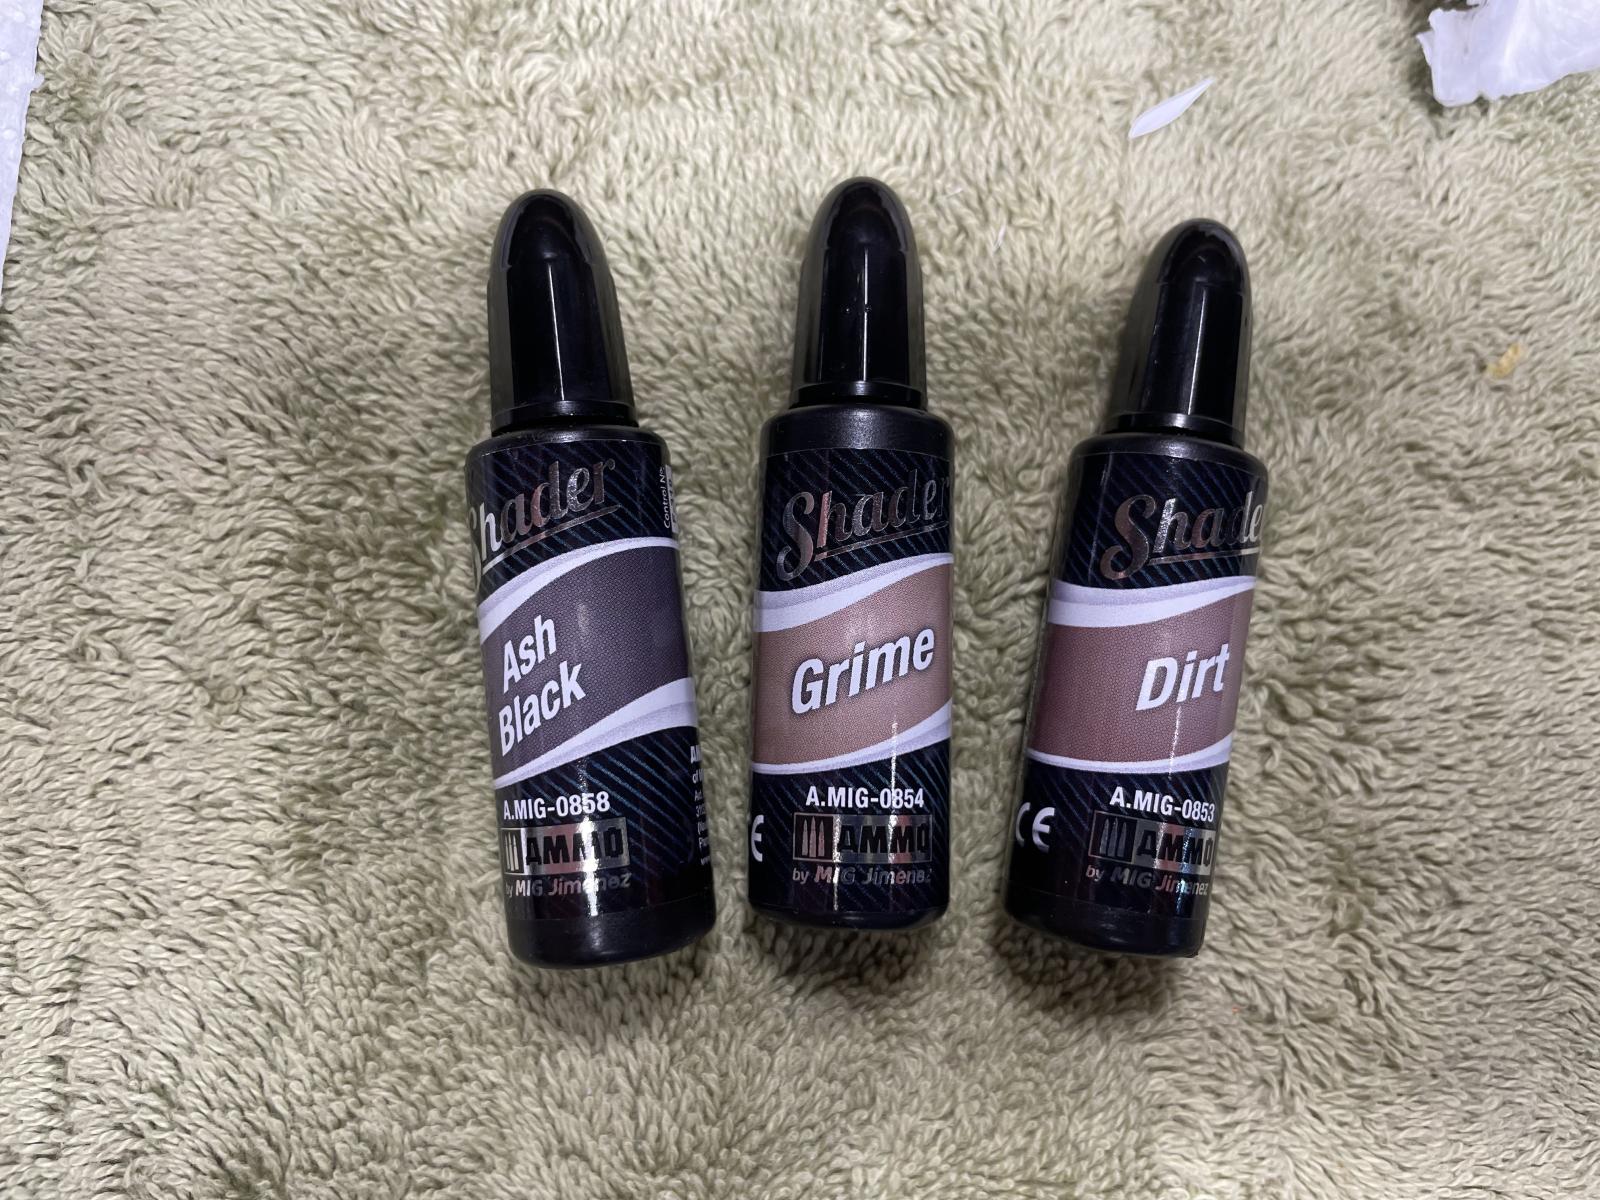
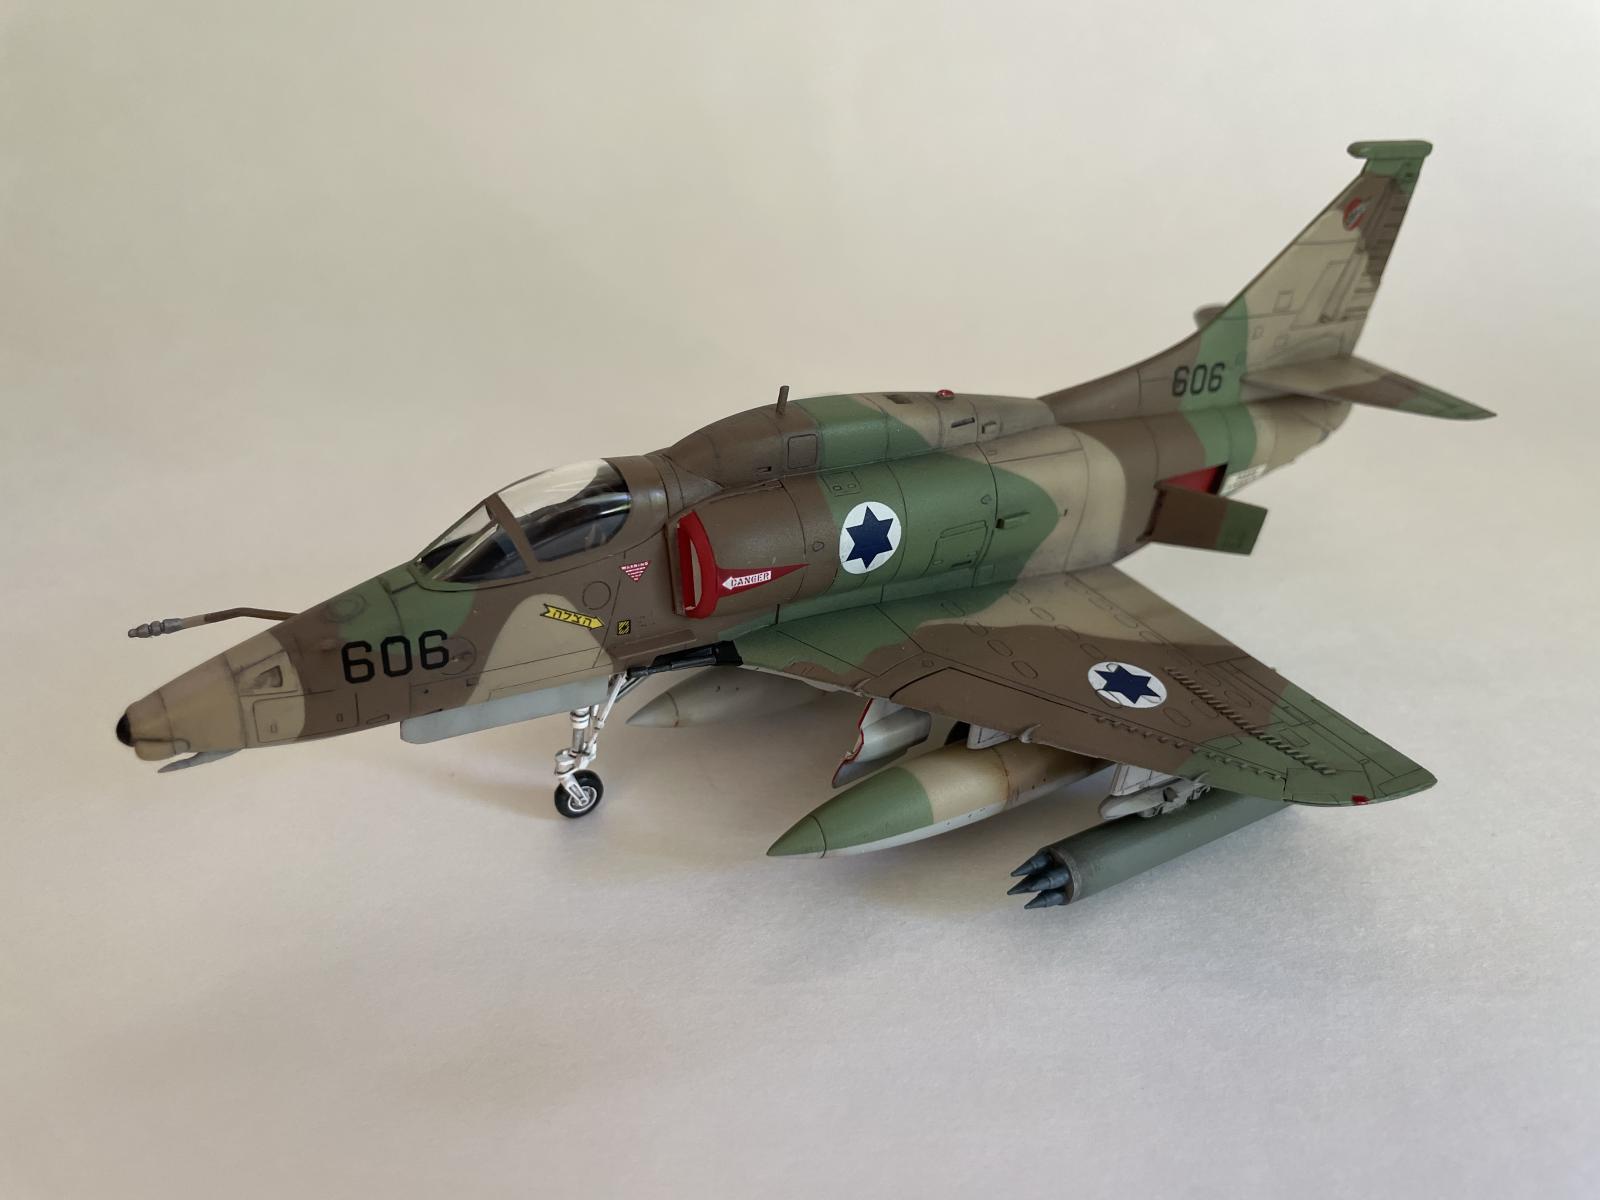
From what I can tell, Mig Shaders are highly-thinned acrylics for airbrushing shadows, highlights, and other related effects. If sprayed over a lacquer coat, they clean up very easily with water and so are quite forgiving. I wanted to try these in areas that I felt needed a softer contrast than that attainable with the enamel pin wash; for example, where the wings meet the fuselage. I'm pretty sure that someone proficient with oils could get a very similar effect, and, yes, I suspect these Shaders are quite gimmicky and not essential. In any case, I purchased three colors to try out. I realized my Paasche H Series syphon-fed airbrush likely lacked the control I would need to accurately spray the Shader where I needed it. So, I dusted off my Badger Patriot 105 (with detail needle) and had some fun. I applied Ash Black where the dorsal pod and wings meet the fuselage:
I then sprayed a couple random streaks along the direction of airflow on the bottom of the aircraft, and applied some Grime color (which has a slightly yellowish-greenish-brownish hue) to the vents next to the wheel wells:
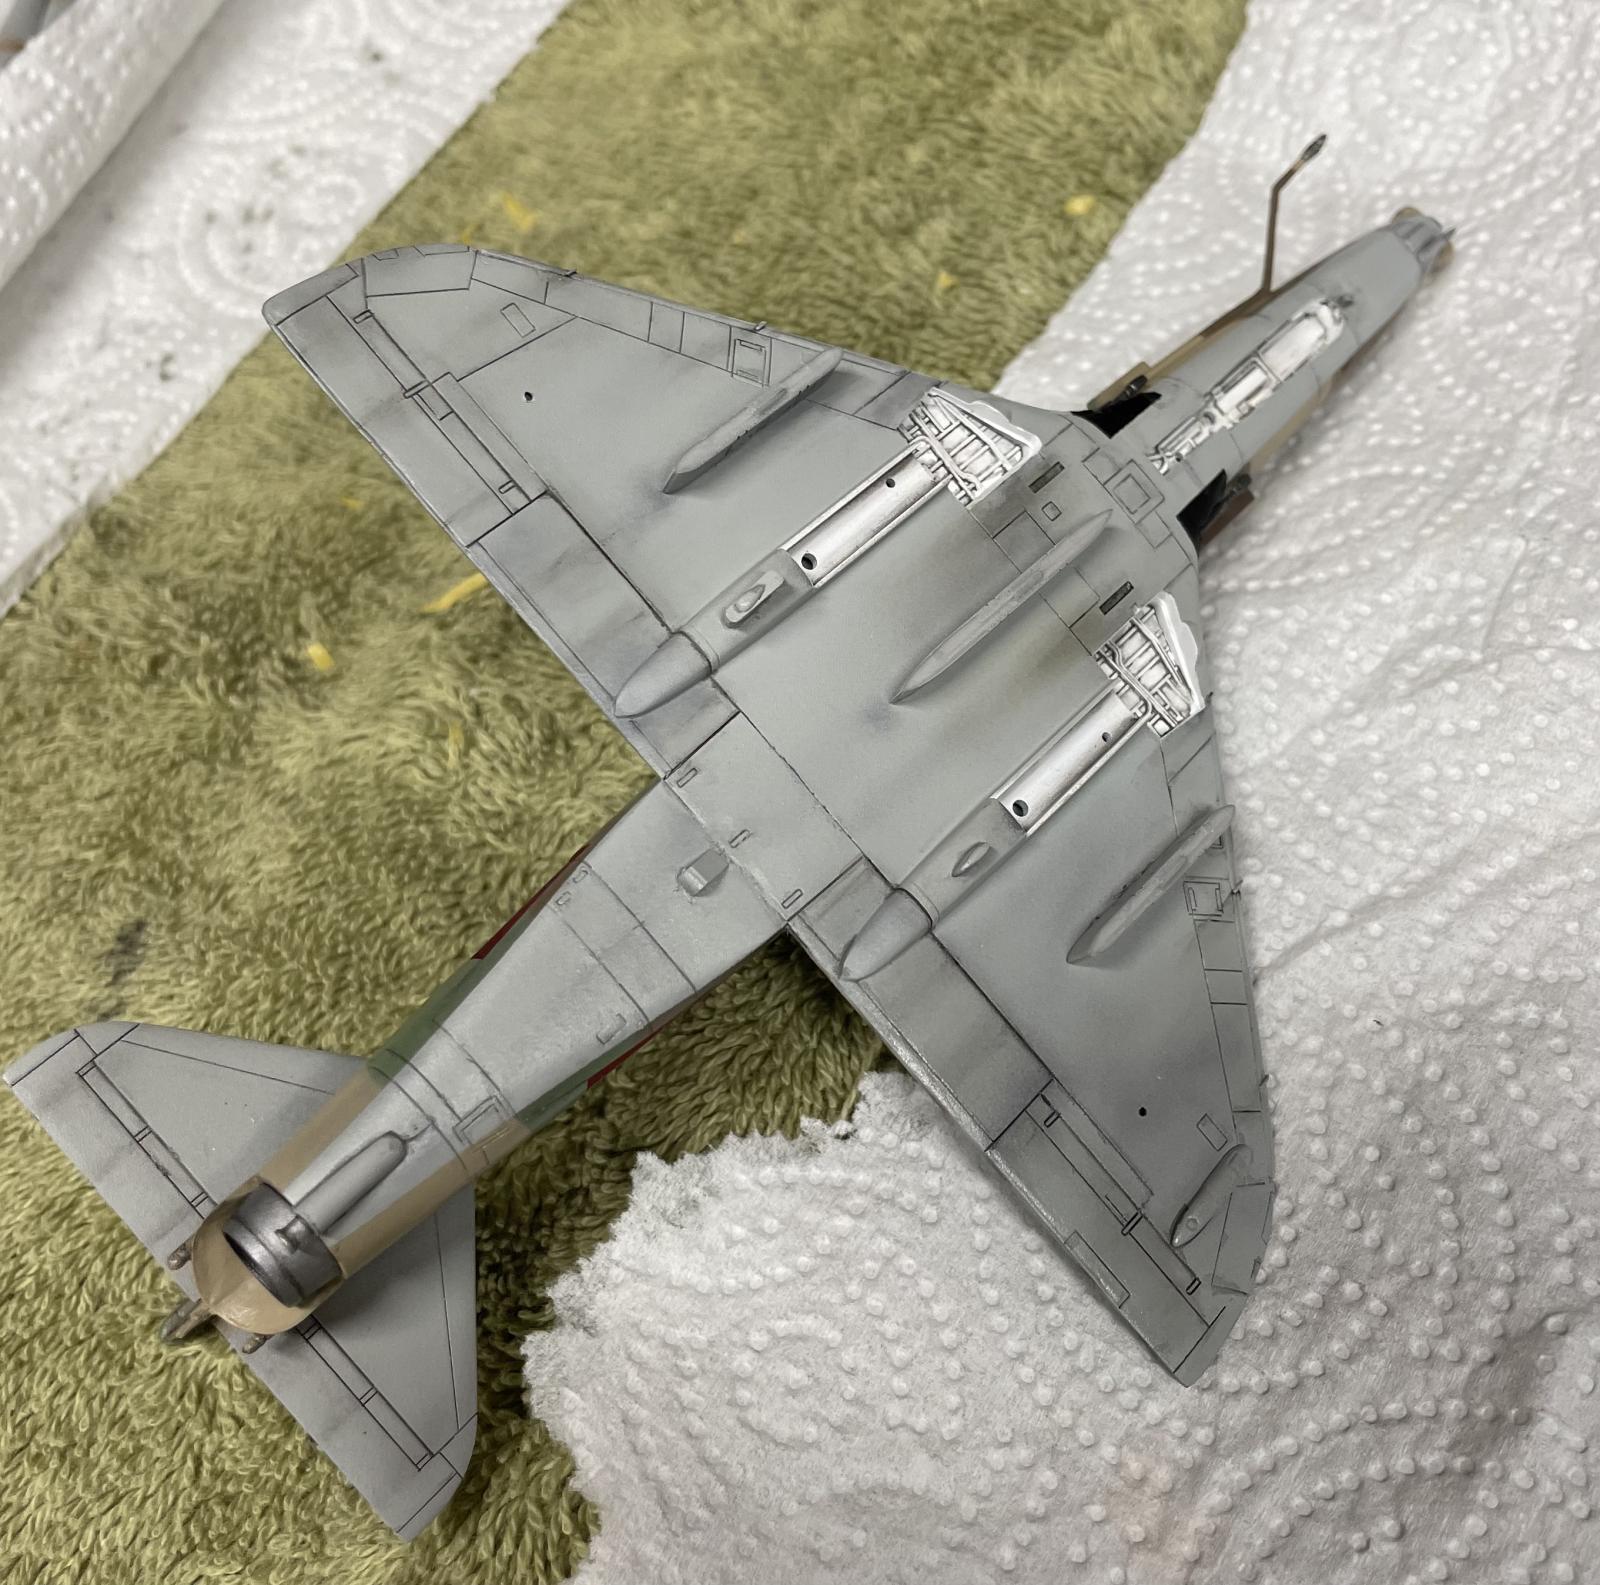
Overall I was pleased with this result, though, again, I don't think this is anything that couldn't have been done with oils (though perhaps this is quicker once you get the hang of it). The nice thing about airbrushing these kinds of effects is that you get the modulation for free; what you sacrifice, though, is the fine control you get from blending oils by hand.
Decals
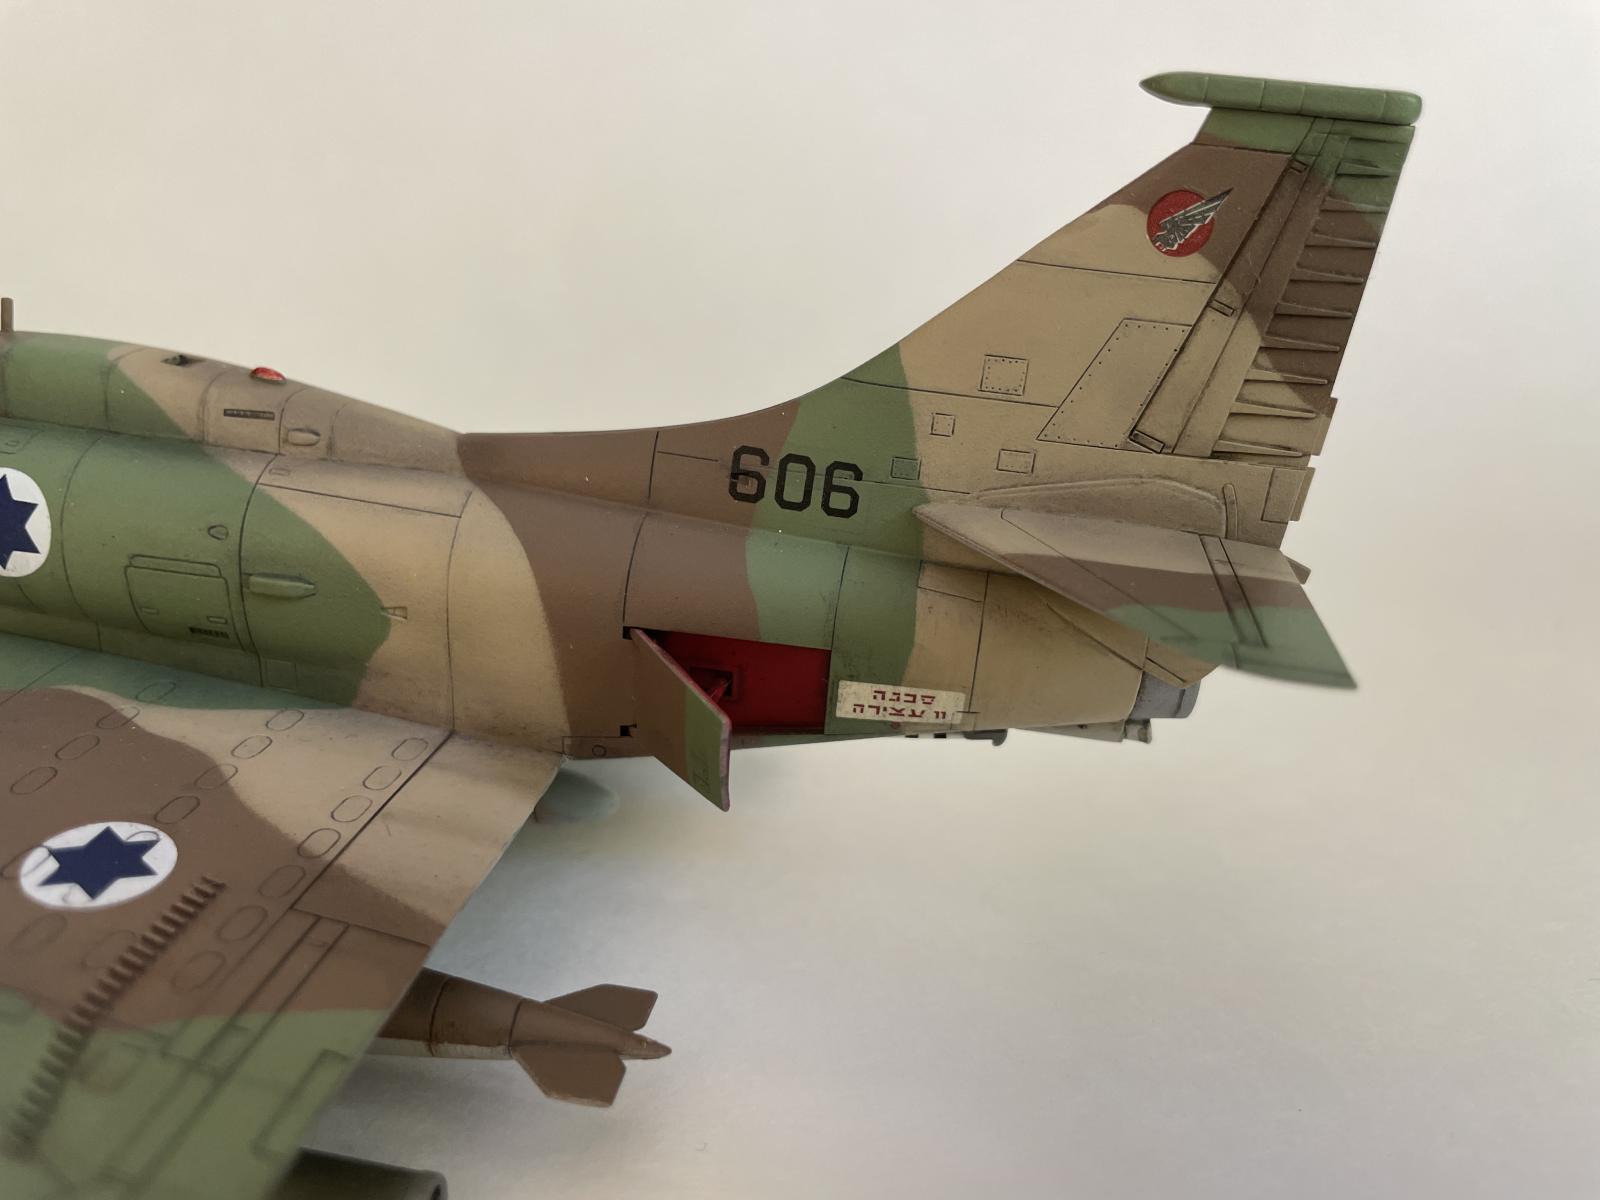
Since I wasn't building the version of the aircraft from the kit, I needed to find some Israeli air force decals. There is an Israeli A-4E by ESCI Ertl, but these are hard to come by; I actually scored a decal sheet, but the decals were badly yellowed and were not very detailed or accurate (e.g. the yellow rescue arrow was in English). There is a very nice IDF A-4H by Hasegawa, but it's 1/48 scale. And that's it! I had to scour the web to find random decals: general Israeli aircraft markings, squadron insignia, and so on. I succeeded, for the most part: Microscale had a nice range of Star of David roundels, and Almark had a good selection of marking and insignia:
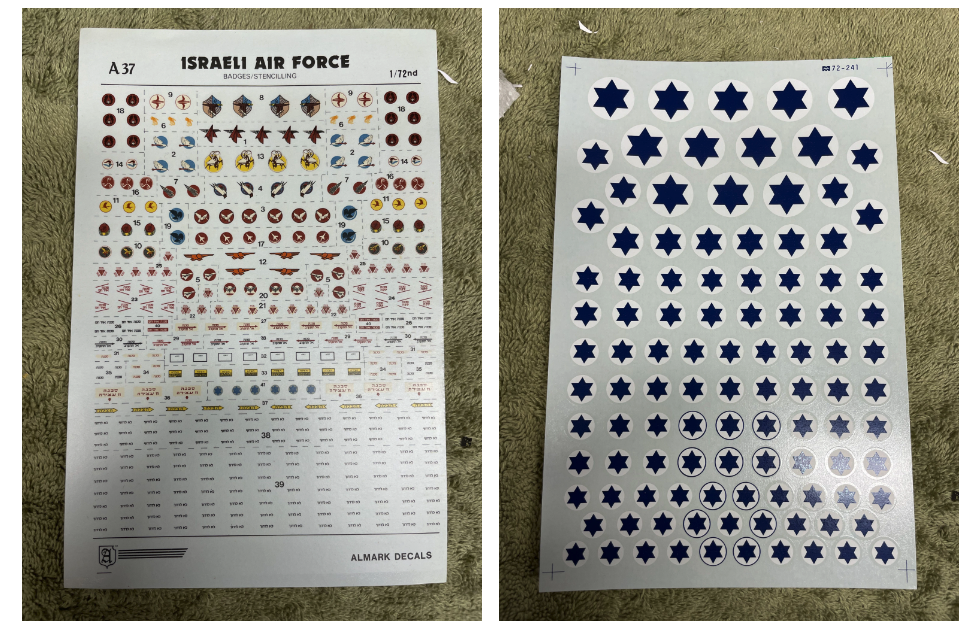
I selected the No. 116 “Flying Wing” squadron, which was the only available insignia that I could verify was indeed an A-4 squadron. The Almark decals came with a bunch of standard aircraft markings in Hebrew; however, the decal carrier film was a little foggy and quite visible on a few test decals that I put down. I therefore had to carefully cut away as much surrounding film as possible with my knife, and I had to forego some of the decals where this wasn't possible (like the cool Hebrew “no step” markings). Once that was done, though, the decals went down without a problem.
I placed the decals directly over Solvaset to reduce silvering and to get tight, close contact. After another coat of clear, I did a bit more weathering over some of the decals. Here you can see how the pin wash settled nicely into the wing indentations over the Star of David roundels,
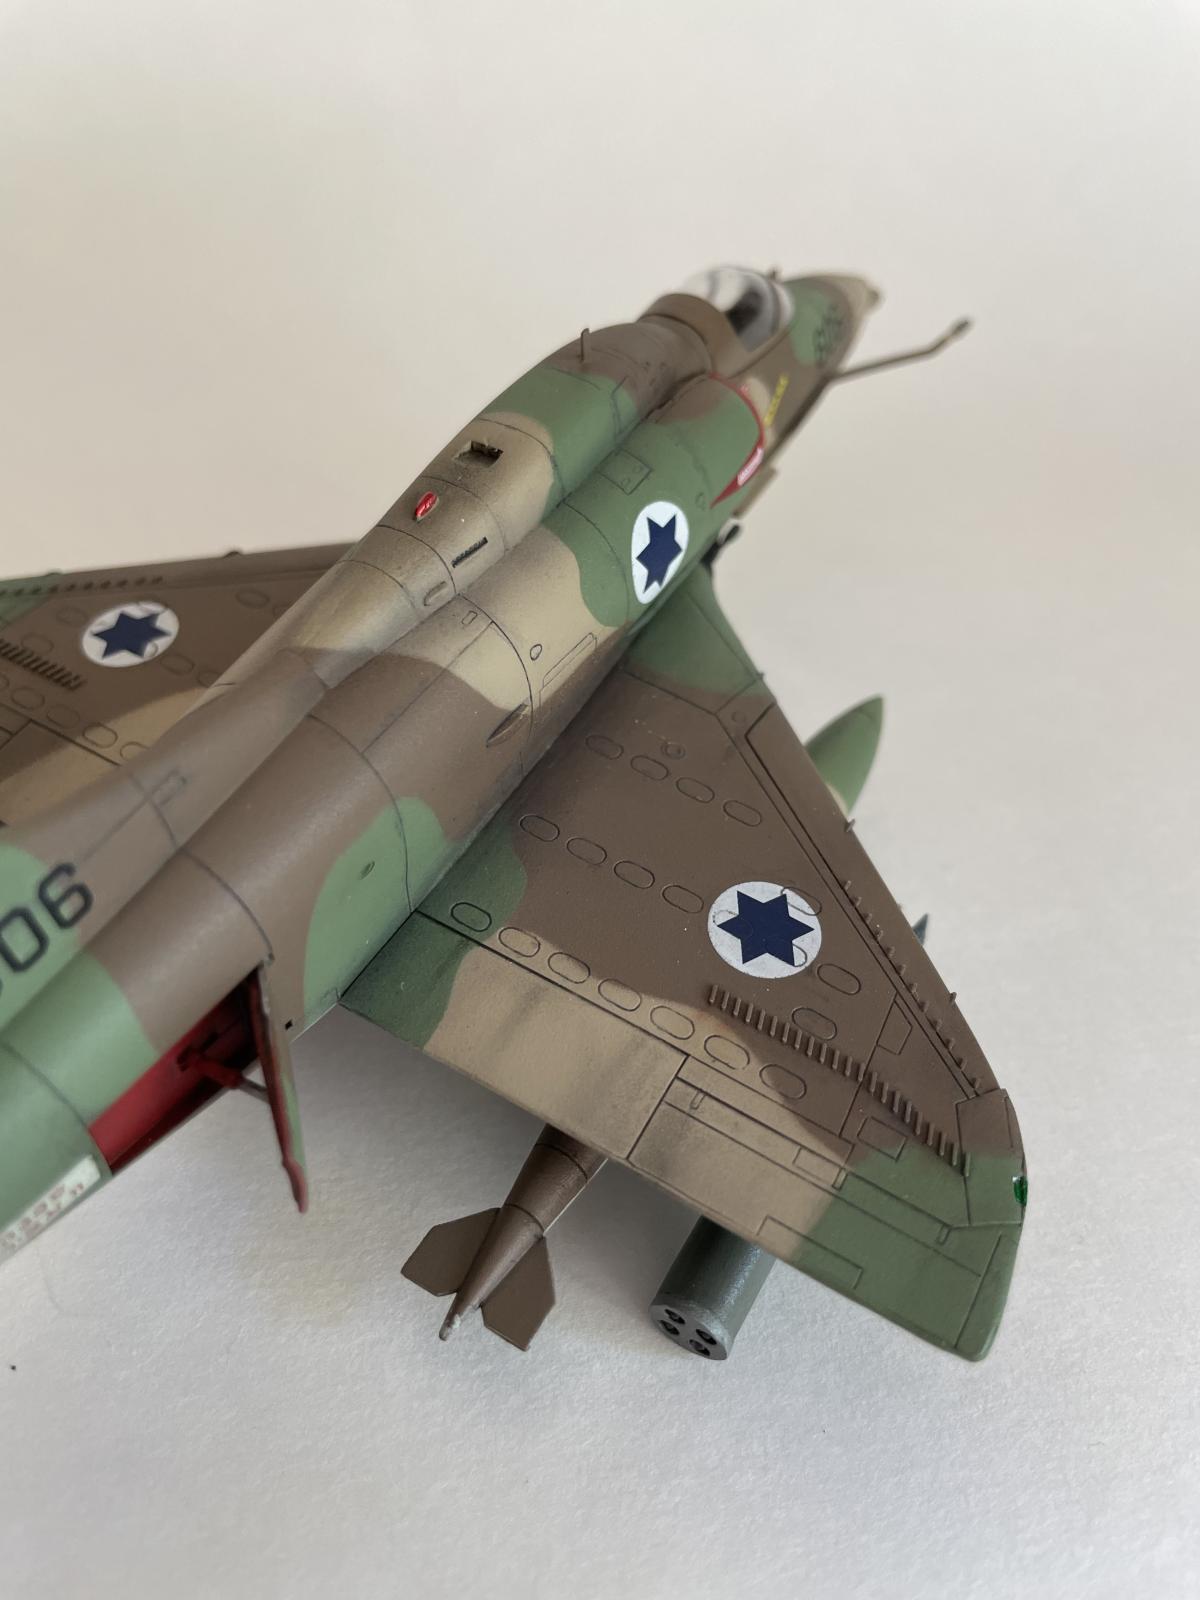
and here I applied a bit of Oilbrusher (Black and some Starship Filth) over the decal presumably warning about the tail hook:
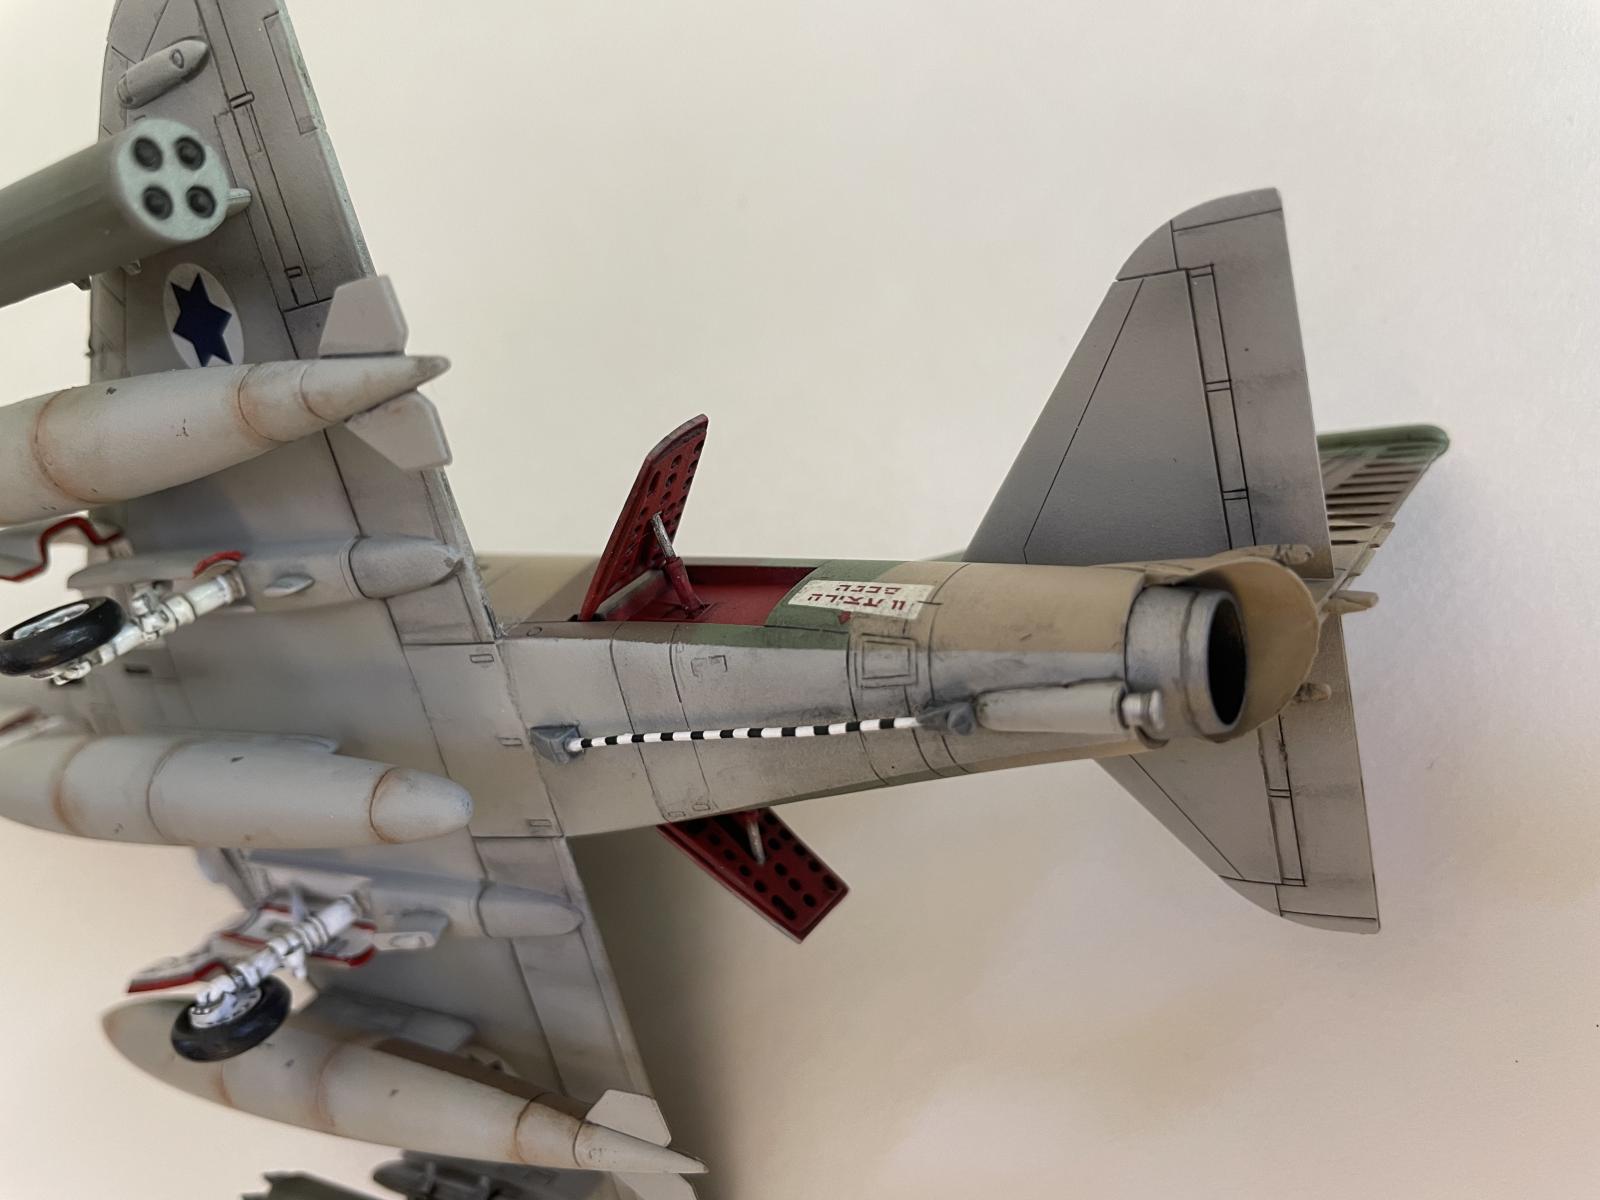
Lastly, as a miscellaneous point, I really dig Tamiya's curved masking tape. I found it useful to mask the curved edges of the canopy:
I got some crisp lines, but learned you can't overlap the stuff easily without leaving a tiny bit of a gap (since the tape is a little thick and and doesn't conform perfectly to small irregularities, like another section of tape). I ended up with some paint on the canopy but that was easy to clean (being acrylic) with a small Tamiya craft swab dipped in X-20A thinner.
That's all 'til next time. Thanks for reading!
A fantastic job and an equally fantastic article, Brian!
Congratulations!
I second that! Very interesting to read about the procedure and the final build looks great!
Fantastic looking Skyhawk. The IAF had the best livery and some truly amazing stories with their A-4's. I'm busy building a 1/48 one at the moment and it doesn't look this good! Nice score with the decals, I also struggled to find some.
Thanks and good luck! I'm excited to see how it comes out! Is this the Hasegawa kit?
Very good article.
Excellent job.just enough weathering to make it realistic.
Very nice result on this Skyhawk, Brian @bapowellphys
The weathering is indeed superbly done.
Very nice work on this, particularly the painting and weathering.
Looks excellent! I love the IDF camo, and the work you did at 1/72 scale (my chosen scale). Nice experimenting with the various mediums - I play around a bit with different ones to achieve similar effects, and never can seem to land on my "preferred" method or medium! I just kind of decide on the fly which set of weathering tools and techniques I'll use with each build. Keeps it interesting!
Thanks everyone for the words of encouragement. It means a lot coming from this crowd!
Excellent work! Spot on job with the weathering! One minor note in terminology, the drop tanks being made of aluminum do not rust, iron-based metals rust.
Well that's good to know for next time. I was wondering if there was a type of external tank that was meant to be more permanent; for example, I was struck by the fact that the A-4 external tanks under the wings were camouflaged, which seemed like a lot of trouble for something expendable. Any idea if there are external tanks that are meant to be reused?
To my knowledge [ which is questionable], most external tanks are meant to be reused. They would drop them in if they had to get out of dodge in a hurry, or maybe in a dog fight. For the most time we always had centerline tanks on our F-4J's, of course this " peace time" On a Med. cruise in the 1970's.
You really brought out the best in this old Fujimi kit, Brian (@bapowellphys). Well done.
Great job and I really like your article! When I try an aircraft, I'm referring back to this.