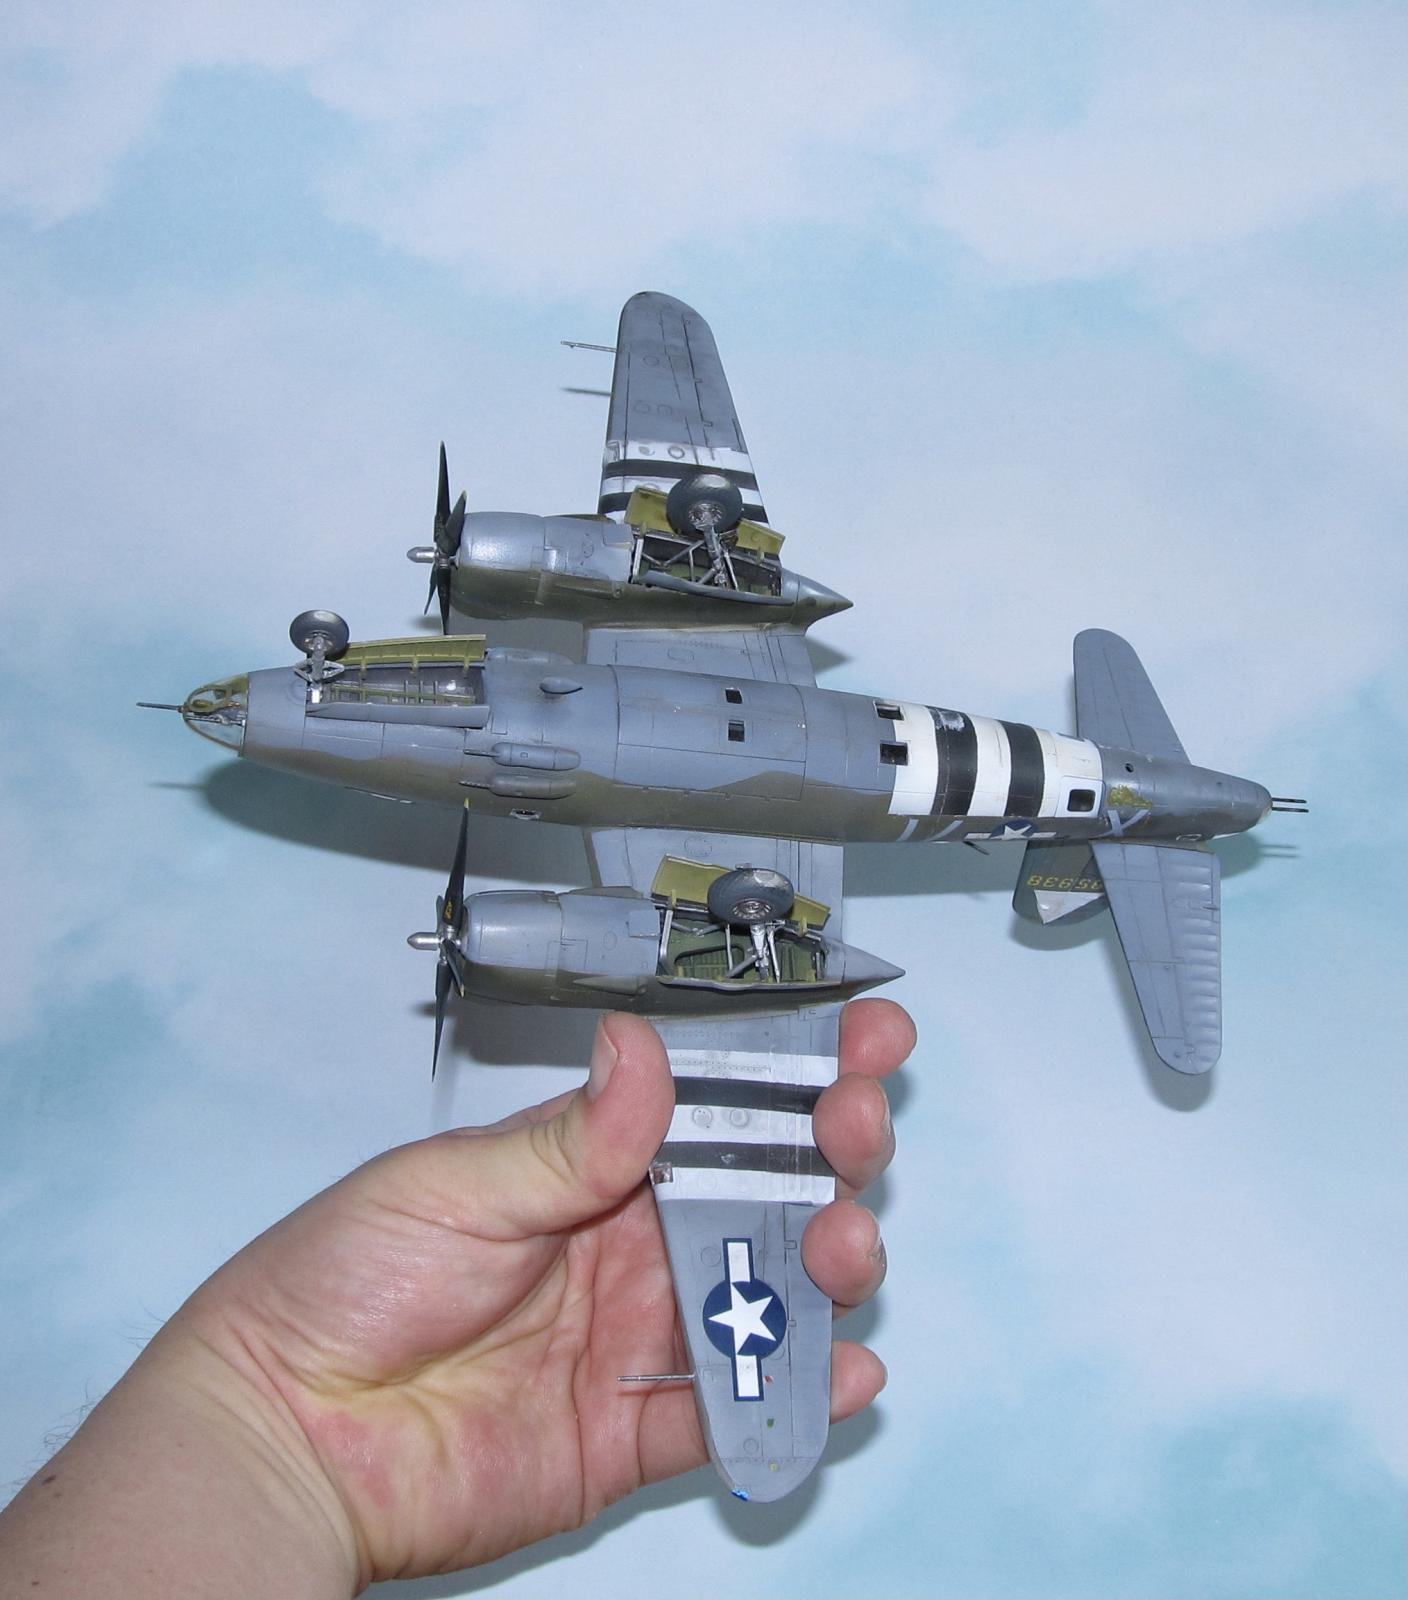
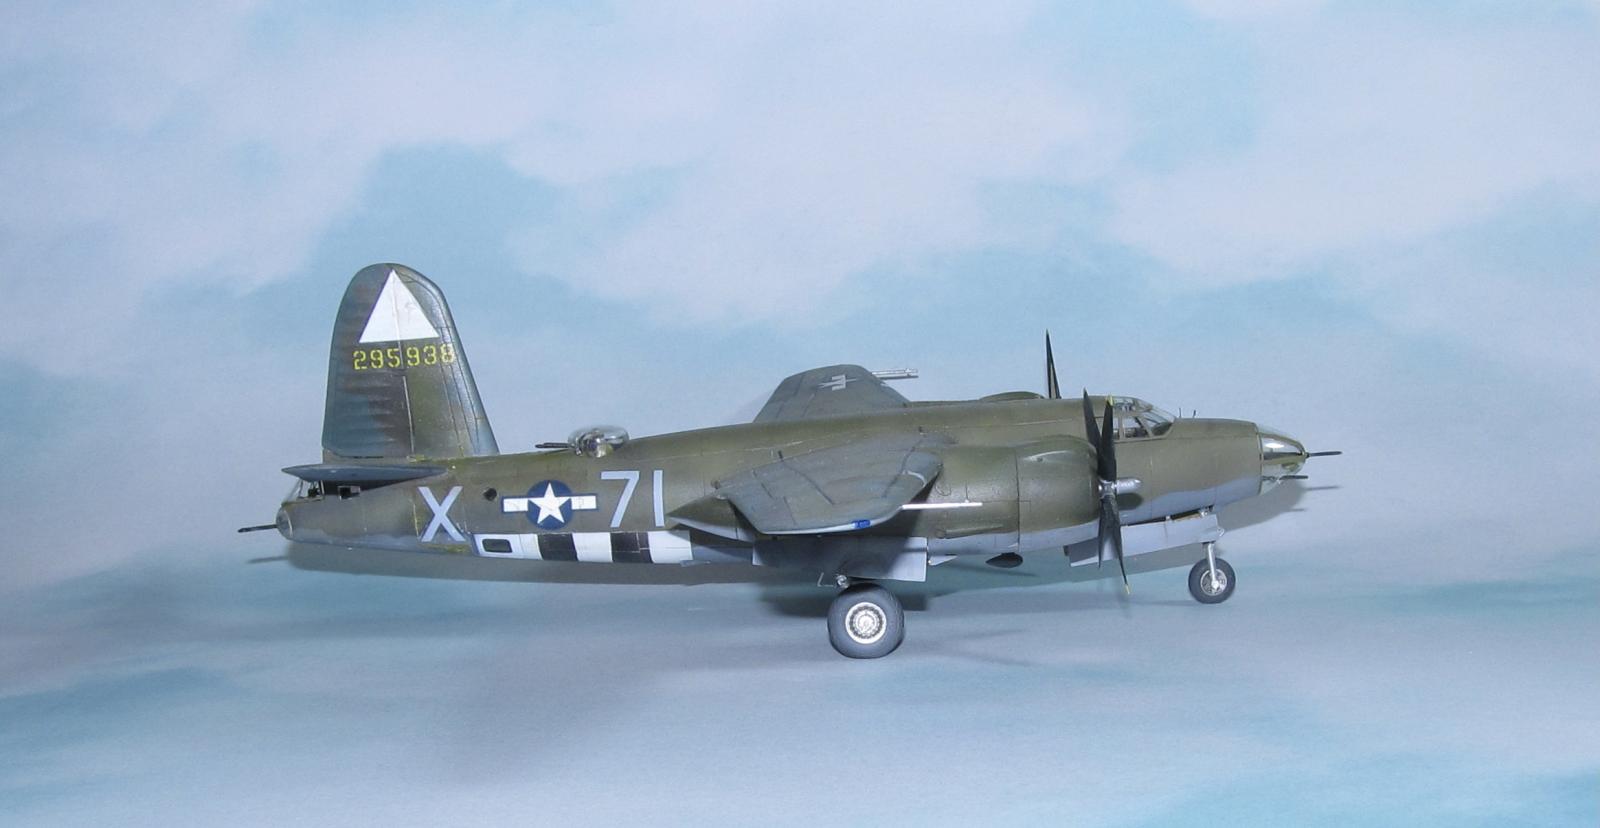
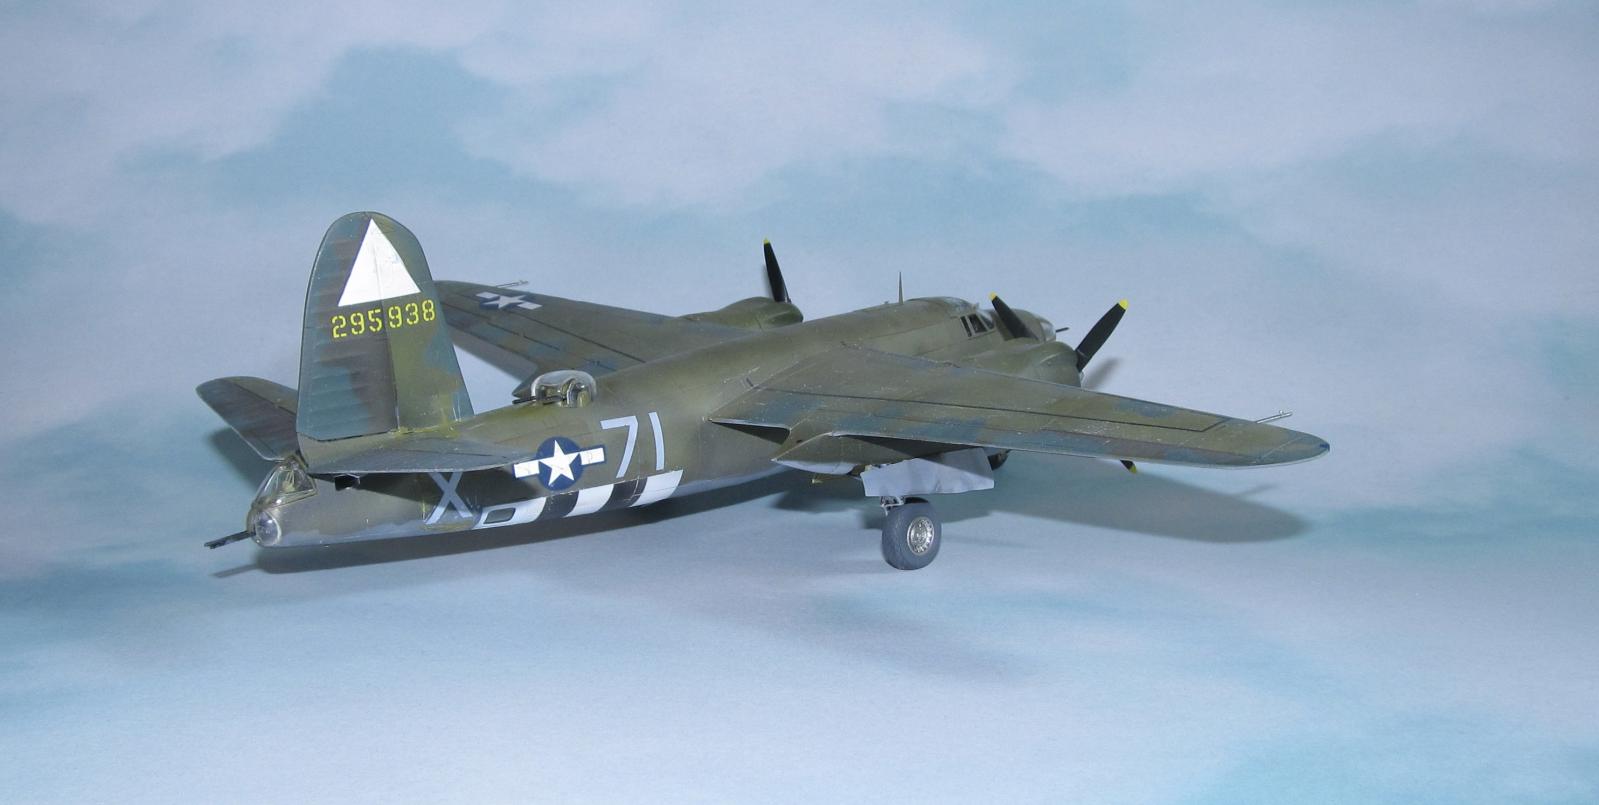
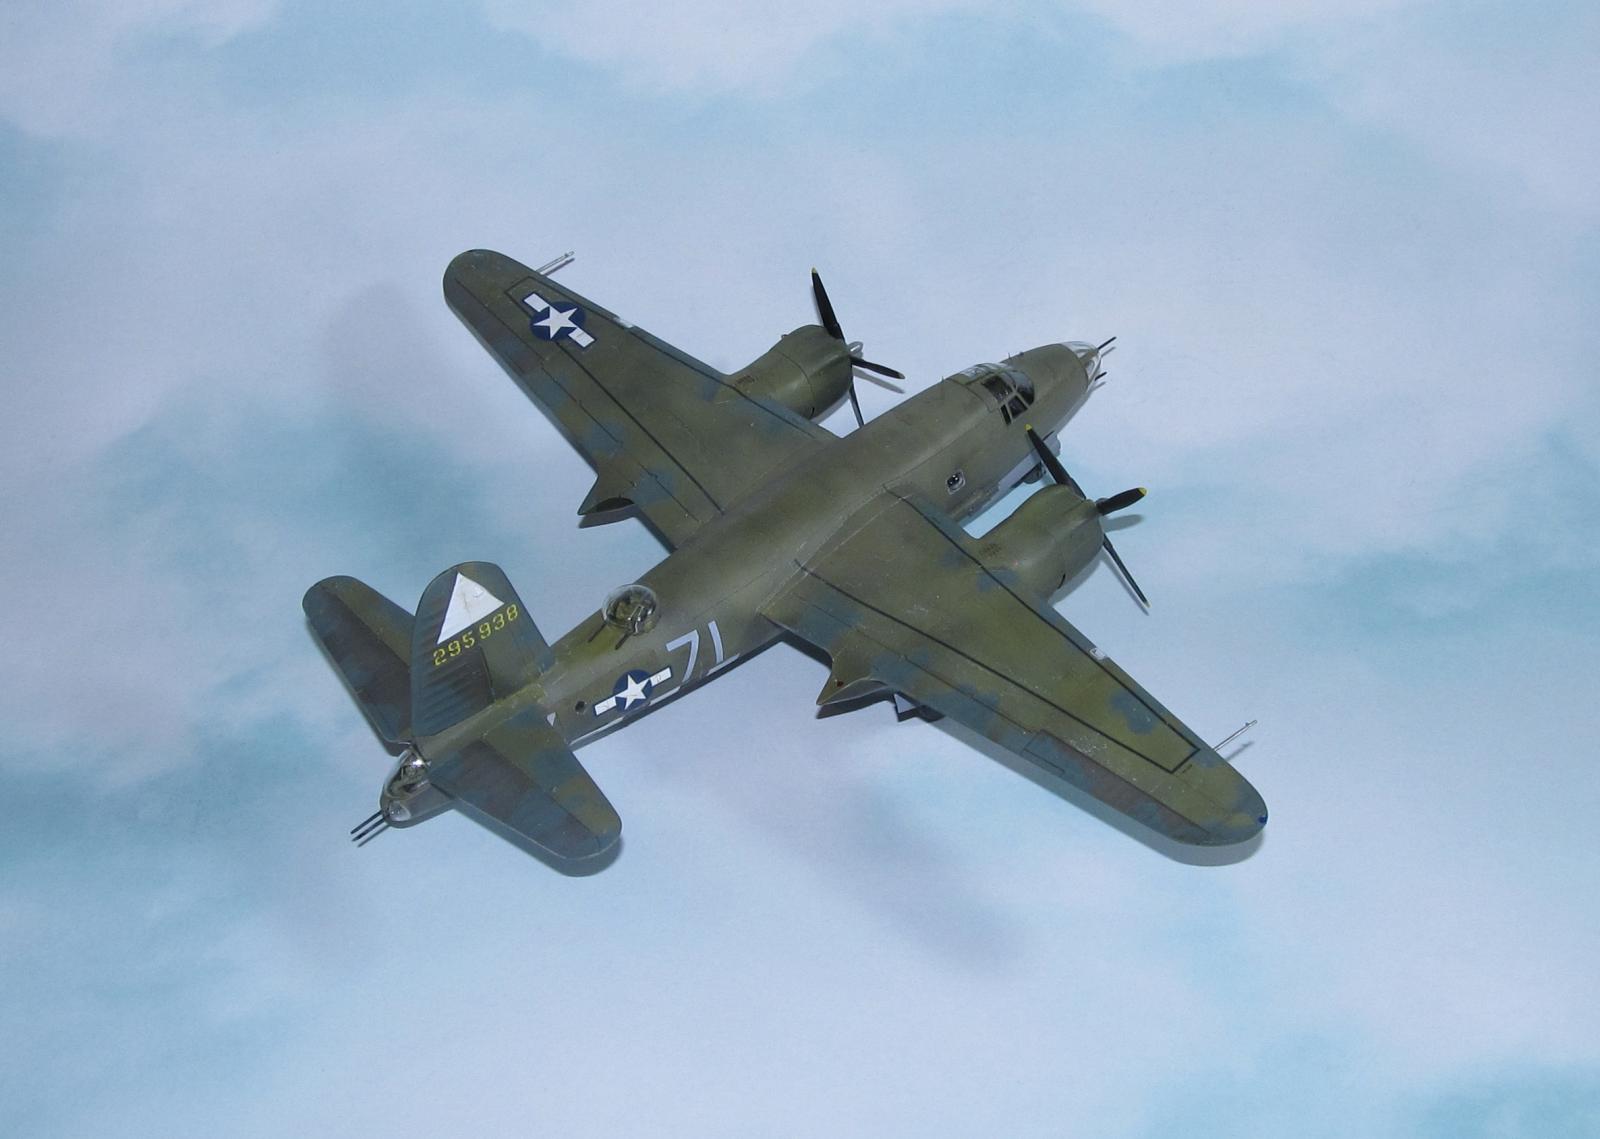
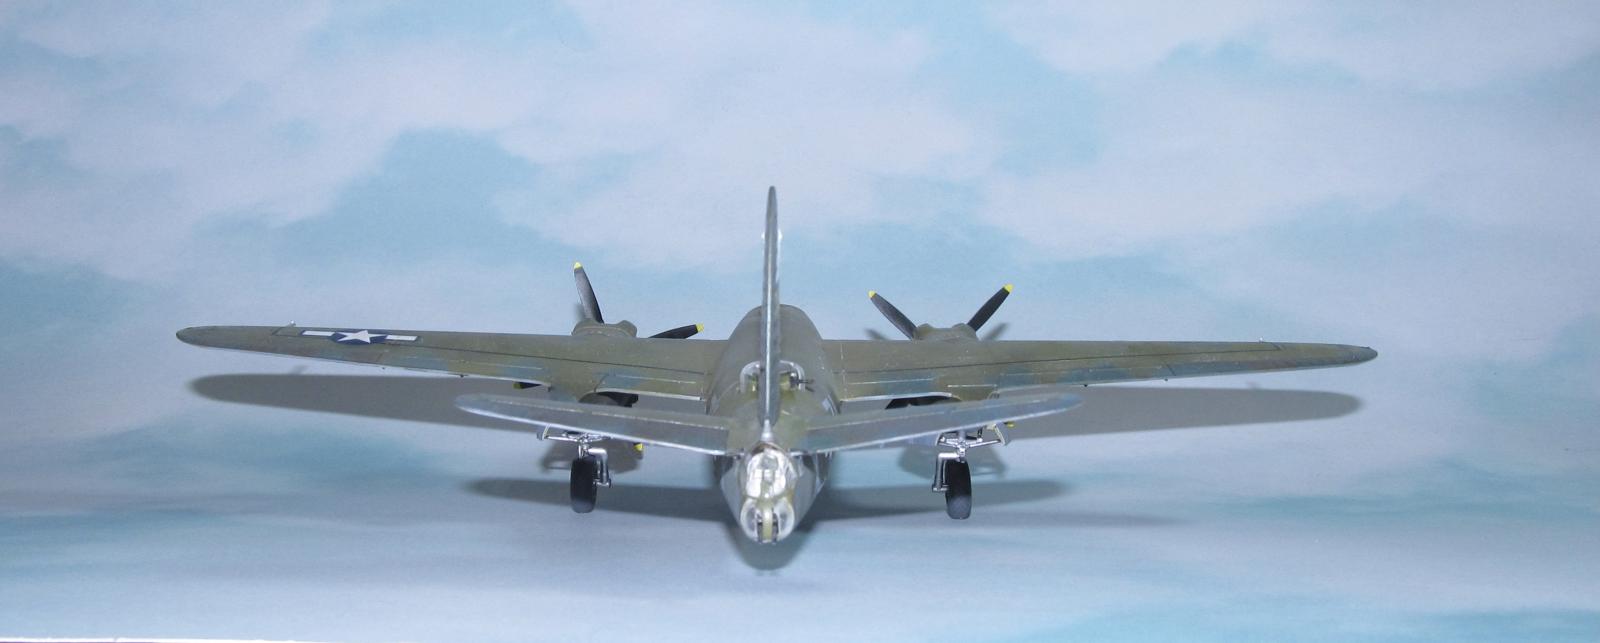
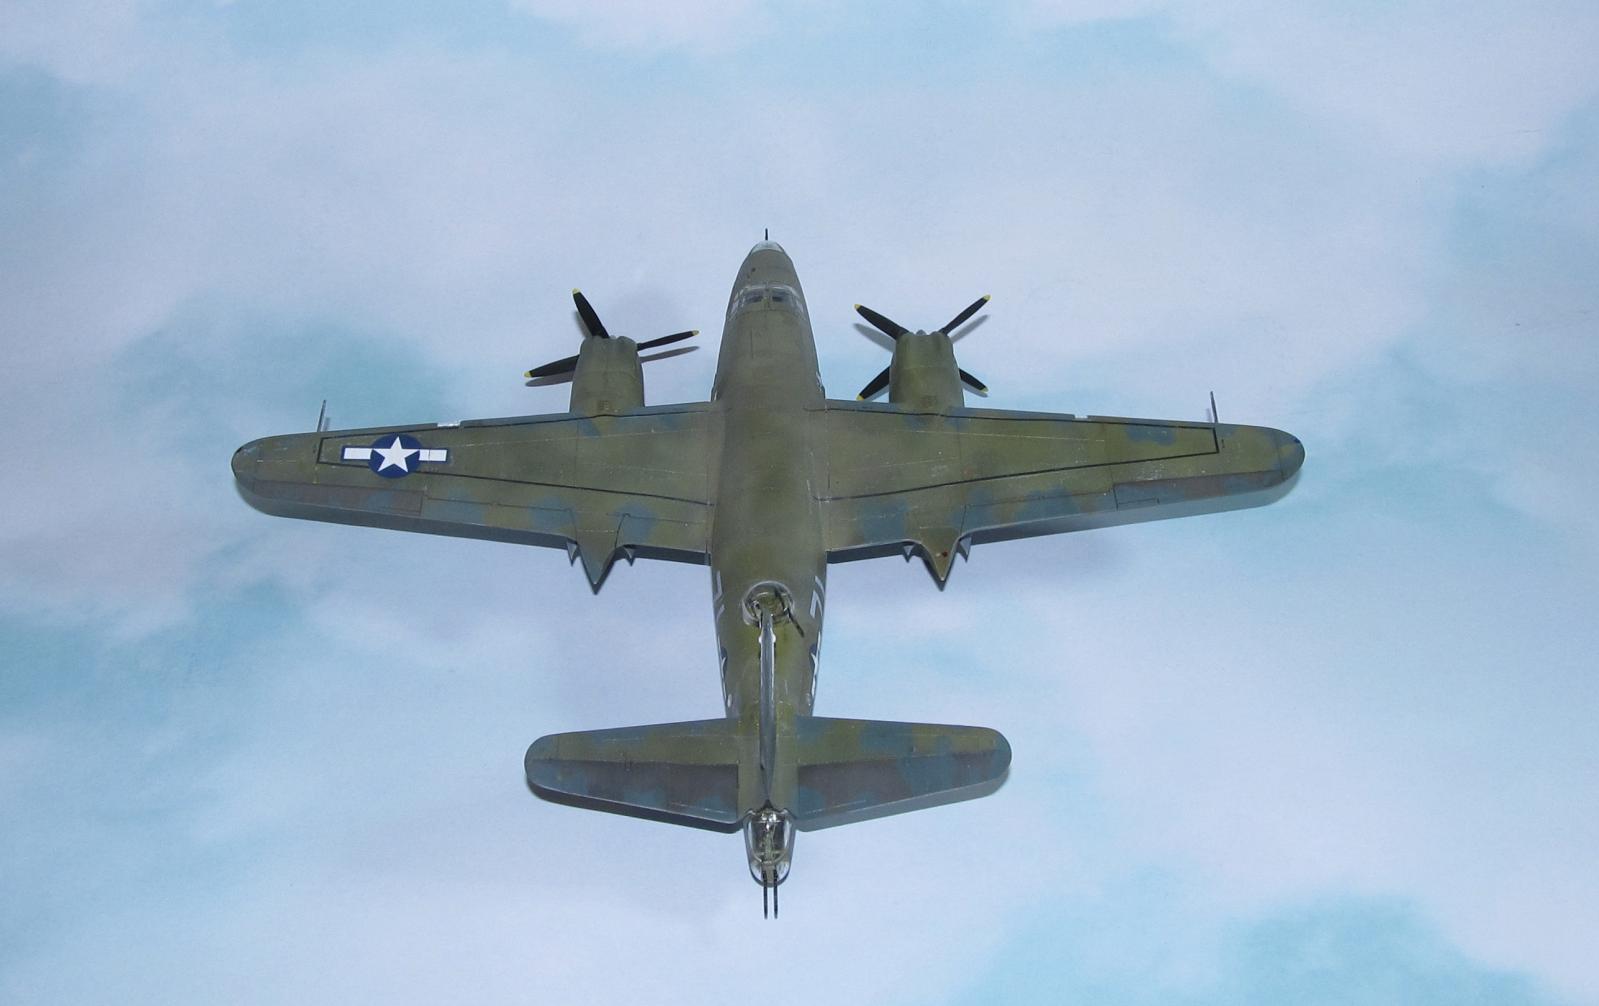
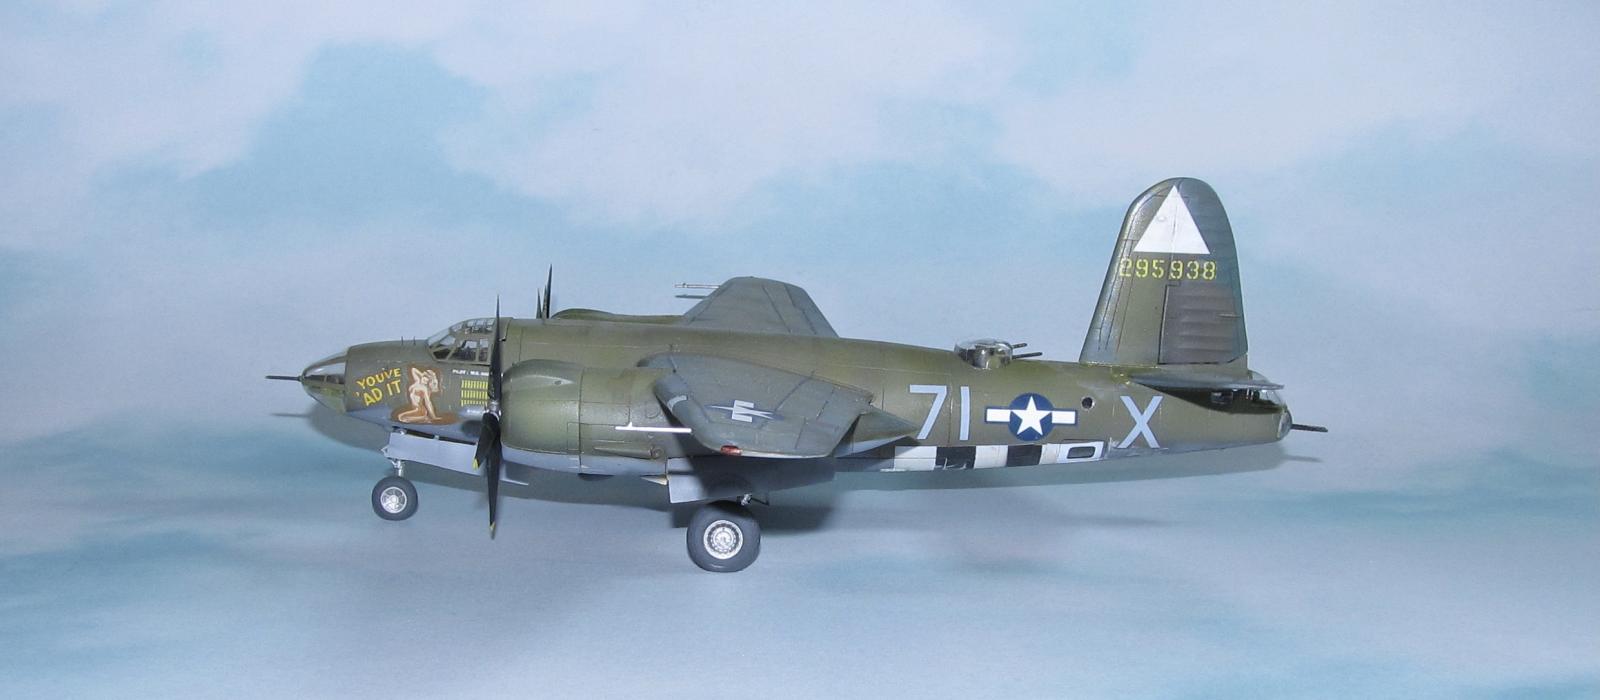
1/72 Eduard (Hasegawa) B-26B From "Wine Women and Song"
The 344th Bombardment Group (Medium) was activated in 1942 as a B-26 Marauder unit at Drane Field which was an auxiliary field of MacDill AAFB in Florida on Sept 8, 1942. It was a training unit till January 1944 when it transferred to England and assigned to the 9th Air Force whose job was to provide close air support for the invasion force whenever that happened. The 344th was initially based at RAF Stansted.
The “Silver Streaks” were assigned to bomb various installations in Nazi occupied Europe starting March 1944. They were selected as the 9th AF's lead bomber group for the Normandy invasion because they were one of the few units equipped with top secret Oboe navigation gear. They led the first bomber strikes of the Normandy Invasion and continued with supporting the British thrust into Caen, the Americans seizing St. Lo, Operation Cobra, the Falaise Gap and other actions on the Western Front. They were moved to A-59 in France and remained there for a majority of the time in France. After the war, their war worn Marauders were to be replaced with A-26 Invaders. However, in February 1946, the unit was sent back to the United States and in March it was deactivated.
The 344th was re-designated as the 126th Bombardment Group (Light) and assigned to the Illinois Air National Guard. Thanks to the Korean War, the unit was Federalized and sent to France on active duty. It remained in France till 1953 when the unit was paper transferred (men and equipment stayed in France) back to the Illinois ANG as the 126th Fighter Bomber Group and assigned to fly F-51D Mustangs. In 1955, it became the 126th Fighter Intercept Wing and flew F-84F Thunderstreaks and F-86L Sabres.
In 1961, the unit became the 126th Air Refuelling Wing flying the KC-97 Stratotanker (the tanker version of the B-29.) Eventually they would fly various marks of the KC-135 tanker. The 126th is still active of this writing (2021) at Scott AFB.
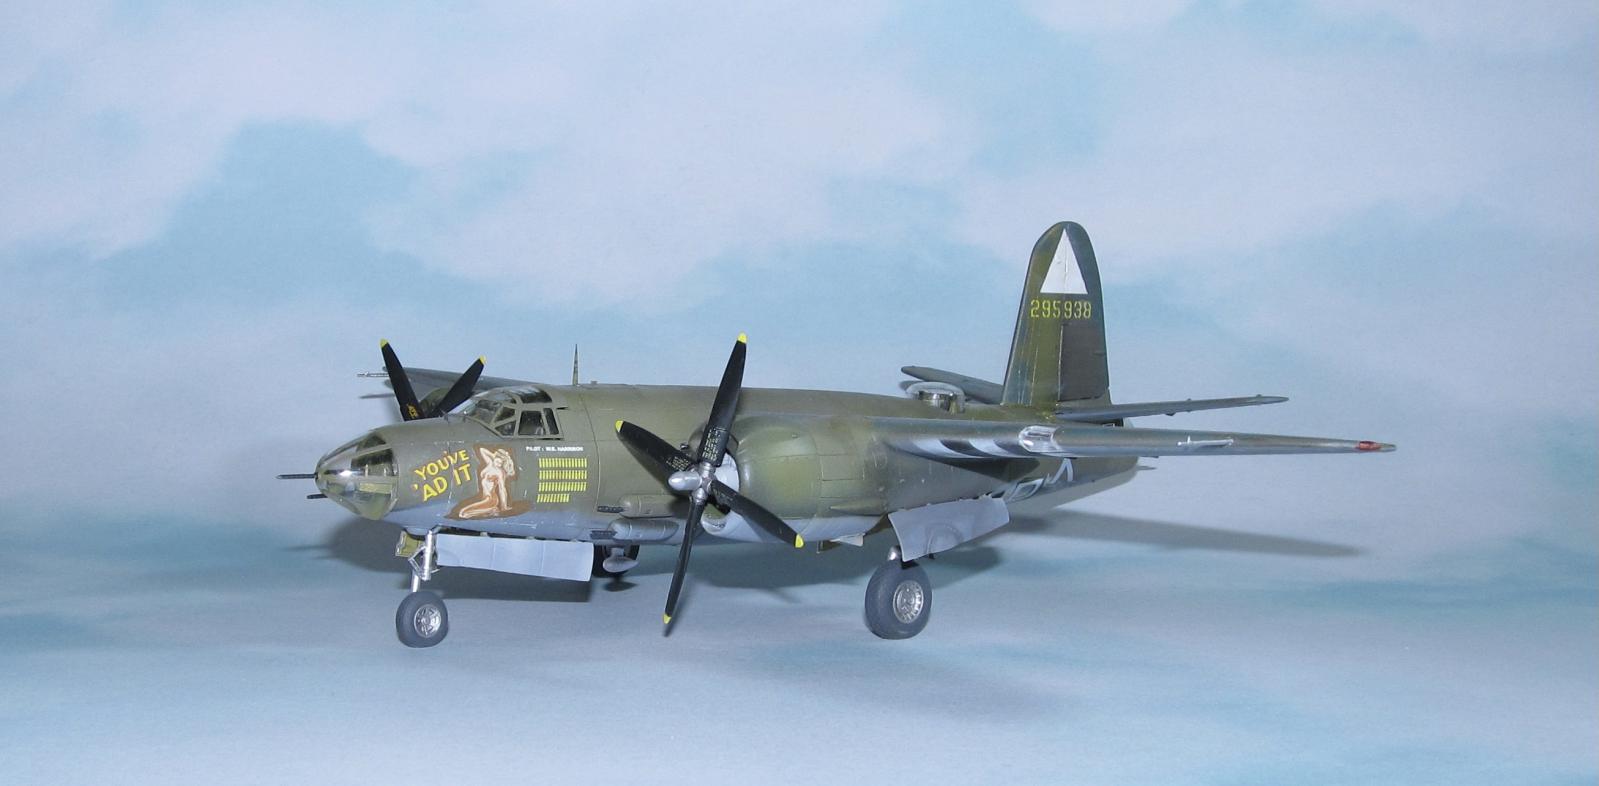
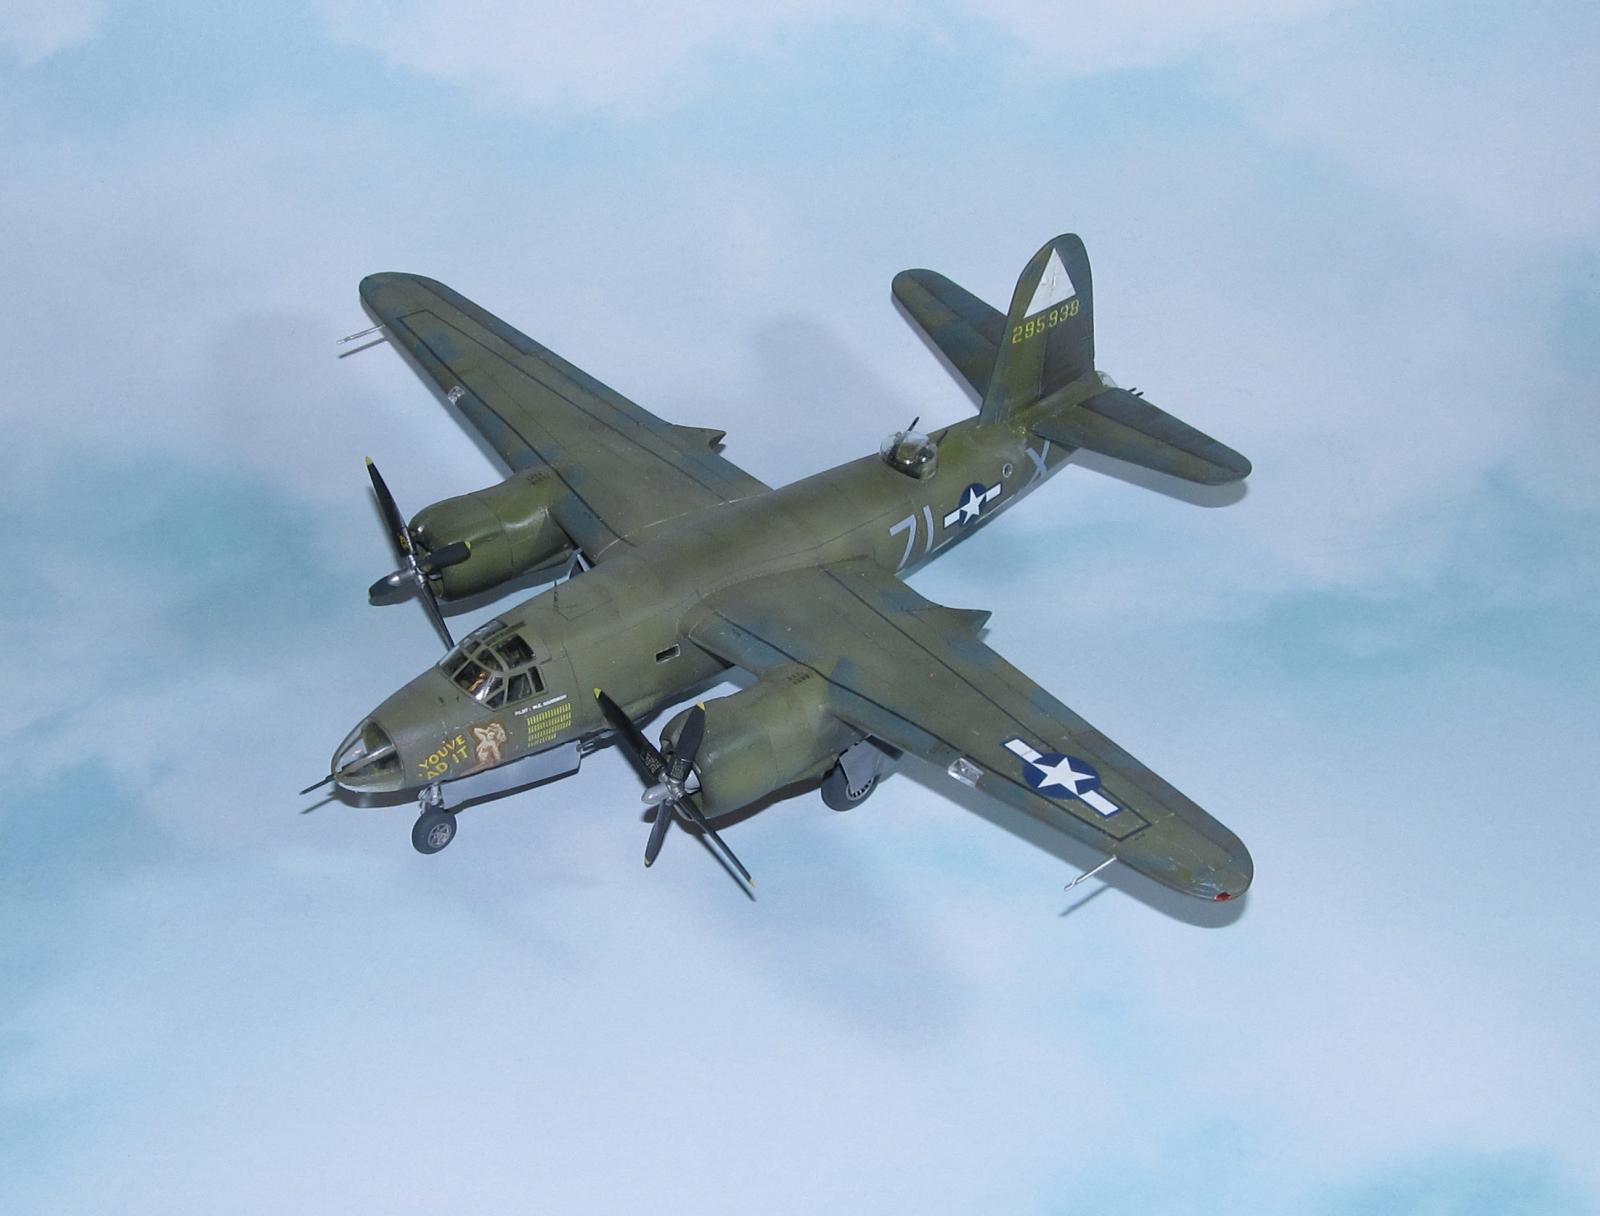
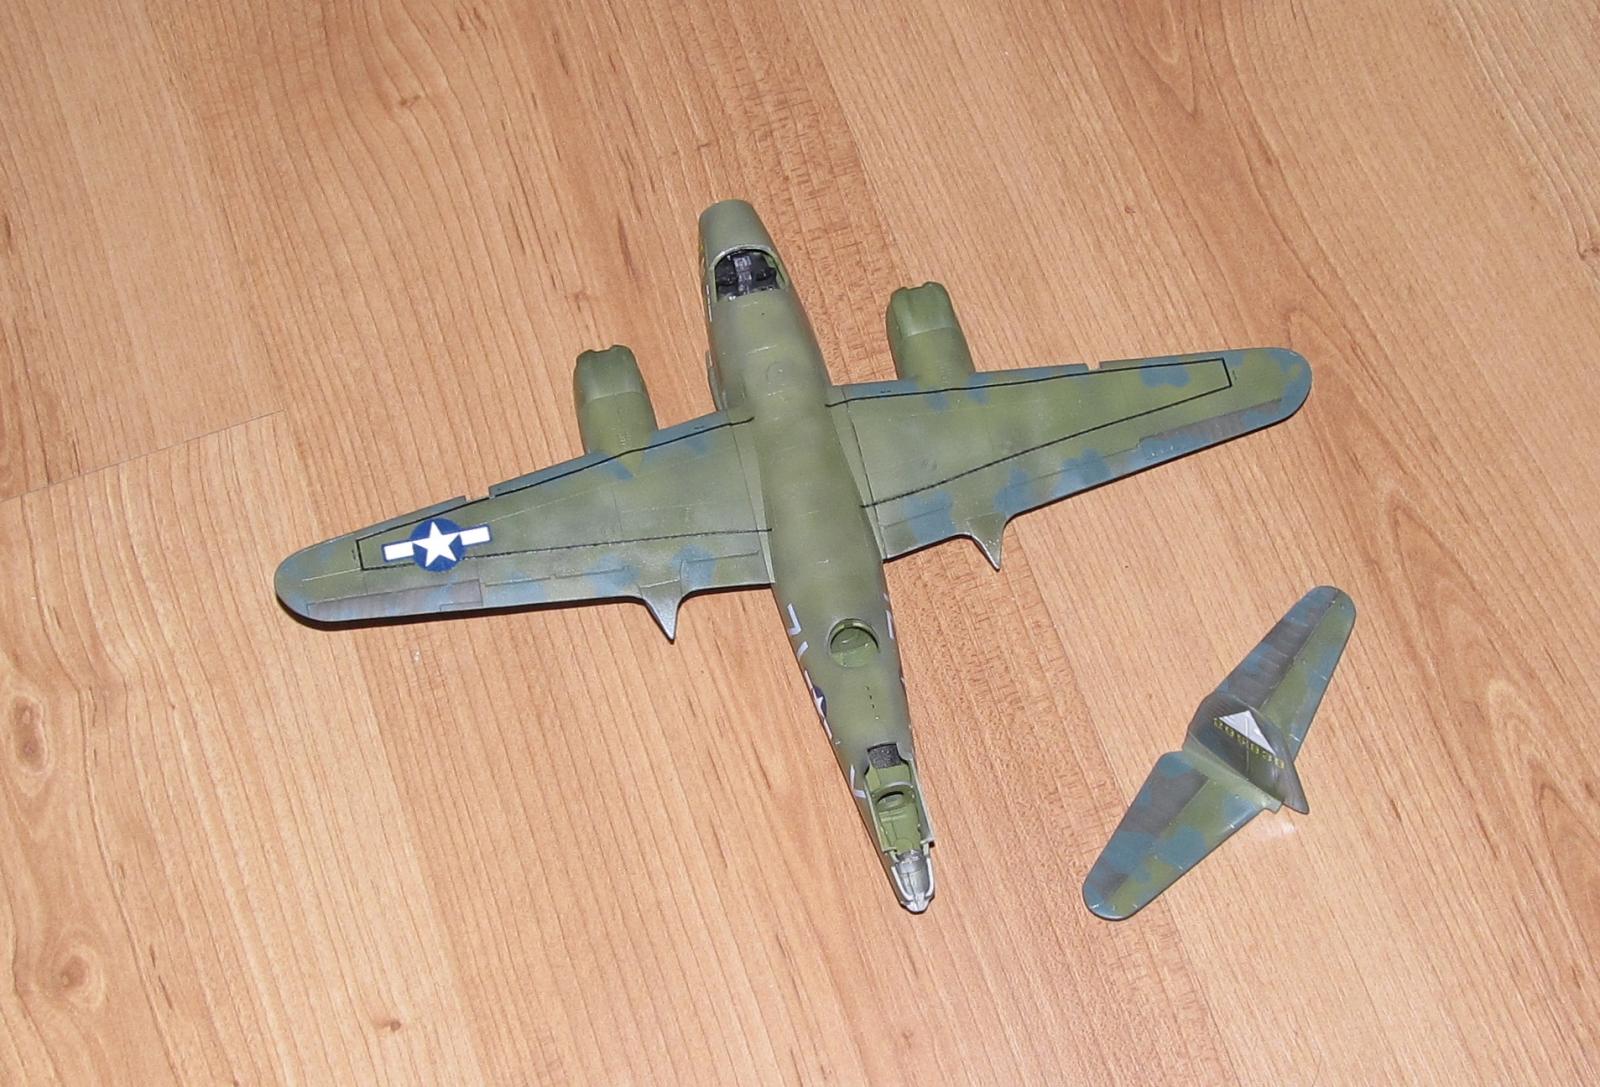
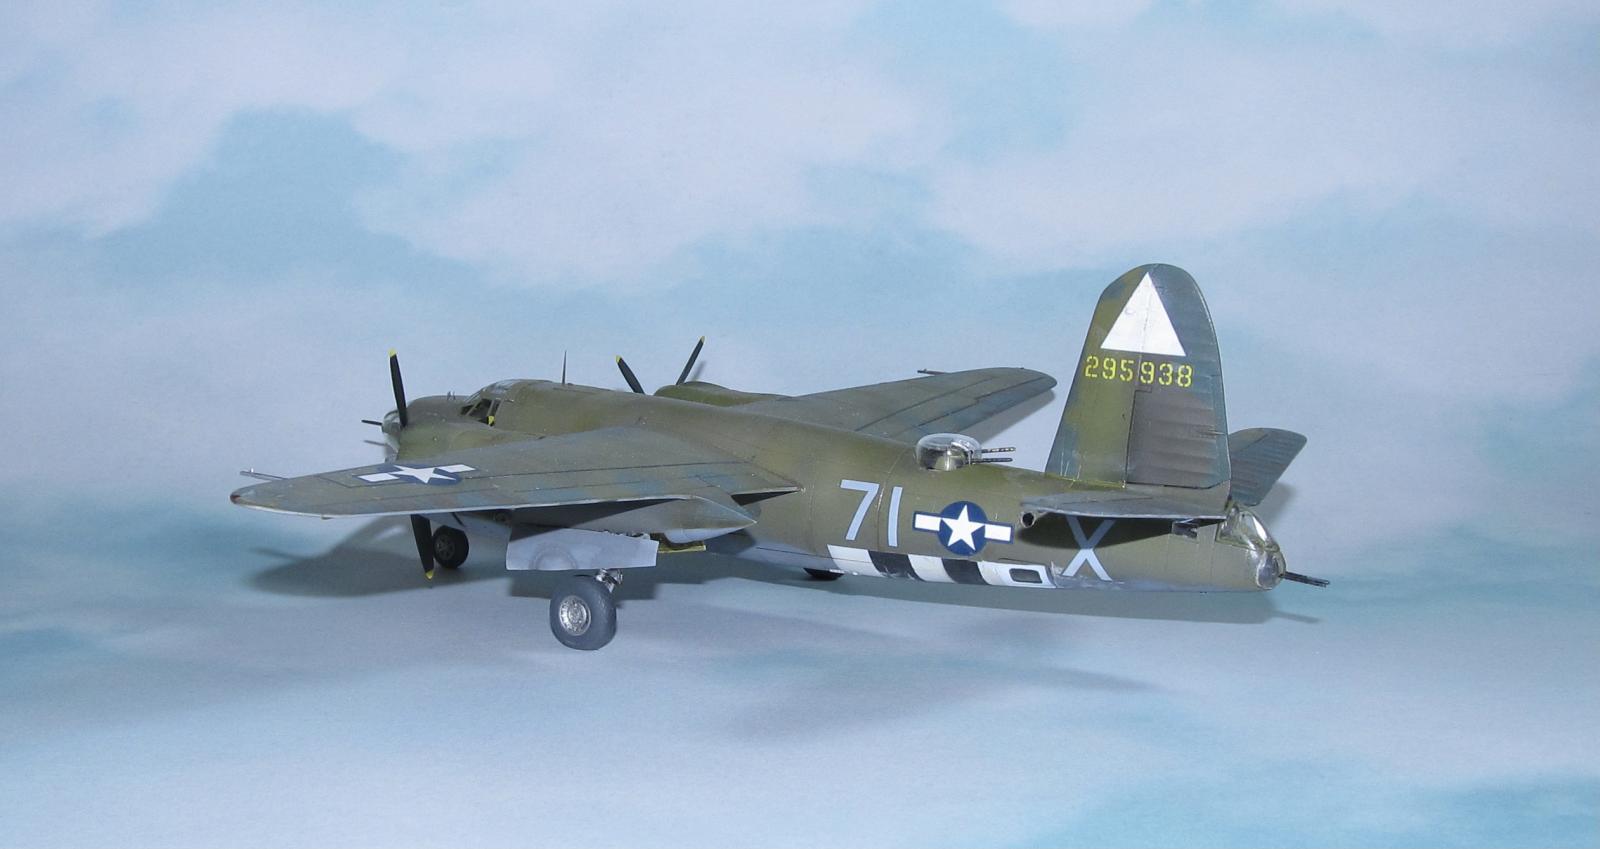
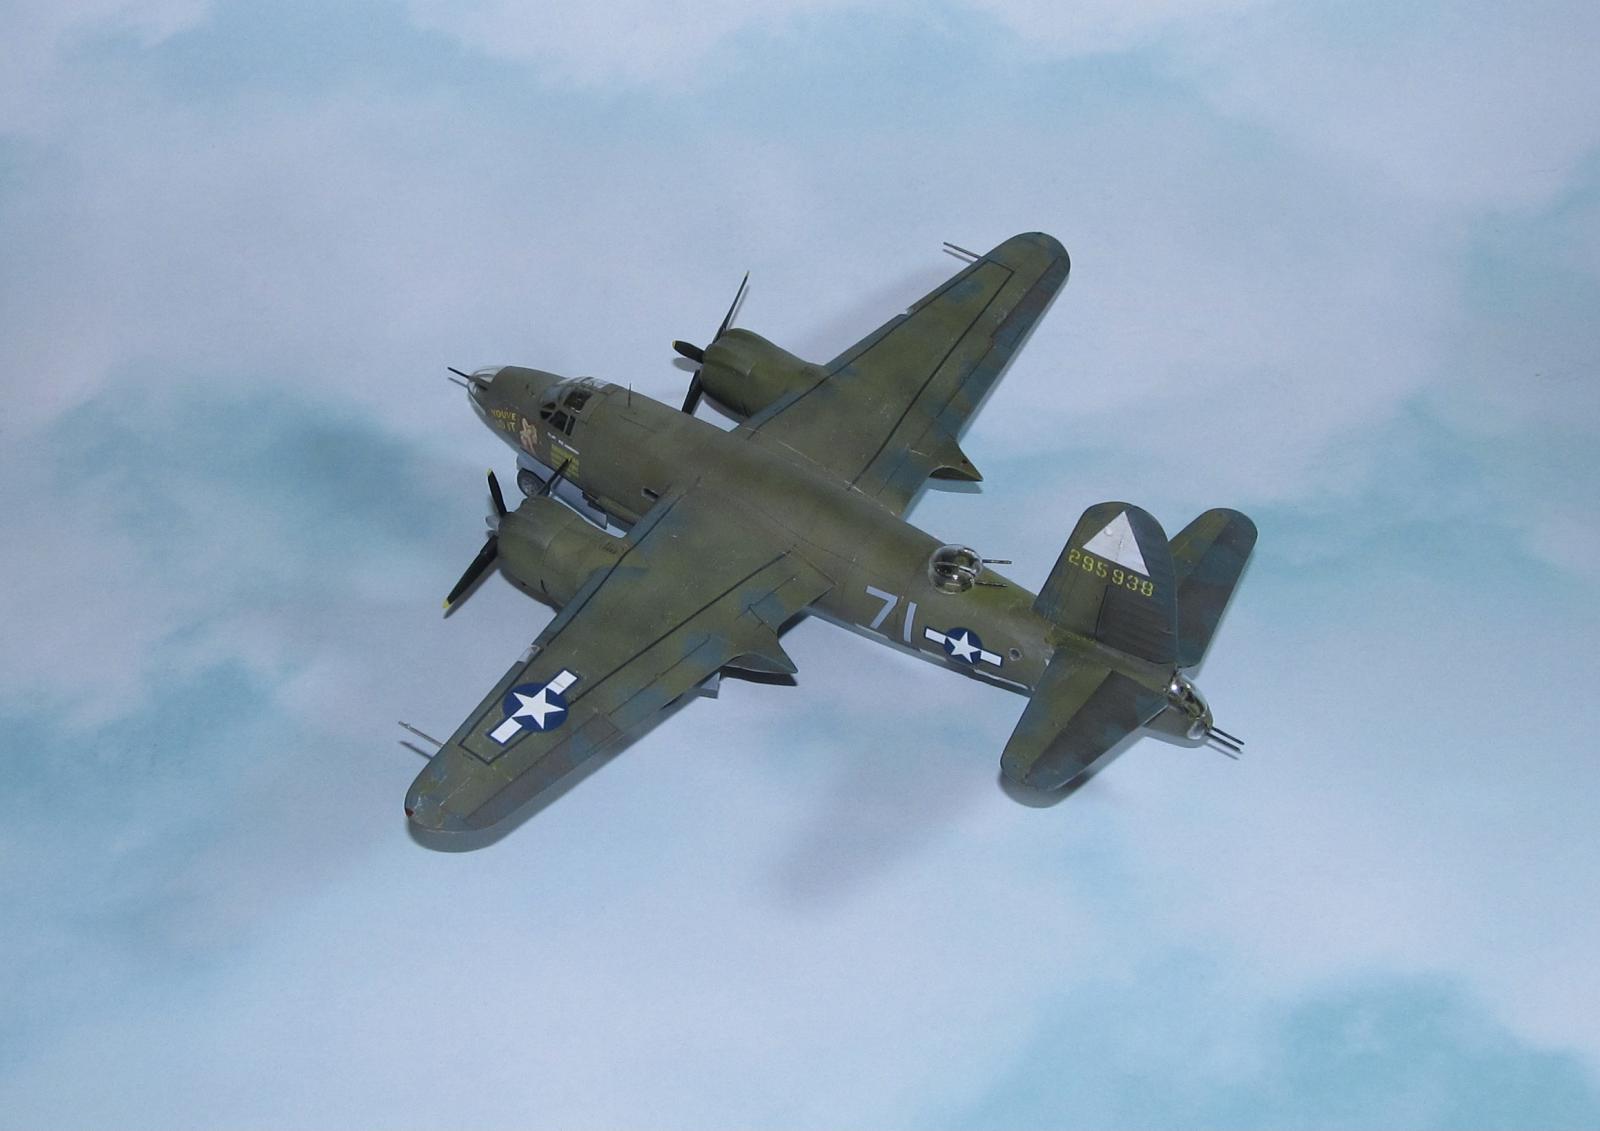
“You've Ad It” was actually the parts of two B-26 Marauders merged into one as the nose of 42-95952 and tail of 42-95938 were stitched together into one working bomber. Mostly notable for its nude female markings. Not much more information than that I could find in various internet searches. Not even Joe Baugher's extensive USAF serial number database could come up with more info.
It was flown by Captain Jack Havener (1920-2011) who grew up in Illinois. He worked for International Harvester his entire life from 1939 to 1942 and 1945-1978 with a 3 year gap serving in the USAAF 9th Air Force's 344th Bomber Group, 497th Bomber Squadron flying 68 combat missions.
The Kit
Hasegawa came out with an excellent rendition of the 1/72 B-26B/C and 1/72 B-26F/G in 2006. I am not an expert in the differences between the various models so I can not say which parts belong to which. What I do know is that these kits disappeared as quickly as they showed up here in North America as I was slow to purchase one and discovered to my dismay that the early bird does indeed get the Marauder.
Fast forward 13 years later and Eduard announced that they were going to release a reboxing with some photo etched parts, resin parts and a colorful decal sheet with markings from various ETO and MTO medium bomber groups. I was one of those that wasn't going to let my sloth get the better of me and ordered one as soon as it became available to preorder this kit.
The basic kit comes on 9 sprues of hard grey plastic and one large sprue of clear parts without much flash except mold marks.
It also comes with a couple of Photo etch frets containing cockpit parts as well as replacement parts for the interior of the bomb bay, the ignition harness for the engines and scissor links for the landing gear among them.
The special edition kit also comes with a set of resin wheels and a Khabuki tape masking set for the canopy and nose.
The main reason why this kit sold out so quickly is the beautiful decal sheet which contains markings for eight bombers of various medium bomber groups (with two different schemes for one bomber.) Five of the schemes have the basic olive drab over neutral grey and the other four are bare metal or bare metal with olive drab. Some markings also require the painting of invasion stripes. Seven schemes include some form of well done naked lady nose art.
CONSTRUCTION
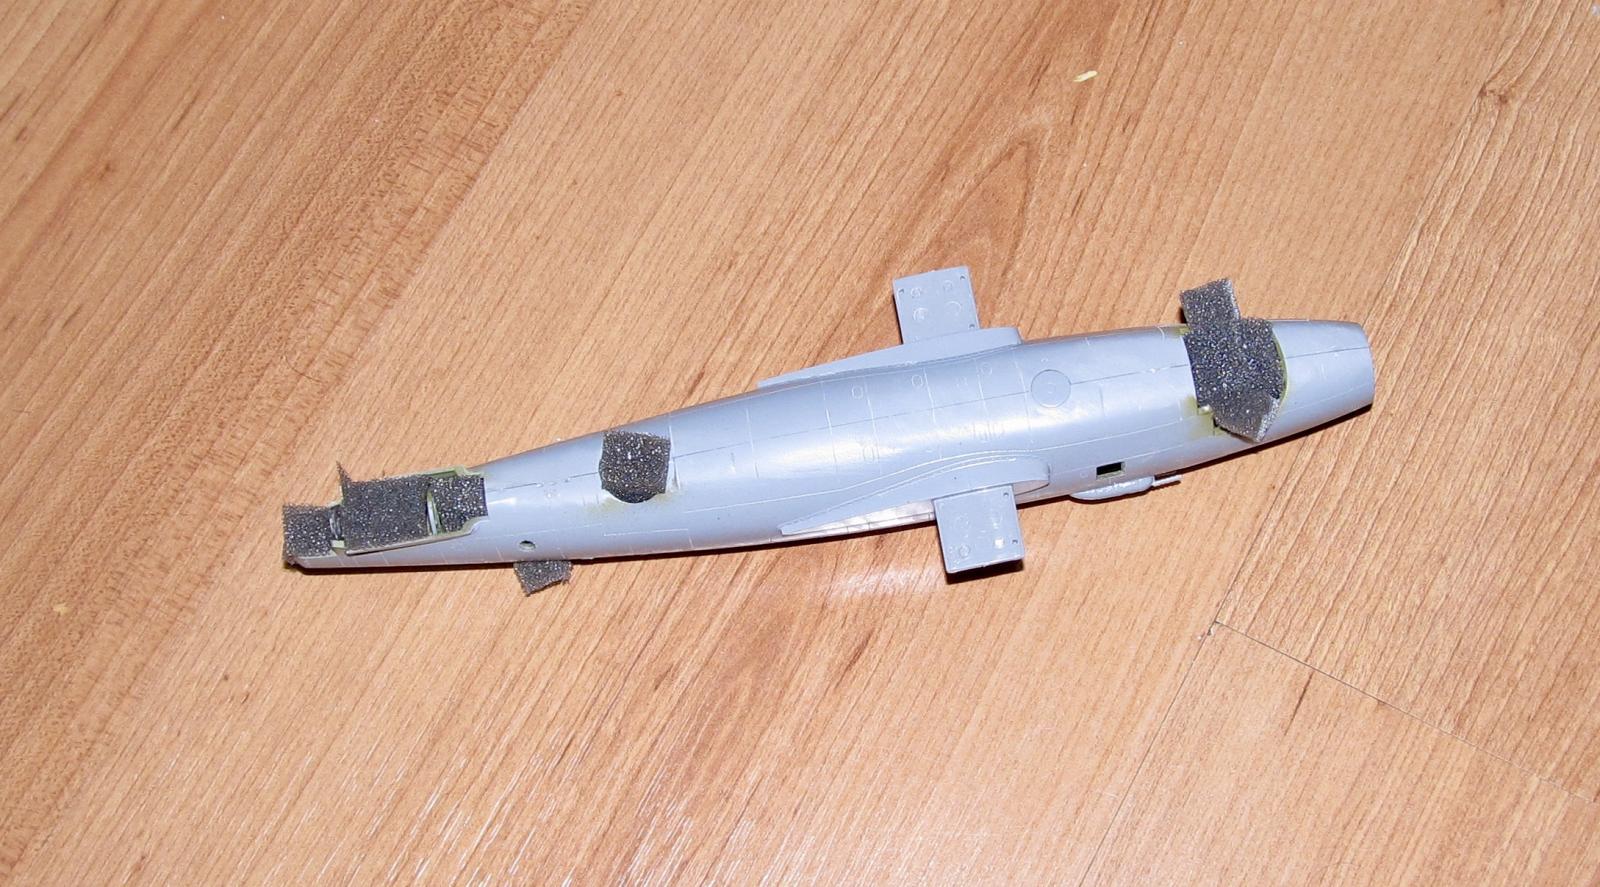
It all began with the engine nacelles. A large steel fish weight was put into empty space in the front of the nacelle. The plastic bits were inserted, painted as per instructions and glued together. I then glued the wings together and then added both wings to their respective nacelle piece. Despite being warned about the poor fit of the wing to the nacelle in other reviews of the kit on MM, I still had to deal with the gap and step. I poured in some CA glue to the area and sanded it smooth with various grades of sand paper and polishing cloths. I ended up rescribing some of the lost details.
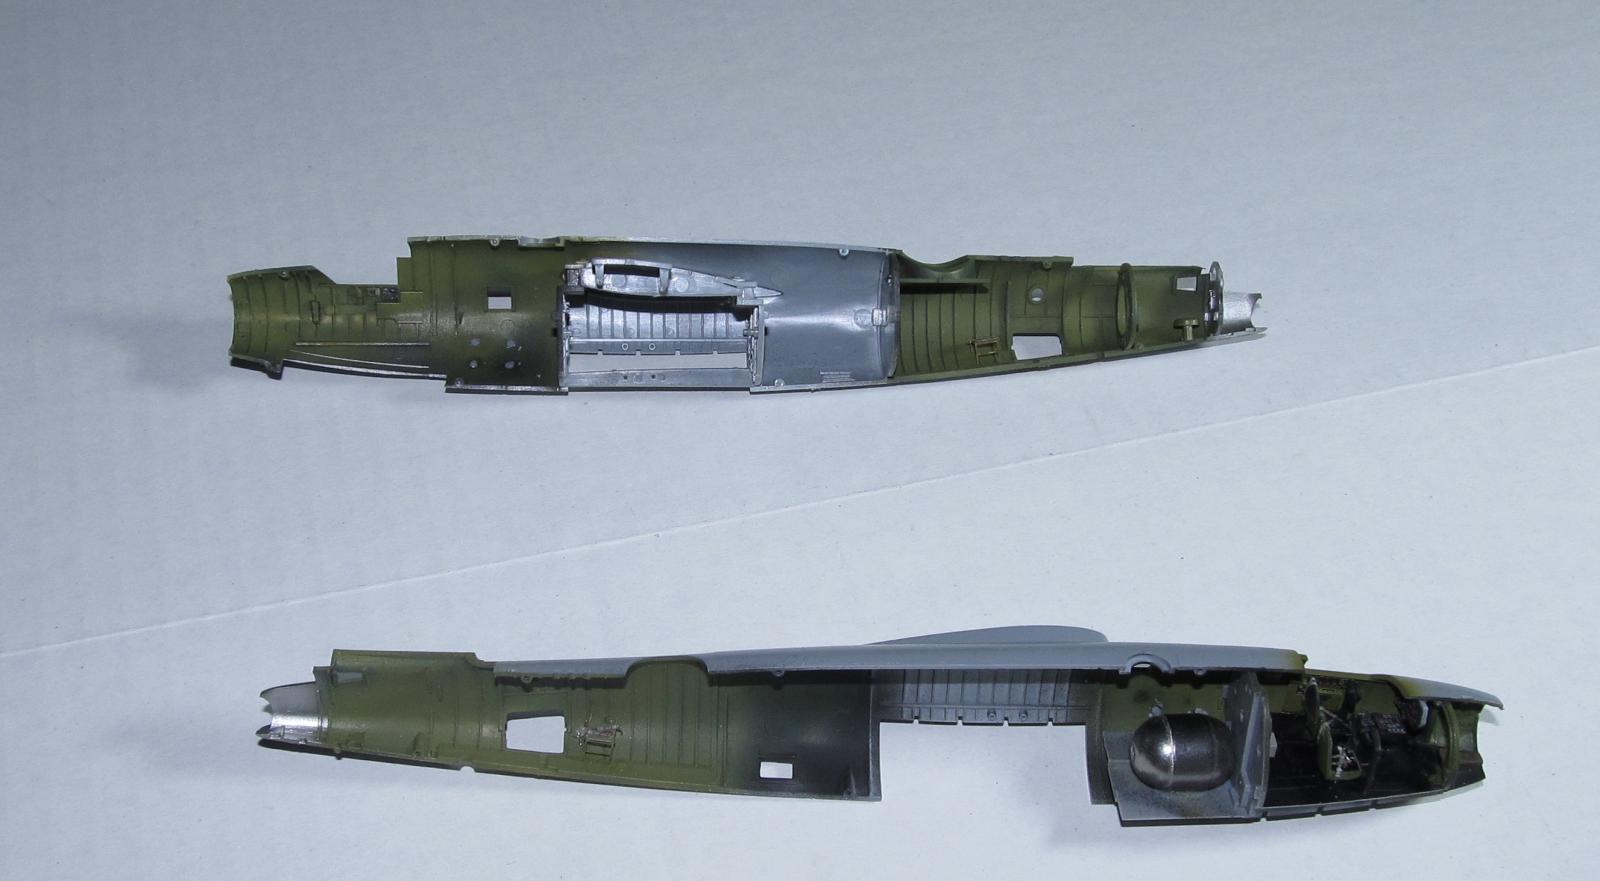
Next I started making the interior. The plastic parts were first primed with Stynylrez black primer and painted with Xtracrylix Interior green. I used most of the PE especially around the cockpit and left off all of the PE details in the bomb bay as I was going to close it up. Adding all the PE detail came around slowly as certain parts needed a number of PE to be added to it such as the instrument panel, seats, side consoles, machine guns and canopy. I opted for the “if I don't see it then I ain't doing it” plan to save me the extra headaches. A number of the interior parts which were mostly for the waist guns were not used as I could barely see them through the openings. The only area that got the full PE treatment besides the cockpit was the nose gunner/bombardier compartment as it is quite visible and open. More parts were used then not used when I dropped the main fuselage and the force of the drop knocked some parts off. I didn't want to crack open the fuselage again so I added those PE parts that I could easily fix while the harder to add PE parts were put into the spares box. Aside from my clumsiness, I didn't have any issues closing up the fuselage (I used CA glue to glue the visible seams and Tamiya extra thin for the rest of the interior joins.) Before I closed the fuselage up, I drilled out the holes for various items including the external gun packs. Note: as with the other reviewers here, I added several large fish weights to the radio compartment, painted the area black and glued the weights in place with CA glue.
One thing that stopped me for a while was losing the part that supports the rear machine guns. I ended up improvising and modifying a spare part strut from another kit into a close approximation of the rear gun mount complete with PE gunsights. Of course, I found the part in the carpet mere days after I completed the model.
As I was taking my time with the interior, I also built up the rear tailplane which is a bit unusual as it has a clear top part (for the rear windows) for the ailerons. I had to mask off the interior, spray it with silver paint then mask off the exterior before I glued it together. I did not have the best fit as the parts seemed misaligned and ended up sanding the edges off then filling/sanding the seams smooth.
I glued the wings and the completed tailplane assembly to the fuselage. The seams were dealt with using Perfect Plastic Putty and the excess wiped off with some damp Q-tips.
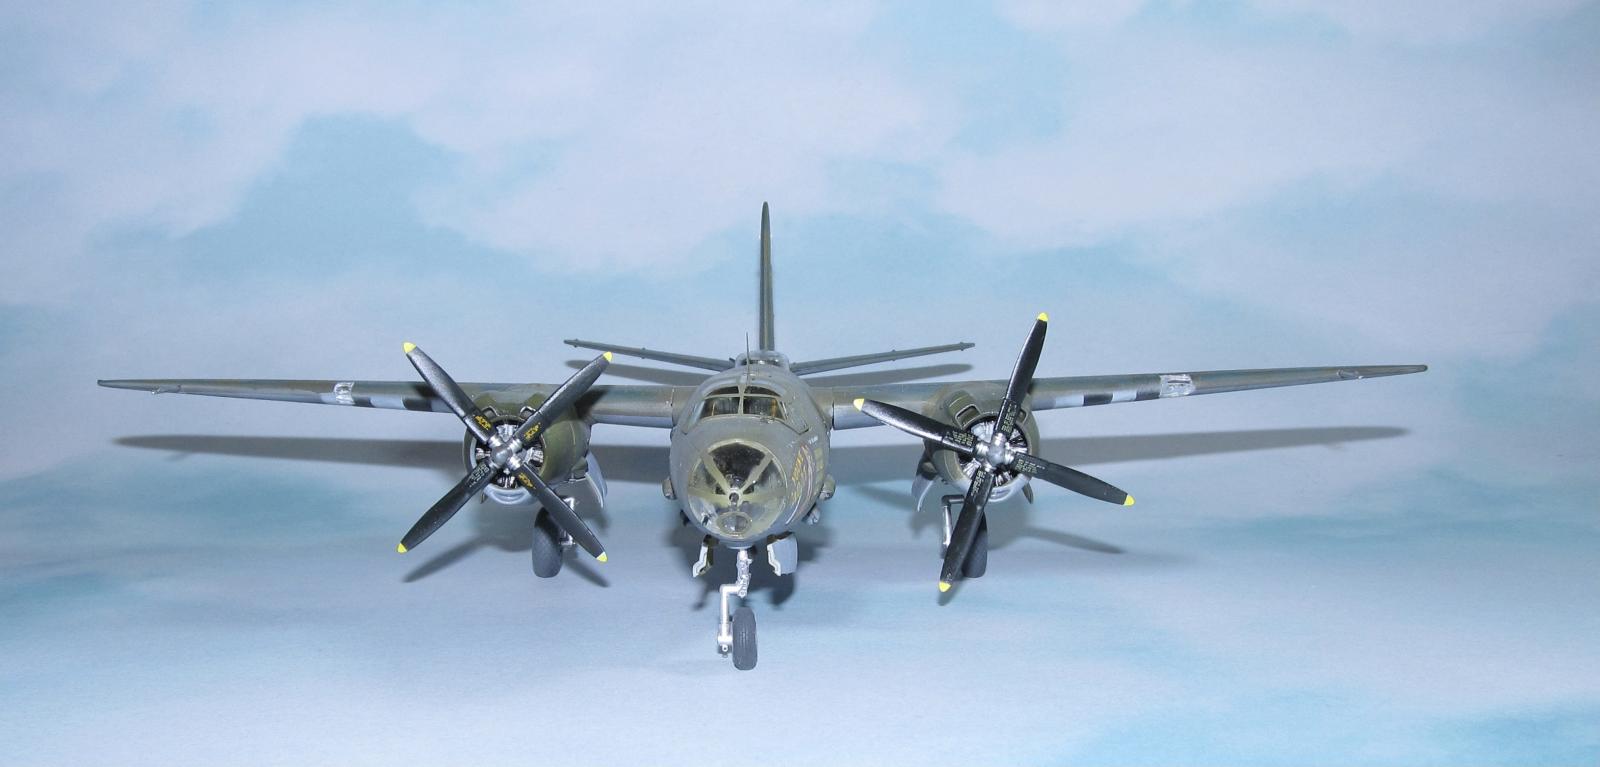
The propellers were painted and decaled as per instructions. I masked/painted the tips using Tamiya Flat white (as the first coat) and Flat Yellow instead of using the decals which never worked well for me.
COLORS AND MARKINGS
Painting
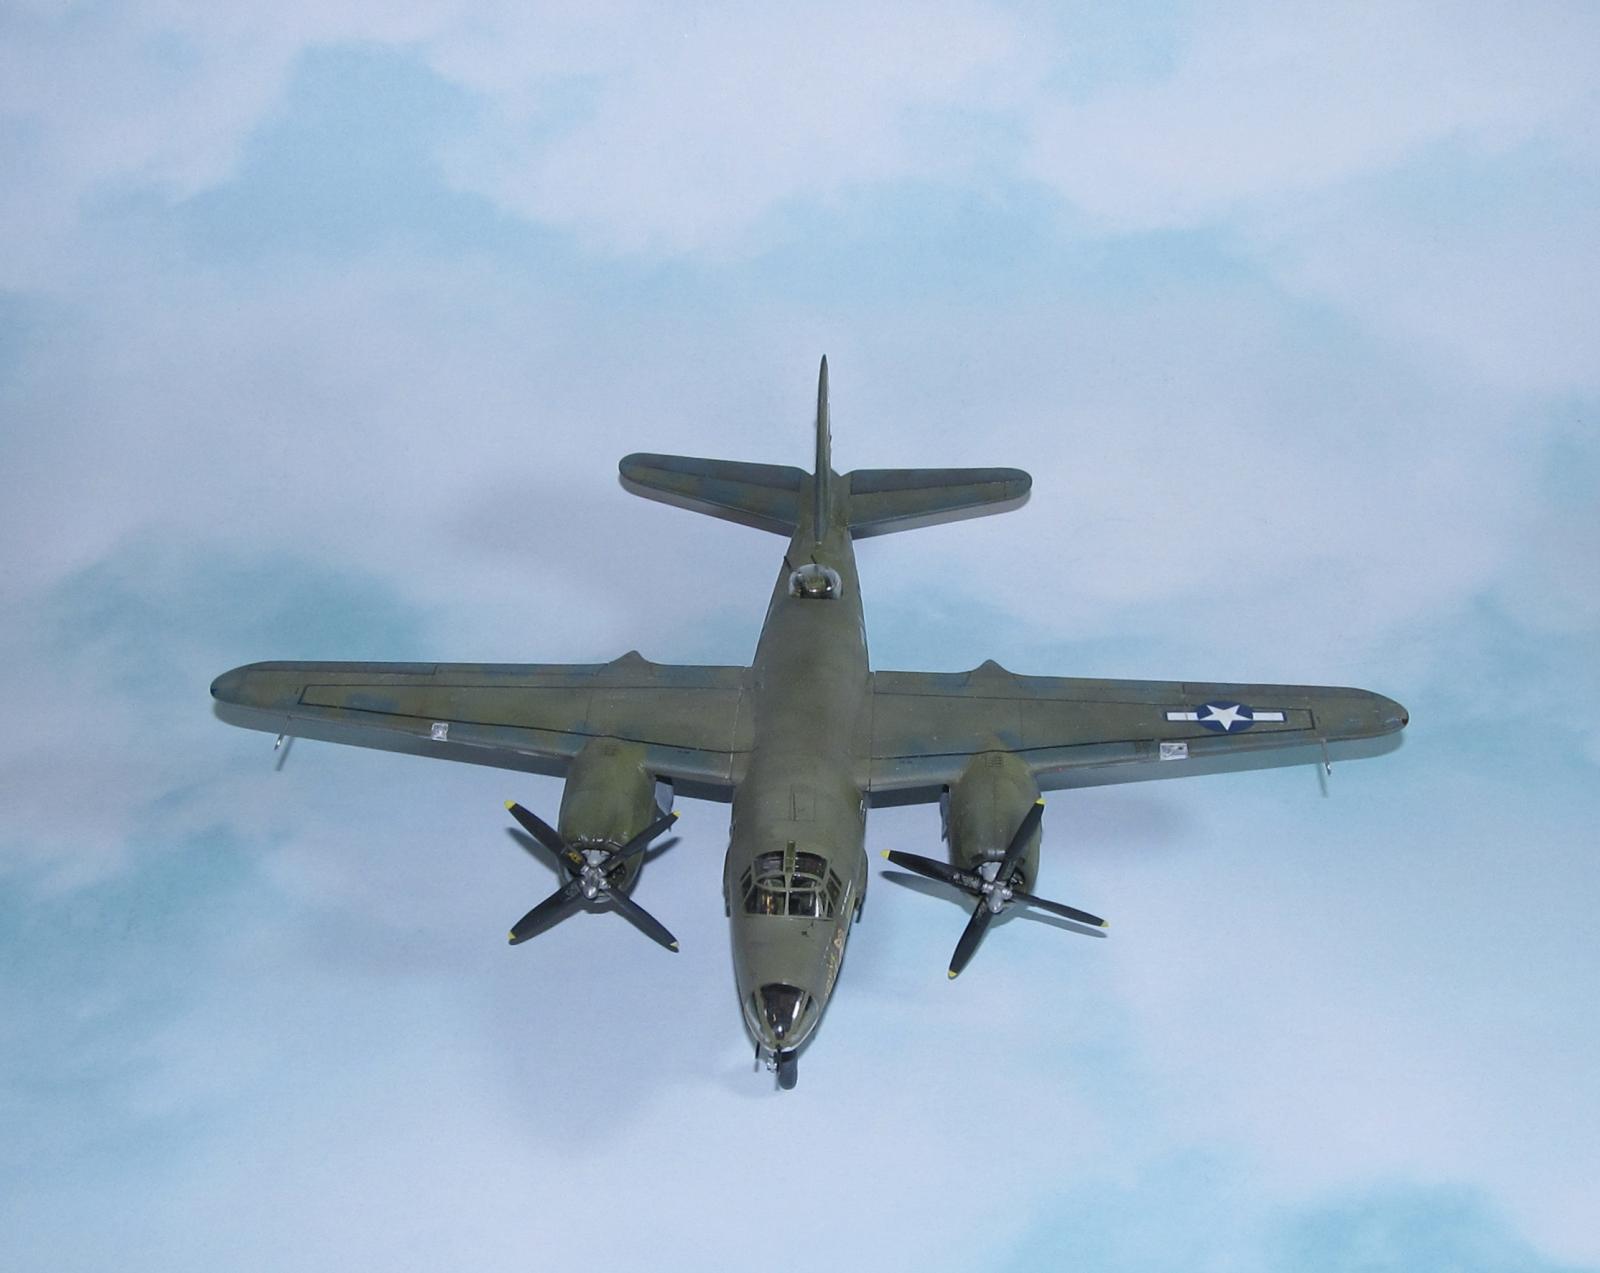
I masked off the various openings while gluing on certain things like the waist gun windows so I can paint those parts as well as the exterior. The model was first primed with grey Stynylrez primer and then sprayed on the Neutral grey in the thin coats to allow for the paint to look “weathered.” Once dry, I masked off the neutral grey areas and sprayed on Tamiya flat black. I roughly masked off the white stripes (to avoid the crisp lines that actually aren't accurate as invasion stripes were sloppily added in real life) and painted them Tamiya flat white in thin coats in an effort to mottle the paint and show a less than uniform coat.
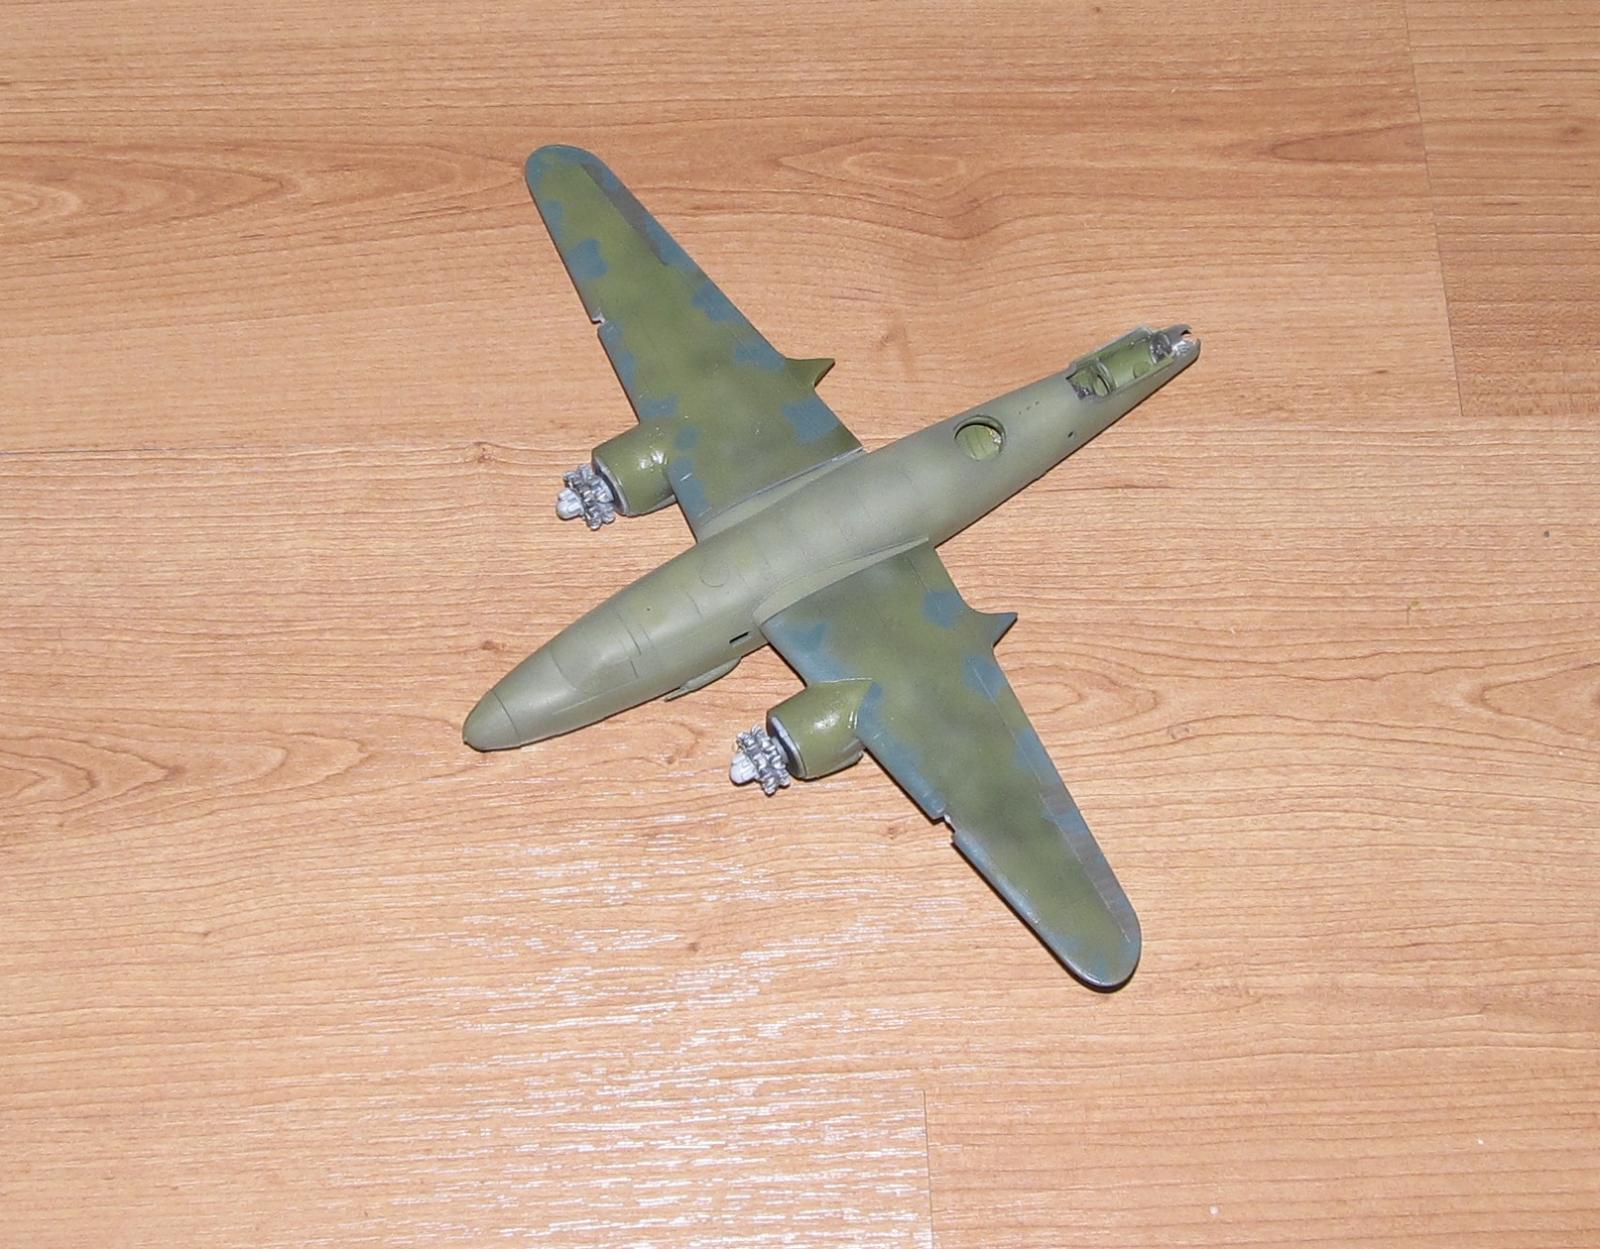
The olive drab was done a bit differently. I first sprayed on a thin coat of Tamiya XF-62 Olive drab then a thin coat of XF-51 Khaki drab. Once it was dry, I decided to spray on Xtracrylix faded OD in thin coats to get the worn out OD I was looking for. I masked off the various areas all along the wings using cut pieces of painters tape and then sprayed on Vallejo European Green FS34092 for the medium green lozenges.
I sprayed too much and had to redo them by painting them over with OD before I got them faded and mottled enough to my satisfaction.
The canopy was masked and painted at the same time. Interior green laid down first, then the various shades of OD and Khaki drab were applied in the same manner as the rest of the plane.
Once the paint was dry, I sprayed on a couple of thin coats of Vallejo Clear Gloss in preparation for the decals.
Decals
Fortunately, the B-26B doesn't need a lot of stencils so the decals were a breeze. No issues with the markings either. I did wet the surface a little so the decals would slide a bit rather stick. They snuggled on the detail with Micro Sol and Micro Set.
Weathering and Final Coat
I used a combination of watercolors and oil paints to do the weathering of the paint. Watercolors for the topside and oils for around the engine nacelles and underside. However, I tried not to over do it as ETO/MTO aircraft were in better shape than their PTO or naval counterparts.
The excess oil paint weathering was removed using turpinoid damp Q-Tips while the watercolors were removed with water dampened Q-Tips.
Once it was dry, the model was sprayed with Tamiya Flat which caused a reaction with something on the surface to look like it had been dipped in salt water. I was not very happy with this result. I sprayed on thinned faded OD over most of the crud, but left areas near the decals alone.
FINAL CONSTRUCTION
I glued on the various PE parts for the canopy which are minor details that might be seen on closer inspection. The clear parts were glued in with white glue. The trickiest piece was the nose dome which had all the extra PE detail for the machine gun (PE gunsight, ammo box and ammo belt) that needed some care to glue in place.
Next the landing gear was painted and glued in place. The plastic landing gear is sturdier than I thought even though I did initially think about getting white metal landing gear replacements. I had to trim the main landing gear pegs to get the painted resin wheels to fit in place. No issues there and did not use the PE wheel covers as they weren't needed in this paint scheme.
The midships turret was added without too much issue.
The painted and decaled props were inserted into the engines and the prop hubs glued in place.
Finally the landing lights were brush painted according to the instructions as well as various painted antenna and pitot tubes were added.
CONCLUSION
I really enjoyed this build despite the glitches along the way. In some ways, I understand why Hasegawa's B-26 series wasn't that popular (compared to the Hase B-25 which was released around the same time) even with the basic plastic as it is a lot of work, but it makes for a nice model kit with some care and the issue with the nacelles fitting on the wing while annoying isn't a deal breaker.
This fine kit isn't a model for a beginner, but definitely for a more experienced hand. Although this Eduard release is sold out (in its first month on the market) and I don't know when Hasegawa will reissue it again, but if you can find a Hasegawa B-26 Marauder then by all means get one.


Great write-up, Dan, warts and all, and you finished up with a good looking B26B, thanks for sharing this with us.
Thank you for the kind words.
Excellent build and equally amazing article, Dan!
Congratulations!
Thanks very much Spiros!
Amazing result, Dan @dbdlee
Great work on the painting.
Thanks for the historical part, a pleasure to read.
You're welcome. I enjoy doing some historical research on models I build.
Great work and Painting! Very realistic!
Thanks very much!
Great read and an excellent build. The overall finish looks great!
Thanks very much. Outside of the flat coat going salty on me, I thought it turned out well.
Thanks for sharing Dan . Looks Super . I like the foam masking technique ! I have not built a Marauder before . Pointers are well taken for future build.
I find foam stays in place a little better than my previous method of low tack tape especially in areas that have a lot of PE to protect.
Thanks.
Good article and a great model, Dan. I like it a lot!
Thanks Tom!
Nice Martin B-26 ! One of my favorites from the war.
It was a fun build. Thanks!
All the hard work paid off, Dan (@dbdlee). Model looks terrific. Thanks for the info on the build.
Thanks very much. Always a pleasure to write.
A beautiful build Dan! I lucked out a few months ago when our club was the recipient of a large stash of models from a deceased modeler, and I got the Hasegawa version of this kit! I'll use your article as a build guide.
Thanks. I hope it helps. A lot of weight is required to keep the nose down.
A fantastic build ,loooks great!
Thanks Robert!
My favorite twin engine bomber! You’ve done a fabulous job with this fussy kit! Well done!
It can be a fussy one for sure. Thanks for the kind words.
Nice work, Dan! I really like everything you’ve done on this.
Thanks very much John.
Very nice, Dan!
The B-26 is not one of my most favourite aircraft - but you make it hard Not to like this beast.
Great article and a great looking Marauder!
Thanks George!
BTW Dan (@dbdlee) - I just noticed the Hobby 2000 B-26 variants are available from Super-Hobby -Poland and looks like it’s the Hasegawa/Eduard Moldings!