Tamiya Lockheed F-117 Stealth Fighter, 1/48th scale USAF

Started by Chuck A. Villanueva · 53 · 3 years ago
  • Profile Photo
    Chuck A. Villanueva said 3 years, 4 months ago:

    Using the masks provided by Tamiya. I start with the lower GPS window.


    Next was to cover the upper GPS window.

    Next to mask the canopy. The serrated leading edges will be a fun endeavor. First covering the outer glass panels.

    Next was to mask the inside the glass section of the canopy. Leaving the edges of the frame bare to be painted black.

    Then Vallejo Primer Black is airbrushed on the interior frame work.

    Next to paint the sub assemblies and the lower section Flat Black.

    Once the lower section is done. I paint the upper section Life Color Gloss Black. Temporarily attaching the canopy to paint the overall top section.

    Now first to apply the top coat in overall black.

    Though it states Gloss Black, it actually dries similar to Gunze a semi gloss finish, which is ok.

    Have to remove the canopy to paint a bit of the section above the GPS window. As the front edge of the canopy overlays the top edge of the canopy opening.

    Taking NATO Black thinned down, I then lightly spray over each panel on the upper surfaces to break up the black finish. It looks overdone in the pics. As the camera flash tends to make the different shade almost look like Gunship Grey or similar color. But in reality it is not so contrasting. The clear coats following will even the finish much later in process.

    The interior masking is removed from the canopy.

    Here in the natural light the finish looks as I was hoping it will look in the end after the decal process.

    Decal time, more to follow.

  • Profile Photo
    Erik Gjørup said 3 years, 4 months ago:

    Firing a flash at the paint in contrast to natural light looks like two different worlds. I like the result as seen in natural light - very nice Chuck (@uscusn)

  • Profile Photo
    Chuck A. Villanueva said 3 years, 3 months ago:

    Yes Erik the natural light does show blotching much better than the interior light tends to diffuse the actual finish.
    Now time to decal. Not much in markings and stencils for the F-117. Starting at the bottom.


    With the future clear coat airbrushed 24 hours before. Stencils in Lt Grey are added as well as a red warning stripe. The Caracal decals are performing well over the surface. Using the Microscale system.

    Next going over the top. Nose to tail. Again decals settle nicely over the finish.

    Once the decals set. Vallejo Flat Clear Varnish is then airbrushed over the air frame and then left to set 24 hours.

    Now to remove the maskings from the canopy and windows. Starting with the lower GPS window adjacent to the nose wheel bay.

    Then carefully removing the masks from the canopy.

    Now to start on the landing gear.

    Starting with the nose strut.

    The retracting arms are then attached.

    The hydraulic pump is then attached to the strut assy. Then before installing into the nose gear bay, it is painted Tamiya Gloss White.

    After painting the nose gear strut assy is then placed into the nose wheel bay. The actuator arms first and then the strut.

    Now the main landing gear struts are next to install.
    .
    The oleos are painted with the Molotow Chrome tip marker. The struts themselves are not as complicated, 2 parts to assemble. So an easy install with a good contact point with in the wheel bay.

    Next the final details, gear bay doors and weapons.

    More to follow.

    1 additional image. Click to enlarge.

  • Profile Photo
    Chuck A. Villanueva said 3 years, 3 months ago:

    Now getting to the nitty gritty.

    First to attach the nose gear door. This door hangs at a 90 degree angle.

    There are 2 doors used for the main gear. One opens front to back and is right behind the main strut.

    The main door opens inward from the wheel bay. These can be posed closed as well. I chose to have these open. All three doors fit very well and should stay in place without being knocked off just moving the plane around on the shelf.

    Now standing less the wheels. The gear is quite sturdy.

    Now to attach the bombs to the weapons trapeze.

    First the racks are attached to each GBU.

    While the bomb rack set.

    A quick view of the upper GPS window and then with the canopy in place temporarily closed.

    I will attach the nose sensors on each war head. A touch of smoke behind the lens.
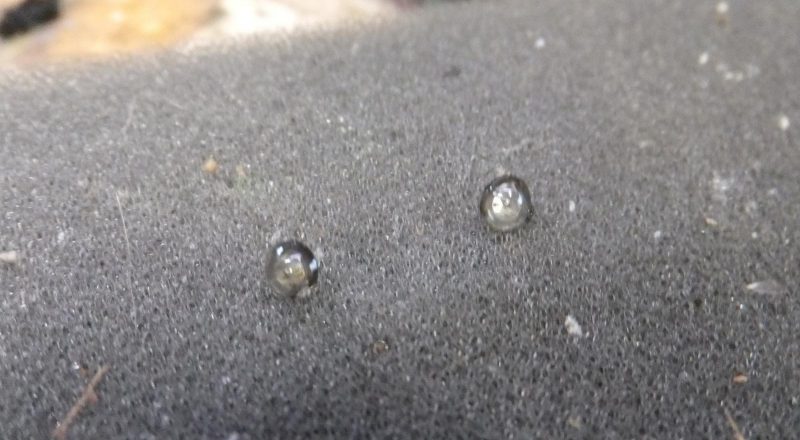
    Next a set of "Remove Before Flight" flags are prepped using copper wire that attaches to a lock on the pylon.

    One flag on the center of the bomb and another that is normally wrapped and attached to the war head.

    One bomb in place on the trapeze mechanism.

    Next the weapons bay doors are have the retraction actuators attached and each door put in place on the center divider of the weapons bay. The process repeated for the other door.

    Testors Rubber in the small bottle is used to paint the tire on the nose wheel then attached to the nose gear strut.

    Next up the main wheels .

    I hand painted the tires on the mains again using Testor's Rubber enamel using the capillary method in painting them.

    Dipping the tip of the brush in Thinner then just a touch where the tire meets the rim of the wheel, the thinned rubber enamel runs around the rim. Not always 100% but a bit of touch up and weathering will cover any discrepancies.

    Then the main wheels are attached to main struts.

  • Profile Photo
    Chuck A. Villanueva said 3 years, 3 months ago:

    Now in the cockpit, attach a set of side upper panels to each side of the upper instrument panel.


    Next the Hud is assembled and in place on top of the IP.

    Finally the canopy lift shocks are attached to the canopy and the assembly attached in back of the cockpit wall.

    And thats a wrap.

  • Profile Photo
    Erik Gjørup said 3 years, 3 months ago:

    Fast trackin' the bits and pieces - what a ride! I do like the small extras and details you put in this big smooth black plane, bringing it to life. Very nice Chuck (@uscusn)

  • Profile Photo
    Chuck A. Villanueva said 3 years, 3 months ago:

    Thanks Erik, giving it some character as it is rather plain otherwise. So posing doors open and dropped flaps add to the overall visual effect.

  • Profile Photo
    Spiros Pendedekas said 3 years, 3 months ago:

    Adding all those many bits of character makes this Nighthawk shining, Chuck @uscusn!
    The amount of detail put on several areas of this kit is simpl;y amazing! it is true that the Nighthawk might look a bit sonplistic (toyish?) if plainly built, yours looks totally amazing!
    What a ride indeed, my friend!