Heller 1/72 Alpha Jet ”Patrouille de France”

Started by Spiros Pendedekas · 55 · 3 years ago · 1/72, Alpha Jet, Heller, Patrouille de France
  • Profile Photo
    Spiros Pendedekas said 3 years, 5 months ago:

    Hi everyone!

    This is my 1/72 Heller Alpha Jet, that I intend to build as a wheels up Patrouille de France bird!

    The Heller kit is a sweet little kit, with good molding, nice, clear instructions and promising decals!

    I have a deadline for it, 30th of November, in order to send it to a great French friend who lives in Bordeaux, as a Christmas present!

    Congratulations to GB host, my friend Allan @kalamazoo, for running this great GB!

    More soon!

  • Profile Photo
    Allan J Withers said 3 years, 5 months ago:

    Spiros my friend, welcome to my group, thanks for joining, I have a couple of these to build myself so I'll be taking notes !

  • Profile Photo
    Spiros Pendedekas said 3 years, 5 months ago:

    Putting it together

    This is going to be a wheels-up Alpha Jet and will be intalled at a base when finished.

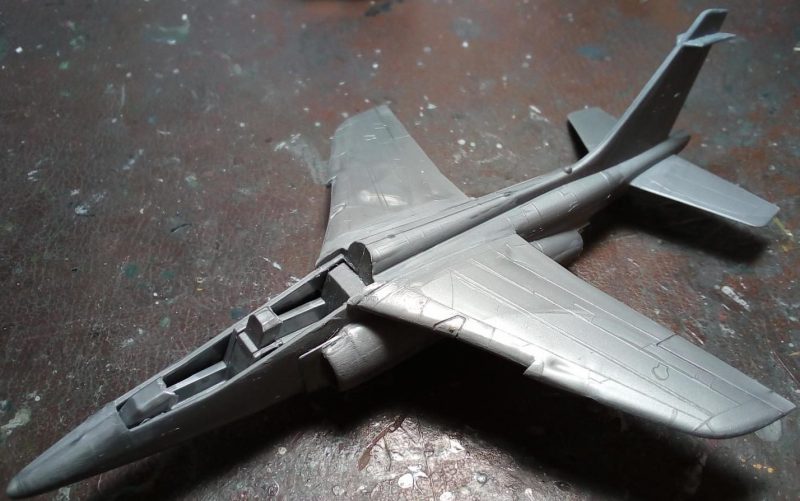
    I first glued the two fuselage pieces together, then inserted the cockpit tub underneath and glued it in place, followed by the under fuselage part and the characteristic central carrying pod underneath, which I believe is the smoke generator.

    The wings are a two piece affair each and were assembled as well. Here is the result:

    .

    The bulbous mini nosed was lost somewhere (I think my little son, QC2, is responsible...).

    No worries, as this kit contains all parts to build all versions; so I glued the pointy nose on, planning to file it down. The air intakes, consisting of two parts each, were attached too. Sone careful fitting will definitely pay off here!

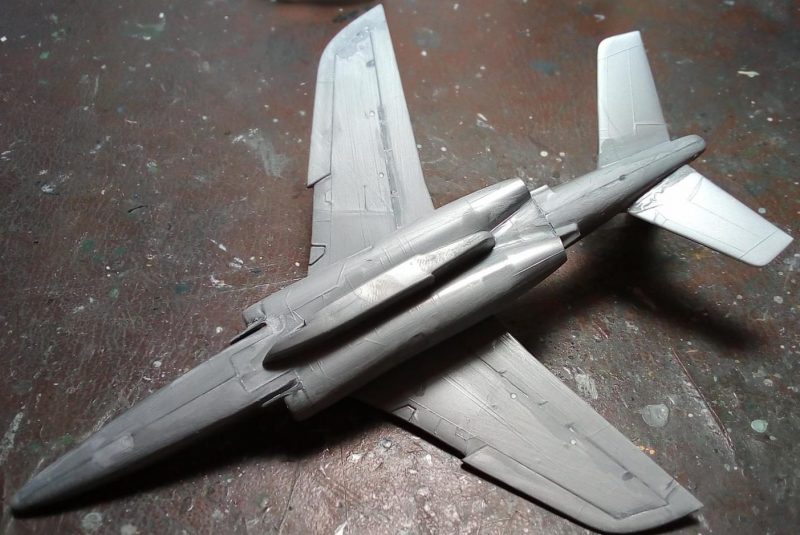
    The fit of the wings to the fuselage presented large gaps, so, they were attached with liquefied styrene, that oozed out of the gaps, acting as filler. The rear stabilizers were glued on too, as well as the gear doors, the finlets and the cockpit consoles.

    To glue the gear doors shut, I had already glued suitable pieces of styrene from the inside, so the doors would have a steady area to adhere to, apart from the fuselage borders. I have learned this trick the hard way, when som doors went into the assembled AND painted fuselage, never to be found again...

    After curing, the whole model was given an initial coarse sanding to even things. Here are the results:

    .

    More to come!

    Cheers, Aerobatic GB!

  • Profile Photo
    Erik Gjørup said 3 years, 5 months ago:

    Now that was a speedy build of this beautiful plane. Perhaps by the PFP QB department? I'll be trying to catch up on this build as it progresses.

  • Profile Photo
    Spiros Pendedekas said 3 years, 5 months ago:

    Thanks, my friend @airbum.
    In fact odds are that QC2 is already responsible for the loss of the bulbous nose, but no harm done!
    You can be reassured that a lot of VNE exceed flights will take place! Thank goodness it is a sturdy design!

  • Profile Photo
    Spiros Pendedekas said 3 years, 5 months ago:

    Puttied!


    ...and liquefied styrene for those nasty sink marks

    More to come!

  • Profile Photo
    Allan J Withers said 3 years, 5 months ago:

    Going well Spiros, those rotten sink holes !

  • Profile Photo
    Spiros Pendedekas said 3 years, 5 months ago:

    Yep, my friend Allan! Nasty indeed!
    After smooth sanding, three more liitle sink marks were taken care of Humbrol putty:


    Cheers!

  • Profile Photo
    Erik Gjørup said 3 years, 5 months ago:

    Puttying along nicely my friend 🙂

  • Profile Photo
    Spiros Pendedekas said 3 years, 5 months ago:

    Thanks, my friend @airbum!

  • Profile Photo
    Spiros Pendedekas said 3 years, 5 months ago:

    Ready for some paint!


    As you can see at the following pic, the scheme is quite intricate:


    Some special masking will be needed...
    Decals are provided for SOME of the white areas, say, the most "delicate" areas. I will avoid to use them and I hope I will succeed, as the tonal variation is not expected to be unnoticeable...
    Let's see how things will go...
    Oh and did I mention that Heller kits are really sweet, no matter the small bugs!

  • Profile Photo
    Erik Gjørup said 3 years, 5 months ago:

    and now a straight and clean bug 🙂 (ref your comment my friend)

    I think I would go for white primer and then the white areas, mask off the red and white, paint blue, mask blue and white and paint red, if you catch my drift? That way there may not be anything for the white areadecals to do, just small text ad stencils and all.

    Looking forward to seeing this one in paint. Gonna be smashing I think! Bring it on Spiros.

  • Profile Photo
    Spiros Pendedekas said 3 years, 5 months ago:

    Yep, I think this is how I will proceed, my friend @airbum!

    More tomorrow? Or, with QC/1 and QC/2 VERY PRESENT, not that much?

    Will I be able to find that crucial 1-hour gap for spraying? (you know, half hour for brush setup, actual job and wrapping up + half hour for possible mishaps dealing...)?

    "Mystery to me...", as per the starting lyrics of the amazing "Private investigations" Dire Straits song...

    P.S. ...I know, I know, I cannot hide my soft spot for Heller kits...

  • Profile Photo
    Spiros Pendedekas said 3 years, 5 months ago:

    Oops! No light shades first?


    I decided to apply the red first and the blue afterwards, ending with the white...
    This way it will be easier for me to do the masking, or so I think!
    Let's see where this painting rules diversion will head to...

  • Profile Photo
    Erik Gjørup said 3 years, 5 months ago:

    Brave man Spiros! Well, why not, after all you got the Greek sun to bake the layers dry 😉