Westland Wyvern – 1/48 Classic Airframes - FINISHED!

Started by Eric Berg · 112 · 3 years ago
  • Profile Photo
    Eric Berg said 3 years, 3 months ago:


    Sign me up. This kit has been sitting on my shelf since at 2005 - 15 or so years ago. How do I know?
    When I opened the box after not looking at for the last 10 years, there is the complete ModelingMadness review of this kit that I printed out on 4/13/05 written by our very own you know who.

  • Profile Photo
    Spiros Pendedekas said 3 years, 3 months ago:

    Wow, what an entry, Eric @eb801! I love the Wyvern! It looks so cool!
    Call me nuts, but I love CA kits. They are difficult to build (some more difficult than others), but I fell SO satisfied upon finishing one.
    Mr Admin noted that this was not a difficult one in his MM review back then, so, good news for you!
    Looking forward to it!

  • Profile Photo
    Tom Cleaver said 3 years, 3 months ago:

    This will become a good model Eric. Follow what I did.

  • Profile Photo
    Eric Berg said 3 years, 3 months ago:

    Spiros and Tom: I’ve had mixed results with CA kits. Some were a delight and others absolutely miserable. I tend to follow those tips and take it nice and slow and Test fit three times before glueing!

  • Profile Photo
    Eric Berg said 3 years, 1 month ago:

    OFF TO THE RACES
    After much hesitation, I decided to move forward with this CA build instead of saving myself a bunch of grief and going out and purchasing the vastly superior Trumpeter Wyvern S.4 kit. Otherwise I would have to "bin" this kit which seems like a shame, so here I go.

    The cockpit - what there is of it - is all finished and waiting installation. Have to say the Martin Baker Mk2 resin ejection seat looks like someone took a blow torch to it and softened up the detail but nevertheless, here is is. I added some imaginary details and spent a bit o time cutting out individual decal gauges from an old Pro-Modeler cockpit panels and instruments sheet. Also cut the resin spinner in half so I could line up the props the way I want them and am fitting in the wheel wheels. Photos on this stuff later.


  • Profile Photo
    Pedro L. Rocha said 3 years, 1 month ago:

    Hey Eric, you know, the plastic parts for the cockpit may not be that great, but you managed to make it appealing even so. Carry on, this looks interesting 😉

  • Profile Photo
    Spiros Pendedekas said 3 years, 1 month ago:

    Wow, my friend @eb801, I can tell you this cockpit looks fantastic from here!
    Looks like the resin molds of the Martin Baker were used past their life limit, but you did a splendid hob on that seat, too!
    Looking forward to your progress!

  • Profile Photo
    Eric Berg said 3 years, 1 month ago:

    Pedro: the cockpit parts are 100% resin except for the instrument panel.

  • Profile Photo
    Eric Berg said 3 years, 1 month ago:

    Spiros: Thanks. This is my 5th Classic Airframes build. 2 were total nightmares and the other two just ok. This one seems much easier than all 4 so we shall see.

  • Profile Photo
    neil foster said 3 years, 1 month ago:

    Hey Eric ,I've built this kit ,it's on my gallery here , Like you said they can be a nightmare but I don't remember any thing particularly bad with this kit.

  • Profile Photo
    Eric Berg said 3 years, 1 month ago:

    Neil: I checked out your Wyvern - looks really good and I'm going to bookmark it so I can check back and use it for referral. Tom Cleaver dialed this kit in back when it came out on MM so I am following his very helpful build tips. So far so good.

    Did you have any problem with the oily residue and paint sticking?

    My favorite Classic Airframes kit is the Westland Whirlwind but only because I'm a Whirlwind fan. It was the worst pain in the rear kit I've ever built and I came close to smashing it to bits in frustration several times. But I plowed through and finally got it looking reasonably good. I think this Wyvern will go a lot more smoothly.

  • Profile Photo
    Eric Berg said 3 years, 1 month ago:

    PROGRESS
    This is one of those kits that you can make mini assemblies while waiting for the glue to dry elsewhere.
    I started the with resin spinner first because it's so visually darned big, that one mistake here and you might as well toss the kit if one were to botch it up. I cut it in half with a razor saw so I could stagger the props as they would be when the Wyvern was parked like this:

    This process shortened the overall length of the spinner assembly the width of the saw blade and a bit more due to sanding the two pieces flat where they meet. I made three shims out of evergreen styrene and sandwiched them between the two pieces with CA glue and sanded them until they visually looked okay. Then I glued everything back together and gave the spinner assembly a coat of Allclad primer.
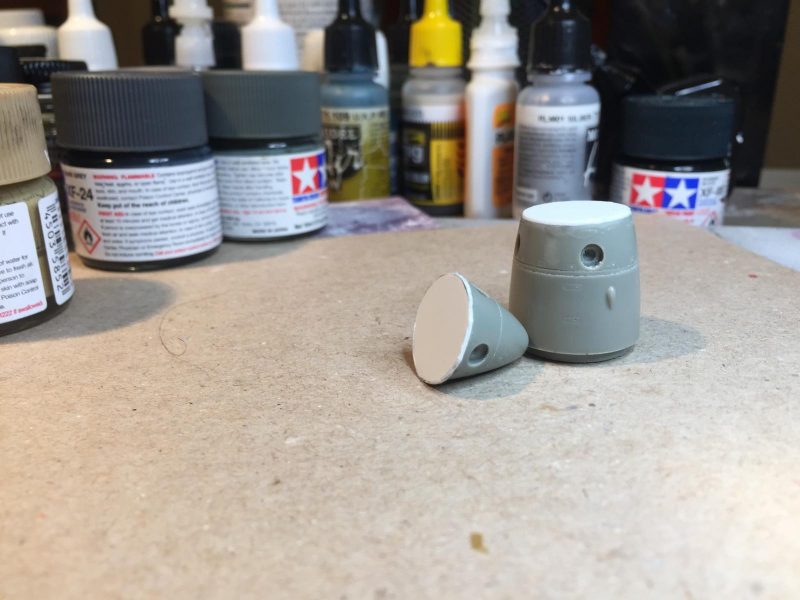


    Meanwhile I prepped the fuselage halves. The fit is surprisingly good. I found it best to install the cockpit tub and the gun sight from below later after gluing the fuselage together. This allows for tighter and easier to dial in fit, so I set them aside for later installation. I began by gluing seams of the fuselage halves in front of the cockpit only, letting that section dry and then worked my way towards the tail, gluing as I went using both CA and Testors styrene cement. And here we are:
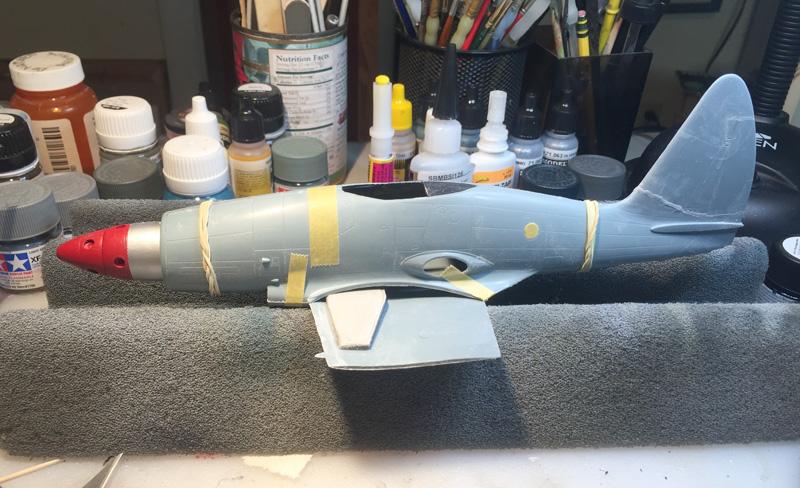
    Lots of sanding ahead. I test fitted the center lower wing where the wheel wells are. Note "hard points". This should be interesting when it's time to attach the rockets and tanks. Note the molded in place dive brakes:
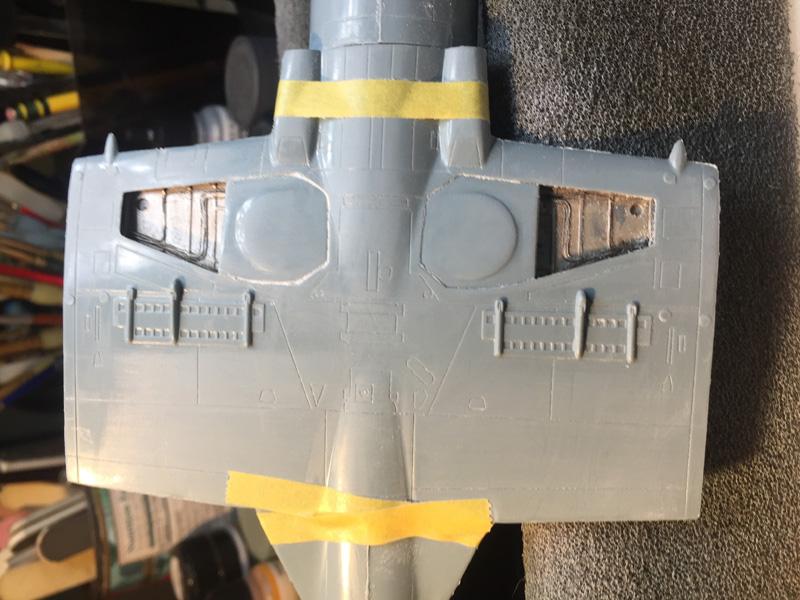
    Oh yeah, here's the props ready for installation.

  • Profile Photo
    Tom Cleaver said 3 years, 1 month ago:

    @eb801 - you got past the really hard part (not that hard to do, but really easy to do wrong) when you dealt with the resin spinner. It should be downhill from there, just time spent doing old school modeling basics.

  • Profile Photo
    Eric Berg said 3 years, 1 month ago:

    Tom - That's exactly why I worked on the spinner first. I can see Classic Airframes didn't get the props right but I am going to leave them be as there would be nothing left of the tips if I did any further sanding to correct the shape. Everything else looks easy compared to previous CA builds.

  • Profile Photo
    Spiros Pendedekas said 3 years, 1 month ago:

    Nice work on that spinner, my friend @eb801!
    I love the prop blades, too!