Glencoe 1/59 de Havilland Venom FB.4, Fuerza Aérea Venezolana

Started by Spiros Pendedekas · 68 · 3 years ago · 1/59, de Havilland, de Havilland Aircraft Company 100 years, Fuerza Aérea Venezolana, Glencoe, Venom
  • Profile Photo
    Spiros Pendedekas said 3 years, 5 months ago:

    Oh dear! It's the Glencoe kit!
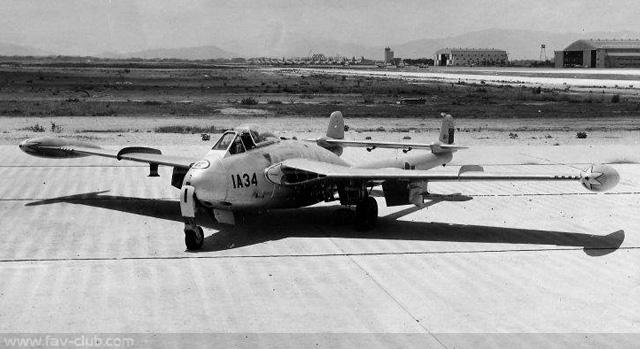
    Hi everyone!

    This is my second entry to this spectacular GB!

    It is the Glencoe 1/59 Venom FB.4, that I intend to build as a Fuerza Aérea Venezolana bird.

    Venezuela acquired 22 Venoms in 1955, remaining in service until the early 1970s.
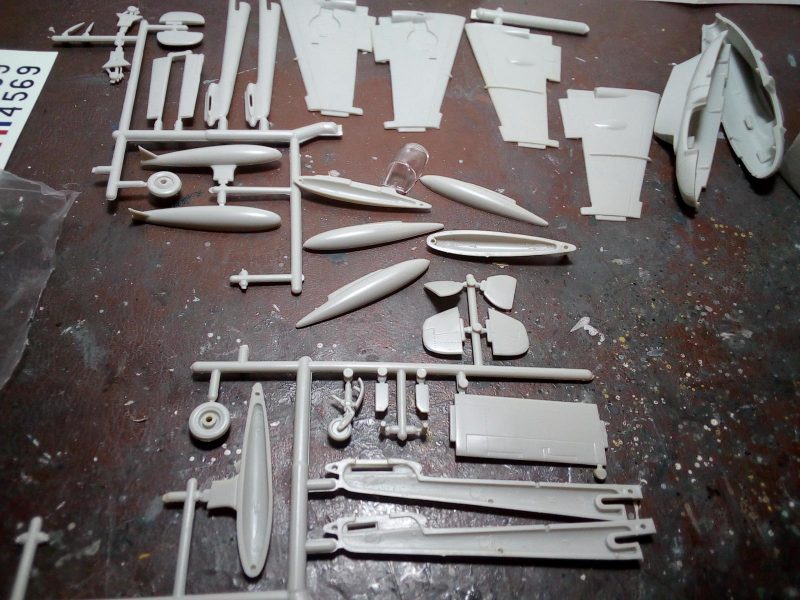
    The Glencoe kit, dating back in the '80s, is a totally "basic"kit. In fact, it cannot get more basic.

    There's no cockpit, to start from. Not even a floor! So, a lot of scratchbuilding there!

    The rest of the parts are of absolute simplicity as well!

    instructions are, understandably, a one step affair and are clear:
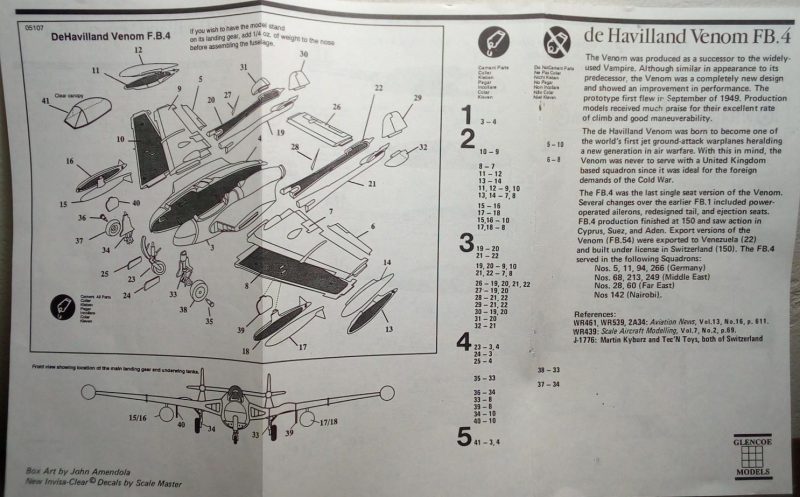
    I cannot comment of final shape accuracy, I just hope it will look like a Venom in the end!

    What shine are the decals:

    Made by Scalemaster, providing 3 RAF schemes (one with "Suez" style stripes), one Swiss and one Venezuelan, in excellent print quality.

    So here it is!

    A very basic kit with a good decal sheet! There's a lot of scratchbuilt to be commenced here, but you know me, I love all those not so brillantly acclaimed kits...I only hope I will finish with something presentable...

    More to comie soon, hoping that priority on other modeling projects permits!

  • Profile Photo
    John Healy said 3 years, 5 months ago:

    This is some good stuff, Spiros. Building these older kits occasionally is a lot of fun.

  • Profile Photo
    Spiros Pendedekas said 3 years, 5 months ago:

    And here we go again

    Scratchbuilding has started at the nonexisting cockpit and front wheel well:

    Interestingly, there are cockpit tub lugs, but no cockpit tub! This is weird! there must be some story behind it...

    Started gluing styrene pieces to form kind of cockpit and floor and wheel well walls:

    Looking crude now,but will be refined later on...

    I laso glued some subassemblies:

    Fit is something between mainstream and HiPM kits...

    The Hobbycraft Vampire seems "Tamiya" compared to the Glencoe...

    Cheers, DH100GB!

  • Profile Photo
    Spiros Pendedekas said 3 years, 5 months ago:

    Thanks John @j-healy!
    I love building old kits!

  • Profile Photo
    Spiros Pendedekas said 3 years, 5 months ago:

    Main wheel wells


    The main wheel wells look totally unrealistic: not only they are very shallow, but also lack the characteristic bulge, in order to accomodate the uprated Venom main wheels. Here is how the Venom wheel well looks:

    With my Excel blade, I carefully removed the false top:

    You can see the bulge emerging, which is nice...a step towards reality, so to say...
    Then I cut suitable pieces from my sons' usual supply of ice cream trays and glued them vertically allaround the wheel well perimeter:

    Upon glue curing, I carefully cut the excess and filled any missed spots with my usual friend, Mr Liquefied Styrene:

    Here's how it looks, compared with the still untouched port wheel well:

    Looks more interstig already!

    Repeat for the port side:

    Pieces of stretched sprue were glued at appropriate places, to add some interest to the blant wheel well. Here's how the two wells look in comparison (and you can also observe the "in work" cockpit):


    (Another) funny thing is that Glencoe provide moveable ailerons, which is unnecessary, as the rest in neutral, but do not provide the two part flaps moveable, where they are frequently seen in "down" position when in the ground, but I think I am carried away now...

    A bit more work is needed to finalize the main wheel wells. Then it's cockpit and nose wheel well improvement...
    Cheers fellow waveriders!

  • Profile Photo
    Allan J Withers said 3 years, 5 months ago:

    Nice to see a different scheme Spiros, your muse "styrene" seems to be helping you along !

  • Profile Photo
    Spiros Pendedekas said 3 years, 5 months ago:

    Thanks, Allan @kalamazoo!
    I just couldn't leave those wells unattended!
    My "muse" Styrene is a really helpful lady, and I will post her pic (which is the one you discovered) at the next update!

  • Profile Photo
    Spiros Pendedekas said 3 years, 5 months ago:

    Dealing with the NLG well, and then some more...

    I didn't like myinitial top well wall, so I fabricated a more suitably looking one. I also fit a cockpit front end wall (basically I formed a weight housing, as A LOT of weight is needed for this rough beauty not to tailsit:

    Weight added, everything (!) "sealed" with liquefied styrene...

    ...and fuselage closed:

    There's a BIG slot underneath, so the Venom could be attached to a stand, which, of course, is not provided. It was closed with a styrene piece, surrounded by liquefied styrene...

    By the way, this is how the "finished" MLG wells look:

    Next is NLG well and cockpit side walls build-up...

    Cheers DH100GB!

  • Profile Photo
    Erik Gjørup said 3 years, 5 months ago:

    One can not leave you alone for a few minutes before you make a lot of progress @fiveten! Great stuff my friend - but I have to check in more often 🙂

  • Profile Photo
    Spiros Pendedekas said 3 years, 5 months ago:

    For some reason, I couldn't resist tackling the Venom, my friend @airbum!

  • Profile Photo
    Tom Cleaver said 3 years, 5 months ago:

    @fiveten:

    Your gluttony for punishment is paying off! I suspect this will look like an actual model in the end.

    Good luck.

  • Profile Photo
    Spiros Pendedekas said 3 years, 5 months ago:

    Thanks Tom @tcinla! The extremely oversimplified intakes (just a corrugated cover) are too much!...
    FOD covers there (which actually look nice!)..
    I was also happy to see parked Venoms with flaps up, so that surgery is avoided...

  • Profile Photo
    Spiros Pendedekas said 3 years, 5 months ago:

    Nose wheel well and cockpit

    I "created" the nose wheel well by using my usual "ice cream tray" thin-n-ice styren-ish sheets, with only the bottom made of a thicker piece, for added strength, in order to support the NLG leg:

    After trimming, I added a fine mesh piece to the bottom, to make it look more interesting:

    I then turned my attention to the cockpit...

    I added side walls and glued side "consoles" at them, all made with sheet styrene.

    The dashboard is an...1/72 C-47 one, heavilly modified, of course!

    Venoms from FB.4 and on, including the FAV ones (according to my research, please provide any corrections) were equipped with a MB Mk2 ejection seat:

    I had an 1/48...Mk10, leftover from an Esci Mirage F-1kit. If one recalls, that seat representation was a tad on the simple side; well, what a great start as to modify that oversimplification of a Mk10 into a Mk2, with a bit of scratchbuilding (told you not to hang around with me, my "normality" is a tad on the surreal side...).

    Anyway, here is the "unmodified" Mk10, resting in the cockpit:

    Having decided to fit FOD covers at those fictive intakes, I started to carve them, just to see what might come, you never know, but more on this at the next post.

    Cheers DH100GB!

  • Profile Photo
    Erik Gjørup said 3 years, 5 months ago:

    Whaddayouknow a Douglas FB-47 Venom F1. Your "frankenplane" scratchbuilding style gets us to the most imaginative corners of the spares-box. Very well thought of my friend.

  • Profile Photo
    Spiros Pendedekas said 3 years, 5 months ago:

    Thanks, my friend @airbum!
    This thread would very well double as a Jefferson Airplane's Surrealistic Pillow album supplement...