Movie Star Mosquito

Started by George R Blair Jr · 52 · 3 years ago · 1/48, 633 Squadron, Airfix, Mosquito Mk VI
  • Profile Photo
    Tom Bebout said 3 years, 6 months ago:

    Great project George, I remember the movie quite well. As a teenager I was the projectionist for a local movie theater and actually ran this picture several times. Always wondered where in god's name they were able to acquire those Mosquito's. The movie has some great flight scenes in it and I recently bought the 633 DVD at Walmart for $5. I'll be watching your progress.

  • Profile Photo
    George R Blair Jr said 3 years, 6 months ago:

    Thanks, Greg (@gkittinger) and Tom (@tom-bebout). I still watch the movie every couple of months. The acting may be a little stilted, but the planes and flying is really cool.

    I have spent the last few days doing the detail painting on the cockpit. It turned out to be a "frankenpit", since I used most of the pieces from the KMC resin cockpit, substituted three pieces from the kit, and then added some of the Eduard set that I had. I have had all three of these sets for many years, and decided it was time to put them to use. The resin pieces appeared to be exactly the same size as the plastic parts they replace, so I anticipated an effortless installation. It didn't turn out that way, of course, and I ended up doing the old test-fit, sand, check again, and repeat. I think it will all fit together now. The resin parts were extremely detailed, and I got to do lots of detail painting, which is one of my most favorite tasks (picture that being said in a sarcastic manner). It is now done and I am waiting overnight to be sure everything sets solid before I seal everything up in the fuselage.
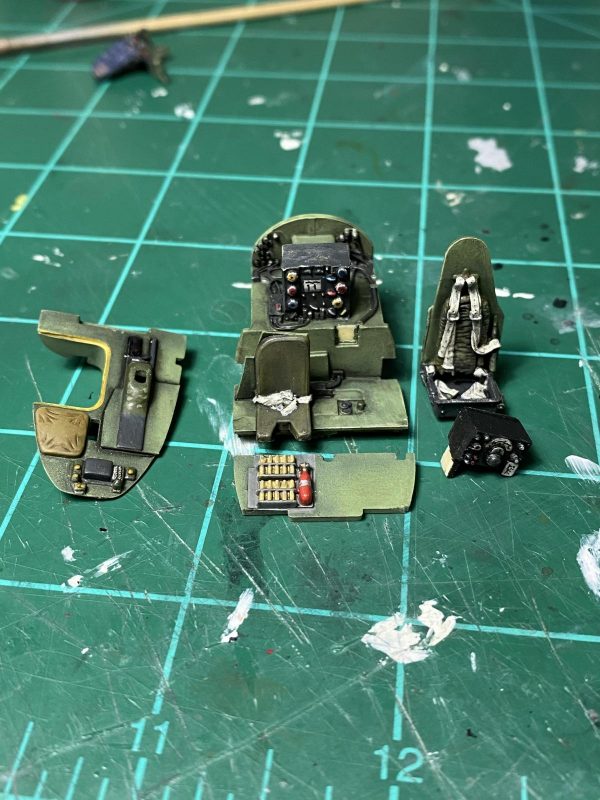


    My friend Erik (@airbum) and I have been trading messages about the instrument panel. All of the Mosquito types have different instrument panels, but you can break them down into two main types: planes with a glass nose will have a panel only on the left side of the cockpit to allow access to the nose, but if the plane has a gun-nose then the panel will cover most of the front of the plane. The resin panel I am using comes from a set for the FB Mk 6, which has a gun-nose. The panel closes off the nose completely. I cut down the right side of the resin panel so there would be access to the nose, but I failed to cut one stack of instruments off that are attached vertically to the center post. As Erik and I posted about the two types of panels, I realized that I probably should remove the extra stack of instruments and black boxes. The problem wasn't that it would be too hard to cut panel down, but the real problem was that I had already painted the panel and I didn't want to lose the work. I dug into the internet and discovered that when the Mk 35s were converted to target-tugs, they usually added some instruments into the space in question. I suspect this was done because access to the nose wasn't quite as important in post-war target tugs as it was in a wartime bomber. With this cheat in hand, I decided to leave the extra instruments, since the movie used postwar TT Mk 35s. That's my story, and I'm sticking to it. Thanks to Erik for the great discussion about the panels.
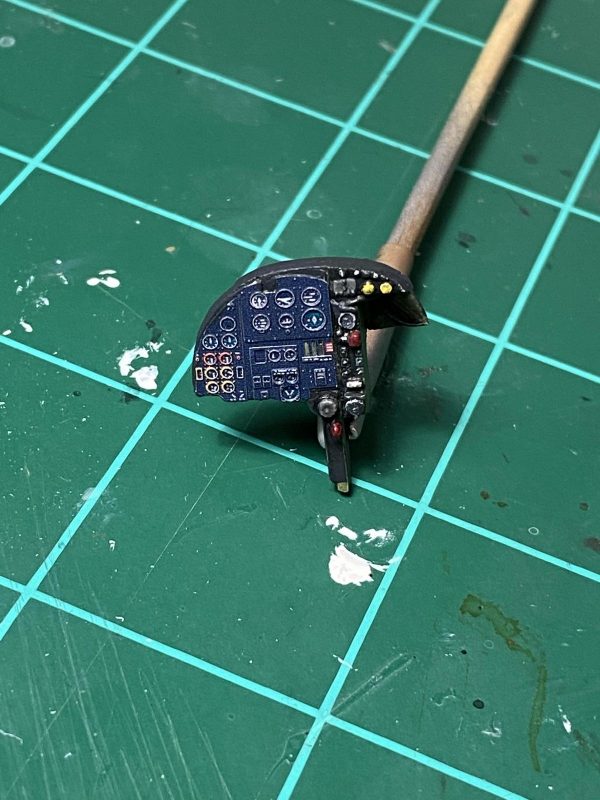
    The tail wheel assembly is added to the fuselage before you bring the two halves together. As I was cutting the parts from their sprue, I noticed that one side of the assembly had its arm broken off. I looked in the plastic bag that it came from, as well as in the box, and didn't manage to find the piece. I scratchbuilt a replacement arm that I think will look OK once it is painted and on the plane.

  • Profile Photo
    Erik Gjørup said 3 years, 6 months ago:

    George, the "frankenpanel" turned out great after you have spend some cozy time with your favourite hobby; detailpainting. . . (was a real pleasure to ping-pong details on the panel with you in PM form)

    That replacement part for the tailwheel looks right at home - well done on that and of course the overall build @gblair!

  • Profile Photo
    Spiros Pendedekas said 3 years, 6 months ago:

    Let me only echo Erik's @airbum comments, George!
    This is spectacular work - and great scratchbuilt skills!

  • Profile Photo
    George R Blair Jr said 3 years, 6 months ago:

    Thanks Erik (@airbum) and Spiros (@fiveten). My favorite occupation is now behind me and I closed up the fuselage today. Ditto for me on the discussion, Erik.

  • Profile Photo
    George R Blair Jr said 3 years, 6 months ago:

    Now that the fuselage is closed up, it was time to deal with a lot of fiddly bits that all lead toward building the wings.

    The landing gear is completed first as it needs to be placed in the nacelle before the wings are closed up. I assembled the wheels, and then pre-painted everything before assembly. The gear consists of 8 or 9 pieces that I anticipated would cause some problems, but they went together fine.

    The nacelles for the dual stage Merlins were selected and the gear installed. Once the glue on the nacelles was solid, I assembled the wings. I continue to be amazed by this kit, which has parts which could be used to assemble a wide variety of Mosquitos. As I mentioned before, there are almost two complete kits in the box. Some of the parts appear to be from an older source, and then newer parts were added to the kit. The older parts are in a very shiny plastic that is noticeably darker than the newer parts. In addition, the older parts seem to have detail that is a little softer than the newer parts. On the other hand, the newer parts have a slightly rough texture to their surface, and are cast in a lighter grey plastic. I mention this because the wings are made up of both old and new parts, so it will be interesting to see if they make any difference in painting and finishing. Both wings went together well and were taped to hold everything together while the glue dries.

    Props were last and were made up of separate prop blades that fit into the hub. I painted the yellow tips first, then masked them off and sprayed the blades with Vallejo black from the can. The bullet nose and hubs were painted a light grey as seen in the movie, then everything was glued together.

    Hopefully the wings and tail surfaces will meet the fuselage tomorrow. Everyone stay safe. Cheers

  • Profile Photo
    Walt said 3 years, 6 months ago:

    That is looking good. The Mosquito is one of the few British planes I would and have built. Those props look very good.

  • Profile Photo
    Spiros Pendedekas said 3 years, 6 months ago:

    Nice progress, George @gblair. Good job on the landing gear, as well as on props!

  • Profile Photo
    George R Blair Jr said 3 years, 6 months ago:

    Things seemed to be rolling along fairly well, but Tom's (@tcinla) post that I might expect some problems had been lurking in the back of my head. Sure enough, the problems rose up yesterday and today. I first encountered problems when I added the wings to the fuselage. There were huge slots in the fuselage, so I anticipated an easy join of the wings and the fuselage. When I dry-fit the wings to their slots, I found that the wings didn't fit. Not only were the wings too thick to fit in the slots, but they were also too long to fit in position. It took a great deal of cutting and sanding to create a rudimentary join. I eventually got to the point where continued work to get a better fit was actually increasing the gap in various parts of the join, so I stopped trying to refine the join and resorted to some large clamps to hold the wing in place while the glue dried. A lot of liquid cement, judicious use of clamps, and a frustrating afternoon finally got the wings in place.

    After that, I figured the worst was past, but I probably jinxed myself. The only things remaining before jumping into final sanding and painting was to install the top of the two nacelles. The nacelles on my model are slightly longer due to the use of a 2-stage Merlin engine. The kit allows you to build either a single stage or 2-stage Merlin, so I cut the upper nacelle panels for the longer engine and prepared to add them to the nacelles. When I dry-fit the pieces, I discovered that they were about an eighth of an inch too short.

    I really don't mind parts that need a little adjustment, but this gap was like the Grand Canyon. My first thought was to start cramming putty into the slot, but I walked away for a while and calmed down. My next thought was to cut some plastic to fill the gap. It was at this point that I realized I could cut down the shorter nacelle pieces for the single stage engine, and I would instantly have a piece that would perfectly match the curvature of the nacelle. A little measuring, followed by some work with my hobby saw, and I had two pieces that fit the bill. So, the nacelles are closed up and the filler is drying. A little sanding and I will be back on track.

    I took a last look at the model before I shut down for the day, and I found the inlets at the wing roots don't look quite right. I decided to let the model sit overnight and I will tackle the next problems tomorrow. Cheers.

  • Profile Photo
    George R Blair Jr said 3 years, 6 months ago:

    Thanks Walt (@luftwaffe-birdman) and Spiros (@fiveten).

  • Profile Photo
    Tom Cleaver said 3 years, 6 months ago:

    @gblair - yep, those are the problems associated with this kit. Looks like "some modeling skill required" has them dealt with. Once you have the inlets dealt with, it should be clear sailing from there.

  • Profile Photo
    Erik Gjørup said 3 years, 6 months ago:

    George (@gblair), nice show of another version of "plug-and-play". . .

    Great solution and equally great progress here. I like to see the effort to create the right instrument panel with the hole for the nose turned out that great - even though there will be no light from the nose, I think the "crawl-through" will be noticeable with all that glass.

    Keep it comin'!

  • Profile Photo
    George R Blair Jr said 3 years, 6 months ago:

    Tom (@tcinla), your warnings were right on. The problems came in places I didn't expect. Erik (@airbum), thanks for the kind words, but right now I am just hoping I can fix the issues that keep popping up on this kit.

  • Profile Photo
    Spiros Pendedekas said 3 years, 6 months ago:

    Great modelling skills here, George @gblair!
    Who could imagine an Airfix would need THAT much rework at the nacelles?

  • Profile Photo
    George R Blair Jr said 3 years, 6 months ago:

    Thanks, Spiros (@fiveten). Tom Cleaver (@tcinla) had told me he had some problems building the same kit, but I wasn't ready for these problems. The wings are on and the nacelles are now fixed, but I am still fixing the last wing problem I encountered. The long, rectangular openings in the wings that stretch from the fuselage to the nacelles weren't rectangles. They tapered noticeably toward the nacelle, and they the wings were already firmly glued to the fuselage. I am gradually scraping the extra plastic away with the edge of my hobby knife, and they are now just about right. I don't have much left to do before I start painting, so hopefully the worst is behind me.