Today was decal day, and a real case of one step forward and two steps back. I wanted to try the Scan and Cut for making the letter codes for the Mosquito. I found several fonts for RAF WW2 aircraft on the internet and imported them into Microsoft Word. I printed a set of codes on my printer and then ran them through the Scan and Cut. Apparently using the machine was not as easy as I thought, because I kept getting letters that had rounded corners. Everywhere there was supposed to be a 90 degree intersection in the letter, the Scan and Cut added a rounded fillet. This, or course, wasn't going to look right. I tried several different things to fix the problem, including a short reading of the instructions, all to no avail.
No problem. I had decals for the codes in the size and color I needed, so I proceeded with decal session. These planes were all painted in WW2 colors for the movie, and I have not found a picture of a plane that appeared in the movie that had any stencils, or "No Step" markings, and so on. I planned to mirror this idea by adding just the roundels, letter codes, and black registration numbers. A quick trip through my decal stash turned up some roundels and fin flash of the right sizes, as well as sheets of lettering and numbers for the codes and registration. Everything went on fine with some MicroSol and MicroSet. I left everything to dry for the day.
I went up during half-time of the Thursday Night Football Game to be sure everything had dried when I noticed that I had been struck by a case of drain bamage, no, wait, make that brain damage, earlier in the day. The codes for the aircraft in the movie are HT. When I added the individual decals for the codes earlier in the day, I had reversed them to TH. Well, I have a cardinal rule: I never work on things like models, home repairs, or computer issues after 8 p.m. I rapidly reach a point of diminishing returns. Well, although it was well after 8 p.m., I decided that I could quickly remove the decals by pressing some masking tape over the errant decals and pull them up. So, I cavalierly pressed the tape on and gave it a pull. It did pull the decals off, as well as the paint beneath the tape. This hole in my paint really bothered me, so I decided to fix the problem at 8:40 p.m. during the remaining halftime of the game. I first sanded down the edges of the paint that remained on the plane, then wiped the plane down to get rid of the sanding dust. Airbrush cranked up, paint booth humming, and ... everything seemed to work. The new paint does stand out a little, but I think it will all blend when it gets its coat of clear gloss. Yeah! Back to the game.
3 attached images. Click to enlarge.
-
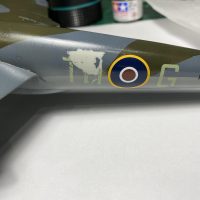
1. Drain bammage strikes!
-
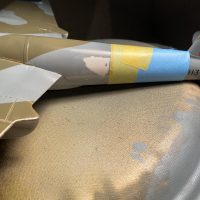
1. Sanded and masked, ready for paint
2. I wasn't taking any chances. I didn't want tape to touch the other decals, so paper covered the decals.
-
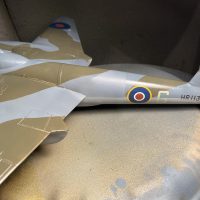
1. Repainted. I think the gloss will fix the difference between the old and new grays.