The Bridges of Toko-Ri, Lieutenant Brubaker’s Panther jet, Revell F9F

Started by Louis Gardner · 133 · 3 years ago
  • Profile Photo
    Louis Gardner said 4 years, 6 months ago:

    Off with their fences ! I mean pitot heads ! OK whatever...

    I did some online research today, and looked for a suitable photo to show an accurate profile of how the fences should look on a "Dash 5" Panther jet. I found this remarkable photo and enlarged it. Then I cropped the area I needed to use as a visual guide.


    Next I used some .010 thickness sheet plastic, and cut out a single example. This was tweaked, and eventually it fit amazingly well. Now I had a pattern, so I used it to cut out another set. After these two were cut from the sheet plastic, I used some very fine sandpaper to detail them even more.

    Eventually I was very happy with how they looked and fit...


    So I glued them in place.

    From this front view, you can see just how thin these things are. This is true of the real ones too. They were excessively thin on the real plane. After all, extra thickness is drag. Drag reduced speed. Not good in a jet or any aircraft for that matter. These things look like razors...
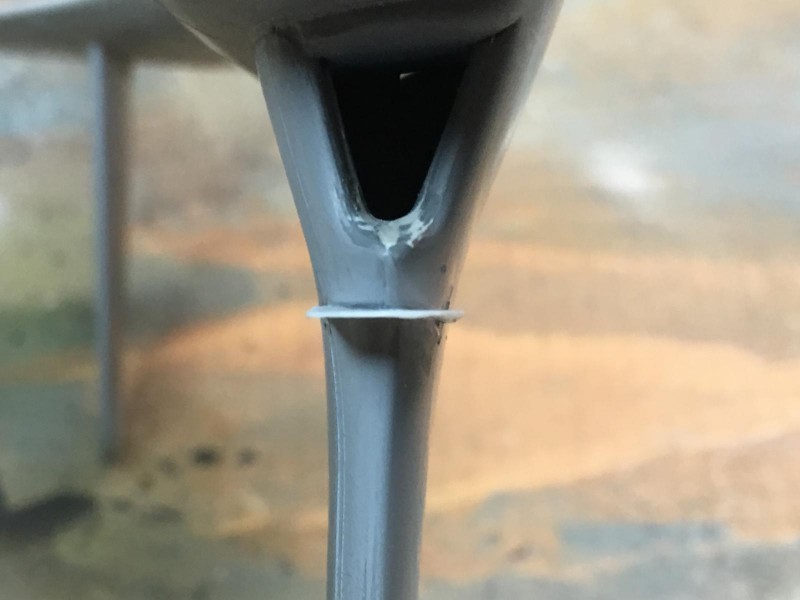
    They look pretty good and are about scale as per my Mk 1 eyeball.

    The seams were given another coat of primer and wet sanded using 1500 grit wet paper. The end result was a glass like surface...

    I wanted to spray the aluminum plate color on first this time. It could be a mistake, but I'm rolling the dice with it. This is Metallizer "Aluminum Plate" from a rattle can. I sprayed the leading edges and the intakes. The wing root also received several coats. Tomorrow I'll buff it out, then spray some Future Acrylic over the Aluminum color to seal it, and hopefully make it a stronger surface for taping.

    My luck, it will pull off when I remove the tape. If it does, I'll strip it off and spray the jet in overall Gloss Sea Blue and start over in a reverse proceedure.

    Here you can see how much better it looks with the thinner more scale like fences. The intakes and leading edges also receive more work, and now they are nearly perfect. Good enough for me.


    After I looked a little closer at this next picture, I decided to tweak the fence a little. It was not perfectly straight. Since the glue was still wet and had not set up, I was able to get these things laser straight.

    Here's how "Brubaker's" Panther looks now...

    I'll let it dry overnight, and go from there tomorrow.

    As always, comments are encouraged.

    Thanks for stopping by.

  • Profile Photo
    Jim Harley said 4 years, 6 months ago:

    looks great! this was my dad's favorite movie...life stopped when it came on the tube.

  • Profile Photo
    Tom Cleaver said 4 years, 6 months ago:

    If you're using Metalizer, before you mask anything, be sure to give it a coat of Metalizer Clear Sealer or I am gonna hear the screams of agony from Florida all the way in California when you unmask.

    Metalizer is THE WORST metal paint. Anything else works better when you have to mask.

  • Profile Photo
    Chuck A. Villanueva said 4 years, 6 months ago:

    Louis, your just fine, I have done the process without the sealer. No need to do that. The only sound will be a yippee ki yo ki yay. Go with what you know it's all good. As we discussed. Great idea on the wing fences. Very much a great improvement over the kit molded fences. Never crossed my mind to modify those. Now go ahead and airbrush the GSB and you will be totally happy with the result.

    2 attached images. Click to enlarge.

  • Profile Photo
    Louis Gardner said 4 years, 6 months ago:

    Earlier today I gave the Metallizer a nice coat of "Future" clear acrylic. I am very pleased with how the wing tip tanks look now. Hopefully this will help prevent any masking accidents.

    Then I turned my attention to the white tips that were present on the tail surfaces. These areas were masked off and sprayed.

    When I removed the masking, I noticed the very tip of the tail had a small seam present where the fuselage halves join together...

    So you know what happened next. I sanded away part of the very nicely applied white paint... as I took care of the single seam that I somehow missed before. This section will get repainted later today.

  • Profile Photo
    Louis Gardner said 4 years, 6 months ago:

    Hello Jim ! @jimh
    Thanks for the compliment. I hope it turns out half as nice as your F2G did. That one grabbed my attention... and quick !

    This is one of my favorite movies from the era too. I especially like the color, and there's a whole lot of flying going on !

  • Profile Photo
    Louis Gardner said 4 years, 6 months ago:

    Hey Tom, @tcinla

    I have had a bad experience in the past with my A-20 Havoc and using metalizer paint. I learned my lesson with that one. I had failed to seal the metalizer, which I used on the fabric covered portion of the controls. This plane was going to be finished in a Pre War scheme of overall Natural Metal, with red and white stripes on the rudder...

    You probably heard the screams back then as I removed the masking tape, and part of the aluminum paint with it. It would have sounded like a Yeti or a Bigfoot howl... It is still sitting on the shelf of doom. It needs another chance, and should hit the workbench again soon.

    Since the I have learned to seal the paint before going any further.

    I disagree with you about metalizer paint being horrible. It is quite the opposite...I have had very good results with them. I like how they look once they are shined up. I built this P-47N many years ago when I first got back into the hobby. It still has it's shine to this very day. Granted it is fragile before it's sealed, but it is better than "horrible". Don't look too close at this old P-47... It has more mistakes than I care to admit. I built it before we had the internet. I have learned an awful lot since this one was built...


    The downside is they lose some of the luster if you apply the wrong type sealer. Don't use a Dull coat unless you want to knock down the shine... This can be used to your advantage if you are trying to replicate an oxidized surface.

  • Profile Photo
    Louis Gardner said 4 years, 6 months ago:

    Hey Chuck, @uscusn

    Those are some nice looking planes ! I like the markings you used for your Panther jet. I hope that my wing tip tanks turn out as nice as yours did.

    What really caught my eye were the MiG's sitting in the background...and the Tigercat with folded wings !

    I agree with you about the sealer. I have done this before and have had very good results. Where I have run into problems using metallizer, was when I failed to let the paint dry long enough. This is especially true if you use it right from the spray can. It can go on too heavy and take several days to completely dry.

    This just happened with my MiG-17... I swiped away some of the paint at the wing root, as I was polishing it up before the camouflage paint was applied.

    Thanks for the compliments on the changes I made to the wing fences. I think it is a definite improvement over the kit parts, which happen to look way too thick, and keep you from getting the leading edge properly sanded smooth. It can be done but not as effectively or as easy, once the fences are gone.

  • Profile Photo
    Louis Gardner said 4 years, 2 months ago:

    Over the past few days we have had a little cold snap with our weather. I think it might have caused me problems... I attempted to spray the Glossy Dark Blue and disaster struck.

    The paint wasn't spraying as it usually does. It was coming out of the air brush too thick and had clumps in it... so I tried to thin it down even more, in hopes this would smooth things out.

    Nope... not today. I ended up with a complete mess. The more I fooled with it the worse it became.

    So I had to resort to a last ditch effort. I used Easy Off oven cleaner and removed all of the paint.
    Here you can see how the Panther looks just as I sprayed the cleaner on it.


    A word of caution: Make sure you have adequate ventilation, and wear eye and skin protection. This stuff is nasty, but it works.

    These next pictures show how the plane looked after a few applications and some work with an old tooth brush and some hot water.


    Most of the paint is gone now. I'll have to go back and do a little sanding in some areas that were very stubborn.


    Because of this, and other things, I might not make the deadline. I will continue to plug away at it and keep you updated.

    Bummer...

    As always, comments are encouraged.

  • Profile Photo
    Allan J Withers said 4 years, 2 months ago:

    Was that glossy dark blue paint stripper ?

  • Profile Photo
    Louis Gardner said 4 years, 2 months ago:

    Hello Allan, @kalamazoo

    No unfortunately that is simply oven cleaner that I sprayed on the Panther. In the pictures it looks this way because it is reacting with the paint. The blue is most likely a combination of the cleaner and the paint as it was lifting it away from the surface... I have some good news to share next. So please stand by for another update.

    Thanks my friend.

  • Profile Photo
    Louis Gardner said 4 years, 2 months ago:

    I gave the Panther a final wet sanding to get rid of any imperfections, and to make sure that none of the filler work was damaged during the paint stripping process.

    The mishap was caused by a combination of factors. The lower than usual temperatures we just had affected the thinner, and the air brush was very dirty.

    Today I completely disassembled the air brush and let it soak. I was impressed with the amount of crud that came off it and could be seen in the cleaning solution. This thing was nasty !

    The other thing was the spray can GSB I was using was older than dirt... It wouldn't spray out anything other than big nasty clumps of paint, and that was the final nail in the coffin lid. Once I saw that happening, I knew I was going to be stripping the entire kit...

    I'm happy to say that everything ended up looking better than I ever could have hoped for. This time I decided to go at the painting from a different approach.

    So I sprayed the Gloss Sea Blue paint on first. I'll go back in a few days and start adding the other colors, like the silver leading edges and white tips on the tail surfaces.

    Here's how Brubaker's Panther looks right now.


    I'll let it sit for several days to allow the GSB ample time to dry. I might even give it a coat or two of glossy clear acrylic (Future Floor Polish), and let that sit for a while too. I don't want any fingerprints in the finish, but it almost always seems to end up happening anyhow.

    There were several hard lessons learned from this:

    1. Never rush things.
    2. Always clean your airbrush better than you have to.
    3. If your air brush isn't spraying correctly, find out why and correct the problem before it makes things worse.
    4. Colder temperatures affect how paint sprays and dries...
    5. Always test old spray cans out on a piece of scrap before you actually try to use the contents on your pristine model.

    The sad thing is that all of these are rookie mistakes, and I knew better. I was simply in a hurry, and it bit me big time.

    All's well that ends well. This reminds me as to just how beautiful the Panther jet is. It also makes me want to build a Banshee now for some reason. I have the ancient Testor's kit in the stash, and it's a re boxing of the old Hawk kit. I'll have to let these thoughts wait for our Korean War Group Build that is going to start in June.

    As usual, comments are encouraged.

  • Profile Photo
    Allan J Withers said 4 years, 2 months ago:

    Looking much better Louis, well saved !

  • Profile Photo
    James B Robinson said 4 years, 2 months ago:

    Nice recover Louis! Very well done.
    @lgardner

  • Profile Photo
    Jaime Carreon said 4 years, 2 months ago:

    Now here's a first - we started these models about the same time and I finished before you did. What's up with that? 🙂 Looking good my friend!

    And please don't use glosscote on it!