The Day the Music Died – Part 2: The Aircraft

Started by James B Robinson · 69 · 4 years ago · C-64 Norseman, Glenn Miller, Modelcraft, RAF Twinwood
  • Profile Photo
    James B Robinson said 4 years, 6 months ago:

    This article is part of a series:

    1. The Day the Music Died – The Glenn Miller Story Intro
      https://imodeler.com/groups/imoder-at-the-movies-1964926360/forum/topic/the-day-the-music-died-the-glenn-miller-story/
    2. The Day the Music Died – Part 2: The Aircraft
    3. The Day the Music Died – Part 3: The Diorama.
      https://imodeler.com/groups/imoder-at-the-movies-1964926360/forum/topic/the-day-the-music-died-part-3-the-diorama/

    I’ve committed to at least two builds for the ‘iModeler at the Movies’ group build. I’ve decided to start with this one, it being the more difficult to accomplish, or so that is my thinking. Time will tell. Check out the first topic above to catch up with the background if you have not seen it.

    Tip of the hat to David Leigh-Smith @dirtylittlefokker for organizing this awesome group. Do yourself a favor and check it out, it promises to be an Epic adventure!

    The Premise

    Depict the scene when Glenn Miller was last seen before departing England for France.

    Major Miller spent the last night before his disappearance at Milton Ernest Hall, near Bedford. On December 15, 1944, he boarded, with Lt. Col. Baessell a C64 Norseman (44–70285) piloted by F/O Stuart Morgan. The plane departed from RAF Twinwood Farm in Clapham, on the outskirts of Bedford on Runway 23 at 1:55 p.m. British Summer Time, and disappeared while flying over the English Channel.

    The Build

    I plan on building the Aircraft Major Miller disappeared in before departure, the C64 Norseman. The build will include several ground vehicles and a semblance of the Twinwood Control Tower.

    1/48 Modelcraft / Taka Noorduyn Norseman

    The only offering of the Norseman in 1/48 scale is from Modelcraft, the re-box of the Taka kit in 1995 (now out of production). It took some time, but I was able to secure (2) kits, a no. 48-001 and 48-003. Both kits are identical, just re-boxed with different Decals. For further information and history on the Norseman, refer to the first Article in this series.

    Let's look at what’s inside the box. The kit provides for 3 versions, A – Land based with wheels, B- Water based with floats and C – Land based with skis. Parts are provided on 3 sprues molded in white and 1 clear sprue. The white sprues are very thick, with the gates being anywhere from 1/8” to 5/16” thick or 3 to 4 cm. There is a little flash and an abundance of ejector pin marks. Some are in hidden spots and some are not. Putty/filler will be required.

    The instructions look like they were copied from a master, one must make sure that they thoroughly review these before starting the kit since there are differences in versions and Military/Civilian aircraft. Here’s a look at the front/back pages. There are no recommendations for paint or decal placement.

    The main sprues:


    In preparation for starting this kit, I decided to apply a coat of primer. Using Vallejo Grey Primer Acrylic Polyurethane. I was hoping to cut down on some of the translucence of the white, the grey helped but was not as dark as I was expecting.
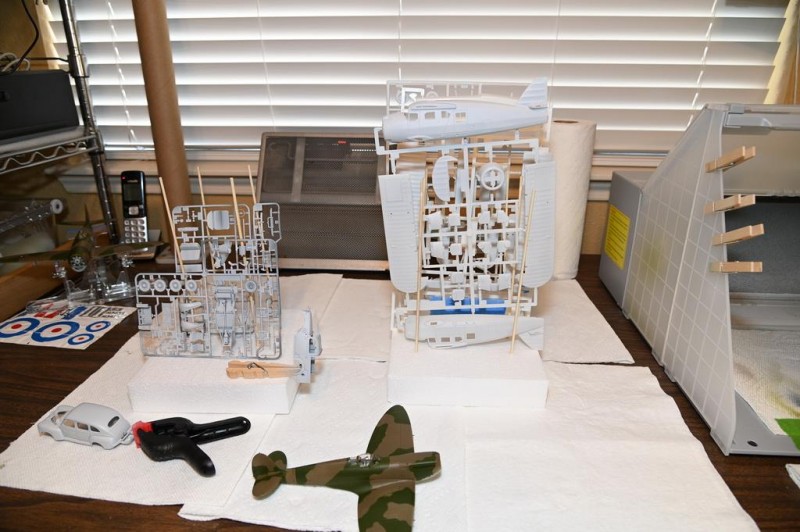
    Here is a close up showing the thickness of the sprues and some of the poorly placed ejector pins.
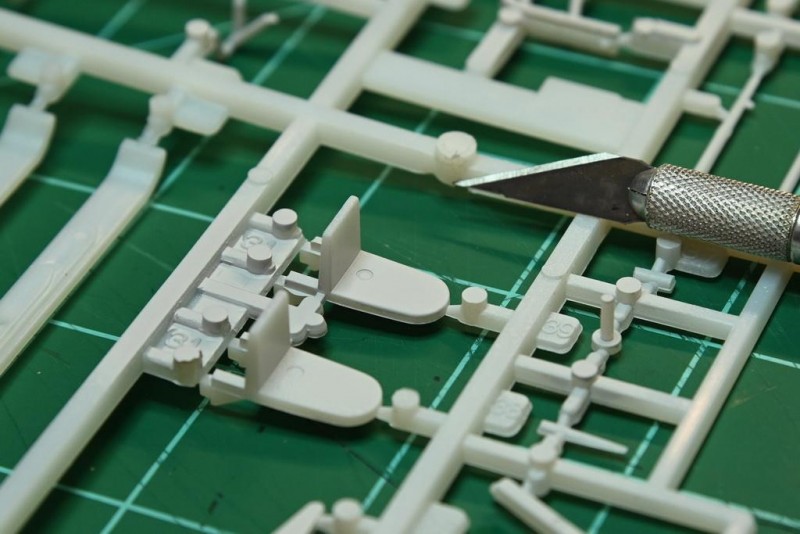
    Stay tuned, more to come………….
    James B

  • Profile Photo
    James B Robinson said 4 years, 6 months ago:

    I spent some time reviewing the instructions and the various images that I have been able to obtain from the internet. I also realized that the instructions did not show up so well, so here are better images of those.

    After allowing the sprues to rest for over 24 hours after applying the primer, I cut off the fuselage halves and the interior floor and bulkhead. First dry fit looks rather promising.

    The interior lacks significant detail, basically none to speak off. From images found, there really wasn’t that much to begin with, but the model doesn’t improve on any of the interior. Here are a few close ups from the instructions showing the interior:

    I really wanted to at least include the jump seats that were present in the transport models, but realized that they would not be visible in any way. The thought crossed my mind, if I open up one of the rear doors one could see some of the interior.

    With this new quest, I started pouring over all the images I had. Surprisingly, the rear door arrangements vary from aircraft to aircraft even within the same model variant. It came with either a wide cargo door (with or without a window) or a smaller entry door on either or both sides. The model shows seams for both arrangements and based on images, these seams were present in the images. This led me to believe that some aircraft had multi-purpose doors, meaning you could have the smaller door attached to a panel with the ability to open up the full cargo door if required. Unfortunately, I have not found a way to verify this.

    Here are a few images showing what I have found:

    This weekend, I will explore scratch building the jump seats and opening up one of the doors. I have already determined that opening one of the front doors is out of the question. The way Taka originally molded the cabin, the front windshield abuts the front door frame, not really matching what was actually manufactured. Luckily, I have a spare if this thing goes Fubar.

    Stay tuned, more to come………….
    James B

  • Profile Photo
    Louis Gardner said 4 years, 6 months ago:

    These are some fantastic pictures ! I can see myself eventually building up one of these (or possibly a Stinson SR-7) as a RC flying plane from scratch. Balsa wood stick and tissue paper style, electric motor for power... You get the idea.

    As far as the rear side doors... That's a good question. Only the Phantom knows !

    You could probably scratch build the seat frames using round Evergreen plastic rod. Maybe use some Evergreen plastic sheet for the actual seat cushions ? They don't appear to be too thick. You would be able to sand the edges round...

    Also the seats on the real thing appear to be the folding type. They could have been raised or lowered depending on the needs at the time.

    Just my thoughts.

  • Profile Photo
    James B Robinson said 4 years, 6 months ago:

    Thanks for stopping by and input Louis @lgardner, Already got the rod and sheet on the cutting board. Just waiting on my new Contour Gauge to arrive tomorrow so I can get the right fit. The one I have is a tad large at 12" so I ordered a smaller 6" model. I'm thinking I'll go with the bench seats that do not attach to the floor (image 20). That way I can attach them to each side of the fuselage halves and make an easier alignment.

    Keep thinking, I'll probably need all the help I can get. 🙂

  • Profile Photo
    Greg Kittinger said 4 years, 6 months ago:

    Looks like a great project!

  • Profile Photo
    Pedro L. Rocha said 4 years, 6 months ago:

    James, it seems that you have everything you need to get more than what the plastic gives you. Going to follow this WIP with interest, it’s not everyday I stumble upon projects that mix the Norseman and Glen Miller

  • Profile Photo
    James B Robinson said 4 years, 6 months ago:

    Pedro @holzhamer, Welcome to the WIP and thanks for stopping by. The desire is big on this one for me. My father introduced me to the Big Band sound and every time I hear Glenn Miller it reminds me of Mom and Dad dancing and I smile. Hope I can create some magic with this one.

  • Profile Photo
    James B Robinson said 4 years, 6 months ago:

    Quick update, the sprues did not take the primer as well as I expected. Maybe I should have applied an enamel primer instead of an acrylic one. It doesn’t hold well to the styrene and peels easily even after over 48 hours of drying time. Lesson learned for the future, dealing with these older models.

    Moving forward, the dry fit was more promising than the reality. There will be some putty and sanding required. I fabricated the bench seats and cushions for the front seats. Added a wood floor to simulate the real thing. Masked off all of the glass and installed all but the wind shield in the fuselage sides.

    Here’s a few shots of the process.

    And here is the body before closing up, showing the interior.

    Fuselage together with the removed door and the windshield off. Notice the size comparison to a P-47 and a Spitfire.

    The seam alignment is very apparent here.

    I’m going to let this one rest for a few days. The replacement decals for one of my other projects arrived and I need to finish those two birds up for posting.

    MTC………James B

  • Profile Photo
    Erik Gjørup said 4 years, 6 months ago:

    I have always liked the Norseman - they did splendid service in civilian life in Greenland on floats, and a few was used on US bases there, one of them ending on the dump at Narsarsuaq - nothing left of the fuselage, but I just had to take one look at the remaining left leg to tell it had to be a Norseman.

    Keep the posts comin, they will be followed with interest!

  • Profile Photo
    James B Robinson said 4 years, 6 months ago:

    Erik @airbum, Thanks for stopping by.

    Based on what I have found, the Royal Canadian Air Force and the United States Army Air Forces were the two largest operators. The RCAF ordered 38 Norseman Mk IVWs, with an addition 34 Mk VI models being ordered later and the American military ordered 749 Norseman Mk IVs as the C-64A (later UC-64A).

    Throughout the Second World War, the USAAF Norseman aircraft were used in North America (primarily Alaska) as well as other in theaters of war, including Europe. Three UC-64As were used by the US Navy under the designation JA-1. Six C-64B float planes were used by the US Army Corps of Engineers, as well as by other Allied air forces, who placed orders for 43 Norseman Mk IVs.

    If you haven't seen the following, here are a couple of websites related to the Norseman:
    https://web.archive.org/web/20160110222023/http://www.noorduynnorseman.com/

    http://www.norsemanhistory.ca/

  • Profile Photo
    Robert Royes said 4 years, 6 months ago:

    Nice progress, love the floorboard. Is that the ground crew in amongst the planes?

  • Profile Photo
    James B Robinson said 4 years, 6 months ago:

    Robert @roofrat, you must be seeing things. 😉 😉

  • Profile Photo
    Robert Royes said 4 years, 6 months ago:

    Well, I am a product of the sixties.

  • Profile Photo
    Greg Kittinger said 4 years, 6 months ago:

    Looking good!

  • Profile Photo
    James B Robinson said 4 years, 6 months ago:

    Update 10/10/19

    As noted in my previous update, the fit of the fuselage was not as perfect as preferred. The problem was not a result of the interior additions, rather the fit of the upper glazing. All of the windows except for the windshield have beveled edges so that they fit flush with the exterior surface of the fuselage. This actually was a pretty neat thing for the side windows but the top one caused some alignment problems.

    In some of my research, I have found reference the UC-64 had an escape hatch in the roof but have failed to find any valid documentation to support this. None of the images I’ve found support this so I am wondering where Taka / Modelcraft came up with presenting the model with a window in the roof.

    I went through all of my reference material and found two original drawings from Noorduyn. The roof window or hatch is not present.

    Armed with this new revelation, I decided it would be better to close up the roof and save myself some frustration in dealing with the miss-fitting window.

    During my most recent search for images regarding the “Roof Hatch”, I ran across this image of Norseman from the 320th Air Transport Squadron based in Le Borge’ in Paris. After the Allied invasion, the primary duty of the 320th was air evacuation from forward hospitals, bringing back the wounded to major hospitals in Paris. The planes could carry three stretchers and a flight nurse. The photograph comments indicated that the plane that would carry Major Miller to Paris, was a 320th ATS aircraft.

    This raised a new concern, did I have the right paint scheme for the aircraft? I went over my notes from Dennis Spragg’s book and found the following:

    “Personnel could clearly see the olive and gray aircraft taxi in, park, and depart within minutes.” (Spragg, Dennis M.. Glenn Miller Declassified (p. 229). Potomac Books. Kindle Edition.)

    I also found evidence from the Noorduyn site that 470285 was assigned to the 35th Air Depot Group and Depot Repair Squadron of Eighth Air Force Service Command, 2nd Strategic Air Depot based at Abbotts Ripton, aka Alconbury, airfield. The 2nd Strategic Air Depot, (identified as 2 SAD in military correspondence) handled service and repair for 1st Air Division B-17s. With both Spragg's reference and this, I believe I have the right scheme.

    Problem solved.

    MTC………James B