F-86F-30 Lt. Jim Thompson

Started by Colin Gomez · 27 · 3 years ago
  • Profile Photo
    Louis Gardner said 3 years, 9 months ago:

    Colin, @coling
    I had a really hard time fixing the warp in the wing of my Monogram "Brubaker" Panther jet... It finally succumbed to brute force and a lot of clamps. I know how hard it is to fix something like that.

    It looks like you are well on your way now to getting "The Huff" one step closer to completion. Thanks for the updates. And thanks again for staring your MiG-15 build.

  • Profile Photo
    Colin Gomez said 3 years, 9 months ago:

    Hi Louis,

    You may do this already, but just in case, I can share a technique I have used. : ) For warped parts, I always boil up a big pot of water and put that in the bathroom sink. Wearing thick rubber gloves (or dish gloves with an insulating layer like wool underneath (e.g some cheapo winter gloves from the dollar store), I plunge the misshapen part in the hot water until it softens. I simultaneously put finger pressure on it in the appropriate place and direction and withdraw the part from the water while continuing to bend it (you can also clamp it and submerge it to save your hands from accidental burns, but usually you have to bend it past the point that you want it to rebound to). After a few seconds to cool, it is usually much improved. I find that this takes a couple of tries but the nice thing is that the hot water seldom damages the part irreparably or irreversibly if you bend it too far the wrong way. I do this a lot for warped wings and fuselages and have had good results. It's also good for bending plastic rod so it takes and holds desired shapes without breaking. If you bend thin rod around a thicker rod while heating, you can make a coil. I guess it sounds kind of nuts to do this so elaborately but it works for me.

  • Profile Photo
    Colin Gomez said 3 years, 9 months ago:

    First of all, thanks Louis and Spiros for your additional encouragement. This is going to be a new challenge for me and not without tests of patience along the way.

    So, just a quick update to show how the metalizer went down. I used "Matt Aluminum" because I figured the finish on a well-used warbird would be less than shiny. Working with the Surface Primer was an interesting learning experience when I discovered that a minute cat hair had worked its way into the finish on one tank. Argghh. I am considering shaving my Persian Cats (my son's cats actually). But I wouldn't do that - they are too cute for words. Anyway the test was to see if I could clean up just the one patch and remove the hair with plastic polish without creating a weird aberration in the overall metal finish (I anticipate more hairs in the future on other models). it worked. I buffed out the hair, reapplied primer and immediately sprayed the metalizer. No visible scar. Phew. I may be able to deal with metalizers after all.

    I did the Hellcat undercoat more roughly. You can see it thins a bit outboard on the wing. I didn't want to waste a lot of paint and will just be doing the salt technique near the wingroot so that will do fine. Looks smooth and metallic to me.

  • Profile Photo
    Spiros Pendedekas said 3 years, 9 months ago:

    Good jobs Colin @coling. Even better that you dealt with the cat hair mishap, so, if something similar happens in the future, you automatically repair no worries!

  • Profile Photo
    Colin Gomez said 3 years, 9 months ago:

    Thanks for your interest in my model and cat problem, Spiros. As long as I am ready for mishaps like lint and hair in paint, I can get on with things.

    Just a small update on my progress on the cockpit and some commentary on photo-etch.

    I got to work on the canopy slide and navigation light assembly. This was a bit hit and miss as I initially misunderstood how much of the Hasegawa plastic to cut away (Eduard instructions can be a bit vague). I assembled it then had to take it apart to hack away more plastic. All the delicate etch survived, luckily. I ended up modifying their approach by leaving the aft part of the "floor" of the canopy framework intact as well as a spine between the arch and the rear of the canopy. This allowed me to keep everything stronger and properly aligned and matched pics of the real thing. It is interesting how much of the fuselage shows through when the canopy is open but that is indeed authentic. Of course, I will be adding wiring, the two clear lights and more etch later on before final fitting but this is all I need before proceeding with the painting stage.
    You may note that I sandwiched plastic between the two halves of the etch arch frame to add strength, aid alignment and reduce glue use. I do this quite a bit with etch instead of using all metal pieces (which will always get covered with goopy glue).

    I completed the base plate for the canopy slide mech, which again uses plastic and metal in combo.

    I finally fitted everything together without glue to check alignment. I find this is very important before final painting and gluing to avoid having to pull things apart at a later stage.

    I decided to use the plastic seat since the real thing is pretty chunky. I added troughs for the armrests from thin plastic.

    Does anyone know if the extra cloth insert with further belts was found on Korean War Sabres? I think it looks cool and it busies up the seat nicely

    Last pic is on the color etch tree. Since I will be doing this as a Korean War bird, I have to do the pit in all black. Too bad I will have to paint over the grey etch but I don't see any way around it. Any way the color belts are nice.

    This was hours of work, believe it or not. A lot of it was staring at pics of cockpits and F-86 models from the Internet before I finally figure out the proper look of things. The rest was going cross-eyed bending and gluing etch. Not my favorite process but definitely one of the things that gives me greatest satisfaction when finished. I don't know about you guys but I love how these little details look when they finally come together.

  • Profile Photo
    Erik Gjørup said 3 years, 9 months ago:

    Colin (@coling) what an awesome update you have for us here. Sorry to be a bit late for the party, but the cat-hair-rescue was a nice touch to the build - and I bet the cats are happy it turned out just fine, saving them from the shavingfoamtreatment!

    The etch/plastic combo is such a fine job - that photoetch detail of yours really stand out - crosseyed or not. I shall be looking forward to the next post in this great build!

  • Profile Photo
    Spiros Pendedekas said 3 years, 9 months ago:

    Hi Colin @coling!
    You've done a truly wonderful job.
    Your Sabre looks spectacular already.
    Looking forward to your next installment.

  • Profile Photo
    Colin Gomez said 3 years, 8 months ago:

    Thanks, Erik and Spiros. Nice to know you are watching.

  • Profile Photo
    Colin Gomez said 3 years, 8 months ago:

    Here is an update on the F-86 cockpit. The replacement dragon decals arrived in the mail so I am "chuffed" to get on with the Huff as the English say and proceed with the build.

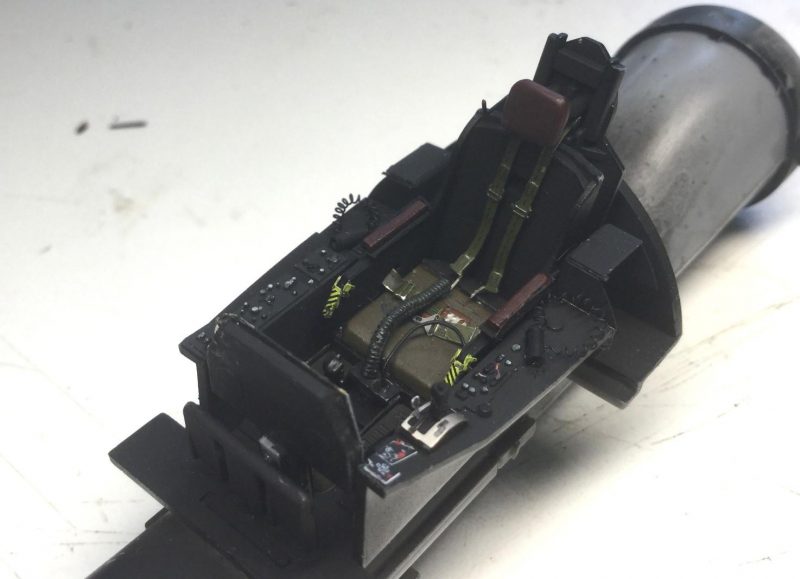
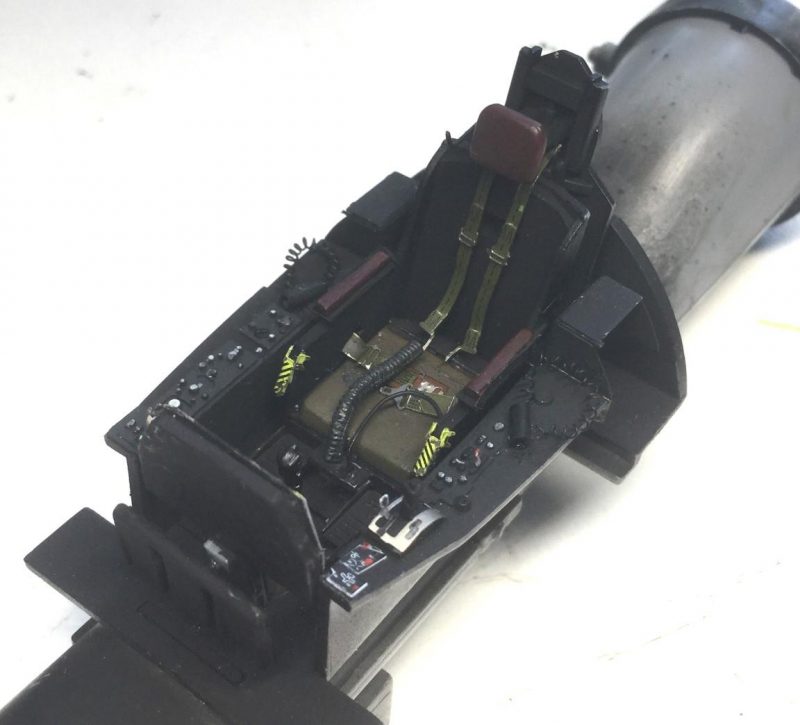
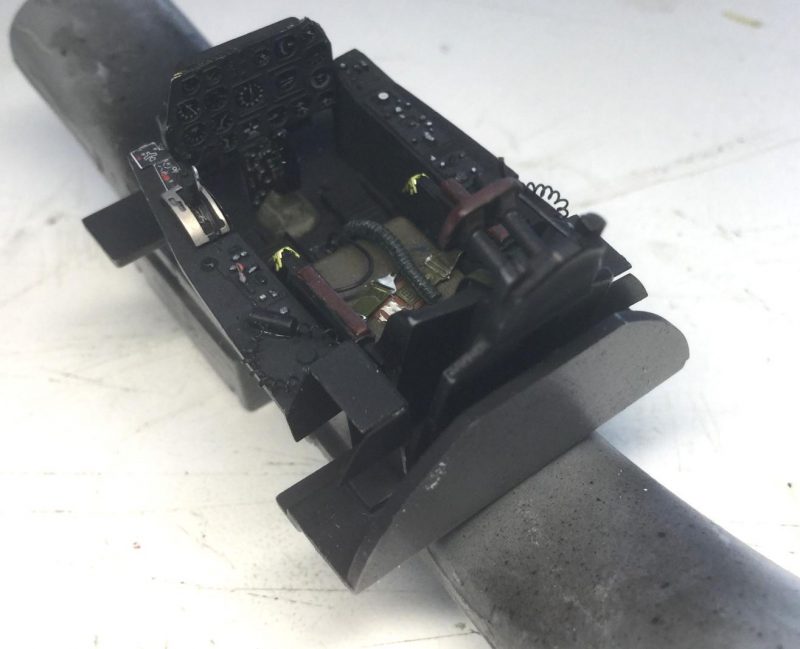
    The cockpit has been a challenge, mainly with trying to get a richly detailed look when everything is flat black! I have used a mixture of blacks in masking and spraying console segments, and in repainting some of the etch from grey to black. It is not so visible in the pics but I have used Tamiya Flat Black, German Grey, NATO Black and Life Color Flat Black to highlight details.

    A couple of pics of the seat show added details in the disconnected oxygen hose and radio cable on the seat pad and a seat height adjustment lever from stretched sprue, as well as Eduard etch foot rests. 
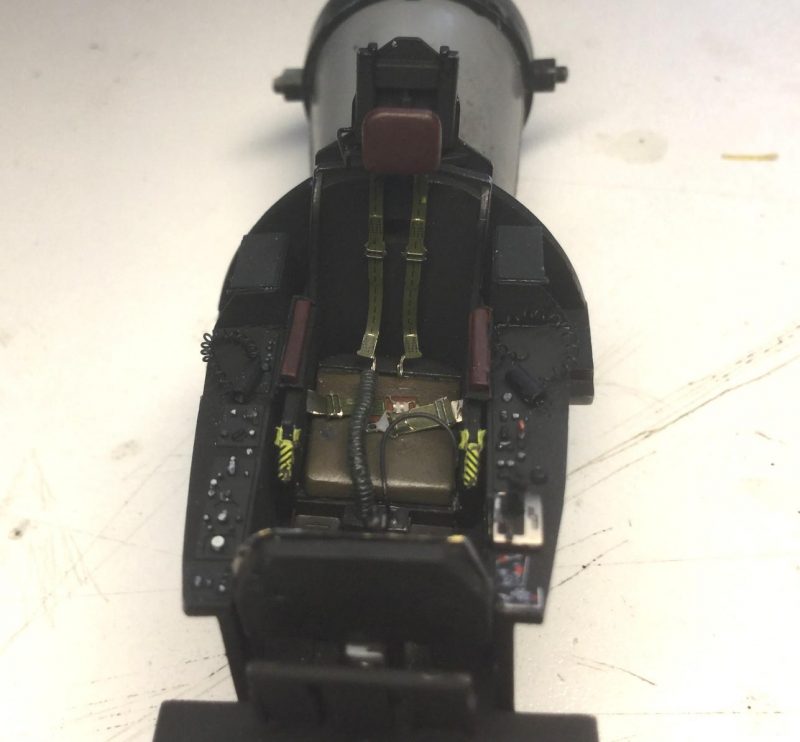
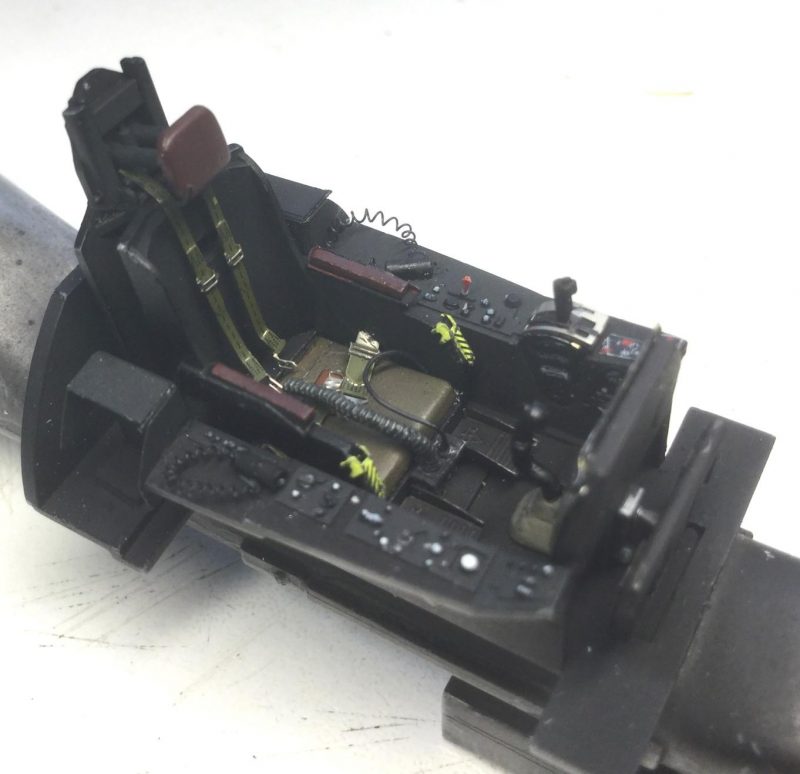
Some pics show the pit without the seat (with scraped paint to glue the seat. Most of the kit switch detail is OOB original and painted with various greys or highlighted with silver pencil. I have added scratchbuilt two cabin lights attached with spiral cord made from wrapping fine stretched sprue around a pin drill bit. The lights themselves are from styrene rod with the ends drilled out. I like the look of the Eduard Color Etch for the belts and harness and yellow/black firing handles. They look good but I nearly had a stroke getting them to stay put with super glue (which, of course, sticks much better to skin than plastic!). Next pics show seat placed in the pit. 
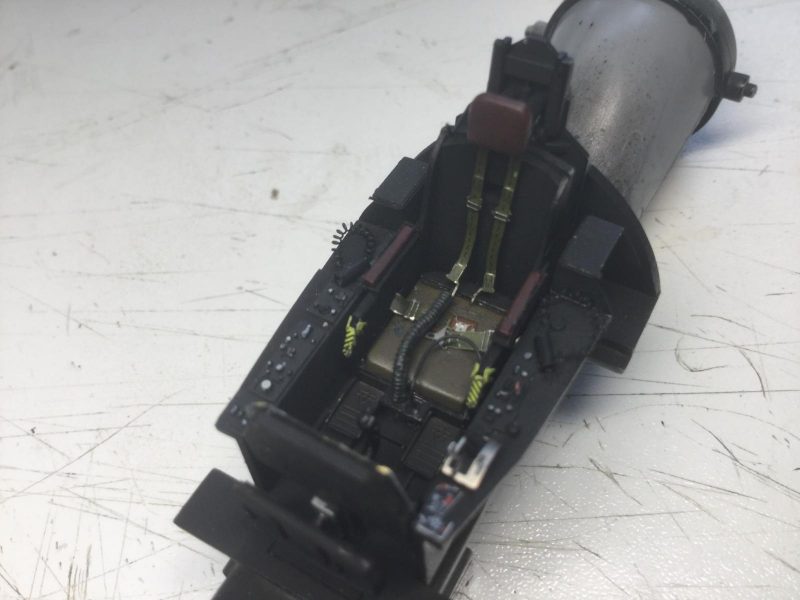
. You may note that the seat is too far back since I just stuck it in there for viewing purposes. I will need to do some trimming of the belt etch ends to get it to fit better. The Eduard inserts for throttle quadrant really help to improve the realism of the pit, even if I had to repaint them slightly with black over grey. Likewise for the set footrests, rudder pedals and instrument panel. BTW, I experimented with 3 different shades for the headrest, based on research showing the headrest could be OD, red-brown, red, black or a light grey. I was initially going for red but i didn't like the look of it against the black and how it clashed somehow with the green details. OD looked too similar to other details but red-brown, which I found in a variety of pics of Korean War F-86 cockpits, looked harmonious. It also happened to be the color in the Hasegawa color suggestions fro the instructions.

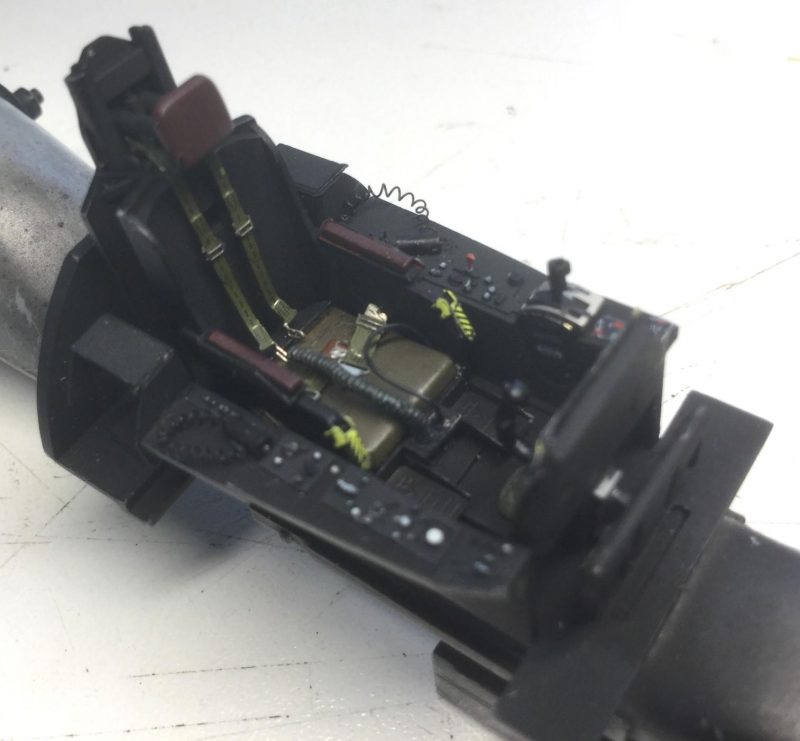
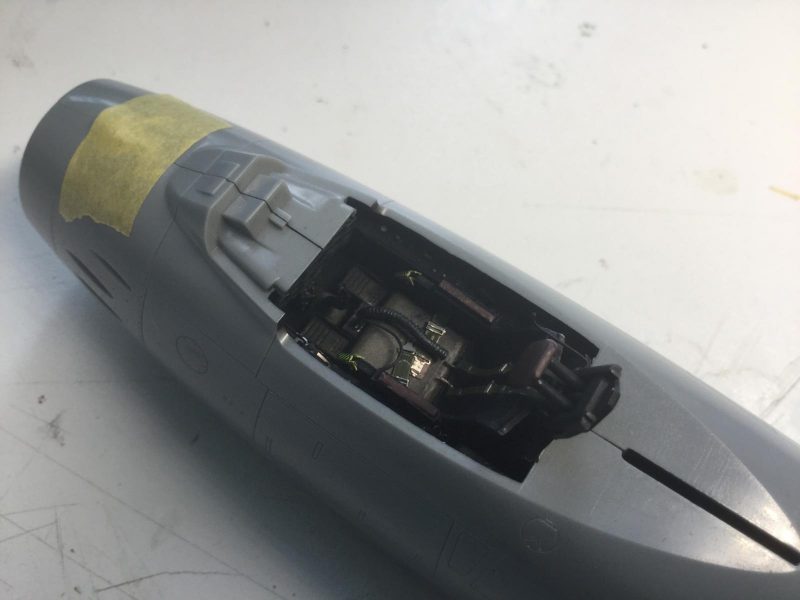
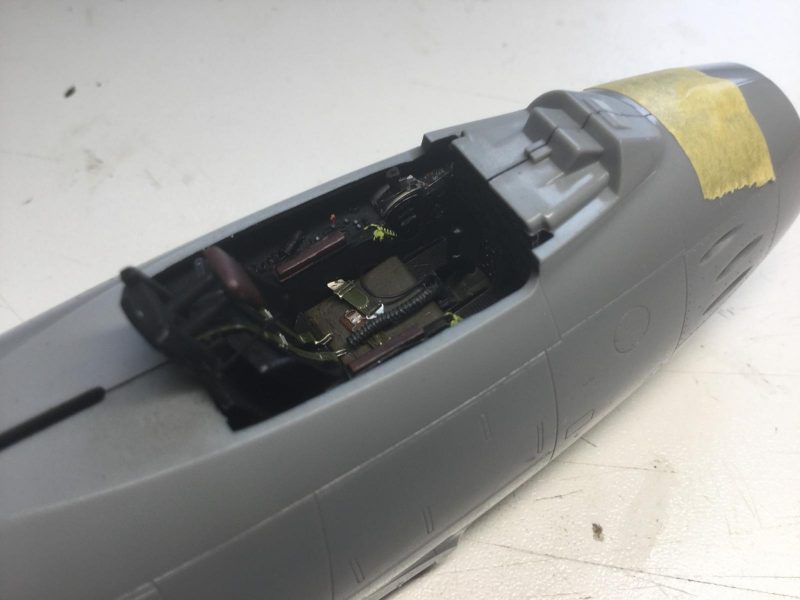
    I have fitted the pit so far in the fuselage to make sure it all looks OK and doesn't cause closure issues. The fit is so tight on the Hasegawa kit that I may have to trim away bits of etch invisible to the eye - especially where the belt ends make it hard to fit the seat.

    There is, of course, more to add with the reflector gun-sight, rails for the canopy and all the canopy detail already done. This will be finished after gluing the fuselage halves together. Stay tuned. Thanks for looking.

  • Profile Photo
    Spiros Pendedekas said 3 years, 8 months ago:

    That's a masterpiece of a cockpit, Colin @coling. Your painting stands out.
    I loved the idea of the wrapped around a drill bit sretched sprue.

  • Profile Photo
    Erik Gjørup said 3 years, 8 months ago:

    I am lost for words! I may be able to say well done. I know AM etch is supposed to make cockpits better, but you really make it stand out in your extra care and combining them with original detail and scratchbuilding. WOW. I am indeed tuned in here - and hope you can aviod glueing your fingers together! (I quote);

    I nearly had a stroke getting them to stay put with super glue (which, of course, sticks much better to skin than plastic!)

  • Profile Photo
    Tom Cleaver said 3 years, 6 months ago:

    Colin, you definitely do nice work on your cockpits. Very good detailing here.

    FWIW, I have found with Vallejo metalizers that a 60 paint - 40 thinner mixture of Tamiya X-18 "Semi Gloss Black" misted on provides a really smooth surface to apply the metalizer paint. The Vallejo primer is much "grainier" and while it won't show up all that much on the drop tanks, it will definitely show up on the airframe. Just a thought for you.

    Here's one of my Sabres, done the way I just described.

    1 attached image. Click to enlarge.