Memorial Day tribute to a fallen family member. Monogram 1/48 B-25 J ”Stuff”

Started by Louis Gardner · 98 · 4 years ago
  • Profile Photo
    Louis Gardner said 4 years, 11 months ago:

    Over the last few days I did some more work on the B-25... I even managed to spray a little on a new "secondary" build that will be ongoing as things permit.

    I sprayed on some Tamiya "Yellow-Green" to a few more items.


    The I sprayed on some Flat Black to the propellers, Tail Gunner's armored plate and Norden Bomb Sight. The prop hubs will need to be re-sprayed. Then the tips will get some yellow and they should be good to go.

    I then followed up by spraying on some more "Dull Dark Green" on some various bits.

    Here's a close up of the Bombardiers Seat. This will get mounted in the nose just ahead of the cockpit.

    On the main portion of the upper turret assembly, the housing was painted in a color called "Bronze green" on some planes. Here you can see where I sprayed the main body using a home brewed color for Bronze Green.

    Since I had the color loaded in the air brush, I decided to go ahead and spray some of it on the interior of a Monogram 1/48 scale B-24 J kit in the stash. I have been wanting to build one up using Bare Metal Foil.

    This one will be completed as "The Dragon and It's Tail".

    The color is very hard to capture using my cell phone camera. You can see where I sprayed some on the interior of the Monogram B-24 fuselage in these pictures.


    This little area of overspray onto the bare aluminum colored plastic shows a decent representation of the color. Otherwise it's way too dark in the pictures.

    I took a bulkhead that I painted from the B-24 kit and actually used my scanner and got decent results. This looks to be just a tad light but you get the idea... It's a very hard color to get a good picture of. It reminds me of a Late War Mitsubishi Green used on the upper surfaces of A6M-5's.

    I have had the opportunity on several occasions to see the inside of the Colling's Foundation B-24 "Witch Craft" over the years. Here I am standing next to the waist gunner's position. The weapon is in the stored position here. You can see the fold up window has been painted using the Bronze Green color on the inside. Here in this photo it looks dark...

    So I took another picture of the color, and this is a more true representation of the actual color as seen from inside a real life B-24...

    Lastly I sprayed the tail gunner's canvas boot using "Faded Olive Drab".

    As usual, comments are encouraged.

    If enough interest is generated, I may start another build journal on the 1/48 scale Monogram B-24. I have been scrounging some detail references for this one over the past few years...and have been itching to build it.

  • Profile Photo
    Jeff Bailey said 4 years, 11 months ago:

    Well Louis, I just found this. Combine that with my abbreviated time spent here on iModeler for the last month & a half, so I'm late to the party. I'm always late, anyway. Why, I'm so often late that when I pass away, they'll call me "the Late Jeff Bailey." LoL!

    Your B-25 is an awesome creation, so far, buddy. Great photos, too. What do you use for a camera? @lgardner

    Later Gator, Brother DAT. (Florida humour!)

  • Profile Photo
    Stephen W Towle said 4 years, 11 months ago:

    This is something that is very esoteric when it comes to B-25s...but the pilots armor plate which I believe was aluminum and had pieces of angled wood, canvas covered dope to help smooth out the plate ends is not mounted correctly. Or the majority of B-25s had the front end of the plate closest to the glazed nose mounting inline with where the seem meets the nose and fuselage directly in front of cockpit and the winds screen. Check the photos. Even Hasegawa followed suit with the armor placement. There should be a seam or a recessed panel line between the two. The things you learn model...

    Hulu has remade Catch-22 with Clooney. I wonder how much of it is CGI? If your into B-25s that is.

    ://www.huhttpslu.com/series/catch-22-858b02a2-61de-4597-aaa0-7e3f12b54673?&cmp=10866&utm_source=google&utm_medium=SEM&utm_campaign=CM_SEM_Catch22&utm_term=+catch%20+22%20+netflix&ds_rl=1251123&ds_rl=1251123&gclid=EAIaIQobChMIou6F9p6U4gIVA7nACh2-PgPzEAAYASAAEgLylPD_BwE&gclsrc=aw.ds

  • Profile Photo
    Louis Gardner said 4 years, 11 months ago:

    Hello Jeff ! @mikegolf
    It's better late than never...Your sense of humor always amazes me.

    As far as the camera, I simply use the one in my IPhone and snap some pictures. The lighting seems to affect the colors though. It's always good to hear from you my fellow DAT brother...

  • Profile Photo
    Louis Gardner said 4 years, 11 months ago:

    Stephen, @stephen-w-towel

    Thanks for the response. The armor plate I was showing in the pictures above is the one for the tail gunner. I know the pictures I posted are not the greatest... sorry.

    This next photo shows the various locations and style of armor they used on the J model B-25.

    The pilot seats had several different styles of armor. I found these pictures while doing the pre build research for this one over at Hyperscale.

    One type of armor plate was called a "Bent Tombstone" while the other was a straight one. This is an illustration of the "Bent Tombstone".

    Then they had a "Late War" pilot seat that provided a lot more protection.

    The co pilot seat had a different arrangement. It was a lot shorter and only came up half way on the back plate.


    Here's a typical installation showing both the pilot and co pilot seat side by side.

    From what I have read, they sometimes took pilot armor and installed it in the co pilots position using parts from wrecked or damaged beyond repair machines. I would want a little more protection too...
    This next picture is one that I personally took a year or so ago of the pilot's seats inside "Barbie III", which is a cannon nosed "H" model.


    Here's me standing next to this piece of flying history...

    I tried to use the link you provided, but I wasn't able to get it to work. Then again, I'm not a computer wizard. I'm doing good to log in ... 🙂

    Thanks for the comments. I am into B-25's so I appreciate anything you send this way. It is amazing the "Stuff" you will find out while doing your research. For me, this is just as much fun as the build...

    Take care my friend.

  • Profile Photo
    Louis Gardner said 4 years, 11 months ago:

    Over the weekend I got some more work done on "Stuff"... the fuselage halves are now ready to glue together.

    I painted the bomb bay inspection hatch using a primer red color. I also used a chrome pen marker to paint the bomb bay interior light.


    Some 500 pound GP bombs were scavenged from an Accurate Miniatures TBF Avenger. I wanted to have a different bomb load than what was provided in the kit. These will be staggered in the bomb bay. The kit supplied three 1,000 pounders...

    Here's a close up of the top turret / cockpit section of the fuselage. Monogram packed a lot of details into this kit. With some careful painting, this stuff will probably not be seen once assembled...

    I'm just checking to see if you're paying attention ...


    The waist gunner position is also nicely done.

    Here's the tail gunner's home.

    This next photo shows the Starboard side rear fuselage half. The round door is an emergency escape hatch... not to be used in flight ! It's so labelled on the real plane. I'm not making this up.

    The front "office" looks busy enough.

    Here's a few pictures that show the entire fuselage before it's glued together.


    The radios turned out pretty good. These may be slightly visible once everything is assembled.

    Port side rear fuselage:

    Bomb Bay internals:


    The upper turret assembly. The clear plexi-glass part gets added later.


    Here's a close up of the 500 pounders from the AM Avenger. They fit nicely inside. There will be a total of four...

    The Bombardier's Station is ready for installation... I'm especially pleased with how the Norden sight turned out.


    The waist guns and single nose .050 were painted and ready for installation. These are correctly molded with different side ammunition feeds.

    The crew entry doors were covered with Bare Metal Foil.


    as were the landing gear doors...

    The leading and trailing edges of the bomb bay doors were painted with flat red. This acted as a warning for injury to the flight crew and maintenance crews. Then they were covered using "Ultra Bright Chrome" BMF. This had an added bonus of making the slight rippling more visible. Perfect !


    This next picture shows the rear crew compartment and the heater. The heater looks like the same ones we had in our old M-60 tanks... I wouldn't be surprised. Later during the "J" model production run, these heaters were removed. They were found to be not very effective at altitude.

    This last photo shows the radio. It turned out pretty good to...

    I'm calling it a night. I hope to glue the fuselage assembly together soon.

    Please stay tuned for updates, and as always:

    "comments are encouraged"

    Good night and thanks for looking.

  • Profile Photo
    Josh Patterson said 4 years, 11 months ago:

    Nice job on the interior! I was a bit worried when the parts were assembled while only painted green. It would be a travesty not to paint all the nice details Monogram molded into the interiors of these kits! Further reading shows the great job you did on the panels! The "plywood" tunnel floor is a great touch as well. For future glass nosed bomber builds Google "Terry Dean nose weights". He molds lead to fit into the nooks and crannies to keep them from tail sitting. (I believe the B-25 has just a single one that fits in the nose gear well.) The ones I got for my B-29 are perfect. One on each side of the nose wheel well under the cockpit floor is enough to keep it balanced. (I would say with a fair degree of confidence that it puts the CG in the same spot it would be on the full size Superfortress!)

    3 attached images. Click to enlarge.

  • Profile Photo
    George Henderson said 4 years, 11 months ago:

    A nice tribute and some great modelling Louis

  • Profile Photo
    Jeff Bailey said 4 years, 11 months ago:

    Great looking B-25, Buddy! I had to chuckle at your comment about the heater assembly ... it DOES look like the heaters we used on the '60s! Worthless pieces of ... uh ... doo-doo!

    What's the difference in the bomb WITH a thin yellow body stripe versus the one without? The old "round tuit" situation, perhaps?

    @lgardner

  • Profile Photo
    Paul Barber said 4 years, 11 months ago:

    I had another run through this thread and I am loving your attention to colour accuracy, Louis. It seems very much your focus currently - its very informative. Helping a lot on my Japanese aircraft builds. So, thanks again my friend! The bare metal foil work is brilliant too!

  • Profile Photo
    Louis Gardner said 4 years, 11 months ago:

    Hello Josh ! @jpatt1000

    Good to hear form you. I tried to locate the weights you mentioned. I was not successful. From what I saw at various other websites, these may not be in production anymore. Sad... as they look pretty good !

    Thanks for the tip and the compliments on the interior.

    Take care.

  • Profile Photo
    Louis Gardner said 4 years, 11 months ago:

    George, @blackadder57

    I just went back and took another look at your Ki-44 ... and man what a beauty it is !

    Thanks for stopping by.

  • Profile Photo
    Louis Gardner said 4 years, 11 months ago:

    Hey there SSgt. Bailey ! @mikegolf

    With you being a former US Army tanker like myself, I was sure that you would agree about the heater ... It really does look like a crew heater that was used in the good old M-60's doesn't it ?

    To answer your question about the yellow stripes on the 500 pounders... it wasn't done because of laziness... They all are supposed to have the stripes. It denotes a 500 pound "General Purpose" or GP bomb... I simply didn't have any more decals. So maybe on second thought it was a little bit of laziness, as they could have been painted on.

    But I guessed that once they were installed in the bomb bay, it wouldn't be too overly noticeable if I stacked them on top... Follow along for another installment and I'll show you what I mean.

    Take care buddy.

  • Profile Photo
    Louis Gardner said 4 years, 11 months ago:

    Hey there Paul ... @yellow10

    It's always good to hear from you. 🙂 I also took another look at your building progress from the Eternal Zero... wow... amazing indeed.

    I have been working on the research for this build for a while. I have complied information over a few years, similar to how I have been doing with the Japanese colors. Speaking of which, I have not forgotten about the project. It is still in the works to get the next episode under way.

    Recently our time has been limited with various doctor appointments and such, so not as much time at the work bench has been available, as it has been in the past.

    Please don't hesitate to ask any questions... if I can be of assistance I definitely will. By the looks of things, you have it well under control.

    Thanks my friend for stopping by, and I'll be looking forward to seeing your next installment on your Zeros and Ki-43. Well done !

  • Profile Photo
    Louis Gardner said 4 years, 11 months ago:

    So everyone, here's the latest scoop on "Stuff"...

    If you have been following along, I have also been working a little bit on a Monogram 1/48 scale B-24 that will be finished as "The Dragon and it's Tail". So as I have been painting various parts for the B-25 "Stuff", in the background I have been doing similar items the "The Dragon"...

    Here are the props from the B-25. I went back and touched up the center hub with some Metalizer "Aluminum Plate" color.


    While I was spraying this color, I decided to paint the props on the Dragon too...

    Here's a comparison of the difference in size between the two. In this next picture, the B-25 prop is on the left, while the smaller B-24 prop is on the right.
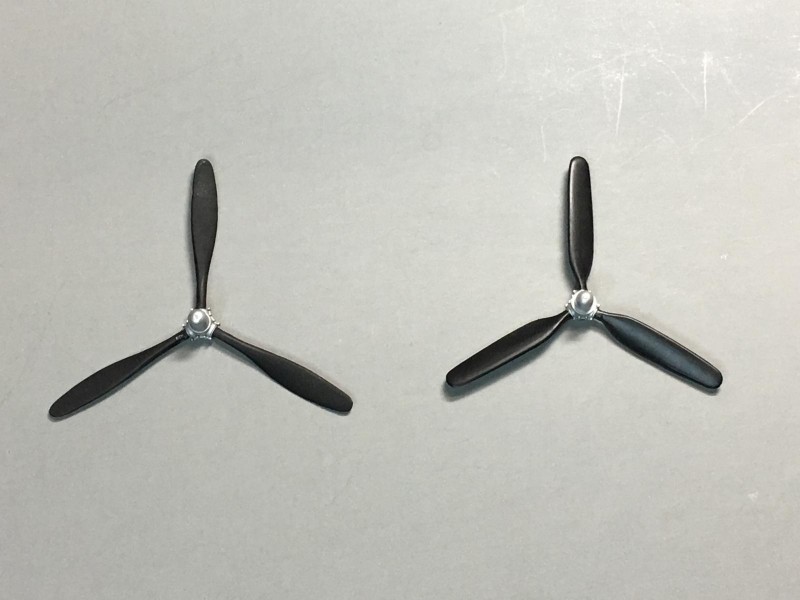
    I decided to build the wheels on the B-24 and spray them too. This next photo shows a comparison between the two sets. B-25 on the left, B-24 on the right... The hubs were also sprayed with Aluminum Plate color.
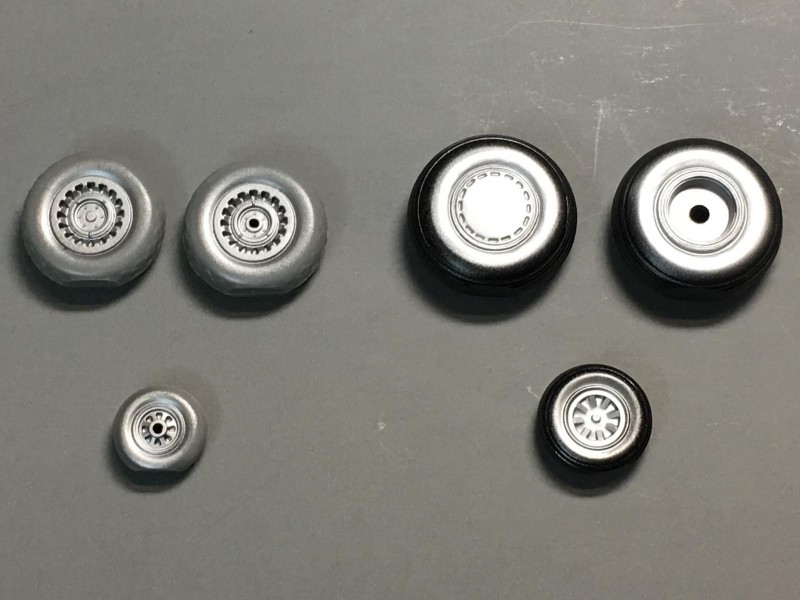
    I glued the fuselage halves together, and allowed them to sit overnight. The next day I started working on the seams.
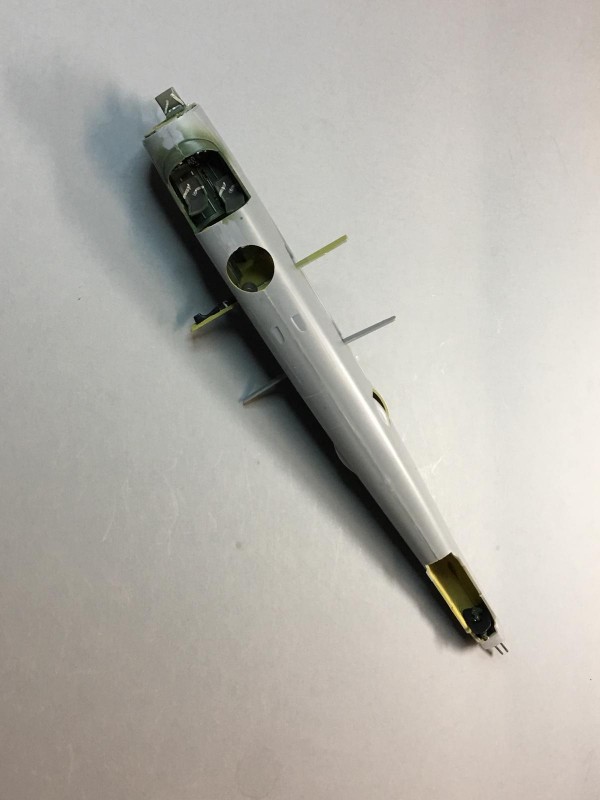
    Here's a picture showing the instrument panel and control yokes in "Stuff".

    This photo shows the Tail Gunner position rather well. The armor plate was painted flat black before installation. Not much will be visible I'm guessing once the stabilizer and canopy are installed.

    Here's the Bomb Bay. You can see how the yellow stripes are not too visible once in position on the upper 500 lb. bombs.

    I staggered them. The overall Aluminum color is seen in this photo of the bomb bay.

    On one side they are closer together and the other side farther apart.

    This picture shows the cockpit and you can see a little of the fuselage interior where the upper turret will eventually go.

    This photo shows how I staggered the seats. This was typically done when the plane was on the ground. It made it easier for the crew to get in and out of the seats.

    Since I was spraying Aluminum Plate color, I sprayed the engines for the B-24... This revealed a flaw, that I should have seen but didn't until afterwards.

    Each engine has a small hole in them... like this.

    Two engines from the B-24 are on the same plastic tree. The holes are the same from each tree. I turned the engines to make the holes a little more visible.

    what a shame ...

    Since I have been comparing parts between the B-24 and the B-25, here's a side by side comparison of the engines. Each one is marked.
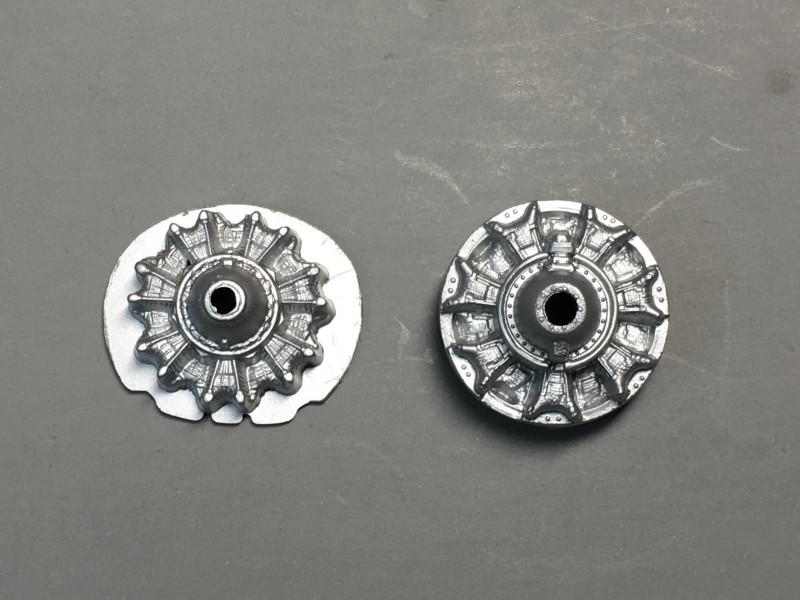
    And a picture I took showing a real life B-25 engine...

    followed by a real life B-24 engine.

    Who's this guy, and what is he sitting in ?

    I had a solution in mind for the molding flaw in the engines for the B-24, in the form of a replacement resin set that were made by Quickboost. I ordered a set of replacement engines for the Dragon, and they should arrive in about a week or so. I'll post up a photo when they arrive. This may be a good idea since the originals were not too good. I'm sure with a little work they could be made better.
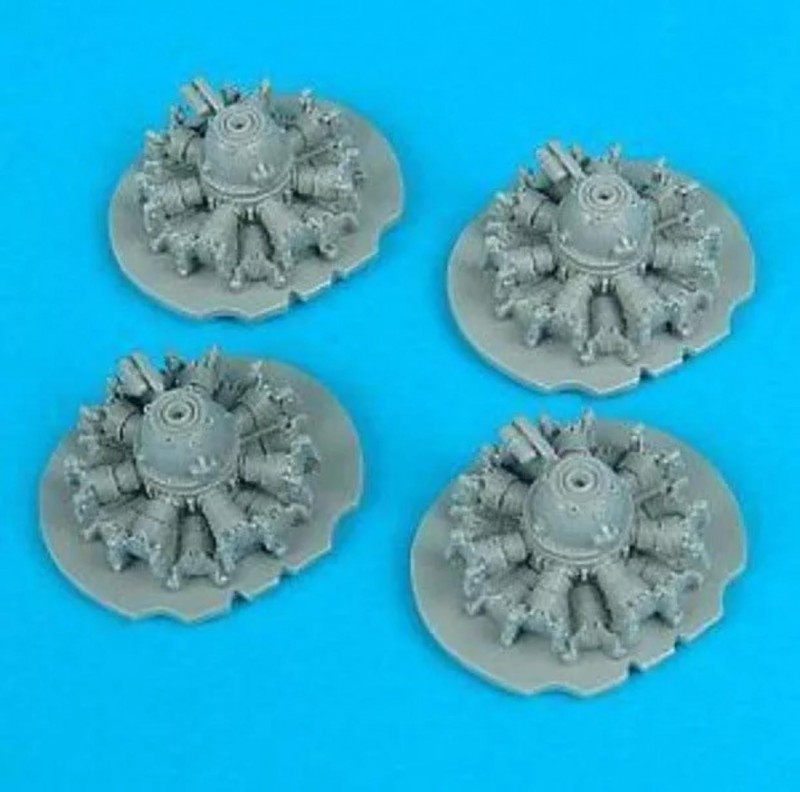
    The last thing I sprayed Aluminum Plate color was the fabric covered control surfaces. Here you can see the elevators. The Ailerons look very similar.

    The I started covering the stabilizer assembly using Bare Metal Foil on the bottom side.

    The light reflecting from the surface of the foil gives it a different look.

    I decided to wrap the foil around the leading edge (and trailing edge for the trim tabs). This top side will get a coat of Olive Drab once the plane is ready for paint.

    Calling it a night.

    As usual,
    "comments are encouraged".

    Good night.