Memorial Day tribute to a fallen family member. Monogram 1/48 B-25 J ”Stuff”

Started by Louis Gardner · 98 · 4 years ago
  • Profile Photo
    Louis Gardner said 4 years, 7 months ago:

    Today I made some more progress on “Stuff”.

    The various sink marks and gaps were filled in and sanded smooth.

    Then I decided to try out the new tools I picked up several months ago for the 1/32 scale Revell of Germany P-51D. These are some great gadgets and now that I have tried them out, I don’t know how I previously managed to rescribe panel lines and add rivets.

    The tools I’m talking about are called “Rosie the Riveter”. They come in various sizes so I picked out two that would work best for 1/48 and 1/32 scale builds.

    Here you can see the added rows of rivets I placed on the sides of the nacelles. These areas were blank and lacked any details. I think they look better now.


    I managed to get the inner wing sections as well as the engine nacelles covered with various shades of BMF.

    Here’s how it looks at the moment.


    Hopefully tomorrow I’ll get the rest of the wings done and possibly even spray paint some OD Green on the top side.

    I’m calling it a night... the hardest parts have been covered now. The bottom of the wing surface is nice and flat and should be easy to cover with foil.

    The nacelles were a little tricky but I prevailed.

    Now I feel better knowing how the new rivet tools work. Maybe I’ll drag out those big P-51’s again soon and get busy with the flaps on them.

    As always comments are encouraged.

    Thanks for stopping by ...

  • Profile Photo
    Erik Gjørup said 4 years, 7 months ago:

    Your BMF rocks! And with the new tool there seem to be no limits 🙂

  • Profile Photo
    Louis Gardner said 4 years, 7 months ago:

    Thanks Erik ! @airbum

    I can whole heartedly recommend these "Rosie the Riveter" tools... Now that I have used two different sizes of them, I can see myself purchasing a few more of them in the future.

  • Profile Photo
    Louis Gardner said 4 years, 7 months ago:

    Last night I completed the foil work on the wings. I may go back and add some more rivet details. The beauty of using foil is the rivet tool can be used before or afterwards. I prefer to do it beforehand since I don't want to dull the rivet tool. Light pressure is all you need to make them work.


    Now I’ll go back and re spray the ailerons. I messed them up with the adhesive from the foil. I'll use some Metallizer Aluminum Plate color to do this like I used on the elevators and rudders.

    Next installment will be to add the engines and paint the upper wing surfaces in OD Green.

    As usual,
    Comments are encouraged.

  • Profile Photo
    Greg Kittinger said 4 years, 7 months ago:

    Looking great! Man, you are the BMF king!

  • Profile Photo
    Louis Gardner said 4 years, 7 months ago:

    Thank you very much Greg. @gkittinger

    I sincerely appreciate the compliments. I just finished painting and installing the wings. I repainted the ailerons on the underside since they looked horrible.

    More pictures and another installment on the way next ...

    Please stay tuned.

  • Profile Photo
    Louis Gardner said 4 years, 7 months ago:

    As mentioned above, I just finished painting the OD Green on the upper surfaces of the wing. I didn't take my time to make things exactly "perfect".

    Instead, I did it rather quickly, as I thought the original ground crews would have done. Please keep in mind that the upper surfaces of these planes were painted as a result of a previous attack made on the airbase by the Luftwaffe.

    The attack had just recently happened, and the planes as they were, (wearing a natural metal finish), provided a nice shiny target for the Germans.

    So the order was given immediately to spray them to help conceal them from future air raid attacks. I don't think that this would have been done with the crews taking their time. This rushed paint job is visible in the various photographs of the real planes. Take a look at the window framing. You will see this area surrounding the glass has been left in natural metal.

    The ground crews simply masked off the entire window area, not taking the time to mask off the individual panels...

    With this in mind, I went to work. I also didn't apply a heavy coat of OD Green. It is thin in several locations on purpose. The BMF is barely covered in these areas.

    Here are the end results. The engines and cowlings have been installed...


    I'm going to be adding some exhaust stains and oil leaks. This should make them look a little more realistic.

    My good friend James Robinson @jamesb

    sent me a very cool window sticker a while back. It has a picture of a radial engine on the sticker.

    Just below the engine it says:
    "Radials Don't Leak, They Mark Their Territory"... A more truthful statement has never been made about these engines.


    The upper wing surfaces were painted using OD Green. I use Model Master enamels whenever possible.

    The undersides remained in the Natural Metal finish as they delivered by North American.

    You know what happens next !

    I couldn't resist the urge... So I slipped the wings in position. Right now they're held in position by friction alone.


    It's really starting to look like a B-25 named "Stuff" now...

    and I'm getting really stoked about this one. Time to take it for a spin around the room.
    "Clear Prop !"

    On second thought, I probably shouldn't do this just yet. The wings have not been glued on... and it doesn't have wheels (or props for that matter) ! How can you land a plane without wheels ? I don't want to belly it in...

    These old Monogram kits are so cool. They give some of us a chance to relive parts of our childhood.

    As always,
    Comments are encouraged.

  • Profile Photo
    Erik Gjørup said 4 years, 7 months ago:

    Your Stuff is comin' along splendidly - cool effects with the rushed paint!
    Now kick the tires, light the fires. . .

  • Profile Photo
    Louis Gardner said 4 years, 7 months ago:

    Thanks Erik ! @airbum

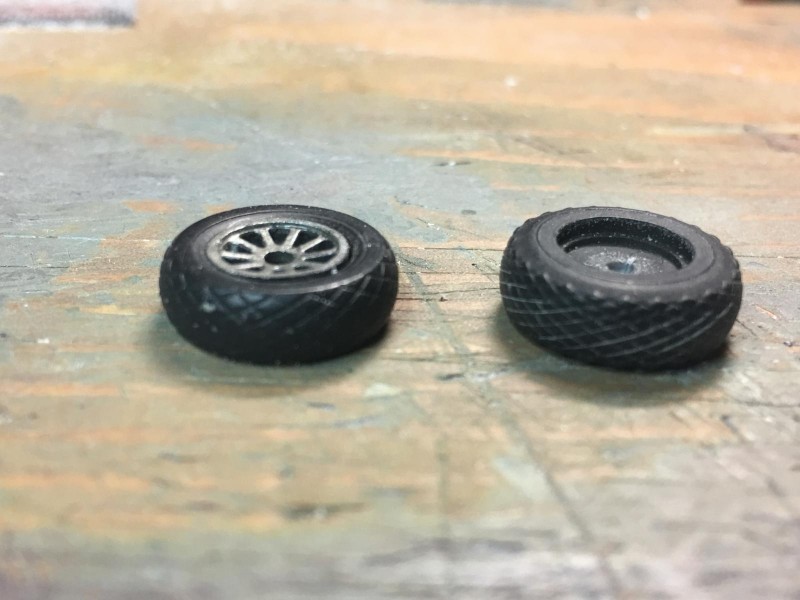
    Today was prop and wheel day at the Iron Werks. I spent all day working on these items for various kits. Here's a picture showing some of the wheels as they were painted in a Dark Gray base color.

    Prior to this point, I was having an extremely difficult time removing the seams that were present in the center of each tire. This was the joint line between both parts. Typically it is not a problem. However on this time it was a nightmare.

    But I did some research and learned some very cool stuff. I'll pass it along to you...

    I practically destroyed the nose wheel. I sanded the tread pattern away trying to eliminate the seam. So I thought I would attempt to re scribe a new diamond pattern... and failed miserably.

    However I was able to save the main wheels. They turned out "OK"... nothing to write home about, juts OK.


    The nose wheel was not so lucky...

    I went into the spare parts and was looking for a suitable replacement for the nose wheel. I found a set of old Monogram main wheels from a P-51 Mustang.


    These wheels had the same general size. Then the light bulb went off.

    The P-51 Mustang was also built by North American... I wondered if they may have used the same tire on the B-25 as a nose wheel ?

    I found this tire size chart... it also shows the T-6 Texan, (another North American plane) that also used the same sized 27 inch tire...as the Mustang.


    Then I thought about a previous Accurate Miniatures Mustang build, and how they offered two sets of tires. One set was weighted or bulged, the other as not and was round. So I "borrowed" a round wheel from the Accurate Miniatures Mustang.

    Next order of business was to cut away the original wheel hub from the Monogram B-25 nose wheel. I ended up with this:


    Here you can see the Monogram Mustang wheel on the left, AM Mustang wheel is just below the B-25 center hubs.
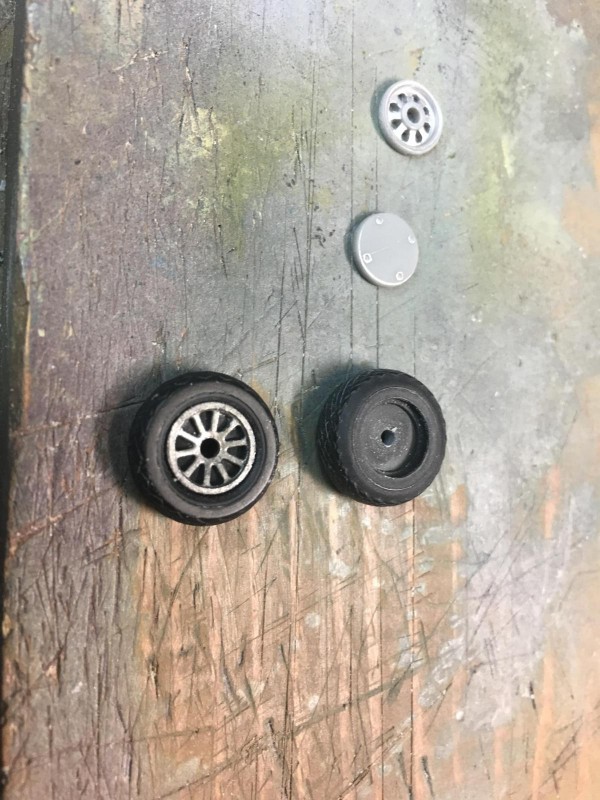
    With some sanding, I was able to thin the center wheel hub enough to allow the spokes to become hollow. This made the wheel look much more realistic, especially with the wheel having a dark background. This makes the center hub pop.

    Here's how the main wheels looked after they were painted.

    I glued the parts together after everything was painted and installed the wheels on "Stuff".


    Now the B-25 can stand on it's own feet... and thankfully it's not a "tail sitter".


    In my research, I found out that the Mustang used 5 various tread styles.

    1. Plain smooth tire
    2. Diamond pattern
    3. Cross pattern
    4. Block pattern
    5. Hexagonal pattern

    Here's a photo showing the plain pattern in use on a Mitchell.


    The most common type I have seen in various photographs was the diamond style tread. Here's a Mitchel from the 321st BG that has this pattern on the nose wheel.

    I found this color assembly line photo that shows the "Cross" Pattern.

    Now I can't confirm this 100 percent, but to me it looks as if the tires may have been shared between the 3 types of planes that were made by North American at the time.

    The Mitchell, the Mustang and the AT-6 all could have shared these parts in common. The chart shows they had a 27 inch wheel. I'd be interested to see if the B-25 did too.

    I'll eventually do some more digging into this subject.

    as usual,
    Comments are encouraged.

    Thanks for stopping by.

  • Profile Photo
    Louis Gardner said 4 years, 7 months ago:

    Earlier today I had the paint shop assembly line fired up and it was running at full speed.

    Here are the various propellers for projects that are currently on the work bench. They have been masked and are ready to spray the tips.


    Once things dried, I installed the props on "Stuff".

    Here's a larger picture that shows more of the plane.

    It was a very nice day outside today. I wanted to try out the new base that Tom Bebout @tom-bebout

    sent me a while ago. Here it is with the B-25 parked on top of it. These next pictures were taken outside in natural sunlight.


    It's designed for smaller single engine fighters, and is a little too small for this plane. I can tell you that Tom would say it looks best with a P-40 or a P-47 parked on it !

    I would probably say it looks best with a F4U though... time will tell on this, as I plan on using the new base for photos on my future articles.

    Thanks Tom !

    You're the best ...

  • Profile Photo
    Erik Gjørup said 4 years, 7 months ago:

    Tom, to adress the last post first; really looking good! (the small base made me think of the japan-trip ones from a carrier)

    Now, the nosewheel; I have bought a few sets of P-51 wheels from Special Hobby (their "Quick & Easy" line) . They are cast resin, and in such a clever way that the entire thread is without any seams! There are three available, and I have two; Q48179 Diamond Tread and Q48180 Diamond and Hole Tread pattern (i think you left that one out in your line of available patterns?) They also have the Cross Tread Pattern (Q48178). They will be made available in my shop soon, but they can be bought at any of your preferred suppliers, including specialhobby.com online. They have the tire as one with the rim for each side. According to the package they fit P-51D from Hasegawa, HobbyBoss, Revell and Tamiya, but no doubt they can be made to fit the new eduard kit and/or any B-25 of your choice.

  • Profile Photo
    Louis Gardner said 4 years, 7 months ago:

    Thanks for this information Erik. @airbum

    I didn't know about these wheels from Special Hobby. That's perfect ! You even provided the part numbers needed. Imagine how nice it would be not having to damage these delicate tread patterns ... I'm going to see about getting a cross tread pattern in 1/48 for an upcoming build, and quite possibly a few of the others you mentioned. This is fantastic !

    And yes you are absolutely correct about me forgetting a type of tire tread that was also found on the Mustang. Some call it the round (or oval) tread pattern, while you mentioned the Hole Tread.

    Anyway, here's a photo I found on the Barracuda Cast website that shows the available treads they provide in the 3 most popular scales. 1/32, 1/48 and 1/72.


    Top to bottom in the photo:
    1: Block tread
    2: Hexagonal tread
    3: Oval tread
    4: Diamond tread

    Thanks for letting me know about the various offerings from Special Hobby, as I have quite a few more Mustangs (and B-25's) in the stash in 1/48 scale. I have 3 AT-6 Texans (or SNJ's depending on how they get painted).

    I just looked at their website and here's a photo of the tire pattern that shows the Diamond pattern with holes... This picture was taken directly from the Special Hobby website. The details look great.


    This happens to be yet another tread pattern that I just learned about... Now I see exactly what you meant... Diamonds AND Holes

    This is all good information to know.

    Now that you mentioned it, the small base setting shown in the last few pictures does remind one of how these planes were flown from the Hornet in mid April of '42...

    Thanks again.

  • Profile Photo
    Erik Gjørup said 4 years, 7 months ago:

    Just took a few pictures with the macro-lens;


    First one is the diamond with hole (in the package through the plastic)

    The second is the diamond alone that had broken off. Very little cleanup is needed!

    @lgardner

  • Profile Photo
    Tom Bebout said 4 years, 7 months ago:

    I guess I'll have to build another base for that B-25. And you're correct a P-40 or P-47 goes quite well on the one I sent you. However, I could see an F-4U looking comfortable sitting on it.

  • Profile Photo
    Louis Gardner said 4 years, 7 months ago:

    Erik, @airbum
    Those are some amazingly detailed wheels ! I couldn't imagine trying to scratch build something that that... wow. They even have the Goodyear logo. Very impressive.