1/48 Hasegawa Ki-44-II Shoki

Started by George R Blair Jr · 41 · 3 years ago · 1/48, Hasegawa, Ki-44, Shoki
  • Profile Photo
    Erik Gjørup said 3 years, 9 months ago:

    George (@gblair), I like the IP a lot!

  • Profile Photo
    George R Blair Jr said 3 years, 9 months ago:

    Thanks for the kind words, Spiros (@fiveten) and Erik (@airbum). I discovered I actually missed two red handles on the left side, so there are five levers and two handles on the left side of the cockpit.

    Today was the day to see if everything came together. The instructions for the resin cockpit said you had to grind the kit sides down to .5 mm, and I "eyeballed" the thickness when I was doing the grinding. It was time to close up the fuselage and add the cockpit, so today we see if my Mark 1 Calibrator Eyeballs are any good. The resin shelf that supported the two guns and the instrument panel was superglued into the left side of the fuselage, and then the right side of the fuselage was glued in place.


    One good thing about the model is that the resin cockpit can be inserted into the fuselage from below, so I was able to let the fuselage glue get solid before I inserted the cockpit. Prior to adding the main resin cockpit pieces, there was a small auxiliary set of instruments on a beam that crosses the fuselage just below the instrument panel that needed to be added. This would be my first indication if everything was OK, and it slid into place perfectly. Maybe there is hope for the main cockpit pieces. The resin floor is an open affair which attaches to the same location pins in the fuselage that would have been used by the kit floor. If I did everything right, it should just slide in. No one was more surprised than I was to have the main floor slide into place perfectly. It fit snugly and then I added some superglue from below to fix everything in place.


    I was worried about being able to see below the open floor in the cockpit. I suppose in the real airplane you would have looked down and seen the top of the wing, but in the model you would see the inside of the bottom wing and the wheel well bulges. I decided to paint the area black to make it harder to see what was really there. I like to protect the areas that will receive glue, as well as keep the black paint off the wing surfaces, so I taped everything up that wouldn't receive paint.


    With that chore done it was time to add the flying surfaces to the fuselage. Nothing threatening here. This Hasegawa kit has gone together, so far, with almost nothing to fill. The fuselage required one swipe of a sanding stick to clean up the joins, but the wing had a gap on both sides after assembly. I think it will be easy to take care of with some acrylic putty.


    The engine was painted and assembled. I sprayed the two sets of engine cylinders with Humbrol Metal Cote Spray Polished Steel straight from the can. I drybrushed the cylinders with some aluminum enamel paint. The center engine cover was sprayed with some Humbrol Aluminum from the can. Everything was given a wash of black and then assembled. I am still toying with adding some wiring to the engine, but I think it looks fairly OK now.


    So, now I am waiting for everything to dry and set solid before I move on. This part of building is a lot like the old "hurry up and wait" in the military. I am in preliminary negotiations to use my wife's Scan and Cut machine to create some painting masks for the plane's insignias and markings. I have always used decals before, so this might be fun. Louis (@lgardner), I think the Scan and Cut should work great for markings. Stay tuned.

    I am hoping to finish this build before my daughter, who is in the last week of her pregnancy with her first child, has her baby. Hopefully tomorrow I can get everything ready for paint, which will be done in several stages. Since this plane is black, I figure I will do the yellow wing leading edges and some of the markings before I do the black paint. More to follow soon.

  • Profile Photo
    Spiros Pendedekas said 3 years, 9 months ago:

    Hi George @gblair.
    Your job is spectacular so far: attention to detail everywhere and no shortcuts at all. I am deeply amazed.
    Your jig device is great: "made" of existing stock equipment, does the job perfectly. A triumph of improvisation!
    Excellent all-around work. This Shoki stands out already!
    I wish all the best for your daughter and the forthcoming lovely family member!

  • Profile Photo
    Louis Gardner said 3 years, 9 months ago:

    George, @gblair
    Thanks for letting me know about the Scan and Cut progress. You made me laugh with the hurry up and wait military comment... So true ! There have been numerous times where we would hurry up to get somewhere, only to end up waiting for several hours exactly as you described. Any veteran will know exactly what I mean.

    I am very happy to hear the cockpit fit inside the fuselage afterwards. I got lucky on mine too...

    Will the exhaust ejector pin marks possibly be hidden by the cowling ? Just curious... you might get lucky there too.

    Thanks for the updates. It looks very good.

  • Profile Photo
    Erik Gjørup said 3 years, 9 months ago:

    Glad to see how well the resin fitted! No need for re-adjustment to the Mk 1.

    The "hurry up and wait" is eqally at home in civil aviation where we practise this each and every day 🙂

    Hope there will be a few half-hours for the family in your busy schedule - and that they appreciate every minute you can spare away from the hobby! All the best wishes for the forthcoming addition to your family @gblair - stay safe.

  • Profile Photo
    George R Blair Jr said 3 years, 9 months ago:

    Today was painting day. My first task was to finally decide which version of this paint scheme I would execute. As I mentioned earlier, there are several versions of the paint scheme used on this plane, all based on the research of whoever's book you are using. All indicated that there are no photos of this particular plane, so everything is based on research. The decal instructions offered yet another paint version, but indicated that the Japanese pilot who flew this plane in the war remembered (in the 1960s) some specific markings that were on his plane. The problem is that he remembered markings that were used by by a unit he had never been assigned to. The decal set I purchased for this plane has decals available to add these questionable markings, but point out that they don't match known research. So, I decided to use a scheme that is a composite of several sources: black paint on top with gray on the belly, yellow leading edge stripes, and white panels under the national markings. Most sources show this plane with a dark green rudder, so this would also be part of the paint scheme. This scheme would allow a little color contrast on an otherwise drab color, although it would mean a lot of masking.

    Before beginning the paint session, I wanted to make sure everything was ready to go. I was glad to see that the acrylic putty I used on the fuselage/wing joints worked perfectly. I love this stuff. Put it into the seam to be filled, let it dry for a few minutes, and then wipe it with a paper towel wet with a little alcohol. No sanding required. How did I live without this stuff before? While the alcohol was out I wiped down the rest of the plane to remove sanding dust, finger prints, and so on.
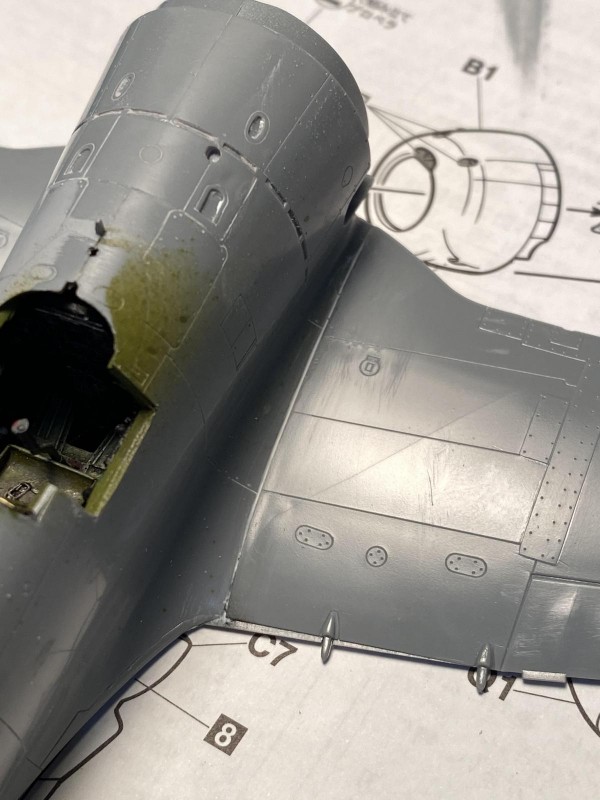

    It took a few minutes to figure out how I was going to cover the cockpit for painting. The rectangular panels removed on either side of cockpit created an awkward masking situation, especially since the left side had a number of photoetch levers that I was worried about knocking off. Luckily I had saved the panels after I cut them out, so I temporarily glued them into the spaces using Elmer's glue. I permanently glued the front windscreen in place, and then glued the rear canopy in place using Elmer's again. The canopy became its own mask for the cockpit, and the Elmer's will allow me to remove the canopy after painting, hopefully with little or no damage to the fuselage.
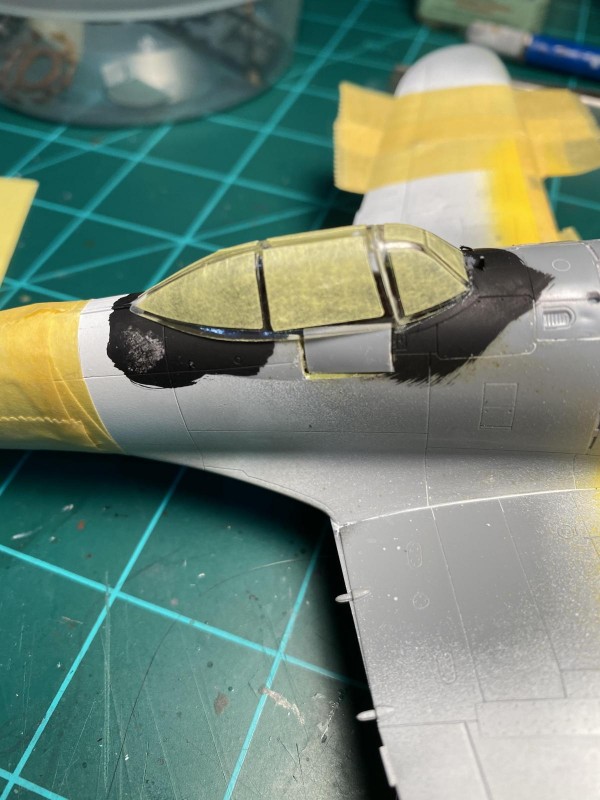
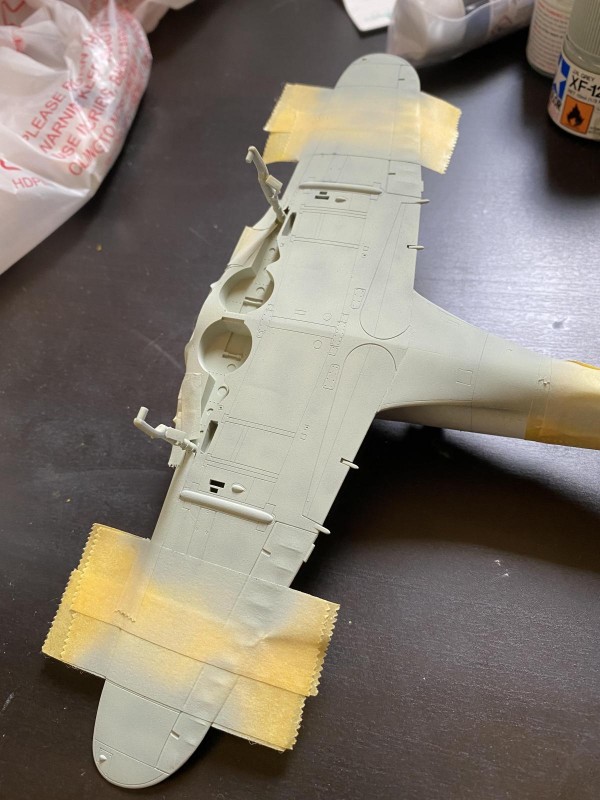
    I started the painting process by painting the areas that would be white using Tamiya Flat White. I masked these white areas with Tamiya tape, and then painted the leading edge of the wings using Tamiya Flat Yellow. Most of the diagrams show the rudder as a dark green, so I painted the rudder using Tamiya IJN Dark Green. Once all of this was dry, I masked off these areas.
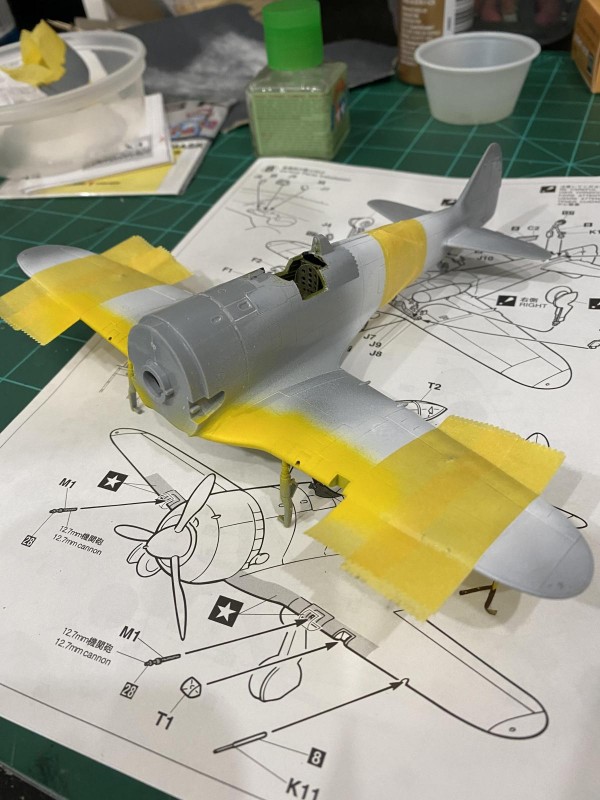
    I wanted to do color variations as I was painting, so I started painting the belly of the plane with Tamiya IJN Gray. I then added some black to the IJN Gray to create a darker shade of the original color, which I sprayed in the center of panels on the belly in a somewhat haphazard manner. The contrast is a little stark at this point, but everything is blended together with a final very thin coat of the original color. This last coat, which is almost as thin as a wash, blends everything and still shows the color variations.
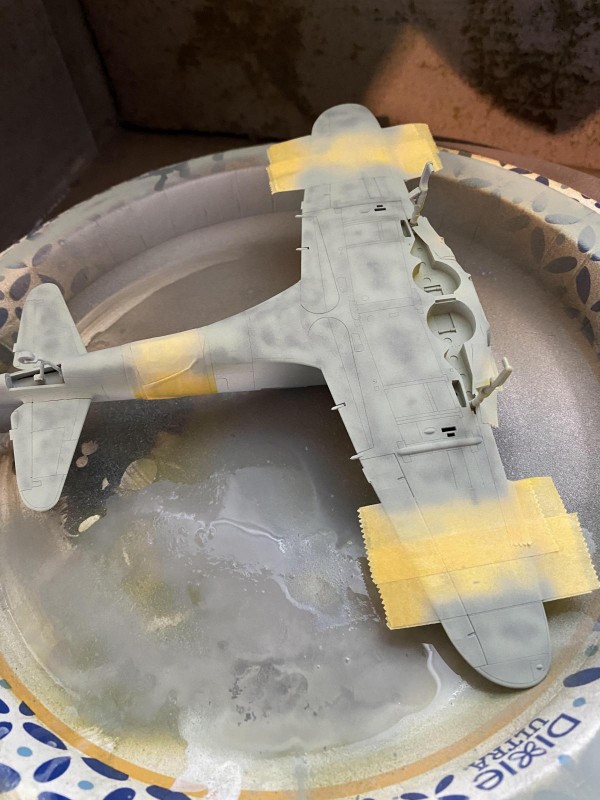


    Once the belly was dry, it was masked off in preparation for the black used on the topside. I used the same technique on the topside that I used on the belly. I first used AK Real Color Nakajima Cockpit Green on the canopy to allow the correct color to show on the inside of the canopy. For the topside color, I started with a very dark gray mixed using a mixture of Tamiya Black and Tamiya Light Gray. I then sprayed very thin Tamiya Black in the center of panels & along panel lines in a random pattern, followed by a very thin, dark gray slightly lighter than the base color. This was also sprayed in a random pattern to highlight certain areas. Once everything had dried, I found there was not a lot of variation on the upper side of the plane, but I decided to let it simmer for a while and then decide if I needed to adjust the contrast on the upper surface. I removed all the masking and found there were no ridges from paint build-up and no bleeding under the tape. There were a couple of areas I will need to fix where I simply failed to insure the tape was covering everything and had the wrong color end up in the wrong place.
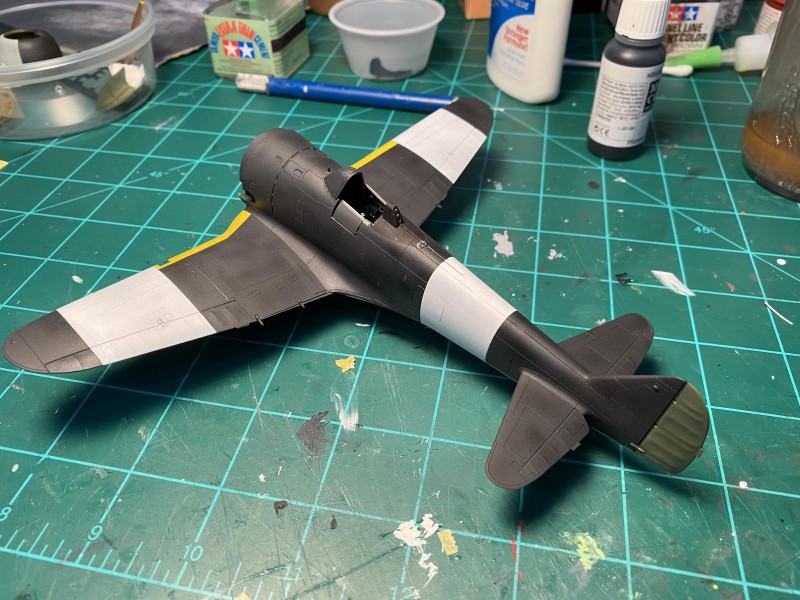

    Overall, I am fairly happy with the paint. Tomorrow I plan to try to borrow my wife's Scan and Cut machine to cut masks for the markings and paint them myself. That will be the next chapter in this adventure.

    Everyone stay safe.

  • Profile Photo
    Spiros Pendedekas said 3 years, 9 months ago:

    George @gblair, you had a busy day and brought us wonderful results!
    I lked your decision about the scheme selection: when there's no photo evidence, you just research through the researchers!
    Your Toyo is comes along beautifully.

  • Profile Photo
    Pedro L. Rocha said 3 years, 9 months ago:

    I know I’m late but the pit looks gorgeous, that resin is a gem but your paintwork brought the best results out of it.
    The black livery sure is impressive, and you bet the painted hinomaru always looks better than a decal. What red will you be using?

  • Profile Photo
    George R Blair Jr said 3 years, 9 months ago:

    Thanks Spiros (@fiveten) & Pedro (@holzhamer). Interesting question about the color for the insignia. Color photos from WW2 are unreliable as far as color goes, and you find a lot of photos from the period that were originally black and white and "colorized" later. Various sets of decals will have as many different colors as there are sets. I figure the color choice will be like the rest of the paint scheme: Do some research and then pick the one I like best. Everyone stay safe.

  • Profile Photo
    Pedro L. Rocha said 3 years, 9 months ago:

    @gblair George, for the red Hinomaru my choice is Mr.Hobby (Gunze) H327. From what I gather FS11136 is a pretty good match

  • Profile Photo
    George R Blair Jr said 3 years, 9 months ago:

    Thanks, Pedro (@holzhamer). I like your red color. I like darker colors, in general, and yours (which is listed as "Thunderbirds Red" on some of the websites I found) is slightly darker than the colors I found. I found some info on Urban's Color Guides, which is from IPMS Sweden. They listed the color as FS31086, which is just slightly brighter than your color. They also listed a faded color as FS31328, which looks almost the same as the original color. From what I can tell from photos, it looks like the red hinomarus faded to a darker color, not a lighter color. I think I will play with some color variation, modulation, and all that stuff. There is also a red marking on the tail which appears to be slightly brighter in the decals.

  • Profile Photo
    Ryan Boerema said 3 years, 9 months ago:

    Ronnie Olsthoorn, who illustrated this aircraft on the cover of Nicholas Millman's Excellent 'Ki-44 'Tojo' Aces of World War 2' in the Osprey series, and who is a pretty thorough researcher, writes, "Lt Inayama's distinctive black-grey, thinly painted Shoki carries the sentai emblem of the billowing 'bag of wind' carried by the Shinto God of the Wind, Fujin. It is usually described in red for the 2nd Chutai, but Inayama himself described his flight markings as being applied in blue paint. The blue fuselage band indicates Inayama's 1st Shotai status and the wing tips might also have been painted blue. By this time the unit had re-organised from chutai to hikotai composition, and the precise presentation of command markings is unknown. The depiction is purely speculative, being based on descriptions of the aircraft from veterans of the 87th."

    Despite what he writes above, Olsthoorn also illustrates the sentai insignia in red, and locates it Gloembang, Sumatra, January 1945, where it was flown against the British carrier strike on Palembang. He does not use either the white fuselage or wing 'bandages'.

  • Profile Photo
    Louis Gardner said 3 years, 9 months ago:

    George, @gblair
    This is some very good information provided here, especially in these last few comments. Nick Millman's website has a lot of very good information on the various colors that were used on these aircraft. From what I have gathered over there, the best approximation of the red that was used on the Hinomaru's was FS11136, just as Pedro @holzhamer
    had mentioned. I have a Federal Standards color chip book, and this is the color shown with the number.


    These colors most likely changed after exposure to the elements, so as long as you are in the ball park, you will be good to go. There is a lot of science that goes into how a color is perceived. We could have a very lengthy discussion on things like how the back ground will affect how a color looks, how the light affects it, the settings on your computer monitor and even the settings on the scanner when I scanned this particular shade... The list goes on and on... You get the idea though, and I think you are on the right track with your red.

    I have had several discussions with Nick in the past, and I know that he has gone through a tremendous effort to get the colors depicted correctly on the illustrations in his Osprey books. His written works have all received praise for his dedication to getting the facts proper. Nick is a great fellow, and has probably forgotten more about the subject than I will ever know.

    As far as the white "Bandages", from what I have read, they were primarily placed on aircraft that were used in defense of the Japanese Homeland Islands. This is not to say they were not used in other locations, but most of the time if you see a plane with them, it was most likely flying above Japan, and not elsewhere. There were always exceptions to the rule though... here's where it pays to do your homework.

    I hope this helps, and your plane is looking spectacular !

  • Profile Photo
    George R Blair Jr said 3 years, 9 months ago:

    Thanks Ryan (@ryanb) and Louis (@lgardner) for the info. The info from Ryan was very similar to the info that came with the Lifelike Decals. From the sources I was able to find, it seems that this plane and pilot flew with the black paint scheme in Sumatra, and then transferred to Japan in 1945. I suspect that the plane received its white homeland defense panels at this time. Things get a little fuzzy when there are no photos of the plane in question. In any case, I committed myself to finishing the paint scheme today using some homemade masks.

    I convinced my wife to let me try her Brother Scan and Cut machine to try making some paint masks to use on this plane. She uses this machine to cut items she uses for card making, and she convinced me that this machine was easy to use. So, after a 30 minute tutorial from my wife, I launched my effort to make the masks needed to paint the hinomarus and the tail insignia. The process is really fairly simple:

    1. Use the machine to either scan your designs into the machine or you can use a computer to make your own designs.
    2. Insert the masking material into the machine and turn it loose.
    3. Take your masks out of the machine, cut them into individual masks, and apply them to your model.

    Of course, this isn't quite as simple as it sounds and there is a learning curve. First, the design must be distinct and have a lot of contrast so that the machine can determine the edges of the design. I copied the decals that I had for the kit, and then cut out the ones I needed for the paint scheme. I arranged them on a blank piece of paper, and then copied a master to use in the machine. Second, the masking material is very thin and has a low tack adhesive, but it really likes smooth surfaces. The Ki-44 had some linkage covers on the wings and tail that the masking had a lot of trouble with. The other problem I had was that once the masks are on the plane, they can be a little hard to see. When you add masking tape to prevent overspray, it can be difficult to be sure you have covered all of the model surface that might be in harm's way.

    I picked the paint scheme with white homeland defense panels because they would make it easier to paint the red of the hinomarus. This plan worked well. I sprayed the markings on the underside of the wings first, just in case things went wrong. For paint, I used Tamiya Flat Red with a couple of drops of brown added to darken it just a little. I liked the color, but decided to add some sun fading using Tamiya Red with a little yellow added. You can't really lighten red using white because you end up with pink, but a little yellow usually works. The problem was that the second color was so thin that it did little to change the look of the initial red.

    For the rest of the hinomarus, I used the Tamiya Red first, then applied the darker red mix. I got a little different look that I think will be OK, but is definitely lighter than the lower markings. The tail markings proved to be a problem child. The tail did not have a white panel, so I wanted to spray a thin coat of white before I applied the red. After I pulled off the masking, I discovered that I got a little white paint that had run under the mask, probably because I had really thinned out the paint. It shouldn't be hard to fix.

    So, I think the experiment with the Scan and Cut masks went well. I suspect that the more you use the machine the better you will be at making masks. I have to admit that the painted markings look better than the decals probably would have. I don't think this will replace the decals on most of my models, but it does provide options for the old decals in some of my really old Monogram and Revell kits. It also provides an option for making markings that don't exist in the form of decals. The cool thing about this machine is that you don't need to be able to create the markings in some type of drawing software. You can conceivably make the markings for anything you can scan into the Scan and Cut. If you are able to use drawing programs, you can use the design software that comes with the machine to create your own markings. I don't know how small the machine will cut, but that is a question for another day and model.

    I have two decals that need to be added to the landing gear doors, then it will be time for some clear to protect the paint, and then some weathering. Getting close to the end.

    15 attached images. Click to enlarge.

  • Profile Photo
    Spiros Pendedekas said 3 years, 9 months ago:

    Hi George @gblair. This looks fantastic , and is getting closer to the end.

    I really enjoyed the "conversation" about the scheme with Louis @lgardner and Ryan @ryanb. A lot of nice info was exchanged.

    This masking machine has a lot of potential indeed!

    Your presentation was extremely thorough, as usual.