Fine Molds 1/48 Mitsubishi Ka-14, the A5M ”Gull wing” Prototype

Started by Louis Gardner · 43 · 3 years ago
  • Profile Photo
    Louis Gardner said 4 years ago:

    This is a kit that I have been wanting to build for quite a while now. As soon as I clear a few unfinished kits from the work bench, this one will be underway.

    It was released by Fine Molds under the name "The Wind Rises", which was a fictionalized / animated film about the life of Jiro Hirikoshi and his story of becoming an Aviation Engineer. If the name sounds familiar to you, it's because he was the designer of several Japanese aircraft that rose to fame, or infamy depending on who's side you were on back then. Here's a picture of the box art.


    This plane happens to be the "Great Grand Father" of the A6M Zero. Strangely enough, the prototype of the A5M Claude had a gull wing arrangement. Here's a photo of it as it is shown on the box end.

    The plane will be painted in a light shade of green, not in a metal color as it's depicted on the box. From what I have gathered, the color was very similar to, if not the same as the Japanese Gray Green that was used on various other planes from the era. I'll have to do a little more digging before I commit to the final color. Meanwhile here's a picture of the instruction sheet that shows the decal placement and markings.

    There are not very many parts to this one, and I hope it will be an easy build. Time will tell. This one could lead up to several more future builds such as the various A5M kits I have in the stash. I have another one from Fine Molds, It's an A5M-1, and two more from Classic Airframes which are A5M-4's.

    Here's a photo showing the plastic and the odd shaped gull wing. The parts look to be very nicely molded, and from what I can see through the plastic bag, the parts look to be nicely detailed.


    As soon as I get some room on the work bench, you will see this one and another Japanese plane, a 1/48 scale Hasegawa B5N-1. I'll start a separate build journal for it.

    As always, comments are encouraged.

  • Very interesting,a rare bird!

  • Profile Photo
    Spiros Pendedekas said 4 years ago:

    Excellent choice Louis! I'm hooked on subjects like these!

  • Profile Photo
    Louis Gardner said 4 years ago:

    Hello Marcus. @mvtb
    It is a very rare plane indeed. When I saw the gull wings, I knew I had to have it.

    Hello Spiros. @fiveten
    Thanks for the comments. I like building planes like this one. I would be a very happy man if a main stream company produced another prototype model... The XF4-U1 Corsair. Another plane I would like to see done in 1/48 scale is a Mitsubishi G3M "Nell".

    Stay tuned gents, for I have an update on this build coming up next.

  • Profile Photo
    John Healy said 4 years ago:

    Great pick, Louis. I’m impressed with the latest Fine Molds models.

  • Profile Photo
    Louis Gardner said 4 years ago:

    I am at a place in the Ki-44 build where I have to spray on some Blue Green "Aotake" color on the model. This A5M prototype also has the same color listed. So does my B5N model, but I have yet to break the seal on the plastic parts, and it will most likely have to wait until more bench room is cleared... But as you know stranger things have happened. It too could get some TLC.

    So I decided to build the cockpit. It sort of reminds me of the new tool Airfix P-40 model, how the fuselage side frame work is incorporated into the actual cockpit tub. I like to assemble my parts before gluing, then going back and detail painting if at all possible. So that's what I did here on this one.


    The instruction sheet called out for "Mitsubishi Interior Green" as the cockpit color. They also gave a formula on how to obtain the color. The instruction sheet stated that equal parts of Tamiya XF-58 Olive Green, and XF-49 Khaki be mixed together to get the color.


    So that's what I did. I sprayed the cockpit

    and the fuselage side walls.

    It dried a little darker and the lighting and solid white background are suspect here. Here's how the cockpit looked after the paint dried. It doesn't look this dark in person.

    The fuselage sidewalls pictures are a more accurate depiction of how it looks. There are a lot of variables that come into play here with how the same color can look so much differently depending on numerous things.

    Finally, here are the parts that are left to be painted. The ammunition storage bins are what will be painted in Aotake Blue Green. The cowling mounted MG's will be painted using gunmetal.

    Then I will be able to assemble the fuselage. I am very pleased so far...

    As always, comments are encouraged.

  • Profile Photo
    Louis Gardner said 4 years ago:

    Hello John, @j-healy

    I am also impressed with these Fine Molds kits. I have some more of them of different types of Japanese aircraft, and if things work out as planned, you just might see a few more of them from this company on my work bench.

    Speaking of work benches, your Japanese biplane is coming along great, and I am impressed with it. I am also very curious as to just how big or small your model is. Would you be able to post a picture of it with a ruler placed alongside it to show the dimensions for us ?

    Thanks !

  • Profile Photo
    Spiros Pendedekas said 4 years ago:

    I loved the cockpit Louis @lgardner. I have the feeling this bird will look super!

  • Profile Photo
    Erik Gjørup said 4 years ago:

    Rocksteady build here! moving along nicely as usual!

  • Profile Photo
    Louis Gardner said 3 years, 12 months ago:

    Thanks fellas for the kind words ! The other day when I was spraying the "Aotake Blue" I sprayed the ammunition storage bins and empty casing ejector chutes. First I sprayed the aluminum color, then I used Tamiya's clear blue and a little bit of yellow after the blue had been sprayed.


    This is how it looked afterwards...


    It has a slight greenish tint to it in a few places where I went back and sprayed on a little clear yellow.

    More to follow, so please stand by.

  • Profile Photo
    Louis Gardner said 3 years, 12 months ago:

    I added the instrument panel decal and I'm happy to say it snuggled down nicely into the plastic with the help of some solvaset.

    Then I added the ammunition storage bin and the cowl mounted MG's. The cockpit was ready to be installed now. I didn't add any seat belt harness, but it would have been a good addition.

    Next I glued the fuselage halves together, and the fit was spot on. No filler was needed anywhere. Once this had dried sufficiently I placed the cockpit in position.

    Not much can be seen of the cockpit once it's in place.

    There's a separate part that is the upper front portion of the fuselage. This is the area where the windscreen attaches. I glued it in place one side at a time. This allowed me to get a perfect fit.

    I changed things up a little in the construction sequence. To eliminate the possibility of having a gap, I decided to glue the upper wing halves in place first. This allowed me to get a nice gap free fit.

    You can see the gull shaped lower wing half placed next to the fuselage / wing assembly in the next photo. If you are building one of these, this is the way to go. The fit is perfect.

    More to come next, so stand by...

  • Profile Photo
    Louis Gardner said 3 years, 12 months ago:

    The engine is a little jewel. It is a model in itself and the fit is spot on. I painted these parts separately as the engine was assembled. First the crankcase and cylinders were painted and assembled. Here I have added the intake pipes and they fit against the intake ports just as the real engine did.


    Then the exhaust was added. These are two different pipes, and I added the open ends of the pipes at this time since it's easier to do at this point.


    The final assembly step is to add the front crankcase cover... and now it's complete.

    I took these photos to show how it looks on a white background to show you how nice it looks once completed.


    This little kit goes together very fast... and before you know it, it will be done.

    More on the way.

  • Profile Photo
    Louis Gardner said 3 years, 12 months ago:

    Since I was on a roll with the construction, I decided to glue the lower wing section in place.


    Here again the fit was superb. This model is fitting the company name of "Fine Molds". I am very impressed with it so far...
    The wheel spats were added next, as were the tail control surfaces, aileron control tubes and pitot tube.


    I gave the seams a very light scrape with a single edge razor blade and that was all that was needed. No filler of any kind was used during the build. Now it was time for a quick spray using Tamiya Gray Primer...

    Once the primer dried, I sprayed on some Tamiya XF-14 "Japanese Army" gray color as per the instructions. My gut instincts tell me this color is a little off, and that Fine Molds may have actually molded the model in the correct shade of plastic. There's some debate on the proper color this plane was painted in.


    Then I masked off the tail in preparation of the red painting that came next. I used some aluminum foil to cover the majority of the airframe, and taped along the edges where a different color would be sprayed.

    The wing tips were painted in Flat Black, and the tail was painted in Flat Red, to match the overall sheen of the XF-14 color. I did this specifically because it will get some clear sprayed over the entire airframe next, and I wanted the overall appearance to be the same.
    Since I was spraying Flat Black, I painted the cowling in this color as a preliminary color base. It will get painted in a Blue Black color once the seam where the parts join together is taken care of after assembly.

    I removed the foil, and foil masking, and found a few mistakes. The foil left some marks on the light grey green color, and some of the red had managed to creep under the tape where the vertical fin connects to the fuselage. This will have to be touched up.
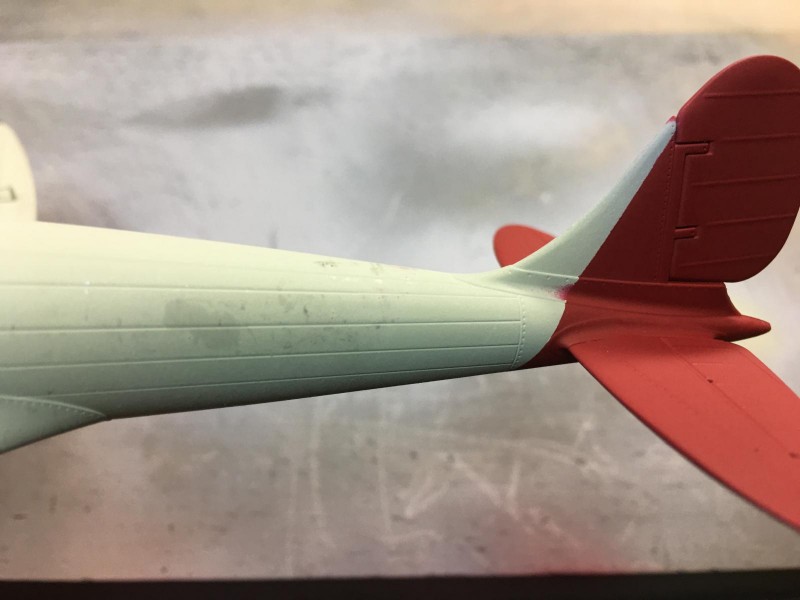
    This last photo shows how the plane looks at the moment. All of this work might have taken 4 to 5 hours at the most.

    It is a very fast assembling model, and I have had a lot of fun building it so far...

    Getting closer.

    As always, comments are encouraged.

  • Profile Photo
    Louis Gardner said 3 years, 12 months ago:

    One small update:
    I found this color chip sample over at Aviation of Japan website. It shows an approximation of what the color of this plane "could" have looked like.


    There's a ton of great information over there, all you need to do is dig around a little. Nick Millman is a good guy and has devoted a lot of time and effort into the study of Japanese aviation. It's well worth the trip and it's only a click away...

    Here's a link if you're interested.

    http://www.aviationofjapan.com/

  • Profile Photo
    Louis Gardner said 3 years, 11 months ago:

    After stewing on this color conundrum for a little while I came up with an idea... Using this computer generated color swatch from Aviation of Japan, I decided to custom blend my own color, as I think the XF-14 called out for in the instructions is a bit too green.


    Using these 3 Tamiya colors, X-1 White, X-14 Japanese Army Gray, and XF-20 Medium Gray, I blended them together a little at a time until I was happy with the end results.

    Starting with the XF-14 JA Gray as the base color, I added some Medium gray until I got the approximate color blend I wanted. Then I kept adding white to lighten it up until I was happy.
    Here you can see the mix in comparison with the original color.

    I used the fuselage side as a sample to test spray the color. This is how it looked compared to the original XF-14 color.

    Next I gave the model a light sanding with some 900 grit wet or dry sand paper. This knocked down the bumps from the previous spraying session. It also smoothed out the brush marks where I tried something new and simply brushed the Future floor acrylic on the model... and I won't be doing that again. From now on it will always be sprayed on instead of brushed.

    The next step was to spray the model in the new custom mixed color. I'm very happy with how it looks now. It is now a much lighter gray with just a slight hint of green in it. Using the Gloss White X-1 instead of the Flat White XF-1, made the model dry with a nice semi gloss sheen.


    After it dried enough, I removed the masking. Then I also gave it a few coats of clear of Future floor acrylic. Much better now...

    I also sanded down the seam line on the side of the cowling where the upper and lower halves are glued together. After a little re scribing to restore the lost panel lines, I gave the cowling a nice coat of US Navy Dark Sea Blue to replicate the "Blue Black" color that was often used by the Japanese on their planes. Believe it or not, this is a very good match...

    The next step will be to add the decals and install the engine.

    As always, comments are encouraged. Thanks for stopping by.