Hasegawa N1K2-J Shiden Kai (George) 1/32

Started by Colin Gomez · 100 · 3 years ago
  • Profile Photo
    Pedro L. Rocha said 3 years, 10 months ago:

    I agree, fine detail is the key word for that cockpit

  • Profile Photo
    Louis Gardner said 3 years, 10 months ago:

    Thank you for posting the photos and the detailed explanation on how you built your seat harness. It will be of great help to me. This has been the stumbling block for my Ki-44 "Tojo" build. The cockpit assembly is inserted from underneath on my kit the same way. I like this assembly option see for the same reasons. Very clever, and it would be nice to see it happen (when possible) with other kits.

    These installments are very helpful and informative. Your work is splendid. Thanks again.

  • Profile Photo
    Mike Licari said 3 years, 10 months ago:

    Wow. Wonderful work on that cockpit.

  • Profile Photo
    Colin Gomez said 3 years, 10 months ago:

    Just a small update on the building process. I have glued and sanded the fuselage halves and tail insert. I follow the liquid glue tight squeeze approach and so seldom need filler on well-fitting kits. When I do need filler, I use stretched sprue wherever possible. I find putty shrinks and flakes off too easily and tends to leave ghost images after painting. i have taken a few shots to show where I added plastic tabs in the fuselage to aid alignment of the wings. There will be a slightly tricky fit where the wings meet the fuselage on top at the root (the wings are only test-fitted for now). Some plastic will stick out from the edges (see pics) and need working together or filing down. Finally for today's work I sanded off the starboard inspection panel on the fuselage as recommended in instructions and re-scribed all panel lines as necessary in various places on the fuselage. All went well.

    Next will be an undercoat for Vallejo Model Air acrylic metalizer. It will be my first time using it. I hope it will work for both the undersides and for an undercoat used in chipping the green camo. Does anyone have experience with Vallejo Acrylic metalizers? they are fairly new. I decided to go with acrylics as soon as they came out as I hate the toxicity of regular lacquer metalizers. I would value your insights before I commit myself to the process..

    6 attached images. Click to enlarge.

  • Profile Photo
    Spiros Pendedekas said 3 years, 10 months ago:

    That's nice progres, Colin @coling!
    I also use this reinforcement method quite a lot.

  • Profile Photo
    Colin Gomez said 3 years, 10 months ago:

    Thanks, Spiros. Always good to test fit and make adjustments, even on a high quality kit like Hasegawa. I am amazed that some models fit as well as they do with such complex shapes and sub-assemblies. Brilliant engineering.

  • Profile Photo
    Pedro L. Rocha said 3 years, 10 months ago:

    No gaps in sight, and usually Japanese manufacturers do some pretty damm good kits, both construction friendly and accurate in shape. For me the only issue of Hasegawa engineering is getting the most of a base mould, meaning some kits are designed around one specific version and from there they add bits or ask you to remove bits to achieve another derivation of that initial version. Their P-40 and 109 1/48 kits are good examples of this. It’s nothing anyone can’t solve obviously but sometimes it gets a bit too much. Tamiya is more the thing with sink marks, sometimes we found them in the most difficult places to solve Lol. Looking forward to some more progress Colin

  • Profile Photo
    Colin Gomez said 3 years, 8 months ago:

    It has been a long time since my last update. I have been waiting for canopy masks and varnish coat for the metalizer. Now I have everything on hand to proceed.

    I have just finished experiments on chipping using the salt technique. I have used an old Otaki Hellcat and the wing of an Airfix MiG-15 to try out the materials and techniques. The two pieces were sprayed with Vallejo Metal Color Surface Primer and Matt Aluminum.

    I then sprayed a protective coat of Tamiya Clear, heavily thinned about 70/30 Tamiya Thinner to Clear. I added about 8 drops of Tamiya Acrylic Retarder as well. The solution sprayed on glassy smooth at fairly close airbrushing range (producing my first coat completely free of pebbly surface - whoopy). After a couple of days curing, I applied large grain kosher salt to select areas, let it dry a couple of hours. I then applied Tamiya IJN Green. This dried overnight before I rubbed off the salt and paint with a microfibre cloth. This was not aggressive enough to remove the pebbly salt completely, so I lightly sanded with 2000 grit sandpaper to the desired effect. What do you think? Does it look realistic enough to you guys? Do I risk doing this to my Shiden Kai?

  • Profile Photo
    Jeremy Millan said 3 years, 8 months ago:

    This is some amazing work and craftsmanship Colin. Masterclass detail! I haven't seen this log until now. I don't know how I missed it. I love all the details in the cockpit. The handles, knobs, dials, wiring and levers look stunning. I couldn't image doing this on a 1/48 scale. I need to try a 1/32 some time. I'd like to try some of your techniques in the future. Thank you for this. Exquisite work!

    P.S. That engine is a work of art as well! I need to learn how to add wiring too. haha

  • Profile Photo
    Spiros Pendedekas said 3 years, 8 months ago:

    This is a fantastic technique, Colin @coling, and I think you should use it to your Shidenkai.
    If I may I would not go that far at that spot I note at your pic below; I think it looks a bit overdone.
    The rest looks perfect to me!


    Eagerly waiting for your painting!

  • Profile Photo
    Louis Gardner said 3 years, 8 months ago:

    Colin, @coling
    I have never tried using the salt method, but that might change in the near future. It looks good, and as long as you can control the areas you want chipped it is definitely worth trying.

  • Profile Photo
    Colin Gomez said 3 years, 8 months ago:

    Sorry it has taken me so long to respond to feedback. I hit a kind of snag/gumption trap with the Shiden Kai over the possibility of riveting it. Seeing Michael Woodgate's fine model a while back made me think I really should make the effort, especially given how it would look after "chipping": with the salt method. My last effort at riveting was my FW-190 several years ago.

    It came out fine but I found the process a bit stressful. Looking at museum bird pics, I realized that the rivets on the Shiden Kai were pretty prominent. Those same pics also gave me a pretty comprehensive picture of how to get the pattern. I have to draw it. This is a VERY small update just to show how I will start to do this. I have only one profile with a rivet pattern shown in the drawing. I've printed out plan views for wing and tail detail in which I will mark the rivet lines in red (not dot by dot, of course, but as lines). I will then pencil in the lines on the model and set to work with Dymo tape, a straight edge, and my trusty Rose the Riveter tool.

    Laying this out will give me motivation to get it done. The Group Build proposal will be the commitment. Anyway, I'm pretty sure the result will be worth it. I still have my T-72 build in the meantime (update today) to pursue more relaxing techniques.

    BTW, thanks, Spiros for the detailed feedback on my salt technique. I agree totally with your assessment. I actually got deliberately sloppy with the salt in places to see how big I could get the chunks and what would happen to the finish underneath - hence the exaggerated wear mid wing. I am still working on the best clear coat. I am finding Tamiya clear a bit fragile and will go with MM Acryl on my next experiment.

    Thank you also Jeremy and Louis. It is motivating to have your kind regards. Sorry once again it has taken so long to get back to you.

  • Profile Photo
    Spiros Pendedekas said 3 years, 8 months ago:

    Hi Colin @coling! Though a lot of work, this riveting will be amazing. Cannot wait to see your progress on this!

  • Profile Photo
    Jeremy Millan said 3 years, 8 months ago:

    I’d like to try some riveting some day. It gives the plane very nice surface detail.

  • Profile Photo
    Colin Gomez said 3 years, 6 months ago:

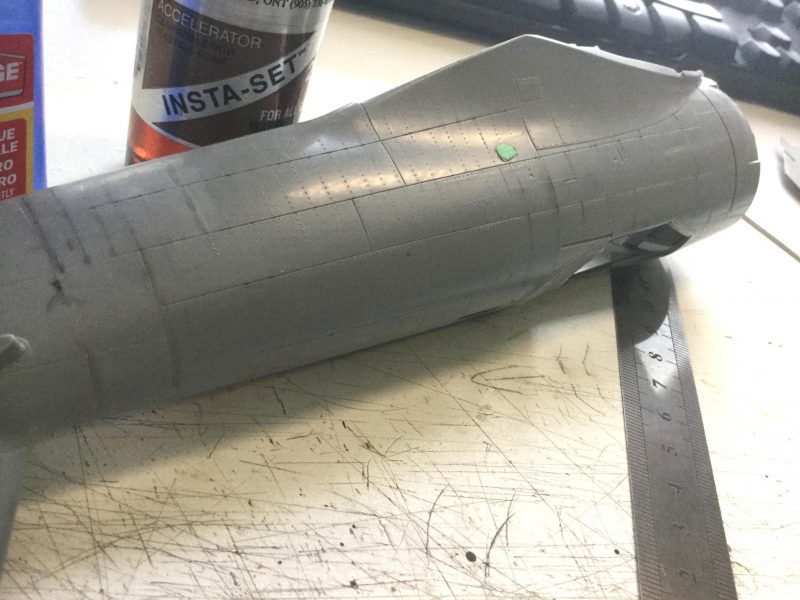
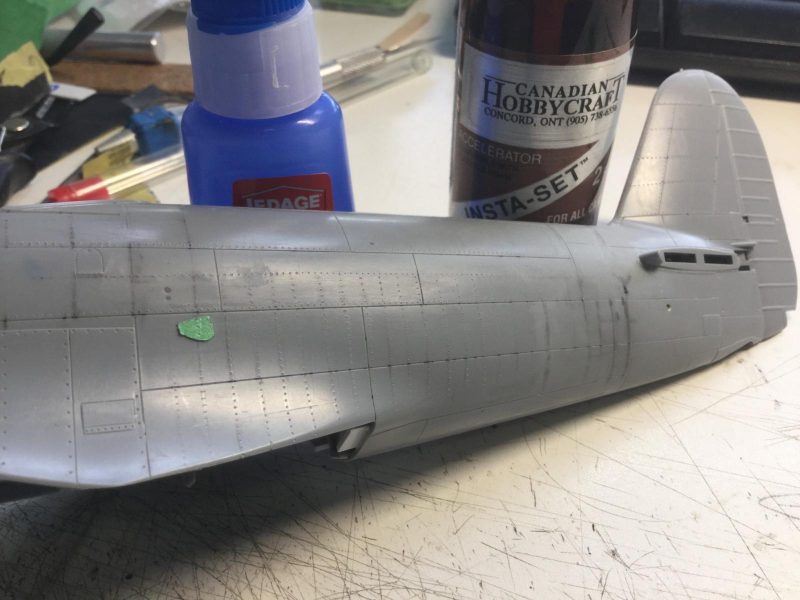
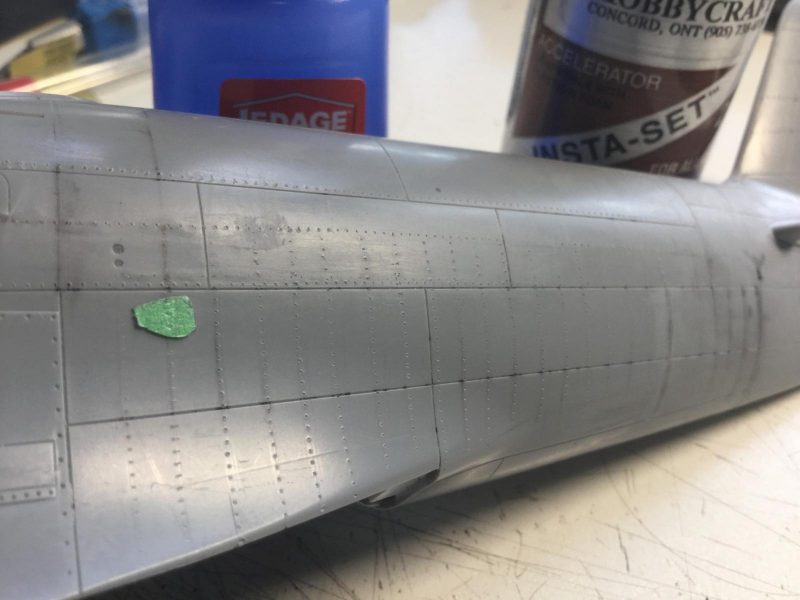
    Hi Guys. Here is an update on my progress with riveting the Shiden Kai. Not exactly a "riveting" update (ha ha) since I have not made such dramatic progress. Still, I have largely completed the port side of the fuselage, and it has actually been quite interesting, including successfully "erasing" mistakes along the way. I am using the rivet diagram I found online, checked against real rivets of museum birds.

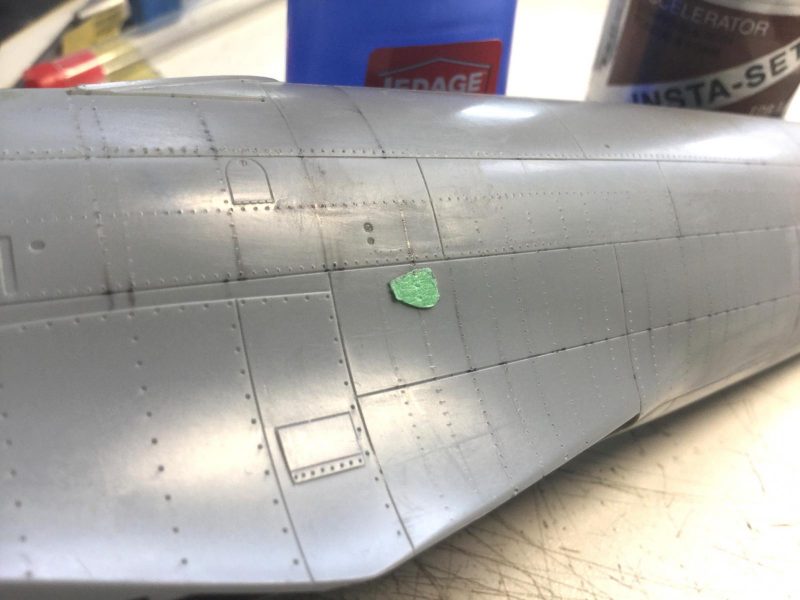
    The real a/c make it clear that lines of rivets on warbirds are often not as perfectly straight and even as diagrams show, so I am not pulling my hair out when the teeth of the riveter go off a bit. At the same time, I have been using super glue and accelerator applied by toothpick to fill a few lines that got quite far off. After sanding down the hardened glue "filler" with 600 and 1500 grit sandpaper, the plastic surface is restored, smooth and unblemished, and ready for a second try. I have included a few pics to show the overall results. Here is one to start with But back to the preliminaries to show this step by step. I first penciled in the lines to mark rivet patterns directly on the model. I used a fine set of calipers from my Grandfather's tool set (he was a commercial artist) to check the spacing between lines. I also made a simple flexible straight edge from paper to layout the pattern on the complex curves of the fuselage. 
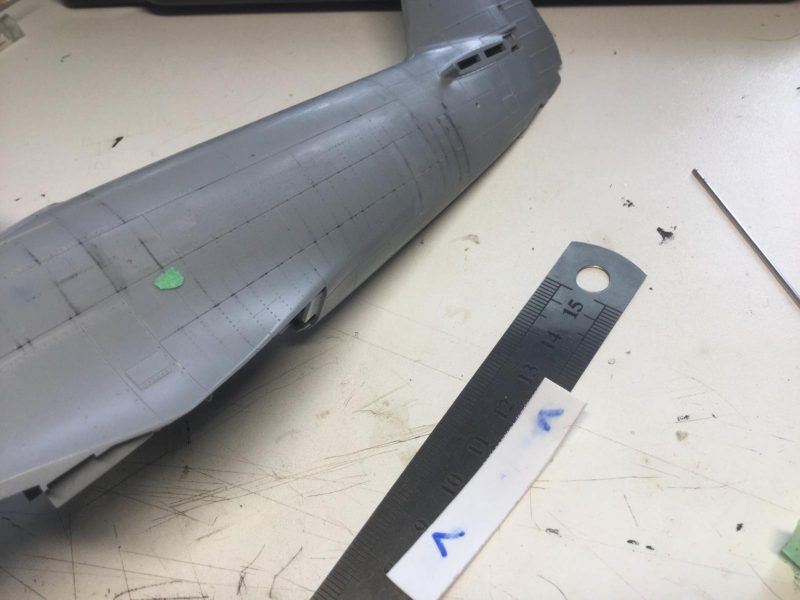
I use three kinds of rulers for guiding the riveting tool: 1. Dymo Tape, which sticks to the plastic surface well but sometimes doesn't guide the riveting tool firmly enough (being a bit too thin and flexible). 2. a thin steel straight edge, which is only good for flatter areas (not flexible enough) and 3. a piece of thick styrene, which has been the best guide so far for the cutting wheel end of the riveter but which also can get a bit chewed up after awhile from the teeth. The trickiest task is riveting along inscribed panel lines since the riveter has to get close to the edge without slipping into the rut. The lines I have filled so far have mostly been from getting too far away from the panel line or slipping out of alignment with it. To my surprise, the easiest lines have been the closely spaced strips aft of the wing root. I did these quite rapidly with my styrene rule, once they were clearly penciled in. The trick is holding the ruler guide in place while rolling the riveter along it. You have to put a lot of pressure on the ruler so it doesn't slip. This must resist the firm pressure you need to push the cutting wheel into the hard Hasegawa plastic. I use strips of masking tape to protect the panel areas that I do not want riveted at the ends of lines. I also use masking tape to stabilize the ends of the straight edge, even when I am holding it down with my thumb. The pictures are very approximate as I don't have enough hands to hold the tools and take a pic with my iPad at the same time. It is important to rivet along a panel line so that you can see the line as you go and not get too far from it or slip into it. . Doing complex curves like the vertical stabilizer require you to keep lines straight while following the bend to the sharper leading edge. this goes pretty quickly, though. Meanwhile, rivet lines between and far from inscribed panel lines must be carefully spaced to look right. Measure twice , cut once. Fill with glue, sand smooth and start again, if necessary. Once again, having penciled lines to follow really helps even if you have to keep redrawing them as you go. I don't like using marker because it is less fixable if you slip and it is harder to see your progress with the tool inside a dark line.

    So, that sums up my riveting adventures so far. I must say that the superglue repair work I have been able to do so far has really helped my courage in getting on with things. I actually abandoned my initial ham-fisted efforts at riveting the Shiden Kai for a couple of days before I re-learned how to do this (I used the method before on my FW-190, but I that was about 10 years ago). Funny how learning curves have to repeat themselves periodically in this hobby. Anyway, I didn't mean to write so much. I hope this update is of some help to potential riveters (or should that be "riveteers" to distinguish a crazy hobbyist idea from an actually useful job? - Rosie the Riveter would I am sure be as baffled as my wife why I do this).