Nakajima B6N2 Tenzan (Jill) 1/48th Hasegawa

Started by Chuck A. Villanueva · 89 · 2 years ago
  • Profile Photo
    Colin Gomez said 3 years, 2 months ago:

    Hey Chuck. That's a lot of progress you have made in a little over a week. Just getting caught up now (over the same period, I have been trying to get the Shiden Kai done). The pre-shading looks great under the nicely translucent Gunze acrylics. Lately Gunze paints have become tricky for me to thin (new formula?) and I have switched from Tamiya thinner to water to stop them from clumping. Yours seem to have gone down well.

    If I may make a suggestion, you might try filling in the accidentally chipped areas on the cowl with the some kind of metalizer or marker, avoiding brushwork or airbrushing. I have used silver Sharpie and Rub N Buff Silver Leaf thinned with citrus thinner on smaller chips.

    Both will flow on when applied carefully and leave a smooth metal-like surface that will probably stay within the bounds of the chipped area. I would do that before your matt coat, which would bring down the shininess and blend everything together realistically, I think. While you no doubt have techniques of your own, I hope you don't mind this possibly useful tip. I am having some success with the sharpie method on my Shiden Kai where the salt over acrylic hasn't worked perfectly in some tiny areas. I will be using thinned Rub n Buff to repair some chips in the Vallejo metal coat that can't be resprayed. Looking forward to seeing your Jill cross the finish line. Such a nice clean-looking airplane.

  • Profile Photo
    Chuck A. Villanueva said 3 years, 2 months ago:

    Hey Colin, thanks, I definitely welcome that tip. I have used sharpies on occasion. Rub N Buff brings back fond memories. I haven't used that in a long time. May have to say since the 80's. If I had thought of it first I should've sprayed some Aluminum before laying the main colors. So whatever peeled off would of exposed the Aluminum not the bare plastic. But then who knows, it may have pulled the Aluminum up as well who knows. Gunze has been coming out of the brush as normal no issues. Love the paint. Have not ran into the clumping. And I do have some recent restock of some colors. I use Tamiya or Testors Universal thinner for Acrylics. I still have some Xtracolours enamel as well. But difficult to get.

  • Profile Photo
    Chuck A. Villanueva said 3 years, 2 months ago:

    Decal time. The kit decals were shot and already looked frosty on the sheet for lack of a better description. Using Techmod Japanese Universal markings sheet. I started with the lower Hinomaru's first.


    Next applied the markings on the top wing panels. These settled nicely over the details on the wings.

    Finally the fuselage Hinomaru's were next.

    The kit provided markings especially the #33 are really quite popular and have seen a few times. And really wanted something different. But finding markings for the Jill are few and far between.
    So I pieced together some markings found on Pinterest of this particular Jill late in the war. Side number 37. Which I was able to piece together from several Japanese kits in the stash to come up with the 37 side number and tail codes. The 37 on the fuselage should be a bit larger. And I believe the tail codes should be white not yellow. But oh well close enough.

    The tail stripes are added. These are Hase decals, but when they settle they do not silver. A bit thick and at first I thought they may not settle properly after a coat of Solvaset. But they do,


    Some weathering is applied with some metal chipping with a silver pencil. Ammo Mig washes fuel stains from the fuel tanks.

    Streaks under the lower wings and fuselage. In the air flow direction.

    Vallejo Satin finish is applied to the overall air frame.

    Next up to remove the masks start work on the final details...
    More to follow.

  • Profile Photo
    Spiros Pendedekas said 3 years, 2 months ago:

    Looking really great, Chuck @uscusn!
    Love the decals and weathering.
    For the tail code color, who can prove you wrong?
    Looking forward to your progress.

  • Profile Photo
    Pedro L. Rocha said 3 years, 2 months ago:

    Very nice work Chuck, those Techmod decals aren’t bad at all

  • Profile Photo
    Chuck A. Villanueva said 3 years, 2 months ago:

    Thanks Spiros, with Japanese markings and schemes still a lot of new research still discovering new patterns in and out.
    Thanks Pedro, a mix of Techmod and other Hase kit decals in the decal bin helps patch the codes together.

  • Profile Photo
    Chuck A. Villanueva said 3 years, 2 months ago:

    Now the fun part. Removing the masks and start the final phase of the build.

    Using Testor's Clear cement to create the rear view windows on each side of the lower fuselage.

    Love this stuff. Dries very clear.

    In the meantime the masking set is removed from the canopy. Hasegawa clear parts show the interior very well still would prefer to have them slid open.

    The exhaust stacks are installed and then painted Burnt iron with a rust wash applied.

    Now to start work on the lower details. First with the tail wheel and hook.

    The tail wheel is very nice one piece affair. Already in aluminum, Tire is painted Testor's Rubber.

    Next the tail hook is painted steel then attached in place in the hook bay.

    The tail lamp is then attached just under the tail rudder.

    Next up, assemble and paint the prop and install the landing gear.

    more to follow...

    Since I will display the fowler flaps extended. Next is the actuators are attached to the flap bays.

    After attaching 8 actuators 4 to each wing, will leave the flaps off for now. Other wise I may just knocked them off with some handling still to follow.

    1 additional image. Click to enlarge.

  • Profile Photo
    Spiros Pendedekas said 3 years, 2 months ago:

    Great progress, Chuck!
    This clear cement is indeed miraculous!
    The canopy parts looked very nicely transparent.
    I lkie how the flaps are proceeding, too.

  • Profile Photo
    Erik Gjørup said 3 years, 2 months ago:

    A shame that the glass will not pose open, but that huge greenhouse does offer a quite a bit more than a glimpse of the innards.

  • Profile Photo
    Chuck A. Villanueva said 3 years, 2 months ago:

    Thanks Spiros, great stuff been using it for at least a couple of decades now. Also good for PE work in the cockpit in areas where there is no stress.
    It is Erik, but seems like Hasegawa does this quite often on the bomber type aircraft. But do have a good view of the interior, well at least until I configured the wings to be folded. Doh!

  • Profile Photo
    Chuck A. Villanueva said 3 years, 2 months ago:

    Before getting started on the landing gear. First to finish the prop.

    Which comprises of 5 parts. The spinner, backing plate, bearing, poly cap and the prop itself.

    First to insert the poly cap into the spinner. Then the bearing cover over that.

    Then slip the spinner over the front of the prop while attaching the backing plate behind the spinner.

    Then paint the spinner and backing plate Red Brown.

    Next is removing the fowler flaps and get them prepared to install once the landing gear is in place.

    Now to work on the main gear. Starting with the strut.
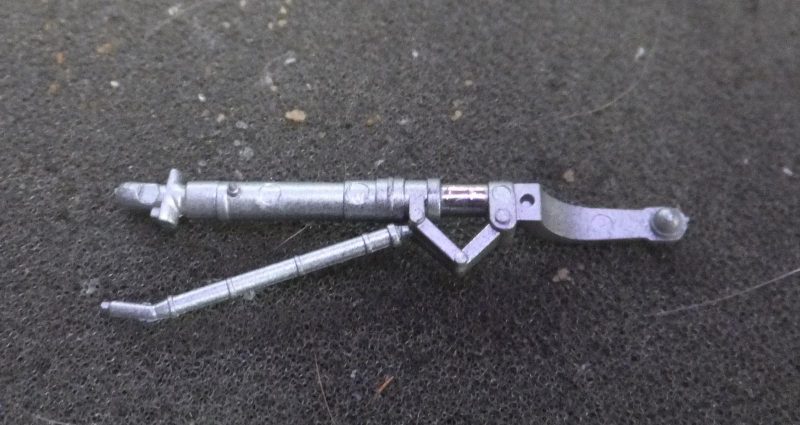
    Next is the retracting actuator arm and the wheel brace.

    The wheel assy which is weighted, is placed loose on the strut (it will spin for now), then the inner wheel spindle brace. and the upper outer gear door. Will leave the lower door cover off for now.
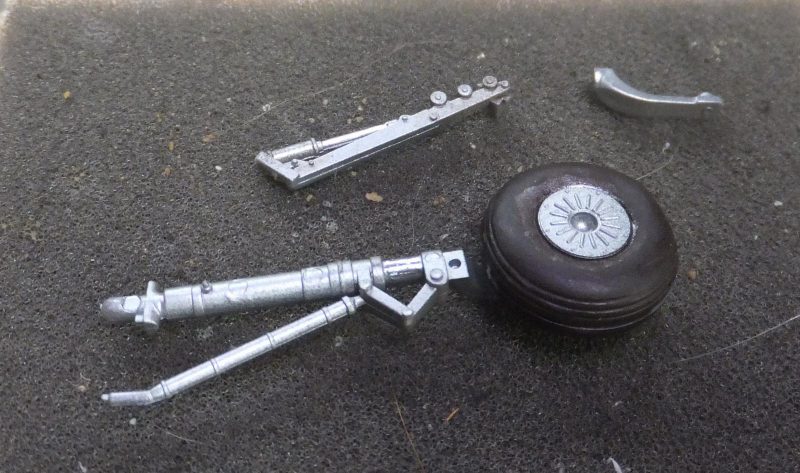
    Being the LH side main gear assy is then installed into the LH wheel bay using the retracting actuator arm to keep it in place . The fit here is very good and will have a long lasting shelf life while parked among it's brethren for years to come.

    Now both gear assy's installed.

    Nice positive contact points for the main gear will last for years. Nice. The inner gear doors are installed as well.
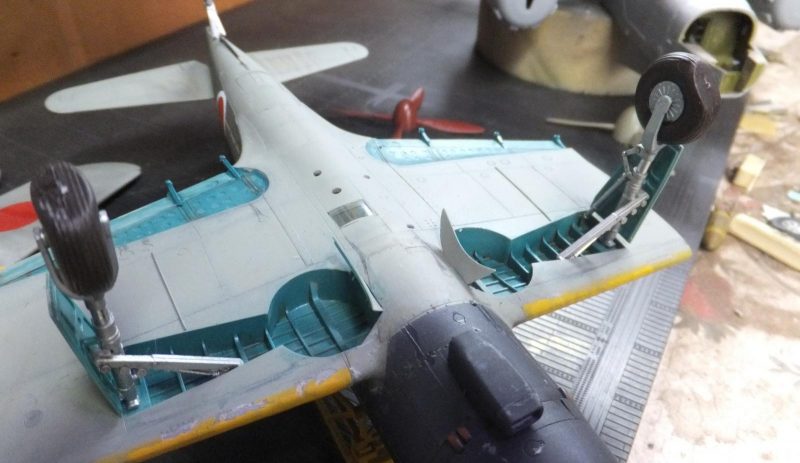
    Once the cement is set, the Jill is now standing on her own.

    Sturdy gear for one good sized torpedo bomber. This is not a small airplane, a bit larger than a Dauntless.

    Next up the torpedo, more to follow...

    1 additional image. Click to enlarge.

  • Profile Photo
    Erik Gjørup said 3 years, 2 months ago:

    OK, with the folded wings it would be extremely nice to have an open canopy. I just realised my Nanzan will face the same problem of having the greenhouse closed. At least there is no option for folded wings. . . . -now there's a thought. . . .

  • Profile Photo
    Erik Gjørup said 3 years, 2 months ago:

    @uscusn, you just beat my reply to the previous post by 27 seconds it seems - but this latest post with her on her own legs just add a lot to understanding the size of the plane. Great progress.

  • Profile Photo
    Chuck A. Villanueva said 3 years, 2 months ago:

    The Torpedo is next up. Starting with dual drive blades.


    Installed the blades, next up is the rudder. Which is then set in place in back of the torp.

    This fits over the screws.

    A few quick swipes with the sanding stick and some 600 grit sandpaper to clean up the sanding marks. Tamiya black is applied on the warhead.

    Then masked off before applying the Vallejo Steel.

    The Vallejo metallics have really performed very well so far.

    After airbrushing the Steel. The screws are painted Brass.

    3 mounts are painted aluminum and attached to the torpedo.

    Then the torpedo is pressed into the polycaps that have been installed during the assembly process. Following Tamiya's idea in their Skyraider. Though the fit is not as secure. But the torp won't fall off after a couple of quick shakes. It stayed in place.

    next to install the gear lower gear doors and attach the wings.

    more to follow..

  • Profile Photo
    Spiros Pendedekas said 3 years, 2 months ago:

    That's a nice looking torpedo, my friend Chuck!