Zoukei-Mura J7W1, 1/48. The 'Magnificent Lightning'

Started by Harvey R. · 69 · 2 years ago · Empire of Japan, EoJ, EoJGB, IJN, J7W, J7W1, Japan, Kyushu, Shinden, WWII
  • Profile Photo
    Harvey R. said 2 years, 4 months ago:

    Zoukei Mura Kyushu J7W1, 1/48. 'Magnificent Lightning'.
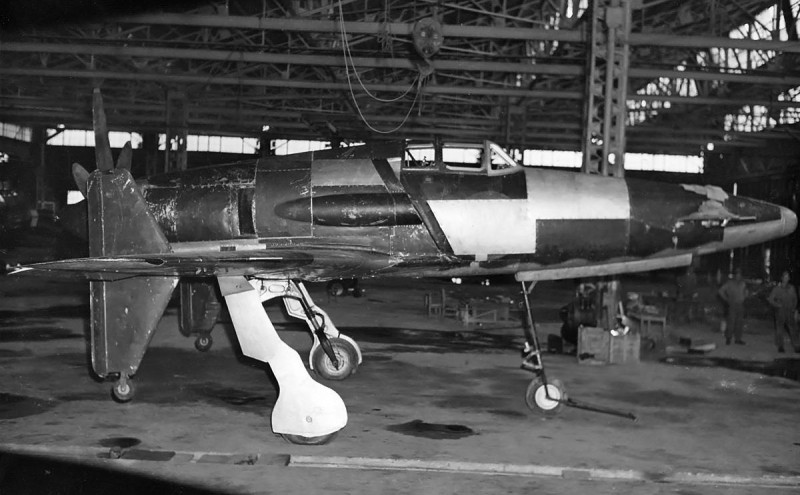


    What's your favourite aircraft? For me, unsurpsingly, its the Corsair. But what aircraft absolutely fascinates you? For me it's the J7W1. Whilst I don't particularly subscribe to the Luft '46 and other similar interests due to them often being too over the top, I must admit the J7W1 is one aeroplane that fits into this area that I am very fond of.
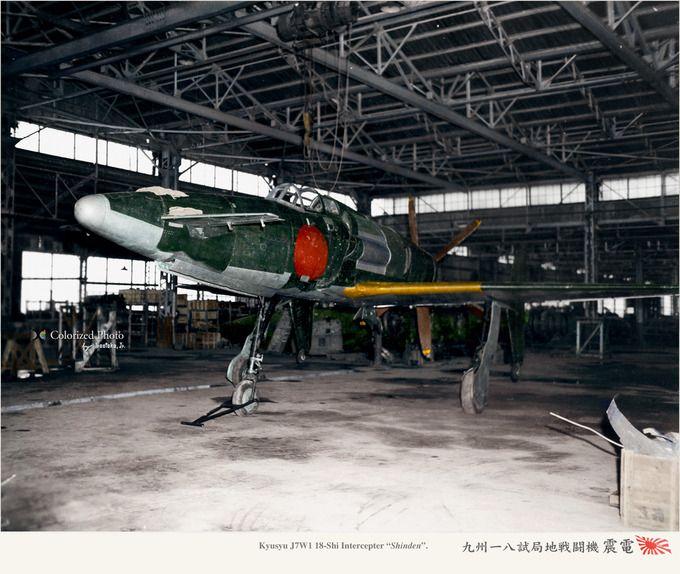
    I've long been a fan of this aircraft and the 'What If?' questions that surround it. It's an aircraft that's design seems alien compared to other aircraft at the time (excluding that XP-55, which is like the J7W got hit with an ugly stick), a massive machine with a nose mounted canard and a big engine in a pusher configuration. Designed to be able to climb and intercept the best of the U.S bombers of the war, the B-29, one can't help but wonder how this aircraft that wouldn't be out of place in a sci-fi movie would have performed. Luckily for U.S airmen, and Japanese aviators that would have to flown her, the J7W1 Shinden never saw service.
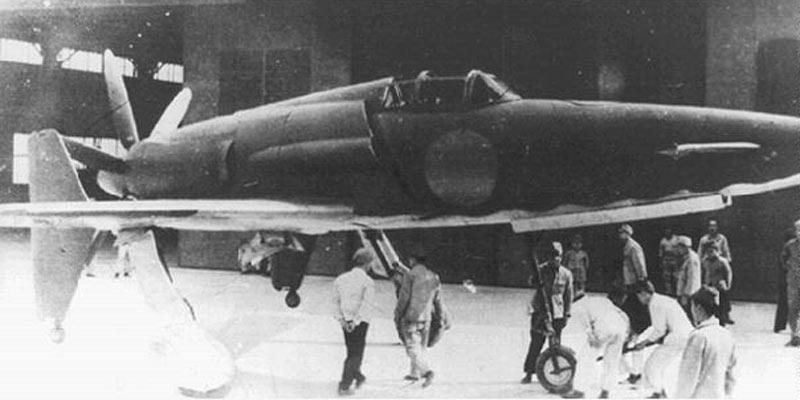
    As such, the history of the aircraft is brief and much has been either lost due to the Japanese tendancy to destroy documents after the ceasefire, or documents remain hidden and untranslated, this helps give the aircraft its mysterious aura. Only two prototypes were built (with one awaiting an engine), with a third in it's beginning steps of construction, with the type completing it's first flight on August 3, 1945, as well as two further short flights on August 6 and 9, for a total of around 45 minutes flight time. Naturally these last two dates were overshadowed by more important matters, being the same days the atomic bombs were dropped.

    After the war the one completed prototype survived and was seized by the US Military, the second and third prototypes were dismantled and loaded onto trucks, placed into a pit, burnt with gasoline and then buried. The only survivor is currently displayed as just the forward fuselage at the National Air and Space Museum in America.

    Despite its fate today, some good yet rare photos exist of the Shinden. Many were from immediately after the war in which the damaged aircraft, possibly caused by a Typhoon, was repaired by Japanese personnel under US orders before being repainted and shipped to America. To be honest its easier to find photos of the Shinden than the F4U-1C. There's even a video of the aircraft being tested which is quite a rare find. Today the Shinden lives on with it's design appearing, or heavily inspiring, in various games, comics and movies.

    The Kit

    The kit for this project is Zoukei Mura's brilliant J7W1 1/48. For a Shinden, your choice is either the old Hasegawa kit complete with raised panel lines everywhere, or the exceedingly rare Zoukei Mura offer.


    To nail on how rare this kit is, I can't find any retailers from the UK, Europe or Japan (at least the websites with English) that sell this kit. I took to looking at eBay, and sadly lost the bid of one at an absolute steal of a price. I've seen them go second hand for £180 which is ridiculous, luckily I didn't pay not nearly that much for mine but still this is the most expensive kit I've purchased.

    From what I've read, Zoukei-Mura's goal with their 1/32 line was to provide a high detail kit with plenty of internal details in order to allow the modeller to learn what goes into the real aircraft in the unseen areas. You'll note that in their other kits they all have guns, fuel tanks, radios, and other such details often left out. The 1/48 Shinden is a shrunken down version of their previous 1/32 release and still offers a very impressive amount of internal details for a modeler to decide whether to show or not.


    After having it the stash for a while, I also treated myself the the Concept Note book that came out for this model, it contains a lot of high quality photographs and models to take inspiration from. Was it worth it? Probably not, it is interesting though and I'm a s****r (su ck er is censored?) for a model and an accompanying book.

    Looking through the instructions we can see just what we are getting into with this build, a highly detailed engine occupies the first 4 steps consisting of 13 parts (with 8 more parts to be added later on). This already looks like the best plastic engine I've seen in a kit. After this, a detailed yet simple construction rendition of the cockpit is put onto an framework with wing spars to provide strength to the model, before fuel tanks and a fully detailed gunbay are placed. After this the engine is placed, some work is done to the wheel bays, and you should be left with a very naked Shinden. The final steps of the model include adding the very long landing gear, but also placing all the exterior panels onto the aircraft like a 'shell'. Before doing this, one has the choice to simply cut open any panels they'd like off of this 'shell' to reveal the details hidden inside. With so much internal detail, some panels will definitely be removed from this build.

    The kit comes with 5 sprues in a cream/white colour, and 1 clear sprue, and a small sheet of decals depicting the prototype Shinden.

    On sprue A we see the forward sub-assemblies such as the 30mm cannons, and the detailed cockpit, as well as the Shinden's skeleton that all future parts will in someway attach to.


    On sprue B we see the aft sub-assemblies, notably of course the engine, propeller, intakes and various fuel/oil tanks.

    On sprue C we get a glimpse of the outer 'shell' of this model, all the external panels for the fuselage are here where we can see a simple but crisp amount of detail. There are rivets, but not everywhere. This kit hasn't fallen into the trap of adding details by the use of WWI tank rivets everywhere like some companies do.

    On sprue D we see the top of the unique silhouette provided by that wing, as well as the rudders and canards.

    On sprue E we see the underside of the wing, and the undercarriage panels.

    When I saw that photo of the Shinden with Bare-Metal panels I saw both an interesting paint scheme for a model, and also a chance to show off many internal details. The plan will be to paint one side as closely to the photograph as possible, with the other having plenty of removed panels to show the engine, tanks, and guns. Whilst I would love an in-flight Shinden, it would be a massive waste of money to build this kit closed up.

    Included here are some of my reference photos, I have some extra ones of the Shinden's parts hidden away in the museum from the Zoukei-Mura book.

    12 additional images. Click to enlarge.

  • Profile Photo
    John vd Biggelaar said 2 years, 4 months ago:

    Great looking kit, Harvey @scalerambush
    This will be an amazing build of the Shiden, an impressive aircraft.
    You cleary treated yourself with a beautiful book containing some nice reference pictures.
    Looking forward to this build.

  • Profile Photo
    Spiros Pendedekas said 2 years, 4 months ago:

    What an amazing entry, my friend @scalerambush!
    A super kit of a futuristic looking plane, built with your usual excellence and attention to detail: cannot get better than this!
    Your decision to depict it with the bare metal panels is simply great!
    Thanks for this wonderful entry in our successful EoJ GB.
    Looking forward to it!

  • Profile Photo
    Harvey R. said 2 years, 4 months ago:

    Thank you, glad to see you both here and hopefully some interesting results come across. Also it hopefully won't take 4 months like the last build thread...

    Simple Beginnings

    First step was to cut and remove the pieces needed for the engine, cockpit and gun-bays. These aren't all the parts, but are most excluding the parts behind the cockpit like oxygen bottles and such which won't be painted in the interior green colour.


    Some flash can be found here, as well as some mould lines on each piece. Whilst the detail is great it isn't quite as refined as Tamiya, I think building Tamiya and Eduard kits almost exclusively has made me soft!

    Normally I'd paint the engine all together after constructing it, but in this case I'll paint each part seperately for two reasons. 1. It's a very detailed engine, and 2. It will actually be seen as I'll have a couple panels removed to show it off.

    Some pieces that will be painted the same colour were assembled, such as a few bits to the cockpit sidewalls, the rudder pedals and control column, and the engine's gearbox. The actual framework for the gunbays should be able to be glued onto the Shinden's frame and painted as such, then the weapons added. On the topic of weaponry this is our first divergence from the source material, if you look closely you'll see the gun ports are blocked up on the real thing as they weren't needed for the prototype however the Zoukei-Mura book states the gun-bays were built as they should have been on the production aircraft. This divergence is simply to allow some interesting detail to be shown with those open gun bay panels, there's always the chance I'll go back on this decision later though, it's going to be easier to cut the gun barrels off and plug the holes than it would be to do it the other way round after all. If you look on the photo earlier of the Shinden at rest in the Smithsonian musuem you can clearly see the forward gun ports were simply blocked over with a piece of metal, but otherwise were there. At the moment it's just deciding if I want to have this model 'inspired' by those photographs or as an 'exact' replica of the photos.

  • Profile Photo
    Woody Kubacki said 2 years, 4 months ago:

    @scalerambush This is going to be an awesome build! I've always liked this aircraft but have not seen many models that attempted to replicate the actual plane that well. The various bare and scratched up panels will surely make for a great looking kit, as well as the bare metal undersides (vs the bland generic light grey). I recently acquired this kit as well for the very cheap price of $40 CDN, so I will have to hit you up for some pics of that concept book when I get around to building it.

    Also, 4 months isn't too long to finish a kit... haha

  • Profile Photo
    John vd Biggelaar said 2 years, 4 months ago:

    Those are very detailed parts, Harvey @scalerambush
    With your experience this will be an amazing looking kit.

  • Profile Photo
    Andrew H said 2 years, 4 months ago:

    Harvey, your build work in process threads are so well put together. Very curious to see how this beast comes together for you.

  • Profile Photo
    Spiros Pendedekas said 2 years, 4 months ago:

    Great start, my friend @scalerambush!

  • Profile Photo
    Harvey R. said 2 years, 4 months ago:

    Mitsubishi Ha-43

    Spent some time working on the engine, the J7W1 was powered by the Mitsubishi Ha-43 engine. This was an 18 cylinder engine that could (supposedly) pump out 2,130hp on takeoff settings, compared to the 2000~hp the F4U-1s P&W R-2800 could pump out in takeoff settings. This engine was intended to be Mitsubishi's answer to the Nakajima Ha-45 Homare that powered some of Japan's very best aircraft, notably the Ki-84 and N1K2. The Ha-43 was said to be far more reliable than the Ha-45, which is part of the reason why this engine came out later as it had a longer development. The Ha-43 was planned to be used in a few of Japan's prototype aircraft, such as the Ki-83, A7M2, and of course the J7W1. Naturally when talking about a Japanese engine (or any vehicle or piece of equipment for that matter) it can't be stressed enough how poor the quality of metal was in 1945, nor how poor the fuel quality was, and as such it's very unlikely the engine would have been able to perform as intended.

    But that's neither here nor there, what is here though is a 1/48 version of it. Being a prototype engine there really isn't many pictures of it and naturally most are either of a very busted up surviving example, or black and white photos which aren't the best quality. This has made colouring the engine a little more difficult than I'd like, and I'm not sure I fully agree with the ZM instructions on the matter.

    What I do have, however, is two beautiful helpful books. The ZM Concept Note naturally goes over this engine, but also AK's brilliant Bible of mine, the Aircraft FAQ, happens to have the artist's rendition of the same engine by coincidence. As you can see the AK look is largely just silver, whereas ZM has some much more obvious black in areas. Looking at reference photos I felt that black wasn't the best fit, and I also felt the AK's one was a bit too silver too.

    Regardless paintwork started with priming the engine's parts, the cylinders themselves were painted in X-11 Chrome Silver. I'm cautious with what paints I'm using here as the interior of the aircraft is also bare-metal, so I don't want to use the exact same paints on the interior of the aircraft as the engine. For other parts of the engine such as pipework I went with a gun-metal rather than the glossy black ZM uses. This is still a shade too dark to me, so I may lighten it down slightly so it appears more grey, however it's may look better once it gets some heat staining done to it. Some parts, such as the gearbox, were painted in MRPs Dark Aluminium. Finally, for the push rods and cylinder heads ZM goes for gloss black again and AK goes for the same silver. I darkened these very slightly by first painting them black, then going over with Vallejo Steel to produce a slightly darker grey. Honestly, it's not very noticeable but I'd rather that than it being too over the top.

    Next up was a wash, normally I go for black but I decided to go with a brown colour. This is partially to show the lower quality of Japanese engines, the difference it makes is night and day but it's too much for for what I want here and is more fitting to what those rusted engine images look like. As such, I got to drybrushing the original silver paint on the cylinders to tone it down and I think it's at a more reasonable level now. I did drybrushing on the other silver/aluminium components too to make the raised details brighter again. Whilst I was careful with the drybrushing it naturally went over the pushrods, so I repainted these but this time added some black to the steel paint.

    Next up is to tone down those gunmetal parts, which are still too dark for me, likely to make it a colour similar to the push-rods on the final pictures of the engines where I mixed the steel colour with a bit of black. The cockpit has also recieved some green ready for brush work.

  • Profile Photo
    Spiros Pendedekas said 2 years, 4 months ago:

    Lost of words for the looks of that engine, my friend @scalerambush!
    Amazing!

  • Profile Photo
    Erik Gjørup said 2 years, 4 months ago:

    Being a bit late to the party, I shall be strapped in to check every now and then. Very nice and detailed explanations on your decisions during the build. Great stuff!

  • Profile Photo
    John vd Biggelaar said 2 years, 4 months ago:

    This is seriously modelling, Harvey @scalerambush
    Absolutely fantastic looking engine.
    The brownish effect does a good job.

  • Profile Photo
    Harvey R. said 2 years, 4 months ago:

    Thanks for following along folks, it's much appreciated!

    The Mitsubishi Ha-43, Part II


    Not a lot of chance to model last night, but I did get some bits done. I lightened up the gun-metal parts slightly with a mix of MRP Dark Aluminium and Black, as well as obviously gluing the parts together as you can see.

    With this done, the engine is coming together. Next is to work on the long axle this engine has to spin the pusher propeller, as well as to work on exhausts and such. I did order a few more paints so I'd like to get them here before I try painting, so I may switch over to the cockpit instead.


    The figure is from Tamiya's A6M5 kit, which came with 4 standing figures that I painted up last year. Whilst I paint figures a bit better now, they'll be the stand ins to show the scale of everything especially when the Shinden gets on it's very tall legs.

  • Profile Photo
    Spiros Pendedekas said 2 years, 4 months ago:

    That engine is a masterpiece, my friend @scalerambush!

  • Profile Photo
    John vd Biggelaar said 2 years, 4 months ago:

    Absolutely speechless on this engine work, Harvey @scalerambush
    This must have been an immense engine.