Two 1/32 scale Revell of Germany P-51-D5 Mustang builds. One as ”Cripes a Mighty 3rd” and ”LOU IV”

Started by Louis Gardner · 366 · 1 month ago
  • Profile Photo
    Jeff Bailey said 4 years, 3 months ago:

    The P-51 don't look like no tank I ever saw, BFAM Louis. New career?

    Nod, nod ... nudge, nudge ... wink, wink!
    @lgardner

  • Profile Photo
    Erik Gjørup said 4 years, 3 months ago:

    @lgardner - I just read the other day the Japanese had quite a few P-40's, and used them as escorts for bombers. many of them were shot down by "friendly flak". Interesting colors - but not 109's 🙂

    Looking forward to the comparison - I think that the yahu sets are a tiny bit better than the eduard - primarily because of their colors.

  • Profile Photo
    Louis Gardner said 4 years, 3 months ago:

    Thanks gentlemen for the compliments. I’ll make a more fitting reply to you soon. It’s almost dinner time !

    One quick note, all of the aftermarket parts arrived. I’ll do a side by side comparison article and post it in the headline section soon.


    I have assembled the Yahu instrument panel and I can post side by side comparison photos for you to see the difference between the two.

    I’ll also post pictures of the kit supplied parts that these are going to be replacing.

    If time permits, I’ll post some better pictures here too later tonight. Meanwhile the pizza is ready ...
    Thanks again.

  • Profile Photo
    Louis Gardner said 3 years, 9 months ago:

    Wow... Hard to believe it has been a little over 6 months since I have done anything to this build.

    Having spent some quality time visiting my friends who restore full sized War Birds yesterday, and getting another close up look at a beautiful P-51, I knew that this had to change. It was very hot and humid yesterday... and I'm drenched with sweat !


    My friend Jim Harley @jimh
    is also partially to thank for this, as he recently posted a very nice Mustang work in progress. PS Jim, here's how your old ride looks now. They have been very busy with her... she's in good hands.

    Picking up where I left off at:
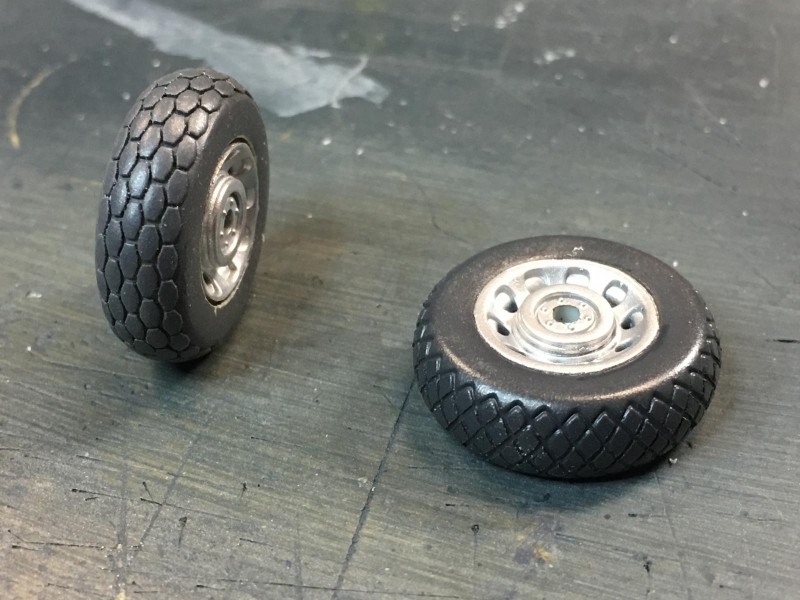
    Tonight I did some work to the main wheels. A few days ago I had the "Iron Werks" fired up and running at full speed. I sprayed the new Barracuda Cast replacement resin wheels at this time. Having a set of proper tires for Major Preddy's plane, I went to work salvaging the wheel hub from the kit supplied wheels.
    Out came the saw, and in a few minutes the incorrect tread pattern for this particular Mustang was history.


    I ended up with something that looked like this.

    I spent some quality time with the file, my old friend. Once I had trimmed the inner wheel down enough to where it would fit inside the new resin wheels, I gave them a quick spray using Model Master buffing Metalizer paint. I chose Aluminum Plate as the color. Here you can see the wheels after I polished them up with an old T shirt. The pictures really don't do this any justice. They are so reflective, they almost look white under the lights...

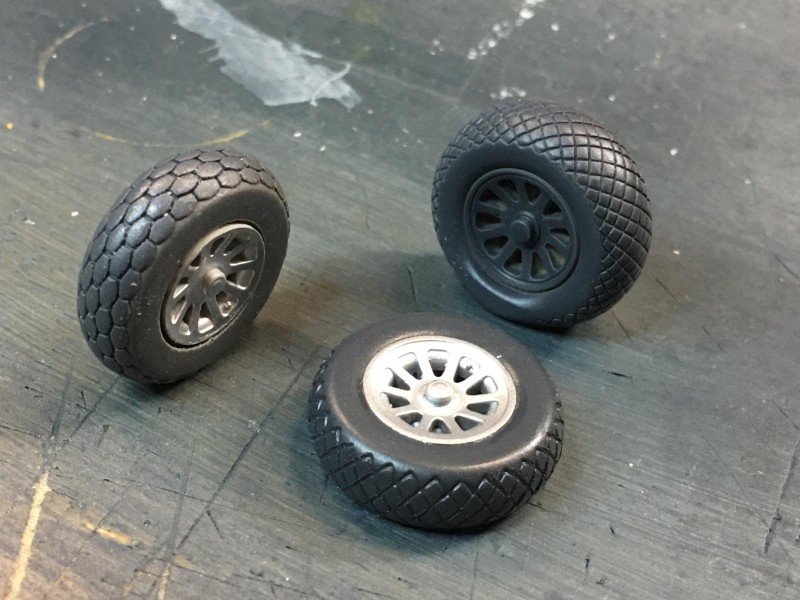
    Here you can see the inner and outer wheel halves placed next to the two new resin tires.

    A few seconds later it was done... I placed a little Tamiya glue to the inner part of the kit supplied wheels where they contact each other.

    Presto ! and just like that the wheels are done other than adding some dirt and dust to them. Here you can see one of the kit supplied wheels that will be used on LOU IV, and the other will be for Major Preddy's "Cripes A Mighty" Mustang.


    This next photo shows another resin Mustang tire / wheel combo that was made by True Details. I picked this set up years ago and have plans to use it on another Mustang at a future date and time. The TD set is wider than the other too, and it just might be a bit too wide. I'm going to use them anyway, and since both tires will match, most people might not notice.

    Here you can better see what I'm talking about. Notice the extra wide TD resin wheel. It is also a weighted tire, so it is bulged, possible a bit too much, so I carefully sanded it some to remove some of the excessive bulge from the sidewall before it was sprayed. The tread pattern is also a little different from the kit supplied parts.
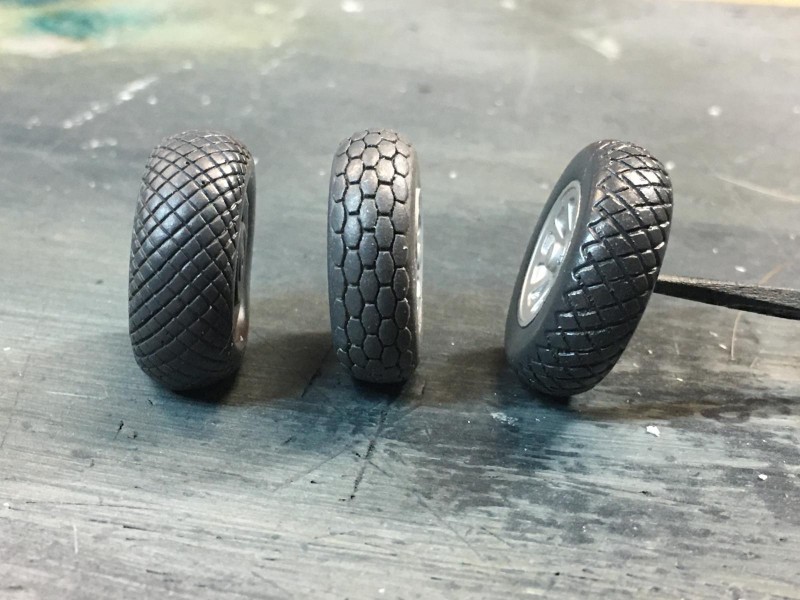
    I'm calling it a night, and as usual,
    Comments are encouraged.

  • Profile Photo
    Spiros Pendedekas said 3 years, 9 months ago:

    What a wheels/tires improvement tutorial, my friend Louis @lgardner!
    I loved reading it and thinking how I could implement those ideas/solutions to my builds.
    Fantastic job, great inspiration for us.
    P.S. The first pic is the best of all: I see a happy man!
    Thanks for posting!

  • Profile Photo
    George R Blair Jr said 3 years, 9 months ago:

    New wheels look great. Projects like this never work for me..bad Karma, I think. I would have done all of the work to liberate the metal rims only to find out they didn't fit the tires. Looking forward to the rest of the build.

  • Profile Photo
    Erik Gjørup said 3 years, 9 months ago:

    Now, the first picture mentions two loose nuts. . . -no wait that was not it. . .

    Oh, whatever - like the qualitytime you spent on the wheels my friend - lovely filing!

  • Profile Photo
    Louis Gardner said 3 years, 9 months ago:

    Spiros, @fiveten
    Yes I am a very happy man anytime I can stand near a pristine P-51 ! It was almost 100 degrees and the humidity levels were near 100 percent... so it doesn't take long in those conditions to start sweating ! Thank you for the compliments.

    George, @gblair
    I have a tiny gap present where the outer portion of the metal wheel meets the tire. It isn't too bad, but it is there. Typically I have problems when I try to make adjustments like this too. But so far it has been OK. Time will tell if this continues or not. Thanks for commenting !

    Erik, @airbum
    Yes the aircraft's name is definitely a play on words. It can be read three or more ways. One way is like the city in France, exactly as it is spelled. The other one is "Two Lousy Nuts", and the last one is "Two Loose Nuts", which obviously can mean several things ... but keep in mind a second seat has been added !

    Stand by my friends as we head on an another adventure...

  • Profile Photo
    Louis Gardner said 3 years, 9 months ago:

    Today I managed to get in some more bench time. So I took full advantage of this... and got to work on one of the replacement resin prop and spinner assemblies that I bought from Eduard. This aftermarket addition is very detailed, and the resin was very easy to work with. In no time flat I sawed away the resin pouring blocks.


    This is the inside of the spinner. If someone was planning on doing a maintenance diorama, this is the way to go. It copies the real structure of a full sized Mustang spinner very nicely.

    Here's how it looks on the outside.

    There is a separate propeller hub boss, and 4 individual blades. They fit into the openings well.


    An assembly jig is included. This allows you to set the proper pitch on the individual propeller blades.


    Here's how it looks with the spinner sections temporarily mocked in place. Nothing has been glued yet.

    I was curious to see how far off the kit supplied prop was, so I placed it into the holding jig fixture. I was pleasantly surprised, as it fit very nicely. This is the original kit prop from one of the models. I painted both of them a while ago.

    I placed the Eduard prop next to the kit prop, and snapped this picture. Other than the hub, there's not much difference. I most likely could have used the kit parts, but I have not built / assembled the propeller and spinner assemblies from both kits just yet. When I do get around to building them, I will definitely save them for an old Revell P-51B kit I have in the stash. These also might be a good upgrade for the old 1/32 scale Hasegawa Mustang. I will find out eventually...

    Here are a few pictures of some more aftermarket items I have collected for these two builds
    I have an Eduard "look" IP set for one model, and the Yahu IP will be used for the other. The Eduard "Look" also comes with a steel seat harness.

    I needed another seat harness for the other plane, so I purchased this RB set. Having just completed a similar set for my Hasegawa Ki-44, I am very enthusiastic about using this one next.


    Then I have two sets of AM exhaust for these planes. They also look very nice, and will be a marked improvement over the kit supplied parts.

    One final picture and this shows the finished wheels. I assembled / painted the last one today, then dirtied all of them up a little.

    As usual, comments are encouraged.

  • Profile Photo
    Jim Harley said 3 years, 9 months ago:

    Hey Louis,
    Just went through the build log on this one...what a great job of outlining each step...very tidy! makes my desk look like a bomb went off. I can see this heading to the top of the build list. When I get done here I'll be heading eBay and looking for aftermarket stuff. I'm glad the guys at American Aero take good care of you, lol, I expect no less from them 🙂 . Really good people. I'll be watching for updates on this one! keep up the great work.

    Jim

  • Profile Photo
    James B Robinson said 3 years, 9 months ago:

    Looking good Louis. Sorry I haven't checked into this one lately. Inspiring to say the least.

  • Profile Photo
    Louis Gardner said 3 years, 9 months ago:

    Hey Jim, @jimh
    Thanks for checking out the Mustang builds. Hopefully I can pass on a few tips for when you build yours. So far I have enjoyed the build. Nothing crazy, but I did find a small error on how the exhaust get installed. This was with the Eduard instructions sheet and not the kit instructions. I took some pictures, so I'll be better able to explain it... but first some paint has to dry.

    You are absolutley correct about the fellows who work over at American Aero. You couldn't ask for a better bunch of people. Each and every one is a good person, and that is sometimes hard to find.

    James, @jamesb
    Thanks buddy... It's good to hear from you. I'll bet you have been swamped at work. Take care and I hope to hear from you again soon.

  • Profile Photo
    Louis Gardner said 3 years, 9 months ago:

    Tonight I had the "Iron Werks" fired up again and I was spraying some Flat Black. In this pile of parts are some F4U Corsair things and some P-51D Mustang things.


    This next photo is showing the Eduard resin propeller blades after they were spray Flat Black. I also painted the inside of the kit supplied exhaust mount in the same color.

    This is where the confusion lies. I either looked at the Eduard instructions incorrectly or they are wrong. My understanding was the resin exhaust was to be glued to the other side of the mounting bracket for the exhaust pipes. Luckily I tried it out before the glue set up and I was able to take it apart before any damage occurred. Tomorrow after a good nights sleep I'll look at them again and see if it was my operator head space and timing, or was it actually written incorrectly. Time will tell, and more pictures will follow to show you what I mean.

    Meanwhile, this is what the un shrouded exhaust is supposed to look like on a real P-51D. I took this picture several months ago, and she's a real beauty.

    As usual, comments are encouraged.

  • Profile Photo
    Spiros Pendedekas said 3 years, 9 months ago:

    Your progress looks great, Louis @lgardner! Nice and neat flat black collective (!) painting.

    Regarding the exhausts positioning, nothing is better than the actual photo you have.

    It's true that some mistakes or omissions can be found at instructions. At such cases, the most important thing is for the actual parts to be correctly depicted. Then, with the aid of real thing pics, one can slowly put things together.

    Your Job looks great!

  • Profile Photo
    Erik Gjørup said 3 years, 9 months ago:

    That AM spinner/propeller combo is unbeatable for a maintenance scene. Almost make one want to leave the tip of the spinner off.

    My keen eye spotted the modified pegs - I remember having seen some somewhere but forgot all about them. Have to hurry up and convert some right away before they dissapear within my "little grey cells"

    Great progress my friend Louis (@lgardner)