1/48 Tamiya Mitsubishi G4M1 Type 11 Betty WWII PTO

Started by Chuck A. Villanueva · 88 · 4 years ago
  • Profile Photo
    George R Blair Jr said 4 years, 11 months ago:

    This is one of the things I really like about scale models. Having the ability to compare the size and shape of different aircraft visually is pretty cool. I once put a B-25 and an F-15 Eagle side-by-side and found they were basically the same size. From what I remember from my courses in pilot training, you can see that the wings on the Betty are not only shorter, but they also taper much quicker. This narrow chord on the wings and the shorter span should generate less lift than the Lanc. I Googled the payloads and found the Lanc could carry up to 14000 pounds, while the Betty could only carry around 2000 pounds. I suspect the Betty had a much longer range than the Lanc. Both models look great, looking forward to the finished Betty.

  • Profile Photo
    Chuck A. Villanueva said 4 years, 11 months ago:

    Thanks George, yes I have been doing type of comparison since childhood. Seeing displays of models in hobby shops or at model shows and see the vast difference in size between them. A WW1 Spad next to a Skyraider. An F-14 next to a Zero. And yet man is pretty much the same size whatever aircraft he or she is flying in. The Lanc is a bit larger than the Betty, but the cockpit looks so much roomier compared to the narrower Lancaster fuselage. Was it more comfortable? One can imagine.
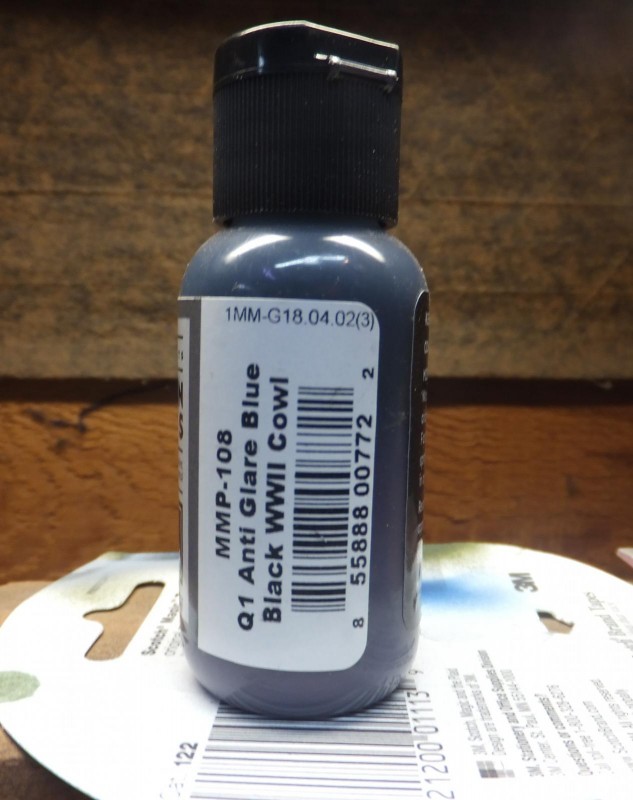
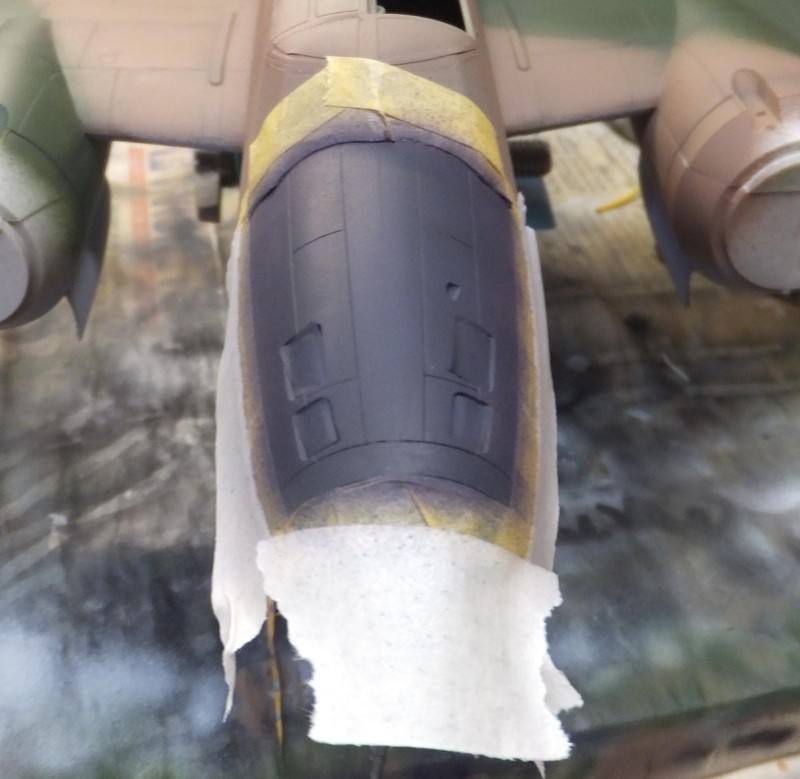
    With the basic painting now done. Time to mask off and paint the anti-glare panel and engine cowls. This build started before that excellent Japanese WWII color research posting by Louis Gardner. And really despite that Japanese aircraft may not be as diversified in color variety like Luftwaffe and the other air forces in WWII. Recent information has made it quite interesting. Now Aeromaster was on the right track back in the early 90's with the introduction of their line of paints which included a new color called Blue Black. With a very little hint of blue as it dried. Too me closer to NATO Black. Recently a fairly new paint (at least for me personally) has been produced by Mission Models and they have introduced some very interesting colors. One Cowl Blue Black.


    First I masked off the nose and engine cowlings to prepare to airbrush.

    Now research is still lacking that Blue Black was used on the Betty, but I am going to assume it was being that the Betty was built by Mitsubishi, as the Zero had this color applied as well.
    I am using this brand for the first time. And it comes out of the brush very well, cutting it Testors airbrush thinner, alcohol based, no clogging. At first it looks too Glossy Sea Blue in appearance when wet. But as it dries, it dries to a darker shade with a nice hint of blue.

    It dries to a nice flat sheen, a comparison of the current Blue Black and the Aeromaster War Bird Acrylic Blue Black painted back in 1993 on this Tamiya A6m3.
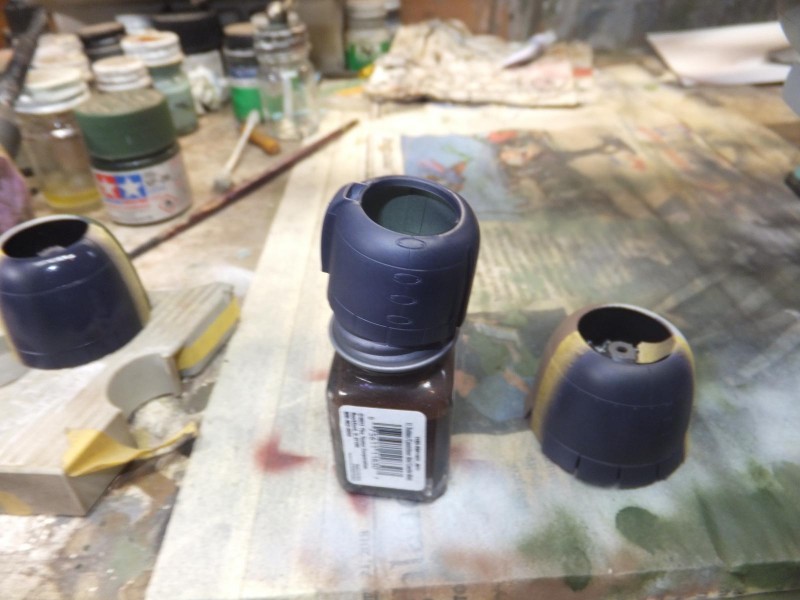
    A toast to Mission Models, as I will pick up some more of their paints. I love the way it does not clog in the airbrush. Unmasked the Betty to reveal the finish. On the nose and cowls.

    Next up decal, decal time. Future Gloss coat time. More to follow.

  • Profile Photo
    Chuck A. Villanueva said 4 years, 10 months ago:

    Using Future I gloss coat the overall air frame to prepare for the decal process.


    Close to the end on this one. Not too many decals were applied on the Betty. So once i let the clear coat set I will start the process.

    That will be the next step. More to follow.

  • Profile Photo
    Pedro L. Rocha said 4 years, 10 months ago:

    Chuck, the Betty is coming along nicely. Choosing the blue black seems the most logic choice for the reasons you mentioned. I have 1 bottle of MM paint but somehow it didn’t impressed me that much, certainly not like the experience you just had with them. Perhaps I’ll give that paint another go on a future occasion.

  • Profile Photo
    david leigh-smith said 4 years, 10 months ago:

    Brilliant work, Chuck. It still amazes me that such a methodical, thought through, detailed, clean, and inspired project like this can come from a bench like that. No offence - you know me better than that - but man...this desk just makes me itch to jump on the first flight to California, hunt you down, clean that bench, and organise your tools. THIS, I know, says way more about me than it does about you, Chuck. Someone parked a dirty car outside our neighbour's house this weekend. I waited for dark and washed it.

    Great stuff, and an excellent thread ("don't look at the bench, David, don't look at the bench")

  • Profile Photo
    Chuck A. Villanueva said 4 years, 10 months ago:

    Hi Pedro, I have just started using the Mission Model paints recently while searching for a better dull coat finish. Bought a couple of colors, liked the way they performed, no clogging and covered very well. The finish looks good once dry. The important part is having some colors that others don't have. The choice for some Japanese camo colors look good and looking forward to trying them on the current Zero that is in the works.

    D-L, it is an organized mess, I know where everything is. But at the end of the day, it's all picked up and put it in it's place. However I am always ready for a challenge. This is my work bench, and this is how I like it. This is my comfort zone. You are more than welcome to visit, however don't touch. Fair warning. Though you can wash the Escalade, I will be ok with that.

  • Profile Photo
    david leigh-smith said 4 years, 10 months ago:

    Fair warning, Chuck, I’ll settle for washing the car!

    The Betty IS looking fantastic. The colour scheme is stunning, more so because it’s rarely seen. Love it.

    David.

  • Profile Photo
    Chuck A. Villanueva said 4 years, 9 months ago:

    I am using Techmod decals for the markings on this project. I have used this brand before on the Hein Ki-61 Tony a few years ago and worked well.


    They are thin and work well with Microscale decal system of Aero/Micro Sol and Aero/Micro Set. Applying the Hinomarus on the wings.

    There are not that many decals to apply. No stencils, not much in colorful markings. Largest piece is the white leading edge stripe applied to the tail.

    Once the decals are applied sit and set for a few hours. Then a dirty wash is applied under the airframe. This is best done in the glossy stage.

    Next day I will use Lifecolor Flat clear as the final finish over the decals. This dries quite flat.

    What I like about this finish, it really tones down the color quite a bit. Especially the red on the Hinomarus.

    Overall the finish looks as I hoped it would be. Toned down with a bit more weathering to do will enhance the final finish. The cowlings are left off, easier to paint around the nacelles and less masking.

    The tail and the nose is about the only color on this otherwise rather bland paint scheme.

    Next unmask the canopies and start adding the final bits and some weathering.

    More to follow. Sayonara!

  • Profile Photo
    George R Blair Jr said 4 years, 9 months ago:

    Looks really good, Chuck. The Techmod decals look like they performed well, especially that one that wraps around the tail. I always worry if the decals that are designed to wrap around something will actually wrap. I have tried Mission Model Paints a couple times with little success, but your great results show the problem is obviously on my end. Looking forward to seeing the completed kit.

  • Profile Photo
    Pedro L. Rocha said 4 years, 9 months ago:

    Your Betty is looking awesome Chuck. I believe I purchased that same decal sheet a few years back, since the kit decals have all turned fir the worse while stashed in my basement storage, so nice seeing you having 0 problems using them

  • Profile Photo
    Chuck A. Villanueva said 4 years, 9 months ago:

    Thanks George, I use a Paasche H model, single action air brush, though the bottle says I can shoot straight out of the container. I cut it at 70/30. It covered very well at that ratio. No clogging was experienced during the process.
    Pedro, its the 3rd time using Techmod. And I like the way they perform. Thin and react well to the MicroSol and Micro Set. I recommend them.

  • Profile Photo
    Chuck A. Villanueva said 4 years, 9 months ago:

    Now the decaling process is done. Some weathering. Flat coat sprayed. Time to de mask the clear parts. Thank the good Lord that this does not take as long as masking. Starting at the nose.


    Still crystal clear. Do you ever find yourself holding your breath at times when unmasking. Especially the clear parts!

    Just take your time, hopefully no bleed thru or peeling paint off. Though I rarely encounter that, you never know.

    So far so good. The EZ masks worked flawlessly and what is really nice is that there is no glue residue on the glazings. Lots of small window panels on the tail cone.

    The tail cone looks great, nice finish once the maskings are removed.

    Next up finish up the landing gear and under surface detail bits. More to follow.

  • Profile Photo
    Don Mk1a said 4 years, 9 months ago:

    I just read this thread from the beginning with fascination. You certainly know how to deliver a full report.

    That big fat fuselage could hold so much super detailing if a modeller wanted to cut away some of the sides. It made me think of those submarine models with the clear plastic hulls.

  • Profile Photo
    Chuck A. Villanueva said 4 years, 9 months ago:

    If Tamiya had been a little bit more Monogram like, they could've really filled out that interior, but only the basics are in there. Open up that LH rear entry way hatch, yes all kinds of ways to display this beautiful model of the Betty. Thanks Don I appreciate your comments.

  • Profile Photo
    George R Blair Jr said 4 years, 9 months ago:

    Every time I get to this stage of the build I worry that something will happen that messes up everything I have done to that point. Pre-cut masking has certainly helped with this process, but there are still a myriad of things that can go wrong at this stage. It certainly looks like you have passed this part of the build unscathed. Well done.