A Messerschmitt 109 for two

Started by Erik Gjørup · 86 · 2 years ago · Bf109, Bf109G-12, CS-199, CS-99, HA1110-K1L, HA1112-M4L, Messerschmitt, UMe 109
  • Profile Photo
    Spiros Pendedekas said 3 years, 3 months ago:

    Nice progress, my friend @airbum!
    I usually apply LqS with a toothpick, @johnb, using a tiny amount at a time. You don't want LqS to spill itself around, on that sensitive model surface...

  • Profile Photo
    Erik Gjørup said 3 years, 3 months ago:

    John (@JohnB), i use a cocktailstick (wich is just a fancy word for toothpick, but you can use them for olives etc) 🙂

    As Spiros (@fiveten) points out it is best to add a small amount at a time. As for speed, I think the glue I use is way past its best-by date and making a new brew with fresh glue may help to expedite hardening time. I will give it a try as I plan on finding a shallower jar to make my LqS in - I can only just reach the present brew with a cocktailstick and that is a bit annoying.

  • Profile Photo
    John vd Biggelaar said 3 years, 3 months ago:

    Thanks my friends, @fiveten, @airbum
    Fully agree, spilling LqS or any other material on your model is not what you want.
    Building it using tiny amouts will surely give better results.

  • Profile Photo
    Erik Gjørup said 3 years, 3 months ago:

    Major shaping finished

    I have been sanding away all day (almost), and now it is in the final-before-final stages

    The shape of the aft fairing finally started to resemble the shape of the vac-canopy


    That has been some serious sculpting and filing and sanding and feddling and tuning – but now it is finally near the goal!

    While I was high on my success, I decided that a resin REVI needed to be installed.


    These AM REVI’s are just so fine, and almost a necessity in my ed’ 109’s I have now started all the normal kit additions – cooler, radiators, flaps, tailplane etc – you know the drill.

    and with some progress finally in sight things may move a bit faster – I have started thinking about the next two-seater, albeit a somewhat different one than this one that is based on a G-4

  • Profile Photo
    Walt said 3 years, 3 months ago:

    Just took at a look at this build, @airbum nice work. I may also add way more work than I would want to do. I wanted to build a trainer 109 before, but after seeing what you when through, I will rely on you to do all the work and let me enjoy it virtually. Actually I would really like to do Zwilling 109 in 1/48th. I have the ICM kit for the Zwilling He-111 so it would be a perfect side kick.

    Looking forward to following the rest of the is build, keep up the good work.

  • Profile Photo
    John vd Biggelaar said 3 years, 3 months ago:

    An effective day of sanding, Erik.
    All fits great and that REVI looks fantastic.

  • Profile Photo
    Spiros Pendedekas said 3 years, 3 months ago:

    Fantastic sanding and revving - oops! - sorry! - REVIing, my friend @airbum!
    I bet your next biplace project is already bing built in your mind!

  • Profile Photo
    Erik Gjørup said 3 years, 3 months ago:

    Thank you gentlemen -

    Walt (@luftwaffe-birdman), there are some easier alternatives out there; AMG has a few boxes that contain a new resin fuselage and windows, though my example was a bit hazy in the resin canopy, wich is the major reason for me not using that one. If the canopy is OK it is a straightforward kit. Another option is the older Falcon VAC-form conversion for the Revell 109 G-10, and my canopy is from thet conversion, so by all means, do go for it if you are up to some converting (judging from your builds here it should be a walk in the park for you) 🙂

    John (@JohnB), those REVI AM things are very nice indeed.

    Spiros (@fiveten), the next, and the one after that . . .

    And another short update coming up in a few minutes - stay tuned

  • Profile Photo
    Erik Gjørup said 3 years, 3 months ago:

    Flappin’ and slattin’

    With a break from the drawn out sanding session, flaps and slats gets TLC

    The slats are usually to be placed in the open position, and that is how they should be after landing. This one will be configured as such.


    However, the edges in the cutouts in the wings are too marked, and in order to make them a bit shallower I have been building up a bit of “paintfiller”. They need one or two layers more, after which the top will be sanded to make a very small edge.

    The Eduard 109 flaps are notorious for their sinkmarks – it seems like they are there on 90% of the kits I’ve built, and some filling and sanding is needed
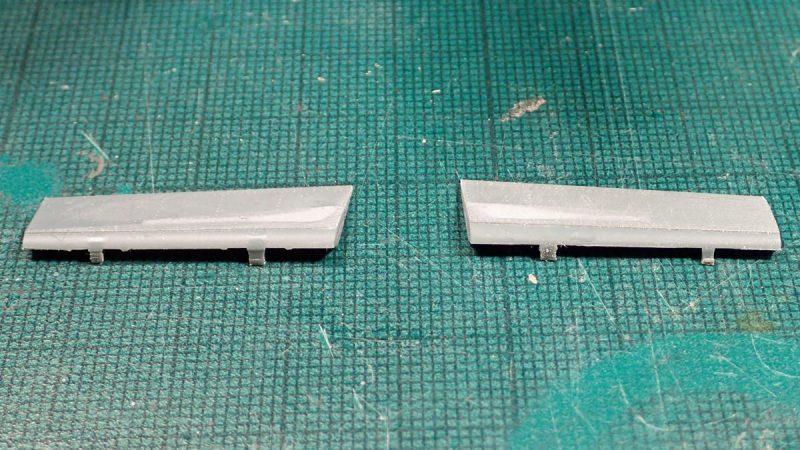

    I had done this some time ago (before I discovered the joys of LqS), and as usual after some cleanup, the flaps just clicks in place.

    I also started the radiators and installed the cooler


    And with that done, it was off to post a few pictures while the glue hardens a bit.

    The cooler flaps will be modified a bit, as a just-lanede hard-worked two-seater will have the upper coolerflap level with the wing – stay tuned for more and feel free to leave a comment

  • Profile Photo
    Louis Gardner said 3 years, 3 months ago:

    Erik, @airbum
    The victory with getting the canopy fairings taken care should make you a happy man. It looks very good, and I also like the work you have done with the leading edge flaps. I have a question for you, and I hope that you know the answer.

    What color was used on the leading edge of the wings behind these flaps ? Was it RLM 02, since that is the usual interior color we find on various Messerschmitt aircraft, or was it painted in the color of the exterior camouflage ? The reason why I am asking is these parts would open automatically when on the ground, and close as the airspeed increased and drag pushed them back against the wing.

    You would think they were painted in the "Open" position, but these parts could have been "pre painted" and then assembled. It would seem logical this area behind the slats would be painted with the exterior color when these aircraft were re-painted or touched up in the field, using a 109 from JG-54 as an example, with their fabulous out of the ordinary paint schemes.

    What are your thoughts on this ? I know that you always have reference material to back up your thoughts and opinions, and don't just make things up... 😉

    I see where it looks like you have painted this area using RLM 02.

    Thanks in advance.

  • Profile Photo
    John vd Biggelaar said 3 years, 3 months ago:

    Very nicely done, Erik.
    Wondering if you know the answer to the question of Louis.

  • Profile Photo
    Erik Gjørup said 3 years, 3 months ago:

    Thank you for the kind words John (@JohnB) and Louis (@lgardner). Almost all 109's were primed in RLM02, the fabric covered parts in rot-resisting red (dark, burgundy). All moving surfaces were usually closed when applying paint, and the insides of coolers and the "hidden" edges of slats, ailerons and the like therefore usually had the RLM02 as their color in those areas. When parked, the slats were pushed back, and a handle locked them in place. You never see a 109 departing/taxiing for departure with these open, as the groundcrew always prepared them for the next mission by closing all and raising the flaps. Most pictures of 109's you see are taken soon after landing as that is the time where the pictures most often are taken. Again - there are bound to be exceptions to the rule, but in conclusion; RLM02 it is. (also for those that were re-painted in the field - it will make it a lot easier to add the camo that way - please also note that the camo on the slats has been painted in closed position, and the lines must be made that way - check my recent post on the hungarian 109 where the slats are closed and the camo follows the lines https://imodeler.com/groups/work-in-progress-aircraft/forum/topic/messerschmitt-bf-109g-6-hungary-v-8-63-zvezda-1-48/. One in standard camo is https://imodeler.com/groups/work-in-progress-aircraft/forum/topic/messerschmitt-bf109g-4-don-pedro-eduard-1-48/?topic_page=8&num=15 that has them open. I do not seem to have made any in LW markings recently?

    Anyway, if you have questions to any specific airframe, I will be happy to try to dig up the info you want, just PM me.

  • Profile Photo
    Spiros Pendedekas said 3 years, 3 months ago:

    I love the that "flaps down" posture, my friend @airbum! Adds a lot to the realism of the model.
    Nice discussion with our good friend @lgardner, too, about the inner color.

  • Profile Photo
    John vd Biggelaar said 3 years, 3 months ago:

    Thanks for this clear explanation , Erik @airbum
    Is it correct to assume that this RLM02 is valid for most other German airplanes in WWII as well?

  • Profile Photo
    Erik Gjørup said 3 years, 3 months ago:

    Thank you my friends.

    Spiros (@fiveten), the eduard kits usually builds flaps down, but with the upper radiator flap down too. It is automatic in how far it opens, and this way it how a hard-worked one gets rid of the heat.

    John (@JohnB), most welcome. I am afraid I do not know for sure, but your guess is a good one I think. I have just come across an early Legion Condor that had the flaps painted all the way, and that seems to indicate that the early variants (those with linen on the flaps) had the paint all the way, indicating a paintjob where the flap had been removed for re-paint (It was an early bird in a one-off experimental color, so it would have been painted in a hangar with all the facilities and tools to remove the flap for re-paint - Louis (@lgardner), this may be useful for you to know too)