Thank you, Spiros, John, Erik, George, Tom and Louis. I was really inspired by your enthusiasm and did some pretty intensive work this week. I hope you like it. Summary and photos below.
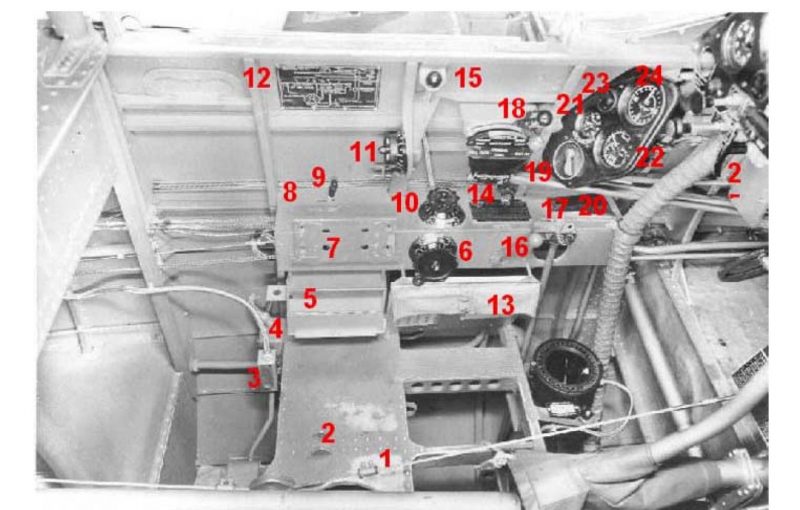
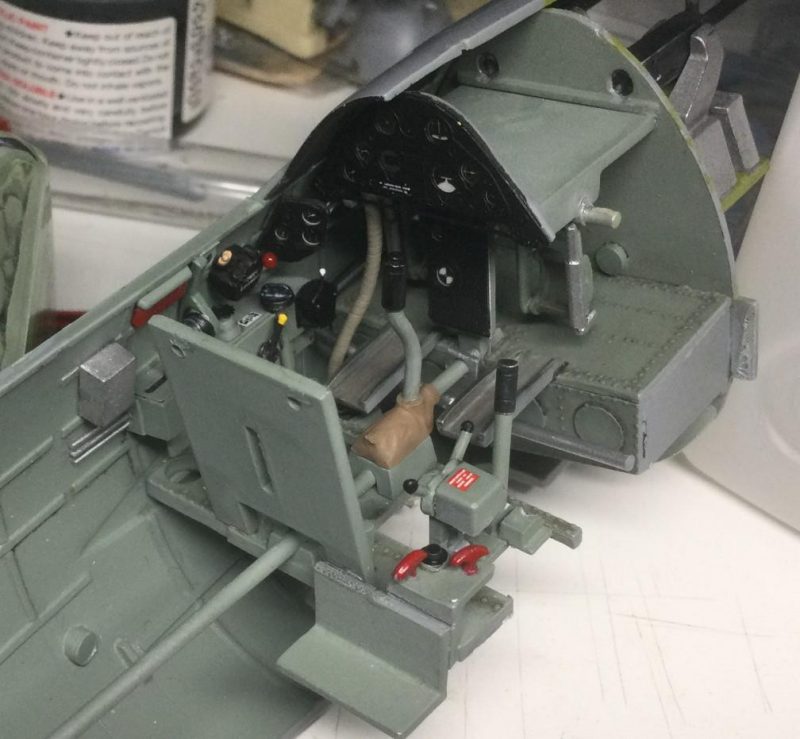
Below (after three pics of the real thing) is the latest progress on the Buffalo cockpit. Pretty much everything is done now except the seat, seat supports and harness. Along the way, I studied all the photos I could of the cockpit and made the most intensive use of the pilot’s manual for the Buffalo Mark 1 available in PDF online, which I excerpt first.
-
-
-
This manual is a goldmine of info, including strong evidence that the pit was mostly painted a dull color as opposed to the silver lacquer in many other Brewster models (as distinctly seen in other cockpit shots in b/w). I made some interpretations on the manual pics that differ for other modelers. For example, I made the area under the rudder bar RAF Interior Green because two out of three photos in the manual show it in the lighter color while only one shows it in a kind of rubbery black. The black is more standard in other model Brewsters ,and I would say that it was eventually painted over on British instructions (as in the other two photos). The one great thing about the manual is that I know the names and functions of nearly every part that I attempted to represent or modify in the cockpit. Sometimes knowing what something was helped me to interpret how to paint or position it better (see below).
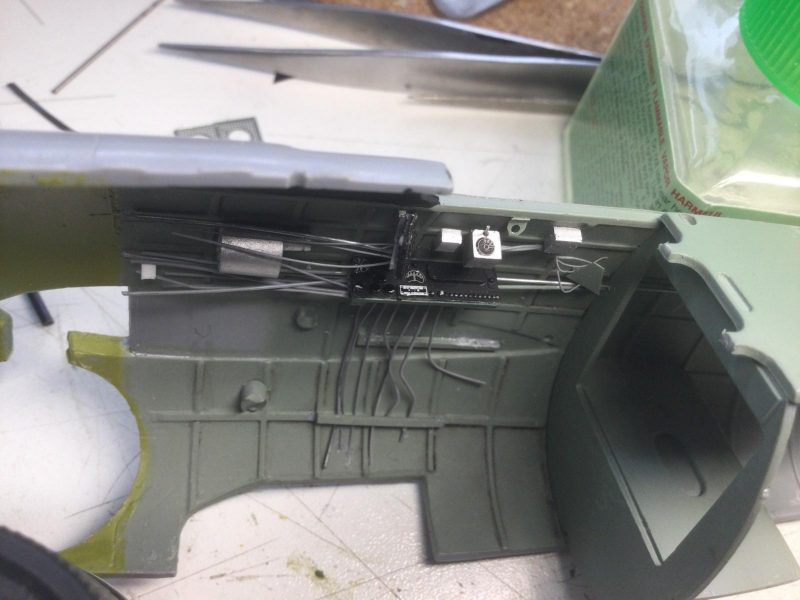
The photos that follow below are amongst the last I will take before the components are glued in permanently. These pics can show much what will be partly hidden later. They also show how darn tricky it is to get everything to fit relative to everything else. There are several odd errors in the Special Hobby kit that I had to fix. First, the emergency hydraulic hand pump handle collided with the main switch panel on the starboard side. Even though it is meant to be angled, it still did not come close to clearing the panel edge. I therefore cut off and repositioned the handle. Next, the stalk containing the undercarriage and flap control levers was trapped and partly hidden under this same switch panel. I cut it off and moved it closer to the seat.
-
1. This handle and stalk behind it were moved more toward the centre.
2. This pic also shows work I did on the compass. needle done with decal strip and glass face as punched out clear styrene sheet - glued on with Future
This allowed me to put a decal for a placard on top and greatly improve the look of the pit.
-
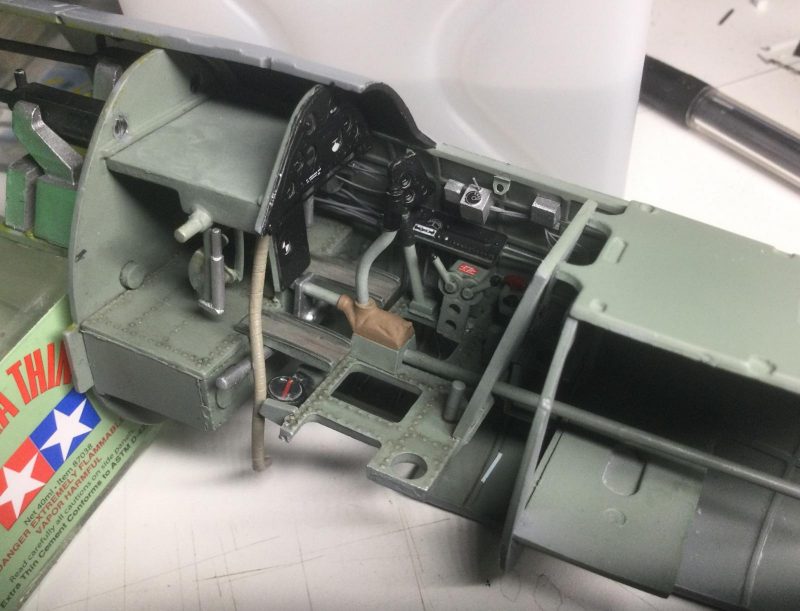
1. See how the modified components are repositioned to fit properly around the main switch panel.
Finally and most frustratingly, the fine photo etch screen which is the oxygen bottle support bracket was oversize and would not fit sandwiched between the seat back and the rear bulkhead.
-
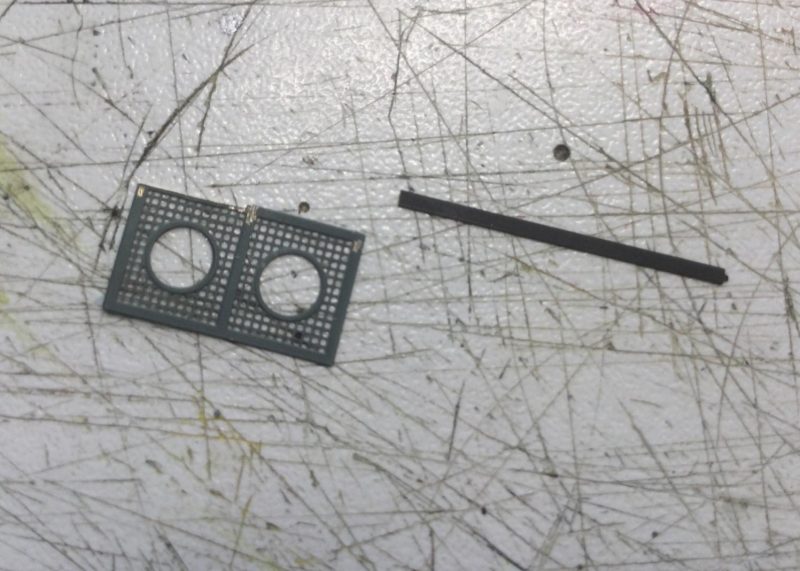
1. Notch cut in mesh to make it fit in against bulkhead (as in the real thing!)
2. New cross piece from scrap etch, again it will match shape of real thing (not symmetrical)
Fortunately, the manual photo showed that the real thing had a notch cut in it to make it fit and that the kit part could be modified to both better match the real thing and fit in the space.
-

1. This cross piece added to my kit etch to make it more accurately unsymmetrical relative to holes.
2.
3. notch
I also cut a notch in the handle mount to slide the mesh farther forward.
-
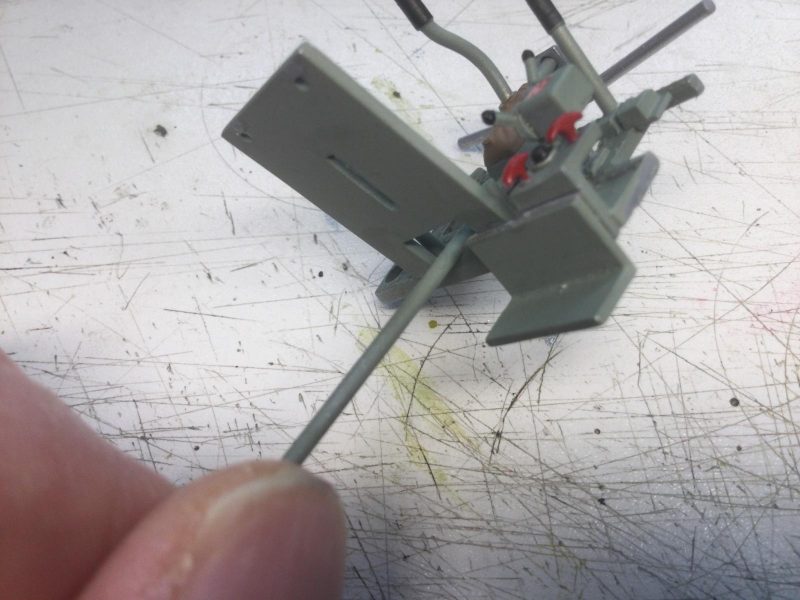
1. Notch cut here to allow mesh to slide farther forward.
It was tricky to cut, file and add a new crosspiece to the etch, but the surgery worked and it fit very well finally (see final photos with fuselage closed up experimentally).
-

1. Cross piece added, notch cut and whole ting fitted farther forward
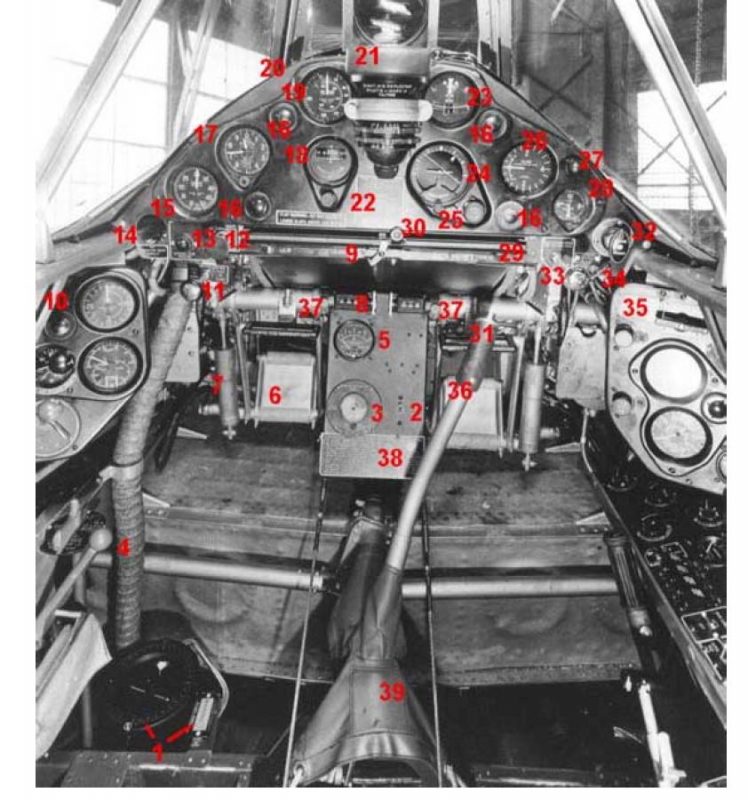
The third odd thing about the SH instructions was how they showed the main control joystick mounted backwards! Unfortunately, a number of modelers appear to have followed the kit instructions and put it in the wrong way around. Every period and museum bird cockpit photo showed the stick in the position I installed it, that is as a “D” shape, “belly” towards the control panel when viewed from starboard (see above pic of model and real joy sticks in following photos). This is also more logical when thinking of how the pilot would pull the stick back into his lap when climbing and how that would be nearly impossible the other way round. A fourth thing is that the SH instructions have you assemble the port and starboard auxiliary instrument panels reversed. In other words, STEP 2 should be STEP 1 with regard to mounting on port and starboard cockpit sides. The etch also kind of dictates this and I studied the look of each panel carefully in the manual to confirm the shape of the panel and its orientation. The shapes and details are very subtle and, again, I have seen a few photos of SH models built with the panels glued in upside down (probably while struggling to get them to look right when following the kit instructions).
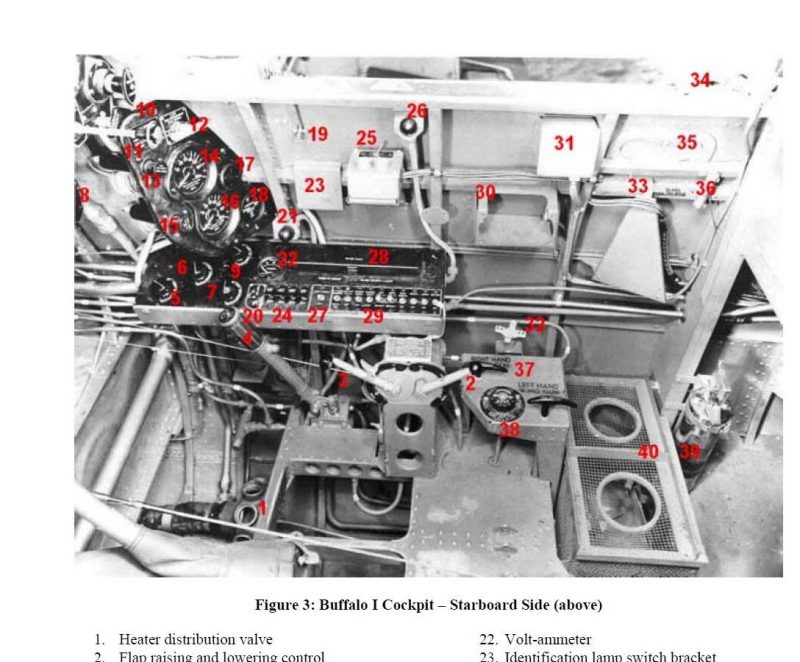
OK, so what did I do in detailing? On the starboard side, I highlighted the electrical switches with Rub n Buff, painted main control knobs SG Black to contrast with the Flat Black panel and added decals for one bezel and another for switches (from spares and Airscale).
This surface detailing could bring the panel to life better since it is so visible and central.
Otherwise it would be a bit of a dull slab. The one thing pit photos of Brewster show is the incredible density of wiring under this switch panel and elsewhere around this side of the pit. I copied as much of this as I could using stretched sprue and solder wire attached it the plastic pieces before painting it with Dk Gull Gray and Rub in Buff Silver gluing it in.
I also did this behind each auxiliary control panel.
-
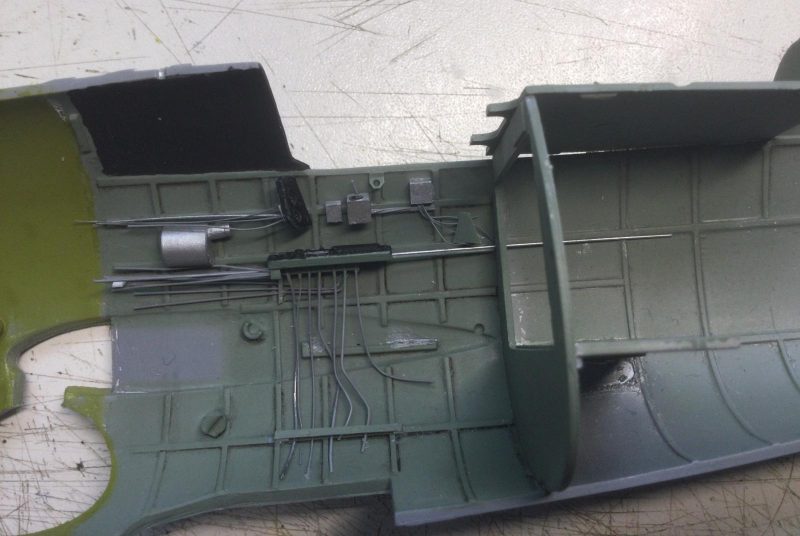
1. See how plastic with sprue wires glued underneath
2. Wiring behind aux instrument panels is as per many cockpit photos (stretched sprue)
3. R3003 control unit bracket is made of thin styrene sheet with stretched sprue wires. It nicely busies up the cockpit wall (as authentic detail)
-
1. Note how decal and painting make the switch panel look more lifelike
2. Three metal boxes are exactly like in manual pic
3. light bracket from styrene sheet
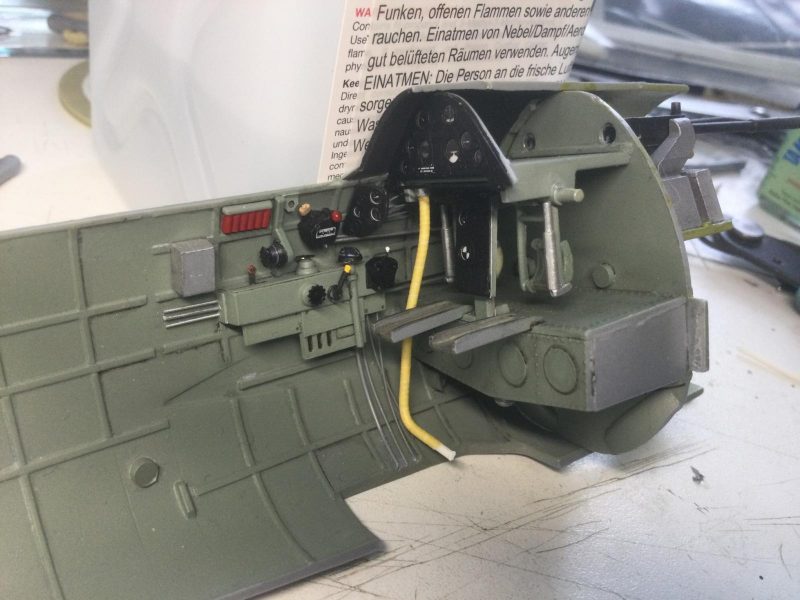
I scratch built the trapezoidal R3003 control unit bracket and the wiring for it and the tiny bracket for the cockpit light. The metallic boxes are for the identification lamp switch bracket, electrical junction boxes and R3003 wireless control. None of these are properly done in kit resin and had to be modified or made from styrene rod and sheet. They were painted with Rub n Buff thinned with mineral spirits – great stuff for small metallic bits.
BTW, the etch main instrument panels are from the kit and are very nice, once painted up.
-
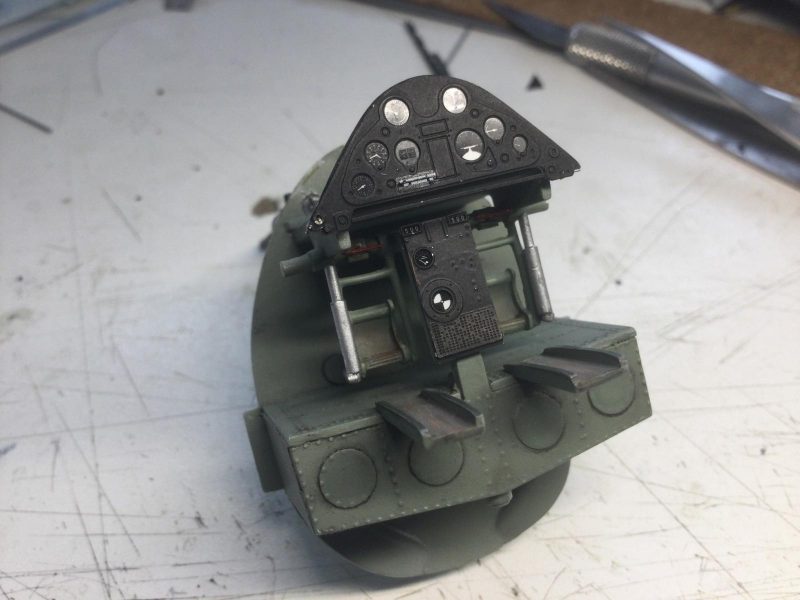
1. Notice the nice kit instrument panel etch and the gun charging handles painted red underneath.
Also nice etch came from the kit for the gun charging handles. I replaced the kit resin pieces for the rudder pedals with F4U1 pedals modified from an old True Details set I had –these were both more accurate and detailed. The rudder pedal framework and hydraulic bits were kit resin and plastic.
On the port side, the throttle quadrant was also modified from the TD Corsair set. I actually lost the kit resin part so I had no choice here. I detailed it with Airscale decals and added control rods and wires from the quadrant to the forward fuselage as per photos.
I detailed the bar with the trim and other controls using stretched sprue for wiring, spare etch for some handles and blob of super glue for knobs. All cockpit ribbing and floor riveting was accentuated with an oil wash over the MM Acryl RAF Cockpit Green and a layer of Tamiya clear.
The tube running from the main panel down the port side is the windscreen heater hose (see pics below). I had fun with this one.
-
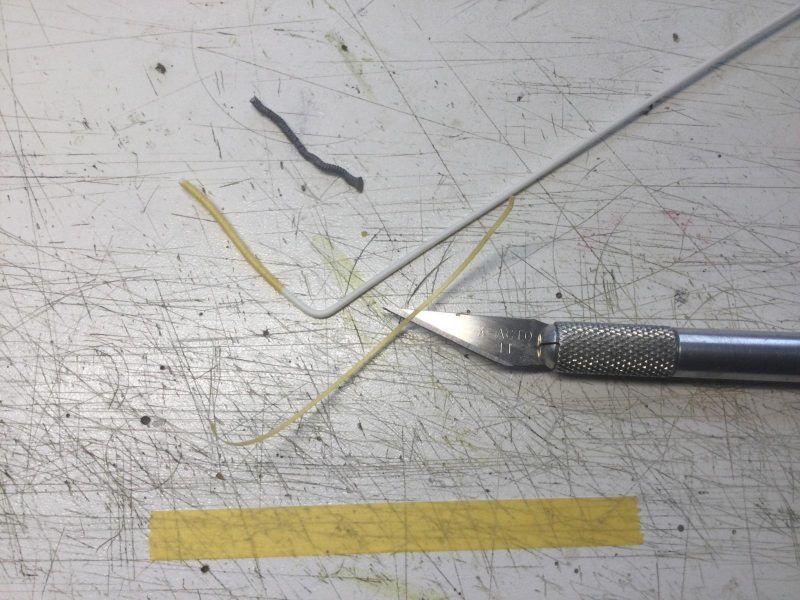
1. Thin piece of masking tape spiraled around styrene rod to make spiral ribbed hose. Much better than ugly Tamiya F-4 hose I first tried (shown above it)
-
1. Here I test fitted the unpainted hose with a friction fit to a scratch built "socket). Note how it must snake around components realistically. This will include the compass in the centre piece of the cockpit assembly
-
1. Here cockpit windscreen heater hose is finally remounted as painted.
I first tried to make it from two oxygen mask hoses from a Tamiya F-4J glued together. That turned out to look awful. When studying manual pics, I realized the hose was very much like a household dryer house with a spiral stretch (not like a ribbed oxygen hose). The best way to do this was spiral a thin piece of masking tape around styrene rod. I coated that with future to seal it up and painted it a neutral grey color. Success!
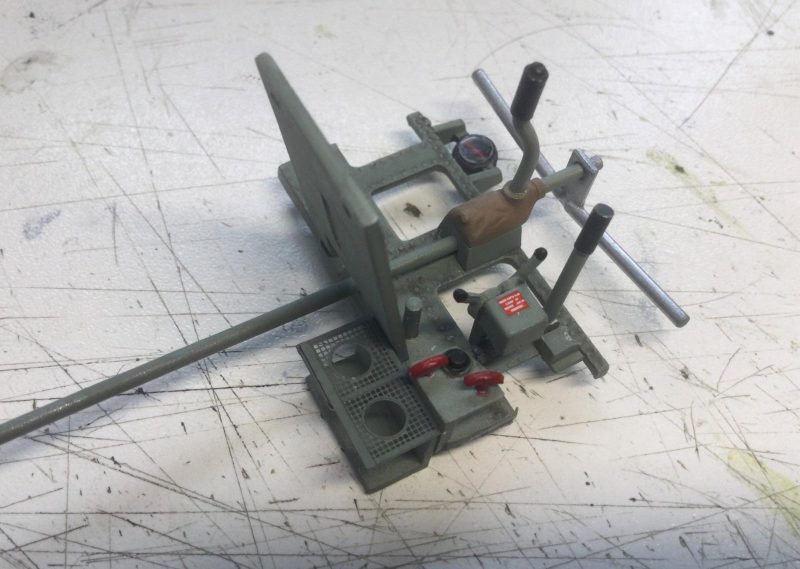
I have now test fitted everything to check how to get the bits to fit in their slots when closing up the fuselage.
-
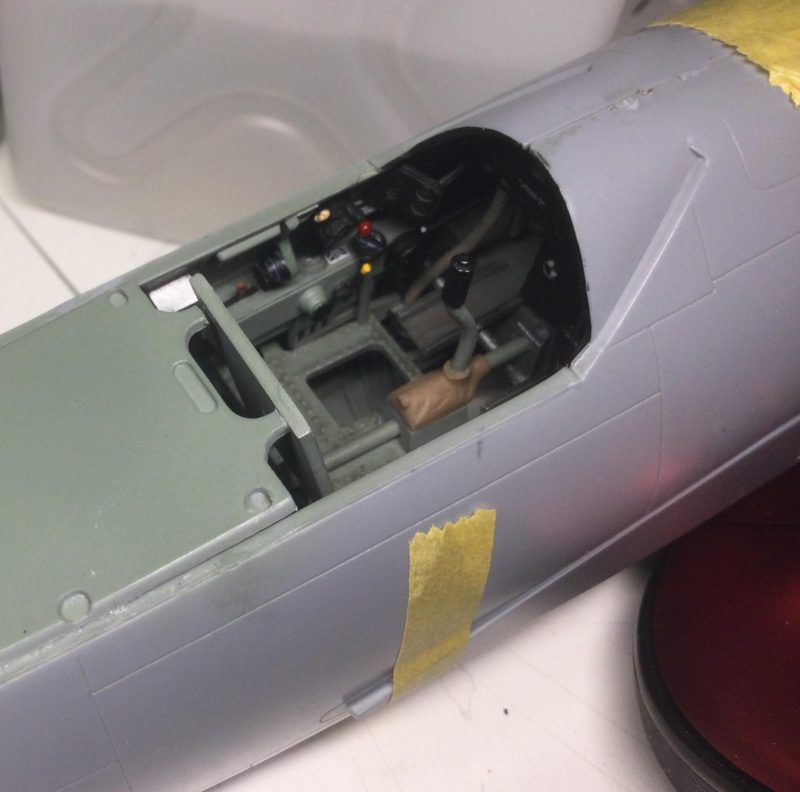
1. I will be creating tubular seat supports here as they extended upward to support the taller RAF seat.
I only have to add scratch-built tube supports for the seat and the seat itself, which will be natural metal (Vallejo). Notice how the seat supports probably extended the tubes which existed in earlier models.
-

1. Tubes to support seat would have also supported the armor plate the RAF requested, Therefore I will use most kit parts and alter them slightly.
I think there is only ONE pic of the RAF seat close up. Here it is with a support cross piece behind.
I hope you like what you see so far of my modeling efforts. Please excuse the lengthy text, but I think some might appreciate the description of the work (especially when just learning how to do these things). Comments and/or questions welcome.