Four more P-40s

Started by Michael Turner · 74 · 3 months ago · 1/48, AMT, Armee de l'Air, Eduard, Hobbycraft, P-40F, P-40L, P-40N, RAAF, RNZAF, USAAF
  • Profile Photo
    George R Blair Jr said 11 months, 1 week ago:

    All four look great, Michael (@michaelt). Building them all at once highlights the subtle differences between the types that might not be readily noticeable otherwise. These should be fun to paint.

  • Profile Photo
    Michael Turner said 11 months, 1 week ago:

    G'day Tom (@tcinla),
    I was hoping that these two (F and L) would be an easy build while I anticipated a bit more effort on the Ns with the need to eliminate the rear canopy to fuselage join (which is often ignored in builds).
    However, the pedant in me couldn't live with the strange lower fairing on the F and L.
    The Osprey book "P-40 Warhawk Aces of the MTO" (Aircraft of the aces 43) has a lot of pictures of Fs and Ls and I think I have a reasonable idea of what is needed here.

    And I've just stumbled across this:
    https://forum.largescaleplanes.com/index.php?/topic/25959-warbird-productionsgrey-matter-aviation-132-p-40fl-nose-conversion/

  • Profile Photo
    Michael Turner said 11 months, 1 week ago:

    G'day Tom (@tom-bebout),

    I've taken a photo of the radiators:

    The Osprey book #43 above doesn't have many clear shots of the intake, but most of those that do show the carburettor intake closed.

    There is one photo of an F in Norfolk, Virginia in the book that clearly does not have the intake, nor does this currently flying aircraft:

    I think that supports my theory that the intake is part of the dust filter system.

    I'm not completely happy with my effort, and one is not as square as I thought it was, so I may revisit them later on.

  • Profile Photo
    Tom Bebout said 11 months, 1 week ago:

    You're doing a great job on the P-40's Michael, I used the pic from the Squadron/Signal book " Curtiss P-40 in Action", to correct the AMT mistake. That's quite a project for you to do 4 at a time. Keep it up I'm enjoying the view. One can never build too many P-40's.

    2 attached images. Click to enlarge.

  • Profile Photo
    Michael Turner said 11 months, 1 week ago:

    G'day Tom (@tom-bebout) ,
    I have that book as well as their "Walk Around" book, but have put them in a very safe place. ;~)

  • Profile Photo
    Michael Turner said 11 months, 1 week ago:

    The Eduard (Mauve) kit has parts to build up the main gear wells, but only three sides. The upper wing has stiffener detail for the wheel well roof, but doesn't quite cover the whole of the wheel well so I added a thin sheet to cover the gap. This will have to be sanded to allow the fuselage parts to fit, though.

    Similarly, the AMT and Hobbycraft (AMT) kits lower wings have three sides of the wheel well moulded on, but not the inner wall. I added some card here too, sitting on a slight slant with a carved out part to clear the wheel well opening, not accurate but close enough. The wings also have stiffener detail, but there is a circular part in the centre where the detail is not as deep, probably an ejection pin point. I left that as is.

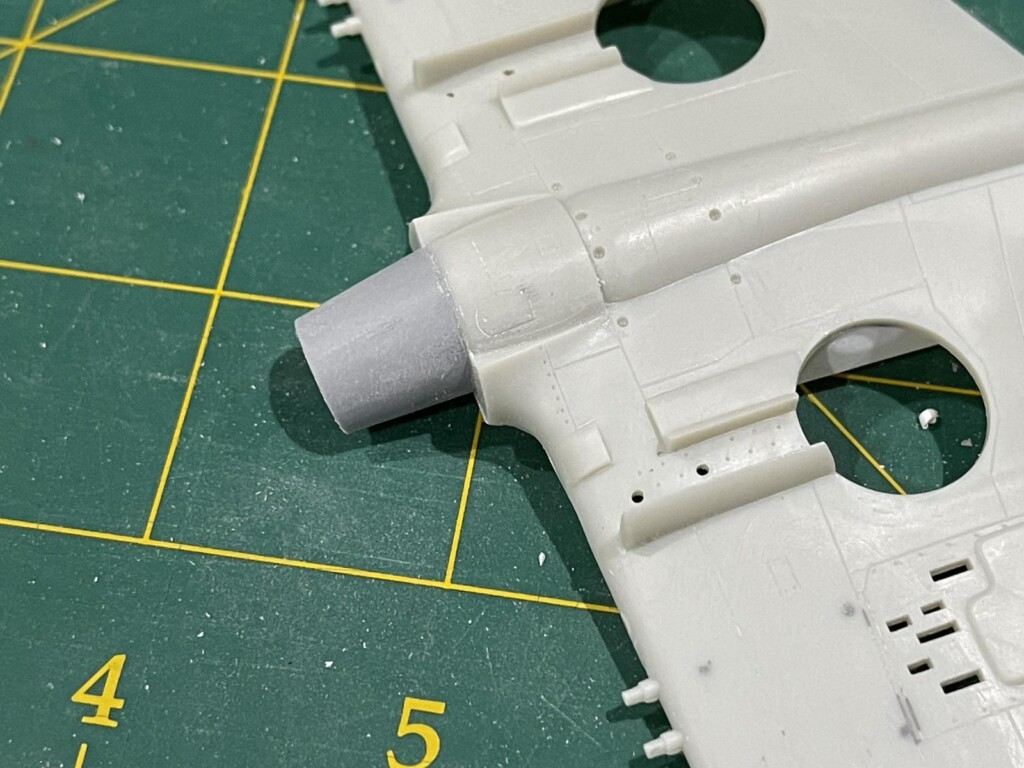
    I used part of a drop tank (from a Su-57) to extend the fuselage keel into the radiator area for the F and L kits and added a blanking plate in the nose. I'll paint the rear of the radiator on this. There is a bit more work required to extending the angled sides forward with more card.

    The assembled nose will look like this, although I also need to add internal detail for the carburettor intake and fair it in at the rear.

    This is the AMD P-40N cockpit with an Ultracast seat.

    The next two are the AMT F and L cockpits with the seats and cut -down frames from the Airfix P-40C. The seats provided by AMT are the square topped ones that came into production with the P-40N. I have Eduard coloured etch seat belts for these two.

  • Profile Photo
    Spiros Pendedekas said 11 months, 1 week ago:

    Nice bay improvements and ditto F&L radiator inlets, my friend @michaelt!
    Great cockpits!

  • Profile Photo
    John vd Biggelaar said 11 months, 1 week ago:

    Those are very nice improvements indeed, Michael @michaelt

  • Profile Photo
    George R Blair Jr said 11 months ago:

    The amount of extra detail you are putting in these kits is phenomenal, Michael (@michaelt). They look great.

  • Profile Photo
    Michael Turner said 11 months ago:

    This pic shows the front of the two Ns.

    The Eduard (Mauve) kit had a thick, flat edge to the front of the radiator opening that made the opening rather narrow.

    I thinned this down, but that means that the internal divider is now too narrow and there are gaps either side.

    I'm thinking about what, if anything , I can do about that.

    The prop for this kit is too large in diameter - it should be 35mm scale radius, but the propeller blades are that long. So, I drilled new holes to mount the blades closer to the centre and will reshape them at the blades bas to fit (one done, two to go.)

    1 attached image. Click to enlarge.

  • Profile Photo
    Spiros Pendedekas said 11 months ago:

    Great progress and ditto "modifications", my friend @michaelt!

    How about carefully adding white glue with a toothpick to the gap, then immediately "smoothen" with a damp cotton bud: in theory (or, hopefully 🤭), white glue's adhesion attitude will create a sort of film that will fill the gap. Since it dries transparent, it will take the surrounding chromate green color, but you may also touch it up.

    Well, at least in theory...

  • Profile Photo
    Michael Turner said 11 months ago:

    G'day Spiros (@fiveten),
    Good idea, I'll give that a go.
    I have some canopy glue, which is really just a thick white glue, that might work.

  • Profile Photo
    John vd Biggelaar said 11 months ago:

    Quite some additional work to fulfill, Michael @michaelt
    The idea of Spiros @fiveten sound promissing, canopy glue will act the same as white glue to my experience.

  • Profile Photo
    Michael Turner said 10 months, 2 weeks ago:

    I have been doing a bit of work on these kits and I only have this long weekend (I don't work Fridays and Monday is a public holiday for the English King's birthday) because they are intended for the Australian Model Expo club display the weekend after.

    These are the cockpits: AMT N, Eduard N and the L (the F is similar)


    And these are them installed: Eduard N, AMT N and the L

  • Profile Photo
    Michael Turner said 10 months, 2 weeks ago:

    I had to add spreaders in the Eduard N and the two Hobbycraft kits (F and L).
    The big resin block on the Eduard kit fouled the boxing in pieces that I added to the wheel wells, so I had to modify the latter to add the wings to the fuselage.

    This is the modifications I've made to the F and L. The black piece in the first pic is the carburettor piping.
    The second pic is not yet glued min place.